FL Studio saves projects in the ‘FLProjects’ folder by default. The folder is located in the ‘Documents’ folder of the user’s computer.
Producing music can be a fun and rewarding experience, but it requires skill, patience, and creativity. FL Studio, formerly known as FruityLoops, is one of the most popular digital audio workstations (DAWs) for producing electronic music. Also, it offers a variety of features like sequencing, mixing, and arranging audio. Also, this allows users to create unique tracks and even full albums.
However, one question that beginners and experienced producers often ask is where FL Studio saves project files. In addition, this is important information, as it helps users keep their projects organized and easy to access. Moreover, we’ll explore where FL Studio saves project files and how users can change the default save location.
Manual Project Save Location
When you are working on a project in FL Studio, it’s always a good idea to save your progress regularly to avoid losing your hard work. FL Studio is designed to automatically save your project files but it is always recommended to save manually when making critical changes to your music project to avoid losing the data.
Choosing A Specific Location for FL Studio Projects
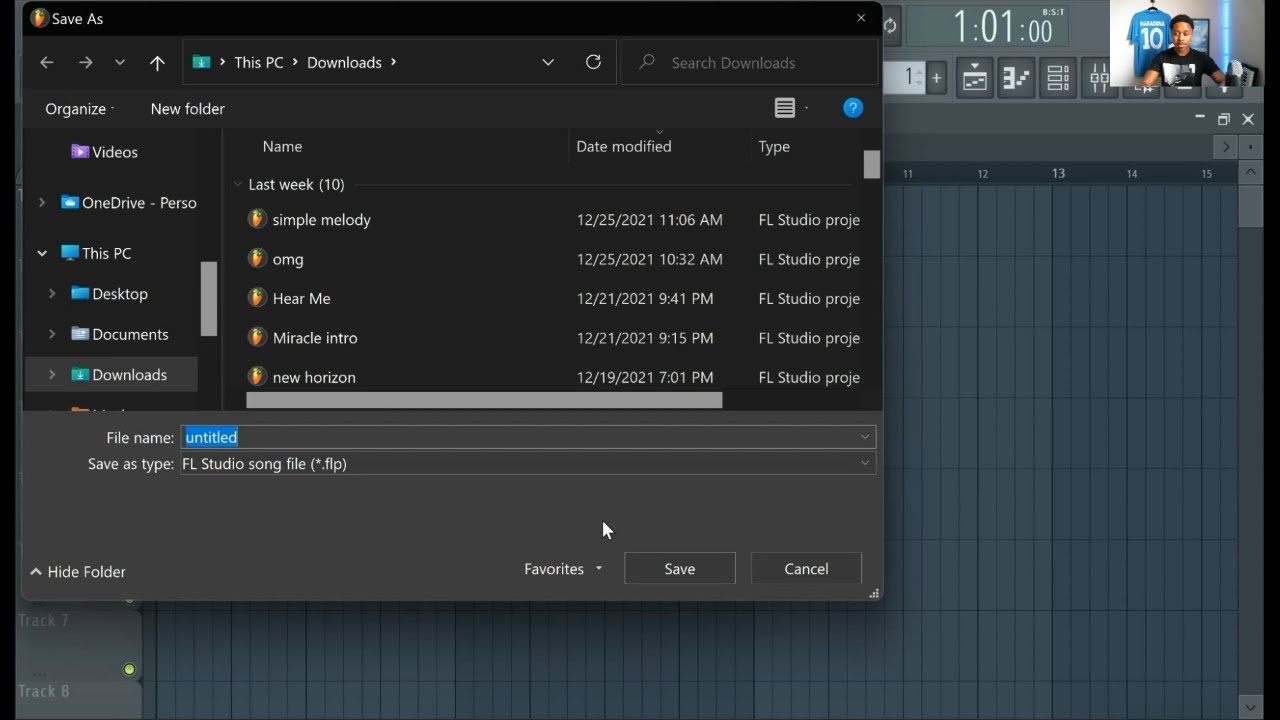
In addition, FL Studio allows you to choose a specific location to save your project. For example, this feature can be helpful if you want to keep all of your music projects organized in a particular folder or drive. To choose a specific location for your FL Studio project, follow these simple steps:
Select “File” from the menu.
Furthermore, click on “Save” or “Save As”.
Additionally, navigate to the location where you want to save your project.
Also, give your project a name and click “Save”.
Changing The Default Save Location for FL Studio Projects
FL Studio saves your project files to the default location on your computer’s hard drive. As a result, if you want to change the default save location, follow these easy steps:
Open FL Studio preference settings by clicking on the “Options” menu and select “File settings.”
In the “General” tab, find the section labeled “File Storage.”
Click the “Browse” button to choose the new default save location.
Once you have selected the new location, click “OK” to save your changes.
You can now enjoy the convenience of your music projects being saved to the new default location every time you save a project.
Credit: howtomakeelectronicmusic.com
Backup Project Saves
FL Studio saves project files in the “Backup Project Saves” folder, which can be found in the program’s file settings. However, it is important to regularly save and backup projects to avoid losing important work in case of a system malfunction or crash.
How Often Does Fl Studio Create Backup Saves?
FL Studio is a digital audio workstation that is popularly used for music production, mixing, and editing. Then, one of the most important aspects of using this software is saving your projects frequently to prevent data loss. FL Studio automatically creates backup saves for project files every five, ten, or fifteen minutes, depending on your settings. You can also change the frequency of the backup saves in the “File” tab, under “General Settings.”
Where Are The Backup Saves Located In Fl Studio?
It is crucial to know where your backup saves are located in case you need to restore a previous version of your project. In short, by default, FL Studio saves backup projects in a dedicated folder called “Backup” in your your FL projects folder. You can locate it on your computer by navigating to “File,” then “Open Recent” and selecting the “Backup” folder. Alternatively, you can go directly to the folder path in your computer’s file explorer. This is usually located at “C:\Users\UserName\Documents\Image-Line\FL Studio\Backup.”
In Conclusion
In summary, backup project saves are essential for protecting your work against unexpected power outages, computer crashes, or software malfunctions. It is critical to know where your backup saves are located, so you can access them if needed. Similarly, FL Studio’s automatic backup saves feature is a handy tool that can help you recover previous versions of your project. You can customize it to your preferred frequency.
Managing Your Projects In Fl Studio
FL Studio saves project files in a specific folder that can be found on your computer’s hard drive. Also, by default, the software creates a directory called “Projects” where all the saved audio files, samples, and plugins are stored for easy access.
FL Studio, a popular digital audio workstation, is widely used by music producers worldwide. Once you start recording, your projects start piling up, and managing them can be overwhelming. Luckily, FL Studio provides useful features for managing projects. In this post, we’ll discuss where FL Studio saves projects and how to manage them using various options such as opening a saved project, sharing your project with other users, and exporting your project as a ZIP file.
Opening A Saved Project In Fl Studio
FL Studio saves all your projects in the “these project files” folder located in your computer’s documents. When you’re ready to work on a saved project, open FL Studio, click on “File” in the top menu bar, select “Open,” and locate your saved project. Alternatively, you can use the “Browser” feature in FL Studio to search for and load your project quickly.
Sharing Your Projects With Other Users
Collaboration is essential in music production. FL Studio allows you to share your projects with other users quickly. You can share your project by exporting it as a zipped loop package, which includes all necessary project files, and sharing it via a cloud storage service or email. Alternatively, you can use the “Save As” option and save your project to a shared network location accessible to your collaborators.
Exporting Your Project As A Zip File
You can export your FL Studio project as individual audio files or as a zipped loop package. The latter contains all necessary files, including samples, effects, and plugins, making it easier for other users to work on the project. To export your project, click on “File” in the top menu bar, select “Export,” and choose either “Zipped loop package” or “WAV file.” You can also choose the specific location and file format for exporting your project. In conclusion, managing your your FL projects is crucial for efficient music production. Knowing where FL Studio saves projects, opening saved projects, sharing your projects with others, and exporting your projects correctly can take your music production to the next level.
Credit: www.youtube.com
Credit: www.image-line.com
Frequently Asked Questions For Where Does Fl Studio Save Projects
Where Are The Fl Studio Files Located?
The FL Studio files are stored in the installation folder on your computer. By default, they are typically located in the “Program Files (x86)” folder on a Windows computer. However, you can change the location of the files when you install the software.
Where Does Fl Studio Autosave Files?
FL Studio autosaves files in the Backup folder located within the FL Studio folder in your computer.
How Do I See All My Projects In Fl Studio?
To see all your projects in FL Studio, simply click on the “File” option in the top left corner of the screen. From there, select “Recent Projects” to view a list of all your recent projects. If you don’t see the project you’re looking for, click “Open” to browse your files and locate the project.
Where Does Fl Studio Save Recordings?
FL Studio saves recordings in the project folder by default. However, you can choose to save them in a separate folder designated specifically for your recordings. Simply go to “Options” > “Project General Settings” > “Folder for recordings” to customize your settings.
Conclusion
Knowing where FL Studio saves projects can save you a lot of time and headache when it comes to locating and sharing them. By default, FL Studio saves projects in the “Projects” folder, but you can change the default save location to a different folder or even an external drive.
Keeping your projects organized and backed up is essential for any producer or musician using FL Studio for their music production needs.
To get more streams on Spotify, focus on getting playlist placements and engaging with your fans. With over 300 million active users, Spotify is one of the most popular streaming platforms in the world.
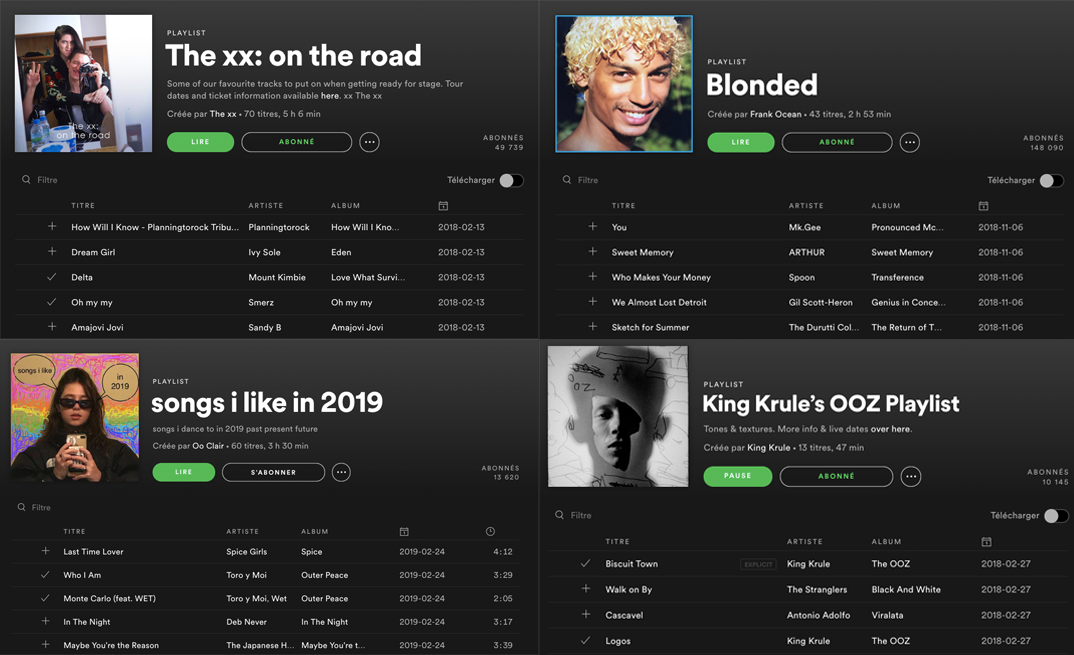
However, with so much content available on the platform, it can be difficult to stand out and get your music heard. One of the most effective ways to increase your streams on Spotify is through playlist placements. This involves getting your music included on popular playlists that are curated by Spotify or other users.
Additionally, it’s important to engage with your fans on the platform by promoting your music on social media and encouraging your followers to add your tracks to their own playlists. By following these strategies, you can increase your visibility on Spotify and grow your fan base.
Credit: blog.groover.co
Create A Catchy Profile
Creating a catchy profile is crucial in getting more streams on Spotify. Make sure to use a unique and engaging bio, add a professional profile picture, and use relevant keywords for your music genre to attract potential listeners.
Creating a catchy profile is essential to getting more streams on Spotify. Your profile is a representation of yourself as an artist. It is the first thing people see before they start listening to your music. Therefore, it is necessary to create a profile that stands out from the crowd. A catchy profile can help you gain more followers, more plays, and ultimately more streams. Here are a few tips for creating a catchy profile on Spotify.
Use A Professional Profile Picture
Your profile picture is the first visual that users notice on your Spotify page. It is important to use a professional and eye-catching photo that matches the theme of your music. A profile picture that reflects your personality and music genre can spark the interest of the listener to dive deeper into your profile. Make sure the photo is of high quality and in line with your brand image.
Write A Compelling Bio
Your bio is your chance to introduce yourself to the world. It should be written in a way that represents who you are, what genre of music you create, and what makes you unique. Avoid generic descriptions and aim for something that connects with your audience on a personal level. Use bio to showcase your skills and why people should listen to your music. Keep it short, sweet, and informative.
Include Links To Your Social Media Accounts
It’s important to promote yourself beyond just Spotify. Provide links to your social media accounts, like Facebook, Instagram, Twitter, and YouTube, to give your listeners more ways to engage with you. Social media is an effective way to keep your followers updated with your new releases, performances, and any upcoming events. By creating a catchy profile with links to your social media accounts, you can boost your online presence and attract more streams.
Credit: blog.groover.co
Collaborate With Other Artists
Collaborating with other artists is a great way to increase your streams on Spotify. Working with other musicians can help you reach new audiences and expand your fan base. By creating a sense of community and cross-promoting each others’ work, you can increase your visibility on the platform and attract more listeners.
Collaborating with other artists on Spotify is an excellent way to not only increase your streams but also create new connections in the music industry. By working together with other musicians, you benefit from their audience, and they benefit from yours. Here are some of the best ways to collaborate with other artists on Spotify.
Work With Artists In A Similar Genre
One of the most effective ways to collaborate with other artists is to work with those who share a similar genre. This is because their fans are more likely to be interested in your music as well. For example, if you are a hip-hop artist, try working with other rappers or producers. If you are an electronic artist, collaborate with other DJs or electronic music producers. This will help you gain exposure to the right audience and potentially bring in new fans.
Feature Other Artists On Your Tracks
Another way to collaborate with other artists on Spotify is to feature them on your tracks. This can be a win-win situation for both parties as the featured artist gains exposure to your fan base, and you get to tap into theirs. Make sure to choose an artist that complements your sound and adds something unique to the song. This will keep your listeners engaged and potentially bring in new fans who are interested in the featured artist.
Participate In Collaborative Playlists
Collaborative playlists are a great way to gain exposure on Spotify. By participating in these playlists, you can connect with other artists and potentially have your music included in the playlist. This will help you gain exposure to a wider audience and potentially bring in new fans. Make sure to participate in playlists that are relevant to your genre and style. This will increase your chances of getting your music noticed and potentially added to the playlist. In conclusion, collaborating with other artists on Spotify is an excellent way to gain exposure, increase your streams and potentially bring in new fans. Make sure to collaborate with artists in a similar genre, feature other artists on your tracks, and participate in collaborative playlists. By doing this, you will be on your way to growing your music career on Spotify.
Promote Your Music On Social Media
Want to increase your Spotify streams? Utilize social media! Share your music on Instagram, Twitter, and Facebook. Engage with your followers and promote through ads. Remember, the more visibility you have, the better chance of gaining new listeners.
Social media can be a powerful tool for promoting your music and growing your fan base on Spotify. With millions of users active on social media platforms like TikTok, Instagram, and Twitter, it’s essential to capitalize on this opportunity to expand your reach.
Use Hashtags To Increase Visibility
Hashtags are an excellent way to increase the visibility of your music on social media platforms. Adding relevant and specific hashtags to your posts can make it easier for fans to find your music. Do some research on the popular hashtags in your genre, and include them in your posts on platforms like Instagram, Twitter, and Facebook. You can also create your own unique hashtag to identify all your content and encourage your audience to use it.
Engage With Your Fans And Other Artists
Engaging with your fans and other artists on social media can strengthen your relationship and foster a sense of community around your music. Replying to comments and direct messages from your fans, sharing their content, and thanking them for their support can help build a loyal following. Collaboration with other artists can also be an effective way to expand your audience and build relationships with other creators in your genre.
Create Eye-catching Visuals
Creating eye-catching visuals can grab the attention of potential fans scrolling through their social media feed. High-quality images, videos, and graphics can help to communicate your message and brand effectively. Ensure that your visuals are consistent with your brand and create a unique identity for your music. In conclusion, promoting your music on social media requires consistency, creativity, and engagement. By using hashtags, engaging with your fans and other artists, and creating attention-grabbing visuals, you can increase your visibility and grow your fan base on Spotify.
Advertise On Spotify
The easiest way to increase the number of streams on your Spotify account is to advertise on the platform. Creating a targeted ad campaign, setting a reasonable budget, and choosing the right ad format are three key factors to consider when advertising on Spotify.
Create A Targeted Ad Campaign
Targeted advertising is an effective way to ensure that your ad is reaching the right audience. With Spotify, you can create a targeted ad campaign based on user demographics, music genres, and listening habits. By targeting your audience in this way, you increase the chances of your ad being heard by people who are interested in your music.
Set A Reasonable Budget
Setting a reasonable budget is essential when advertising on Spotify. You can choose between a cost-per-click (CPC) or cost-per-impression (CPM) model, depending on your budget and goals. It’s important to ensure that your budget is in line with your expected return on investment (ROI).
Choose The Right Ad Format
Spotify offers a range of ad formats to choose from, including audio, video, and display ads. Audio ads are played in between songs, while video ads can be displayed within the app on a user’s device. Display ads are typically shown on the right-hand side of the screen. Knowing your audience and the type of message you want to convey will help you choose the right ad format.
With the right targeted ad campaign, a reasonable budget and the appropriate ad format, advertising on Spotify can help increase your streams and grow your audience.
Optimize Your Track Titles And Descriptions
One of the key factors that can affect the number of streams your track gets on Spotify is the title and description of your track, which can impact whether listeners can find your music and encourage them to listen to your track.
Include Relevant Keywords
When it comes to optimizing your track titles and descriptions, you should include relevant keywords that describe your track’s genre, mood and theme. This can help your track appear in search results when users are searching for specific keywords on Spotify. You can also check the keywords that other popular tracks in your genre use on Spotify and incorporate them into your track titles and descriptions.
Make Sure The Titles And Descriptions Are Easy To Read
It is important to use clear and concise language when writing your track titles and descriptions. Avoid using complicated vocabulary or long sentences. You can also use bullet points or short sentences to highlight the main features of your track, such as the instruments used, vocals, genre, or mood. Additionally, you should also ensure that your track titles and descriptions are free of grammar and spelling errors, as this can affect your credibility as an artist.
Highlight Your Important Track Features
When optimizing your track titles and descriptions, you should emphasize your track’s unique features. This can be anything from the use of a specific instrument to the style of singing or rapping. By highlighting your track’s unique qualities, you can grab the listener’s attention and encourage them to hit the play button. You can also include links to your social media profiles or website in your track descriptions to help promote your music and gain more followers.
In conclusion, optimizing your track titles and descriptions is a simple yet effective strategy for increasing the number of streams your tracks get on Spotify. By including relevant keywords, writing easy-to-read descriptions, and highlighting your track’s important features you can attract more listeners, improve your visibility on the platform and start getting more plays on your music.
Release Music Consistently
Spotify is a popular streaming platform that enables millions of users to discover new music every day. Whether you’re an emerging artist or an established performer, if you want to achieve success on the platform, you need to make sure that your music reaches as many ears as possible. One way to do this is by releasing music consistently.
Stick To A Regular Release Schedule
When releasing music on Spotify, it’s essential to stick to a regular release schedule. Consistency is crucial because it helps to build expectations among your audience. If your fans know that you release a new track every month, they will be eagerly waiting for your next release, and this can help to boost your streams.
You can plan your release schedule by creating a spreadsheet or a document that outlines your upcoming releases. This way, you can make sure that you’re on track and that you’re releasing music consistently.
Release Singles Instead Of Albums
Another strategy to boost your streams on Spotify is by releasing singles instead of albums. This is because singles tend to have a higher chance of being added to playlists, which can help to increase your visibility and your streams.
When you release a single, you can also create a cover art that is tailored to the track. This can help to make your release more memorable and can also increase your chances of being discovered on the platform.
Release Music During Peak Listening Hours
If you want your release to be successful on Spotify, it’s essential to release it during peak listening hours. This is because most users tend to listen to music during specific times of the day, such as during their commute or while working out. By releasing your music during these hours, you can increase your chances of being discovered and played on the platform.
Additionally, you can use the data provided by Spotify to determine the best time to release your music. This data includes information such as the most popular genres in your region and the most active users, which can help you to tailor your release schedule accordingly.
Share Your Music With Music Bloggers And Influencers
If you’re a musician, your primary focus is probably on making great music. But, if you want to get more streams on Spotify, you need to get your music in front of more people. One way to do that is by sharing your music with music bloggers and influencers. Here are some tips on how to do that effectively:
Research Blogs And Influencers In Your Genre
Before you start reaching out to anyone, you need to research the blogs and influencers in your genre. You want to find the ones that are most likely to be interested in your music. Make a list of these blogs and influencers, along with their contact information.
Example: If you’re a hip-hop artist, you might want to target bloggers who write about hip-hop music or influencers who have a large following among hip-hop fans.
Reach Out To Them With A Personalized Message
Once you have your list, it’s time to start reaching out to these bloggers and influencers. But don’t just send a generic message to everyone on your list. Take the time to craft a personalized message for each person.
Example: Start by addressing them by name and mentioning why you specifically chose them to reach out to. Then, tell them a little about yourself and your music. Finally, ask if they would be interested in checking out your music.
Offer Them Something In Return
No one likes to feel like they’re being used, so it’s important to offer something in return for their help. This could be anything from a shoutout on social media to a free download of your album.
Example: If you’re a new artist, you might offer to write a guest post for their blog in exchange for them featuring your music. Or, you could offer to promote their blog or social media accounts to your fans.
The key is to be sincere and genuine in your offer. Don’t just offer something because you feel like you have to.
Credit: dittomusic.com
Use Analytics To Learn About Your Audience
One effective way to get more streams on Spotify is to use analytics and learn about your audience. By understanding their listening habits and preferences, you can tailor your content to better suit their needs and increase engagement. Keep track of metrics such as listener demographics, location, and behavior to help guide your content strategy.
One of the best ways to get more streams on Spotify is to understand your audience’s preferences and behaviors. That’s where analytics comes into play. By leveraging the data provided by Spotify, you can gain insight into who your listeners are and what they like.
Track Your Stream Count And Listener Demographics
To start, you should track your stream count and listener demographics. This will help you understand how many people are listening to your music and who they are. Spotify provides detailed information on your audience’s age, gender, location, and listening habits. For example, if you notice that your listeners are mostly based in a particular city or country, you can tailor your promotions to that location. Or if you find that your audience is primarily young adults, you can create content that appeals to this age group.
See What Songs Are Performing The Best
Next, you should evaluate which songs are performing the best. Spotify’s analytics provide you with information on each song’s total play count, as well as the number of daily streams. This can help you identify which songs are resonating with your audience and which ones need more attention. You can also check which playlists your music is featured on, and which users are sharing your tracks on social media. By measuring these metrics, you can identify potential collaborations or sponsorship opportunities and focus on creating more of the content that resonates with your audience.
Adjust Your Strategy Based On What You Learn
Finally, based on what you learn from your analytics, you can adjust your strategy to increase your streams. For example, if you discover that certain songs are outperforming others, you can prioritize your promotion efforts on these tracks. You can also experiment with different marketing techniques to attract more listeners. These may include running social media campaigns, collaborating with other artists or curators, or optimizing your Spotify profile for search. Overall, using analytics to learn about your audience is a crucial step in increasing your streams on Spotify. By understanding who your listeners are, what they like, and how they engage with your music, you can tailor your strategy to boost your success on the platform.
Frequently Asked Questions On How To Get More Streams On Spotify
How Do I Increase The Number Of Streams On Spotify?
To increase the number of streams on Spotify, you can engage with your existing fans through social media and playlists, collaborate with other artists, and release new music regularly. Utilizing paid promotion and targeting specific demographics can also grow your stream count.
Keep your profile up-to-date and user-friendly to attract new listeners.
How To Get 1,000 Streams A Day On Spotify?
To get 1,000 streams a day on Spotify, you need to focus on creating high-quality content, including a strong marketing plan to promote your music. Engage with your followers, collaborate with other musicians, and stay active on social media platforms.
Also, make sure your tracks are optimized for playlists, and don’t forget to utilize Spotify for Artists to gain insights into your audience and adjust your strategy accordingly.
How Do I Get My Streams Up On Spotify?
To get your streams up on Spotify, you need to distribute your music through a digital distributor that partners with Spotify. Some popular options include DistroKid, TuneCore and CD Baby. Once your music is distributed, it will be added to Spotify’s library for listeners to discover and stream.
How Do People Get So Many Streams On Spotify?
Artists get a lot of streams on Spotify by updating new content frequently, promoting their music through social media and other platforms, submitting their music to playlists, collaborating with other artists, and performing at live events. They can also work with music promotion companies and utilize targeted advertising to reach new audiences.
Conclusion
To sum up, getting more streams on Spotify requires strategic planning and consistent effort. Utilizing social media, collaborating with other artists and curators, optimizing your profile and track tags, submitting your music to playlists, and keeping track of your stats are all effective ways to increase your visibility and attract more listeners.
By implementing these tips, you’re more likely to stand out and gain more streams on Spotify. Happy streaming!
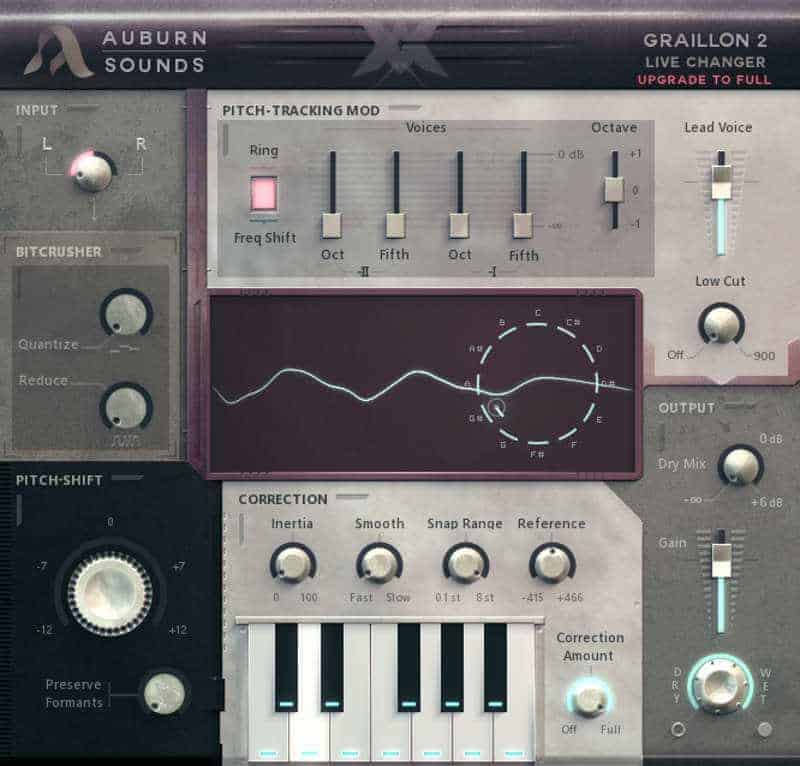
The best free autotune VST plugins for recording and editing music are GSnap, MAutoPitch, and Graillon 2. These plugins offer various features to help improve pitch and tone for better overall sound quality.
Autotune can be a valuable tool for music creators and producers looking to enhance their recordings but may not have the budget for premium software. Autotune has become increasingly popular in music production in recent years, used by artists across various genres to help correct pitch and improve overall vocal performance.
While premium autotune software can be expensive, there are several free VST plugins that provide similar features and functions. We will discuss three of the best free autotune VST plugins available: GSnap, MAutoPitch, and Graillon 2. Whether you are a beginner or experienced music producer, these plugins can help take your recordings to the next level.
Credit: m.youtube.com
Top 3 Free Autotune Vst Plugins
Discover the top 3 free autotune VST plugins that boast high-quality pitch correction for recording your best vocals. Enhance the sound quality, adjust the tune, and enjoy the benefits of these exceptional plugins without breaking the bank.
Whether you’re a professional music producer, singer or an amateur musician, you will most likely want to polish your vocal performances to sound pitch-perfect. One of the ways to achieve that is to use autotune VST plugins that can do wonders to your vocals with just a few clicks. However, not everyone has the budget to invest in expensive autotune software. That’s why we’ve rounded up the top 3 free autotune VST plugins in this article to help you enhance your vocal tracks without breaking the bank. Plugin 1: GSnap GSnap is a great and straightforward plugin that is easy to use and perfect for beginners. It corrects pitch inaccuracies while preserving the natural timbre of the singer’s voice. Additionally, it has a MIDI control mode, which makes it possible to use it with an external MIDI controller, giving you more flexibility and control over your vocal performance.
Plugin 2: Mautopitch
MAutoPitch is another excellent free autotune VST plugin, which offers advanced features for users who want more control over their vocal performances. With MAutoPitch, you can adjust the correction speed, smoothness, and scale. It also comes with a spectrum analyzer and a pitch display to help you see the changes made to your vocal tracks in real-time.
Plugin 3: Kerovee
KeroVee is a unique autotune VST plugin that uses frequency shifting instead of traditional pitch-shifting methods. This results in a more natural-sounding pitch correction without sacrificing the clarity and character of the original vocal performance. KeroVee has a straightforward interface that is easy to navigate, making it another great option for beginners. In conclusion, with the help of these free autotune VST plugins, you don’t have to spend a fortune to achieve the perfect pitch when recording music. Experiment with these plugins to find the one that suits your needs, and watch your vocal performances improve dramatically.
Credit: cymatics.fm
Tips For Using Autotune Vst Plugins
Autotune VST plugins have become an essential tool for recording artists. Here are the best free Autotune VST plugins to ensure that your vocals are pitch-perfect: GSnap, MAutoPitch, KeroVee, Auto-Tune Evo, Tal-Vocoder-2, and Graillon 2. Tips for using these plugins effectively include adjusting the speed, key, and accuracy settings.
If you are new to the world of music production, autotune is a technology that corrects and adjusts pitch in vocals or instruments. Autotune VST plugins enhance the quality of vocal tracks, save time, and add efficiency to your workflow. Here are some tips for using autotune VST plugins.
Tip 1: Choose The Right Vst Plugin
Before diving into using an autotune VST plugin, choose the right one for your needs. There are several free VST plugins available, but not all of them offer the same features and functions. Select a plugin that satisfies your music production’s exact needs and is compatible with your DAW. Some popular autotune VST plugins include Graillon 2, GSnap, and MAutoPitch, to name a few.
Tip 2: Set The Correct Key
One of the most important steps when using an autotune VST plugin is setting the correct key. Choosing the incorrect key can produce unpleasant sounding pitches, which can ruin your vocal track. Some VST plugins have an automatic key detection function, but it is always advisable to double-check and change the key manually.
Tip 3: Use It Sparingly
While autotune VST plugins can enhance the quality of vocals, it is always best to use it sparingly. Overusing autotune in a track can produce an unnatural and robotic sound, which might not be what you desire. Use autotune subtly to add a natural pitch correction to your vocals and maintain the essence of your track. In conclusion, using autotune VST plugins can help you create high-quality vocal tracks for your music production. However, remember to choose the right VST plugin, set the correct key, and use it sparingly to avoid an unpleasant, unnatural sound. Start experimenting with autotune today to take your music to the next level!
Credit: bedroomproducersblog.com
Frequently Asked Questions On Best Free Autotune Vst Plugins
What’s The Best Free Auto-tune Plugin?
The best free Auto-Tune plugin is GSnap, a popular pitch correction plugin. It provides good results for basic pitch corrections and is easy to use. GSnap works with both Windows and Mac operating systems and is compatible with different DAWs, including FL Studio and Audacity.
Is There A Free Version Of Auto-tune?
Yes, there is a free version of Auto-Tune available. It is called Auto-Tune Access and it is a simplified version of the software that provides basic pitch correction features. You can download it for free from the Antares website.
What Auto-tune Do Pros Use?
Professional singers and music producers primarily use Antares Auto-Tune Pro. It is one of the most popular and widely used pitch correction plugins, providing precise and customizable pitch correction.
What Plugin To Use For Auto-tune?
For Auto-Tune, the plugin you can use is the Antares Auto-Tune. It’s one of the most popular and commonly used plugins by music producers and audio engineers alike.
Conclusion
The world of music production has been revolutionized with the help of autotune VST plugins. From correcting pitch to achieving unique vocal effects, they have become an essential tool for any musician or producer. With the options of free autotune VST plugins available, there is no need to break the bank to access highly functional software.
From the comprehensive list above, finding the best autotune VST plugin that works for you is now just a few clicks away. Happy music making!
Add saturation to individual tracks and use a limiter on the master track to make your mixes sound loud. Getting the mix of your track just right can be a daunting challenge when you’re getting started with music production.
However, there’s nothing more frustrating than finally getting the levels right, mixing everything perfectly, and then realizing your track sounds weaker and quieter than other tracks when you play it back. The good news is that with a few simple techniques, you can make your mixes sound louder without sacrificing the quality of your track.
We’ll explore some tips and tricks to help you bring your mixes to life and ensure they stand out in the crowd by sounding bright, punchy and full of power.
The Importance Of A Loud Mix
To stand out in today’s music industry, it is important to master the art of loud mixing. Techniques such as careful EQ and compression, parallel processing, and limiting can help bring your mix to life and give it the necessary volume to compete with other tracks.
When it comes to producing music, a loud mix is often seen as an essential aspect of the process. In fact, it is not merely about volume, but rather the impact of loudness on overall sound quality. Achieving a loud mix requires aligning multiple elements of a track, such as equalization, compression, and limiting, to create a cohesive, powerful sound. In this post, we explore the importance of a loud mix and the impact of loudness on perception.
Why Loudness Matters
Loudness is the perceived level of volume of a track. Therefore, when mixing a track, it is essential to consider the desired volume level and ensure it is consistent throughout the track. A loud mix is crucial for standing out in a competitive, overcrowded market. Louder tracks often attract more attention of listeners and listeners are more likely to gravitate towards songs that sound louder. A loud mix can also help to enhance a track’s energy and dynamics.
The Impact Of Loudness On Perception
Perception plays an essential role in how a track is received by listeners. A track with multiple loud parts can alter the way a listener perceives the sound quality. Undoubtedly, a loud mix can shift the balance and can make some elements stand out while others may be unnoticed. A skilled producer can use loudness as a tool to create excitement and enhance the listener’s emotional response to a track. However, if the loudness is too high or not uniform throughout the track, it may lead to ear fatigue and make the track unlistenable. The key takeaway: a loud mix can be a powerful tool in a producer’s toolkit. However, it is imperative to consider the impact of loudness on the overall sound quality and ensure that it is consistent throughout the track.
Credit: www.levelsmusicproduction.com
Loudness Vs. Volume
Loudness and volume are two different things when it comes to music production. To make your mixes sound loud, you need to focus on increasing loudness without sacrificing dynamic range. Use compression, limiting and other techniques to achieve a balanced and powerful sound.
Understanding The Difference
When it comes to mixing music, one of the most common goals is to make the final product sound loud. However, it’s important to note that loudness and volume are not the same thing. Understanding the difference between the two is crucial when it comes to mastering your mixes.
Why Volume Isn’t Everything
While it may seem logical that increasing the volume would make your track sound louder, this isn’t necessarily the case. Volume refers to the amplitude or level of a waveform, while loudness is a perception of how loud something sounds to the human ear. So, even though two tracks may have the same volume, they can still sound different in terms of loudness. This is because loudness is influenced by factors such as frequency balance, dynamics, and even the listening environment. To make your mixes sound louder, you need to focus on improving their perceived loudness rather than simply increasing the volume level.
Tips For Increasing Loudness
There are several strategies you can use to boost the perceived loudness of your mixes:
Use compression to reduce the dynamic range of individual tracks and create a more consistent overall sound.
Use EQ to balance the frequency spectrum of each track and ensure that no particular frequency range dominates the mix.
Use saturation or distortion to add harmonic content and increase perceived loudness.
Use limiting to prevent peaks from exceeding a certain level and create a louder overall sound.
Reference your mixes on a variety of playback systems to ensure that they sound good across different listening environments.
By implementing these tips and focusing on improving the perceived loudness of your mix rather than just its volume, you can create mixes that sound loud, impactful, and professional.
Preparing Your Mix For Loudness
To make your mixes sound loud, you should pay attention to the levels of each element in the mix to avoid distortion and clipping. Utilize volume automation to give certain parts of the mix more energy and excitement without sacrificing dynamic range.
Lastly, consider using mastering plugins to enhance the overall volume of the mix without altering its tonal balance.
Preparing Your Mix for Loudness If you want your mixes to sound loud and punchy, it’s essential to prepare your mix correctly right from the start. In this section, we will discuss the various techniques you can use to help you achieve a louder mix without sacrificing quality or dynamics. The best way to begin this process is to focus on proper gain staging, use compression to control dynamics, and equalize for clarity and definition. Proper Gain Staging One of the most crucial factors to achieve a loud mix is to ensure proper gain staging. Maintaining an optimal signal-to-noise ratio throughout the mixing process by balancing your levels will prevent clipping or overloading any of the audio channels. Additionally, gain staging is crucial for preparing your mix for mastering. Ensure that the levels of each track are balanced and consistent throughout the mix. Using Compression to Control Dynamics Compression is another effective tool to control the dynamics of your mix and make it louder. By compressing parts of your mix that have higher dynamic ranges, you can bring the peaks and valleys of the audio levels closer together. Doing so will help to prevent clipping and overloading while pushing your mix to higher levels. Remember, compression is not a cure-all tool, and it should only be used where necessary. Equalization for Clarity and Definition Equalization is an essential tool to shape the frequency balance of your mix, ensuring that each part of it is clear and well-defined. Through EQing, you can ensure that the different elements of your mix, including vocals, instruments, and drums, stand out and cut through the mix. Bear in mind that too much EQ can cause distortion and noise in your mix, so use this tool with care. In conclusion, by focusing on proper gain staging, compression, and equalization, you can prepare your mix for loudness while ensuring that it still sounds crisp and clear.
Tools For Loudness
To make your mixes sound loud, there are several tools you can use. Compressors, limiters, EQs, and maximizers are all helpful for achieving a louder sound without sacrificing quality. Experiment with different settings to find the perfect balance for your mix.
To make professional-sounding loud mixes, you need to have the right tools. Using the right tools can help you achieve loudness without compromising the quality of your mix. Here are some commonly used tools for achieving loudness in your mix.
Maximizers And Limiters
Maximizers and limiters are essential tools for loudness. They work by boosting the overall level of your mix and setting a maximum peak level. Maximizers increase the volume of your mix until it reaches the desired level without clipping, while limiters prevents the mix from exceeding specified levels. Using a combination of maximizers and limiters can help push the overall loudness of your mix while keeping it within acceptable levels.
Multiband Compression
Multiband compression is another tool that can help you achieve loudness in your mix. It’s a type of compression that works on different frequency bands within a mix. This allows you to lower the levels of the louder parts of the mix while keeping the quieter parts of the mix audible. By compressing different frequency ranges of the mix, you can achieve a more balanced and fuller sound while still achieving loudness.
Saturation And Distortion
Saturation and distortion are audio effects that help add warmth and harmonics to your mix. When used in moderation, they can help to add a pleasant and musical distortion effect on your mix and make it sound more natural. By adding saturation and distortion, you can also increase the perceived loudness of your mix. However, it’s important to use these tools with care as excessive use can lead to an overly distorted or muddy mix. Overall, using tools like maximizers, limiters, multiband compression and saturation can help you achieve loudness in your mix while still maintaining its quality. Experimenting with various combinations of these tools can help you achieve the desired sound that you’re looking for.
Mastering For Loudness
Mastering for Loudness is a crucial skill for any music producer looking to make their mixes sound powerful and impactful. By utilizing compression, limiting, and EQ techniques, you can create a sonically pleasing mix that sounds loud without sacrificing dynamics or musicality.
Mixes that sound weak and limp not only sound unimpressive but also fail to grab listeners’ attention. That’s where mastering for loudness comes into play. Mastering is the process of preparing and transferring recorded audio from a source that contains the final mix to a data storage device, known as the master. It is done to achieve a balanced and cohesive sound throughout an album. Mastering for loudness involves processing the audio to make it sound as loud and punchy as possible without compromising its quality. It is a technique that can help your music stand out in today’s loudness war.
The Role Of The Mastering Engineer
The mastering engineer is the person responsible for ensuring that the final mix of a song or album sounds polished and balanced. Their job is to analyze the mix, make adjustments to its frequency balance, dynamics, and stereo image to make it sound better. Mastering engineers use a combination of hardware and software tools to achieve the desired sound. Their primary job is to make sure that the sound is consistent throughout the whole album.
The Importance Of Balanced Eq
Balanced EQ is a crucial part of mastering for loudness. The mastering engineer must ensure that the frequency response of the track is smooth and balanced. They do this by correcting any imbalances and resonances that can cause muddiness or harshness in the mix. Using an EQ, the mastering engineer can enhance the low and high ends of the mix to make it sound more exciting and engaging. EQing is a fine art and should be done carefully to avoid any over-processing and artifacts.
Using Limiters To Boost Volume
Limiters are used to increase the overall volume of a track while controlling the peak levels. They are the secret weapon of loudness in mastering. A limiter works by compressing the dynamic range of the track, limiting the maximum output level. By controlling the peaks and increasing the volume of the track, the limiter can make it sound more impactful and louder. However, it is essential to use limiters in moderation and avoid over-compression as it can lead to loss of dynamics, distortion, and unwanted artifacts. In conclusion, mastering for loudness is a complex and delicate process that requires precision, expertise, and attention to detail. Using a combination of EQ, compression, and limiters, the mastering engineer can achieve the desired loudness while maintaining the quality and balance of the mix. Remember that mastering is the final stage of the recording process, and it is the last chance to make an impression on the listener. So, master your tracks for loudness to make them stand out and compete in today’s competitive music industry.
Credit: www.businessinsider.com
Common Mistakes To Avoid
When trying to make your mixes sound louder, there are some common mistakes you should avoid. One of them is overcompressing your tracks, which can make them sound flat and lifeless. Instead, focus on using EQ and volume automation to achieve a balanced and impactful sound.
Making your mixes sound loud is an essential aspect of music production. While it may seem like an easy task, there are common mistakes you must avoid to achieve the desired result. Overlooking these mistakes might result in a frustrating mix that lacks balance and dynamic range. In this blog post, we’ll discuss some of the most critical mistakes to avoid, including overusing compression and limiting, ignoring dynamics and musicality, neglecting the importance of a clean mix, and pushing levels too far.
Overusing Compression And Limiting
Compression and limiting are two essential tools that every producer should learn to use. However, the overuse of these tools can cause more harm than good to your mix. Overcompressed tracks tend to sound flat, lifeless, and dull, causing ear fatigue to the listener. Similarly, limiting pushes the mix to the extremes, resulting in harsh, distorted sounds that lack musicality. Therefore, it’s crucial to use compression and limiting sparingly and appropriately, allowing the natural dynamics of the track to shine through.
Ignoring Dynamics And Musicality
Dynamics and musicality are the heart and soul of music production. However, many producers overlook these elements in pursuit of making their mixes sound loud. Ignoring dynamics leads to a flat, emotionless mix, resulting in listener fatigue. Similarly, overlooking musicality by pushing the mix too far can result in an unpleasant, overproduced sound. As a producer, you should strive to balance the loudness levels with the natural dynamics and emotional impact of the track.
Neglecting The Importance Of A Clean Mix
A clean mix is a foundation for achieving a loud, balanced sound. Neglecting to create a clean mix congests the mix, making it challenging to achieve proper balance and separation of instruments. It’s crucial to remove any unwanted frequencies, pops, clicks, and background noise before applying any processing to the mix. A clean mix allows for better control and enhancement of the desired frequencies, leading to a balanced, clear, and loud mix.
Pushing Levels Too Far
Pushing levels too far in pursuit of making your mix sound loud is perhaps the most common mistake producers make. It’s essential to note that loudness is not everything, and overly loud mixes are often fatiguing to the listener. Pushing levels too far overloads the mix, causing distortion, which ruins the natural dynamics and overall musicality of the track. As a result, it’s crucial to use proper gain-staging techniques and avoid pushing the levels beyond the mix’s natural limits. While making a loud mix is a desirable goal, overdoing it can result in a frustrating and unpleasant sound. By avoiding these critical mistakes discussed in this blog post, you can achieve a loud, balanced mix that keeps the listener engaged from beginning to end.
The Future Of Loudness
The Future of Loudness in music production is an ever-evolving and polarizing issue. On the one hand, sound engineers and producers strive to make their mixes sound as loud and impactful as possible in a bid to stand out. On the other hand, there is a growing concern about the negative effects of loudness on sound quality and listening experience.
The Loudness Wars And The Move Towards Dynamic Range
For years, the music industry has been embroiled in a “Loudness War,” a competition to create the loudest track possible. In the past, artists and producers would push the volume levels as high as possible, compressing and limiting the audio signal to give the impression of loudness. The result was often a distorted and harsh sound, lacking in dynamic range.
However, in recent years, there has been a move towards promoting dynamic range in music, with the aim of creating a more natural and transparent sound. This shift has been motivated in part by growing concerns over listener fatigue and hearing damage caused by excessive loudness.
The Emergence Of New Loudness Standards
To address these concerns, new standards and guidelines for loudness have emerged over the years such as LUFS (Loudness Units Full Scale) which helps maintain a consistent loudness level across different mediums and devices. This move towards more transparent and balanced sound has given rise to the concept of “loudness normalisation,” where the overall loudness of a track is standardized to a specific level for a given medium or platform. This has resulted in a more level playing field for artists and producers, who can now focus on the musicality and artistic intention of their mix rather than just how loud it is.
Balancing Loudness With Musicality And Artistic Intention
Although there is a growing emphasis on making tracks sound good and loud, it is important to ensure that this is not done at the expense of musicality and artistic intention. The ideal goal should be to create a mix that sounds natural and transparent, rather than simply “loud” for the sake of it. This can be achieved through careful and selective use of compression and limiting, equalization, and other digital processing tools. In the end, a well-balanced mix with good musicality and dynamic range will always be more enjoyable to listen to, regardless of its overall loudness level.
Credit: www.soundonsound.com
Frequently Asked Questions On How To Make Your Mixes Sound Loud
How Do People Get Their Mixes So Loud?
Mixes are made louder through a process called mastering. This involves using various techniques such as compression, equalization, and limiting to increase the volume while preserving the dynamics and clarity of the music. High-quality equipment, experienced engineers, and careful attention to detail are all essential for achieving a loud, balanced mix.
Why Can’t I Get My Mixes Loud?
To get your mixes loud, you need to take a few steps. Firstly, ensure that your recordings are not clipping and that they have enough dynamic range. Secondly, use proper EQ and compression techniques. Thirdly, use limiters and maximize the volume to achieve a loud, consistent sound without distortion.
Finally, ensure that your playback system is of high quality.
How Can I Increase The Loudness Of My Sound?
To increase the loudness of your sound, you can try adjusting the volume settings on your device or use external speakers or headphones with higher volume capabilities. Additionally, you can increase the input levels on your recording device or use audio editing software to amplify the sound post-recording.
How Do You Make Your Mixes Sound Good?
To make your mixes sound good, there are several things to keep in mind: 1) Good mixing requires careful balancing of frequencies and volumes. 2) Proper use of EQ, compression, and reverb can enhance the mix. 3) Pay attention to panning and stereo imaging.
4) Use high-quality monitors or headphones when mixing. 5) Finally, regular practice and experimentation can help you develop a good mix.
Conclusion
Loudness is often associated with quality in the music industry. Using the right techniques to make your mixes louder can give you an advantage in the constantly evolving music market. Achieving a loud mix takes a combination of experience, knowledge and experimentation.
Using the tips shared in this post can help you take your mixes to the next level and achieve a competitive sound. Keep practicing!
To use Look Ahead in audio, simply adjust the plugin’s settings for faster processing. Look Ahead allows for a delay in audio processing to prevent clipping or distortion in peak moments.
This technique is commonly used in audio mastering and mixing for a cleaner sound. Audio mastering involves the process of preparing the final product for distribution, ensuring that it is consistent in volume and quality across various media types. Mixing, on the other hand, is the process of combining multiple audio tracks into a final stereo master track.
Look Ahead is a popular tool in both mastering and mixing, as it allows for a more controlled and refined sound. We will explore the benefits of using Look Ahead in audio processing and provide some tips for optimizing its use in your audio projects.
Credit: m.youtube.com
What Is Look Ahead?
Look Ahead is a technique used in audio processing to manipulate the dynamic range of the audio signal. By doing so, it ensures that the louder parts of the audio signal do not exceed a certain threshold level, while the quieter parts of the audio signal are raised to a more audible level. This technique is widely used in mastering, mixing, and audio production, and is an essential concept for anyone involved in creating audio content. In this post, we will delve into the definition of Look Ahead, how it works, and how to use it effectively.
Definition Of Look Ahead
Look Ahead is a process of dynamic range compression that analyses the incoming audio signal and adjusts it in real-time using a lookahead processor. This technique works by analysing the incoming signal with a short delay before it reaches the output. By doing so, the processor can detect changes in the signal and make adjustments in advance to prevent overloading the output signal. This results in a smoother, more balanced sound that is free from unwanted peaks or distortions.
How It Works
Look Ahead is a method of automated gain control that uses a compressor to adjust the level of an audio signal. A compressor is a tool that reduces the dynamic range of an audio signal by reducing the volume of the loudest parts of the audio and increasing the volume of the quieter parts of the audio. The Look Ahead compressor is different from a standard compressor in that it analyses the incoming audio and predicts how the signal will change in the future. This means that the compressor can adjust the gain of the audio before the changes occur, resulting in smoother, more consistent audio.
Using Look Ahead Effectively
When using Look Ahead in audio production, there are a few things to keep in mind to ensure that you get the best results. Firstly, it’s important to set the correct threshold level for the compressor. This will ensure that the compressor only kicks in when the signal reaches a certain level. Too high or too low a threshold can result in unwanted compression or distortion. Another important consideration is the attack and release times of the compressor. These settings determine how quickly the compressor compresses the signal and how quickly it lets go of the compression once it’s no longer needed. It’s important to experiment with these settings to find the best balance for the type of audio you’re working with.
In conclusion, Look Ahead is a powerful tool that can greatly improve the quality of your audio production. By using this technique effectively, you can achieve a more balanced and polished sound that is free from unwanted peaks or distortion. When used in conjunction with other audio processing techniques, Look Ahead can help to create professional-sounding audio that is sure to impress your audience.
Why Use Look Ahead In Audio?
Using Look Ahead in audio production helps to prevent digital clipping and distortion by allowing the compressor to react to the incoming signal before it reaches its peak. This gives a smoother and more natural sound, with a higher level of clarity in the mix.
Audio production is a complex process that requires attention to detail at every stage. When it comes to creating high-quality audio recordings, using the right tools and techniques can make all the difference. One such technique is using Look Ahead in Audio. This technique, also known as Look Ahead Limiting, allows you to process audio signals in advance, resulting in improved sound quality and greater control over the final output.
Benefits Of Using Look Ahead
Using Look Ahead in Audio has numerous benefits that improve the quality and clarity of sound. Some of these benefits include:
Reduced distortion: Look Ahead processing can help reduce unwanted distortion caused by sudden peaks in the audio signal.
Tighter control: With Look Ahead processing, you can achieve tighter control over the dynamics of the audio signal, resulting in a more polished final product.
Improved mixing: Look Ahead processing can make it easier to balance the levels of different audio elements in a mix, resulting in a better overall sound.
Enhanced clarity: Look Ahead processing can improve the clarity of spoken words, making it easier to hear and understand the content.
Improvements In Sound Quality
When it comes to audio production, sound quality is paramount. Look Ahead processing can help improve sound quality in several ways:
Dynamic range: Look Ahead processing can help to maintain a consistent dynamic range across the entire audio signal, resulting in a more natural and balanced sound.
Balancing levels: With Look Ahead processing, you can balance the levels of different elements in a mix, resulting in a smoother and more balanced overall sound.
Reduced distortion: Look Ahead processing can reduce the amount of distortion in the final output, resulting in a cleaner and more professional sound.
Improved clarity: Look Ahead processing can help to improve the clarity of the audio signal, resulting in a clearer and more defined sound.
Using Look Ahead in Audio is an effective way to enhance the quality and clarity of sound in your recordings. By processing audio signals in advance, you can achieve tighter control over the dynamics of the audio, balance levels more effectively, and reduce unwanted distortion. With these benefits, Look Ahead processing is a valuable tool to have in your audio production arsenal.
When Should Look Ahead Be Used?
If you are into music production, then you know the importance of using effects, plugins, and processors. Among these, Look Ahead is an effect that enhances the overall audio quality by reducing peaks and unwanted distortion. This effect predicts the incoming signal and processes it before it reaches a certain threshold level. But when should we use Look Ahead? Let’s discuss.
Situations Where Look Ahead Is Beneficial
Look Ahead is a powerful effect and can be used in various situations to improve the quality of the audio signal. Here are some situations where you can use Look Ahead:
Situations
Solutions
You are working with a dynamic source
Use Look Ahead to reduce peaks and unwanted distortion
You want to compress the audio signal without affecting the transients
Apply Look Ahead to preserve the transients and improve the overall dynamics
You want to reduce the pumping effect caused by a compressor
Use Look Ahead to eliminate the pumping effect and create a smooth and natural sound
Examples:
Let’s take an example to understand the practical implementation of Look Ahead. Suppose you are working on a track and notice that some instruments are creating unwanted peaks that are affecting the overall mix. In this case, you can use Look Ahead to reduce these peaks and create a cleaner mix without affecting the natural dynamics of the instruments. Similarly, if you are compressing a vocal track and notice that the transients are getting affected, you can use Look Ahead to preserve those transients and create a smooth and balanced vocal sound.
By using Look Ahead, you can achieve a better overall sound quality and improve the dynamics of your mix. So, it’s important to experiment with Look Ahead in different situations and see how it can benefit your music production process.
Credit: awave.com.au
How To Implement Look Ahead In Your Audio Production
Looking ahead in audio production is essential for creating high-quality tracks. By analyzing the peaks and valleys in your sound wave, look ahead can ensure dynamic range and prevent distortion. Implementing look ahead can help achieve a polished and professional sound in your audio production.
As an audio production professional, you are always looking for ways to improve your workflow and create high-quality, polished audio tracks. One technique that can help you achieve this is by using Look Ahead in your audio production process. It is a powerful tool that can smooth out audio levels and ensure consistent sound quality. In this guide, we will walk you through step-by-step on how to implement Look Ahead in your audio production.
Step-by-step Guide
Implementing Look Ahead in your audio production is a straightforward process that involves a few simple steps:
Choose the audio source where you want to apply Look Ahead.
Select the Look Ahead plugin from your audio editing software.
Adjust the Look Ahead settings to suit your audio requirements.
Preview the audio with Look Ahead applied.
Export the file with Look Ahead applied to achieve the desired sound quality.
Settings To Consider
While implementing Look Ahead, you must consider the following settings to achieve the desired audio quality:
Setting
Description
Look Ahead Time
The amount of time to preview the audio before applying any changes.
Compression Ratio
The amount of compression applied to the audio.
Attack Time
The amount of time to apply compression after the audio exceeds the threshold.
Release Time
The amount of time to release the compression after the audio falls below the threshold.
Threshold
The level above which the compression is applied to the audio.
Using Look Ahead can drastically improve the quality of the audio tracks you produce. By following the step-by-step guide and considering the essential settings, you can ensure that your audio tracks are polished and consistent. So, be sure to implement Look Ahead in your audio production process to get the most out of your audio editing software.
Tips And Tricks For Using Look Ahead
Look Ahead is a unique feature of audio processors that enables engineers to detect and apply compression and limiters to signals that are yet to come. The main advantage of this feature is the ability to anticipate and prevent audio peaks that are too loud in a mix. However, using Look Ahead in the right way can be a challenge for beginners, especially when it comes to avoiding its overuse. In this article, we’ll explore some tips and tricks for getting the most out of Look Ahead in audio processing.
How To Avoid Overusing Look Ahead
Although Look Ahead can be useful in audio processing, it can also be overused, leading to audio tracks that might sound unnatural. Here are some tips to avoid overusing Look Ahead:
Use Look Ahead only for specific tracks that require it.
Set a longer attack time to avoid the “pumping” effect that might occur at the start of a new track.
Use shorter release times to allow the compressor to recover faster from the peaks.
Be careful when using Look Ahead with limiters. Too much Look Ahead can result in distortion and unwanted noise.
Advanced Techniques
If you’re an experienced audio engineer, you might consider using some advanced techniques when using Look Ahead. Here are some examples:
Technique
How it Works
Mid/Side Processing
Use Look Ahead on the mid or side channels only to avoid overuse on both channels.
Parallel Compression
Create a parallel path with Look Ahead applied heavily to add clarity and punch to your tracks.
Multiband Look Ahead
Apply Look Ahead to each frequency band (low, mid, high) separately to get more control over the audio signal.
By applying these advanced techniques, you can get more nuanced and refined audio processing results with Look Ahead.
Overall, Look Ahead is a great tool for audio processing when used appropriately. By following these tips and tricks, you can avoid overusing this feature, create more natural-sounding audio, and achieve more advanced processing results.
Look Ahead Vs Other Audio Techniques
Look Ahead is a valuable technique in audio production that anticipates the incoming audio signal, enabling dynamic range compression to be consistently applied. This differs from other audio techniques, such as peak control, which respond to the signal only when it reaches a certain threshold, resulting in distortion.
Comparison With Other Techniques
When it comes to audio production, producers are faced with multiple options to deliver high-quality sound. However, one technique that stands out is the “Look Ahead” technique. Look Ahead helps to prevent distortion in audio signals, giving a smoother and more natural sound to the listener. Furthermore, Look Ahead helps to boost the level of the audio without any gain adjustments. So, how does Look Ahead compare to other audio techniques in terms of effectiveness? Table: Look Ahead vs Other Audio Techniques
Technique
Advantages
Disadvantages
Compression
Controls the level of audio signals, reduces peaks and prevents distortion, adds warmth to the audio
Can remove too much dynamics, adds noise to the audio, rhythm can be lost
Limiting
Removes the loudest parts of audio, reduces distortion, can boost the level of audio without changing the dynamic range
Can sound harsh, squashes the sound, can leave gaps in the audio signal
Look Ahead
Prevents distortion, improves the quality of the audio, and preserves the dynamic range, boost the level of audio without gain adjustments
Can cause latency issues if not correctly set, requires more CPU power
When To Choose Look Ahead Over Other Options
Look Ahead is an excellent choice when working with audio files with peak levels. It helps to control the peaks, prevent distortion, and maintain clarity and quality in the audio. Furthermore, Look Ahead helps to maintain the dynamic range of the audio, ensuring that it does not sound flat or dull. If maintaining the quality of the audio and eliminating distortion are essential, then the Look Ahead technique is the best option. However, it is crucial to note that Look Ahead can cause latency issues if not set correctly and may require more CPU power than other techniques.
Credit: www.audioanimals.co.uk
Frequently Asked Questions Of How To Use Look Ahead In Audio
What Is Look Ahead In Audio?
“Look ahead” in audio refers to a process of buffering audio data in advance so that there is no interruption or delay when the data is streamed or played. This technique is commonly used in audio processing software to ensure seamless playback and reduce latency.
“
What Does Look Ahead Do On A Compressor?
The look ahead feature on a compressor anticipates changes in level and adjusts the gain to prevent distortion. It focuses on the upcoming audio and adjusts the gain accordingly, resulting in a cleaner sound.
What Does Look Ahead Do On A Limiter?
A look-ahead function on a limiter analyzes incoming audio signals and anticipates peaks, allowing it to reduce their level before they occur. This helps to prevent the limiter from causing distortion or other unwanted effects during the signal’s processing.
What Is Lookahead In Logic?
Lookahead in logic refers to the process of analyzing future tokens in a sequence in order to decide on the next action to take. It allows parsers to predict actions and make decisions based on the input they receive.
Conclusion
Using the Look Ahead feature in audio production is a game-changer for enhancing sound quality. By reducing background noise and highlighting desired audio, you can create a cleaner and more professional final product. Just remember to adjust the threshold and attack/release settings according to the specific recording environment.
With these easy tips, you’ll be well on your way to creating top-notch audio content. Happy producing!
Mixing an album can take anywhere from several weeks to a few months. Mixing an album can be an incredibly daunting task.
It requires careful attention to detail, a keen ear, and a lot of patience. There are many factors that can affect how long it takes to mix an album, including the number of tracks, the complexity of the music, and the skill level and experience of the mixing engineer.
Additionally, the mixing process can be affected by outside factors such as scheduling conflicts, software and equipment malfunctions, and unexpected changes to the music itself. Despite these challenges, the end result can be incredibly satisfying for both the artist and the mixing engineer, as they work together to create a cohesive and polished final product.
The Art Of Mixing Music
Mixing music is both a science and an art that takes time and patience. It’s the process of taking all individual tracks of a song and blending them together to create a cohesive and balanced sound. The final mix can make or break a song, as it can vastly affect how well a song is received by listeners. In this blog post, we’ll cover the basics of music mixing, including what mixing is all about, the role of a mixing engineer, and why a well-mixed album is important.
What Is Mixing?
Mixing is the process of taking all of the individual tracks of a recorded song, such as vocals, drums, guitar, bass, and others, and blending them together to create a final stereo mix. In technical terms, it involves adjusting the levels of each element, panning, equalization, and effects processing. The goal is to create a cohesive sound that highlights the best aspects of the song and makes all elements clear and present.
The Role Of A Mixing Engineer
The mixing engineer is responsible for taking all the recorded tracks and turning them into a blended and balanced mix. They are trained in the technical aspects of mixing, including understanding frequency spectrums and knowing how to use software tools to optimize the sound. They also bring creativity, interpretation, and a critical ear to the process, applying their personal style and expertise to create a unique mix for each song.
The Importance Of A Well-mixed Album
Having a well-mixed album is crucial to the success of a music artist. A good mix can make a mediocre song sound great, and a bad mix can ruin an otherwise fantastic piece of music. Inconsistent levels, muffled vocals, or overpowering instrumentals can distract listeners and take away from the intended emotions of the song. A well-mixed album ensures that the listener has a clear and cohesive experience and gets the best version of the music as intended by the artist.
Ultimately, mixing is an intricate process that requires both technical knowledge and creative skill. Music mixing is all about balancing individual sounds and creating a unique, polished mix that enhances the overall quality of the song. At the end of the day, a great mix can take a good song and make it into a hit, making it a critical component of any musician’s success.
Credit: majormixing.com
Factors Influencing The Mixing Process
Mixing an album is a critical stage in music production that involves finalizing all the recorded tracks of an artist and creating a polished sound that will be enjoyed by music lovers. Often, the question that any artist asks is, how long does mixing an album take? The answer to this question is dependent on several factors.
Number Of Tracks
One factor that can influence the time it takes to mix an album is the number of tracks that need to be mixed. The larger the number of tracks, the more time-consuming the process can be. Every track must be finely tuned, equalized, and mixed to produce the desired effect, and each additional track adds value to the final mix.
Complexity Of Arrangement
The complexity of the arrangement is another factor that influences the time it takes to mix an album. A complex arrangement with many instruments and sounds can take more time to mix. In contrast, a simple arrangement with fewer instruments can be mixed quicker. Complex arrangements may also need more revisions and tweaking to get the desired sound.
Quality Of Recording
The quality of the recording is another significant factor in determining the length of the mixing process. If the recording quality is poor, it might take more time to correct the mistakes or imperfections that were captured during the recording process. On the other hand, high-quality recording can speed up the mixing process since there would be less need for cleanup and tweaking.
Instruments Used
The type of instrument used in the recording process can also impact the time required for mixing. For instance, mixing a rock track with lots of electric guitars will take more time than mixing a pop track that has more electronic sounds. Each instrument needs to be balanced and equalized to fit well with the other instruments in the mix.
Musicianship Of Performers
The musicianship ability of the performer is the final factor that can influence the mixing process. Talented musicians who play their instruments correctly and in time with the music can help in the mixing process. On the other hand, less skilled performers that require more edits and overdubbing can increase the mixing time.
Factors Influencing the Mixing Process
Factors
Description
Number of tracks
The larger the number of tracks, the more time-consuming the process.
Complexity of arrangement
A complex arrangement with many instruments and sounds can take more time to mix.
Quality of recording
If the recording quality is poor, it might take more time to correct the mistakes or imperfections.
Instruments used
The type of instrument used in the recording process can also impact the time required for mixing.
Musicianship of performers
Talented musicians who play their instruments correctly and in time with the music can help in the mixing process.
The Timeframe Of Mixing
Mixing an album can take anywhere from a few days to a few weeks, depending on the complexity of the project, the number of tracks, and the experience of the engineer. The process involves combining and balancing individual tracks to create a cohesive, polished sound that captures the intended tone and emotion of the music.
Mixing is one of the most critical stages in music production. It’s the process of blending recorded tracks together, adjusting their levels, frequencies, and stereo placement to produce a finished song. The duration of mixing an album relies on different variables and factors, which can influence the total time it takes to complete the process. Let’s explore the various factors that affect the timeframe of mixing an album.
Variables Affecting Mixing Time
Mixing is a detailed process that may vary depending on the project’s scope and complexity. Here are some variables that can affect the time it takes to complete an album’s mixing process.
The number of tracks – the more the tracks, the more time it takes to mix
The genre – some styles require intricate mixing processes
The quality of the recorded tracks
The experience and skill of the mixer
Average Time For Mixing A Song
Mixing an album can be time-consuming, and it is essential to understand how long it takes to mix a single song to estimate how long it would take to complete an album. On average, a single song may take between 3-5 hours to mix completely. This timeframe can also vary depending on the song’s complexity and other factors affecting mixing time, such as the number of revisions required, which can add more time to the total process duration.
Factors That Can Delay Mixing Time
Several factors can delay the mixing process, leading to more time required to complete the album. Here are some factors that can affect the overall timing of the mixing process.
Factors
Description
More tracks than anticipated
If some instruments were added later, more tracks may be recorded, leading to a longer mixing time.
Unpolished Tracks
Tracks that need a lot of polishing will require more time to mix.
Multiple revisions
If there are lots of client revisions or changes, it costs time to redo the mixing process.
Mixing Style
Different styles or genres may need specific mixing styles, taking up more time.
Credit: majormixing.com
The Process Of Mixing
Mixing an album is a complex process that requires attention to detail. Depending on the number of tracks and the desired sound, it can take anywhere from a few days to several weeks for a mixing engineer to complete the task.
The time it takes to mix an album can vary greatly, but it is important to take the necessary time to ensure the best possible outcome.
When it comes to creating a top-quality album, the mixing process is one of the most critical steps. Mixing an album is not just about putting the tracks together, but it involves a series of steps to ensure that the music is well-balanced, polished, and sounds perfect. In this blog post, we will discuss how long it takes to mix an album, with a particular focus on the process of mixing.
Preparatory Work
Before the mixing process begins, preparatory work needs to be done to ensure that everything is set up correctly. This includes ensuring that all the tracks are correctly labeled and organized, checking the tempo, and making sure all the instruments and vocals are recorded correctly.
Creating A Rough Mix
After the preparation is done, the next step is creating a rough mix. A rough mix is a preliminary version of the song with all the individual tracks mixed together. It’s called a rough mix because it’s not the final product, and more adjustments will be made as we progress to the next stages.
Equalization
Equalization is a critical step that involves adjusting the levels of different frequencies in the recordings. The goal is to make each instrument in the mix sound great by cutting or boosting certain frequencies.
Compression
Compression is the process of reducing the volume of the parts of the recording that are too loud, and boosting the volume of the parts that are too low. It helps to bring all the instruments together, giving them a sense of balance.
Reverb And Delay
Reverb and delay are effects that give a sense of space to the music. Reverb makes the music sound as it was recorded in a big room, while delay puts an echo on the sound.
Stereo Imaging
Stereo Imaging is the process of positioning the different instruments in the stereo field. It ensures that the listener can distinguish each instrument and creates depth in the mix.
Automation
Automation involves making changes in the mix that are automated, such as adjustments to volume, equalizer, or panning. It ensures that every aspect of the mix is well-balanced and polished. In conclusion, the process of mixing an album is a step-by-step process that involves several stages, including preparatory work, rough mix creation, equalization, compression, reverb, stereo imaging, and automation. The duration of mixing an album depends on the complexity of the project, the number of tracks, and the experience of the mixing engineer. However, an experienced engineer can mix an album in a few days to a few weeks to achieve a perfect balance of sound.
Common Mixing Mistakes
Mixing an album can take anywhere from a few days to several weeks depending on various factors including the number of tracks, the complexity of the music, and the level of detail required. To avoid common mixing mistakes, it is important to take your time and approach each track with a fresh perspective.
Mixing an album is a crucial step in the music production process that can make or break the quality of the final product. As such, there are several common mixing mistakes that should be avoided to ensure the album is mixed to perfection. Here are five of the most common mixing mistakes and how to avoid them.
Overprocessing
Overprocessing is a common mistake that occurs when too many effects and plugins are added to a track during mixing. This can result in a track sounding muddled and unnatural. To avoid overprocessing, keep the use of effects and plugins to a minimum and ensure they enhance the overall sound of the track rather than distract from it.
Muddiness
Muddiness is another common mixing mistake that can occur when the low frequencies of a track are too dominant and overpower the rest of the mix. To avoid muddiness, use a high-pass filter to remove unwanted low frequencies from non-bass tracks and ensure the bass track is mixed appropriately to balance the overall sound of the track.
Lack Of Balance
A lack of balance is a common mistake that occurs when the levels of the individual tracks in the mix are not balanced correctly. This can result in some tracks being too loud while others are too soft. To avoid a lack of balance, use reference tracks to ensure the levels of each track are balanced correctly and all instruments can be heard clearly.
Incoherence
Incoherence can occur when the mix lacks a consistent style or flow from one track to the next. This can result in the album sounding disjointed and unappealing to listeners. To avoid incoherence, consider the order in which the tracks will appear on the album and ensure each track has a consistent style and flow that complements the others.
Frequency Imbalance
Frequency imbalance occurs when there is an unequal distribution of frequencies across the mix. This can result in some frequencies being too dominant while others are too weak. To avoid frequency imbalance, use reference tracks to ensure the distribution of frequencies is balanced correctly and all frequencies can be heard clearly. By avoiding these common mixing mistakes, you can ensure the album is mixed to perfection and appeals to listeners. Remember to take your time during the mixing process and refer to reference tracks to ensure the mix is balanced and consistent.
Collaborating With A Mixing Engineer
Collaborating with a mixing engineer can take anywhere from a few weeks to a few months, depending on the complexity of the project and the amount of revisions required. Effective communication between the artist and the engineer can help to streamline the process and ensure a high-quality final product.
Choosing The Right Engineer
Choosing the right mixing engineer is crucial for the success of your album as it can make or break the final outcome. Look for an engineer who has experience mixing your genre of music. Take a look at their portfolio to get an idea of their previous work. Read reviews and feedback from their previous clients to understand their work quality and professionalism.
Setting Expectations
Once you choose the right mixing engineer, it’s essential to set your expectations right in the beginning. Discuss your goals and your vision for the album with the engineer, so they understand what you want to achieve with the mix. Clarify how you would like the mix to sound and provide reference tracks if necessary.
Communication During Process
Constant communication during the mixing process is necessary to ensure the engineer is achieving what you want. Set up regular check-ins to review the progress made, ask for updates, and provide feedback. Make sure to give clear and concise feedback on what you like and don’t like about the mix. If something isn’t working, speak up and ask for modifications. Your input is vital in developing a mix that satisfies your vision. Throughout the whole collaboration process, keep an open mind and trust your engineer’s expertise. Remember that music is subjective, and everyone has different tastes. The most important thing to keep in mind is that you are both working towards the same goal: making the best album possible.
Frequently Asked Questions Of How Long Does Mixing An Album Take
How Long Should Mixing Take?
Mixing time can vary depending on the ingredients and equipment used, but generally, mixing should take around 2-3 minutes for small quantities and up to 10 minutes for larger batches to ensure a thorough blend. It’s important to follow recipe instructions and monitor the mixing process to avoid overmixing, which can lead to tough or dense baked goods.
How Long Does It Take To Record And Mix An Album?
The length of time it takes to record and mix an album can vary depending on the artist, the complexity of the music, and the available resources. Generally, it can take anywhere from a few weeks to several months to complete the process.
It’s important to take the necessary time to ensure the quality of the final product.
How Long Does It Take To Audio Mix?
The time it takes to audio mix depends on the length of the audio track, the complexity of the mix, and the skill level of the audio engineer. Generally, it can take anywhere from a few hours to several days to complete the audio mix for a project.
How Much Should I Charge To Mix An Album?
The cost of mixing an album varies depending on the length and complexity of the tracks. However, the average rate for a professional mix engineer ranges from $500 to $1,500 per song. It also depends on the mixer’s experience, reputation, and equipment used in the process.
Conclusion
As we wrap up this article, we can say that the answer to “How long does mixing an album take? ” Is not as straightforward as we may think. The time taken for mixing an album varies depending on various factors such as the genre, complexity, and budget of the project, as well as the expertise of the mixing engineer.
However, what is clear is that mixing is a crucial stage in music production that determines the quality and success of the final product. Therefore, it is essential to allow sufficient time and resources for the mixing process to ensure a professionally mixed album that meets the desired standards and captures the listener’s attention.
Yes, upgrading to Izotope Nectar 4 is highly recommended. This latest version offers various improvements, including a vast array of updated modules, improved performance, enhanced interface, and better AI integration.
Izotope Nectar 4 is a significant upgrade from its predecessor, with an array of new modules and improvements. The software’s AI integration improves performance, while the interface is more user-friendly than ever. If you’re wondering whether to upgrade to the latest version of Izotope Nectar, we highly recommend doing so.
This article will take a closer look at the new features of Izotope Nectar 4 and explore its benefits.
Credit: www.youtube.com
Features Of Izotope Nectar 4
Izotope Nectar 4 offers advanced tools for vocal production, with new and improved features like Vocal Assistant and Unmasking. It provides users with distortion, saturation and compression effects, making it an excellent investment for audio pros seeking to enhance their vocal mixing.
Izotope Nectar 4 has blown away music producers with its improved features, ensuring high-quality and seamless audio production.
Overview Of Izotope Nectar 4
Izotope Nectar 4 is an all-in-one vocal suite featuring a wide range of sound effects that enhance vocal production. It is renowned for ensuring a crystal-clear vocal production that mesmerizes listeners. The latest version heightens the quality of previous versions, making it more impressive and should you upgrade to it? Definitely.
Improved Vocal Assistant
The improved Vocal Assistant in Izotope Nectar 4 has the ability to listen to your audio and suggests the best starting points on the mix.
New Presets
Izotope Nectar 4 comes with a new set of presets that are designed to save time on vocal processing. These presets enable the producer to achieve a certain style much quicker and easier than ever before.
Additional Modules
Izotope Nectar 4 now offers a vast range of modules that cater to a wide range of vocal mixing. These modules include an auto-level mode, a follow EQ mode, pitch correction, de-esser, and many more. With this new addition, music producers can effortlessly mix and achieve the same professional sound quality as their favorite music artists.
Benefits Of Upgrading
If you are a music producer or a sound engineer, you must have heard of Izotope Nectar. It is a vocal processing plugin that has been a game-changer in the music industry. Its previous version, Izotope Nectar 3, was already a powerful tool for processing vocals, but the new version, Izotope Nectar 4, takes it to a whole new level. Here are some benefits of upgrading to the new version:
Improved Workflow
The developers of Izotope Nectar 4 have put a lot of effort into improving the workflow of the plugin. The new version comes with a redesigned interface, making it easier to navigate and use. The interface is more streamlined, and the controls are more intuitive. The workflow improvements mean you can achieve your desired results faster, saving you valuable time.
More Effects
Izotope Nectar 4 comes with more effects than its predecessor, giving you more options to choose from. The new version includes new distortion, saturation, and modulation effects. These effects can help you to add more character and depth to your vocals. Moreover, it also comes loaded with a vast library of professionally designed presets that you can use as a starting point for your vocal processing.
Better Mixing Control
Izotope Nectar 4 has also added more advanced mixing capabilities. You can now add up to 12 modules in the signal chain and rearrange them in any order you want. You can also use Izotope’s Visual Mixer to visualize and adjust individual tracks’ panning and volume in the mix. These features can help you to achieve a balanced and polished mix with ease.
Enhanced Compatibility
Izotope Nectar 4 is compatible with all major DAWs, including Ableton Live, Logic Pro X, Pro Tools, and FL Studio, among others. This compatibility ensures that you can use the plugin seamlessly with your preferred DAW. Additionally, the plugin supports all computer platforms, including Mac and Windows, giving you the freedom to use your favorite operating system.
In conclusion, Izotope Nectar 4 is an excellent investment for anyone who wants to enhance their vocal processing capabilities. The new version offers significant improvements in workflow, effects, mixing control, and compatibility. Upgrading to Izotope Nectar 4 will undoubtedly take your vocal processing to the next level.
Comparison Of Izotope Nectar 4 To Previous Versions
Izotope Nectar 4 is the latest release by the leading software manufacturer Izotope, designed to enhance vocal production and enable professional-sounding results. But how does it compare to its previous versions, Nectar 3 and Nectar 2? Let’s dive into the improved features and upgrades in Nectar 4.
How Is It Different From Izotope Nectar 3?
Nectar 4 offers several upgrades and enhancements over its predecessor Nectar 3. One of the most significant improvements is the improved Vocal Assistant 2.0, featuring updates to the Unmask function and the addition of the Dynamic EQ. This allows for more targeted and nuanced vocal processing, making it easier for producers to extract the best performance from any vocal recording.
Besides that, Nectar 4 has also expanded its user-friendly interface, integrating machine learning algorithms, allowing users to achieve custom vocal processing in a matter of seconds. So, upgrading Nectar 3 to Nectar 4 is undoubtedly a wise decision if you want to experience powerful features that can significantly elevate your vocal production.
Improvements Over Izotope Nectar 2
If you’re using Izotope Nectar 2 and contemplating an upgrade, Nectar 4 has several upgrades that could make a massive difference in your productions. One of the most significant updates is the improved Vocal Assistant, providing more advanced customizations to your project’s vocals. Vocal Assistant 2.0 integrates the Unmask and Dynamic EQ functions, providing users with the ability to modify and customize vocal tones.
Another improved feature is the Harmony module, which allows producers to add collaborative harmonies to their vocal tracks, allowing for a more natural and well-blended sound. Not to mention, improved tracking technology ensures that every part of your vocal track remains in tune and blends with the rest of the track seamlessly.
Other improvements include new EQ models, an expanded module menu, and faster processing times. These features make Nectar 4 a worthy investment, providing a more streamlined vocal processing experience.
In Conclusion
Upgrading from Nectar 3 or Nectar 2 to Nectar 4 offers new features that can significantly enhance your vocal production. With improved Vocal Assistant 2.0, Dynamic EQ, harmony module, more advanced EQ models, and machine learning algorithms, the upgrade to Nectar 4 is a game-changer. So, if you’re looking for an efficient and user-friendly vocal processing software that can take your productions to the next level, Nectar 4 is undoubtedly worth the investment.
Credit: www.izotope.com
Reviews From Users Who Have Upgraded
Upgrade is essential for every software to get the latest features and advancements. And when it comes to Izotope Nectar 4, it’s a crucial decision to upgrade since it promises to enhance the vocal workflow and user experience. So, let’s take a look at some reviews from users who have upgraded to Nectar 4.
Positive Experiences
Users who have upgraded to Nectar 4 have expressed their satisfaction with its advanced features. The new auto level mode and improved harmony module have enabled them to achieve better and faster results. The inter-plugin communication has made it easier to switch between different plugins without any lag or delay. And the integration with other Izotope plugins has made their workflow much smoother and convenient.
Negative Experiences
However, some users have reported issues with the new interface, which they found to be cluttered and confusing. They had difficulty finding some essential features and had to spend extra time navigating. Some users also experienced compatibility issues with their DAWs, resulting in crashes and other technical glitches. Nevertheless, Izotope has been prompt in addressing these issues through frequent updates and patches.
Overall Feedback
Overall, most users who have upgraded to Nectar 4 believe that it’s worth the investment. The improved features and enhancements have made it a game-changer for their vocal productions. Though some users have faced interface and compatibility issues, the frequent updates and patches have resolved them quickly. Therefore, if you’re looking to enhance your vocal productions, upgrading to Nectar 4 might be the right choice for you.
Credit: www.izotope.com
Frequently Asked Questions On Izotope Nectar 4 Should You Upgrade
Is Nectar 4 Elements Worth It?
Yes, the Nectar 4 elements is worth it. It is a high-quality foam mattress that provides excellent comfort and support. The mattress is designed to contour to the sleeper’s body, promoting healthy spinal alignment and reducing pressure points. Additionally, the Nectar 4 elements is durable and comes with a lifetime warranty.
What Is New In Nectar 4?
Nectar 4 has introduced a complete and polished new user interface for improved workflow, added Melodyne 5 Essential for advanced vocal editing, and has enhanced the Vocal Assistant with unmasking controls and improved pitch detection. It also includes new dynamic EQ, compression, and saturation modules for further control over mixing and mastering.
What Are The System Requirements For Nectar 4?
To use Nectar 4, the recommended system requirements include a 2. 8 GHz Intel Core 2 Duo processor or better, 4 GB of RAM, and at least 400 MB of hard drive space. A compatible VST, AU, AAX, or RTAS host application is also required.
Does Izotope Have Pitch Correction?
Yes, iZotope offers pitch correction software called Nectar. It’s designed to correct and enhance pitch and timing, and is utilized by music producers and audio engineers.
Conclusion
As we come to the end of this exploration of Izotope Nectar 4, the decision to upgrade ultimately depends on your specific needs and preferences. With its numerous upgraded features and improvements, it provides a substantial improvement from its predecessor.
So if you’re looking for a comprehensive vocal production suite, then upgrading to Izotope Nectar 4 is definitely worth the investment. Whether you’re a beginner or a professional, this plugin offers an array of tools to help you achieve a polished and professional sound in your music production.
To take reverb off audio files, use EQ and apply it to the frequencies where reverb occurs. Then, use a noise gate to remove any remaining reverb.
Audio files with excessive reverb can be challenging to work with. However, removing reverb can drastically improve the quality of the audio file. One popular method for removing reverb from audio files is by using EQ (equalization) and a noise gate.
EQ can be used to target the specific frequencies where reverb occurs, while the noise gate can remove any lingering reverberation. Other methods include using a de-reverb plugin or recording the audio in a sound-treated environment to eliminate reverb altogether. It’s essential to remember that the amount of reverb removed should be balanced to avoid making the audio sound dull and unnatural.
Methods For Removing Reverb From Audio Files
Remove unwanted reverb from audio files by utilizing various methods such as using noise reduction and equalization techniques, adjusting the attack and release times, or utilizing specialized reverb removal software. With careful processing, you can achieve a cleaner, more professional sounding audio file.
Reverb is a common audio issue that can ruin a good recording. It can make the sound muddy, unclear, and difficult to understand. However, removing reverb can be challenging, especially if it’s an integral part of the recording. In this article, we will discuss the three most popular methods for removing reverb from audio files: manual method, using plugins, and third-party tools. The manual method involves using an equalizer to boost and cut certain frequencies manually. This method requires time, patience and a good ear. Follow these steps to remove reverb manually:
Open the audio file in a digital audio workstation (DAW).
Play the recording and identify the frequencies that need to be removed, usually between 500 Hz to 3 kHz.
Use an equalizer to cut the frequencies that cause the reverb.
Examine the sound and adjust the equalizer until the desired result is achieved.
Save the new file without reverb.
There are many plugins available that can remove reverb effectively. These plugins use advanced algorithms to analyze the sound and remove the reverb automatically. Here are some popular plugins for removing reverb:
Waves DeReverberation
Accusonus ERA Reverb Remover
iZotope RX 7 Advanced
aXDeNoise
Using plugins is a faster and more efficient way to remove reverb, especially when working with large audio files. There are also third-party tools available that can remove reverb from audio files. These tools use artificial intelligence and machine learning algorithms to detect and remove reverb. Here are some popular third-party tools for removing reverb:
Multichannel support, adjustable reverb reduction, works with any DAW
$499
ERA 5
Easy-to-use, intuitive interface, noise and hum removal, spectral editing
$119
Third-party tools are expensive, but they can provide the best results, especially when dealing with complex reverb issues. In conclusion, removing reverb from audio files can be challenging but using the right methods and tools can help you achieve professional-sounding recordings. Whether you choose the manual method, use plugins, or third-party tools, carefully assess the pros and cons of each and select the one that best suits your needs.
Credit: coastsonic.com
Manual Method
Removing reverb from audio files manually is a time-consuming process that involves editing each section of the audio carefully. The process includes creating a duplicate file for editing and using effects such as EQ and gating to remove reverb from each section until the audio sounds clean and polished.
Are you tired of listening to audio files with unwanted reverb? No need to worry! There is always a solution. In this article, we will discuss how to manually remove reverb from the audio files using different techniques. The manual method is time-consuming but effective. Let’s jump into the steps involved in the manual method.
Step 1: Isolate The Audio Section With The Reverb
The first step is to identify the audio section with the reverb. You can easily identify the area with the reverb by listening carefully to the audio. Once you have identified the section, extract it by using an audio editor program, such as Audacity. In Audacity, select the section and press Ctrl + X to extract the section.
Step 2: Use Eq To Remove The Reverb Frequencies
The second step is to use Equalization (EQ) to remove the reverb frequencies. To do this, import the isolated section in Audacity and open the Equalization window. In the Equalization window, select low-pass filter and decrease the frequency to around 200 Hz. Then select high-pass filter and increase the frequency to around 8000 Hz. This will remove the reverb frequencies from the section.
Step 3: Apply A Gate To Remove The Remaining Reverb
The last step is to apply a Gate effect to remove the remaining reverb. A gate effect is a digital sound processing technique that removes any sound below a certain threshold. In Audacity, select the isolated section and open the Noise Gate effect window. Adjust the settings to remove the remaining reverb. Test different threshold levels and decay levels until you achieve the desired result. That’s it! By following these three simple steps, you can manually remove reverb from your audio files. However, this method is time-consuming and requires some technical skills. If you are not comfortable using the manual method, you can use plugins like ERA Bundle, RX by iZotope, or ERA Reverb Remover to remove reverb quickly and efficiently.
Using Plugins
Remove reverb from audio files easily using plugins that are designed to remove unwanted effects. Save time and energy by using a plugin instead of manually adjusting the recordings, producing clean and professional-sounding audio files.
Removing reverb from audio files is a challenging task that requires skills and expertise. There are many techniques that you can use, but using plugins is one of the most effective ways. Plugins are software extensions that work within your digital audio workstation (DAW) to manipulate the sound. In this post, we will explore how to use plugins to remove reverb from audio files.
Step 1: Choose The Right Plugin
The first step in using plugins to remove reverb from audio files is selecting the right plugin. There are several plugins available in the market, but not all of them work effectively. You need to choose a plugin that is specifically designed to remove reverb. Some popular plugins that you can consider include Waves RVox, SPL De-Verb, and iZotope RX.
Step 2: Adjust The Plugin’s Parameters
Once you have selected the right plugin, the next step is adjusting its parameters. Each plugin has its settings that you can manipulate to achieve the desired result. For instance, in the Waves RVox plugin, you can adjust the threshold, range, and attack to remove reverb from your audio file effectively. It is important to note that each audio file is unique, which means you may need to adjust the parameters depending on the audio file.
Step 3: Control The Dry/wet Mix
A dry/wet mix refers to the balance between the processed (wet) and unprocessed (dry) sounds. When using plugins to remove reverb, you must control the dry/wet mix because it determines the extent to which the reverb reduction will affect the audio file. If the mix is too dry, the audio file may sound unnatural, but if it’s too wet, the reverb may still be audible. You need to adjust the dry/wet mix until you achieve the perfect balance.
Conclusion
Using plugins is an effective way to remove reverb from audio files. However, it is essential to choose the right plugin, adjust its parameters accordingly, and control the dry/wet mix to achieve the desired results. With these steps, you can get a cleaner, clearer audio file that is free from reverb.
Third-party Tools
Using third-party tools such as audio editing software can help in removing reverb from audio files. With the aid of various plugins or filters, these tools effectively clean up the sound, enhancing its quality.
Third-Party Tools Taking reverb off audio files can be a challenging task, especially if you are a beginner. But don’t worry, third-party tools can help you remove reverb from your audio files without any fuss. These tools are specifically designed to remove reverb from audio files and can be a great addition to your editing toolkit. In this article, we will explore the steps involved in using third-party tools for removing reverb from audio files. Step 1: Research and Choose a Third-Party Tool Choosing the right third-party tool can make all the difference in removing reverb from audio files. There are numerous tools available on the internet, and it can be overwhelming to choose the right one. Therefore, before selecting a tool, do some research and read reviews from other users who have used the tool. Here are some essential factors to consider when choosing a third-party tool: – Compatibility with your operating system and software – User-friendly interface – Additional features – Price Step 2: Use the Tool on the Audio File Once you have chosen the third-party tool to remove reverb from the audio file, the next step is to use it. The process of using the tool may vary depending on the software and operating system. However, the basic steps to load the audio file into the tool and initiate processing should be straightforward. Once the audio file is loaded, you can initiate the reverb removal process, which may take a few minutes to complete. Step 3: Adjust the Settings for Optimal Results After completing the reverb removal process, you should preview the audio file to assess the effectiveness of the tool. In some cases, the tool may not remove the reverb entirely or may remove some desirable aspects of the audio file. Therefore, it is crucial to adjust the settings of the tool to achieve optimal results. The tool may showcase various parameters that can be altered to achieve efficient results. In conclusion, third-party tools can be a great addition to your audio editing toolkit. However, selecting the right tool and knowing how to use it correctly is essential to remove unwanted reverb from your audio files. By following the steps mentioned above, you can achieve efficient results and improve the overall quality of your audio files.
https://www.youtube.com/watch?v=kpmUUes6IKU
Credit: joespedals.com
Frequently Asked Questions Of How To Take Reverb Off Audio Files
Can You Remove Reverb From Audio?
Yes, you can remove reverb from audio using different software tools and techniques such as equalization, gating, and reverb removal plugins. These solutions can help you reduce the amount of reverb in an audio recording and make it sound clearer and more focused.
How Do I Get Rid Of Echo In Audio Recording?
To get rid of echo in audio recording, you can apply acoustic treatment to the recording space or use a noise reduction plugin. Ensure that you have a good quality microphone, record in a quiet environment, and adjust the microphone placement.
Additionally, consider adding some reverb to the audio to make it sound more natural.
How Do I Cut Down Reverb?
To cut down reverb, you can try these tips: 1. use acoustic panels and foam to absorb the sound waves 2. use a pop filter when recording 3. adjust the microphone position or distance 4. adjust EQ settings to reduce high frequencies 5.
use a noise gate to eliminate background noise.
Why Is There Reverb In My Audio?
Reverb is caused by sound waves reflecting off surfaces in a space and then returning to the microphone. This creates a trailing echo effect that gives your audio a sense of space and depth. To reduce reverb, try recording in a smaller room with more sound-absorbing materials or use noise-cancelling software.
Conclusion
Taking off reverb from audio files can be challenging, but with the right tools and techniques, it can be achieved seamlessly. Using tools like noise reduction, spectral editing, and reverb reduction plug-ins, one can achieve a clean sound with ease.
Remember to always use the appropriate settings for your specific audio and experiment with different techniques to find the perfect result. Overall, removing reverb from audio files is an essential skill for any audio engineer, and with practice, it can become an effortless task.
To kickstart your music career, first, identify your niche audience and create a compelling brand image. Then, make use of social media, live performances, and collaborations with other artists to promote your music.
Music is an incredibly competitive industry, making it challenging for aspiring musicians to achieve success. However, with a strategic approach and consistent effort, it is possible to build a career in the music industry. One of the most crucial steps is to identify the target audience and create a compelling brand image that resonates with them.
The next step is to utilize social media platforms like Instagram, YouTube, and TikTok, where music has a massive following, and consistently produce high-quality content. Live performances are also a great way to attract attention and grow your fan base. Collaborating with other artists to create music can also be beneficial, as it exposes you to new audiences and helps you develop additional skills. With patience, determination, and a lot of hard work, you can kickstart your music career and achieve success.
Discover Your Sound
Discover Your Sound is the perfect place for aspiring musicians to kickstart their career. With expert guidance and resources at your disposal, you can hone your skills and find your unique sound, setting the stage for a successful music career.
Identifying Your Genre
One of the most important things you can do as a musician is to identify your genre. This is the first step in developing your unique sound. To do this, you need to explore different styles of music and figure out what speaks to you.
Refining Your Unique Style
Once you have identified your musical genre, you can start refining your unique style. This involves looking deeper into what makes your music different from others in your chosen genre. It could be your lyrics, your vocal style, your instrumentation, or a combination of these things. To truly refine your unique sound, you need to experiment with different techniques and approaches. Try new things and see what works best for you and your music.
The Importance Of Discovering Your Sound
Discovering your unique sound is crucial if you want to make it in the music industry. Not only will it help you stand out from other musicians, but it will also make it easier for you to find your audience. After all, people are always looking for something new and exciting to listen to. To discover your sound, take the time to explore different musical genres and styles. Listen to a variety of music, read about different techniques and approaches, and experiment with different instruments and vocal styles. With time and practice, you will find your own unique sound and style.
Credit: www.slideshare.net
Build Your Brand
To kickstart your music career, building your brand is crucial. Create a unique identity and market yourself effectively through social media and networking. Consistency in your image and sound can lead to increased recognition, gigs, and ultimately success.
Crafting a strong brand is key to kickstarting your music career. Your brand is your identity, and it’s how you’ll be known to the world. Building your brand involves creating a unique visual identity, establishing a social media presence, and crafting an image that resonates with your audience.
Crafting Your Image
Your image is how you present yourself to the world, both visually and in terms of character. It’s important to be authentic to who you are while also catering to your target audience. Consider what kind of music you make and what kind of image would best communicate that style to your fans. When crafting your image, ensure that your bio, press photos, and website align with your vision. Remember to keep things simple and consistent, so that your message is clear across all platforms.
Creating A Logo And Visual Identity
A logo and visual identity are essential to your brand. A logo is a symbol or design that identifies your brand, while visual identity encompasses fonts, colors, and other design elements that help distinguish your brand. Your logo should be simple yet memorable. Consider hiring a designer to create a professional and unique logo that aligns with your brand’s vision. Once you’ve created your logo, be sure to incorporate it across all your platforms, from your website to your social media profiles.
Establishing A Social Media Presence
Social media is an essential tool for promoting your brand and connecting with fans. Choose the platforms that align with your brand’s vision and style, and use them consistently. Be sure to update your profiles regularly and engage with your followers. Consider creating a content calendar to stay organized and ensure you’re putting out quality content. Use hashtags to reach a wider audience and collaborate with other musicians and influencers to expand your reach. In conclusion, building your brand is a crucial step in kickstarting your music career. By crafting your image, creating a logo and visual identity, and establishing a social media presence, you’ll be able to grow your fan base and take your career to the next level.
Connect With Industry Professionals
Connect with industry professionals in the music field to kickstart your career. Network, gain insider knowledge, and receive valuable advice from those with experience to take your passion to the next level.
Networking Strategies
As a musician looking to kickstart your career, connecting with industry professionals is crucial. Networking serves as a foundation for opening doors to opportunities in the music industry. Some essential networking strategies you can employ include:
Attending live shows and events in your area
Joining online communities like forums and social media groups
Reaching out to music bloggers, radio stations, and other influencers
Participating in music competitions or showcases
Attending Music Conferences And Festivals
Music conferences and festivals offer excellent opportunities to meet and connect with industry professionals, as well as learn more about the industry. Some great industry events include:
Event
Location
Date
South by Southwest (SXSW)
Austin, Texas, USA
March
Canadian Music Week
Toronto, Canada
May
Midem
Cannes, France
June
Summerfest
Milwaukee, Wisconsin, USA
June-July
Reeperbahn Festival
Hamburg, Germany
September
Working With Managers And Agents
Managers and agents can provide vital assistance to your career, from booking gigs to negotiating contracts. Finding the right one is key, and the best way to do this is through networking. Before signing a contract, be sure to review and understand it fully.
Collaborating With Established Artists
Collaborating with established artists can give you a much-needed boost in exposure and credibility. There are a few ways to approach this:
Reach out to established artists directly, showing your interest in collaborating
Utilize online collaboration platforms, such as BandLab and Kompoz
Participate in songwriting camps or workshops
Keep in mind that establishing relationships takes time and patience. But with persistence and hard work, connecting with industry professionals can set you on the path towards a successful music career.
Record Your Music
Record Your Music is the perfect solution for budding musicians who want to kickstart their music career. Whether you want to create a demo or record an entire album, professional recording services are available to give you the edge you need in the competitive music industry.
If you want to kickstart your music career, recording your music is crucial to showcase your talent. Whether you choose to set up a home studio, work with a producer, or choose the right recording studio, understanding music mixing and mastering can help you achieve professional-quality recordings. Here are some things that you need to know:
Setting Up A Home Studio
Setting up a home studio is one of the most efficient ways of recording your music. With a home studio, you have the freedom to create your music at your own pace and at any time that works best for you. Here are some things that you need to get started:
A computer with recording software such as GarageBand, Logic Pro, or Pro Tools.
A microphone and headphones.
An audio interface to connect your microphone and instrument to your computer.
Choosing The Right Recording Studio
Choosing the right recording studio is crucial to ensure that your music is professionally recorded. Here are some things to consider when choosing a recording studio:
Considerations
Details
Location
Choose a studio that is located nearby or easy to access. Traveling long distances can be costly and time-consuming.
Equipment
Ensure that the studio has the latest recording equipment to produce high-quality recordings.
Cost
Determine your budget and choose a studio that fits within your budget.
Working With A Producer
Working with a producer can help you produce quality music that best showcases your talent. A producer can help you bring your musical vision to life and provide creative input to enhance your music. Here are some things to consider when working with a producer:
Choose a producer with experience in your genre.
Establish clear communication and expectations before starting the recording process.
Be open to creative input and trust in the producer’s expertise.
Understanding Music Mixing And Mastering
Mixing and mastering are critical components of recording your music. Mixing refers to the process of balancing and blending individual tracks of your recording, while mastering is the final step to prepare your music for distribution. Here are some things to consider:
Hire a professional mixing and mastering engineer or learn the technical skills required to do it yourself.
Invest in high-quality software and equipment to ensure that the mixing and mastering process is of high quality.
Promote Your Music
If you’re looking to kickstart your music career, promoting your music is crucial. Utilize social media and other online platforms to get your music out to a wider audience. Collaborate with other artists and leverage their fanbase to gain more exposure.
As a budding musician, promoting your music is just as important as creating it. Without effective promotion, your music may never reach the intended audience. In this section, we’ll go over some key steps you can take to successfully promote your music.
Creating A Marketing Plan
One of the most important things you can do to promote your music is to have a solid marketing plan in place. This will help you to focus your efforts and ensure that you’re reaching the right audience. To create a marketing plan, start by identifying your target audience and figuring out where they spend their time online. From there, you can start to develop a strategy for reaching them through social media, email marketing, and other channels.
Building A Fanbase
Another key element of promoting your music is building a fanbase. This means connecting with your fans and cultivating a community around your music. To build a fanbase, you can engage with your fans on social media, perform at live events, and offer exclusive content or merchandise to dedicated fans. By building a strong fanbase, you’ll have a dedicated audience who will be eager to promote your music to their own networks.
Creating Music Videos And Visuals
In today’s digital age, visual content is king. Creating high-quality music videos and visuals can be a powerful way to promote your music and reach a wider audience. When creating music videos and visuals, make sure to put in the time and effort to ensure that they are high-quality and professional. This will help to ensure that they are well received by fans and potential new listeners.
Releasing Your Music On Streaming Platforms
Finally, one of the best ways to promote your music is to release it on streaming platforms like Spotify, Apple Music, and YouTube. This will make it easy for your fans to access your music and share it with their own networks. When releasing your music on streaming platforms, make sure to optimize your titles, descriptions, and tags to help it appear in relevant searches. You can also consider working with a distributor to ensure that your music is being promoted to a wider audience. Overall, promoting your music is all about reaching the right audience and building a strong community around your music. By taking the steps outlined here, you can start to build a following and promote your music to a wider audience.
Credit: www.magzter.com
Perform Live
Perform Live is an excellent platform for upcoming musicians to kickstart their music career. With an extensive network and resources, Perform Live offers budding artists a chance to showcase their talent to industry professionals and gain exposure through live events.
Performing live is one of the most important ways for musicians to connect with their fans. Whether it’s playing a small club or a large arena, a live performance can create a lasting impression that can help to kick-start a music career. For independent artists, playing live shows is a way to generate income and build a fanbase. This section will explore how to book your own gigs, work with booking agents and promoters, prepare for a live show, and manage tour logistics.
Booking Your Own Gigs
Booking your own gigs can be a great way to gain experience and build your fanbase. To book your own gigs, start by reaching out to local venues and introducing yourself and your music. Be prepared to share your music and any relevant information about your previous performances. It’s important to have a professional press kit that includes your bio, high-quality photos, and samples of your music. When contacting venues, make sure to personalize your message and show that you have done your research on the venue and their audience. Be professional and courteous in your communication, and be willing to negotiate on the terms of the gig. Some venues may offer a flat fee, while others may offer a percentage of the door sales.
Working With Booking Agents And Promoters
Working with booking agents and promoters can help to take your music career to the next level. Booking agents and promoters have connections with venues and can help to secure higher-paying gigs. They can also help with tour logistics, such as arranging transportation and lodging. When working with a booking agent or promoter, it’s important to have a clear understanding of the terms of the agreement. Make sure to read the contract carefully and ask any questions before signing. To find a booking agent or promoter, start by asking other musicians in your network for recommendations. You can also research online or attend music industry events to connect with industry professionals. When reaching out to a booking agent or promoter, be prepared with your press kit and any relevant information about your previous performances. Be professional in your communication and show that you are serious about your music career.
Preparing For A Live Show
Preparing for a live show is essential for a successful performance. Start by rehearsing your music and making sure that you are comfortable playing your songs. Practice your stage presence and consider your outfit and overall appearance. It’s important to create a setlist that flows well and showcases your best songs. When preparing for a live show, make sure to communicate with the venue or promoter about your technical requirements. This includes any necessary equipment, such as microphones or amplifiers, and any specific sound or lighting needs.
Managing Tour Logistics
Managing tour logistics can be challenging, but it’s essential for a successful tour. Start by creating a detailed itinerary that includes all of your performance dates and locations. Arrange transportation, lodging, and meals in advance, and make sure to communicate with the venues or promoters about any additional needs or requirements. When traveling, it’s important to have a clear understanding of your budget and to stick to it. Keep track of your expenses and consider ways to save money, such as sharing lodging or traveling by bus instead of flying. In conclusion, performing live is a crucial part of any musician’s career. Whether booking your own gigs or working with industry professionals, it’s important to be prepared and professional in your communication. By preparing for your live show and managing tour logistics, you can ensure a successful and memorable experience for yourself and your fans.
Manage Your Finances
Get a head start in your music career by managing your finances effectively. Keep track of your income and expenses, create a budget, and invest wisely to ensure long-term success in the industry.
As you embark on your music career, it’s crucial to manage your finances. With so many moving parts in the music industry, staying on top of your finances will ensure you’re not leaving anything on the table. Here are some key areas to focus on to help manage your finances effectively:
Creating A Budget
The first step to managing your finances is to create a budget. A budget will help you keep track of your income and expenses, so you can ensure you’re not overspending. It should include a breakdown of your monthly income, such as royalties, merchandise sales, and any jobs or gigs you have secured. You’ll also need to track your expenses, such as studio time, equipment, touring expenses, and marketing costs. By regularly reviewing your budget, you’ll be able to make adjustments as needed to ensure you’re staying on track.
Understanding Music Royalties
Music royalties are an essential part of your income as a musician. It’s crucial to understand the different types of royalties and how they’re calculated, so you can maximize your earnings. For example, you’ll earn mechanical royalties when someone covers your song or streams your music, while performance royalties are earned when your music is played on the radio, TV, or at live venues. Understanding these different types of royalties and tracking your earnings will help ensure you’re getting paid what you’re owed.
Managing Music Publishing
Music publishing is another critical aspect of your finances as a musician. It’s important to understand how music publishing works, including the importance of registering your songs with a Performing Rights Organization (PRO). A PRO will help collect royalties on your behalf and ensure you’re getting paid for every performance of your music. Additionally, consider working with a music publisher to help pitch your songs to other artists or sync them for use in TV, film, and other media.
Hiring An Accountant
As your music career grows, you may want to consider hiring an accountant to help manage your finances. An accountant can assist with tax planning, bookkeeping, and financial analysis, all of which will help ensure your finances are always in order. Even if you’re not ready to hire a full-time accountant, consider working with a bookkeeper or tax professional to help stay on top of your finances. Managing your finances as a musician is crucial to your success in the music industry. By creating a budget, understanding royalties and music publishing, and working with an accountant, you’ll be able to ensure you’re getting paid what you’re owed and maximizing your earnings.
Stay Motivated
Struggling to stay motivated in your music career? It can be tough to keep going, but remember to focus on your goals and the reasons why you love making music. Surround yourself with supportive people and keep pushing yourself out of your comfort zone.
With determination and hard work, success is within reach.
Staying motivated is crucial when it comes to kickstarting your music career. In fact, it’s one of the key elements that will help you stay focused and achieve your goals. As a musician, you’re likely to face creative blocks, rejections, and other obstacles throughout your journey. But with the right mindset and some guidance, you can stay motivated and keep moving forward.
Setting Goals
Setting goals is essential for maintaining motivation. Be clear about what you want to achieve and when you want to achieve it. Set achievable goals that can be broken down into smaller tasks. Keep your goals visible and track your progress regularly. Celebrate your achievements to stay motivated and keep pushing yourself to the next level.
Staying Inspired
Inspiration can come from anywhere and at any time. Stay open to new experiences, ideas and sounds. Listen to different genres, attend concerts, collaborate with other musicians, and stay connected with your fans. Surround yourself with like-minded people who share your passion and support you along the way. Keep a journal to jot down your thoughts and ideas.
Overcoming Creative Blocks
Creative blocks are inevitable. They can be caused by stress, fear, fatigue, or lack of inspiration. But don’t let them discourage you. Take breaks, go for a walk, exercise, meditate, or try something new. Experiment with different writing techniques or collaboration methods. Don’t be afraid to ask for feedback or advice from others. Use creative blocks as an opportunity to learn and grow as a musician.
Dealing With Rejection
Rejection is a part of the music industry. It can be disheartening, but it’s not the end of the world. Use rejection as a learning opportunity. Analyze the feedback you receive and use it to improve your skills. Stay positive and stay focused on your goals. Remember that rejection is not a reflection of your worth as a musician.
Conclusion
Keeping motivated is key to kickstart your music career. Set goals, stay inspired, overcome creative blocks, and deal with rejection. With the right mindset and some guidance, you can stay motivated and achieve your dreams as a musician. So keep pushing yourself, surround yourself with positivity, and never give up on your passion.
Frequently Asked Questions For Kickstart Your Music Careeer
How Do I Jumpstart My Music Career?
To jumpstart your music career, start by creating a solid online presence through social media and streaming platforms. Collaborate and network with other musicians and industry professionals. Don’t be afraid to perform live whenever possible and seek out opportunities for exposure, such as music festivals or competitions.
Finally, continue to hone your craft and stay true to yourself and your unique sound.
Is 25 Too Old To Start A Music Career?
No, 25 is not too old to start a music career. Many successful musicians began their careers later in life, and age should not be a barrier to pursuing your passion for music. With hard work, dedication, and a strong commitment to your craft, you can achieve success at any age.
Is 27 Too Late To Start A Music Career?
No, 27 is not too late to start a music career. Many successful musicians started their careers later in life. With hard work, dedication, and perseverance, you can achieve your dreams at any age. Age is just a number when it comes to pursuing your passion.
How Can I Turn My Music Passion Into A Career?
To turn your music passion into a career, start by creating a strong online presence through social media and networking. Attend music events and connect with musicians and industry professionals. Continuously hone your skills by practicing and performing, and consider investing in music education.
Pursue opportunities for gigs, collaborations, and record deals. With dedication and persistence, you can turn your music passion into a fulfilling career.
Conclusion
To conclude, starting a career in music can be a daunting task, but with the right mindset and preparation, it is achievable. Remember to keep practicing and always seek guidance from experienced professionals. Utilize social media platforms to promote your music and build your audience, and don’t forget the importance of networking.
Allow yourself to adapt to different situations and learn from your mistakes. Keep your passion for music alive and never give up on your dreams. With dedication, hard work, and a little bit of luck, you can kickstart your music career today.
To stop music on Fl Studio, click the stop button. Fl Studio is a powerful digital audio workstation that allows users to create, mix, and edit professional-quality music.
However, knowing how to stop music on Fl Studio is important for those who want to pause or finish their work. Simply pressing the stop button located at the top of the interface will halt all audio playback. This button can be found next to other transport controls such as play, pause, and record.
When you need to resume playback, simply hit the play button to pick up where you left off. Additionally, Fl Studio offers other controls such as looping, which can be useful for practicing or playing back certain sections of your composition. With these controls, users can easily manage the audio playback on Fl Studio.
Credit: www.image-line.com
Stop Music Playback On Fl Studio
Stopping music playback on FL Studio is a simple process. You can either click on the stop button or press the spacebar on your keyboard. Additionally, you can use the Ctrl+Space keyboard shortcut to stop the music playback.
When you’re done working on a music project on FL Studio, the next thing you want to do is stop the music playback. There are various ways to do this, depending on your preference. In this post, we’ll explore the three most common ways to stop music playback on FL Studio.
Using The Spacebar Shortcut Key
One of the easiest and most convenient ways to stop music playback on FL Studio is by using the spacebar shortcut key. All you need to do is press the spacebar on your keyboard to stop the music playback. This key is readily available on your keyboard, and it works no matter what window or plugin you are using on FL Studio.
Click Stop In The Transport Panel
The Transport Panel is another option to stop playback on FL Studio. You can locate the Transport Panel at the top of your screen, and it consists of various buttons and options. You can easily stop the music playback by clicking on the Stop button in the Transport Panel. This is a simple and straightforward method, and it works well if you prefer to use the Transport Panel.
Using The Stop Button On Midi Controller
If you have a MIDI controller connected to your FL Studio, you can also use the Stop button on your MIDI controller to stop the music playback. This option is useful if you prefer using a MIDI controller to control your FL Studio, and it makes it easier to stop the music playback without having to switch between your keyboard and mouse. In conclusion, stopping music playback on FL Studio is a simple and straightforward process, and you can choose any of the above options that you prefer. Use the Spacebar Shortcut key, click Stop in the Transport Panel, or use the Stop button on your MIDI controller to stop the music playback.
Stop Music Recording On Fl Studio
Stopping music recording on FL Studio is a simple process. Click on the stop button or hit spacebar to halt the recording process. You can also use the “Shift + Space” shortcut key to stop the music instantly.
Stop Music Recording on FL Studio Recording music on FL Studio is a great way to create your own tracks and beats, but at times, you may want to put a stop to the recording process. In this section, we will guide you through how to stop music recording on FL Studio using two different methods. Click Stop in the Transport Panel The easiest way to stop the music recording on FL Studio is to click the “Stop” button in the Transport Panel. This panel is located in the upper left-hand corner of the FL Studio window. To stop recording, you just have to click the “Stop” button while the music is still playing. Using the Spacebar Shortcut Key If you prefer to use your keyboard to control the music recording, you can use the spacebar shortcut key to stop the recording. To do this, you have to press the spacebar on your keyboard while the music is still playing. This will immediately stop the recording process, and you can save your recording as a project or export it to a WAV or MP3 file. In conclusion, stopping music recording on FL Studio is an easy process. You can either click the “Stop” button in the Transport Panel or use the spacebar shortcut key. By following these simple steps, you can ensure that your recording process is stopped on time and your project is saved accordingly.
Stop Music Loops On Fl Studio
FL Studio is one of the best digital audio workstations available, offering a wide range of features for music production. However, it can be tricky to stop music loops on FL Studio, especially for new users. In this post, we will discuss different ways to stop music loops on FL Studio, including using the spacebar shortcut key and clicking stop in the transport panel.
Using The Spacebar Shortcut Key
If you want to stop the music loop in FL Studio quickly, you can use the spacebar shortcut key. Once you press the spacebar, the music will stop playing, and the playlist cursor will be set to the beginning of the pattern. If you want to start playing the music again, press the spacebar again, and the music will play from the beginning.
Click Stop In The Transport Panel
Another way to stop the music loop in FL Studio is by clicking stop in the transport panel. The transport panel is located on the top of the workspace, and it contains various controls, including play, stop, record, and tempo. To stop the music loop, click the stop button in the transport panel, and the music will stop playing. You can also use the stop button to pause the music temporarily and then resume playing by pressing the play button.
Conclusion
Stopping music loops on FL Studio is easy once you know the proper techniques. You can use the spacebar shortcut key for quick stops or click the stop button in the transport panel for more control. Keep practicing, and soon you will master FL Studio’s features and produce high-quality music effortlessly.
Stop Music Patterns On Fl Studio
To stop the music playing on FL Studio, simply press the “Stop” button on the transport panel or use the shortcut key “Spacebar”. It’s important to stop the music before making any changes or adjustments to your project.
If you have been working with FL Studio, you know how important it is to stop music patterns. Whether you want to start a new project or make some changes to an existing one, you need to know how to stop the music playing in the background.
Using The Spacebar Shortcut Key
One of the easiest ways to stop music on FL Studio is to use the spacebar shortcut key. This key is used to play and stop music, so it’s a great tool to have in your arsenal. To stop the music, all you have to do is press the spacebar. It’s that simple!
Click Stop In The Transport Panel
Another way to stop music on FL Studio is to click on the Stop button located in the Transport Panel. The Transport Panel is located at the top of the FL Studio interface and contains various buttons that help you control the music. To stop the music, simply click on the Stop button, and the music will stop playing.
Conclusion
Stopping music patterns on FL Studio is an essential skill that every producer needs to know. Whether you are a beginner or an experienced producer, it’s important to be able to stop the music when you need to. Using the spacebar shortcut key or clicking on the Stop button in the Transport Panel are the two easiest ways to stop the music on FL Studio. So, next time you find yourself in a situation where you need to stop the music, try one of these two methods and being a pro.
Stop Music Clips On Fl Studio
Stopping music on FL Studio is a simple process, just click the stop button located on the transport control panel or use the shortcut key “Space” on the keyboard. This will halt all playback and stop any music clips that are currently running.
As a music producer, stopping a clip or a track on FL Studio is an essential task. You don’t want to ruin the flow by fumbling around with the software. Luckily, there are a few ways to stop music clips on FL Studio, and we’re going to cover them in this post.
Using The Spacebar Shortcut Key
One of the most common and convenient ways to stop a music clip on FL Studio is by using the spacebar shortcut key. This method works seamlessly, and it just requires a single tap on the keyboard. Here’s how to do it:
Select the clip you want to stop by clicking on it.
Press the spacebar key on your keyboard to stop the clip.
If you want to resume the clip, simply press the spacebar key again.
This method is ideal if you’re working with a laptop and have limited space.
Click Stop In The Transport Panel
Another way to stop a music clip on FL Studio is by using the stop button in the transport panel. This is a traditional method, and it works just as well. Here’s how to do it:
Look for the transport panel at the top of the screen.
Click the stop button (a square icon) to stop the clip.
If you want to resume the clip, click the play button (a right-facing triangle icon).
The transport panel is useful because it has other helpful buttons for controlling the clip, such as record, rewind, and fast-forward. In conclusion, stopping music clips on FL Studio is a straightforward process, and you can do it in seconds using either the spacebar shortcut key or the stop button in the transport panel. Try both methods and see which one works best for your workflow.
Credit: www.youtube.com
Frequently Asked Questions Of How To Stop Music On Fl Studio
How Do I Stop All Audio In Fl Studio?
To stop all audio in FL Studio, simply press the spacebar on your keyboard or click the stop button in the transport panel. This will halt all audio playback in the program.
What Is The Pause Key In Fl Studio?
The pause key in FL Studio is simply the space bar on your keyboard. Pressing this key will temporarily stop playback of your project, allowing you to make adjustments or take a break.
How Do I Stop Clicking In Fl Studio?
To stop clicking in FL Studio, adjust the buffer size in your audio settings. Increase the buffer size to reduce the load on your computer’s processor, which can minimize clicks and pops in your audio playback. Additionally, make sure that all of your drivers and software are up to date and that you’re not overloading your processor with too many plugins or tracks.
How Do I Mute And Unmute In Fl Studio?
To mute an audio track in FL Studio, click on the “mute” button on the Mixer panel for that track. To unmute the track, click on the “mute” button again. You can also use the shortcut key “M” to mute and unmute the selected track.
Conclusion
To sum up, stopping music on FL Studio may seem like a simple task, but it’s important to do it right to avoid any issues. Whether you prefer using keyboard shortcuts or the transport toolbar, it’s crucial to know the right steps.
By taking the time to understand how to stop music in FL Studio, you can avoid unwanted sounds and ensure a smooth workflow. So, go ahead and hit that stop button with confidence, and create your masterpiece hassle-free!