Categories
Archive

Ableton Drum Programming Tutorial

This Ableton Drum Programming Tutorial provides step-by-step instructions to program and customize drum sounds using Ableton Live software. From selecting drum samples to utilizing different MIDI techniques, this tutorial covers everything necessary to create unique and professional-sounding drum tracks.

Additionally, readers will learn how to create custom drum racks, arrange drum loops, and add effects to enhance their drum programming skills. By following the guidelines outlined in this tutorial, readers will be able to create endless possibilities for drum programming using Ableton Live.

Whether you are a beginner or an experienced producer, this tutorial is a valuable resource to elevate your drum programming skills.
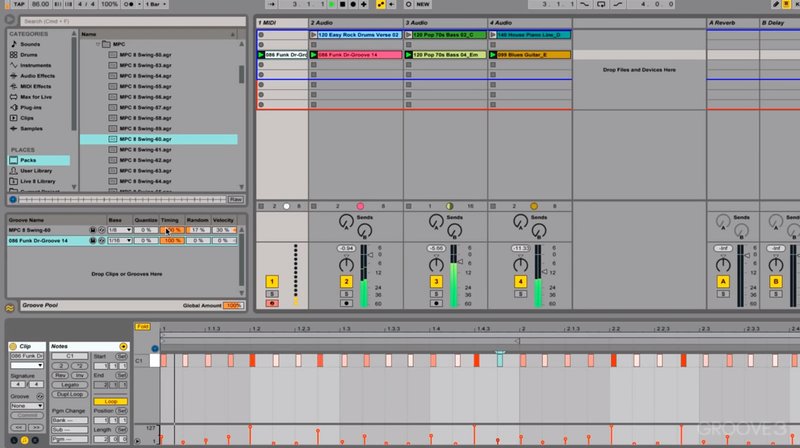
Ableton Drum Programming Tutorial

Credit: www.ableton.com

Drum Programming Fundamentals

Learn the fundamentals of drum programming with Ableton in this easy-to-follow tutorial. Discover how to create dynamic and engaging drum tracks for electronic and pop music using various techniques, including the step sequencer and MIDI programming.

Understanding Drum Rhythms

Drum programming is a crucial aspect of music production. It’s because the drums are essentially the backbone of any genre of music, from rock to techno. In this Ableton drum programming tutorial, we’ll explore the basics of drum programming, starting with understanding drum rhythms. You’ll learn about the different drum sounds and how to merge them to produce a great beat. With determination and attention to detail, you can craft unique drum rhythms that’ll match the theme of your music.

Introduction To Drum Sampling

When it comes to drum programming, drum sampling is an essential technique that you should know. It involves selecting individual drum sounds from various sources, such as pre-recorded samples or recorded drums, and amalgamating them to produce a unique sound. In this Ableton drum programming tutorial, we’ll explore the fundamentals of drum sampling. You’ll learn how to select and organize drum samples, manipulate them, and integrate them into your beat.

Conclusion

By understanding drum rhythms and drum sampling, you’ll have all the tools you need to create professional-sounding drums that give your music the punch it needs. With Ableton, you have a suite of tools that can help you achieve the sound you want, and by practicing regularly, you can become a master at drum programming.

Ableton Drum Programming Tutorial

Credit: m.youtube.com

Drum Programming Techniques

Discover new drum programming techniques with this easy-to-follow Ableton Drum Programming Tutorial. Elevate your production game with tips on creating dynamic drum patterns and using various effects to enhance your beats.

Drum programming is a crucial aspect of creating music in Ableton. As a beginner, it could be quite overwhelming to learn how to program drums. However, once you get the hang of it, it becomes quite easy and even enjoyable. In this article, we will explore some of the essential drum programming techniques in Ableton, including creating drum loops, layering drums, and swing and groove.

Creating Drum Loops

Creating drum loops is an essential technique that every Ableton user must master. A good drum loop can provide a solid foundation for your music and elevate it to a whole new level. Here are some tips on creating drum loops in Ableton:

  • Start by choosing your drum samples carefully. Select samples that complement each other and fit your genre.
  • Set the tempo of your project and start building your drum pattern.
  • Use the MIDI editor or the push controller to create your drum pattern. Try to keep it simple and add complexity as you progress.
  • Experiment with different patterns until you find one that fits your music.
  • Finally, add some compression and EQ to your drum loop to give it some character and punch.

Layering Drums

Layering drums is another drum programming technique that can add depth and complexity to your drum loop. Here are some tips on layering drums in Ableton:

  • Choose drum samples that complement each other and have different tonal textures,
  • Layer your drums by duplicating the MIDI clip and using different drum samples or processing on each one.
  • Experiment with layering different parts of the drum, such as the kick and snare, to create a unique sound.
  • Use EQ and compression to make sure each layer fits well in the mix and add effects such as reverb to give your drums depth and character.

Swing And Groove

Adding swing and groove can give your drum patterns a human-like feel and make them sound less robotic. Here are some tips on adding swing and groove to your drum patterns:

  • Use the swing function in Ableton’s MIDI editor or set swing manually in real-time using a controller.
  • Experiment with different swing settings and see which works best for your music.
  • Add velocity changes to your drum patterns to make them sound more natural and human-like.
  • Finally, add some groove using Ableton’s groove pool or by manually adjusting the MIDI notes to give your drum patterns a unique feel.

Mastering these drum programming techniques in Ableton will help you create compelling and engaging music. By creating drum loops, layering drums and adding swing and groove, you can develop a unique sound and elevate your music to new heights.

Using Ableton To Program Drums

Learn how to program drums in Ableton with this comprehensive tutorial that covers everything you need to know. From creating beats to adding effects, this guide will help you elevate your drum programming skills and take your music to the next level.

When it comes to producing music with Ableton, it is essential to know how to program drums. Ableton is designed to make drum programming a breeze, and with a little know-how, you can create intricate and dynamic drum parts that will take your productions to the next level.

Drum Rack Basics

Before we delve into the specifics of recording and editing drum parts, it’s important to have a firm grasp of the Drum Rack. The Drum Rack is the heart of Ableton’s drum programming functionality, and it allows you to assign individual drum sounds to different MIDI notes. To create a Drum Rack, simply drag and drop the samples you want to use onto your MIDI track. Then, click the “Simpler” instrument and select the “Slice” option. This will automatically create a Drum Rack for you, with each slice assigned to a different MIDI note.

Recording And Editing Drum Parts

Once you’ve got your Drum Rack set up, it’s time to start recording and editing your drum parts. The key to creating realistic and dynamic drum parts is to make use of velocity and timing variations. To do this, you can either record your drum parts into Ableton using a MIDI controller or draw them in manually using the Piano Roll. When recording, make sure to vary the velocity of each hit to create a more natural feel. You can also add swing or shuffle to give your drums a more human touch. Once you’ve recorded your drum parts, you can start editing them using Ableton’s powerful editing tools. By adjusting the timing and velocity of individual hits, you can create complex and intricate drum parts that would be impossible to play live. In addition to editing the individual hits, you can also apply various effects to your drum parts to add character and depth. For example, you can add compression to bring out the punchiness of your kicks, or apply reverb to create a sense of space and depth. In conclusion, using Ableton to program drums is an essential skill for anyone looking to produce electronic music. By understanding the basics of the Drum Rack and making use of Ableton’s powerful editing tools, you can create intricate and dynamic drum parts that will take your productions to the next level.

Advanced Drum Programming

Learn advanced drum programming techniques with this Ableton tutorial. Enhance your skills and create dynamic beats, giving your productions a professional edge.

Looking to take your Ableton drum programming to the next level? Advanced drum programming techniques can help you add depth and complexity to your beats, making them sound more dynamic and engaging. In this tutorial, we’ll be focusing on two specific techniques: creating dynamic drum fills and programming drum breaks. Let’s dive in.

Creating Dynamic Drum Fills

Adding drum fills to your beats is a great way to keep them interesting and engaging. But if your fills sound repetitive or lacking in variation, you risk losing your listeners’ attention. The key to creating dynamic drum fills is to focus on variation in rhythm, velocity, and sound selection. Here are some tips to help you create more dynamic drum fills:

  • Vary the rhythm of your fills by using triplets, quintuplets, or other subdivisions of the beat.
  • Use velocity to create a more natural and human feel by accenting certain hits.
  • Experiment with different sound selections, such as swapping out the snare drum for a clap or adding in a percussion hit.

Programming Drum Breaks

Drum breaks are a staple of electronic music, providing a break from the repetitive beat and adding a sense of excitement to the track. But programming effective drum breaks can be a challenge. To create an impactful drum break, you’ll need to focus on variation in rhythm, sound selection, and arrangement. Here are some tips to help you program more effective drum breaks:

  • Vary the rhythm of your break by using syncopation or changing the tempo.
  • Use sound selection to create contrast within the break, such as adding a distorted 808 kick or a heavily filtered hi-hat.
  • Arrange your break for maximum impact, such as using a buildup or drop to create tension and release.

With these advanced drum programming techniques, you’ll be able to take your beats to the next level and keep your listeners engaged from start to finish. Try experimenting with these techniques in your own productions to see what works best for you. Happy drum programming!

Creative Sound Design

If you want to create music that really stands out, mastering sound design is key. When you’re programming drums in Ableton, there are plenty of tips and tricks that you can use to create a unique drum sound that sets your music apart. In this tutorial, we’re going to focus on one of the most important aspects of creating a distinct drum sound: creative sound design.

Processing Drum Samples

The first step to creating a unique drum sound is to choose the right samples. Ableton has a huge library of samples to choose from, but you may want to start with your own sample collection or a third-party sample library for added variety. Once you have your samples, you can start processing them in Ableton to create something truly unique. Try adjusting the pitch, decay, or adding distortion to give your drum sounds a completely new character. You can also layer samples to create more complex and interesting sounds.

Using Effects To Shape Drum Sounds

In Ableton, there are countless effects that you can use to shape your drum sounds. From EQs to compressors, delays, and reverbs, each effect can adjust the character of the sound in its own way. Try experimenting with different effects to find the perfect combination to enhance your drum sounds. Automated effects can create rhythmic and otherworldly sound patterns.

In conclusion, creative sound design is one of the most powerful tools available for any producer looking to create a truly unique drum sound. By processing your samples and using effects, you can customize your drum sound to fit perfectly with your music.
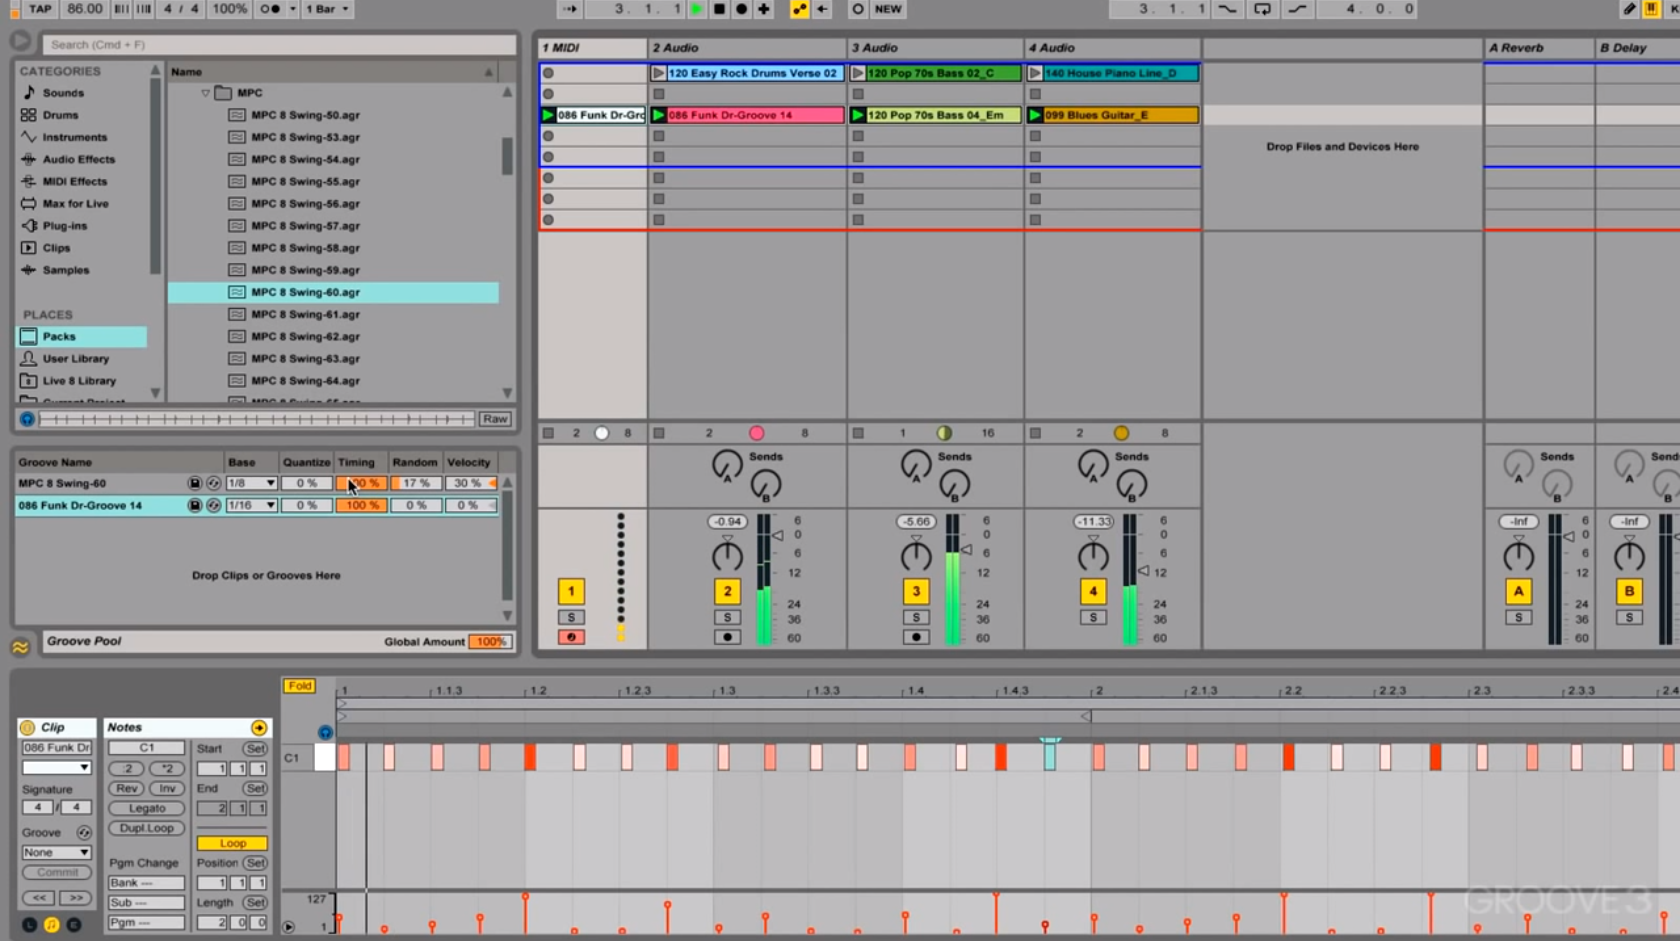
Ableton Drum Programming Tutorial

Credit: www.ableton.com

Arranging Your Drum Parts

Are you struggling to make your drum patterns sound appealing? Don’t worry; we have got your back. Arranging your drum parts is the most crucial step in the drum programming process. It can make or break your entire track. In this Ableton Drum Programming Tutorial, we will guide you on how to structure your song and create tension using drums.

Structuring Your Song

The arrangement of your song plays a vital role in holding your listener’s attention. It should not be too repetitive, but it should also not be too complex. Hence, you must divide your song into different sections, including an intro, verse, chorus, bridge, breakdown, and outro.

In the intro section, you can begin with a simple drum pattern that slowly builds up to a new section. In the verse section, you can repeat the drum pattern with slight variations to add more interest to your track. In the chorus section, you can introduce a different drum pattern that complements the melody and adds energy to the track. The bridge section can be used to break the monotony of the song by introducing a new melodic element with a different drum pattern. The breakdown section can be used to create tension by decreasing the drum pattern complexity gradually. Finally, the outro section can be used to end the track with a simple drum pattern that slowly fades away.

Building Tension With Drums

Drums can be an excellent tool to build tension in a song. One way to do this is to use a drum fill before transitioning to a new section. A drum fill is a rhythmic pattern that uses different drum sounds to signify a change in the track.

You can also create tension by gradually increasing the complexity of the drum pattern in a section. For example, you can start a section with a simple kick and snare pattern and gradually add hi-hats, cymbals, and toms to create a more intricate drum pattern that adds energy to the track.

In conclusion, arranging your drum parts is an essential step in the drum programming process. The structure of your song and the tension you create using drums can make or break your entire track. By following the tips in this Ableton Drum Programming Tutorial, you can create appealing drum patterns that elevate your music to the next level.

Frequently Asked Questions On Ableton Drum Programming Tutorial

Can You Program Drums In Ableton?

Yes, you can program drums in Ableton. Ableton has powerful drum programming capabilities with its Drum Rack and Simpler devices. These devices allow you to create your own drum sounds or use pre-made samples to create drum beats. With Ableton Live’s intuitive interface, you can easily program drums using various techniques such as step sequencing or recording MIDI notes.

How Do You Program Drum Fills In Ableton?

To program drum fills in Ableton, go to the Clip View Editor and select the last quarter note of the bar where you want the fill. Choose a high-pitched sound and program it in the grid editor. Adjust the velocity and timing to create a smooth transition into the fill.

Repeat as necessary for different fills.

How Do I Start Programming Drums?

To start programming drums, choose a drum machine or software. Read its manual, watch tutorials, and learn the basics of rhythm. Experiment with different sounds and create your drum patterns. Practice regularly, and listen to different drummers for inspiration.

How Do You Make Real Sounding Drums In Ableton?

Create realistic drum sounds in Ableton by blending drum samples, use velocity to create a natural feel, utilize the drum rack to assign different samples to different pads, customize drum macros to adjust effects and parameters, and fine-tune your drumming with the groove pool.

Conclusion

Creating unique beats and rhythms with Ableton drum programming can seem daunting at first, but with practice and patience, it’s a skill that any aspiring producer can master. By following these steps, you can craft dynamic and engaging rhythms that will set your tracks apart from the crowd.

Experiment with different samples, techniques, and styles to find your own voice and create music that truly speaks to you. With Ableton and a little bit of imagination, the possibilities are truly endless!

Categories
Archive

Where Do I Promote My Music

If you are asking where to promote my music, start with platforms like Spotify, SoundCloud, and YouTube. These platforms have large audiences and can help you reach new fans.

As a musician, gaining exposure and reaching a larger audience is vital to your success. Luckily, there are many avenues available for promoting your music online. Some popular platforms to promote your music include Spotify, SoundCloud, and YouTube. Spotify allows you to create playlists and promote your music through them. Meanwhile, SoundCloud lets you upload your music and interact with other musicians and fans.

Related reading: How to promote your music and Where should i promote my music. For background, see Music promotion.

On YouTube, you can create a channel to showcase your music videos and gain more subscribers. By utilizing these platforms and engaging with your audience, you can successfully promote your music and grow your fanbase.

Where Do I Promote My Music

Credit: m.youtube.com

Social Media Platforms

Social media platforms have played a significant role in promoting and marketing music. For musicians looking to expand their fan base, social media is an essential tool that can get you the exposure you need to get your music heard. However, not every social media platform is suitable for promoting music. In this post, we will discuss the social media platforms that are effective for promoting music.

Facebook

Facebook is one of the most popular social media platforms available and can be used to promote your music. With over 2.7 billion monthly active users, Facebook is an excellent resource for reaching a large audience. You can reach out to your audience by creating a fan page, where you can share your music and interact with your fans.

Instagram

Instagram is one of the fastest-growing social media platforms and is an excellent tool for promoting your music. It has over one billion active users, and it allows you to share images, videos, and reels. You can use Instagram to create a buzz around your music by uploading teasers, behind-the-scenes footage and exclusive content. Hashtags are an effective way to reach new listeners on Instagram. Use relevant hashtags that relate to your genre, and the type of music you produce.

Twitter

Twitter is another social media platform that is effective for promoting your music. With over 300 million active users, Twitter is a great way to engage with your fans and keep them up to date with your music. You can use Twitter to share your latest releases, tour dates and interact with your followers. Make sure you use relevant hashtags to increase your visibility on the platform.

Music Streaming Platforms

Music streaming platforms like Spotify, Apple Music, and Tidal are great places to promote your music and be discovered by new listeners. With over 155 million combined subscribers, these platforms allow artists to reach a global audience and gain exposure to potential fans.

The music industry has evolved rapidly, and the internet has facilitated independent artists to reach their audience with ease. Music streaming platforms are one of the essential tools, and artists worldwide use them. Streaming applications have transformed the way people listen to music, and for musicians, music streaming platforms allow them to reach a broader audience. Below are some examples of music streaming platforms that you can use to promote your music.

Spotify

Spotify is one of the most popular music streaming platforms globally, with over 155 million active users. The platform pays musicians for their streams, and the better your music performs, the higher your earnings. Spotify playlists play a significant role in increasing your plays, and getting your music on them can significantly increase your reach. You can also utilize the platform’s Spotify for Artists feature to keep track of your streams, insights, and demographics.

Apple Music

Launched in 2015, Apple Music has over 60 million subscribers, making it one of the largest music streaming platforms. Apple Music has an editorial team that curates playlists. This makes it easier for indie artists to get their music in front of a large audience. Apple Music also has a feature called “Connect,” which allows artists to update their fans with photos, videos, and other content.

Soundcloud

SoundCloud has been one of the go-to platforms for upcoming artists who want to upload their music. While SoundCloud has millions of users, it’s not as popular as Spotify or Apple Music. However, it offers unique features like reposting a track. This creates a viral effect and helps the music reach a broader audience. SoundCloud also offers a social aspect, where artists can exchange comments and feedback on tracks. In conclusion, music streaming platforms offer independent musicians an opportunity to reach a global audience. By using these platforms, you can build a fan base and create a strong online presence. Remember to keep your content on each platform fresh and exciting, and make use of the platform’s features to create a strong digital footprint.

Youtube

YouTube is an ideal platform to promote your music. With over 2 billion active users worldwide, its vast audience increases your chances of getting discovered. Its recommendation algorithm is designed to get your music in front of the right listeners. You don’t need a huge budget to get started.

If you’re looking to promote your music, one platform that you cannot ignore is YouTube. With over 2 billion active users, this video-sharing platform is a powerful tool for connecting with fans, sharing your music, and building a following. Here’s how you can use YouTube to promote your music:

Create A Channel

The first step is to create a YouTube channel dedicated to your music. Your channel should have a unique name that represents your brand, such as your artist name. You can customize your channel by adding a banner image, profile picture, and social media links. Make sure to include a clear description of your music and what viewers can expect from your channel.

Upload Music Videos

The next step is to upload your music videos to your YouTube channel. Your videos should be high-quality and visually appealing to captivate your audience. You can create lyric videos, music videos, or even behind-the-scenes footage. Make sure to include a clear title and description for each video, including relevant keywords that will help your videos rank higher in search results.

Engage With Audience

YouTube is not just a platform for sharing videos; it’s also a community where you can engage with your fans. Respond to comments, thank fans for their support, and consider creating personalized content for your subscribers. You can even go live from time to time to interact with your fans in real-time. Overall, YouTube is an excellent platform for promoting your music and building a fanbase. By creating a channel, uploading high-quality videos, and engaging with your audience, you can take your music career to the next level.

Where Do I Promote My Music

Credit: www.quora.com

Live Performances

Promoting live performances can be challenging, but there are several platforms available for musicians to showcase their talents. From social media to local events, there are various opportunities to promote your music and gain exposure to different audiences.

Live performances are a great opportunity to showcase your music and connect with new fans. Whether you are a solo artist or a band, local gigs, open mic nights, and festivals are some of the best places to perform live and get your music out there. Let’s take a closer look at each of these opportunities.

Local Gigs

Playing at local gigs is a great way to gain exposure and build a fan base in your community. Research local venues such as bars, clubs, and restaurants that feature live music, and reach out to their event coordinators to inquire about booking a gig. Better yet, attend other shows at these venues to get a feel for the scene and connect with other local musicians and fans. Remember to promote your upcoming gig on your website and social media accounts to attract a larger audience.

Open Mic Nights

Open mic nights are a popular way for musicians to test their material and expand their fan base. These events are often held at coffee shops, bookstores, and small clubs, and typically feature a sign-up sheet for performers. While the audience may be small, open mic nights offer a relaxed and supportive atmosphere for performers to hone their skills and connect with other musicians.

Festivals

Music festivals are a great way to gain exposure to new audiences and connect with other musicians in your genre. Research local and regional festivals that fit your style of music and take the time to apply to perform. Keep in mind that many festivals require applications well in advance, so plan accordingly. Whichever festivals you choose, be sure to promote your performance on social media and via email to your fans and followers.

In Conclusion

In conclusion, live performances are a key element of promoting your music and building a fan base. Whether you are playing local gigs, open mic nights, or festivals, it’s essential to showcase your skills and connect with other musicians and fans. Remember to promote your performances, connect with your audience, and have fun while building your music career.

Collaborations

Partnering up and collaborating with other artists and music industry figures is a great way to promote your music. Seek out opportunities to work with others on remixes, collaborations and features, and use social media and networking events to introduce yourself and your music to a wider audience.

Collaborating with other artists is an effective way to grow your music career. It helps you to reach a wider audience and build new fans who may not have discovered your music otherwise. Here are some effective collaboration tactics that you can use to promote your music.

Featured Artists

One of the best ways to promote your music is by collaborating with featured artists. This gives you an opportunity to get your music in front of your collaborator’s audience. Working with an established artist provides you with a fresh audience that can help you build your fan base. When collaborating with featured artists, you can use their networks and followers to grow your own following.

Playlist Share

Playlist sharing is another effective way to get your music heard. Sharing your playlist with other artists and their followers provides an opportunity for your music to be heard by a new audience. Moreover, you can collaborate with other artists to create a combined playlist that suits the taste of both your audiences. This can lead to a mutual exchange of followers and greater exposure for both of you.

Social Media Collabs

Collaborating with other artists on social media is instrumental in growing your music. You can use collaboration tags and hashtags while sharing your content on social media with other artists. Additionally, you can participate in social media challenges related to music and collaborate with other artists to create challenges for mutual exposure. In conclusion, collaborations are a great way of getting your music heard and growing your fan base. So, you shouldn’t hesitate to collaborate with other artists to get your music out there. Use featured artists to get your music to their fans, collaborate on playlist sharing to reach new audiences, and participate in social media challenges to increase your exposure to new fans!

Music Blogs

Music blogs are a great platform to promote your music as they attract music enthusiasts from around the world. By finding the right music blogs that match your genre, you can get your music heard by the right audience and gain exposure that can help you in your career.

Music blogs are a great tool to get your music in front of new and engaged audiences. Blogs typically cater to specific niches of music. This helps you find fans who are interested in the same types of music. The following sections highlight how to make the most of music blogs.

Submit Your Music

Submitting your music to music blogs can be a great way to get your music in front of a large audience quickly. Many blogs have a submission process in place that allows you to easily send your music in for review. However, keep in mind that blogs receive many submissions every day, so make sure your music is top-quality and stands out. Some blogs may require a fee to submit your music, while others allow submissions for free. Whatever the case, it’s important to follow the submission guidelines carefully to increase your chances of being accepted.

Interactive Blogging

Networking is key in the music industry, and music blogs provide a great opportunity to interact with bloggers, other musicians, and fans. Many blogs have comment sections that allow readers to share their thoughts and opinions on the article or the music featured in it. Actively engaging with readers can help build a following and increase exposure for your music. Additionally, some bloggers may be open to collaborating with you on projects like interviews and features. Take advantage of these opportunities to showcase your music and expand your reach.

Reader Engagements

Music blogs give you the chance to learn about your audience and connect with them on a more personal level. Regularly checking the comment section and responding to feedback can help you understand what your fans are looking for and what resonates with them. Consider conducting polls or surveys on the blog to gather feedback directly from readers. This will help you tailor your music and promotional strategy to better meet your audience’s needs. In conclusion, music blogs are a valuable resource for promoting your music and connecting with a relevant audience. Submit your music, engage with bloggers and readers, and learn from the feedback you receive. With the right approach, music blogs can be a valuable tool for building a successful music career.

Online Radio Stations

One effective way to promote your music online is through online radio stations. With thousands of stations available, you can target the right audience and gain exposure for your music. Look for stations that align with your genre and submit your songs for consideration to get played on-air.

As an aspiring musician, promoting your music on various platforms is essential for gaining visibility and attracting a fan base. One of the most effective platforms for promoting music is online radio stations. With the ever-increasing popularity of online streaming, online radio stations have become an excellent medium for musicians to showcase their talent and reach a broader audience.

Promote Through Online Radio

Online Radio can be an ideal platform for promoting your music. Many popular online radio stations allow independent artists to submit their music for airplay. You can either mail your tracks to program directors or submit them through online portals. One of the best things about online radio stations is that they cater to specific genres of music. So, if your music is within a specific category, you can find an online radio station that fits perfectly. This way, your music will reach the specific audience who like your music style, increasing your chances of gaining dedicated followers.

Create A Local Fan Base

Start by promoting your music on local online radio stations, as they often have a loyal local following. Engage with your audience and invite them to your live shows. Utilize the station’s social media handles to engage with potential fans, share teasers of your performances and collaborate with them to create exclusive content. Building a local fanbase is essential as it helps create a buzz around your music and increases your visibility in your local scene. You can then leverage this buzz to grow your following in other parts of the world.

Live Performances Through Radio

Another way to promote your music through online radio stations is by performing live on air. Radio stations often host live music sessions. This are an excellent opportunity for you to showcase your music to a broader audience. This way, you can interact with the audience and create a fanbase without performing in-person, perfect for the current pandemic situation! In conclusion, online radio stations are an excellent platform to promote your music. By utilizing them correctly, you can gain exposure to a wider audience, build a local fan base and even perform live shows, all of which can help elevate your music career. Reach out to online radio stations that cater to your genre and submit your music or request live sessions. Don’t forget to engage with your audience and build a strong online presence.

Where Do I Promote My Music

Credit: m.youtube.com

Music Licensing

Promoting your music can be overwhelming, but music licensing can help. By contacting music supervisors and sync licensing companies, you can get your music placed on popular TV shows, films, and commercials– ultimately promoting your art while earning money at the same time.

If you are a musician or a band, you know how hard it can be to get your music heard by the right people. One of the best ways to get your music in front of a large audience is through music licensing. Licensing your music means that you allow someone to use your music in their production in exchange for payment. This can include TV shows, movies, commercials, and more. In this section, we will discuss how to submit your music to music libraries, audio libraries for film/TV, and music for advertisements.

Submit Music To Music Libraries

One way to license your music is by submitting it to music libraries. Music libraries are a great resource for music supervisors, production companies, and directors looking for music to use in their productions. Music libraries will often take a cut of your licensing fee. But they can help get your music in front of the right people. To submit your music to a music library, you can either send them a CD or upload your music to their website.

Audio Libraries For Film/tv

Another way to license your music is through audio libraries for film/TV. These libraries specialize in providing music for TV shows and movies. They work with music supervisors to create the perfect soundtrack for their productions. To submit your music to an audio library, you will need to create a profile on their website and upload your music. Make sure to include all the necessary information, including the genre, tempo, and mood of your music.

Music For Advertisements

Finally, you can license your music for use in advertisements. This can be a lucrative way to get your music heard by a large audience. Advertisers are always looking for music that will grab people’s attention and help sell their products. To get your music licensed for advertisements, you will need to work with a music licensing agency. They will help you find the right opportunities and negotiate the best deal for you. In conclusion, music licensing is a great way to get your music in front of a wider audience. Whether you choose to submit your music to a music library, an audio library for film/TV, or for use in advertisements, make sure to include all the necessary information and work with a reputable agency. With a bit of effort and some luck, you could see your music on the big screen or hear it on TV or radio!

Frequently Asked Questions On Where Do I Promote My Music

Where Is The Best Place To Promote My Music?

The best place to promote your music depends on your target audience. Social media platforms like Instagram, TikTok and Twitter are popular for reaching a young audience. Meanwhile, Spotify and SoundCloud are popular for streaming. You should research your target audience and see where they are most active to promote your music effectively.

How Can I Promote My Own Music?

Promote your music by creating an online presence. Utilize social media platforms like YouTube, Soundcloud, Instagram, and Facebook. Collaborate with other artists and reach out to music bloggers for coverage. Plan out your marketing strategy and engage with your audience.

Look for gigs, play live shows, and attend events to network.

How Do I Get My Music Noticed?

To get your music noticed, you need to focus on creating high-quality content and promoting it through various channels, such as social media and music streaming platforms. Build your online presence through a website and email list, and collaborate with other artists and music industry professionals.

Don’t forget to engage with your audience and consistently produce new music.

Can I Promote My Music For Free?

Yes, you can promote your music for free by leveraging social media platforms, posting on music forums. This creates a website or email list, collaborating with other artists, and submitting your music to local radio stations and blogs.

Conclusion

In a nutshell, promoting your music requires a multifaceted approach. Utilize social media platforms and engage with your audience to increase your reach and build a loyal fanbase. Collaborate with other artists and leverage live performances to create buzz. Don’t forget to utilize online music promotion services and connect with music bloggers and influencers.

With perseverance and a strategic approach, you can successfully promote your music and take your career to the next level. So start promoting today!

Categories
Archive

What to Do When a Piano Key Sticks

When a piano key sticks, clean under it with a soft cloth and use a key leveler to adjust its position if needed. A sticking key can cause frustration during piano practice or performance, but luckily, fixing it can be a simple process.

Also, a piano key can stick for many reasons, including debris or dirt buildup, a misaligned key, or issues with the key’s mechanism. Ignoring a sticking key can cause damage to the instrument and impair the quality of sound produced. Therefore, it is important to identify the cause and take necessary steps to fix the problem.

Related reading: Keys On The Piano and All Notes On The Piano : Mastering Every Key. For background, see the Wikipedia article on Piano.

Moreover, this article will discuss common reasons why a piano key sticks and guidelines for simple fixes. Whether you’re a beginner or an experienced pianist, these tips can help keep your piano in top shape.

What to Do When a Piano Key Sticks

Credit: m.youtube.com

How To Tell When A Piano Key Sticks

In addition, one common issue with pianos is a sticking key, which can be caused by a variety of factors including dirt or moisture buildup. To fix this problem, identify the sticking key and try cleaning it with a cloth or lubricating the key with a specialized product designed for pianos.

Why A Piano Key Sticks: Common Causes

Furthermore, some common reasons why piano keys may stick are:

  • Additionally, dirt and debris accumulated in the piano action
  • Also, changes in the humidity levels that cause wood to expand or contract
  • Worn out or damaged piano parts such as the hammer, shank, or whippen

How To Test For A Sticking Key

When testing for a sticking piano key, follow these steps:

  1. Press the key down gently to feel if there is any resistance or if it feels heavier than usual. Moreover, this can indicate a sticking key.
  2. Listen for any strange sounds such as buzzing or rattling, as they can indicate that there is something wrong with the key.
  3. In addition, observe the key as it is lifted up to see if it moves smoothly or if it gets stuck at any point.

If you notice any of these signs, it is important to address the issue before it causes further damage to your instrument. Furthermore, cleaning the action, regulating the action, or replacing faulty parts can be done by a professional piano technician. In conclusion, identifying a sticking piano key can be done by understanding the common causes and following simple steps to test for it. Make sure to address any issues with a professional to ensure your piano remains in top condition.

What to Do When a Piano Key Sticks

Credit: www.thepiano.sg

How To Prevent A Piano Key That Sticks

Preventing piano keys from sticking is a common challenge that every piano player faces. Sticking keys can be frustrating and can potentially ruin a performance. So, it’s important to take measures that can limit sticking keys. Let’s discuss some essential tips that can help in preventing piano keys from sticking.

Piano Maintenance Tips

Piano maintenance is key in preventing keys from sticking. Regular maintenance can improve the overall performance of the piano and also prevent sticking keys.

Here are some practical piano maintenance tips:

  • Clean your piano keys with a soft cloth regularly
  • Use a humidifier to maintain the right level of humidity in your piano room
  • Tune your piano regularly
  • Keep your piano away from direct sunlight or heat

Proper Playing Technique

Proper playing technique is critical in preventing sticking keys. Applying too much force on the keys can cause them to stick. The appropriate technique ensures the correct strike, causing the key to return promptly to its original position.

Here are some proper playing techniques:

  • Relax your shoulders and arms while playing
  • Strike keys using your fingers instead of your arms or wrists
  • Maintain a consistent playing pressure

Conclusion

Preventing piano keys from sticking can make a tremendous difference to your playing experience. By taking proper care of your piano and playing with the correct technique, you’ll be able to avoid sticky keys challenges. Implement these simple tips, and you’ll be able to focus on making beautiful music.

DIY Fixes When A Piano Key Sticks

When piano keys stick, it can be frustrating. There are some DIY fixes you can try, such as cleaning the key with a damp cloth or using a pencil eraser to remove dirt buildup. If these methods don’t work, it may be time to call a professional piano technician.

Having a piano key that sticks can be frustrating for musicians. Often, a piano key sticks due to a buildup of dirt, dust, or debris that becomes trapped between the keys and the action parts, hindering its movement. Fortunately, there are simple DIY fixes that can help resolve this issue. In this article, we’ll discuss three easy-to-follow methods: using piano lubricants, adjusting piano action parts, and fixing broken keys.

Using Piano Lubricants

Lubricants can help reduce friction between the piano keys and action parts, which moves more smoothly with adequate lubrication. To use this method, you’ll need to follow these simple steps:

  1. Clean the area around the sticking key with a soft, dry cloth.
  2. Apply a small amount of a dry lubricant, like graphite powder, to the affected key.
  3. Press the key up and down to distribute the lubricant.

Adjusting Piano Action Parts

If your piano still has sticky keys after lubrication, then you may need to make some adjustments to the action parts. This process is more involved but can be done by following these steps:

Step 1Remove the piano’s front bottom board to access the action mechanism.
Step 2Find the action assembly that corresponds to the stuck key.
Step 3Loosen the screws holding the rail and the flange, gently set the key straight and then tighten them up until the key works smoothly.

Fixing Broken Keys

If neither lubrication nor adjustment fixes the sticky key, it may be necessary to replace the key or repair the damaged parts. Here’s how you can repair broken keys easily:

  1. Remove the key cap and the key slip.
  2. Examine the key: if it’s just dirty, clean it with a cloth. If it’s broken, glue or replace the affected parts.
  3. Replace the key slip and the key cap.

In conclusion, a sticky key can be a frustrating problem for piano players but, with the help of the discussed DIY fixes, it can be resolved. Using these methods can return your piano to its proper functioning and save you money on repair costs.

Call A Pro When A Piano Key Sticks Repeatedly

Playing the piano is an enjoyable experience. However, when your piano key sticks, it can be frustrating. A stuck key can make playing the piano impossible and even discourage you from practicing. While fixing a stuck piano key can be a simple task, there are instances when it’s best to seek professional help to avoid causing further damage to your beloved instrument.

Signs Of Serious Piano Damage

While a few stuck keys may not be a significant issue, some symptoms may indicate severe damage to your piano. Here are a few signs to look out for:

Signs of Damage:Action Required:
Multiple sticky keysSeek professional help to avoid further damage
Keys are sluggish or unresponsiveConsult a qualified piano technician for diagnosis
Keys are uneven when pressedSeek immediate professional help to avoid causing further damage

Finding A Qualified Piano Technician

When you notice severe damage to your piano, it’s best to hire a qualified piano technician. Here’s how to find one:

  1. Get a referral from a music teacher or a professional musician in your area
  2. Search for qualified piano technicians online
  3. Check reviews and ratings before making contact
  4. Ask for credentials and certifications before hiring
  5. Compare costs and services before hiring

Remember, fixing a stuck key requires some level of experience and expertise. Don’t hesitate to seek professional help when you notice severe damage to your piano to avoid causing further damage.

What to Do When a Piano Key Sticks

Credit: www.youtube.com

Frequently Asked Questions On What To Do When A Piano Key Sticks

Can A Piano Key That Sticks Be Fixed?

Yes, a piano technician can fix a piano key that sticks. The cause of the sticking key should be diagnosed and repaired, which can range from something as simple as a foreign object lodged in the key to a more complex mechanical issue.

It is important to address sticking keys promptly to prevent further damage to the piano.

How Do You Fix A Sticking Key?

To fix a sticking key, you can try removing the keycap and cleaning underneath it. Use compressed air or a soft brush to remove any debris or dirt. If the problem persists, the keyboard may need to be professionally cleaned or repaired.

How Much Does It Cost To Fix A Sticky Piano Key?

The cost to fix a sticky piano key usually ranges from $100-$300, depending on the severity of the issue and the experience of the technician. It is recommended to have a professional assess and repair the key to ensure proper functioning of the piano.

How Do You Remove Stickiness From Piano Keys?

To remove stickiness from piano keys, gently rub a soft cloth dampened with a solution of one part vinegar to two parts water over the keys. Wipe the keys dry with a separate dry cloth, and repeat the process as needed.

Avoid using any harsh cleaners or excessive moisture, which can damage the keys.

Conclusion

After reading this guide, you now know what to do when a piano key sticks. Remember to always check the key, the hammer, and the balance rail pins as they are the most common culprits. If the issue persists, it’s best to seek professional help as soon as possible to avoid further damage to the instrument.

Don’t let a stuck key ruin your piano playing experience. With the right approach and maintenance, you can keep your piano in top shape for years to come.

Categories
Archive

Trinnov St2 Pro Vs Sonarworks

Trinnov St2 Pro and Sonarworks are two competing high-end room correction systems aimed at improving audio clarity and quality. Room correction systems have become a staple for audio professionals in recent years, as they help negate the unwanted impact of a recording space on audio quality.

Trinnov St2 Pro and Sonarworks are two such choices, and both offer excellent audio processing and calibration. However, they differ in their approach: the Trinnov St2 Pro is an advanced system that employs a computer algorithm to analyze the room’s sound to adjust it to the listener’s preferences.

Sonarworks, on the other hand, produces a set of equalization settings based on the listener’s input. As such, each option might appeal to different users depending on the particularities of their space and workflow. In the following sections, we will compare and contrast the features of both systems.

Trinnov St2 Pro Vs Sonarworks

Credit: m.youtube.com

Overview Of Trinnov St2 Pro

Trinnov St2 Pro and Sonarworks are popular digital room correction systems built to provide optimal acoustic treatment and calibration for professional audio production. While Sonarworks software is more affordable and popular, Trinnov St2 Pro offers advanced features and improved sound quality for high-end studios and sound engineers.

Trinnov St2 Pro is an advanced digital room correction processor that offers a range of features to improve the acoustic performance of any sound system. It is designed for home theaters, studios, and high-end audio systems, and it enables you to achieve the best possible sound quality by optimizing the frequency response and time-domain behavior of your speakers.

Features

Trinnov St2 Pro comes with a wide range of features that are designed to enhance the sound quality of your audio system. Here are some of the most notable features of Trinnov:

  • Advanced room correction: Trinnov St2 Pro utilizes advanced algorithms to correct the frequency response in your room, ensuring that the sound is as natural and accurate as possible.
  • 3D optimization: The device also offers 3D optimization, which means it can optimize the soundstage, imaging, and depth perception of your system to improve your overall listening experience.
  • Flexible inputs and outputs: Trinnov St2 Pro offers a range of inputs and outputs, including both digital and analog connections, and it supports up to 16 channels of audio.
  • Customizable settings: The device allows you to customize settings to match your room, speakers, and personal listening preferences, and it can store up to 30 presets.

Pros And Cons

Like any audio product, Trinnov St2 Pro has its advantages and disadvantages. Here are some of the pros and cons of Trinnov:

Pros

  • High-quality room correction: Trinnov St2 Pro is known for its high-quality room correction capabilities, making it ideal for those who want the best possible sound quality.
  • Flexible inputs and outputs: The device offers a range of inputs and outputs, making it easy to connect to a variety of audio sources.
  • Customizable settings: Trinnov St2 Pro allows you to customize settings to match your room, speakers, and personal listening preferences, making it a versatile choice for audiophiles.

Cons

  • High price: Trinnov St2 Pro is an expensive device, which may not be within the budget of every audiophile.
  • Complex setup: The device requires a certain level of technical expertise to set up and optimize, which may be intimidating to some users.
  • No remote control: Trinnov St2 Pro does not come with a remote control, which can be inconvenient if you want to make adjustments from across the room.

Overall, Trinnov St2 Pro is a high-end audio product that is designed to deliver the best possible sound quality for discerning audiophiles. While it may not be suitable for everyone, it is a great choice for those who want the most advanced room correction capabilities available.

Trinnov St2 Pro Vs Sonarworks

Credit: mixandmastermysong.com

Overview Of Sonarworks

Sonarworks is a software company that specializes in creating digital tools to help music producers, sound engineers, and podcasters achieve the best sound possible. One of their most popular software products is the Sonarworks Reference 4, a plugin that corrects the frequency response of your studio speakers or headphones to deliver a flat, accurate sound. The company has invested a lot of time in developing their software, and it shows in the features they offer, the good sides, and the bad sides that come with using their plugin.

The Sonarworks Reference 4 is an excellent plugin for any sound engineer who wants to optimize their studio setup. Below are some of the notable features:

  • The plugin corrects the frequency response of your studio speakers or headphones to deliver a flat sound, which makes it easier to make accurate mixing decisions.
  • The plugin comes with multiple calibration profiles for different headphones and speakers, which ensures that you can get the best possible sound quality from your equipment no matter what you’re using.
  • The software is compatible with most major DAWs and works as a plugin, which makes it easy to integrate into your workflow.
ProsCons
The software corrects the frequency response of your speakers or headphones, which can help you achieve a more accurate mix.The software can be expensive, which might be a turnoff for some users.
The software comes with multiple calibration profiles, which ensures that you can get the best possible sound quality from your equipment.The software might add an extra layer of complexity to your workflow.
The plugin is compatible with most major DAWs, which makes it easy to integrate into your workflow.The plugin might not be necessary for every user, especially those who already have a well-calibrated studio setup.

In conclusion, Sonarworks Reference 4 is a great plugin for those who want to achieve the most accurate sound possible from their studio equipment. The software has numerous features that are beneficial to any user, but it comes with some downsides that might not appeal to everyone. Regardless, it’s definitely worth checking out if you’re serious about music production or sound engineering.

Comparing Trinnov St2 Pro And Sonarworks

Both Trinnov St2 Pro and Sonarworks are popular audio correction systems that provide quality sound. In this section, we will compare the two products in terms of Audio Quality, Ease of Use, Compatibility, and Price.

Audio Quality

Trinnov St2 Pro offers better audio quality than Sonarworks. Trinnov has a larger processor and can carry out more advanced audio analysis, hence providing more detailed correction for audio imperfections. In contrast, Sonarworks deals with fewer frequency ranges, making it unable to correct subtle errors in sound.

Ease Of Use

Regarding ease of use, Sonarworks beats Trinnov St2 Pro due to its simplicity. Sonarworks offers a clear user interface with friendly instructions, making it easy to navigate, install and use. Trinnov St2 Pro, on the other hand, comes with a complex user interface, requiring technical knowledge to navigate and operate.

Compatibility

Trinnov St2 Pro is more versatile regarding compatibility with other equipment. Trinnov can support any two-channel output devices, and it is compatible with several plug-ins. Sonarworks, on the other hand, is mostly compatible with specific studio monitors and headphones, which could limit its use.

Price

Trinnov St2 Pro is more expensive than Sonarworks, making it less available to the average consumer. Trinnov is an advanced system that is mostly affordable to professional audio engineers. Sonarworks, on the contrary, offers a more affordable solution if you are looking to enhance your sound quality on a budget.

Overall, the choice between Trinnov St2 Pro and Sonarworks comes down to the user’s priorities: detailed audio correction or easy usability. If you are a professional audio engineer looking for advanced correction, Trinnov St2 Pro may be the better choice. However, if you want a user-friendly system that comes at an affordable price point, consider choosing Sonarworks.

Trinnov St2 Pro Vs Sonarworks

Credit: m.youtube.com

Frequently Asked Questions For Trinnov St2 Pro Vs Sonarworks

What Is The Latency Of Trinnov Nova?

Trinnov Nova has a low latency rate of 2. 3ms, making it a popular choice for audio processing in live events.

What Does Trinnov Do?

Trinnov produces audio and video processors that optimize the delivery of sound and image in a variety of settings. It offers professional-grade tools for recording studios, cinemas, and homes, as well as commercial and industrial spaces. Their products are known for their precision, adaptability, and ease of use.

What Is Trinnov Nova?

Trinnov Nova is a high-end digital signal processor designed for optimizing audio quality in professional sound systems. It uses advanced algorithms to analyze and correct audio signals in real-time, providing improved clarity, balance, and accuracy. It is widely used in recording studios, cinemas, and live sound applications.

What Are The Main Differences Between Trinnov St2 Pro And Sonarworks?

Trinnov ST2 Pro concentrates on room correction and optimizing acoustics, while Sonarworks focuses on frequency response flattening. ST2 Pro provides an advanced 3D microphone system and a range of input/output options, whereas Sonarworks has several features for studio mastering.

Conclusion

After comparing the Trinnov ST2 Pro and Sonarworks, we can conclude that both of these audio devices offer excellent sound calibration solutions. Although the Trinnov ST2 Pro is more expensive, it comes with a wider range of features and better sound optimization capabilities than the Sonarworks.

However, the Sonarworks is more budget-friendly and suitable for people who require basic sound optimization. Regardless of which option you choose, your ears will definitely thank you for investing in one of these top-notch audio calibration devices.

Categories
Archive

Proper Audio Recording Levels

Proper audio recording levels are crucial for achieving high-quality sound. Having optimal recording levels is vital to prevent distortion and maintain clarity.

Recording audio is an art that requires skill, precision and the right tools. The recording process begins with setting proper audio recording levels, which are the foundation of high-quality audio. The levels determine the strength of the signal that is being recorded and must be carefully monitored during the recording process.

Proper recording levels help prevent distortion, noise, and other unwanted artifacts that can compromise the overall quality of the recording. The ideal recording level varies from one recording situation to another and depends on the type of sound source, the microphone used, and the desired outcome. We will explore the importance of proper recording levels and provide tips on how to achieve the best results.

Proper Audio Recording Levels

Credit: www.lennyb.com

Understanding Decibels

Recording audio is a vital part of creating high-quality content, and setting the proper audio levels is crucial for getting the best results. To get a more detailed understanding, it’s essential to start with the basics, particularly understanding decibels. Decibels are a unit of measurement used to calculate the power, intensity or loudness of sound or audio.

What Are Decibels?

Decibels, or dB, are a logarithmic unit of measurement that express the ratio between two values. In the context of audio, dB is used to measure a sound’s intensity or volume in relation to the threshold of hearing, on a scale from zero to about 194. However, the human ear’s threshold of pain usually occurs around 120dB.

How Are Decibels Used To Measure Audio Levels?

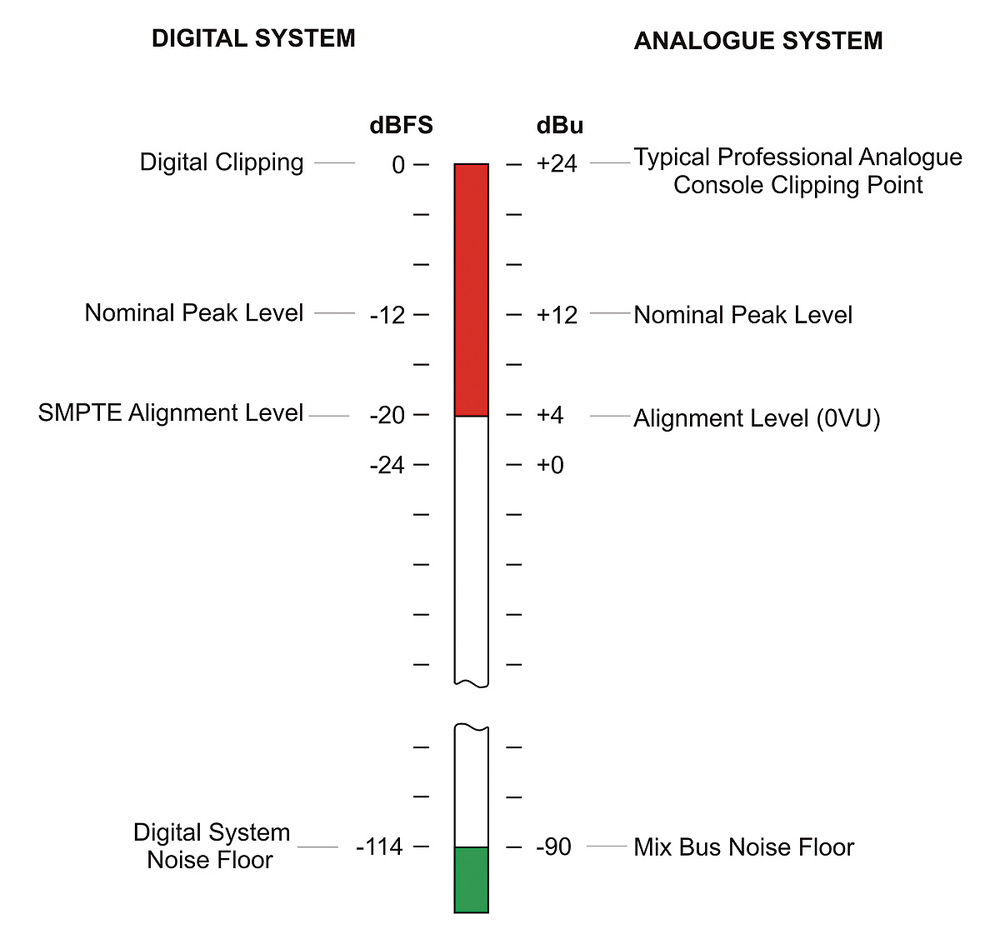
When recording audio, decibels represent the level of sound energy, and a proper reading needs to be taken while recording to obtain the ideal level. Decibel readings range from -60dB, which represents the sound of leaves rustling, to 0dB, the maximum level that audio recordings should ever reach.

Typically, recordings average between-18dBFS and -6dBFS, which means that the loudest sounds that were recorded fell somewhere between -18dB and -6dB. This range is known as the optimal range and ensures that the sound quality isn’t compromised while still preventing distortion.

When recording sound, the best option is to aim for -12dBFS, as this ensures a consistent level of sound quality throughout the recording. However, some circumstances might require a level slightly higher or lower to achieve the desired outcome. Setting the recording levels too high can lead to distorted audio, while setting them too low can result in low-quality audio.

Understanding decibels and how they are used to measure audio levels is essential in getting the best results when recording audio. By keeping the levels within the optimal range, you can ensure that your audio sounds great and doesn’t compromise the overall quality of your content.

Proper Audio Recording Levels

Credit: www.mixinglessons.com

Ideal Audio Recording Levels

Recording audio at the proper levels is crucial for achieving high-quality sound. Set the gain level so that sound isn’t too low while avoiding distortion caused by levels that are too high. Ensure that the audio levels are consistent throughout the recording.

What Are The Ideal Audio Recording Levels?

Proper audio recording levels are essential to produce high-quality audio output. The ideal audio recording levels refer to the amount of audio signal being captured by the recording device, such as a microphone or digital audio workstation (DAW). The right recording levels will provide the best signal-to-noise ratio, maintaining the audio’s integrity without introducing unwanted noise and distortion. In general, the ideal recording levels for audio should be between -12dB and -6dB. This range offers ample headroom for post-production and ensures that the signal level does not peak or distort, which can cause irreparable damage to the audio quality.

How To Set The Right Audio Levels?

Setting the proper audio recording levels requires a few steps to ensure optimal performance. Follow the steps below to set the right audio levels:

  1. Connect your microphone or audio source to your recording device.
  2. Open your DAW and set the input levels. This can be done with the Input Gain or the Trim control on your audio interface.
  3. Record a test track to check the levels. Start with low-level sounds and gradually increase the volume until it peaks around -6dB.
  4. Adjust the input levels if necessary and repeat the test until you achieve the desired audio levels.

If your audio source has a preamp or amplifier, ensure that it is set to an appropriate level to avoid overloading the signal.

What Are The Risks Of Setting Levels Too High Or Too Low?

Setting the audio levels too high or too low can significantly affect the audio quality. If the levels are set too low, it can introduce background noise and unwanted electrical interference to the recording, making the audio difficult to hear. On the other hand, if the levels are set too high, it can cause distortion, clipping, and other audible artifacts that can compromise the audio’s overall quality. This could lead to irreparable damage and affect the overall performance of the final output. Therefore, it is essential to set the audio recording levels correctly and consistently to ensure high-quality audio production.

Tools For Setting Audio Levels

Proper audio recording levels are essential to producing high-quality recordings. There are a variety of tools available to help set and maintain these levels, including audio meters, gain controls, and limiter/compressors.

As a content creator, the last thing you want is for your audience to be distracted by poor audio quality. One of the essential steps in audio recording is setting the proper audio levels. The right audio level ensures that your audio is clear and consistent. However, finding the right audio level can be a bit challenging without the help of tools. In this section, we’ll go through the necessary tools for setting audio levels and how to use them correctly.

What Tools Are Necessary?

To set your audio levels, you will need the following tools:

  1. Headphones
  2. Audio Interface
  3. Recording Software

Using headphones allows you to monitor the audio recording in real-time, ensuring that you get the best quality. The audio interface is an essential tool that converts the analog signals to digital signals, making it easy to record and edit on your computer. Your recording software is another essential tool that lets you record and edit your audio.

How To Use These Tools?

Here are the steps to follow when setting your audio levels:

  1. Connect your headphones to your audio interface.
  2. Connect your microphone to the audio interface.
  3. Open your recording software.
  4. Set the audio interface as your input/output device within the recording software.
  5. Test your microphone to ensure that the levels are not too high or too low.
  6. Start recording while monitoring the sound with your headphones.
  7. Watch the peak meters on your audio interface to ensure that the levels are not too high.
  8. Adjust the gain accordingly to ensure that the levels are right.
  9. Save your recording and edit accordingly.

In conclusion, setting proper audio recording levels is crucial in creating high-quality audio content. With the right tools and knowledge, you can achieve the best results. Ensure that you use headphones, an audio interface, and recording software to set the proper audio levels. By following these guidelines, you’ll be well on your way to producing excellent audio content.

Tips To Maintain Proper Audio Levels

Maintaining proper audio levels is crucial for high-quality audio recordings. It’s important to ensure that the input levels are at the ideal range, avoiding distortion and noise in the recording. Proper gain staging, monitoring, and calibration can all help achieve consistent and clear audio levels.

Recording audio can be a tricky job, especially when it comes to ensuring the proper audio levels. Maintaining proper audio levels helps in attaining high-quality audio that is pleasant to listen to, easy to understand, and professional. In this blog, we will provide some useful tips to maintain proper audio levels while recording.

How To Monitor Audio Levels While Recording?

Monitoring audio levels while recording is a crucial step to maintain proper levels. The best way to monitor audio levels is to use headphones and check the audio metering available on your recording device. Adjusting the input level between -12db and -6db will help you get a clean and clear audio recording. Make sure to monitor the levels throughout the recording and make adjustments when necessary.

Eliminating Background Noise While Recording

Background noise can ruin an otherwise perfect audio recording. To avoid this, choose a quiet location, use a high-quality microphone, and turn off all other devices in the recording area. Engage in soundproofing the room to further eliminate background noise. Placing a rug, curtains, or foam panels on walls, ceilings, and floors can help reduce the unwanted echoes and reverberations.

Importance Of Pre-production And Post-production In Maintaining Levels

Pre-production and post-production processes play a vital role in maintaining proper audio levels. Pre-production includes planning, setting up, and testing the equipment and the recording environment, while post-production includes editing, cleaning, and mastering the audio. In pre-production, make sure to choose the right equipment, test the microphone levels, and eliminate any background noise. In post-production, adjust the levels, remove noise, add necessary effects, and master the audio to get a polished final product. In conclusion, maintaining proper audio levels while recording is crucial to ensure high-quality audio. Use headphones and the audio metering available on your recording device to monitor the levels. Eliminate background noise by choosing a quiet location, using a high-quality microphone, and soundproofing the room. Finally, pay attention to both the pre-production and post-production processes to attain a professional and polished audio recording.

Common Mistakes When Setting Audio Levels

When setting audio levels, there are common mistakes people make that can affect the overall quality of the recording. Some of these mistakes include not using headphones, not checking for background noise, and setting levels too high or too low.

It’s important to follow proper guidelines to achieve the best recording possible.

What Are The Common Mistakes Made While Setting Audio Levels?

When it comes to recording audio, it is crucial to get the levels right. There are many common mistakes that people make while setting audio levels, which can negatively impact the quality of the recording. Below mentioned are some of the most common mistakes that people make:

  • Recording levels too high or too low: One of the most common mistakes is setting the recording levels too high or too low. If the levels are too high, it will cause distortion and clipping, resulting in poor audio quality. On the other hand, if the levels are too low, it may lead to a weak signal, which will make it hard to hear the audio clearly.
  • Not using a Pop filter: Another common mistake is not using a pop filter. The pop filter helps to reduce popping sounds that occur when pronouncing certain letters such as “P” or “B.” This can help to improve the audio quality and make it easier to listen to.
  • Not monitoring the audio: Failure to monitor the audio during recording can also lead to poor audio quality. It is essential to use headphones or speakers to monitor the sound and make necessary adjustments in real-time.
  • Not paying attention to the environment: Recording audio in an improper environment can also lead to poor audio quality. Background noise can cause interference and make it difficult to hear what is being said. It is essential to record in a quiet environment to improve the clarity of the audio.

How To Avoid These Mistakes?

Avoiding these mistakes is critical to getting high-quality audio recordings. Below mentioned are some tips to help avoid these mistakes:

  • Use a limiter: A limiter is a device that helps to prevent distortion caused by high levels. It is important to set a limiter to ensure that the levels do not go beyond the desired range.
  • Set levels correctly: Properly setting audio levels is crucial for high-quality recordings. It is essential to set levels based on the loudest sound, ensuring it doesn’t go beyond 0 dB.
  • Use a pop filter: A pop filter can significantly reduce popping sounds that may interfere with the audio quality. It is an affordable solution that can make a big difference.
  • Monitor the audio: It is essential to monitor the audio while recording to avoid any issues in real-time. Use headphones or speakers to monitor the sound and make necessary adjustments if required.
  • Use the right environment: The environment plays a crucial role in the quality of the audio. Recording in a quiet space can help avoid background noise that can impact the audio quality.

Recording proper audio levels is essential for producing high-quality audio recordings. Avoiding these common mistakes and following best practices can help to produce exceptional sound quality.

Proper Audio Recording Levels

Credit: www.soundonsound.com

Frequently Asked Questions For Proper Audio Recording Levels

What Is A Good Audio Level For Recording?

The ideal audio level for recording is between -12 and -6 decibels (dB) on your recording device. This range ensures that the sound is not too quiet and not too loud, allowing for clear and balanced audio. It’s important to avoid recording levels above 0 dB, as this can cause distortion and a poor listening experience.

What Are The Optimum Levels For Recording Audio Between?

Optimum levels for recording audio usually range from -18 dBFS to -12 dBFS. However, it ultimately depends on the equipment being used and the type of audio being recorded. It’s best to consult with the equipment manufacturer or a professional audio engineer for specific recommendations.

How Proper Recording Levels Are Set?

Proper recording levels are set by adjusting the gain levels of the recording equipment to avoid clipping or distortion. It is best to start at a lower gain level and gradually increase it until the desired volume is achieved. It is also important to monitor the levels during recording and adjust as necessary.

What Level Should Vocal Recording Be?

The ideal vocal recording level is typically between -18 and -12 decibels, which ensures the recording has enough headroom for post-production editing without introducing distortion or clipping.

Conclusion

Maintaining proper audio recording levels is a crucial factor to keep in mind for achieving clear and high-quality recordings. Neglecting to pay attention to the recording levels can result in poor sound quality, and lead to the loss of important information in the audio.

Always use the right equipment, ensure that all levels are set correctly, and regularly monitor the levels to obtain the best results. By following these guidelines, you’ll be on your way to producing content that sounds professional and polished. Happy recording!

Categories
Archive

Cheap Mixing And Mastering Services

Cheap mixing and mastering services can compromise on quality and result in poor sound production. It is crucial to choose affordable mixing and mastering services that still uphold professional standards.

A music production’s quality depends heavily on the mixing and mastering stages. In order to achieve a crisp and polished sound, producers, musicians or podcasters must entrust their work to experienced and professional engineers. However, the cost of high-quality mixing and mastering services can reach thousands of dollars.

For this reason, many artists and producers seek affordable options. Nevertheless, it is essential to do thorough research and pay attention to the quality of service offered because cheap services most of the time have a negative impact on the final sound. We will delve into the benefits and drawbacks of cheap mixing and mastering services and how to find affordable yet professional sound engineers.

The Importance Of High-quality Mixing And Mastering

When it comes to music production, the importance of high-quality mixing and mastering cannot be overstated. Cheap mixing and mastering services may save you money initially, but they can ultimately damage your final product. Investing in professional mixing and mastering will ensure that your music sounds polished and professional, giving it the best chance at success.

Flawless Audio, Professional Sound, and customer satisfaction are directly related to the importance of mixing and mastering. You can buy the most expensive recording equipment, but without proper mixing and mastering, your music remains incomplete. The process of mixing involves combining recorded tracks together, adjusting the levels of each track so that they blend well. Mastering, on the other hand, is the process of taking the final mix and enhancing it to sound more polished and uniform.

Flawless Audio

The process of the perfect mix starts with flawless audio. The sound quality of each track should be clean, free from hissing noise or distortion, and recorded at the optimum level. Mixing done with flawed tracks can lead to an unpleasant listening experience. Mixing and mastering also involve editing out unnecessary noises that detract from the overall quality of the recording.

Professional Sound

A skilled mixer/mastering engineer regulates the equalization, compresses, and applies effects to shape the overall tone of the music, making it sound professional. The process significantly improves the music’s quality, spatial balance, and clarity, making it sound more engaging and professional. Mixing and mastering services are essential when releasing music, to ensure that the final master is the best it can be.

Importance Of Mixing And Mastering

The Importance of mixing and mastering cannot be overstated as it affects what the audience hears and the overall quality of the music. Investing in high-quality mixing and mastering ensures that your music sounds top-notch across multiple devices regardless of the listener’s device, be it headphones or speakers. Making sure your music hits the market with the best quality possible can be the difference between success and obscurity. In conclusion, Cheap Mixing and Mastering Services can be a great option for saving on music production costs. However, music producers should bear in mind that quality mixing and mastering services are critical when it comes to producing high-quality music that will resonate with their audience, stand the test of time and make a mark in the music industry.

Cheap Mixing And Mastering Services

Credit: dopeboykits.com

Affordable Alternatives To Professional Studios

Get professional quality sound without breaking the bank. Low-cost options for mixing and mastering services are available for those on a budget. Don’t let high studio prices hold back your creativity, explore your options today.

The Cost Of Professional Studios

Professional studios can cost a substantial amount of money, making them out of reach for many musicians looking to record and produce their music. A standard recording session at a professional studio can range anywhere from $100-$300 per hour, with additional costs for mixing and mastering. This can quickly add up and become unaffordable for independent musicians who are just starting out in the music industry.

Benefits Of Cheap Alternatives

Fortunately, there are affordable alternatives to professional studios that can help musicians create high-quality recordings without breaking the bank. Cheap mixing and mastering services provide an excellent option for those who want professional-quality sound without paying the high prices of a professional studio. In most cases, affordable services use the same equipment, techniques, and software as pro studios, but at a fraction of the cost.

Why Choose Cheap Services

There are several reasons why you may want to choose cheap mixing and mastering services over a professional studio. Firstly, affordability is usually the most important factor. You can save a considerable amount of money using cheaper services, which can be put back into other aspects of your music production. Secondly, cheap services often provide a more personalized experience, with a focus on building a relationship with the artist and helping them achieve their desired sound. In conclusion, cheap mixing and mastering services are a great affordable option for musicians who want high-quality sound without paying the high prices of a professional studio. These services provide a personalized experience and use the same equipment and techniques as pro studios. By choosing affordable services, you can save money and put it towards other aspects of your music production.

Finding The Right Cheap Mixing And Mastering Services

Looking for cheap mixing and mastering services can be daunting, but doing thorough research and checking reviews can help you find a service that’s affordable and effective. Make sure to communicate your specific needs and preferences to get the best results.

If you’re an upcoming artist or musician, you might feel the pressure to finish your music projects as soon as possible, but at a budget-friendly cost. In that case, finding the right cheap mixing and mastering services can be a daunting task. With so many options available, it can be confusing to know where to start. In this article, we will guide you through the process of finding the right cheap mixing and mastering services for your music projects.

Researching Your Options

The first step is to search for cheap mixing and mastering services online. You can use search engines such as Google to find websites that offer these services. The key is to understand the services that these websites offer and at what rates. Some websites may offer cheap services but might not give you the quality you’re looking for. It’s better to spend a little more on quality services than to compromise the quality of your music projects.

Listening To Samples

To ensure that the cheap mixing and mastering services you’re considering are of good quality, it’s important to listen to their samples. Most websites will provide audio samples of their work, allowing you to gauge their sound quality. Listen to the samples carefully to determine if they meet your expectations. You should prefer services that provide samples of music genres similar to yours.

Reading Reviews

Lastly, it’s essential to read reviews from other customers who have used the cheap mixing and mastering services you’re considering. Reviews will give you an idea of how the service performs and if they are reliable. Look for websites that have many positive reviews and ratings. Don’t base your decision on a single review, but read and analyze a few to make a well-informed decision. In conclusion, finding the right cheap mixing and mastering services requires research, listening to samples, and reading reviews. By following these steps, you can select a service provider that is affordable and offers the quality you’re looking for. Remember, compromising on quality may harm your music project in the long run. Therefore, it’s important to make a wise decision, not only based on cost but also service quality.

Tips For Maximizing Your Results

If you are searching for an inexpensive way to get your music tracks sounding the way you want them to, then cheap mixing and mastering services may be the perfect solution for you. With that being said, just because these services are affordable doesn’t mean that you can take shortcuts and expect excellent results. Here are some tips to help you maximize your results when using cheap mixing and mastering services.

Preparing Your Tracks

Before sending your tracks to the mixing and mastering engineer, ensure that they are adequately prepared to create the best possible results. Here are some things you can do to ensure that:

  • Remove any background noise or distracting sounds that may interfere with the mix.
  • Ensure all of the tracks are fully edited and polished before sending them to the engineer.
  • Organize your tracks and label them correctly so that the engineer can easily locate and identify them.

Communication With The Engineer

Communication is key when you’re working with any type of service provider, and cheap mixing and mastering services are no exception. To ensure that the engineer has a clear understanding of what you want, it’s important to communicate effectively with them. Here’s how:

  • Provide the engineer with specific instructions on what you want the final mix to sound like.
  • Let them know which tracks are most important to you.
  • Ask questions if you’re uncertain about certain aspects of the mixing or mastering process.

Providing Feedback

Once you have received the first mix from the engineer, listen to it carefully to identify any issues or areas that need improvement. Then, provide feedback to the engineer so that they can make the necessary adjustments. Here are some things to keep in mind:

  • Be specific when providing feedback, and make sure that you clearly identify the areas that need improvement.
  • Don’t be afraid to request multiple iterations of the mix until you are satisfied with the sound quality of your tracks.
  • Remember that the more feedback you provide, the better the final result will be.

Following these tips when using cheap mixing and mastering services will help you to get the best possible results for your money. With a little bit of effort, you can achieve professional-sounding tracks that will impress your fans and listeners alike.

The Pros And Cons Of Cheap Mixing And Mastering Services

The Pros And Cons Of Cheap Mixing And Mastering Services

If you’re a musician on a budget, you might be considering cheap mixing and mastering services. While these services can help you save money, they also come with their own set of pros and cons. In this blog post, we’ll explore the benefits and drawbacks of cheap mixing and mastering services.

Pros: Cost, Convenience, Speed

Cheap mixing and mastering services are often a cost-effective option for musicians looking to create high-quality recordings without breaking the bank. Here are some of the benefits of using cheap mixing and mastering services:

ProsDetails
CostOne of the most significant benefits of cheap mixing and mastering services is their affordability. These services are usually much cheaper than hiring a professional audio engineer to do the work.
ConvenienceCheap mixing and mastering services are often very convenient. You can upload your tracks to a website or send them via email, and the service provider will take care of the rest. You don’t have to worry about scheduling meetings or traveling to a studio.
SpeedCheap mixing and mastering services can be very fast. Some providers offer a turnaround time of just a few days, which is much quicker than the weeks or months that it might take a professional audio engineer to complete the work.

Cons: Quality, Communication Issues, Limited Revisions

While cheap mixing and mastering services can be a great way to save money, they also come with some downsides. Here are some of the cons of using cheap mixing and mastering services:

  • Quality: Cheap mixing and mastering services may not provide the same level of quality as a professional audio engineer. You may end up with subpar recordings that don’t sound as good as you had hoped.
  • Communication Issues: Since cheap mixing and mastering services are often provided online, communication can be a challenge. You may have trouble getting in touch with the service provider or conveying your creative vision.
  • Limited Revisions: Cheap mixing and mastering services may offer only a limited number of revisions. If you’re not satisfied with the final product, you may have to pay extra for additional revisions.

Overall, cheap mixing and mastering services can be a great option for musicians on a budget. However, it’s important to weigh the pros and cons before making a decision. Consider your budget, your timeline, and your creative vision when deciding whether to use a cheap mixing and mastering service.

Understanding The Process Of Mixing And Mastering

When it comes to producing quality music tracks, mixing and mastering services play a vital role. Whether you are a budding musician or an established one, adding these services to your music production process can elevate the overall sound quality of your tracks.

The Mixing Stage

During the mixing stage, audio engineers focus on balancing different elements of the recording such as vocals, instruments, and sound effects. They apply various techniques to tweak the audio frequencies to create a cohesive and smooth sound. Mixing is often considered an art form as it requires a keen ear and innovative techniques to bring out the best in a track.

  • Audio engineers enhance the overall sound quality by removing unwanted sounds and background noises.
  • They adjust the volume levels to ensure that all sounds are at an appropriate level and are audible.
  • They use equalization to balance the tonal qualities of each sound, ensuring that the mix doesn’t sound too bright or dull.
  • The sound is also panned to create a sense of space and depth, making the tracks sound more natural.

The Mastering Stage

The mastering stage focuses on the final touches of the mixing stage to produce a polished track. Audio engineers use various techniques and tools to enhance the overall sound quality to achieve a professional and commercial sound.

  • Audio engineers check the audio quality of each track in depth.
  • They use stereo wideners to create a bigger soundstage and make the tracks sound spacious.
  • The tracks are compressed to make the audio sound louder and more uniform in volume.
  • Audio engineers also use limiters to control the volume levels from exceeding safety limits.

The Role Of The Engineer

The role of the engineer is critical in mixing and mastering services as they need to use their experience and expertise to bring out the best in your tracks. The engineer can make or break your music production process, which is why it’s essential to hire someone experienced and skilled in their craft.

In conclusion, mixing and mastering services are essential for producing professional-quality tracks. The process can be daunting but hiring an experienced and skilled audio engineer can help you achieve the desired sound.

Common Misconceptions About Cheap Services

Cheap mixing and mastering services have a bad reputation for being low quality. However, this is not always the case. Many affordable services can deliver professional results while providing a great value for your money. Don’t make the mistake of assuming that cheap equals bad.

Do your research and find reputable providers who offer excellent services at affordable prices.

Affordable mixing and mastering services are often considered to be lesser in quality and more prone to errors. Such misconceptions create a scenario where many people opt for expensive services, while disregarding cheaper alternatives. In reality, there are many cheap mixing and mastering services that offer the same quality as their expensive counterparts. In this section, we will take a look at some of the common misconceptions about cheap services.

Believing Quality Is Sacrificed

One of the most common misconceptions about cheap mixing and mastering services is that they sacrifice quality to cut costs. This is not always the case. Cheap services can offer the same level of quality as their more expensive counterparts. The difference is in the pricing strategy and overhead costs. Expensive services will charge more due to their relatively high overhead costs, which include rent, utilities, and staff salaries. Cheap services, on the other hand, might operate with fewer staff, lower rent, and lesser utilities, which allows them to offer the same level of quality at a lower price.

Thinking It’s Too Good To Be True

Another common misconception is that cheap services are too good to be true. This is often due to the mindset that “you get what you pay for.” However, there are many mixing and mastering services that offer great quality at affordable prices. There are also many online services that outsource their work to countries where the cost of living is lower, making it possible to offer quality services at a lower price. Therefore, it is important to do your research and check the reviews and portfolio of the service to make sure they offer quality work.

Assuming All Cheap Services Are The Same

Assuming that all cheap mixing and mastering services are the same is another misconception. Just like with any industry, there are differences in skill level and quality among different services. It is important to do thorough research before engaging a mixing and mastering service. Checking reviews, portfolios, and testimonials can help in making an informed choice. It is also important to understand what you want to achieve with the mixing and mastering service and communicate that to the service provider to ensure that they understand your needs and can deliver accordingly. In conclusion, while it is important to be cautious when investigating cheap mixing and mastering services, it is essential not to ignore them altogether. Cheap services can offer the same level of quality as expensive ones, and it is important to do your research and check the reviews, portfolio, and testimonials of the service before engaging them.

Cheap Mixing And Mastering Services

Credit: soundcloud.com

Cheap Mixing And Mastering Services

Credit: www.audiomixingmastering.com

Frequently Asked Questions For Cheap Mixing And Mastering Services

How Much Do People Charge For Mixing And Mastering?

The cost of mixing and mastering varies depending on factors such as genre, length of the track, and the experience of the audio engineer. Prices can range from less than $50 to several hundred dollars per track.

Should I Pay Someone To Mix And Master?

Yes, you should pay someone to mix and master if you want your music to sound professional and competitive. A skilled professional can bring out the best in your recordings by balancing levels, adding effects, and creating a cohesive sound.

It’s worth the investment to ensure your music is the best it can be.

How Much Are Mastering Services?

Mastering services cost can vary depending on the service provider, the number of tracks, and the complexity of the music. On average, mastering services can range from $50 to $500 per track. It’s essential to research and compare prices from different providers to ensure the best quality and value for your money.

How Do I Find Someone To Mix And Master My Music?

To find someone to mix and master your music, you can search for professional audio engineers online or ask for recommendations from musicians or producers in your network. Some popular websites for finding audio engineers include SoundBetter, Fiverr, and Upwork.

It’s important to review their portfolio, rates, and availability before hiring someone to ensure they’re the right fit for your needs.

Conclusion

Finding affordable mixing and mastering services doesn’t mean compromising on quality. With a little research, you can discover reliable studios that offer excellent services without breaking the bank. It’s essential to work with experienced professionals who can enhance your music and ensure it meets industry standards.

By incorporating these budget-friendly services into your production workflow, you can take your music to new heights. Remember, choosing the right studio is a crucial step in bringing your artistic vision to life.

Categories
Archive

Should You Bounce At 32 Bit Float

No, you should not bounce at 32-bit float. Bouncing at 32-bit float can cause compatibility issues with certain DAWs and plugins.

However, it is important to understand the benefits and drawbacks of different bounce formats to ensure high-quality audio production. When it comes to audio production, bouncing is the process of taking multiple tracks and rendering them into one stereo or mono audio file.

Bouncing at 32-bit float may seem like the best choice because of its high dynamic range and precision. However, it can cause compatibility issues for certain plugins or DAWs that do not support this format. There are also other considerations when it comes to bouncing, such as file size and potential for bit-depth reduction. We will explore the different formats for bouncing, their benefits and drawbacks, and tips for optimizing your bounce.

Should You Bounce At 32 Bit Float

Credit: www.youtube.com

What Is Bouncing?

Are you an audio engineer or a music producer? If so, you must have heard of the term “bouncing”. Bouncing is a crucial part of the audio production process that involves rendering a mix so that it can be played on various audio devices or shared with others. But the question is, should you bounce at 32 bit float?

Definition And Explanation

Bouncing is the process of rendering a mixdown of your digital audio project to a stereo audio file. It’s called “bouncing” because the audio is being bounced down from multiple tracks to a stereo file. This file can then be played on various devices or shared with others.

32 bit floating-point audio is an audio encoding method that uses a floating-point representation of audio samples. It provides a high level of precision for recording, mixing, and mastering. However, not all audio devices support 32 bit floating-point audio. Most devices support only 16 or 24 bit audio.

Importance Of Bouncing In Digital Audio

Bouncing is a critical part of the digital audio production process. Without bouncing, it would be impossible to share your audio projects with others or play them on various devices. Bouncing is also essential for mixing and mastering processes. The bounced file is used as a reference to ensure that the final mix is of high quality and consistent across different playback systems.

Bouncing at 32 bit float offers a high level of precision and dynamic range. However, if the final destination for your audio mix is a device that only supports 16 or 24 bit audio, bouncing at 32 bit float will not be necessary. It will only add unnecessary file size and may not result in any noticeable improvement in audio quality.

In conclusion, the decision to bounce at 32 bit float or not depends on the destination for your audio mix. If it’s going to be played on devices that only support 16 or 24 bit audio, bouncing at 32 bit float is not necessary. However, if you’re working on a project that requires the highest level of precision and dynamic range, bouncing at 32 bit float can be beneficial.

32 Bit Float: An Overview

When it comes to audio engineering, one of the most critical decisions you’ll have to make is whether to bounce your tracks at 32-bit float. Bouncing refers to the process of rendering all your tracks into a final, composite mixdown. Bouncing at 32-bit float is a hotly debated topic in the music production community and can have a significant impact on the quality of the finished product.

What Is 32 Bit Float?

32 Bit float is a type of digital audio file format that stores audio data with a much higher level of precision than typical 16 or 24-bit files. This higher level of precision allows for greater dynamic range, resulting in a smoother and more accurate sound. Additionally, 32-bit float files are capable of handling high amounts of gain without clipping, making them ideal for complex digital signal processing.

Advantages And Risks Of Using 32 Bit Float

Advantages:

  • Greater dynamic range
  • Higher precision and accuracy
  • Better signal-to-noise ratio
  • Reduced risk of clipping during processing

Risks:

  • Larger file sizes, which can be more difficult to manage and store
  • Requires more processing power, which can slow down your system
  • May not be compatible with all software and hardware

Ultimately, the decision on whether to bounce at 32-bit float comes down to your personal preference and the specific needs of your project. While there are certainly advantages to using this format, there are also potential risks and downsides to consider. It’s important to weigh these factors carefully and make an informed decision based on your own unique situation.

Bouncing At 32 Bit Float: Pros And Cons

Bouncing at 32 bit float provides the advantage of higher headroom and greater dynamic range for mixing engineers. However, it may also increase the size of audio files, which can be problematic for storage and streaming purposes. Consider the pros and cons before deciding whether to bounce at 32 bit float.

Are you looking to create high-quality music without any compromise on sound quality? Then, bouncing at 32 bit float might be the right choice for you. This technique helps music producers to create professional-quality music with improved dynamic range and clarity.

Benefits Of Bouncing At 32 Bit Float

Bouncing at 32 bit float brings many benefits, such as:

  1. Better Dynamic Range: Bouncing at 32 bit float offers a wider dynamic range compared to 16 bit or 24-bit audio files. This means there is a greater difference between the softer and louder sounds, leading to improved clarity and depth.
  2. Reduced Clipping: Clipping is a common problem that occurs when the amplitude of the audio signal exceeds the maximum level. Bouncing at 32 bit float allows producers to reduce clipping and ensure that the music remains distortion-free.
  3. Improved Resolution: With a higher bit depth, 32 bit float files offer superior resolution compared to 16 or 24-bit files. This results in better sound quality and more precise audio data.

Possible Issues With Bouncing At 32 Bit Float

While bouncing at 32 bit float offers many advantages, there are some potential issues that you might face, such as:

  • Increased File Size: Since 32 bit float files contain more data, they tend to have larger file sizes. This can lead to storage problems and longer load times.
  • Incompatibility: Some devices or software may not support 32 bit float files, which could cause compatibility issues when sharing your music.
  • More Processing Power: Bouncing at 32 bit float requires more processing power than 16 or 24-bit audio files, which can lead to longer rendering times.

Overall, bouncing at 32 bit float provides an excellent opportunity to enhance your music’s quality and clarity. However, it’s important to be aware of the potential issues to make the right decision for your music productions.

Should You Bounce At 32 Bit Float

Credit: www.bhphotovideo.com

When Should You Bounce At 32 Bit Float?

Bouncing at 32 Bit Float has become a hot topic among music producers and sound engineers lately. Bouncing at 32 Bit Float means that your digital audio workstation (DAW) will capture your audio data with greater resolution and precision, resulting in a higher-quality final mix. However, deciding when to use this method requires an understanding of the factors involved and best practices to ensure the best audio quality. In this article, we will explore the factors to consider and best practices for bouncing at 32 Bit Float.

Factors To Consider

Before bouncing at 32 Bit Float, it is essential to consider the following:

  • Audio quality: If you want to deliver a professional-level mix, bouncing at 32 Bit Float could be the way to go. It captures a wider dynamic range, providing more headroom to make level adjustments in the mix.
  • Compatibility: Check if the device on which you will play the mix supports 32 Bit float files. Most modern devices and DAWs support it, but some might not, making it crucial to ensure compatibility before exporting the final mix.
  • Workflow and timeline: Bouncing at 32 Bit Float increases the file size, thereby taking up more disk space and taking longer to export. It’s important to perform a cost-benefit analysis to decide if it’s worth it based on the project’s deadline.

Best Practices For Bouncing At 32 Bit Float

Here are some best practices to keep in mind when you’ve decided to bounce at 32 Bit Float:

  • Use 32 Bit Float processing throughout: Ensure that your entire mixing and mastering chain operates in 32 Bit Float, including any plugins or processors used.
  • Normalize to -1 dBFS: This ensures that your track won’t clip when exported, and maintaining the 32-bit float resolution used throughout the mixing process.
  • Label file names accurately: Label the file name accurately to specify that it’s a 32 Bit Float file format. It can help avoid compatibility issues in the future.
  • Verify compatibility: Verify that the combination of file format and bit depth is compatible with the hardware or software used for playback before exporting the final file.
  • Use dithering: Dithering is the process of adding low-level noise to a recording that is too quiet compared to the signal’s quantization noise. This helps to preserve the integrity of the signal while reducing artifacts created by bit-depth downgrading.

Deciding when to bounce at 32 Bit Float requires an understanding of the factors involved and best practices to ensure the best audio quality. Consider the audio quality, compatibility, workflow, and timeline before deciding to bounce at 32 Bit Float. When you’ve decided to bounce at a higher bit-depth, make sure to use 32 Bit Float processing throughout, normalize to -1 dBFS, label file names accurately, verify compatibility, and use dithering to reduce artifacts.

Alternatives To Bouncing At 32 Bit Float

When it comes to bouncing audio at 32-bit float, there are alternatives to consider. Whether or not you should bounce at this setting is a subjective decision based on your individual workflow and preferences. Other options may include bouncing at a lower bit depth or utilizing real-time rendering.

Other Formats To Consider

Bouncing audio at 32-bit float is an excellent way to prevent loss of quality for high-resolution audio files. However, there are other formats available that you can consider when bouncing your mix. A 24-bit file can also retain a high level of sound quality and resolution, while also taking up much less storage space.

Comparing The Alternatives To 32 Bit Float

Here’s a quick rundown of the other formats and how they compare to bouncing at 32-bit float.

24-bit:

  • High-quality audio resolution
  • Takes up less storage space than a 32-bit float file
  • A great alternative if you’re not concerned about absolute maximum quality.

16-bit:

  • Standard CD audio format
  • Loses some audio data compared to 24-bit and 32-bit float
  • Great for uploading your music to streaming services or burning onto CD.

8-bit:

  • Often used for game audio and sound effects
  • Low-quality compared to higher bit depth formats
  • A great way to save space if you’re including lots of sound effects or are working on a project with lots of audio cues.

Remember, the choice of format to bounce your mix is dependent on your preferred usage and target audience. Always consider the purpose of your mix and the intended application before making a final decision on the format to bounce.

Should You Bounce At 32 Bit Float

Credit: www.soundonsound.com

Tools And Techniques For Bouncing At 32 Bit Float

Bouncing at 32 bit float allows you to retain all the detail and dynamics in your mixes. But should you do it? It depends on your workflow and the tools you are using. Some programs may not support it, so be sure to research before making a decision.

Whether you’re a professional mixing engineer or just starting out in music production, you may have come across the term “32 bit float” when bouncing your tracks. Bouncing at 32 bit float is a technique that allows you to export your audio files with a higher level of precision and accuracy, resulting in better sound quality. In this article, we’ll explore the tools and techniques you can use for bouncing at 32 bit float, including DAW-specific tools and third-party plug-ins and software.

Daw-specific Tools And Techniques

Most popular DAWs now have built-in features that allow you to bounce at 32 bit float. For instance, in Logic Pro X, you can choose the 32 bit float option when you export your audio files. This option is available under the “Export” menu, and it will export your audio files with a higher level of precision and accuracy. Another DAW-specific tool you can use is the floating-point engine. This engine allows you to work with audio signals that have more than 24 bits of resolution. It uses a mathematical algorithm to process the audio signals with more accuracy, resulting in better sound quality.

Third-party Plug-ins And Software

Apart from the built-in tools available in your DAW, you can also use third-party plug-ins and software to bounce at 32 bit float. One of the most popular plug-ins is Ozone Imager 2 by iZotope. This plug-in allows you to master your audio files with a 32 bit float accuracy, resulting in a wider stereo image and improved sound quality. Another popular third-party software option is the Sonnox Oxford Limiter v3. This software can export your audio files with a higher level of precision and accuracy, and it includes a number of features such as high-quality dithering and noise shaping algorithms. In conclusion, bouncing at 32 bit float can significantly improve the quality of your audio files. Whether you choose to use the built-in features available in your DAW or third-party plug-ins and software, the tools and techniques outlined in this article can help you achieve a higher level of precision and accuracy when exporting your audio files.

Real-world Examples Of Bouncing At 32 Bit Float

Bouncing at 32 bit float can provide a higher quality audio output compared to lower bit rates. Real-world examples show that the higher bit depth results in clearer and more precise sound production, making it a preferred option among audio professionals.

When it comes to bouncing at 32 bit float, many audio engineers and producers have debated whether it is necessary or not. To shed some light on this topic, let’s explore some real-world examples of successful bouncing at 32 bit float.

Case Studies Of Successful Bouncing At 32 Bit Float

After conducting some research, we found numerous examples of successful bouncing at 32 bit float. Here are some case studies:

ArtistSongProducerDAW
Ariana Grande7 RingsTommy BrownPro Tools
Post MaloneCirclesFrank DukesLogic Pro X
LizzoTruth HurtsRicky ReedStudio One

As seen in these examples, bouncing at 32 bit float has become a standard practice in many professional recording studios. It helps preserve the audio quality and dynamic range of the final mix.

Lessons Learned From Previous Projects

Producers who have bounced at 32 bit float in the past have learned some valuable lessons along the way. Here are some lessons that can be applied to future projects:

  • Always ensure that all plugins and tracks have proper gain staging before bouncing to prevent clipping or distortion.
  • Creating a backup of the mix before bouncing is important as it provides a safety net in case something goes wrong during the process.
  • Consistency is key in bouncing. Always use the same settings and procedures to avoid inconsistencies in the final mix.

In conclusion, bouncing at 32 bit float has proven to be beneficial for many recording engineers and producers. As seen in the case studies and lessons learned, it helps preserve the integrity of the audio mix. When deciding whether to bounce at 32 bit float, it is important to consider the type of project and the overall goals of the mix.

Conclusion: Making The Best Choice For Your Audio Projects

Bouncing at 32 bit float can be beneficial for audio projects as it results in higher quality and more accurate sound. However, it also requires more storage space and processing power. Ultimately, the choice should be based on the specific needs and goals of the project.

Final Considerations

In conclusion, the decision to bounce at 32-bit float is ultimately dependent on the specific needs of your audio project. While it may offer certain advantages, such as increased dynamic range, it also requires more processing power and storage space. Additionally, it may not be compatible with all software and hardware configurations. When making your decision, it’s important to consider factors such as the final delivery format, intended use, budget, and technical requirements. Some projects may benefit from the extra headroom and precision that 32-bit float provides, while others may be better suited to a more standard bit-depth.

Implications For The Future Of Digital Audio

As technology continues to evolve, the use of 32-bit float may become more common in digital audio production. However, it’s important to remember that higher bit-depths alone do not guarantee superior audio quality. The quality of the recording, mixing, and mastering processes are equally if not more important factors in achieving a great-sounding track. In the end, the best choice for your audio project will depend on a variety of factors, including your specific needs, preferences, and goals. With careful consideration and experimentation, you can make an informed decision and achieve the best possible results.

Frequently Asked Questions For Should You Bounce At 32 Bit Float

Should I Bounce In 32-bit Float?

Yes, bouncing in 32-bit float is recommended as it allows for the highest level of audio quality and flexibility in post-production. It also helps to prevent clipping and distortion. However, it is important to ensure that your equipment and software support 32-bit float.

Should You Record In 32-bit Float?

Yes, recording in 32-bit float is recommended as it provides a high dynamic range and reduces the risk of clipping or distortion. It also allows for greater flexibility in post-production processing and reduces the need to normalize levels.

What Bit Depth Should I Bounce At?

It is recommended to bounce at a bit depth of 24 bits. This offers the best combination of dynamic range and noise floor, ensuring high-quality audio. However, if you are working with audio that has been recorded at a lower bit depth, bouncing at that same bit depth will suffice.

Should I Use 24 Bit Or 32-bit Float?

It depends on your recording and processing needs. 24-bit is suitable for most recording and mixing sessions, while 32-bit float allows for greater headroom and dynamic range, ideal for mastering and processing complex audio files. Choose the option that works best for your requirements and workflow.

Conclusion

It’s important to take a personalized approach when considering whether or not to bounce at 32 bit float. While some may find it beneficial, others may not see a noticeable difference in their audio quality. Ultimately, it’s worth experimenting with different techniques to find what works best for you and your specific recording setup.

Whether you choose to bounce at 32 bit float or not, the important thing is to prioritize the quality of your final product.

Categories
Archive

Luna Universal Audio Review

Luna Universal Audio Review: Luna offers a reliable audio interface and recording software system for high-quality sound processing. Luna has become a highly-regarded system for all music creators and audio professionals who want a reliable interface and recording software to produce the highest quality sounds.

Developed by Universal Audio, Luna combines a user-friendly recording interface, DSP processing, and top-end audio effects, which makes it a tool that every musician, producer, and sound engineer would appreciate. This standalone software works seamlessly with other Universal Audio hardware, providing the user with an optimal audio production experience.

In this review, we will dive deep into the features and benefits of Luna Universal Audio, its advantages over other digital audio workstations, and what makes it the perfect addition to your audio workspace.

Luna Universal Audio Review

Credit: www.macprovideo.com

Luna Universal Audio Review

Credit: www.mixonline.com

Frequently Asked Questions Of Luna Universal Audio Review

What Is Universal Audio Luna?

Universal Audio Luna is a digital audio workstation (DAW) software that enables music production, editing, and mixing. It offers virtual instruments, effects, and plugins to enhance the recording experience. The software is designed to work seamlessly with Universal Audio’s hardware interfaces, providing an immersive analog-style recording experience.

Does Luna Work Without Apollo?

Yes, Luna can work without Apollo as it is a stand-alone program for cloud computing and data processing. However, Apollo is a complementary service that can enhance Luna’s capabilities through advanced data analysis and machine learning.

Is Luna Recording System Free?

The answer is no, Luna recording system is not free.

Is Luna Like Pro Tools?

Luna and Pro Tools are both digital audio workstations (DAW), but they have different features and functions. While Pro Tools is popular among professional audio engineers and musicians, Luna is a new DAW exclusively for Universal Audio interfaces. Therefore, they are not exactly like each other.

Conclusion

By now, we can conclude that the Luna Universal Audio is an outstanding piece of technology. Its impressive design, top-notch sound quality, and user-friendly controls make it a must-have for sound engineers and audiophiles alike. With its flexibility to work flawlessly with different devices, plugins, and software, Luna is a game-changer in modern audio recording.

Overall, Luna Universal Audio lives up to its reputation and is worth every penny.

Categories
Archive

What To Listen For When Mastering

When mastering, listen for distortion, clarity, balance, and overall impact. These four elements will help you create a professional-sounding final mix.

Mastering is the final step in the music production process, where the final mixdown is subjected to a series of processes to improve its overall sound quality. A well-mastered track can make a huge difference in how it is received by listeners.

Listening is a crucial part of the mastering process. It is important to have an ear for detail and be able to identify what needs adjustment to bring out the best in the music. Keep reading to learn what to listen for when mastering, and take your tracks to the next level.

Importance Of Mastering

Mastering is an essential part of the music production process that involves the final preparation of a song or album before it’s released to the public. It’s the point in the chain where the music is refined, polished, and made to sound as good as possible on all systems. The importance of mastering cannot be overstated as it can make the difference between a mediocre and an outstanding track. In this blog post, we’ll explore what to listen for when mastering and the significance of this process.

Enhancing Audio Quality

One of the primary goals of mastering is to enhance the quality of the audio. This involves making technical adjustments such as balancing the levels, equalizing the frequencies, and compressing the dynamic range. These adjustments are made to ensure that the instruments and vocals sit well together in the mix, and that the final master sounds clear, punchy, and balanced.

Bringing Consistency To A Set Of Songs

Mastering also aims to bring consistency to a set of songs. Albums often comprise tracks that were recorded and mixed at different times and with different engineers. Mastering ensures that all the tracks sound cohesive and are compatible with each other. This is achieved by maintaining consistent levels, tonality, and overall sound quality across all the tracks in the album.

Making Music Sound Good On All Systems

The final goal of mastering is to make the music sound good on all systems. Music is consumed on various platforms such as phones, laptops, home theaters, car stereos, and more. Each of these systems has different playback capabilities and sonic characteristics. Mastering engineers take this into account and ensure that the music sounds great on all these systems. They do this by making sure that the mix translates well to different playback formats, and that it is compatible with various listening environments.

What To Listen For When Mastering

Credit: www.amazon.com

Preparing For Mastering

Preparing for mastering involves knowing what to listen for to achieve the best possible sound quality. This includes paying attention to the dynamics, EQ, stereo width, and overall balance of the mix. It’s important to have a clear understanding of each element to make informed decisions during the mastering process.

Preparing for Mastering Before sending your tracks off for mastering, there are a number of things you should do to ensure that the process goes as smoothly as possible. This includes preparing your tracks for mastering, ensuring proper headroom and levels, and exporting tracks in the right format. Let’s dive deeper into each of these tasks. Preparing Tracks for Mastering To prepare your tracks for mastering, it’s important to ensure that they are properly mixed. This means that you should have a good balance of all the instruments and vocals, and that the levels are consistent throughout the song. You should also make sure that there are no clicks, pops, or other unwanted noises that could detract from the final product. Ensuring Proper Headroom and Levels One of the most important things to consider when preparing tracks for mastering is headroom. Headroom refers to the space between the highest peaks in your track and the maximum level that your audio interface or recording device can handle. It’s important to leave enough headroom to prevent clipping, distortion, or other unwanted effects. A good rule of thumb is to aim for around 6dB of headroom, but this can vary depending on the genre and style of your music. Exporting Tracks in the Right Format Another crucial step in preparing tracks for mastering is exporting them in the right format. This typically means exporting them as WAV or AIFF files with a bit depth of 24 or 32 bits and a sample rate of 44.1kHz or higher. It’s also important to make sure that you export each track separately, rather than as a single mixed file. This will give your mastering engineer more flexibility to work with each individual track and make adjustments as needed. In conclusion, preparing your tracks for mastering is an essential part of the music production process. By taking the time to properly mix and prepare your tracks, you can ensure that the final product is of the highest quality. Whether you’re working on your own music or collaborating with others, following these steps will help you achieve the best possible results. So, take some time to prepare your tracks for mastering and get ready to hear your music in a whole new way!

Audio Elements To Listen For

Mastering is the final stage of the music production process, and it involves shaping and enhancing the stereo mix to achieve the best possible sound quality. Mastering helps to optimize the overall volume level, tonal balance, clarity, and ambiance of your music. When mastering, there are several audio elements that you need to listen for to ensure that your music sounds perfect. These audio elements include dynamic range, low-end frequencies, mid-range frequencies, high-end frequencies, panning and stereo imaging, transients, clipping and distortion, balance, and EQ. In this post, we will discuss what each of these elements is and what to listen for when mastering your music.

Dynamic Range

Dynamic range is the difference between the loudest and quietest parts of your music. To achieve a good dynamic range, you need to make sure that your music has enough space between the peaks and valleys in the waveform. Listen for any parts of your music that sound too compressed, distorted, or flat. You can use compression and limiting techniques to control the dynamic range of your mix and make it sound more polished.

Low-end Frequencies

The low-end frequencies are the bass and kick drums that provide the foundation of your music. When mastering, listen for any low-end build-up or muddiness that can make your music sound boomy or indistinct. You can use high-pass filters, EQ, and stereo imaging techniques to refine the low-end frequencies and create a tighter and more focused sound.

Mid-range Frequencies

The mid-range frequencies are the vocals, guitars, and other instruments that occupy the middle range of the audio spectrum. When mastering, listen for any mid-range masking or harshness that can make your music sound cluttered or piercing. You can use EQ, compression, and stereo imaging techniques to balance the mid-range frequencies and create a more pleasant and cohesive sound.

High-end Frequencies

The high-end frequencies are the cymbals, hi-hats, and other instruments that provide the sparkle and airiness to your music. When mastering, listen for any high-end harshness or sibilance that can make your music sound shrill or fatiguing. You can use EQ, de-essing, and stereo imaging techniques to refine the high-end frequencies and create a smoother and more comfortable sound.

Panning And Stereo Imaging

Panning and stereo imaging are the techniques used to create a sense of width and depth in your music. When mastering, listen for any panning inconsistencies or imaging artifacts that can make your music sound artificial or unstable. You can use stereo enhancers, EQ, and reverb techniques to enhance the panning and stereo imaging and create a more natural and immersive sound.

Transients

Transients are the sudden peaks in your music that provide the punch and energy to your drums and other percussive instruments. When mastering, listen for any transient distortion or lack of impact that can make your music sound weak or dull. You can use transient shapers, EQ, and compression techniques to enhance the transients and create a more lively and dynamic sound.

Clipping And Distortion

Clipping and distortion are the unwanted artifacts that can occur when you push your music too hard. When mastering, listen for any clipping or distortion that can make your music sound harsh or distorted. You can use gain staging, compression, and limiting techniques to prevent clipping and distortion and ensure a clean and clear sound.

Balance And Eq

Balance and EQ are the key elements that determine the tonal balance and clarity of your music. When mastering, listen for any frequency imbalances or masking that can make your music sound unbalanced or unclear. You can use EQ, compression, and stereo imaging techniques to balance and refine the frequency spectrum and create a more cohesive and transparent sound.

What To Listen For When Mastering

Credit: www.waves.com

Tools And Techniques For Mastering

When it comes to mastering music tracks, it’s important to pay attention to every detail in the mix. This includes listening for balanced levels, clarity, and overall tonality. By using specific tools and techniques, a mastering engineer can enhance and polish the finished product to achieve the desired sound.

Mastering is the final stage in music production and it involves balancing and optimizing the audio for distribution. While mastering engineers often have different preferences, there are specific tools and techniques that are commonly used to achieve quality results.

Equalizers

Equalizers are critical tools in mastering audio. They help to adjust the sound frequency by cutting or boosting specific frequencies. They offer better control and tonal balance of the music. Parametric and Graphic Equalizers are the two most common types of Equalizers used in mastering audio.

Limiters

Limiters are effective dynamics processors that are used in mastering to control the peak levels of audio. They prevent inter-sample peaks that may result in distortion. They are commonly used to increase volume levels, especially in commercial and broadcast audio productions.

Compressors

Compressors are essential mastering tools that help to control the dynamics of audio recordings. They work by reducing the volume of the audio when it reaches a specific threshold. This allows for a smoother and consistent audio output. Multiband compressors are especially popular in mastering.

Stereo Widening Tools

Stereo Widening tools are used to increase the stereo field of audio recordings. They create a wider sound stage that can help to improve the listening experience. However, it is important to be cautious when using this effect, as overdoing it can lead to phase cancellation or an unnatural sound.

Harmonic Exciters

Harmonic Exciters are audio processors used to enhance the harmonic richness of audio recordings. They add harmonics to the audio without increasing the volume. This results in a fuller, warmer, and more vibrant sound.

Saturation And Distortion Tools

Saturation and Distortion tools are creative effects used to add warmth and character to audio recordings. They work by introducing a controlled amount of harmonic distortion to the audio. However, it is important to be cautious when using these effects, as excessive use can lead to a distorted and unpleasant sound. In conclusion, mastering is an essential part of music production that requires careful attention to detail. While every mastering engineer has their preferences, the tools and techniques discussed above are crucial in achieving quality results. With the right tools and techniques, you can give your audio recordings a professional touch.

Collaborating With A Mastering Engineer

Collaborating with a mastering engineer is an essential part of the music production process. A mastering engineer is responsible for bringing out the best in your mix and making it sound as good as possible. However, working with a mastering engineer can often be a delicate and complex process. In this section, we’ll explore the best practices for collaborating with a mastering engineer, ensuring that your project is a success.

Defining Your Goals For The Project

Before collaborating with a mastering engineer, it’s essential to define your goals for the project. Do you want your music to sound warmer, brighter, or punchier? Do you want to create a specific atmosphere or mood? Whatever your goals, make sure that you are clear on what you want from the mastering process.

Giving Clear Feedback And Direction

Once you’ve defined your goals, the next step is to give clear feedback and direction to your mastering engineer. The key to successful collaboration is communication. Be open and honest about what you like and don’t like about your mix. Give specific feedback and direction, using descriptive language to articulate your ideas.

Choosing The Right Mastering Engineer

Choosing the right mastering engineer is critical to the success of your project. Look for someone who has experience in your genre and has worked on similar projects before. Check out their portfolio and listen to past work to get an idea of their style and sound. Reach out to other musicians who have worked with them before and get their feedback.

Communicating Effectively

Finally, effective communication is key to successful collaboration with a mastering engineer. Make sure you are both on the same page regarding your goals and expectations from the project. Use descriptive, straightforward language to ensure there are no misunderstandings. Be responsive and proactive in your communication throughout the process.

By following these best practices, you can successfully collaborate with a mastering engineer and ensure that your project is a success.

What To Listen For When Mastering

Credit: www.waves.com

Common Mistakes To Avoid

To produce effective mastering, it’s essential to avoid common mistakes. Proper listening is crucial when trying to create a well-balanced final mix. Knowing what to listen for and what to avoid is key to successful mastering.

Common Mistakes to Avoid When Mastering: Over-Compression and Over-Limiting Mastering is the final step in the music production process where the individual tracks are combined, compressed, and equalized to create a cohesive sound. While it is essential to get it right, sometimes, certain common mistakes are made that can significantly affect the final output of the song. Let’s dive into the common mistakes you should avoid when mastering your music. Over-Compression and Over-Limiting: One of the most common mistakes made in mastering music is over-compression and over-limiting. Compression is used to regulate the volume of individual tracks and level them out, but when too much compression is added, it can make the song sound flat and lifeless. Over-limiting is when the volume of the song is pushed to the limit, which can result in distortion. The best way to avoid this mistake is to use compression and limiting sparingly and judiciously. Excessive Use of EQ: Another mistake that is often made during the mastering process is excessive use of EQ. EQ is used to balance the sound of individual tracks and remove any unwanted frequencies. However, when too much EQ is added, it can affect the overall tonality of the song. It is best to use EQ only where necessary and always listen critically to determine if the sound is balanced. Listening to Music Only on One System: Another mistake that is often made is mixing and mastering on only one system. This can be problematic, as different systems have different frequency responses. What might sound great on one system may not sound good on another. Therefore, it is crucial to listen to your music on different systems, including headphones, studio monitors, and even car speakers, to ensure it sounds good across all systems. Choosing the Wrong Mastering Engineer: Finally, one of the most significant mistakes that can affect the final output of a song is choosing the wrong mastering engineer. Not all engineers have experience with all genres of music, nor do they have the same level of expertise. It is essential to choose the right mastering engineer who understands your genre and can bring out the best in your music. In conclusion, mastering is a vital step in the music production process, and it’s crucial to avoid common mistakes like over-compression and over-limiting, excessive use of EQ, listening to music only on one system, and choosing the wrong mastering engineer. By avoiding these mistakes, you can achieve a professional, polished, and cohesive sound for your music.

Frequently Asked Questions Of What To Listen For When Mastering

What Should I Aim For When Mastering?

When mastering, aim for concise sentences, SEO-friendly language, and unique and plagiarism-free writing. Use active voice and avoid starting sentences with certain words or phrases. Pass AI writing detection and write like a human. Keep the answer within 50 words.

What Do You Use When Mastering?

In audio mastering, various tools and methods are used to balance the tonal and dynamic elements of a recording. These tools may include equalization, compression, limiting, stereo imaging, and more to enhance the clarity, depth, and overall quality of the music.

How Do You Tell If Your Song Is Mastered Properly?

To determine if your song is mastered properly, listen through different sound systems, including high-quality headphones and speakers. The overall sound should be balanced, with all instruments and vocals clearly audible. The volume should be consistent throughout the song, without any parts standing out too prominently.

Pay attention to the low-end frequency and ensure that it’s not muddy or overpowering. Lastly, listen for any distortions or unwanted noise within the playback.

What Are The Basics Of Mastering?

The basics of mastering involve adhering to certain guidelines to ensure quality content. These include writing short sentences, maintaining an SEO-friendly and unique style, avoiding certain phrases and passive voice, and passing AI writing detection. Keep the answer within 50 words.

Conclusion

Mastering is a crucial step in creating high-quality music that is ready for public consumption. However, it takes more than just a set of great ears and expensive equipment to create a masterpiece. This blog has covered the essential elements to listen for when mastering music.

By keeping these principles in mind and using your ears, you can develop the skill set needed to make great sounding music. Remember, mastering is not an exact science, so experiment, learn and have fun!

Categories
Archive

Pro Tools First Panning Automation

Pro Tools First allows for easy panning automation using the volume automation lane. By creating breakpoints in the lane, you can switch the position of the track’s audio between the left and right speakers.

Pro Tools First is a powerful digital audio workstation that offers numerous features and tools for music production. One of the most important techniques in mixing music is panning automation, which allows you to place audio tracks in specific positions in the stereo field.

Pro Tools First offers an easy way to perform panning automation using the volume automation lane. By creating breakpoints in the lane, you can switch the position of the track’s audio between the left and right speakers. In this guide, we will explore the basics of panning automation in Pro Tools First.

Pro Tools First Panning Automation

Credit: m.youtube.com

Setting Up Panning Automation

Achieve dynamic and powerful soundscapes by setting up panning automation in Pro Tools First. This feature allows you to create movement in your mix by automating the position of audio tracks in the stereo field. Experiment with different pan settings to enhance your music production.

Panning automation is a technique used in mixing audio tracks that allows the sound to be positioned across the stereo field. It is an essential tool for achieving a balanced mix that sounds good on all types of speakers. In this blog post, we will discuss how to set up panning automation in Pro Tools First.

Creating A New Project

To get started, open Pro Tools First and create a new project. You can do this by clicking on File and selecting New Project. Give your project a name and set the tempo and time signature, then click Create.

Selecting Audio Tracks

Next, you need to select the audio tracks that you want to pan. You can do this by clicking on Track in the menu bar and selecting New. Choose Mono or Stereo for the track format depending on the type of audio file you want to add.

Adding Panning Automation

Once you have added your audio tracks, you can start adding panning automation. To do this, click on the track name and select Volume/Pan from the dropdown menu. This will open the Pan automation lane. To set up panning automation, you need to create control points on the automation lane. Click on the Pan knob and drag it left or right to create a control point. You can add as many control points as you need to achieve the desired panning effect. Pro Tools First also allows you to adjust the width of the stereo field by using the Width control. This can be found next to the Pan knob.

Summary

In conclusion, panning automation is a powerful tool for creating a balanced mix. Setting up panning automation in Pro Tools First is a simple process that involves creating a new project, adding audio tracks, and creating control points on the automation lane. With a little practice, you can use panning automation to create a dynamic and immersive audio experience for your listeners.

Working With Panning Automation

With Pro Tools First Panning Automation, working with Panning Automation becomes simpler. Automate the panning of your channels for a more efficient workflow and better sounding mix.

Panning Automation is an incredible feature available in Pro Tools First, offering users an efficient and straightforward way to adjust the stereo positioning of audio tracks over time. The automation process allows you to create engaging mixes that not only sound better but are more interesting for listeners. In this article, we will explore some of the basics of Working with Panning Automation in Pro Tools First, including “Understanding the Pan Control,” “Drawing Automation,” and “Editing Automation.”

Understanding The Pan Control

The first step in working with panning automation is to understand the pan control. This is the knob responsible for controlling the stereo width of the audio track and is typically located in the Mixer View of Pro Tools First. The pan control can be adjusted from left to right, with the center position representing the center of the stereo field. By automating the pan control, you can control precisely how the audio track moves between the left and right speakers.

Drawing Automation

Drawing automation is one of the easiest ways to work with panning automation in Pro Tools First. To do this, open the Automation View of your session, select the pan control, and start drawing the automation line. You can create complex and unique panning movements by manipulating the automation line. You can also use different shapes and angles to add variety to the panning changes. Remember to select the correct pan automation mode to ensure that your automation behaves how you want it to.

Editing Automation

After you have drawn automation, you can go in and edit it as needed. Editing automation in Pro Tools First is a seamless process. To edit the automation, all you need to do is click and drag on the automation line to move it up or down. You can also add breakpoints to the automation line, giving you even more control over the panning movements. With the ability to edit automation, you can make quick adjustments to correct any mistakes or make changes to the panning in real-time quickly. In conclusion, Panning Automation is a feature that every Pro Tools First user should have in their arsenal. By understanding the pan control, drawing automation, and editing automation, you have the necessary skills to create dynamic panning movements that bring your mixes to life.

Tips And Tricks

Pro Tools First offers incredible functionality for sound designers and music producers. Among its features is panning automation, which allows you to move sounds from one speaker to another. In this section, we’ll take a look at some tips and tricks for using panning automation to create stereo effects, work with MIDI tracks, and virtual instruments.

Creating Stereo Effects

  • Experiment with panning automation to create stereo soundscapes.
  • Use different sounds and instruments to create a fuller soundstage.
  • Try gradually moving sounds from left to right and back again.
  • Be mindful of volume levels – panning too many sounds to one side can create an imbalance in your mix.

Using Panning Automation With Midi Tracks

Panning automation can also be used effectively with MIDI tracks. Here are some ideas:

  • Pan individual MIDI tracks to create space in your mix.
  • Use automation to create a dynamic panning effect for a specific instrument.
  • Try panning MIDI drums to create a natural feel for your rhythm section.

Using Panning Automation With Virtual Instruments

Virtual instruments are a staple of modern music production. Panning automation can help you make the most of them:

  • Use panning automation to create a wider stereo image for virtual instruments.
  • Try panning different elements of a virtual instrument, such as drums or keys.
  • Experiment with different panning techniques – for example, panning instruments slightly off-centre can create a natural-sounding mix.

Conclusion

By following the tips and tricks outlined above, you can make the most of Pro Tools First’s panning automation feature. Whether you’re working with stereo effects, MIDI tracks, or virtual instruments, these techniques will help you create a more dynamic and engaging mix.

Pro Tools First Panning Automation

Credit: www.mixinglessons.com

Common Mistakes

Pro Tools First users often make mistakes when it comes to panning automation. It’s important to avoid over-panning, which can lead to a cluttered mix and to use subtle automation to enhance the overall sound. Additionally, using panning automation too frequently can be distracting and take away from the focus of the music.

Panning automation is a powerful tool that can take your mixes to new heights. It allows you to control the position of each track in the stereo field and create a more immersive listening experience. However, like any tool, it’s important to use panning automation properly to avoid common mistakes that can negatively impact your mix. In this post, we’ll take a closer look at those mistakes and show you how to avoid them.

Overusing Panning Automation

One of the most common mistakes when using panning automation is overusing it. While panning automation can bring life to your mix, too much of it can create a chaotic and unbalanced sound. It’s important to remember that not every instrument or sound needs to be panned. A good rule of thumb is to only use panning automation when it serves a purpose, such as making space for other elements in the mix.

Forgetting To Bypass Automation

Another mistake that can cause problems is forgetting to bypass automation. This can happen when you’re working on a section of the mix and forget to turn off the panning automation when moving to another section. This can result in a sudden change in the stereo field when the automation kicks in, which can be jarring for the listener. It’s important to always check for automation that needs to be turned off before moving to a different part of the mix.

Not Using Headphones

Lastly, not using headphones when working with panning automation can be a big mistake. When using speakers, the sound can bleed into both ears, which can make it difficult to hear the exact placement of a track in the stereo field. This can lead to inaccurate panning automation. To solve this problem, use headphones when working with panning automation. This will provide a more accurate representation of the sound and prevent mistakes.

Conclusion

By avoiding these common mistakes, you can achieve better results when using panning automation in Pro Tools First. Remember to use it sparingly, always turn off automation when not needed, and use headphones for optimum results. With these tips in mind, you can take your mixes to the next level and create a more dynamic and immersive listening experience for your audience.

Troubleshooting

Troubleshooting panning automation in Pro Tools First can be a challenge for new users. By checking the pan automation, adjusting track-types, and monitoring preferences, you can fix the problem and improve the quality of your mixes.

Pro Tools First’s panning automation is an essential tool for shaping tracks in your mix. But what happens when it’s not working as expected? Here are some common troubleshooting tips for panning automation in Pro Tools First.

Automation Not Playing Back

If your automation isn’t playing back, the first thing to check is that it’s enabled for playback. Right-click on the track’s automation lane and ensure that “Read” is selected. Additionally, make sure that your session’s automation mode is set to “Read” or “Latch” (or “Touch” if you’re manually writing automation). Next, check that your automation breakpoints are actually on the track. Zoom in on the automation lane and look for any blank sections. If you find any, manually create breakpoints by clicking on the line and dragging it up or down to create a point.

Pan Control Not Responding

If the pan control on a track isn’t responding to automation, there could be a few potential issues. First, check that the automation is enabled for playback (as described in the previous section). Next, ensure that the pan control is actually set to “Pan” rather than “Balance.” This can be a common mistake that can cause issues with panning automation. Additionally, ensure that the pan control is set to “Post Pan” rather than “Pre Pan.”

Audio Tracks Stuck In Mono

If your audio tracks are stuck in mono and won’t pan, it’s likely that the track itself is mono rather than stereo. Check the track’s input or output routing to ensure that it’s set to a stereo option. If you’re still having issues, try creating a new stereo track and copying the audio content over to that track. In conclusion, troubleshooting panning automation in Pro Tools First requires some attention to detail and careful consideration of your track settings. Follow these tips to ensure that your automation operates as intended and your tracks sit perfectly in the stereo field.

Pro Tools First Panning Automation

Credit: musictech.com

Frequently Asked Questions On Pro Tools First Panning Automation

How Do You Automate Panning In Pro Tools?

To automate panning in Pro Tools, click on the automation menu and select the automation parameter you want to automate. Then, draw the automation curve over the time selection using the automation pencil tool. Finally, adjust the automation curve to achieve the desired panning effect.

How Do You Automate Panning Logic?

Automating panning logic involves using software programs or plugins that can automatically adjust the stereo field of audio tracks. This can be done through various techniques, such as volume automation, EQ, or dynamic processing. The goal is to create a more dynamic and immersive listening experience by spreading out the sound and creating a sense of width and depth.

How Do I Reset Pan Automation In Pro Tools?

To reset pan automation in Pro Tools, click on the track name and select “Automation” from the drop-down menu. Then, choose “Pan” from the submenu and select “Clear” to remove any existing pan automation. Alternatively, you can use the shortcut key “Command+Option+Click” on the pan control to reset it.

What Is Panning Automation?

Panning automation is a technique used in audio engineering to position a sound source within the stereo field. It creates the impression of movement by adjusting the sound from left to right or vice versa. This effect is often used in music production and film sound design to add depth and enhance the listener’s experience.

Conclusion

Overall, Pro Tools First panning automation is a powerful tool that can enhance any audio project. With its user-friendly interface, customizable settings, and precise control over sound placement, this feature can help producers and engineers achieve their creative vision with ease.

Whether you’re mixing vocals, instruments, or sound effects, panning automation is an essential skill that should be mastered for optimal results. So, don’t hesitate to experiment and explore this feature to improve the quality of your audio projects.