Categories
Archive

Equalize Your Compressors Sidechain

To equalize your compressors sidechain, adjust the ratio, attack, release, and threshold settings in your audio software. This allows you to fine-tune the compression and improve the overall sound quality.

Also, Equalizing your compressor’s sidechain can be a crucial step in achieving the desired sound quality in your audio production. Compression is an essential tool in audio engineering, used to even out the dynamic range of a sound or mix. The sidechain is a tool that allows you to manipulate the compressor’s response to specific frequencies, to reduce noise, increase clarity, or add depth and texture to the sound.

Related reading: Sidechain Compression and How To Sidechain In Ableton. For background, see the Wikipedia article on Dynamic range compression.

Moreover, by setting the right ratio, attack, release, and threshold, you can fine-tune the compression on specific frequency ranges. This results in a more polished and professional-sounding mix. We will walk you through the process of equalizing your compressor’s sidechain. So you can take your audio production to the next level.

The Importance Of Equalizing Your Compressors

When mixing and mastering audio, compression is a common technique used to even out the dynamics of a track. However, using a compressor without equalization can result in unwanted frequency buildup and an unbalanced mix. In addition, Equalizing your compressors is a crucial step to ensure a smooth and transparent sound.

Prevents Unwanted Frequency Buildup

Furthermore, without equalization, a compressor can exaggerate certain frequencies, causing buildup in specific ranges and making the mix sound muddier and less defined. By using equalization, you can target these problematic frequencies and cut or boost them accordingly. This allows the compressor to work more efficiently and resulting in a clearer and more balanced mix.

Allows For A Smoother And More Transparent Sound

Equalizing your compressors can also assist in creating a more natural and transparent sound. Additionally, by cutting unwanted frequencies and boosting others, you can achieve a smoother transition between the compressed and uncompressed parts of the audio. This results in a more pleasing and natural sounding mix that doesn’t suffer from overly aggressive compression artifacts.

Overall, equalizing your compressors can significantly improve your mix, so treat it as an essential step in the compression process. Also, prevent unwanted frequency buildup and aim for a more transparent sound. Then every element of your track comes through clearly and sits well in the mix.

Tools Needed

Equalizing your compressors sidechain requires a few simple tools, such as a compressor, EQ plugin, and a reference track. Moreover, with these tools, you can ensure that your audio tracks are mixed with precision and clarity. This makes them sound professional and polished.

In addition, to equalize your compressors sidechain, you will need two specific tools: an Equalizer plugin and a Compressor plugin. These tools work together to balance the frequencies of the music during the mixing and mastering processes. Here is a brief description of these two plugins:

Equalizer Plugin

The Equalizer plugin is a tool that helps balance the frequencies of your music. With this plugin, you can adjust the levels of bass, mid, and treble, thus toning down or sharpening the sound. Most equalizers have a visual representation of the sound wave. This allows you to view and manage the specific ranges of frequency that need balancing.

Compressor Plugin

The Compressor, on the other hand, helps make the volume levels of the music more even. By reducing the gain of the louder parts of the music, and increasing the quieter parts, the overall volume becomes more consistent. Once the compressor is engaged, the next step is to set the threshold and ratio. This will determine how much and when the compressor will act upon the sound. In addition to these two essential plugins, some of the popular equalizer and compressor plugins that can be used include FabFilter Pro-Q3, Waves SSL G-Master Buss Compressor, and Sonnox Oxford Dynamic EQ.

These plugins have different features and settings that can help you achieve the desired outcome. It is crucial to choose the right plugins that work best with your music style and production needs. Using the right tools, you can achieve a well-balanced and well-compressed sound. By equalizing and compressing your sidechain, you can create music that has a more even volume, with controlled and balanced frequencies. So pick up the right tools, and start equalizing your compressors sidechain today!

Setting Up Your Sidechain Compression

Equalizing your compressor’s sidechain is a vital step in setting up your sidechain compression. By adjusting the EQ settings, you can customize the sidechain inputs to achieve the desired effect on your audio signal.

Sidechain compression is a powerful mixing technique that allows you to lower the volume of one track when another track plays. This technique helps to create more dynamic and open-sounding mixes. However, it requires careful setup to work correctly. In this article, we’ll explore the crucial steps involved in setting up your sidechain compression, including routing your tracks, adjusting your threshold and ratio, and activating the sidechain filter.

Routing Your Tracks Correctly for Sidechain Equalization

The first step in setting up your sidechain compression is to route your tracks correctly. To do this, you’ll need to create a bus or auxiliary track that receives the input from the track you want to use to trigger the compressor. For example, if you wanted to use a kick drum to trigger the compression on a bass guitar track, you would send the output of the bass guitar track to the bus track. Then, you would set the input of the compressor on the bus track to the kick drum track. This setup allows the compressor to lower the volume of the bass guitar track when the kick drum plays.

Adjusting Your Threshold And Ratio for Sidechain Equalization

Once you’ve set up your sidechain routing, you’ll need to adjust the threshold and ratio settings on the compressor. The threshold determines the level at which the compressor starts to reduce the volume of the secondary track. Meanwhile, the ratio determines how much the volume of the secondary track is reduced. It’s important to find the right balance between these settings and to adjust them in context with the rest of your mix. For example, if the secondary track is being completely drowned out by the primary track, you’ll need to increase the ratio and lower the threshold to ensure the compression is audible.

Activating The Sidechain Filter

Finally, you’ll need to activate the sidechain filter. This filter allows you to specify what frequency range triggers the compressor. For example, if you want the bass guitar track to be compressed only when the kick drum’s lower frequencies are playing, you would set the sidechain filter to cut the higher frequencies of the kick drum track. This step is crucial to ensuring that the compression only affects the desired frequency range and doesn’t create unwanted artifacts in the rest of the mix. In conclusion, setting up your sidechain compression correctly takes some know-how and experimentation.

By following the steps outlined in this article, you can ensure that your sidechain compression is effective and helps create a more dynamic mix. Remember to route your tracks correctly, adjust your threshold and ratio, and activate the sidechain filter to get the most out of this powerful mixing technique.

Equalize Your Compressors Sidechain

Credit: www.mixinglessons.com

Equalizing Your Sidechain

Equalizing your sidechain is an important technique that can help you achieve a more balanced mix. By equalizing your sidechain, you can remove unwanted frequencies that may be causing your compressor to trigger unnecessarily. This results in a distorted and uneven sound. Here, we’ll discuss how to identify problem frequencies and adjust your equalizer settings using a spectrum analyzer.

Identifying Problem Frequencies for Sidechain Equalization

If you’re experiencing issues with your compressor triggering too frequently or at the wrong times, the first step is to identify problem frequencies. Problem frequencies are frequencies that are particularly loud or that clash with other instruments within the mix, causing your compressor to jump in unexpectedly. To identify these frequencies, you can use a spectrum analyzer.

Using A Spectrum Analyzer for Sidechain Equalization

A spectrum analyzer is an essential tool for identifying problem frequencies in your mix. It allows you to see the frequency content of your mix in real-time, making it easy to spot problem frequencies. To use a spectrum analyzer, you’ll need to insert it into your sidechain’s plugin chain and play your mix. Look for frequencies that are notably louder than others or that clash with other instruments, and make a note of those frequencies.

Adjusting Your Equalizer Settings in Sidechain Equalization

Once you’ve identified problem frequencies using your spectrum analyzer, you can begin to adjust your equalizer settings. Using your equalizer, you can remove unwanted frequencies and boost others that may be lacking in presence. Make sure you’re adjusting the equalizer on your sidechain, not your main mix, as this can cause unwanted changes to your overall sound. Start by reducing the gain of the problem frequencies you identified, and adjust the levels of the surrounding frequencies to compensate. Take your time and make small adjustments, checking your sound regularly to make sure you’re achieving the desired effect.

Advanced Techniques

Achieving a perfectly balanced audio mix requires mastering advanced techniques such as equalizing your compressors’ sidechain. This technique allows you to control the dynamic range of different instruments in the mix. This results in a professional-sounding final product. With proper implementation, equalizing your compressors’ sidechain can take your audio engineering skills to the next level.

Using Multiband Compression In Your Sidechain

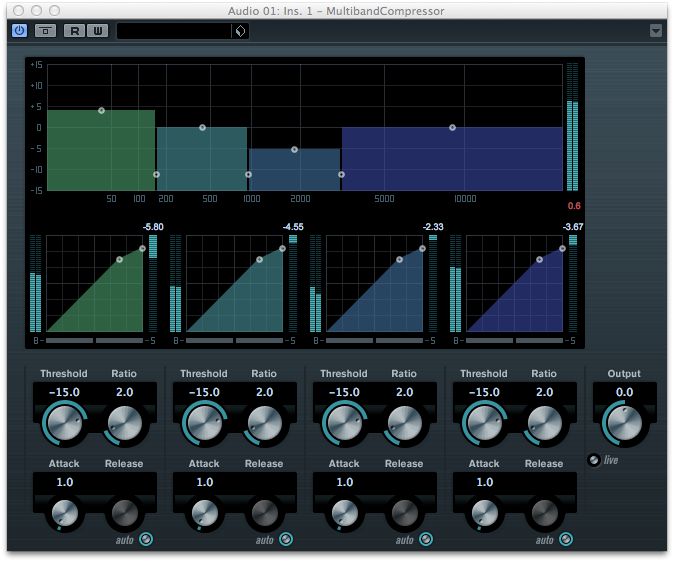
In advanced techniques, multiband compression is a great tool for refining your compressor sidechain. It provides a more selective approach for controlling the dynamics of your mix. This technique permits you to compress particular frequency bands inside the sidechain’s detector circuit. Bear in mind that too much reduction of the wrong frequencies can lead to an unnatural sound. This is why it’s essential to experiment with different settings.

Automating Your Eq Settings in Sidechain Equalization

Another advanced technique for equalizing your compressor sidechain is to automate your EQ settings. Automating your equalizer guarantees that the dynamic range of certain portions of your mix is preserved. EQ automation enables you to adjust your EQ shapes around the vocal’s syllables or kick or snare hits.

For instance, you can decrease the bass frequencies on the bass guitar only when the kick drum is played. Automating EQ settings is a type of compression that preserves the natural rhythm and timing of your instruments while giving you greater control.

Moreover, you can select specific frequencies and create EQ automation allowing you to attenuate or boost only when there is a conflict with other instruments’ frequencies.

The options are enormous, and EQ automation enables you to produce a unique audio sound that is impossible to achieve with conventional EQ.

Example

FrequentlyDecibel (dB)
30Hz-3
60Hz-7
120Hz-3
240Hz-1

Using an equalizer, you can make these cuts. On the other hand, with EQ automation, you can adjustand boost different frequencies according to the song’s dynamic range. It’s quite immersive, empowering you to make a unique sound that stands out among the rest.

Automating your EQ settings and using multiband compression is an advanced technique to equalize your compressor sidechain. Try both techniques in your next mix and enjoy the amazing benefits they offer.

Examples In Practice

Achieving a balanced sound can be difficult with multiple compressors in use, but by equalizing their sidechains, you can create a more cohesive mix. By adjusting the frequency response of each compressor’s sidechain, you can ensure that they’re all working together, keeping your mix sounding natural and dynamic.

Applying Sidechain Equalization To Drums

When it comes to music production, applying sidechain equalization to drums can make a significant difference in the overall mix. To achieve this, it is essential to use a compressor with sidechain functionality.

  • Insert a compressor plugin on the drum track.
  • Engage the sidechain function on the compressor and select the track you want to trigger the compressor, such as the bass track.
  • Configure the sidechain equalization parameters to boost or cut specific frequency ranges on the triggered track that clash with the drum track.
  • Tweak the threshold and ratio settings to achieve the desired amount of compression and gain reduction.

Applying Sidechain Equalization To Vocals

Sidechain equalization can also be useful when applied to vocals, particularly in busy arrangements. Here’s how to do it:

  1. Insert the compressor on the vocal track.
  2. Activate the sidechain function and select the track that you want to trigger the compressor, such as the piano track.
  3. Set the parameters of the equalizer to cut or amplify specific frequencies on the triggered track that compete with the vocal frequencies.
  4. Adjust the threshold and ratio to achieve the desired compression and gain reduction effect.

In conclusion, applying sidechain equalization to compressors is crucial in producing a clean and balanced mix. Whether you’re dealing with drums or vocals, the sidechain equalization technique can help you achieve the sound you’re aiming for.

Equalize Your Compressors Sidechain

Credit: www.youtube.com

Frequently Asked Questions For Equalize Your Compressors Sidechain

What Should The Compressor Settings Be For Sidechain?

The compressor settings for sidechain dependent on the type of music, desired effect, and the material being mixed. Experiment with Attack, Ratio, Threshold, and Release time. Maintain transparency when utilizing sidechain compression and also mix in consideration of low-end material.

Should I Sidechain Or Eq First?

You should apply EQ before sidechaining in most cases. EQing allows for better control of the frequency balance, while sidechaining regulates the volume levels. EQ helps achieve a cleaner sound before sidechaining, which can then be used for enhancing the mix during sidechaining.

Should You Sidechain Compression?

Yes, sidechain compression can be a useful technique for creating a more balanced mix by reducing the volume of certain instruments when others are playing. This can help to prevent clashing frequencies and improve overall clarity. However, it should be used judiciously and not overdone, as it can also lead to an unnatural sounding mix if not properly set up.

What Is The Best Ratio For Sidechain?

The best ratio for a sidechain depends on the specific use case and desired outcome. Different applications may require different ratios to optimize performance and achieve desired results. It is important to consult with technical experts and conduct thorough testing to determine the optimal ratio for your specific needs.

Conclusion

Balancing and enhancing the audio is crucial in the music production industry. Sidechain compression can be the perfect solution by giving your tracks the necessary space they need. Understanding and equalizing the compressors sidechain can achieve the desired effect. It’s important to experiment with different settings and find what works best for your specific track.

Utilize this technique to achieve a professional sound, and take your music production to the next level.
Categories
Archive

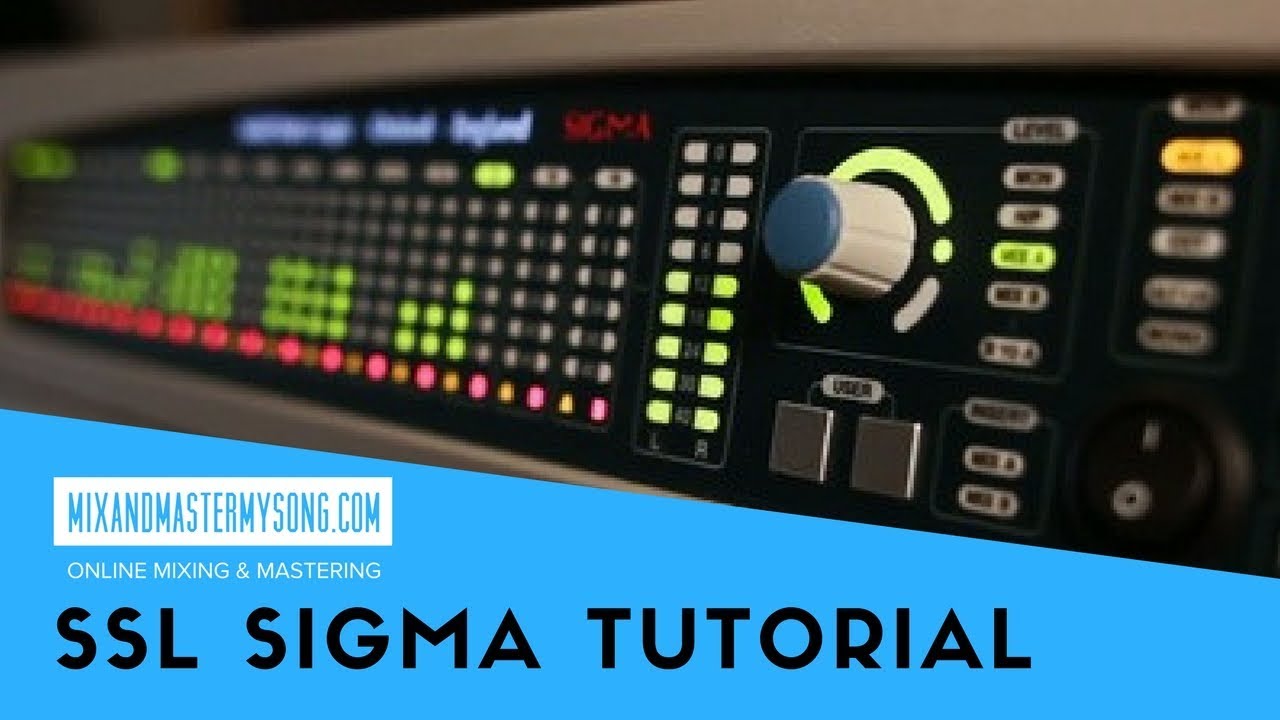
Solid State Logic Sigma Tutorial

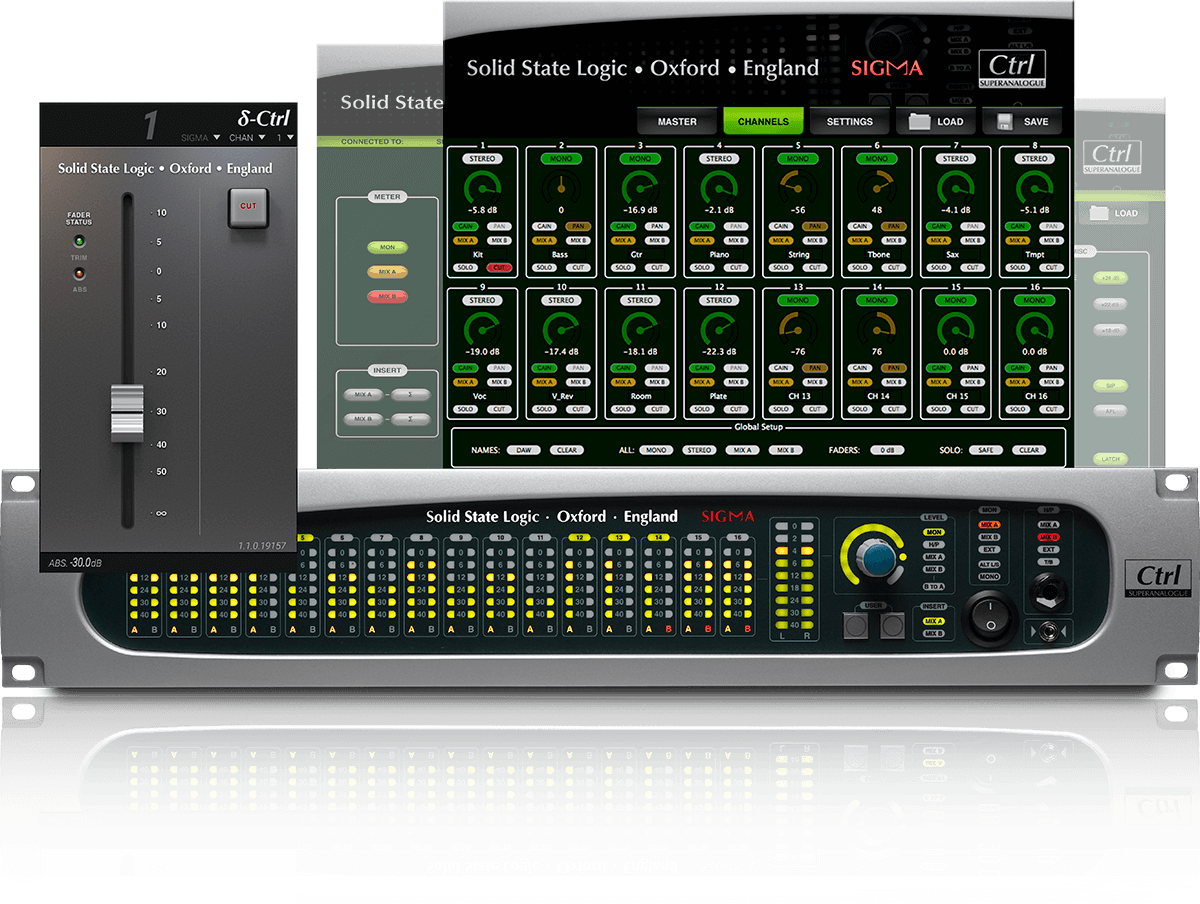
This guide covers SSL Sigma in plain terms. Solid State Logic Sigma is a workflow solution and analogue summing mixer. This tutorial will cover the features and functions of Solid State Logic Sigma, including how to use it in live sound mixing, analogue mixing, and hybrid mixing environments.

Also, Solid State Logic (SSL) is known for its advanced engineering and high-quality audio equipment. Also, the Sigma is an analogue summing mixer that was designed to improve workflow for engineers by providing an easy way to combine analogue and digital audio sources in one system.

Related reading: Analog Vs Digital Summing and SSL Uf1 A Deep Dive Review. For background, see the official Solidstatelogic website.

Moreover, it is a unique piece of equipment that gives users creative options for mixing, boosting sound quality and enhancing the dynamics of music. In addition, in this tutorial, we will take a closer look at the features of the Sigma and explore how it can work in various applications to achieve professional results.

Sigma’s Features

In addition, Solid State Logic Sigma is a premium-quality mixing console that features a wide range of advanced features. For example, its innovative functionality allows sound engineers to create professional sound outputs that sound amazing on any sound system. Here are some of Sigma’s top features:

Flexible Channel Processing for SSL Sigma

Furthermore, Sigma provides versatile channel processing that makes it easier to create customized sounds for different applications. As a result, with a range of high-pass filters, parametric equalizers, and compressors, you can adjust the sound to suit any taste. The console also allows you to integrate analogue and digital processors into the mixer, making it easier to balance between the two and achieve a more refined sound.

Advanced Automation Capabilities for SSL Sigma

Additionally, sigma’s advanced automation capabilities allow you to create complex mixes with ease. However, the mixer has a wide range of automation options that can be fine-tuned for specific sound needs, including automation for channel faders, mutes, panning, EQs, and dynamics. This feature allows sound engineers to take complete control of the mix process, making it an invaluable tool for live performances as well as studio recording and mixing.

Intuitive User Interface

Also, sigma’s user interface is straightforward and intuitive, making it easy to operate even for beginners. Then, the console provides a simple control layout that allows you to navigate the various features without any complications. The mixer’s touchscreen interface provides a rich visual representation of the sound output, which makes it easier to make precise adjustments. Moreover, the mixer’s interface can be customized to suit individual preferences, making it more user-friendly.

SSL Sigma – Solid State Logic Sigma Tutorial

Credit: m.youtube.com

Set Up And Configuration for SSL Sigma

Moreover, learn how to set up and configure the Solid State Logic Sigma in this comprehensive tutorial. From installing the software to connecting the hardware, this step-by-step guide will help you get started with your SSL Sigma.

Plugin Installation

In addition, installing the Solid State Logic Sigma plugin is a straightforward process. After purchasing the plugin, download it from the SSL website. Extract the files and run the installer. Select the plugin format compatible with your DAW, then follow the on-screen instructions. Once the installation is complete, launch your DAW and locate the SSL Sigma plugin in the plugin list.

Hardware Connections

Before connecting your SSL Sigma, ensure your equipment is turned off. Furthermore, connect the Sigma to your computer via USB and turn it on. Connect your Outboard gear as per your requirements. Select and modify the signal chain to suit your workflow. The SSL Sigma gives you the capability to switch between different routing chains without modifications to physical cabling.

System Configuration

System configuration can be a tricky process, but the Solid State Logic Sigma simplifies it with a straightforward setup process. Additionally, launch the Sigma Delta control software and select Sigma Delta-Studio Settings. In the Audio Device settings, select the appropriate audio interface, sample rate and clock source. Once you have configured these settings, you can configure routing preferences between the Sigma and your DAW or setup routing to your analog outboard gear. In conclusion, setting up and configuring the Solid State Logic Sigma is a relatively simple process. By following the above steps, you will be ready to start exploring the sophisticated routing features and premium sonic quality of the SSL Sigma.

Getting Started With Sigma

Also, a helpful Sigma tutorial can aid in getting started with Solid State Logic’s innovative software. New users can learn about the various features and tools available to maximize their experience.

Moreover, if you’re new to Solid State Logic’s Sigma, you might feel overwhelmed by its functionality and features. But don’t worry – Sigma has a streamlined interface that’s intuitive and easy to navigate. In this tutorial, we’ll walk you through the basics of getting started with Sigma, from creating a session to setting up your inputs and outputs.

Navigating The Interface for SSL Sigma

When you first launch Sigma, you’ll see a clean, uncluttered interface that’s designed to be easy to use. The main window has three sections:

  • The Mixer section, which is where you’ll be doing most of your work.
  • The Workstation section, which provides access to Sigma’s file management and session settings.
  • The Settings section, which contains global settings for Sigma.

To navigate between these sections, you can use the tabs at the top of the screen. Additionally, you can use the buttons in the top-right corner of the window to access various menus and settings.

Creating A Session for SSL Sigma

Before you can start mixing, you’ll need to create a session in Sigma. To do this, go to the Workstation tab and click on the New Session button. This will open a dialog where you can specify the name and location of your session. Once you’ve created your session, you’ll be taken back to the Mixer section. Here, you’ll see a blank mixer with no channels or inputs.

Setting Up Input And Outputs for SSL Sigma

To start routing audio through Sigma, you’ll need to set up your inputs and outputs. You can do this by going to the Settings tab and clicking on the Audio tab. Here, you’ll see a list of all of the inputs and outputs that Sigma has detected on your system. To add an input or output, simply click on the + button next to it. Once you’ve added your inputs and outputs, you can start routing audio by clicking on the Routing tab in the Mixer section. Here, you can drag and drop inputs and outputs to create your routing path. And that’s it – you’re ready to start mixing with Sigma! With its powerful features and intuitive interface, Sigma is a great choice for anyone looking to take their mixing to the next level.

Working With Sigma’s Channel Strip

Solid State Logic Sigma is a powerful mixer that offers flexibility and versatility like no other. One of its key features is the Channel Strip, which allows you to process your audio signals with precision and finesse. With Sigma’s Channel Strip, you can shape your sound as if you’re working with a classic analog mixer. Let’s take a closer look at how you can use Sigma’s Channel Strip.

Eq Section

The EQ section is the heart of the Channel Strip and allows you to shape your audio signals by boosting or cutting specific frequencies. Sigma’s EQ section includes four bands of EQ with switchable high and low pass filters. This allows you to make precise adjustments to your audio signal and tailor it to your needs. The EQ section also features a variable Q control, which lets you adjust the width of the filter bands and create a more gentle or sharper curve.

Dynamics Section

The Dynamics section is where you can apply compression, limiting, and gating to your audio signal. Sigma’s Dynamics section includes a sophisticated compressor/limiter with variable threshold, ratio, attack and release times. You can also use the sidechain options to trigger the compressor from an external source. The gating section includes adjustable threshold, attack, hold, and release controls, which is useful for reducing unwanted noise or bleed from other channels.

Filters And Stereo Width

Sigma’s Channel Strip also includes a high-pass filter with adjustable frequency and a variable-width stereo spread control. The high-pass filter is useful for removing unwanted low-frequency rumble or noise, while the stereo spread control lets you adjust the width of the stereo image for a broader or more focused sound. The filters and stereo width controls are a great way to add depth and dimension to your mix without having to resort to complex processing techniques.

Advanced Automation Techniques

Learn how to use advanced automation techniques with Solid State Logic Sigma through this tutorial. Discover new ways to maximize your workflow and improve your audio production.

Solid State Logic (SSL) Sigma is a high-quality mixing console that has gained wide recognition in the professional audio industry. One of its key features is its automation capabilities, allowing users to streamline workflows and create custom mixes with ease. In this tutorial, we will focus on some advanced automation techniques that can take your mixing game to the next level.

Basic Automation Workflow

Before diving into the advanced techniques, let’s first understand the basic automation workflow in SSL Sigma. The console features motorized faders and rotary encoders, which can be automated to control various parameters such as volume, pan, and EQ. You can record the automation data and edited using the SSL Sigma Remote software, or directly on the console itself.

Customizing Channel Strip Automation for SSL Sigma

SSL Sigma allows for complete customization of channel strip automation, giving users the ability to fine-tune their mixes to perfection. Users can create custom automation curves, adjust automation sensitivity and even automate plug-in parameters. The console also has a feature called “Q-Link,” which enables users to control multiple parameters with a single fader or knob.

Using Snapshot Automation for SSL Sigma

Snapshot Automation is another powerful feature in SSL Sigma that allows users to save and recall specific console settings instantly. This is especially handy when switching between different parts of a song or when mixing for different artists. You can record Snapshot Automation along with other automation data for complete mixing flexibility. In conclusion, with its powerful automation capabilities and advanced features, Solid State Logic Sigma is a top-of-the-line mixing console that can take your mixing skills to new heights.

SSL Sigma – Solid State Logic Sigma Tutorial

Credit: mixandmastermysong.com

Tips And Tricks For Using Sigma

Learn how to make the most out of your Solid State Logic Sigma mixer with our comprehensive tutorial! Our tips and tricks cover everything from routing and EQ to compression and dynamics control, helping you get the most from this powerful mixing tool.

Solid State Logic Sigma Tutorial is an advanced mixing tool that offers a lot of features for producers and engineers. It can be a bit overwhelming at first, but with a little bit of practice and some tips and tricks, you can master it quickly. In this article, we will discuss some tips and tricks that will help you use Sigma optimally. Here are some of the things that we will cover:

Maximizing Cpu Performance for SSL Sigma

One of the benefits of using Sigma is that it can help you save CPU power. However, to do this, you need to make some adjustments to the settings. First, try to disable any unnecessary plugins or channels that are not used in your session. Additionally, turn off any visualizations and animations that may consume more processing power. Another way to save some CPU power is to use automation sparingly. Automating too many parameters can quickly eat up your CPU power.

Using Sigma For Mixing And Mastering

Sigma is an excellent tool that can be used for both mixing and mastering. One of the most useful features is its ability to change the mix bus and insert processing quickly. This means that you can switch between different EQs, compressors, and saturation plugins without having to re-route anything. Sigma also provides separate control over the wet/dry mix, which is helpful when applying parallel processing. Additionally, you can use Sigma to create custom monitoring setups. For instance, you can use the monitor control to route multiple studio speaker sets seamlessly.

Troubleshooting Common Issues for SSL Sigma

Sigma is a potent plugin, but it’s not immune to issues. Here are some of the common Sigma issues and how to solve them:

  • Sigma not loading: If Sigma fails to load, try reinstalling the plugin or restarting your DAW.
  • Inconsistent sound: If your mix is sounding different than usual, try bypassing Sigma and see if the sound improves. If the sound is the same without Sigma, then the issue is probably with other elements of the mix.
  • Latency issues: Sigma may introduce latency in some DAWs. To solve this, try adjusting your DAW’s audio buffer size or disable any visualizations that consume too much CPU.
  • Compatibility issues: Sigma can be quite picky about the format it uses, so make sure that you are using the correct version for your DAW and operating system.

In conclusion, Solid State Logic Sigma Tutorial is an excellent tool for mixing and mastering. With a little bit of practice and some tips and tricks, you can use Sigma optimally to improve your mixes. Whether it’s maximizing CPU performance or troubleshooting common issues, Sigma has a lot to offer. So, go ahead and give it a try, and you won’t be disappointed!

SSL Sigma – Solid State Logic Sigma Tutorial

Credit: solidstatelogic.com

Frequently Asked Questions For Solid State Logic Sigma Tutorial

What Is The Solid State Logic Sigma?

The Solid State Logic Sigma is a remote control unit designed for use with DAWs and analog equipment.

What Features Does The Sigma Offer?

The Sigma offers hands-on control, digital connectivity, and the ability to switch between multiple analog devices.

How Can The Sigma Improve My Workflow?

The Sigma can save time and streamline your workflow through its integration with various software and analog equipment.

Is The Sigma Easy To Use?

Yes, the Sigma has an intuitive design that is easy to navigate, even for those new to using remote control units.

Conclusion

The Solid State Logic Sigma provides advanced mixing capabilities that simplify the process for professional sound engineers. By focusing on flexibility and power, this tutorial has shown how to navigate the interface, redesign multiple channels, and save presets. The SSL Sigma is the perfect tool for mixing multiple analog and digital audio sources while maintaining high sound quality.

Sharpen your audio mixing skills with the Solid State Logic Sigma today.

Categories
Archive

How To Get A Loud Punchy Master

To get a loud and punchy master, use a combination of compression, EQ, and limiting. When mastering your audio, you want it to stand out and be heard in a crowded field.

In order to achieve this, it’s important to use some specific tools and techniques to give your audio that extra oomph. Compression is useful for controlling the dynamic range of your audio, while EQ can help you to carve out any problem areas in your audio spectrum.

Limiting is also critical, as this will help you to push your levels as high as possible without introducing distortion. By mastering these tools and techniques, you’ll be able to achieve a cool, bold sound that will sound fantastic on any system.

How To Get A Loud Punchy Master

Credit: m.youtube.com

Understand Compression

When it comes to achieving a loud and punchy master for your music tracks, understanding compression is crucial. Compression is a tool used to control the dynamic range of audio signals, which is the difference between the loudest and quietest parts of a track. In this post, we’ll take a closer look at compression, including what it is, how it works, the different types of compression, and its applications in mastering.

What Is Compression?

Compression is a process that reduces the dynamic range of an audio signal by attenuating the loudest parts and amplifying the quieter parts. This results in a more even overall volume level, which can make a track sound louder and more consistent. Compression is often used in music production to help instruments sit well in a mix, to tame peaks and bring out detail.

How Does Compression Work?

Compression works by setting a threshold level, which determines the point at which the compression kicks in, and a ratio, which determines how much the audio signal is attenuated beyond that point. When the audio signal exceeds the threshold level, the compressor begins reducing the level of the signal by the amount set by the ratio. This creates a more consistent overall volume level, without exceeding the maximum level allowed.

Types Of Compression

Type of CompressionDescription
VCA CompressionUses voltage controlled amplifiers to apply compression
Optical CompressionUses an optical circuit to apply compression
FET CompressionUses field-effect transistors to apply compression
Variable-Mu CompressionUses vacuum tubes to apply compression

Applications Of Compression In Mastering

  • Dynamics Control: Compression can help control the dynamics of a mix, ensuring all elements are heard and none are too loud or too quiet.
  • Tightening: Compression can help tighten up a mix, making it sound more cohesive and professional.
  • Clarity: Compression can help bring out the details in a mix, making it sound more clear and defined.
  • Loudness: Compression can help make a mix sound louder and more punchy, without exceeding the maximum level allowed.

By understanding compression and its applications in mastering, you can achieve a loud and punchy master that sounds professional and cohesive. Keep in mind that compression is just one tool in the mastering process, and it’s important to use it in combination with other tools, such as EQ and limiting, to achieve the best possible results.

Eqing Your Master

Achieving a loud and punchy master requires careful EQing. Start with a balanced mix and use EQ to enhance the desired frequencies. Avoid over-compressing or limiting and make subtle adjustments for a polished final product.

As a music producer, mastering your tracks is crucial to ensure that your music is ready for distribution. One of the essential steps in mastering is equalization or EQing. It involves adjusting the balance between different frequencies in your mix. In this section, we will explore what equalization is, different types of EQ, and how to use EQ to create a loud, punchy master.

What Is Equalization?

Equalization or EQ is a process of adjusting the balance of different frequencies in your mix. It is done by boosting or cutting specific frequency ranges to improve the overall sound quality of your track. EQing can be done at the individual track level or during the mastering phase of your music production.

How To Use Eq

Using EQ during mastering needs patience, skills, and practice. Correct use of EQ can significantly improve the sound quality of your track. Follow these steps to use EQ effectively:

  1. Load your mastered mix into a new session.
  2. Apply a high pass filter to eliminate unwanted low frequencies.
  3. Listen to the mix and identify problematic frequencies.
  4. Use a parametric EQ to cut or boost specific frequency ranges.
  5. Be subtle with your EQ adjustments to avoid over-processing.
  6. A/B test your mix to ensure that your adjustments have improved the overall sound quality of your track.

Types Of Eq

There are different types of EQ plugins that you can use during mastering, each with their unique features and characteristics, including:

EQ TypeDescription
Parametric EQAllows you to adjust the center frequency, bandwidth and amplitude of equalization.
Graphic EQHas a set number of fixed frequency bands that you can adjust.
Dynamic EQApplies EQ adjustments to specific frequency ranges based on input level.
Multiband EQAllows you to adjust different frequency ranges with separate EQ bands, ideal for more complex EQ adjustments.

Tips For Eqing Your Master

When EQing your master, follow these tips to achieve a loud, punchy master:

  • Use EQ as a complementary tool to enhance your mix, not as a corrective tool to fix problems.
  • Avoid over-processing by making subtle adjustments.
  • Start by cutting frequencies that don’t need to be in your mix.
  • Boost the kick and bass frequencies to create a punchy mix.
  • Use a spectrum analyzer to identify problem frequencies.
  • Perform frequent A/B testing to evaluate your adjustments.

Preparing Your Mix To Be Mastered

Before you begin mastering, ensure that your mix is well balanced, and each element is audible. Here are some tips to prepare your mix for mastering:

  • Avoid clipping and ensure that your levels are within the acceptable dB range.
  • Eliminate unwanted artifacts such as clicks, pops, and noise.
  • Ensure that your tracks are arranged appropriately, and there is no phase cancellation.
  • Use reference tracks to evaluate the loudness and tonality of your mix.

Setting Up An Effective Mastering Chain

Creating an effective mastering chain involves selecting the right plugins, the correct order of these plugins, and applying the necessary adjustments. Here is an example of a mastering chain:

  1. EQ – Cut unwanted frequencies and boost desirable ranges.
  2. Compressor – Control dynamics and bring out more detail in your mix.
  3. Limiter – Reduce peaks and increase loudness without clipping.
  4. Stereo Widener – Expand the stereo field and create more space in your mix.
  5. Loudness Meter – Ensure that your track meets the desired loudness standards.
  6. Dithering – Apply noise shaping to reduce quantization distortion during conversion to a lower bit depth format.

Now that you know how to EQ your master effectively, try implementing these techniques to create a loud and punchy master. Remember, mastering takes practice, patience, and attention to detail, so keep experimenting and refining your skills.

Maximizing Your Dynamics

In music production, dynamics refer to the range of volume in a song. Maximizing your dynamics will produce a loud and punchy master that stands out among others. There are various techniques to achieve this, with the use of limiters and multiband compression being the most effective.

What Are Dynamics?

Dynamics in music refer to the variation in volume between different sections or parts of a song. It is what gives a song its emotional impact by creating tension, release, and drama. The use of dynamics is what sets professional recordings apart from amateur ones.

How To Use Limiters

Limiters are compressors that operate on the loudest parts of a song, reducing their volume to increase overall loudness without causing distortion. To use a limiter, first, adjust the threshold to the point where the quieter parts of the song are left untouched. Then, adjust the makeup gain to increase overall loudness while ensuring that the limiter does not crush the dynamics altogether. Repeat the process until you achieve the desired level of loudness.

Multiband Compression

Multiband compression operates on specific frequency ranges, allowing for more precise control over dynamics. To use multiband compression, first, identify which frequency ranges require compression. Then, adjust the threshold, attack, and release settings for each band to achieve a balanced and punchy sound across the frequency spectrum. This technique should be used sparingly to avoid squashing the dynamics too much.

Tips For Maximizing Dynamics On Your Master

  • Use EQ to remove unnecessary low-end frequencies that may cause muddiness and reduce the clarity of your mix.
  • Ensure that your mix is properly balanced and not overly compressed before applying additional limiting and compression on the master channel.
  • Avoid over-limiting, which can cause distortion and reduce the impact of the quieter sections of the song.
  • Use the A/B comparison feature on your limiter to compare your mixes with professional recordings to ensure that you are on the right track.
  • Master your tracks at an appropriate loudness level to avoid causing fatigue to listeners’ ears.

By applying these techniques and tips, you can achieve a loud and punchy master that competes with professional recordings. Remember to always use your ears as your guide and avoid overdoing it to produce a balanced and dynamic sound.

Stereo Imaging

To achieve a loud and punchy master, stereo imaging plays a crucial role. Focus on widening the stereo field by using panning techniques and adding stereo effects to individual tracks. This gives the mix a sense of depth and clarity, resulting in a more impactful and professional sound.

Understanding Stereo Imaging

Stereo imaging refers to the perceived spatial relationship between sounds in a mix. A good stereo image can create a wider, deeper, and more engaging listening experience. In mastering, stereo imaging is especially important, as it can help individual elements stand out in the mix and create a sense of balance. Understanding stereo imaging is the first step to achieving a loud, punchy master.

How To Use Stereo Widening

Stereo widening is a technique used to enhance the stereo field of a mix. It can make a track sound wider and more three-dimensional. But, it’s essential to use stereo widening carefully because too much can lead to phase cancellation and a weaker mono mix. To use stereo widening, apply it in small amounts to elements that benefit from a wider stereo field, like synths, backing vocals, and guitars.

How To Use Panning

Panning is a basic technique used to position sounds in a stereo mix. It helps to create a sense of space, depth, and balance. Panning individual elements can create separation between sounds, making it easier to distinguish each element of the mix. To use panning, experiment with different positions for each element in the mix. Keep in mind that low-frequency elements like bass and kick drums should typically be panned center to maintain a strong low end.

Mid/side Imaging Techniques

Mid/side imaging techniques can help to create a more defined stereo image. The mid channel contains information that is present in both left and right channels, while the side channel contains information that is unique to each side. Using mid/side processing can allow you to adjust the stereo image without affecting the center of the mix. Try adding a mid/side EQ to boost the side channels or using a mid/side compressor to control the stereo image.

Tools For Stereo Imaging On Your Master

There are several tools available to help with stereo imaging in the mastering process. Widening plugins like Ozone’s Imager can enhance stereo width, while EQ plugins like FabFilter’s Pro-Q 3 offer mid/side processing for precision control over the stereo field. Additionally, metering plugins like Voxengo’s SPAN can help identify and correct phase cancellation issues that may arise from over-processing the stereo image. Proper use of these tools can help create a loud, punchy master with a well-defined stereo image.

Preparing Your Master For Export

To get a loud and punchy master ready for export, it’s essential to start with a well-mixed track. Make sure the levels are balanced, and there’s no distortion. Then, apply compression, EQ, and limiting to enhance dynamics and loudness without sacrificing quality.

Are you a music producer or sound engineer who wants to know how to get a loud punchy master? Look no further! In this section, we will focus on the crucial steps to prepare your master for export. Following these steps will help ensure that your final master is of high quality and ready for distribution.

Setting The Final Limiter

The final limiter is an essential tool in the mastering process. It ensures that the audio level does not exceed the maximum threshold, giving your music a polished, coherent sound. When setting the final limiter, make sure that the gain reduction levels are not too high as this can result in audio distortion. Use a limit between 1-3dB to avoid excessive compression.

How To Export Your Audio

Exporting your audio correctly is critical to ensuring that you get the best possible sound quality. First, select “Export Audio” in your digital audio workstation (DAW). Next, open the export settings window and select the desired audio format and sample rate. Set your export as a WAV file as this format retains the highest quality of your audio.

Export Formats And Settings

Choosing the right export format and settings can make a significant difference to your final master. We recommend exporting as a WAV file as it is an uncompressed audio format that retains the highest quality of your audio files. Additionally, ensure that your sample rate is set to 44.1kHz or higher, as this provides a professional-grade sound that is compatible with most distribution platforms.

How To Check Your Master For Errors

Before sending your master for distribution, it is essential to check for any potential errors. Use spectrum analyzers or loudness meters to ensure your audio is not peaking excessively or suffering from poor frequency balance. Make sure that your track sounds great and is free from any artifacts or unwanted noises.

Preparing Your Master For Distribution

Once you have checked and exported your master, it’s time to prepare it for distribution. We recommend that you normalize your audio to prevent any loss of volume during playback. You can also add metadata such as track info, artist name, and artwork. Once you have completed these steps, you are ready to send your master to a distribution platform. With these essential steps for preparing your master for export, you are on your way to getting a loud, punchy master that is ready for distribution. Keep in mind that mastering is an art, and your approach may vary based on your preferences, equipment, and listening environment. But these steps will help you achieve the best possible sound for your music.

How To Get A Loud Punchy Master

Credit: www.audio-issues.com

Frequently Asked Questions On How To Get A Loud Punchy Master

How Can I Make My Master Louder?

To make your master louder, you can use equalizers to boost specific frequencies or use a limiter to increase overall loudness without clipping. It’s important to use these tools carefully to avoid damaging the audio quality or causing distortion. Additionally, making sure your original recordings are high quality and properly mixed can also help improve overall loudness.

How Do You Make A Mix More Punchy?

To make a mix more punchy, use compression and EQ. Use a compressor to reduce the dynamic range and make the sound louder. Adjust the EQ to emphasize the mid and high frequencies. Use distortion or saturation to add harmonics.

Finally, use limiting to increase the overall volume without clipping.

How Do You Get The Right Amount Of Punch In Your Master?

To get the right amount of punch in your master, you should start by making sure each track is well balanced and not competing for space. Use compression, EQ, and saturation to enhance the desired frequency ranges and add harmonics.

Use a limiter to adjust the overall loudness without clipping or distorting the mix. Experiment with different settings until the desired punch is achieved.

How Do You Get Loud And Clear Masters?

To get loud and clear Masters, follow these guidelines: 1. Use high-quality audio recording equipment. 2. Maintain a consistent recording level. 3. Monitor and adjust the EQ and compression settings. 4. Use a limiter to prevent audio clipping. 5. Ensure the final mix is balanced and free of distortion.

Conclusion

Achieving a loud and punchy master requires not just technical expertise, but also a great deal of perseverance. It involves understanding the intricacies of compression, EQ, and limiting, while also recognizing the unique needs of each track. By adhering to the guidelines discussed you can be well on your way to creating a master that stands out and grabs the listener’s attention.

Remember, mastering is both an art and a science, and with practice, dedication, and a willingness to learn, you can achieve the results you desire.

Categories
Archive

Use Multiband Compression Vocals

Multiband compression can enhance a vocal’s clarity and balance. It achieves this by compressing specific frequency bands independently, allowing for targeted control of the vocal dynamics.

Multiband compression is a powerful tool for achieving a polished vocal sound. Unlike traditional compression, which applies the same level of compression to the entire audio signal, multiband compression allows for focused control of specific ranges of frequencies. This targeted control helps to ensure that specific aspects of the vocal performance, such as sibilance or low-end rumble, are properly compressed without affecting other areas of the sound.

When used correctly, multiband compression can enhance a vocal’s clarity, balance, and impact, making it an essential technique for any serious vocal producer or music engineer.

Use Multiband Compression Vocals

Credit: www.soundonsound.com

The Basics

Multiband compression is a useful technique for vocals as it enhances tonal balance and reduces harshness. By splitting the audio into different frequency bands and applying compression independently, the dynamic range is better controlled, resulting in a more polished sound.

How Does Multiband Compression Work?

Multiband compression is a technique used to compress different frequency ranges or “bands” separately, giving more control over the tonal balance of a sound. In simpler terms, multiband compression takes the whole frequency spectrum and divides it into several smaller frequency ranges that can be processed individually. By processing different bands separately, you can achieve more precise control over the levels of specific frequencies and make sure that important elements, such as vocals, stand out in the mix.

What Are The Different Bands In Multiband Compression?

Multiband compression divides the frequency spectrum into various bands such as lows, mids, and highs. Typically, it may have around three to five bands that cover the full frequency spectrum. The number of bands can vary based on the intended purpose and personal preference. Each band can be further processed separately, using its threshold, ratio, attack, and release settings. When using multiband compression on vocals, it is essential to split the frequency spectrum to make proper compression adjustments. Placing more emphasis on vocals, while compressing the background noise, will improve vocal clarity and ensure that all frequencies are at their optimal levels in the mix. In conclusion, multiband compression is an effective technique to improve the overall sound quality of vocals in a mix. By dividing up the frequency spectrum and compressing each band separately, you can achieve a well-balanced mix that allows the vocals to stand out. Understanding the basics of multiband compression is necessary to make the right adjustments that enhance the quality and clarity of the vocals in any audio track.

Use Multiband Compression Vocals

Credit: m.youtube.com

Best Practices

Multiband compression on vocals is a useful technique to adjust and balance the tonal qualities of a recording. By dividing the frequency range into different bands, it allows for more precise control over the dynamics and adds depth and clarity to vocals in a mix.

Multiband compression for vocals is a popular technique used by many audio engineers to achieve a balanced and polished sound. But proper execution of multiband compression is essential to avoid over compression and produce a nuanced vocal mix. In this post, we’ll discuss the best practices to use multiband compression on vocals.

When Should You Use Multiband Compression On Vocals?

Multiband compression can help to control the dynamics of a vocal mix, making it sound polished and cohesive. It is useful when you want to control specific frequency ranges of the vocal mix and compress them differently. You typically use multiband compression when the dynamic range of the vocal mix is wide, and the vocals have inconsistent levels.

What Are Some Common Settings Used For Vocal Multiband Compression?

To get the best results with multiband compression, it is essential to understand the settings commonly used. Here are some of them:

  • Threshold: It decides at what point the compression will start working. The lower the threshold, the more the compression effect.
  • Ratio: It refers to the amount of compression applied once the signal crosses the threshold. The higher the ratio, the more compression applied to the signal.
  • Attack and Release: These are the times taken to activate and release compression. Quick settings can create an edgy sound, and slow settings can cause pumping.
  • Makeup Gain: It restores the output gain lost after compression. The objective is to restore the original level of signals before compression.

How Can You Avoid Overusing Multiband Compression On Vocals?

Using excessive multiband compression can lead to a loss of dynamics and create an artificial sound. Here are some tips to help you avoid over-compression:

  • Listen to the mix after every tweak and ensure that the mix doesn’t lose its natural sound.
  • Use multiple bands only if necessary. Keep in mind that using more bands on vocals can sometimes lead to an over-processed sound.
  • Start with lower compression ratios and thresholds and work your way up gradually.
  • Watch out for unwanted artefacts such as distortion and pumping.

Multiband compression on vocals can be a powerful tool to add nuance and balance to your mix. Keep these best practices in mind, and you’ll be able to produce a polished, professional sound.

Advanced Techniques

Multiband compression is a powerful technique that can be used to enhance vocals in music production. By using multiband compression, you can achieve a smoother and more consistent vocal sound, which can make a big difference to the overall quality of your mix.

Advanced Techniques: Use Multiband Compression Vocals

Multiband compression is an essential tool to have in your mixing arsenal. It allows you to control the dynamics of your vocals across specific frequency bands, enhancing their clarity and presence. While it’s a well-known fact that multiband compression can be used to shape and tame a vocal’s dynamic range, it can do much more than that when used creatively and intelligently. In this article, we’ll explore some advanced techniques that will bring your vocal mixing game to the next level with multiband compression.

How Can Multiband Compression Be Used Creatively On Vocals?

Multiband compression can be used creatively on vocals to create a unique and dynamic sound. By splitting the frequency spectrum of the vocal and applying different settings to each band, you can emphasize or de-emphasize specific aspects of the vocal performance. For instance, you could use multiband compression to reduce the sibilance of a singer or add warmth to the low end. You could also use multiband compression to add texture and character to a vocal, creating a more interesting and engaging sound. The possibilities are endless, and the key is to experiment with different settings and find what works best for the specific vocal performance.

What Are Some Advanced Settings For Vocal Multiband Compression?

To use multiband compression effectively, you need to understand the different settings available and how they affect the sound of your vocals. Here are some advanced settings to consider:

  • Threshold: Set the threshold for each band to achieve the desired dynamic range reduction.
  • Ratio: Adjust the ratio to control the amount of gain reduction applied to the band.
  • Attack: Set the attack time to control how quickly the compressor responds to changes in level.
  • Release: Set the release time to control how quickly the compressor releases the gain reduction.
  • Knee: Adjust the knee to control the compressor’s transition between the unprocessed and compressed signal.
  • Makeup Gain: Apply makeup gain to increase the level of the compressed signal to match the original level.

What Are Some Alternative Techniques To Multiband Compression For Vocal Mixing?

While multiband compression is a powerful tool, it’s not always the go-to solution for every vocal mixing situation. Here are some alternative techniques to consider:

  • Equalization: Use equalization to adjust the frequency response of the vocals.
  • De-essing: Use de-essing to reduce the sibilance of a vocal performance.
  • Parallel Compression: Use parallel compression to enhance the presence and impact of a vocal performance.
  • Saturation: Use saturation to add warmth and character to a vocal performance.
  • Automation: Use automation to adjust the level and other parameters of the vocals throughout the song.

In conclusion, multiband compression is a powerful tool for vocal mixing that can be used creatively and intelligently to enhance the sound of your vocals. By experimenting with advanced settings and alternative techniques, you can find the right approach for each vocal performance and create a unique and dynamic mix that stands out from the rest.

Use Multiband Compression Vocals

Credit: www.stockmusicmusician.com

Frequently Asked Questions Of Use Multiband Compression Vocals

Should You Use Multiband Compression On Vocals?

Yes, multiband compression can be effective on vocals to achieve an even and balanced sound. However, it should be used with caution and adjusted based on the specific needs of the vocal track. It’s important to avoid over-compressing and to use proper EQ and other techniques in conjunction with multiband compression for optimal results.

When Should You Use Multiband Compression?

Multiband compression is useful when you want to compress different frequency ranges separately. It helps in controlling the dynamics of a mix and managing the louder and quieter parts of individual tracks. It can be used to enhance clarity and balance in a mix, and to manage frequency masking between tracks.

Why Use Multiple Compressors On Vocals?

Multiple compressors are used on vocals to control the dynamics and improve the clarity of the sound. By using different compressors with different settings, you can target specific aspects of the vocals, such as reducing sibilance or evening out the volume.

This can result in a more polished and professional sound.

What Type Of Compression Is Best For Vocals?

The best type of compression for vocals is typically a gentle-to-moderate opto compressor or a transparent VCA compressor with a low ratio. These can help level out dynamics, reduce peaks, and smooth out the vocal sound without adding unwanted artifacts.

Ultimately, the best approach depends on the specific vocalist and style of music.

Conclusion

Multiband compression is a powerful tool to take your vocal sound to the next level. By effectively controlling the dynamics of the vocals, multiband compression can make them sound fuller, more consistent, and professional. However, it’s essential to use multiband compression judiciously and with a clear understanding of how it affects your sound.

Remember to experiment with different settings and listen carefully to the results. When used properly, multiband compression can be a game-changer in making your vocal tracks sound their best. Happy mixing!

Categories
Archive

Can You Mix a Song Without Stems

Mixing a song without stems is possible, but it can be challenging. It requires a lot of creativity and skills to make the track sound cohesive and balanced.

Mixing a song is an essential aspect of producing music. It involves adjusting and manipulating individual audio tracks to create a polished and coherent sound. However, when you don’t have the original stems, the process becomes much more difficult. Stems are individual tracks of an audio recording, such as vocals, drums, guitars, and bass.

They provide the flexibility to adjust each element of a song’s mix separately. Mixing without stems means working with only one or two stereo files, which can limit your options. Nevertheless, some talented mixing engineers can create amazing mixes with less. We will explore the challenges of mixing without stems and provide some tips to help you navigate this terrain.

Importance Of Stems In Mixing

Anyone who has dabbled in the world of audio mixing knows how important stems are in the process. In simple terms, stems represent isolated audio tracks (e.g., drums, guitar, vocals) that have been grouped together and exported as one audio file. These stems are an essential tool for mixing engineers, and their use can make all the difference in the final sound quality of a song.

What Are Stems In Mixing?

In layman’s terms, a music stem is a collection of tracks that represent various parts of a song, such as the drums, bass, guitar, and vocals. These tracks can be edited independently and mixed together to create a final product. Stems are usually exported in WAV or AIFF format, and they allow mixing engineers to have more control over the sound of a song during the mixing process.

Why Are Stems Essential?

Stems are essential for mixing because they allow mixing engineers to manipulate each track individually and make adjustments to the overall sound of the song. Mixing engineers can adjust the levels, EQ, compression, and other effects on each stem, isolate problematic tracks, and make necessary changes to parts of the song.

Without stems, the mixing process would be significantly more complicated, as mixing engineers would have to work with one single stereo audio file that contained all of the tracks. This lack of control and precision would make it much harder to achieve a polished final product.

Conclusion

As we have seen, stems are essential in the mixing process. They provide more control and precision in the mixing process, allowing engineers to achieve a much higher quality final product. So, if you are planning to mix a song, it is crucial to ensure that you have access to high-quality stems.

Challenges Of Mixing Without Stems

Mixing without stems poses several challenges for audio engineers. It makes it difficult to isolate specific elements in the track, such as vocals or individual instruments. Without proper separation, it can be challenging to fine-tune the mix and achieve the desired sound.

Mixing is an essential part of music production that involves combining different tracks into one cohesive arrangement. While having separate audio files, known as stems, for each instrument and vocal track makes mixing easier, it is possible to mix a song without stems. However, mixing without stems presents several challenges that can make it difficult to achieve a professional-sounding mix.

Limited Control Over Individual Tracks

When mixing without stems, the producer has limited control over individual tracks. Instead, they must rely on processing techniques like EQ, compression, and panning to shape the overall sound. This can make it challenging to address specific issues in the mix, such as a muddy bass or harsh vocals. Additionally, without access to individual tracks, it can be hard to add or remove elements from the mix and to make subtle adjustments in volume or tone.

Difficulty In Making Significant Changes

Mixing without stems can also make it difficult to make significant changes to the arrangement. For instance, if the producer decides to change the chord progression or add a new section to the song, they may need to reconstruct the entire mix from scratch. This is because they do not have access to the individual tracks that make up the song. Consequently, making significant changes to the mix can be time-consuming, tedious, and may not yield the desired results. In summary, mixing without stems presents several challenges that can make it difficult to achieve a professional-sounding mix. Limited control over individual tracks and difficulty in making significant changes are some of the challenges that producers face when mixing without stems. While it is possible to mix a song without stems, it is advisable to have separate audio files for each track to make the mixing process more manageable and efficient.

Approaches To Mixing Without Stems

Mixing a song without stems can be a challenging task, but there are various approaches to make it possible. These include using EQ and compression techniques, working with phase inversion and utilizing stereo wideners. With the right approach and skills, it is possible to achieve a quality mix without stems.

When it comes to audio mixing, the general rule of thumb is that you need access to all of the individual stems to get the most control and creative freedom. However, there can be situations where you have to mix a song without the stems, say, when you’re dealing with an old recording or a live performance. In such cases, you may find yourself with a limited set of tools to work with. But, don’t worry, several proven techniques can help you mix without stems. Let’s take a look at a few of them.

Use Of Mastering Tools

Mastering tools can be your savior in situations where you do not have access to individual stems. EQ, compression, and limiting can help you sculpt, refine, and optimize your mix. To get started, use EQ to enhance the overall tonal balance of the mix. Trim out the unnecessary frequencies and boost the essential ones. Compression will help control the dynamics and add punch, and limiting can help you bring up the volume while retaining the clarity.

Automation And Eq Techniques

Automation can be one of the most effective ways to balance out the mix and create space for different elements. Volume automation can help you smoothly blend the different parts and make sure that nothing is too loud or too soft. Panning automation can be used to create stereo width and give the mix more depth. EQ techniques such as subtractive EQ can also be used to remove unwanted frequencies and help you shape the sounds. These techniques require a lot of technical know-how, but they’re powerful tools in the right hands.

Conclusion

Mixing without stems is challenging, but it’s not impossible. You may not have access to the individual elements, but you can still be creative and use various techniques such as mastering tools and EQ to shape and enhance the mix. Automation is also an effective tool that can help you create drama and dynamics in your track. So, if you find yourself in a situation where you have to mix without stems, be confident, and use your creativity to make the most out of what you have.

Can You Mix a Song Without Stems

Credit: fr.fiverr.com

Mastering Tools For Mixing Without Stems

Mastering tools for mixing without stems can be a challenging task, but it’s not impossible. By making use of a combination of EQ, compression, panning, and other techniques, you can create a mix that’s similar to the original song even without the stems.

Mixing without stems can be a challenging task, but with the right mastering tools, you can achieve great audio quality. Even though working with stems offers more control, having to deal with a stereo mixdown file doesn’t mean you cannot deliver a top-notch track. Here, we will discuss some of the mastering tools you can use to get your track sounding amazing.

Loudness Meters

In the absence of stems, loudness meters are a fantastic tool for setting consistent loudness levels throughout your track. These meters help you gauge the dynamic range of the music and ensure that the levels remain controlled. One of the most popular loudness meters is the LUFS (Loudness Units Relative to Full Scale) meter. This meter measures the loudness of your track, and you can use it as a reference point to balance the levels of different parts of your song.

Multiband Compressors

Another mastering tool that you can use when mixing without stems is a multiband compressor. This audio plugin lets you target specific frequency ranges in a mix to enhance or reduce them. It works by compressing the dynamic range of certain frequencies in your track and adjusting the volume levels of the particular frequency ranges.

Harmonic Exciters

Harmonic exciters are another plugin that can help you enhance audio quality when mixing without stems. This tool works by adding harmonics or overtones to the audio signal, which can help the music sparkle and shine. Harmonic exciters can provide a subtle boost to the high end of the mix, and you can also use them to stimulate certain frequency ranges that may lack punch or lack character. In conclusion, mixing without stems is not an easy task, but with the right mastering tools, it can be done. Loudness meters, multiband compressors, and harmonic exciters are just a few of the mastering tools you can use to improve the quality of your track and deliver a version that you can be proud of. So, try them out, experiment with different settings, and see what works best for your music.

Automation Techniques For Mixing Without Stems

Automation techniques have made it possible to mix songs without stems, allowing for a smoother and more efficient process. With the use of advanced tools and software, mixing engineers can now achieve the desired sound without relying on individual track elements.

Mixing music without stems can be a daunting challenge, but it’s not impossible. The process involves using various automation techniques to create a cohesive and balanced sound. In this post, we’ll explore some of the most effective techniques, including volume and panning automation, reverb and delay automation.

Volume And Panning Automation

Automating the volume and panning of different elements in a mix is crucial for achieving balance and separation. One effective technique is to use volume automation to adjust the levels of each track throughout the song. For example, you could use volume automation to bring up a guitar solo during its section or to fade out a vocal track during a bridge. Similarly, panning automation allows you to create a sense of space and width in your mix. You can use this technique to move elements from left to right or create a stereo image. For example, you could pan a guitar to the left during the intro and move it to the center during the chorus for extra impact.

Reverb And Delay Automation

Reverb and delay are two effects that can help bring your mix to life, but they can also muddy it up if not used properly. Automating the wet/dry mix of your reverb and delay effects can help you achieve a clean and polished sound. For example, you can use reverb automation to add extra depth to a vocal during the chorus without making it sound too washed out during the verse. You can also use delay automation to create rhythmic patterns with a guitar or synth, creating a hypnotic effect that draws the listener in. In conclusion, mixing without stems requires a creative approach and an understanding of how to use automation techniques effectively. By using volume and panning automation as well as reverb and delay automation, you can create a professional-sounding mix that rivals those mixed with stems.

Eq Techniques For Mixing Without Stems

Mixing a song without stems can be quite challenging, but with EQ techniques, it is possible to bring out the desired sound. By manipulating the frequency spectrum of individual tracks, you can achieve a balanced mix without the need for stems.

When it comes to music production, mixing plays a crucial role in enhancing the quality and overall impact of a song. However, it can be quite challenging to mix a song without stems, which are the individual tracks of a song separated into vocals, drums, bass, etc. Despite this, there are still EQ techniques that can be used to improve the mixing process, even without stems. In this article, we will delve into two popular EQ techniques for mixing without stems: Surgical EQing and Broad EQing.

Surgical Eqing

Surgical EQing is an EQ technique that involves making precise adjustments to specific frequencies in a song. When mixing without stems, it is essential to use surgical EQing to detect and correct any specific issues within the mix. For example, if there is a particular frequency that is causing muddiness or masking other instruments, surgical EQing can help target that frequency and make the necessary adjustments to ensure all instruments are heard clearly in the mix.

Broad Eqing

Broad EQing, in contrast, involves adjusting broad ranges of frequencies across multiple tracks to create the desired tonal balance. This method is particularly helpful for improving overall tonal balance and reducing frequency buildup in the mid-range. With broad EQing, it is essential to use your ears and make adjustments until the mix becomes more balanced. In conclusion, mixing without stems can be a significant challenge, but it is not impossible. With the right EQ techniques, the quality of the mix can be improved. Using surgical EQing to make precise adjustments and broad EQing for overall tonal balance are both effective strategies for mixing without stems. So, if you find yourself in a situation where you don’t have access to stems, make sure to use these EQ techniques to improve the mixing process.

Tips For Mixing Without Stems

Mixing without stems can be a challenge, but it’s possible. You’ll need to focus on EQ and volume adjustments, as well as creative use of effects, to compensate for the lack of individual tracks. It may take some experimentation, but with practice, you can successfully mix a song without stems.

Mixing a song without stems can be a challenging task. Stems are essential components of a track, as they provide a clear separation of instrument sounds. However, there are times when you may not have access to stems, but you still need to mix a track. Here are some tips to help you mix a song without stems.

Organizing Tracks Before Mixing

Organizing your tracks before mixing is vital as it allows you to have a clear understanding of the various components of the song. Create a folder for each instrument or vocal track to ensure that you can easily access the audio files. Label each track appropriately, indicating the instrument name, and use color coding to help differentiate the tracks. Additionally, before mixing, ensure that all the tracks are in sync, so they are all playing at the same time.

Understanding The Song Structure

Understanding the song’s structure before mixing is essential to create a clear mix. Listen to the track several times to detect changes in the song’s structure and identify the parts of the song, such as the intro, verse, chorus, bridge, and outro. You can create markers for each section to help you visualize the song’s structure and ensure each section is mixed correctly.

Using Eq To Balance Frequencies

When mixing without stems, it’s essential to balance frequencies manually using EQ to ensure each track is audible in the mix. Use EQ to remove unwanted frequencies and ensure each instrument has its space in the mix. Start by cutting frequencies in one track and listening to the impact on the other tracks. Eventually, you will be able to balance all the frequencies correctly.

Using Compression To Control Dynamic Range

Dynamic range refers to the difference between the quietest and the loudest parts of the track. You can use compression to reduce the dynamic range and ensure that all the parts of the track stay in balance. Start by applying compression to your vocal tracks, then move to other instruments that require it. Adjust the attack and release times to ensure the compression sounds natural.

Using Reverb To Create Space

Reverb is an essential component of any mix, as it can add depth and space to a track. When mixing without stems, use reverb to create an ambient space for the instruments. Place the reverb on an aux send, creating a common space for all the instruments. Use different reverb settings for different instruments to ensure they are all audible. Mixing without stems can be a challenging task. However, with proper organization, understanding of the song’s structure, balancing frequencies, compression, and the use of reverb, you can create a professional-sounding mix. Follow these tips to achieve a great mix without stems.

Frequently Asked Questions For Can You Mix A Song Without Stems

Is It Better To Mix With Stems?

Mixing with stems can enhance the overall sound quality and provide more control in the mixing process. Stems can also make it easier to make adjustments without affecting other elements. Ultimately, whether to mix with stems depends on the individual project and preferences of the mixer.

Do You Need Stems To Master A Song?

No, it is not necessary to have stems to master a song. However, having access to the individual tracks (vocals, drums, etc. ) Can give the audio engineer more control over the final product. It ultimately depends on the specific needs and goals of the mastering process.

Are Track Stems Necessary?

Track stems are not necessary, but they can be helpful in the music production process. They provide a way to access individual elements of a mix, allowing for greater control over the sound. Additionally, they can be useful for remixing and collaboration purposes.

Do You Need Stems To Do A Remix?

No, you do not necessarily need stems to do a remix. However, having access to the separate instrumental and vocal tracks can make the remixing process easier and more effective. Stems provide greater flexibility and control over the mix and allow the remixer to isolate and manipulate specific elements.

Conclusion

Mixing a song without stems is possible, but it requires an arduous process that involves creativity, experimentation, and a solid understanding of audio manipulation techniques. A good mixing engineer knows how to extract and enhance the best qualities of individual sounds and make them work together to achieve an outstanding final product.

While having access to stems can save time and effort, mixing from scratch can also provide unique and unexpected results. Trust your ears, keep learning, and have fun with the process.

Categories
Archive

Tips For Mastering Rock Music

Mastering rock music requires a combination of technical skill, creativity, and practice. In order to excel in this genre, it is important to focus on developing your style, perfecting your technique, collaborating with other musicians, and performing regularly.

With dedication and persistence, anyone can become a master of rock music. Rock music is one of the highest-selling and most beloved genres of music. It encompasses a wide range of sub-genres, including classic rock, metal, punk, and grunge, among others.

So, if you desire to be a master of rock music, you’ve made a good choice. However, it takes more than just a desire to be successful in this highly competitive and challenging genre. To be a master of rock music, there are various tips and tricks you must follow consistently. We will provide you with some helpful tips for mastering rock music so that you can rock on stage like a professional.

Tips For Mastering Rock Music

Credit: www.masteringthemix.com

Start With The Roots

To master rock music, it is important to start with the roots. Learn the history and influences of the genre and study the techniques of its pioneers. Practice, experimentation, and a strong passion for the music will help improve your skills as a rock musician.

If you’re looking to master rock music, then starting with its roots is the way to go. Rock music can trace its origins to a variety of genres, including blues, folk, and country. Understanding the roots of rock music can help you to better appreciate and master the genre.

Listen To Classic Rock Bands

One great way to understand the roots of rock music is to listen to classic rock bands. Bands like Led Zeppelin, The Rolling Stones, and The Who were heavily influenced by blues and other genres. Listening to their music can give you a better understanding of the blues influence and other genres that contributed to the development of rock music.

Understand The Blues Influence

The blues is one of the most important genres that contributed to the development of rock music. Many of the early rock musicians were heavily influenced by blues artists like Muddy Waters, Howlin’ Wolf, and Robert Johnson. Understanding the blues influence on rock music can help you to better appreciate and master the genre. To understand the blues influence on rock music, it’s important to listen to blues music and pay attention to the elements that have been incorporated into rock music. These elements can include the 12-bar blues progression, the use of the pentatonic scale, and the emphasis on guitar solos and improvisation. In conclusion, mastering rock music requires you to start with the roots. Setting a solid foundation by understanding the blues influence and listening to classic rock bands can put you on the path to mastering the genre.

Tips For Mastering Rock Music

Credit: blog.daisie.com

Learn The Essential Techniques

Rock music is all about power and energy. It’s a genre that requires a high level of technical skill and expertise to master. Do you want to take your rock music skills to the next level? If so, you need to learn some essential techniques that will help you become a better rock musician. In this post, we’ll cover three key techniques that every rock musician should know: Power Chords, Hammer Ons and Pull Offs, and Bending and Vibrato.

Power Chords

Power chords are the foundation of rock music. With a power chord, you can create a thick, heavy sound that drives the music forward. To play a power chord, you only need to play two notes – the root note of the chord and the fifth note. You can move the shape up and down the fretboard to play different chords. Power chords are usually played with distortion, which gives them their signature sound.

Here are some tips for mastering power chords:

  • Practice moving the chord shape up and down the fretboard
  • Experiment with different strumming patterns to create different rhythms
  • Try playing power chords with palm muting to create a tighter sound

Hammer Ons And Pull Offs

Hammer ons and pull offs are used to create smooth and fluid legato playing. A hammer on is when you play a note and use your fretting hand to hammer down on a higher note without picking it. A pull off is when you play a note and use your fretting hand to pull off to a lower note without picking it. These techniques are commonly used in fast-paced rock solos and riffs.

Here are some tips for mastering hammer ons and pull offs:

  • Practice playing scales with hammer ons and pull offs
  • Use a metronome to practice playing them in time
  • Start slow and gradually increase your speed

Bending And Vibrato

Bending and vibrato are essential techniques for creating expressive and emotive rock music. Bending is when you use your fretting hand to bend a note up or down to a higher or lower pitch. Vibrato is when you use your fretting hand to create a subtle, back-and-forth vibrato effect on a note.

Here are some tips for mastering bending and vibrato:

  • Practice bending the strings slowly and gradually increasing the bend
  • Experiment with different types of vibrato, such as wide and narrow
  • Use a metronome to practice vibrato in time

Get Familiar With Guitar Effects

To fully master rock music, it is essential to get familiar with guitar effects. With numerous effects available, mastering each one is a crucial step towards producing great rock music. Take time to learn how each effect works, experiment with different combinations, and find the perfect sound for your music.

If you’re planning on mastering rock music, it’s important to become familiar with all the different guitar effects that you can incorporate into your sound. These effects can transform your sound, creating a unique and captivating listening experience for your audience. In particular, there are three key effects that every rock musician should master: distortion, delay, and reverb.

Distortion

Distortion is one of the most iconic effects in rock music, giving your sound a gritty, aggressive, and distorted edge. Distortion can be applied in a number of ways, from overdriving the preamp to using a dedicated distortion pedal. Whatever method you choose, the key is to experiment with different settings and levels of distortion until you find the perfect sound for your music.

Delay

Delay creates a powerful echo effect, adding depth and texture to your sound. It can be used in a subtle way, to add a touch of ambiance to your music, or in a more pronounced way to create a distinct rhythmic pattern. To master delay, experiment with different delay times and feedback settings, and try playing with different rhythms and notes to see how they interact with the delay effect.

Reverb

Reverb is a versatile effect that can be used to create a sense of space and depth in your music. It can be used to simulate the sound of a large concert hall or an intimate recording studio, depending on the type and level of reverb you use. To master reverb, experiment with different reverb types and settings, and try using it sparingly to create a subtle but powerful effect. In conclusion, mastering the different guitar effects is an essential part of becoming a great rock musician. By experimenting with distortion, delay, and reverb, you can create a sound that is uniquely your own, capturing the attention and imagination of your audience.

Practice With A Metronome

Practice makes perfect! And when it comes to mastering rock music, there is no substitute for it. However, practicing just for the sake of it is not enough. You need to have a systematic approach to your practice sessions to make the most of your time. One tool that can help you achieve that is a metronome.

Start Slow And Increase Gradually

It can be tempting to start playing rock music at lightning-fast speed right from the start. However, that approach can actually do more harm than good. Playing too fast can lead to sloppiness and mistakes, which can be hard to fix later. Instead, start with a slow tempo and focus on playing each note accurately. When you can play the piece without making any errors, gradually increase the speed of the metronome by a few beats per minute.

Focus On Accuracy

Accuracy is key in rock music. No matter how fast or slow you play, if you’re not hitting the right notes at the right time, it’s not going to sound good. When practicing with a metronome, make sure each note you play is precisely timed with the clicks. If you’re struggling with a particular section, slow down the metronome and focus on nailing that part before moving on.

Use A Metronome To Improve Your Timing

A metronome is an invaluable tool for improving your timing and overall proficiency as a musician. It can help you stay on beat, play in perfect synchronicity with other musicians, and ultimately create a better sound. So, if you’re serious about mastering rock music, make sure to practice with a metronome regularly.

Whether you’re developing your skills as a beginner or striving for perfection as an advanced musician, practicing with a metronome can help you achieve your goals. So start slow, focus on accuracy, and use a metronome to improve your timing. With consistent practice and dedication, you’re sure to make great strides as a rock musician.

Play Along To Backing Tracks

Get ready to rock out like a pro by mastering the art of playing along to backing tracks. Not only does it improve your timing and rhythm, but it also allows for more creative freedom with your guitar playing. Follow these tips to take your rock music skills to the next level.
Available Resources

To master rock music, one of the essential things you need to do is play along with backing tracks. This helps you develop a sense of rhythm, practice your timing, and solidify your understanding of the song’s structure. The good news is that there are numerous resources available online that offer a range of backing tracks that you can use. Some resources that you can explore include YouTube, Spotify, and guitar-based websites, such as Ultimate Guitar and Guitar Pro. These platforms offer a plethora of backing tracks that cater to different styles and genres of rock music.

Develop Your Sense Of Rhythm

Playing along to backing tracks helps you to develop a sense of rhythm. With backing tracks, you can practice playing in time with a drum beat, bass line, and other accompanying instruments. This helps you learn to play with more precision and accuracy, improving your timing. A good way to start this practice is to begin with simpler tracks and gradually progress to more complicated ones. As you get comfortable with playing along to the backing tracks, start focusing on the subtler nuances of the music, such as picking up on changes in tempo, dynamics, and phrasing.

Experiment And Have Fun

Most importantly, have fun with it! Experiment by improvising over the tracks. Try playing the lead parts, add your spin or try something new. This will help you find your style and explore new sounds. In conclusion, playing along to backing tracks is an excellent way to improve your sense of rhythm, timing, and overall musicianship. With the range of resources available online, you have almost limitless opportunities to find a track that suits your skill level and musical taste. Remember, the most important part is to enjoy the process and have fun along the way.

Learn To Improvise Solos

Improvise solos with ease by mastering rock music tips. Enhance your skills by incorporating scales, rhythm and melody into your solos. Learn to blend in with other musicians and to improvise on the spot with confidence.

Learning to improvise solos is an essential skill for any aspiring rock musician. It’s what sets great guitar players apart from good ones and can take your performances to the next level. Whether you’re just starting or you’re a seasoned player, here are some tips for mastering rock music improvisation:

Start With The Pentatonic Scale

The pentatonic scale is an essential tool for rock guitar soloing. It’s a five-note scale that’s used in countless rock songs and is easy to learn. Start by practicing the scale up and down the neck of your guitar. Once you’ve got the pattern down, try playing it in different positions on the neck. This will help you become more comfortable with the scale and make it easier to improvise over different chord progressions.

Study Solos From Your Favorite Songs

One of the best ways to improve your soloing skills is to study the solos of your favorite guitar players. Listen to the way they use the pentatonic scale and how they build their solos. Pay attention to the phrasing, note choice, and how they connect different ideas together. Study the solos note for note and try to recreate them, then use what you’ve learned in your own improvisation.

Practice With Backing Tracks

Playing along with backing tracks is a great way to hone your improvisation skills. Choose a backing track in a specific key or chord progression and start improvising using the pentatonic scale. Try to come up with new ideas and build on them as you go. You can find backing tracks on YouTube or use a software program like GarageBand to create your own. In conclusion, learning to improvise solos is a crucial skill for any aspiring rock musician. Use the tips above to practice and improve your improvisation skills, and remember to have fun and be creative with your playing. With time and practice, you’ll become a master of rock music improvisation.

Collaborate With Other Musicians

Collaborating with other musicians can help improve your skills and bring fresh perspectives to your music. Seek out opportunities to collaborate with like-minded individuals and be open to new ideas and creative approaches. By working together, you can create a richer and more dynamic sound that will stand out in the competitive world of rock music.

Collaborating with other musicians can help you master your rock music skills. Whether you’re just starting out or you’ve been playing for years, collaborating with others is a great way to learn new techniques, get feedback, and grow as a musician. Here are some tips for collaborating with other musicians.

Join A Band Or Form Your Own

Joining a band or forming your own is a great way to collaborate with other musicians. You’ll have the opportunity to play with others and learn from their experience. If you’re joining a band, find one that plays the style of music you’re interested in and audition. If you’re forming your own, find musicians who share your vision and start rehearsing.

Exchange Knowledge And Ideas

When collaborating with other musicians, it’s important to exchange knowledge and ideas. Share what you know and learn from others. This can be done in various ways including:

  • Attending workshops or classes
  • Participating in jam sessions
  • Conducting online collaborations
  • Hosting songwriting sessions

Stay Open-minded

It’s important to stay open-minded when collaborating with other musicians. Everyone has their own ideas and approaches, so be willing to try new things and be open to constructive criticism. This can help you grow as a musician and develop your own unique sound.

Conclusion

Collaborating with other musicians is a vital part of mastering rock music. By joining a band, exchanging knowledge and ideas, and staying open-minded, you’ll develop your skills and grow as a musician. Start collaborating today and see where it takes you!

Perform Regularly

To master rock music, it is important to perform regularly. Practice makes perfect and consistent playing allows you to better understand and improve upon your skills. So make sure to set aside time to jam out and hone your craft.

Performing regularly is an essential part of mastering rock music. Regular performances provide opportunities to gain experience and confidence by playing in front of a live audience. Additionally, it helps you receive valuable feedback from the audience to refine your skills and improve your overall performance. Here are some key tips to keep in mind when performing regularly:

Gain Experience And Confidence

One of the keys to mastering rock music is gaining experience and confidence by playing regularly. Whether you are performing at small gigs or large concerts, every performance provides an opportunity to polish your skills and overcome your fear of performing in public. By continually playing in front of people, you will gain the confidence you need to make your performance stand out.

Receive Feedback From The Audience

Performing regularly also means getting feedback from the audience. This feedback is important because it helps you improve your performance and connect with your audience. Pay attention to the audience’s reactions and learn from them. If something that you did on stage didn’t work, adjust it for next time. Use this feedback to make improvements and add to your performance, making it even better next time.

Maximize Your Performances

To maximize your performance, you must always be prepared by rehearsing your setlist beforehand. Knowing your songs inside-out will make your performance more confident and effortless. Dress appropriately for the occasion, be prompt, and ensure that every piece of equipment is working perfectly. This preparation will ensure that your performance is polished, professional, and thoroughly enjoyable for you and your audience. Performing regularly is a perfect opportunity to hone your skills, learn from your mistakes and gauge your development. Stick to these guidelines, and you’ll rock your performances consistently.

Tips For Mastering Rock Music

Credit: m.youtube.com

Frequently Asked Questions On Tips For Mastering Rock Music

What Should I Aim For When Mastering?

When mastering, aim to adhere to five key guidelines: keep sentences brief (20 words max), write in an SEO-friendly and unique style, use active voice, avoid certain words and phrases, and write like a human to pass AI writing detection.

Stay within 50 words to answer this question.

How Loud Should My Mix Be Before I Master It?

Your mix should be at an average loudness level of -6dB to -3dB before mastering. This provides enough headroom for the mastering engineer to work on without clipping or distortion. It also ensures that the overall loudness of the final mastered track meets industry standards.

What Makes A Good Mastered Song?

A good mastered song should have a balanced frequency response, clear dynamics, and appropriate volumes. It should also be free of distortion and unwanted noise. The mastering process should enhance the overall sound of the mix and make it sound cohesive, while maintaining the intended mood and emotion of the music.

What Are The Basic Mastering Techniques?

The basic mastering techniques involve equalization, compression, limiting, stereo widening and volume normalization. These techniques help balance the frequency and amplitude levels in a recording, remove unwanted noise and distortion, and create a cohesive and polished final product. Each technique requires skill and experience to use effectively.

Conclusion

After reading through these tips, it is clear that mastering rock music takes dedication, practice, and a willingness to learn from mistakes. By developing a strong foundation in music theory, practicing regularly, experimenting with different techniques and sounds, seeking feedback from others, and staying true to your personal style, you can work towards becoming a master of rock music.

With patience and perseverance, you can achieve your goals and create music that truly resonates with your audience. So keep experimenting, keep practicing, and never give up on your passion for rock music.

Categories
Archive

Hip Hop Mixing And Mastering

Hip hop mixing and mastering is the process of refining and enhancing the sound of a hip hop track. Achieving the desired quality and balance in a hip hop mix requires technical expertise and creativity.

Hip hop is a genre of music that has exploded in popularity over the past few decades. With its roots in African American and Caribbean communities, hip hop is characterised by its rhythmic beats, spoken word lyrics, and distinctive vocal delivery.

To create a successful hip hop track, the production process is key, and this includes mixing and mastering. Mixing and mastering involves balancing the different elements of a track, such as the vocals, drums, bass, and other instruments, and then applying various effects and processing to create a polished final product. The goal is to ensure that every element is clear, and that the overall sound is powerful and dynamic. In the world of hip hop, mixing and mastering is particularly important, as the genre places a strong emphasis on the beat. The kick drum, snare, and hi-hat are crucial elements that must be perfectly balanced with the other parts of the track. Additionally, hip hop vocals are often heavily processed with effects such as auto-tune, reverb, and distortion, making skilled mixing and mastering even more crucial. Overall, hip hop mixing and mastering requires expertise in both technical and creative aspects of music production. A great mix can make or break a hip hop track, so it’s essential to work with professionals who understand the nuances of the genre and have the skills to deliver a fantastic final product.

Hip Hop Mixing And Mastering

Credit: m.youtube.com

The Basics Of Hip Hop Mixing

Mastering the art of hip hop mixing is crucial for creating the perfect sound. It involves balancing elements such as vocals, drums, and bass to create a cohesive and engaging track. With the right techniques and tools, you can take your hip hop music to the next level.

Hip hop is one of the most popular music genres today. Producing a great hip hop track requires a skillful mix of vocals, beats, and instrumentation. While mixing and mastering may seem like complex processes, it is essential to understand the basics to bring out the best in your music. In this post, let’s discuss the fundamental concepts of hip hop mixing. We’ll cover three essential concepts: understanding EQ, compression techniques, and reverb and delay.

Understanding Eq

EQ stands for Equalization. EQ essentially means adjusting the tonal balance of a track by altering the levels of frequencies. With EQ, producers can change the balance of frequencies between the vocals, beats, and other instruments. EQ can eliminate unwanted noises and accentuate the dominant parts of the track. In hip hop mixing, it’s essential to focus on EQ to give each element of the track its own space. For example, you might remove bass frequencies from a vocal track to give it more presence and clarity.

Compression Techniques

Compression is the process of reducing the dynamic range of audio signals. Dynamic range refers to the difference between the loudest and quietest parts of a track. Compression is a crucial tool in hip hop tracks to make sure that all elements are audible and impactful. For example, you can compress a snare drum to make it stand out in the mix. You might compress a vocal track to make it sound denser and more present.

Reverb And Delay

Reverb and delay are two essential effects that producers use to add depth to hip hop tracks. Reverb is a space simulator, which makes the sound appear as if it was recorded in a room with natural reverb. Delay, on the other hand, is similar to reverb, but instead of simulating the sound of a room, it delays the sound. Producers use reverb and delay to give tracks a sense of space and to create a sense of depth. In conclusion, hip hop mixing is a complex process that requires skillful use of techniques and tools. But it’s not all rocket science! By mastering the basics of EQ, compression, reverb, and delay, you can create a hip hop track that sounds amazing. With a bit of practice, you’ll soon be on your way to producing professional-sounding hip hop tracks.

Mixing Techniques For Hip Hop Vocals

Discover the essential mixing techniques for hip hop vocals that will make your track stand out. From EQ and compression to reverb and delay, this guide covers everything you need to know about hip hop mixing and mastering.

When it comes to mixing and mastering hip hop vocals, there are several techniques you can use to help bring out the best in the vocals and make them sound professional. In this article, we will focus on three specific techniques that can help you achieve this goal: adding vocal effects, using vocal EQ techniques, and utilizing automation.

Adding Vocal Effects

Adding vocal effects is a great way to give your hip hop vocals a unique sound and make them stand out in the mix. Some common vocal effects that work well with hip hop include reverb, delay, and distortion. Reverb can be used to give the vocals a sense of space and depth, making them sound like they are being performed in a larger room or hall. Delay can be used to create an echo effect, making the vocals sound like they are bouncing off walls. Distortion can be used to add grit and character to the vocals, giving them a raw and edgy sound.

Vocal Eq Techniques

EQ is a crucial tool for mixing and mastering hip hop vocals. Proper EQ can help balance the vocals in the mix and bring out certain frequencies that make the vocals sound clear and well-defined. When EQing hip hop vocals, it’s essential to focus on the mid-range frequencies, as this is where most of the vocal energy resides. Boosting the mid-range frequencies can help bring out the vocals and make them sound more prominent in the mix. Additionally, it’s essential to remove any unwanted frequencies that may be competing with the vocals. This can include low-end rumble, high-end hiss, or any other frequencies that are causing issues in the mix.

Utilizing Automation

Automation is a powerful tool for mixing and mastering hip hop vocals. It allows you to adjust the levels, effects, and other settings on a per-track basis, ensuring that every part of the mix sounds balanced and polished. One effective way to use automation with hip hop vocals is to adjust the volume and effects settings during different parts of the song. For example, you might want to add more reverb or delay to the vocals during the chorus or bridge, while keeping them dry and straightforward during the verses. Overall, these three techniques can help you achieve a professional and polished sound when mixing and mastering hip hop vocals. By adding vocal effects, using vocal EQ techniques, and utilizing automation, you can make sure that your hip hop tracks sound their very best.

Mixing Techniques For Hip Hop Beats

Effective mixing techniques such as panning, EQ and compression can set your hip-hop beats apart. Mastering also plays a crucial role in achieving a polished sound by adjusting the overall balance and loudness. It requires attention to detail and a good ear for music.

Hip hop music is one of the most popular genres in the world, and a large part of its appeal lies in the unique mix of beats, lyrics, and sounds. To create the perfect hip hop track, it is crucial that the mixing and mastering of the beats are done correctly. In this article, we will look at some of the best mixing techniques for hip hop beats that can help take your tracks to the next level.

Balancing The Beat

Balancing the beat is the first and most crucial step in mixing hip hop music. Proper balancing ensures that all the elements of the track, such as the bass, drums, and vocals, are well-balanced and can be heard clearly. To achieve this, it is essential to pay attention to the volume of each element and make sure none of them overpower the others.

Layering Sounds

Layering sounds is an essential technique used in mixing hip hop music. It helps to add depth and texture to the track, making it more engaging for the listener. By layering different sounds, you can create unique beats and add more complexity to your tracks. It is important to make sure that the layers work well together and do not clash or overpower each other.

Utilizing Filters

Filters are an essential tool in hip hop music mixing. They help to cut out unwanted or unnecessary frequencies in the track while maintaining the essential elements. High-pass filters can be used to cut out low frequencies from elements like the snare, while low-pass filters can help remove high frequencies that may be causing harshness in the mix. Utilizing filters effectively can help achieve a cleaner, more polished sound. In conclusion, mixing and mastering hip hop beats can be challenging, but by utilizing these techniques, you can create an engaging and professional-sounding track. Remember to balance the beat, layer sounds for texture, and utilize filters to clean up and enhance the mix. With practice, you can become an expert at hip hop mixing and mastering.

Mastering Techniques For Hip Hop Tracks

Mastering techniques for hip hop tracks can make or break the success of a track. Proper hip hop mixing and mastering can help to achieve clarity, balance and enhance the overall impact of the sound. The process involves creating a cohesive mix by using EQ, compression, and other effects.

As a hip hop mixing engineer, one of the most crucial aspects of your job is mastering the final mix. Mastering is the process of putting the finishing touches on a track, making it sound polished and professional. The goal of mastering is to enhance the overall sound and vibe of a mix so that it sounds great across all listening devices like headphones, speakers, or car sound systems. It involves using several different techniques to ensure the track has the right balance of loudness, low-end punch, and clarity. In this post, we’ll explore some of the most effective mastering techniques for hip hop tracks.

Using Compression

Compression is an essential tool when it comes to mastering hip hop tracks. In general, compression is used to even out the levels of a mix. However, in hip hop, compression is often used to add density and weight to a mix. When applied correctly, it can help to tighten up the overall sound and bring out the punch in the bass and drums. To use compression in hip hop mixing and mastering, first, set the attack and release times according to the tempo of the track. Then, adjust the threshold to control the amount of compression. Consider using a ratio of 2:1 or 4:1 for a more subtle effect, or up to 10:1 for a more aggressive sound.

Utilizing Limiting

Limiting is a type of dynamic range compression that is commonly used in the final stages of mastering a hip hop track. Its primary function is to help raise the overall loudness of a mix without causing distortion. Limiting can also be used to control the peaks in a mix and prevent them from clipping. When using limiting, start by setting the threshold so that it’s just touching the loudest parts of the mix. Then, adjust the gain to achieve the desired level of loudness. Keep a close eye on the gain reduction meter to ensure that the limiting isn’t affecting the dynamics too heavily.

Adding Clarity

Adding clarity is a crucial aspect of mastering a hip hop track. A mix that sounds muddy or unclear can be challenging to listen to. To enhance clarity, start by focusing on the midrange frequencies, as that’s where most of the musical content in a hip hop track resides. One effective way to add clarity is by using EQ. Consider cutting frequencies below 100 Hz and above 15 kHz to remove any extraneous rumble or hiss that might be clouding the mix. Additionally, you can use a multiband compressor to tame any harsh or spiky frequencies and bring out the details in the midrange. In conclusion, mastering is a crucial stage of hip hop mixing. By using compression, limiting, and adding clarity, you can help to make your mixes sound professional and polished. Keep experimenting with different techniques and tools to find the right balance for each track.

Hip Hop Mixing And Mastering Tools

Professional Hip Hop mixing and mastering tools can significantly enhance the quality of your music and make it sound more polished and powerful. From EQs and compressors to limiters and reverbs, there are various plugins and software designed particularly for Hip Hop producers and engineers that make the process of mixing and mastering simpler and more efficient.

Hip hop music production thrives with the right set of mixing and mastering tools. The use of efficient software and hardware options helps in delivering high-quality sound outputs. However, the success of any mixing and mastering process is highly dependent on the efficiency of the tools used in the creation process. In this blog post, we will dive into the essential tools required for the mixing and mastering of hip hop music. We’ll go into detail regarding the top software plug-ins and hardware options that every producer must-have. Let’s get started with the Hip Hop Mixing and Mastering Tools.

Software And Plug-ins

Several software options are available for use by producers, but some are suitable for hip hop music production. The choice of software is dependent on the producer’s preference and budget. Some of the most widely used software include: 1. Pro Tools – widely used in the music industry, and considered the industry standard for music production, including recording, editing, and mastering audio. 2. Logic Pro – a must-have software for Mac users, its user-friendly interface, and efficiency makes it a top choice for many music producers globally. 3. Reason – another software that serves as an all-in-one music production solution, with various devices for sound creation, recording, sequencing, and effects processing. Plug-ins, on the other hand, are designed to work either independently or to enhance the functionality of already existing software. Some of the most widely used plug-ins in the hip hop music production industry include: 1. Native Instruments Maschine – one of the best plug-ins for beat making, loop editing, and melody creation, making it an essential tool for hip hop music production. 2. Waves API – used for equalization and dynamic processing in mixing and mastering.

Hardware Options

Hardware options are essential in hip hop music production, as they help in amplifying signals and manipulating sound output. Some of the hardware options that are widely used in hip hop music production include:

HardwareDescription
Studio MonitorsSpeakers designed to offer a flat frequency response that’s critical in mixing.
MIDI controllersUsed for creating melodies, controlling different software options, and for basic music production tasks.
Audio InterfacesUsed for connecting microphones, instruments to the computer, and help in getting crystal clear sound outputs while mixing and mastering.
Equalizers and CompressorsEssential in sound manipulation, used to tweak different frequency ranges, and also in controlling dynamic range.

In conclusion, every producer must be aware of the most efficient tools and equipment that are essential for creating high-quality hip hop music output. The software, plug-ins, and hardware options listed above are the essential components that every producer must-have, which will help in achieving a high-quality output. It’s up to the producer’s preference and budget to choose the most suitable option that meets their music production needs.

Hip Hop Mixing And Mastering

Credit: www.masteringthemix.com

Hip Hop Mixing And Mastering

Credit: www.macprovideo.com

Frequently Asked Questions For Hip Hop Mixing And Mastering

How Long Does It Take To Mix And Master A Rap Song?

Typically, it takes around a day to mix and master a rap song. However, the time may vary depending on the complexity of the song and the expertise of the sound engineer. Factors such as the number of tracks and the artist’s preferences also affect the duration.

What Is Mastering In Rap?

Mastering in rap is the final stage of audio post-production which enables the track to sound consistent, clear and balanced. It involves adjusting the volume levels, adding effects, and preparing the audio for distribution across various streaming platforms, CDs or vinyl records.

How Loud Should I Master Hip Hop?

The loudness of hip hop mastering can vary, but it is generally recommended to aim for an integrated loudness level of around -14 to -10 dB LUFS. However, it ultimately depends on the track and the desired sound. It’s important to find a balance between loudness and quality to avoid distortion and loss of dynamic range.

What Is Mixing In Hip Hop?

Mixing in hip hop refers to the process of blending different audio tracks together to create a final product that sounds cohesive and balanced. This can involve adjusting volume levels, equalization, and applying various effects to enhance the overall sound quality.

The goal of mixing is to create a polished final product that showcases the artist’s music in the best possible way.

Conclusion

Hip hop mixing and mastering are vital aspects of music production. It helps in making soundtracks powerful, professional, and polished. This process requires time, patience, and expertise to deliver high-quality outcomes. With the advancement of technology, some mixing and mastering software and tools are now available to assist you in achieving your desired sound.

It is essential to find the right balance between creativity and technical skills to produce exceptional hip hop music that stands out in the industry.

Categories
Archive

Roland Re 501 Chorus Echo Tape Delay

The Roland RE-501 Chorus Echo Tape Delay is an iconic vintage effect processor that combines a chorus and delay in one unit. It uses a tape loop to create a warm, analog sound that is sought after by many musicians and producers.

The RE-501 was first introduced in 1978 and has since become a staple in many studios and guitar rigs. It features various controls for adjusting the delay time, feedback, chorus depth, and intensity, making it a versatile tool for creating unique sounds.

The unit also has stereo outputs and can be used in conjunction with other effects to create even more complex sounds. Its iconic sound has been heard on countless recordings across genres, from rock to reggae and everything in between.

Roland Re 501 Chorus Echo Tape Delay

Credit: articles.boss.info

Design And Features

The Roland Re 501 Chorus Echo Tape Delay’s design and features make it a coveted piece of vintage equipment. Its analog circuitry, warm sound, and versatile controls make it a favorite among musicians and producers alike. With its distinctive chorus and delay effects, the Re 501 remains a sought-after tool for achieving that classic tape delay sound.

The Roland RE-501 Chorus Echo Tape Delay is a classic analog delay unit that has been a sought-after effect unit for decades. This chorus echo tape delay has a charming, vintage design that harks back to the 70s and 80s. In this section, we’ll delve into the design and features of the Roland RE-501 Chorus Echo Tape Delay.

Appearance

The Roland RE-501 Chorus Echo Tape Delay has an aesthetically pleasing appearance that has been a major selling point for decades. This chorus echo unit features a metal chassis with faux-wood veneer that resembles the look of vintage appliances. The controls are easy to operate, and the LED indicators are bright and easy to read.

Control Panel

The control panel of RE-501 is elegant, minimalistic, and easy to operate. It features six knobs, three switches, and a few additional buttons. Each knob on the control panel is tactile, and it is easy to tweak various parameters on the fly. The switches on the panel correspond to various functions such as tape speed, chorus on/off, and echo mode. The control panel also has a bypass switch that allows you to turn bypass on or off.

Delay Time Range

The delay time range of the Roland RE-501 Chorus Echo Tape Delay is impressive, ranging from 10ms to 800ms. With such a wide range, this chorus echo tape delay is suitable for a wide range of musical applications. The delay time range knob on the control panel allows you to adjust the delay time to your preference.

Chorus Section

The chorus section of the Roland RE-501 Chorus Echo Tape Delay is one of the standout features of this unit. It allows you to add depth and color to your sounds, making them sound richer and more complex. The chorus section includes three modes, chorus 1, chorus 2, and ensemble, each with its unique sound, intensity, and speed. The chorus section also has a chorus bypass switch that allows you to turn the chorus module on or off. Overall, the Roland RE-501 Chorus Echo Tape Delay is an excellent vintage effect unit that has stood the test of time. Its design and features have been popular for decades, and it remains highly regarded among musicians and sound engineers alike. With its impressive delay time range and powerful chorus section, it is perfect for adding warmth, color, and depth to your sounds.

Roland Re 501 Chorus Echo Tape Delay

Credit: reverb.com

How The Roland Re-501 Works

The Roland RE-501 chorus echo tape delay is a classic piece of equipment used in music production. It works by splitting the incoming signal into two pathways, one with a dry signal and the other with an echo effect. The signal is then recorded on to a magnetic tape and played back, providing a warm and rich echo effect.

Roland RE-501 Chorus Echo Tape Delay is one of the most sought-after vintage tape echo units used by musicians worldwide. It is known for producing warm, rich, and high-quality delay and chorus effects. But how does the Roland RE-501 work? In this article, we will explore the workings of this classic analog tape echo unit.

Input And Recording

The first step in using the Roland RE-501 is to send your audio signal to its input. You can use a microphone, instrument, or line level source to feed the unit. The RE-501 also has a built-in preamp to boost weaker signals. Once the input signal is set, you can start recording it onto the tape. The RE-501 offers a variety of recording modes, including single, dual, and Sound On Sound. In the single mode, the recorded signal overwrites the previously recorded signal. In the dual mode, the recorded signal is added to the original signal, resulting in a thicker sound. Sound On Sound mode is similar to the dual mode but allows you to record multiple layers of sound.

Delay And Chorus Processing

After the signal is recorded onto the tape, the RE-501’s delay and chorus processing comes into play. The delay time can be adjusted using the slider on the front panel or through external control. The RE-501 also offers variable feedback, which adds a repeating echo effect to the original sound. In addition to delay, the RE-501 also has a built-in chorus effect. The chorus effect can be adjusted using the slider on the front panel, or you can use external control to modulate the effect. The result is a lush, vibrato-like effect that adds depth and movement to your sound.

Output And Playback

Once you have recorded and processed your sound, it’s time to hear the results. The RE-501 has multiple output options, including a dry/wet mix control, stereo outputs, and a headphone output. You can use the dry/wet mix control to adjust the balance between the dry (unprocessed) and wet (processed) signal. This allows you to create the perfect balance between your original sound and the RE-501’s effects. In conclusion, the Roland RE-501 is a vintage tape echo unit that offers rich, warm, and high-quality delay and chorus effects. Its input and recording, delay and chorus processing, and output and playback features make it an excellent tool for musicians looking to add depth and movement to their sound.

Modern Emulations And Alternatives To The Roland Re-501

The Roland RE-501 Chorus Echo Tape Delay is a legendary piece of gear that has been used by countless musicians to add depth and character to their sound. However, these days it can be difficult to find and maintain, as it requires spools of tape and constant calibration. Luckily, there are now a variety of modern emulations and alternatives to the RE-501 that can help you achieve a similar sound with less hassle. In this article, we’ll take a look at a few of the most popular options, and compare them to the original hardware.

Digital Emulations

One of the easiest ways to recreate the sound of the RE-501 without using the original hardware is to use a digital emulation. There are a variety of plugins and standalone applications available that model the sound of the original unit, and are much easier to use and maintain. Some popular examples include:

  • Strymon Deco
  • Universal Audio Galaxy Tape Echo
  • Arturia Space Echo

These emulations offer a wide range of settings and parameters, allowing you to tweak the sound to your liking. They also often include additional features, such as stereo widening and feedback looping, that the original hardware did not have.

Analog Tape Delays

If you’re looking for a more authentic sound that still utilizes tape, there are a few analog tape delay units on the market that are worth considering. These units use actual tape loops to create a warm, natural sound, similar to the RE-501. Some popular options include:

BrandModelFeatures
FulltoneTTEVariable speed control
CatalinbreadBelle EpochOffers self-oscillation
MaestroEchoplex EP-3Classic sound used by Jimi Hendrix

These units can be more expensive than digital emulations, but they offer a more authentic sound and a tactile, hands-on experience.

In conclusion, there are a variety of modern alternatives to the Roland RE-501 Chorus Echo Tape Delay that can help you achieve a similar sound with less hassle. Whether you prefer a digital emulation or an analog tape delay, there are plenty of options available on the market today.

Roland Re 501 Chorus Echo Tape Delay

Credit: retrogearshop.com

Frequently Asked Questions On Roland Re 501 Chorus Echo Tape Delay

Is Space Echo A Tape Delay?

Yes, the space echo is a tape delay.

When Did Roland Re-201 Come Out?

The Roland RE-201 was released in 1974.

What Is The Roland Re 501 Chorus Echo Tape Delay?

The Roland RE 501 is a vintage analog effects unit that combines chorus, echo, and reverb effects, providing rich and warm soundscapes perfect for guitarists, keyboardists, and producers alike.

How Does The Re 501 Produce Its Unique Sound?

The RE 501 produces its unique sound by using a combination of analog tape delay and chorus effects. The tape delay creates a warm and musical echo effect, while the chorus effect provides an ethereal modulation that can produce a wide range of textures and colors.

Conclusion

The Roland RE-501 Chorus Echo Tape Delay is a classic piece of equipment that has stood the test of time. It’s a valuable asset for musicians and recording engineers alike, offering unique and unparalleled sound processing capabilities. The RE-501’s ability to add warmth, depth and character to any sound makes it a favourite in the music industry.

Whether you’re looking to create sonic landscapes or infuse your music with vintage charm, the Roland RE-501 Chorus Echo Tape Delay is an excellent choice. So, add this historic piece of gear to your collection and watch your sound come to life.

Categories
Archive

What Does It Mean to Mix a Song

Mixing a song refers to the process of combining and balancing all the individual tracks within a recording to create a final stereo audio file. This involves adjusting different elements such as volume, panning, EQ, compression, reverb, and other effects to produce a cohesive and polished sound.

Mixing is a crucial step in the music production process as it can significantly impact how a song is perceived by listeners. A poorly mixed song can sound muffled, disjointed, or harsh, while a well-mixed song can sound clear, balanced, and exciting.

Mixing is a skill that requires technical expertise, attention to detail, and a good ear for musical balance. We will explore the basics of mixing a song and the various techniques used to create a professional-sounding mix.

What Is Mixing A Song?

Mixing a song refers to the process of combining and adjusting different audio tracks to create a final, polished version ready for mastering and distribution. It involves adjusting levels, panning, and equalization, as well as adding effects and automation to enhance the overall sound quality and clarity.

Defining Mixing

Mixing a song is the process of combining different audio components to create a final stereo or surround sound mix. It’s an essential step in music production and involves using specialized software to adjust levels, panning, and EQ to get the best possible sound.

Mixing Components

When mixing a song, there are several components to consider. These include:

  • Tracks: The individual recordings that make up the song. These could include vocals, guitars, drums, and synthesizers, among others.
  • Levels: The volume of each track in the mix. Balancing levels is a crucial part of the mixing process as it determines how prominent each instrument is in the final mix.
  • Panning: Deciding where each track sits in the stereo field. Panning is used to create a sense of space and depth within the mix.
  • EQ: Adjusting the frequency balance of each track to ensure they don’t overlap with each other and to enhance certain frequencies.
  • Compression: Controlling the dynamic range of each track to ensure it sits well within the mix.
  • Effects: Adding reverb, delay, and other effects to tracks to enhance the overall sound.

Overall, mixing a song involves making sure that all components work together to create a cohesive and enjoyable listening experience.

What Does It Mean to Mix a Song

Credit: www.masteringthemix.com

The Goals Of Mixing

Mixing a song involves bringing together all the individual elements such as vocals, instruments, and effects to create a cohesive and balanced final product. The primary goals of mixing are to enhance the clarity, depth, and impact of the sound and to ensure that the mix translates well across different sound systems and environments.

Enhancing Sound Quality

Mixing is the process of combining individual tracks of a song to create a cohesive and balanced final product. The primary goal of mixing is to enhance the overall sound quality of the song. Achieving this goal requires a deep understanding of various audio processors and effects, such as equalizers, compressors, and reverb. The engineer needs to use these tools judiciously to ensure that each element of the song can be heard clearly and dynamically, without overwhelming the other instruments or vocals.

Creating A Balanced Mix

Another essential goal of mixing is to create a balanced mix. A balanced mix is one in which each element of the song is heard at the appropriate volume and frequency. Achieving a balanced mix involves using panning to position each instrument in the stereo field and applying EQ to remove any unwanted frequencies. The engineer must also use compression to control the dynamic range of each track and ensure that no track is too loud or too soft compared to the others.

Benefits of a Balanced Mix:
Allows listeners to hear every instrument/vocal clearly
Creates a professional sound that is pleasant to the ear
Puts the focus on the song’s message and emotions

Applying Effects

In addition to EQ, compression, and panning, mixing also involves applying effects to enhance the overall sound of the song. Effects like delay and reverb can help create a sense of space and depth, while distortion and saturation can add warmth and character to the song. As with all audio processors, the engineer must use these effects tastefully and make sure that they serve the song’s overall feel and message. To conclude, mixing is an art that requires a deep understanding of audio engineering principles, as well as an ear for musicality and emotion. The goals of mixing, including enhancing the sound quality, creating a balanced mix, and applying effects, are all interconnected and serve to create a polished and professional final product that captivates listeners.

The Mixing Process

When it comes to music production, mixing a song is an essential step before it can be released. The process involves balancing and adjusting different elements in a track to create a cohesive and polished sound. Good mixing skills can take a song from sounding run-of-the-mill to remarkable.

Importance Of Starting With A Clean Slate

A crucial aspect of the mixing process is starting with a clean slate. This means the individual tracks are free of any background noise, unintentional sounds or any other element that might interfere with the music. If the audio is not clean, it can affect the quality of the sound and even ruin the overall effect of the mix. Thus, it’s essential to make sure all tracks are polished and capable of sounding good on their own before beginning the mixing and mastering.

Mixing Techniques And Tools

After ensuring cleanliness, it’s time to bring in mixing expertise and tools. Mixing techniques such as EQ, compression, and reverb are used to balance different elements of the track. Equalization or EQ helps bring out specific frequencies of sounds while compression helps reduce the volume difference between loud and soft parts. Reverb assists in simulating different acoustic environments. It’s crucial to understand and use these tools correctly to create a polished and professional sound.

Common Tools used in MixingPurpose of Tools
Equalizer (EQ)Helps in adjusting the frequency levels of the audio tracks
CompressionUsed to balance the volume levels of the different tracks in a mix
ReverbUsed to add a simulated acoustic environment to individual tracks or the mix
DelayA tool used to add space and depth to the mix
PanningThe process of adjusting the stereo position of an audio track
AutomationUsed to adjust the volume and effect levels over time

Mastering comes after the mixing is complete. Here, settings such as loudness and limiting are adjusted to optimize the final mix.

In conclusion, mixing and mastering a song are crucial steps in the production process. With these skills, producers can produce more polished and professional-sounding tracks.

What Does It Mean to Mix a Song

Credit: mastering.com

How To Mix A Song For The Best Results

Mixing a song refers to the process of blending and balancing individual tracks to create a final stereo mix that sounds cohesive and complete. It involves adjusting the volume, EQ, and other effects to ensure that each element fits together to create the best possible sound.

Get the best results for your mix by paying attention to every detail.

Mixing a song is the process of combining several audio tracks, balancing the levels and creating a final stereo mix that sounds good on all audio systems. The process includes adjusting the volume, pan, EQ settings, and adding effects to enhance the sound. The goal is to create a cohesive and balanced finished product that represents the creative vision of the artist.

Preparing Your Mix

Before diving into the mixing process, it’s important to prepare your mix properly. You need to ensure that all the tracks are aligned, set at the right tempo and volume. This ensures that the mixing process can begin smoothly and with minimal issues. Begin by setting the individual tracks to roughly the same level. Then, use the volume faders to balance the levels of each track. This ensures that no track is overpowering the others and that the vocals, drums, bass, and other instruments are all in balance.

Crafting A Soundscape With Eq And Panning

Crafting a soundscape with EQ and panning is an essential aspect of mixing a song. EQ is used to adjust the frequency response of each track so that each instrument sits in the mix. Panning is used to place each instrument in the stereo field, creating a sense of space and depth. Begin by EQing each track to remove any unwanted frequencies. Then, use panning to position each instrument in the stereo field. This creates a sense of space and separation between the sounds and makes the mix sound more natural.

Using Effects For Enhancement

Using effects such as reverb, delay, and compression can enhance the sound of each track. Reverb adds a sense of space and creates a natural sound. Delay adds depth to the mix and can be used to create a sense of movement. Compression can be used to balance the dynamic range of each track, making the overall mix sound more cohesive. When applying effects, ensure that they are used sparingly and only to enhance the sound. Too many effects can make the mix sound cluttered and muddy, so use them judiciously. Mixing a song involves crafting a finished product that represents the artistic vision of the artist. By preparing your mix, crafting a soundscape with EQ and panning, and using effects for enhancement, you can create a cohesive and balanced final product that sounds good on all audio systems.

The Role Of A Mixing Engineer

A mixing engineer is responsible for creating a balanced and polished sound in a song. They adjust levels, EQs and other effects in each track to create a cohesive and appealing sound that pleases the listener. This skill is critical to the success of a song in the competitive music industry.

Mixing a song can be a tedious process for many music producers. That’s why they turn to professional mixing engineers. A mixing engineer’s primary task is to take all the individual tracks of a song, each representing an instrument or sound, and merge them into a final track that sounds polished and complete. In this article, we will discuss the role of a mixing engineer, what they do, and some tips for improving your mixing skills.

What A Mixing Engineer Does

A mixing engineer is responsible for ensuring that all the various tracks of a song blend seamlessly in terms of volume, tone, panning, and timing. They take individual tracks previously recorded and create a cohesive sound. Without a mixing engineer, individual tracks may clash or sound disjointed. Mixing engineers work with producers and artists to bring their musical ideas to life. They do this by utilizing various techniques such as equalization, compression, reverb and delay. They also use modern software to create different instrumental effects that enhance the quality of the song.

Tips For Improving Your Mixing Skills

Mixing a song is an art that takes time and effort to perfect. Here are some tips for improving your mixing abilities:

  • Use reference tracks when trying to create a specific sound. Reference tracks are similar songs to yours that you can use as a guide to get the mix you want.
  • Ensure that each track has enough headroom. This means that each track should have some space to breathe to avoid it becoming muddy and cluttered.
  • Start mixing at low volumes. It helps to listen to your mix at low volumes to ensure you can hear each instrument and make necessary changes.
  • Use automation to create variation. Automation is a powerful tool that can turn an ordinary mix into an impressive one. It can be used to create variations in the song and keep the listener engaged.

Conclusion: Mixing a song may seem difficult at first, but with the help of a mixing engineer, it can become much more manageable. Mixing engineers bring together all the pieces of a song to produce a cohesive and polished sound. The tips outlined above can help you improve your mixing skills and create outstanding mixes. Remember, practice makes perfect, so don’t be afraid to experiment and try new things.

Common Mixing Mistakes And How To Fix Them

Mixing a song involves balancing and adjusting the individual tracks to create a cohesive and polished final product. Common mixing mistakes include not properly leveling tracks, overusing effects, and neglecting to EQ properly. These can be fixed by regularly referencing the mix on different speakers, using effects sparingly, and paying close attention to the frequency balance of each element.

Mixing is an art, and just like any art form, it requires a level of skill and expertise. Even experienced mix engineers can make mistakes, especially when working on a new track or experimenting with new techniques. Mistakes made during a mix can have a huge impact on the final production, resulting in a track that sounds unbalanced, muddy, or even unprofessional. In this section, we’ll cover some common mixing mistakes and how to fix them.

Over-compressing

One of the most common mixing mistakes is over-compressing. Compression is a powerful tool that can help balance the levels of a track and add sustain to some elements. However, too much compression can cause a track to lose its dynamics, resulting in a flat and lifeless sound. If you find that your mix is lacking energy and excitement, it might be because you’ve over-compressed it. The best way to fix this is to use compression more sparingly and selectively. Try reducing the compression ratio, increasing the attack time, and adjusting the release time until you find a more balanced sound.

Not Leaving Enough Headroom

Another common mistake is not leaving enough headroom in your mix. Headroom is the amount of space between the loudest peak in your mix and the maximum level that your mixing console or audio interface can handle before it starts to distort. If you don’t leave enough headroom, your mix will sound distorted and harsh, making it difficult to listen to. To fix this, make sure that you leave at least 3-6 dB of headroom in your mix. You can do this by reducing the levels of your individual tracks or using a gain staging plugin to adjust the levels before they hit the master bus.

Ignoring The Importance Of Mono Compatibility

Mono compatibility is often overlooked but it can have a big impact on the final mix. Mono compatibility is the ability of a track to sound good when played through a mono system, like a radio or a phone speaker. If your mix isn’t mono compatible, it can sound unbalanced or even disappear in mono. To fix this, make sure to check your mix in mono regularly throughout the mixing process. Use plugins like utility to check the phase correlation, and use panning and EQ to make sure that the individual elements of your mix sound good in both stereo and mono.

Overuse Of Effects

Finally, another common mixing mistake is overusing effects. Effects, like reverb, delay, and chorus, can add depth and interest to a mix, but using too much of them can make a mix sound muddy and cluttered. To fix this, use effects more selectively and purposefully. Try keeping the effects in the background, rather than in the forefront of your mix, to add depth without overwhelming the main elements of your track. In conclusion, mixing is an art that takes time and practice to perfect. By avoiding these common mixing mistakes and applying the tips described in this section, you can create a more balanced and professional sounding mix.

What Does It Mean to Mix a Song

Credit: www.epidemicsound.com

Frequently Asked Questions On What Does It Mean To Mix A Song

How Do You Mix A Song?

Mixing a song involves adjusting and balancing individual tracks of a recording to achieve a cohesive and polished final product. This process can include adjusting volume levels, panning, equalization, compression, and adding effects. It is typically done using specialized software and requires attention to detail and critical listening skills.

What Is Difference Between Mixing And Mastering A Song?

Mixing involves balancing and adjusting individual tracks in a song, while mastering is the final process of optimizing the overall sound quality of the mixed song. Mixing deals with adjusting tone levels, panning, and effects and mastering refines the mix to enhance its loudness, clarity, and overall tonal balance.

What Does It Mean When A Song Is Being Mixed?

Mixing a song is the process of combining individual tracks of a recording to create a final stereo mix. This involves adjusting levels, panning, and equalization, adding effects and dynamics processing to achieve the desired sound. The mix is typically done by a professional audio engineer in a specialized studio environment.

What Is It Called When You Mix A Song?

Mixing a song is called audio mixing.

Conclusion

Mixing a song can be an intimidating and complex process, but it is an essential step to turning your recordings into a complete and polished product. By balancing the individual elements of a track, adjusting levels, adding effects, and enhancing the overall sonic quality, a mix can make or break a song.

With some practice, patience, and an ear for detail, you can achieve professional-level mixes that will showcase your artistry and impress your listeners. Happy mixing!

Categories
Archive

How To Make Chord Progressions

To make chord progressions, start by choosing the key of your song and then choosing chords that fit within that key. From there, experiment with different combinations and transitions to create a unique and interesting progression.

Chord progressions are the backbone of most songs and can greatly impact the mood and tone of the music. Whether you’re a beginner or a seasoned musician, understanding how to create and manipulate chord progressions is a valuable skill. Starting with the key of your song, you can choose from a variety of chord options that fit within that key.

Once you have a basic progression, you can then experiment with different combinations and transitions to create a unique and interesting sound. We’ll delve deeper into the process of making chord progressions and offer some tips and tricks for making them sound great.

How To Make Chord Progressions

Credit: www.musictheoryacademy.com

Importance Of Chord Progressions

Chord progressions are an integral part of making music, and it’s impossible to have a melody without a set of chords that accompany it. Chord progressions provide the structure to a song and can make all the difference between a dull and an exciting piece of music. In this blog post, we’ll explore the importance of chord progressions, and how they can help you create dynamic melodies, provide harmonic direction, and understand the mood of the music.

Creating A Dynamic Melody

The melody of a song is what sticks in a listener’s mind, and a dynamic melody is what separates a good song from a great one. By using different chord progressions, you can create a unique melody that complements the mood of the music. For instance, a happy song typically has more major chords in its chord progression, while a sad song usually has more minor chords. Experimenting with different chord progressions can also help you create tension and release in your melody, making it more interesting and memorable for the listener.

Providing Harmonic Direction

Chord progressions also provide harmonic direction to a song, meaning they give the listener a sense of where the music is going. By using predictable chord progressions, you can provide a sense of stability and comfort to your listener. On the other hand, using unexpected chord progressions can add tension and excitement to a song, making it more interesting to listen to. By understanding how different chord progressions can affect the listener, you can provide the exact harmonic direction you want in your music.

Understanding The Mood Of The Music

Lastly, chord progressions play a significant role in conveying the mood of the music. As mentioned earlier, major chords often connote happiness, while minor chords often signify sadness. This means that by utilizing different chord progressions, you can manipulate the mood of the music to suit your intentions. For example, if you want to create a piece of music that invokes a sense of nostalgia or longing, you might use minor chords in your chord progression.

Music Theory Basics

For anyone interested in making music, understanding music theory is essential. When it comes to chord progressions, you don’t have to be a trained musician, but a basic understanding of music theory will definitely help.

Major And Minor Scales

The major and minor scales are the foundation of western music. Before we dive into chord progressions, it is essential to understand how these scales are constructed. The major scale is a seven-note scale that has a bright, happy sound, while the minor scale has a sadder, darker feel. Being able to differentiate between these two scales is vital when creating a chord progression.

Triads And Seventh Chords

Triads and seventh chords are the building blocks for chord progressions. A triad consists of three notes, while seventh chords have four notes. Triads can be major, minor, augmented, and diminished, while seventh chords can be major seventh, minor seventh, dominant seventh, half-diminished seventh, and fully diminished seventh. Knowing how to construct and use these chords properly is vital to creating interesting and complex chord progressions.

Roman Numeral Analysis

Roman numeral analysis is a system of analyzing chords based on their position in a scale. Each chord is assigned a Roman numeral based on its relationship to the root note of a scale. For example, in the key of C Major, the chords would be assigned as follows: I (C), ii (Dm), iii (Em), IV (F), V (G), vi (Am), and vii° (Bdim). Understanding the relationship between these chords is key to creating chord progressions that are both interesting and coherent.

Building Chord Progressions

Learning how to make chord progressions can be overwhelming, but it doesn’t have to be. Start by familiarizing yourself with basic music theory and experimenting with different chord combinations. With practice, you’ll be able to create unique and captivating chord progressions for your compositions.

Building a chord progression is like putting together a puzzle. Each piece needs to fit together seamlessly to complete the picture. In music, a chord progression is a sequence of chords that follow one after the other to create a melody. Learning how to build chord progressions is essential for any musician looking to write their own music, whether it’s for a band or a solo project. In this article, we will cover how to choose a key, use chord extensions, and incorporate modal interchange to help you build your own chord progressions.

Choosing A Key

The first step in building a chord progression is choosing a key. The key you choose will determine which chords are available to you. To choose a key, you need to consider the melody and the mood you want to create. A minor key will give you a darker, more somber sound, while a major key is brighter and more uplifting. Once you have settled on a key, you can start to explore the chords that are available to you.

Using Chord Extensions

Chord extensions are notes that are added to a basic chord to create a more complex and interesting sound. These notes can add depth and complexity to your chord progression. Some common chord extensions include the 7th, 9th, and 11th chords. For example, a C chord with an added seventh would be written as C7. Experiment with different extensions to see how they can enhance your chord progression.

Incorporating Modal Interchange

Modal interchange is the use of chords from a parallel key to create a more complex and interesting sound. For example, if you are in the key of C major, you can use chords from the parallel minor key (C minor) to create a more melancholic sound. This technique can add depth and complexity to your chord progression. Experiment with different chords from different keys to create a sound that is unique to you. In conclusion, building chord progressions is an essential skill for any musician. By choosing a key, using chord extensions, and incorporating modal interchange, you can create a sound that is unique and interesting. Experiment with different techniques and have fun creating your own chord progressions.

Popular Chord Progressions

Learn how to create captivating chord progressions with this guide on popular chord progressions. Impress your listeners with the knowledge of how to string together chords that harmonize perfectly.

As a musician, understanding chord progressions is a fundamental aspect of music theory. Chord progressions refer to a series of chords played in a specific order, forming the harmonic foundation of a song. In this post, we’ll take a look at some popular chord progressions used in various musical genres.

The I-iv-v Progression

One of the most common chord progressions is the I-IV-V progression. In this progression, the chords used are the first, fourth, and fifth chords in a given key. For example, in the key of C major, the chords used would be C, F, and G. This progression can be heard in many popular songs such as “Sweet Home Alabama” by Lynyrd Skynyrd and “I Got a Woman” by Ray Charles.

The 12-bar Blues

Another popular chord progression is the 12-bar blues. As the name suggests, this progression is commonly used in blues music. It consists of three chords played over 12 bars, typically using the I, IV, and V chords. The chords are usually played with a dominant seventh chord, and variations of the 12-bar blues can be heard in a variety of genres such as rock and roll, jazz, and country music.

The Ii-v-i Progression

The ii-V-I progression, also known as the “2-5-1” progression, is a staple in jazz music. The chords used are the second, fifth, and first chords in a given key. For example, in the key of C major, the chords used would be Dm7, G7, and Cmaj7. This progression provides a sense of resolution and is often used to end a piece of music. You can hear this progression in the jazz standard “Autumn Leaves” by Joseph Kosma. Understanding chord progressions is essential for any musician looking to create their own music or improvise over existing songs. By mastering these popular chord progressions, you can gain a deeper understanding of music theory and develop your skills as a musician.

Creating Interesting Rhythms

Creating interesting and unique chords progressions is key to making memorable music. Experimenting with different chord combinations and rhythms can add depth and intrigue to your compositions, and make your music stand out from the crowd.

When it comes to creating chord progressions, the rhythm is just as important as the actual chords themselves. A simple chord progression can become incredibly compelling with the addition of a unique and engaging rhythm. In this section, we will explore various techniques that you can use to create interesting rhythms in your chord progressions.

Syncopation Techniques

One effective way to create interesting rhythms in your chord progressions is to use syncopation. Syncopation is all about creating an unexpected emphasis on certain beats within a measure. This technique can add a sense of complexity to an otherwise straightforward chord progression. To incorporate syncopation, try experimenting with the placement of your chords within a measure. Play around with different rhythms until you find something that sounds unique and engaging.

Using Arpeggios

Another way to create a more intricate and interesting rhythm is by incorporating arpeggios into your chord progressions. An arpeggio is simply a broken chord where the notes are played one at a time instead of all at once. By using an arpeggio, you can create a more fluid and flowing rhythm that adds a new dimension to your chord progressions. Try experimenting with different ways of playing the arpeggio to create a variety of rhythms and moods in your music.

Incorporating Suspended Chords

Suspended chords are another effective way to add interest and complexity to your chord progressions. A suspended chord is created by replacing the 3rd of a chord with either the 2nd or 4th note of the scale. The result is a more open and ambiguous sound that can add a sense of tension and release to your music. By incorporating suspended chords into your chord progressions, you can create a more dynamic and engaging rhythm that keeps your listeners on their toes. In conclusion, creating interesting rhythms in your chord progressions is all about experimentation and exploration. By using syncopation, arpeggios, and suspended chords, you can add depth, complexity, and intrigue to your music, elevating your chord progressions to the next level.

How To Make Chord Progressions

Credit: mastering.com

Alternative Approaches

Explore unconventional methods to create chord progressions such as borrowing chords from the parallel minor, substituting chords with their relative majors, and altering chords with extensions. Experimenting with these alternative approaches can lead to unique and interesting chord progressions that stand out in today’s music scene.

When it comes to creating chord progressions, there are many approaches one can take. One of the most common ways is to use diatonic chord progressions that follow the rules of the key. However, sometimes a song may call for a more unique and creative approach. This is where alternative approaches come into play.

Emotion-driven Progressions

One approach to chord progressions is to let the emotion or feeling of the song guide your choices. This means using chords that convey the intended emotions, rather than following a strict harmonic structure. For example, if the song is meant to be sad or melancholy, you can use minor chords or more dissonant intervals. If the song is meant to be uplifting or joyful, you can use major chords or brighter voicings.

Non-diatonic Chord Progressions

Another approach to creating chord progressions is to use non-diatonic chords. These are chords that do not belong to the key of the song but can add a unique color or flavor. For example, you can use borrowed chords from other keys, such as a major chord in a minor key, or use chords that are completely outside of the key.

Using Inversions And Voicings

Using inversions and voicings can also add interest and variety to your chord progressions. Inversions refer to rearranging the order of notes within a chord, while voicings refer to the specific sound or tone of a chord. By using different inversions and voicings, you can create more complex and layered harmonies. This can be particularly effective when working with a simple chord progression, as it can add depth and complexity without straying too far from the structure of the song. In conclusion, alternative approaches to chord progressions can offer a fresh and creative perspective on songwriting. Whether it’s prioritizing emotion or experimenting with non-diatonic chords, these approaches can help you create unique and memorable compositions.

Tools And Resources

Achieving catchy chord progressions requires skill. With the help of tools and resources available online, music enthusiasts can learn how to create and experiment with different chord progressions with ease. From chord generators to online courses, the possibilities are endless.

Tools and Resources: When it comes to making chord progressions, having the right tools and resources can make all the difference. There are a variety of options available, including Digital Audio Workstations, Chord Progression Software, and Music Theory Books and Courses. Let’s take a closer look at each of these options and how they can help you make captivating chord progressions for your music. Digital Audio Workstations: Digital Audio Workstations, or DAWs, are comprehensive software packages designed for recording, mixing, and producing music. They are a great tool for creating chord progressions as well. DAWs like Ableton Live, Logic Pro, and FL Studio come with built-in piano rolls, chord progressions, and MIDI effects that can help you create complex chord progressions easily. You can also use the DAW’s virtual instruments and software synths to experiment with different sounds and chord voicings. Chord Progression Software: If you’re looking for a more focused approach to making chord progressions, there are also several dedicated chord progression software options available. ChordPotion, Chord Progression Generator Pro, and RapidComposer are a few examples of software that can help you generate chord progressions quickly and easily. These programs often come with pre-made chord progressions, chord suggestions, and chord variations that you can use as a starting point and customize to your liking. Music Theory Books and Courses: If you want to dive deeper into the theory behind chord progressions, there are many music theory books and courses available that can help. These resources can provide you with a strong foundation in music theory, including chord construction, tonality, and chord progressions. Some popular options include “Music Theory For Dummies” by Michael Pilhofer and Holly Day, as well as online courses such as “Music Theory Fundamentals” by the University of Edinburgh. Conclusion: In conclusion, having the right tools and resources is key to making captivating chord progressions. Whether you choose to use a DAW for an all-in-one solution, dedicated chord progression software for a more focused approach, or music theory resources to deepen your knowledge, there are many options available to help you create the chord progressions that will take your music to the next level.

How To Make Chord Progressions

Credit: ampedstudio.com

Tips For Success

Here are some helpful tips for making chord progressions that will lead to musical success. Start with a basic understanding of music theory, experiment with different chord combinations, and don’t be afraid to break the rules and create something unique.

Practice, patience, and creativity are key to crafting memorable and impactful chord progressions.

When it comes to creating chord progressions, it can be easy to fall into a rut or feel unsure about where to start. To help you overcome these hurdles, we’ve put together some tips that can help you create unique and compelling chord progressions.

Experimentation And Exploration

One of the best things you can do to develop your skills with chord progressions is to experiment and explore different possibilities. Start by trying out new chord progressions that you’ve never used before, even if they feel weird or unfamiliar at first. Challenge yourself to break out of the common patterns you may be using, and try out different keys, modes, and chord qualities.

Analyzing Other Artists’ Progressions

Another helpful strategy for developing your chord progression skills is to analyze other artists’ progressions. Take note of the way they use chords to create moods and feelings in their music, and try to apply those lessons to your own work. You can also try breaking down your favorite songs to figure out the progressions they use and why they work.

Staying Organized And Focused

Finally, it’s essential to stay organized and focused as you work on chord progressions. Keep a notebook or software where you can track and organize your progressions, and make sure you’re focusing on one idea at a time. Don’t get bogged down by trying to create too many progressions at once. Instead, work on each one until you’re happy with it before moving on to the next. By following these tips, you’ll be able to develop your skills and create unique and compelling chord progressions that help your music stand out. Remember, the key is to experiment, analyze, and stay focused as you work towards your goals.

Frequently Asked Questions For How To Make Chord Progressions

How Do I Make My Own Chord Progression?

To make your own chord progression, start by choosing a key and deciding on a chord’s purpose (major or minor). Then, play around with different chords and experiment with their placement within the progression. Use your ear as a guide and try to create a cohesive and interesting progression.

Additionally, you can utilize music theory principles to enhance your chord choices.

How Are Chord Progressions Made?

Chord progressions are made by selecting a key, choosing chords that belong to that key, and arranging them in a specific order. The order can be based on a particular genre, style or personal preference. Experimenting with different chord combinations can help create unique and interesting progressions.

How Do You Build Off A Chord Progression?

To build off a chord progression, you can use various techniques such as repetition, altering chord shapes and inversions, adding or removing chords, and changing the rhythm or melody. Experiment with different chord progressions and explore variations to create a unique sound.

Remember to maintain the overall structure and flow of the composition.

Is Copying Chord Progressions Illegal?

No, copying chord progressions is not illegal. However, there may be copyright issues if a portion of the melody or lyrics are also copied. It is best to seek permission or write an original composition to avoid legal problems.

Conclusion

Creating chord progressions may seem daunting at first, but with the right approach, it can be a rewarding experience. Throughout this article, we’ve explored various tips and techniques that will help you compose memorable chord progressions. Remember to keep experimenting with different sounds and chord structures to find your unique style.

Creating chord progressions is an essential skill for any musician, and with practice and patience, you will become more confident in your abilities. Keep practicing and happy composing!