Categories
Archive

Gain Staging 2

Gain staging is the process of setting proper levels in an audio signal chain. Doing so prevents distortion and ensures optimal sound quality.

In music production, gain staging plays a vital role in achieving a polished and professional-sounding mix. As an audio engineer or music producer, knowing how to gain stage is crucial for achieving high-quality mixes. Proper gain staging begins at the source, where levels are set for each sound and instrument before it enters the signal chain.

It continues through the signal path, where levels are adjusted to prevent clipping or distortion in each step. Finally, gain staging is essential in the mixing stage when levels need to be balanced and adjusted to create a cohesive and balanced sound. Mastering gain staging techniques can improve the overall quality and clarity of the audio signal, resulting in a better listening experience for the listener.

Understanding The Basics Of Gain Staging

Gain staging is a crucial process in achieving a well-balanced and high-quality sound in audio production. It involves setting the gain levels of each audio signal to avoid distortion and noise. Understanding the basics of gain staging can greatly improve the overall sound quality of your recordings.

Gain staging is an essential technique that involves optimizing the levels of an audio signal at every stage of processing, from recording to mixing and mastering. It helps to ensure that the audio signal is amplified correctly, maximizing its quality while minimizing unwanted distortion and noise. Understanding the basics of gain staging is, therefore, key to achieving professional-quality audio products. In this article, we’ll cover the basics of gain staging, including tips on setting levels, avoiding distortion, and optimizing the signal-to-noise ratio.

Setting Levels

Setting levels is critical in gain staging as it helps to maintain the appropriate levels for all components in the processing chain. A simple rule of thumb is to aim for an average level of -18dBFS for recorded tracks and -6dBFS for the master bus. This gives enough headroom to avoid clipping while also minimizing noise. However, keep in mind that different genres and styles may require different levels depending on the desired sound. Another important aspect of setting levels is to avoid overdriving any of the individual components in the chain. For instance, if you’re recording a guitar through a preamp, set the preamp level to achieve a healthy level without clipping. Similarly, when mixing, ensure that all tracks are balanced with each other, neither too loud nor too soft.

Avoiding Distortion

Distortion occurs when the audio signal is clipped or overdriven, resulting in an unpleasant, harsh sound. Therefore, it’s crucial to avoid distortion by ensuring that the signal levels are not exceeding the maximum allowed level in each component of the processing chain. You can use a meter to monitor the levels and adjust them as needed. Also, some plugins come with built-in meters to help you avoid clipping and distortion. Most importantly, be mindful of the coloration of the sound. Distortion can sometimes be desirable when achieving certain effects, but it should be done intentionally and in a controlled manner.

Optimizing Signal-to-noise Ratio

Signal-to-noise ratio (SNR) quantifies the difference between the audio signal and background noise. SNR can impact the overall quality of your audio products, making it essential to optimize it. Various factors can impact SNR, such as poor microphone placement, low-quality equipment, and too much amplification. One way to optimize SNR is to ensure that you’re using the appropriate gain structure for each component in the processing chain. Avoid unnecessary amplification, compression, or EQing. Also, consider implementing noise reduction techniques, such as gating and filtering. In conclusion, mastering the art of gain staging is a gradual process that takes time and practice. By understanding the basics of gain staging, including setting levels, avoiding distortion, and optimizing the signal-to-noise ratio, you can achieve clean, professional, and high-quality audio products.
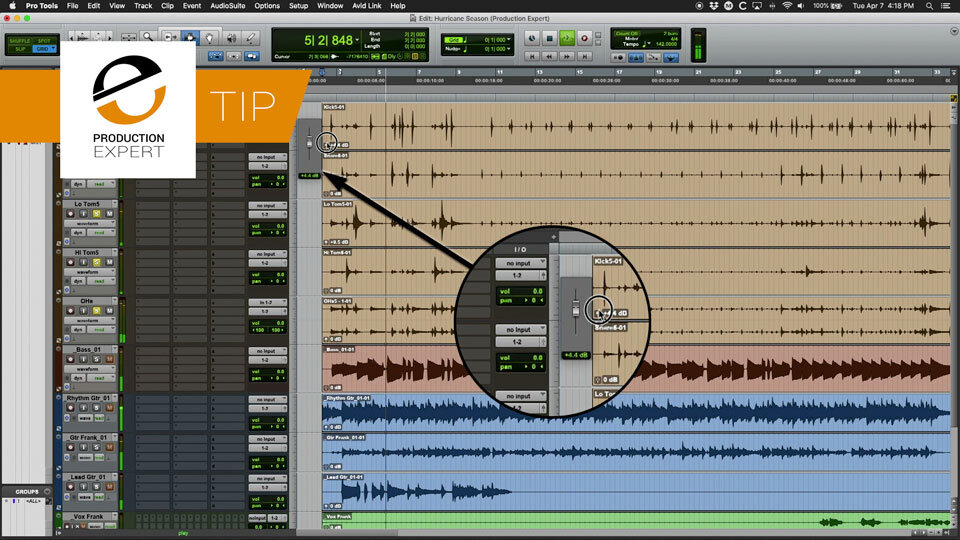
Gain Staging 2

Credit: www.production-expert.com

Why Gain Staging Is Important

Gain staging is the process of setting the gain (or volume) levels of different audio components in a recording or live sound system to ensure optimum performance. It is a crucial step in any audio production process as it affects the sound quality of the entire mix.

Improving Sound Quality

Proper gain staging helps to improve the overall sound quality by keeping the signal level within the optimal range of each audio component. When the signal level is too low, it can result in noise and a loss of detail in the audio. Similarly, when the signal level is too high, it can lead to distortion, which can ruin the sound quality of the audio recording or performance.

By setting the gain levels correctly, we can ensure that every audio component in the signal chain operates at its optimal level, and the sound quality of the final mix is significantly improved.

Preventing Equipment Damage

Incorrect gain staging can lead to equipment damage, which can be costly to repair or replace. When the signal level is too high, it can cause clipping, which results in distortion, and can damage the speakers. Similarly, when the signal level is too low, it can lead to noise, which can damage the amplifiers and other audio components in the signal chain.

Therefore, it is essential to set the gain levels correctly to prevent any damage to the equipment and ensure its longevity.

Maintaining Consistency

Gain staging also helps to maintain consistency in the audio signal chain. When the gain levels are set correctly, it ensures that every audio component operates consistently, and the sound quality is consistent throughout the entire recording or performance.

Moreover, it helps to ensure that the levels are consistent from one recording or performance to the next, allowing us to achieve a more consistent and professional sound.

In Conclusion

Gain staging is an essential step in any audio production process. By setting the gain levels correctly, we can improve the sound quality, prevent equipment damage, and maintain a consistent audio signal chain. Thus, it is essential to pay attention to gain staging and ensure that it is done correctly.

Tools For Gain Staging

Gain staging is the process of optimizing the signal levels in a recording. Gain staging tools like compressors, limiters and equalizers can help control noise and manage signal levels for a well-balanced mix, resulting in a cleaner, clearer sound.

Proper gain staging is essential for achieving optimum sound quality when recording music. One of the keys to achieving this is having the right tools. While some professionals rely on their ears, others prefer to use specific tools that make the process much more efficient and reliable. Below are some of the tools that can help you with gain staging.

Gain Knobs

Gain knobs are the most basic tools for gain staging. They are found on audio interfaces, mic preamps, and mixing consoles. The gain knob is used to control the amount of gain applied to the signal as it enters the system. It is usually the first step in the signal chain and determines how loud the signal will be throughout the rest of the chain. Turning the gain knob up too high can lead to clipping and distortion, while turning it down too low may result in a weak and noisy signal. Therefore, it is essential to set the gain knob at the correct level to achieve the best signal-to-noise ratio.

Digital Audio Workstations

Digital Audio Workstations (DAWs) are essential tools for recording and mixing music. They allow for precise control over each element of the recording process, including gain staging. Most DAWs have a built-in meter that displays the input level of each track. This enables you to monitor and adjust the gain levels of each track to ensure that they sit in the mix perfectly. Additionally, some DAWs offer plug-ins specifically designed for gain staging, making it easier to set the gain levels accurately.

Meters And Visual Aids

Meters and visual aids are the easiest and most efficient tools for gain staging. They provide visual feedback on the level of the audio signal, making it easy to see if the levels are too high or too low. There are several types of meters, including peak meters, RMS meters, and VU meters. These meters display the audio level in real-time, helping you to adjust the gain levels accordingly. Additionally, many audio plugins come with built-in meters that can help you with gain staging. In conclusion, Gain staging is an important aspect of recording and mixing music. It ensures that all of the instruments and vocal tracks sit nicely in the mix, making the final product sound clear and professional. When it comes to gain staging, the best tools are the ones that work best for you. Whether it’s a gain knob, a DAW, or a visual aid, choosing the right tool for the job can make all the difference in the quality of your recordings.

Techniques For Gain Staging

Gain staging is the process of optimizing audio levels at each stage of the signal flow. Gain staging 2 involves adjusting the gain of individual tracks to achieve a balanced mix, while avoiding clipping and distortion. It is a crucial technique for achieving high-quality audio recordings.

Proper gain staging is an essential aspect of achieving good sound quality in your recordings and live performances. It involves setting the gain levels of all the devices in your signal chain in such a way that the signal is neither too high nor too low, allowing for optimal signal-to-noise ratio and preventing issues like distortion and clipping. There are several techniques you can use to achieve proper gain staging, including:

Top-down Approach

The top-down approach to gain staging involves starting with the output device and working your way backwards, adjusting the gain levels of each device along the way. This way, you can ensure that the overall signal level is balanced and optimized for each device in the chain. For instance, when recording, you may start by setting the level on your mixing console or audio interface output to a safe level, then adjust the levels of any EQs, compressors, and other processors in the chain.

Bottom-up Approach

The bottom-up approach, on the other hand, involves starting with the source device and working forward. This technique is particularly useful in live sound situations where you may not have control over the output device. Starting with the source device such as a microphone or instrument, you will adjust gain levels on a channel-by-channel basis, working your way out to the final output.

Using Pink Noise

One of the most accurate ways to set gain levels is by using pink noise. Pink noise contains equal energy in every octave and can be used to set levels for each device in the chain. To use this technique, send pink noise through your signal chain and set the gain levels of each device so that the output signal reads at the desired level. Pink noise can be easily generated through free plugins in your DAW. In conclusion, gain staging is a crucial aspect of achieving high-quality sound in your recordings and performances. We recommend experimenting with top-down, bottom-up, and pink noise techniques to find the one that works best for your setup and preference.

Common Gain Staging Mistakes And How To Avoid Them

Gain staging is crucial for achieving high-quality audio in recording and mixing music, but it’s common to make mistakes. Avoid issues such as overloading, noise floor, and mismatched levels by familiarizing yourself with the basics of gain staging and following best practices.

Effective gain staging is essential for achieving a clean and balanced mix. It is a careful process that involves setting the levels of audio signals at each stage of the recording chain to avoid any distortion, noise or clipping. However, several common gain staging mistakes can ruin your recordings and mixes. In this article, we will discuss the most common gain staging mistakes and how you can avoid them when recording music.

Setting Levels Too High

One of the most common gain staging mistakes is setting levels too high. This mistake often happens out of fear that the sound will be too low, which may lead to the sound being too distorted or overdriven. When recording, keep in mind that there is a threshold that you must not exceed. Going over that threshold leads to clipping. To avoid this mistake, it is crucial to set the levels of your audio signal at a suitable level. You can use gain staging plugins or external hardware to monitor your audio signals at optimal levels.

Not Checking For Clipping

Another common mistake during gain staging is not checking for clipping. Clipping happens when audio signals exceed the maximum level that the system can handle, and this leads to distortion. This issue usually arises when setting levels too high. Clipping can occur at any point in the recording chain: when recording the sound, processing the signal, or during the mixing stage. The best way to avoid clipping is to keep the recording levels low and monitor the audio levels through each stage of the recording chain. Ensure that your meters do not indicate any red lights, which may signal clipping has occurred.

Not Considering The Entire Signal Chain

The third common gain staging mistake is not considering the entire signal chain. Gain staging is a delicate balancing act between all stages of the recording, mixing and mastering chain. Each individual channel in the signal chain affects the final mix, and any adjustments you make at one stage, will impact other stages. To avoid this mistake, it is important to monitor the levels of each signal across the entire signal chain. Ensure that the levels are balanced, and there are no inconsistencies in the recording. That’s it for our discussion on the most common gain staging mistakes and how you can avoid them. Gain staging is a crucial process that can significantly affect the quality of your recordings and mixes. By understanding and following the tips shared in this article, you can avoid these mistakes and achieve a balanced, clear, and noise-free audio output.

Advanced Gain Staging Techniques

Advanced Gain Staging Techniques are crucial to achieve optimal sound quality in music production. In Gain Staging 2, mastering engineers use advanced techniques like multi-band compression and EQ to fine-tune sound levels and ensure the various elements of audio tracks are balanced.

Gain staging is a crucial part of the mixing process, where we adjust the level of audio signals to prevent noise, distortion, and clipping. By managing the gain structure of tracks and plugins, we can achieve a clean and balanced mix, with each element sitting in its proper place. In Gain Staging 1, we covered the basics of gain staging, including setting levels, using headroom, and gain structure. In this article, we’ll explore some advanced gain staging techniques that can take your mixes to the next level. Let’s dive in!

Parallel Compression

One common technique to add punch and depth to drums, bass, and other instruments is parallel compression. It involves duplicating the original track, compressing it heavily, and blending it with the dry signal. The idea is to retain the dynamic range and transient of the original sound while adding sustain and energy from the compressed track. Here’s how to set up parallel compression:

  1. Copy the track you want to process, and name it “Parallel Compressed.”
  2. Insert a compressor plugin on the new track, and set it to a high ratio (e.g., 6:1 or more), fast attack, and long release.
  3. Adjust the threshold to reduce the gain reduction to your liking, typically around 6-10 dB.
  4. Lower the fader of the compressed track to around -20 dB, so that it’s not too loud.
  5. Mix the compressed track with the original one to taste, using the faders or a send/return track.

Serial Compression

Another way to enhance the impact and clarity of a track is serial compression, which means applying multiple compressors in a row to shape the dynamics. While this technique may seem counter-intuitive, as we learned in Gain Staging 1, excessive compression can squash the life out of the sound. However, if we use different compressors with distinct settings, we can achieve a more transparent and musical effect. Here’s how to set up serial compression:

  1. Insert one or more compressors on the track, starting with the most gentle one.
  2. Set the ratio, attack, and release of each compressor according to the desired effect.
  3. Use the makeup gain of each compressor to restore the level lost by the gain reduction.
  4. Pay attention to the gain staging of each compressor, so that they don’t clip or distort the signal.
  5. Compare the sound with and without the compressors, and adjust the settings as needed.

Vocal Mix Buss Processing

When it comes to mixing vocals, one of the critical elements is the vocal mix buss, which is the sum of all the vocal tracks. By processing the vocal mix buss, we can add cohesion, warmth, and presence to the vocals, and make them stand out in the mix. Here are some techniques to process the vocal mix buss:

  • Insert an EQ plugin on the vocal mix buss, and boost the presence frequency around 2-5 kHz to enhance the clarity and articulation of the vocals.
  • Add a gentle compression to the vocal mix buss, with a low ratio (e.g., 2:1), medium attack, and release, to glue the vocals together and tame any peaks.
  • Use a saturation or harmonic distortion plugin to add warmth and harmonics to the vocal mix buss, without overloading it.
  • Apply a stereo imaging or width plugin to widen the vocal mix buss, but be careful not to make it too wide, as it may conflict with other elements.
  • Adjust the level and balance of the vocal mix buss, so that it doesn’t overpower or get lost in the rest of the mix.

Maximizing The Benefits Of Gain Staging

Gain Staging 2 is a critical process that ensures optimal levels for each audio component in your mix. Maximizing the Benefits of Gain Staging will increase the quality and clarity of your audio recordings. Proper gain staging reduces noise, distortion, and frequency interference, improving the overall sound of your recording.

Gain staging is the process of optimizing the signal level before it reaches the recording medium, either analog or digital. By utilizing proper gain staging, you can manage signal levels and reduce noise and distortion, resulting in better sounding recordings. Maximizing the benefits of gain staging can be achieved by creating a gain staging checklist, continuously monitoring levels, and adapting to different recording scenarios.

Creating A Gain Staging Checklist

To ensure that gain staging is done correctly and consistently, creating a gain staging checklist is essential. The checklist should include setting the initial input gain, monitoring levels, adjusting preamp gain, and monitoring output gain. When creating the checklist, it’s essential to have a specific order of tasks to ensure that the sound quality is optimized through the recording process.

Continuously Monitoring Levels

Levels are continuously monitored to ensure that the signal level remains consistent and does not get too hot or too low. By using a level meter, you can maintain the optimal level for each recording scenario. Keeping the signal level consistent throughout the recording process is essential in ensuring that the recording is clear and free from noise.

Adapting To Different Recording Scenarios

Gain staging should be adjusted to suit different recording scenarios. Factors such as microphone type, recording environment, and instruments used, all have an impact on the signal level. Therefore, adapting to different recording scenarios is essential in ensuring that the optimal signal level is achieved. By adapting to different recording scenarios, you are maximizing the benefits of gain staging. In conclusion, by maximizing the benefits of gain staging, you can achieve optimal signal levels, reducing noise and distortion resulting in better sounding recordings. Creating a gain staging checklist, continuously monitoring levels and adapting to different recording scenarios, are just a few ways to achieve this. Proper gain staging is an essential part of the recording process that should never be overlooked.

Gain Staging 2

Credit: www.reddit.com

Gain Staging 2

Credit: www.soundonsound.com

Frequently Asked Questions On Gain Staging 2

What Is The Gain Staging Standard?

Gain staging standard refers to a technique of setting the levels of each stage in an audio signal path, such as microphones, preamps, and mixers, to optimize sound quality and minimize noise. This ensures that the signal doesn’t clip or distort while maintaining a good signal-to-noise ratio.

It’s important to follow this standard to achieve a balanced and professional sound.

What Is The Gain Staging?

Gain staging refers to the process of properly setting levels throughout an audio signal path to avoid distortion and unwanted noise. It’s important to ensure that each device in the signal path is set to an appropriate gain level to achieve a clean, high-quality sound.

What Is The Value Of Gain Staging?

Gain staging is the process of setting the levels of audio signals at each stage of processing to avoid unwanted noise and distortion. Proper gain staging ensures an optimal signal to noise ratio and helps achieve a clear and dynamic mix.

It is essential in creating a high-quality sound recording or live performance.

How Many Decibels Is Gain Staging?

Gain staging is measured in decibels, but there is no specific or fixed decibel range for it. The ideal gain staging depends on the specific equipment and application, as well as the desired sound quality. Proper gain staging ensures minimum noise and maximum headroom for better sound clarity and quality.

Conclusion

Proper gain staging is crucial for achieving an optimal audio experience. By following the steps outlined in this blog, you can ensure that your audio levels are consistent and free from unwanted distortions. Remember to keep a close eye on your input levels and to make adjustments as needed to prevent any audio clipping.

With the right approach to gain staging, you can enhance the quality of your audio and produce content that your audience will love.
Categories
Archive

Improve Your Recordings

To improve your recordings, focus on setting up the right environment and using quality equipment. With the right tools and techniques, you can produce high-quality audio and achieve the best results for your project.

Recording audio can be a challenging task, especially if you’re new to the process. Also, whether you’re recording music, podcasts, or voiceovers, it’s important to have a clear understanding of where to start and what steps to follow. To begin, create a suitable environment for recording.

Related reading: Finishing Your Recordings and Tips For Repairing Bad Recordings. For background, see Sound recording and reproduction on Wikipedia.

Moreover, this could involve finding a quiet space with minimal background noise or investing in sound-absorbing panels to reduce echo and reflections. Additionally, using high-quality equipment such as microphones, mixers, and audio interfaces can make a significant difference in the final product. We’ll explore various tips and techniques to help you achieve the best results when recording audio. From choosing the right microphones to setting up your recording space, we’ll cover everything you need to know to improve your recordings.

Improve Your Recordings

Credit: www.celestionplus.com

How to Improve Your Recordings: Invest In Quality Equipment

Investing in quality recording equipment is a wise decision for improving the overall sound of your recordings. In addition, by upgrading your microphone, interface, and monitors, you can capture every detail of your performance and produce high-quality recordings that stand out.

Furthermore, investing in quality recording equipment is important if you want to produce professional-sounding recordings. It can be tempting to cut corners and opt for cheaper alternatives, but this will only hinder the overall quality of your recordings. In this blog post, we’ll discuss the importance of investing in quality equipment, with a focus on microphones, audio interfaces, and studio monitors.

Microphones

Additionally, a good microphone is the cornerstone of any recording setup. The right microphone will capture the essential nuances of your sound, giving your recordings a polished, professional sound. When choosing a microphone, there are a variety of factors to consider, such as the type of sound you want to capture and the recording environment. Some popular microphone types include dynamic, condenser, and ribbon microphones.

Audio Interface

Also, an audio interface serves as the bridge between your microphone and computer, allowing you to record and monitor your sound. A quality audio interface can make a significant difference in the overall quality of your recordings. Look for an interface with high-quality preamps, low-latency monitoring, and compatibility with your DAW software. Consider your recording needs to determine how many inputs and outputs you require.

How to Improve Your Recordings: Studio Monitors

Moreover, Studio monitors are an essential part of any recording setup. They are designed to provide accurate, uncolored sound reproduction, allowing you to hear your recordings as they truly sound. When shopping for studio monitors, consider the size of your room, the type of music you’ll be recording, and your overall budget. It’s also important to consider things like frequency response, driver size, and sensitivity. Investing in quality recording equipment not only improves the overall quality of your recordings but also makes the recording process much more enjoyable. With a little research and investment, you can take your recordings to the next level and produce polished, professional-sounding tracks.

Improve Your Recordings

Credit: learning.hotjar.com

Understand The Physics Of Sound

The importance of understanding the physics of sound cannot be overstated when it comes to improving your recordings. As a content creator, you want to create audio that sounds not only good but professional. In addition, understanding the science behind sound waves will enable you to manipulate sounds the way you want and achieve your audio recording goals. This post will discuss the three main components of sound, which are frequency, amplitude, and wavelength.

Frequency

Furthermore, frequency is the number of waves produced by a sound source per second. A sound wave’s frequency is measured in Hertz (Hz). Low-frequency sounds, such as bass drums or tubas, produce waves that occur fewer times per second. Sounds like bird chirps or string instruments that produce higher-pitched noises, have waves that occur more often.

How to Improve Your Recordings: Amplitude

Amplitude, also known as volume or loudness, refers to the height of a wave, which directly corresponds to the intensity of the sound. A louder sound produces a higher amplitude wave while a softer sound has a lower amplitude. Volume or amplitude is measured in decibels (dB), and the human ear can generally perceive sounds between 0 dB and 140 dB.

Wavelength

Additionally, wavelength determines the pitch of a sound. It is the distance between two corresponding points of a sound wave, such as the highest points or the lowest points. Higher frequency sounds have shorter wavelengths, while lower frequency sounds have longer wavelengths. Understanding wavelength is essential for ensuring that every frequency of sound in a recording is captured in the final product.

Understanding the physics of sound is crucial in creating quality audio productions, so don’t neglect it. Also, knowing the basics of frequency, amplitude, and wavelength will help you produce a professional-sounding audio that engages your listeners and effectively delivers your message.

Proper Room Acoustics

Moreover, proper room acoustics are crucial to improving your recordings. A room’s acoustic properties can have a significant impact on the quality of your recordings. That’s why it’s essential to create a space that supports your recording efforts by reducing unwanted reflections and echoes that can alter the sound.

How to Improve Your Recordings: Diffusers And Absorbers

In addition, diffusers and absorbers are essential acoustic tools that can balance the sound in your recording room. Diffusers break up sound reflections, preventing the buildup of sound waves in specific areas, while absorbers absorb sound waves, reducing unwanted echoes and improving overall sound quality. Placing diffusers and absorbers in the right locations in your room can make a significant difference in the recording quality.

Speaker Placement

Furthermore, the placement of your speakers in the recording room must be precise. Proper speaker placement ensures that the recorded audio is as accurate and consistent as possible by creating a stereo field that immerses the listener in the sound. In general, speakers should be positioned at an equal distance from the back and side walls of the recording room and at the same distance from the listener.

Reflections

Additionally, reflections play an essential role in the recording process as they define the room’s acoustics and contribute to the recorded sound’s character. However, too many or poorly placed reflections can cause unwanted interference, creating a muddy sound. To reduce reflections, you can use diffusers and absorbers. Placing absorbing acoustic panels or foam in strategic locations can minimize reflections, improving overall sound quality.

How to Improve Your Recordings: Master The Art Of Mic Placement

Master the Art of Mic Placement to Improve Your Recordings. Proper microphone placement can make a significant difference in the quality of your recordings. With the right techniques, you can capture the sound you want and enhance the overall production value of your project.

If you want to make a high-quality recording, mastering the art of mic placement is essential. It’s the key to capturing the sound of your instruments or vocals accurately, bringing clarity and depth to your recordings. Here are some tips on mic placement for vocals, drums, and guitars.

Vocals

When it comes to recording vocals, the microphone should be placed about six to eight inches away from the singer’s mouth. This distance will help prevent excessive sibilance and popping. Additionally, consider the type of microphone you are using, as each microphone has its pickup pattern and frequency response.

Drums

Drums are the foundation of your music, and mic placement plays a crucial role in capturing their sound accurately. Place the kick drum’s microphone around three inches from the drum’s head, facing the beater. For the snare drum, place the microphone about two inches above the drumhead, angled downward towards the center of the snare. The overheads should be placed above the drum kit, around four to five feet away from the drummer, pointing down towards the drum kit.

How to Improve Your Recordings: Guitars

Mic placement is critical when recording guitars, whether it’s acoustic or electric. For an acoustic guitar, place the microphone about six to eight inches away from the instrument, a few inches above the soundhole. For an electric guitar, place the mic directly in front of the speaker cabinet, around one or two inches away from the grille cloth. In conclusion, mastering mic placement works wonders in improving your recordings and bringing out the desired clarity and depth. These are some essential tips when it comes to recording vocals, drums, and guitars. Proper positioning of the microphone is an art, and it takes time and practice to get it right. Work with different mic placements and experiment with microphone types to find the sound that works best for you.

Spend Time On Post-production

To improve the quality of your recordings, it’s important to spend time on post-production. This involves editing and fine-tuning your audio files to remove any unwanted sounds, adjust the levels, and add effects to enhance the overall sound quality. By putting in the effort during the post-production stage, you can ensure that your recordings sound professional and polished.

If you want to improve your recording quality and have a professional sounding track, then you must spend time on post-production. Many people focus solely on the recording process and forget that post-production is equally important for the final product. Post-production includes editing, mixing, and mastering. In this blog post, we will focus on the importance of EQ, compression, and reverb in improving your recordings.

Eq

EQ or Equalization is the process of adjusting the frequency balance of your track. Every sound has a different frequency range, and adjusting these frequencies can give your tracks a more balanced and professional sound. With EQ, you can cut out unwanted frequencies and enhance the desired ones, leading to a cleaner and more polished sound. When applying EQ to your track, use a parametric EQ with a graphical interface for better visualization and accuracy. Always trust your ears and avoid over-processing your tracks with too much EQ.

How to Improve Your Recordings: Compression

Compression is the process of controlling the dynamic range of your track, which is the difference between the loudest and quietest parts. Compression helps in maintaining a consistent signal level, which is essential for a balanced and smooth sound. When applying compression, adjust the attack and release settings carefully and use a ratio of 2:1 or 3:1 for a natural-sounding result. Avoid over-compressing your tracks as it can lead to a loss of dynamics and a squashed sound.

Reverb

Reverb is the process of creating a sense of space and depth in your track. It mimics natural reflections of sound waves bouncing off surfaces within a room. Reverb helps in giving your track a more natural, organic and professional sound. When applying reverb, adjust the decay time and pre-delay settings according to the desired effect and avoid using too much of it. Use reverb sparingly on individual tracks and more generously on group tracks or the overall mix. In conclusion, spending time on post-production is crucial in taking your recordings to the next level. With the right adjustments in EQ, compression, and reverb, you can create a polished and professional sound. So, give your tracks the treatment they deserve and improve your recording quality today!

Improve Your Recordings

Credit: www.youtube.com

Learn From The Pros

Improving the quality of your recordings can be a daunting task, but it doesn’t have to be. There’s so much that you can learn from professional sound engineers and producers who have been in the industry for years. By paying attention to their techniques and implementing them in your recordings, you can make significant improvements to the quality of your music.

How to Improve Your Recordings: Online Tutorials

One of the best ways to learn from the pros is to take advantage of online tutorials. You can find tutorials on almost every aspect of music production, from recording techniques to mixing and mastering. Online tutorials can help you learn new techniques, as well as alternative ways of doing things. You can find a wide variety of tutorials on YouTube, online courses, and blogs.

Studio Visits

Visiting a professional recording studio can also be a great way to learn from the pros. By witnessing their workflow and seeing how they work with equipment, you can learn a lot about the recording process. You may even get to see how different professionals approach different genres of music. If you’re lucky, you might even get to assist in a recording session or two, which can be an invaluable learning experience.

Recording Seminars

Recording seminars can also be an excellent way to learn from the pros. Many professionals hold seminars where they share their techniques and experiences in the industry. These seminars cover a wide range of topics, including recording techniques, mixing and mastering, and the music industry itself. Attending a seminar allows you to interact with other musicians and learn from their experiences too.

By learning from the pros, you can gain valuable insights that can help you improve your recordings. Whether it’s through online tutorials, studio visits, or seminars, there are many opportunities for you to learn from experienced professionals. The more you learn, the better equipped you’ll be to create high-quality music that stands out.

How to Improve Your Recordings: Experiment With Different Techniques

If you want to take your music recordings to the next level and stand out from the crowd, experimenting with different recording techniques can make a huge difference. Here are some ideas to help you produce top-quality recordings!

Layering Tracks

Layering tracks is a smart approach to recording that adds depth and dimension to your recordings. This technique involves recording multiple takes of the same part and stacking them together to create a fuller sound. By layering tracks, you can enhance your tracks without having to rely on heavy processing, EQ or compression.

PROSCONS
Creates a fuller soundRequires multiple takes of the same part
Enhances your tracksCan be time-consuming

Using Effects

Using effects such as reverb, echo, and delay can add depth and richness to your recordings. However, It’s important to know when to use effects and not to overuse them.

  • Use effects to add depth and richness to your tracks
  • Don’t overuse effects and wash out your recordings
  • Experiment with different types and settings of effects

How to Improve Your Recordings: Multitrack Recording

Multitrack recording is a method of recording that allows you to record different parts of a song independently of one another. This technique frees you up to focus on one specific aspect of a song at a time and ensure that each part is properly recorded. Multitrack recording also gives you the flexibility to edit your tracks as needed in the post-production process.

  1. Record different parts of a song independently
  2. Focus on one specific aspect of a song at a time
  3. Edit your tracks as needed in post-production

Practice, Practice, Practice

Recording music can be a frustrating process when your final product doesn’t sound as good as you imagined. The good news is that with enough practice, anyone can improve their recordings. Here are some tips to help you practice effectively and get better results.

Recording Consistently

One of the most important things you can do to improve your recordings is to be consistent in your practice. Establish a routine and stick to it. Whether it’s daily or weekly, make sure you are recording on a regular basis. This will help you become more comfortable with the recording process and fine-tune your technique.

Analyzing Your Recordings

It’s easy to get caught up in the moment and overlook mistakes or areas that need improvement. It’s crucial to listen to your recordings with a critical ear. Take notes on what you think sounds good as well as areas that need work. This will help you identify problems and address them in future recordings.

Making Adjustments

After analyzing your recordings, it’s time to make adjustments. This could mean changing your microphone placement or adjusting the EQ settings in your mixing software. It’s essential not to get discouraged; every mistake is an opportunity to learn and improve. Take the time to experiment with different techniques until you find what works best for you.

Remember, practice makes perfect! Making strides in your recordings may take time, but with enough practice, you’ll be sure to see improvement. Consistency, analysis, and adjustment are key to becoming a better recording artist.

Frequently Asked Questions Of Improve Your Recordings

How Can I Make My Recording Quality Better?

Improve your recording quality by following these tips: invest in a good microphone, adjust the microphone’s position to reduce background noise, use headphones to monitor your recording, record in a quiet place, and edit your recording to enhance the sound quality.

How Can I Make My Recording Sound Better?

To improve the sound of your recording, you can try the following tips: 1. Invest in high-quality recording equipment. 2. Choose a quiet and acoustically treated space to record in. 3. Position your microphone correctly. 4. Control the levels and gain during recording.

5. Use EQ, compression, and reverb during post-production editing.

How Can I Improve The Quality Of My Music Recording?

To improve the quality of music recording, you can follow these tips: 1) Choose a good recording environment that minimizes background noise 2) Invest in high-quality microphones and equipment 3) Optimize your recording levels to avoid distortion 4) Edit your tracks carefully, removing unwanted noise and mistakes 5) Master your music to ensure it sounds its best on different devices and platforms.

How Do I Make My Recordings Clearer?

To make your recordings clearer, you can start by using a high-quality microphone and ensuring it is positioned correctly. Reduce background noise and adjust levels to avoid distortion. Edit the final recording to remove any unwanted sounds or sections. You can also try using EQ and compression to enhance the clarity of the audio.

Conclusion

To sum it up, improving your recordings requires a combination of skill, knowledge, and proper equipment. By following the tips mentioned such as setting the sound levels, mastering your audio, and using quality headphones or monitors, your recordings can go from average to exceptional.

Consistency and experimentation will also aid in achieving your desired sound. Don’t be discouraged if it takes some time and practice – the result will be worth it. Ultimately, the key is to never stop learning and striving for improvement.

Categories
Archive

Mixing Screaming Vocals

Mixing screaming vocals involves using high-pass filters, noise gates, compressors, and EQs to control and enhance the tone and clarity of the vocals. If you’re looking to produce aggressive, heavy metal-styled music, then the screaming vocals are an essential aspect that cannot be overlooked.

As an Amazon Associate I earn from qualifying purchases.

Screaming vocals can bring an energy and ferocity to the music that can’t be achieved with clean vocals. To achieve the right mix of screaming vocals, you need to balance the full range of harmonies, uniqueness, distinctions, clarity, and blending with the other instruments.

This balance requires the use of various techniques such as noise gates, compressors, EQs, and high-pass filters. In this blog, we will explore each technique and how you can use them to achieve the perfect mix of screaming vocals for your production needs.

Setting Up A Recording Space

To get clear and powerful mixing of screaming vocals, it’s vital to have the right recording space set up. The right acoustics, equipment, and microphone position will help capture the vocalist’s unique tone without any unwanted noise or feedback. With these elements in place, you’ll be able to mix the vocals with precision and clarity for an exceptional final track.

Consider Room Acoustics

The first step in setting up a recording space for mixing screaming vocals is to consider the room acoustics. The room in which you record your vocals plays a significant role in the overall sound quality of your recording. If the room is too reflective or has too much echo, it may interfere with your vocals. On the other hand, if the room is too dead, the vocals may sound dull and lifeless. So, it is important to choose a room that strikes the right balance between reflection and absorption.

Invest In Soundproofing

The next step in setting up a recording space for mixing screaming vocals is to invest in soundproofing. Screaming vocals can be extremely loud, and there is a risk that they may disturb people living nearby or cause interference in other equipment. To avoid this, you need to soundproof the room. Soundproofing can be achieved by using materials such as acoustic foam, blankets, and curtains, which help to absorb sound.

Work With An Appropriate Mic

The final step in setting up a recording space for mixing screaming vocals is to work with an appropriate mic. It is essential to choose a mic that works well with screaming vocals. A dynamic mic is the best option as it can handle loud sounds without distortion. However, you may need to experiment with different types of mics to find the one that works best for you. In conclusion, setting up a recording space for mixing screaming vocals requires careful consideration of several factors, including room acoustics, soundproofing, and the type of mic you use. By following these guidelines and taking the time to experiment, you can create a space that produces high-quality recordings of screaming vocals.

Preparing The Vocals

To successfully mix screaming vocals, it’s crucial to prepare the vocals first. Start by listening to the raw tracks and adjusting the volume and pitch as needed. Then, apply compression and EQ to enhance the clarity and intensity of the screams.

Preparing screaming vocals is crucial to ensure your sound is on point. The key is to focus on essential steps to make your vocals stand out. In this article, we will discuss three essential steps to prepare vocals for screaming. We will dive into warm-up exercises, proper technique, and vocal health.

Warm-up Exercises

Before screaming your lungs out, it’s essential to spend some time warming up your vocals. A 5-10 minute warm-up routine can help avoid voice strain, making it easier to scream with power and control. A few warm-up exercises include:

  • Lip rolling
  • Tongue trills
  • Humming
  • Vocal sirens

Use Proper Technique

Using proper technique while screaming can make a difference in the quality of your sound. Here are a few techniques to keep in mind:

  • Maintain good posture with your head up and shoulders back
  • Use your diaphragm to support your vocals
  • Focus on hitting your notes with a relaxed throat and open mouth
  • Avoid pushing your vocals too hard, allowing them to come out naturally

Ensure Vocal Health

Maintaining vocal health is critical. Screaming can lead to vocal strain, causing long-term damage to your voice. Here’s how you can keep your vocals healthy:

  • Avoid or limit smoking and alcohol consumption
  • Stay hydrated by drinking plenty of water
  • Get enough rest to avoid exhaustion
  • Consider seeing a vocal coach to help improve your technique and overall vocal health

Overall, preparing your vocals before screaming can make a significant difference in the quality of your vocals. It’s crucial to focus on warm-up exercises, proper technique, and vocal health to achieve a powerful and controlled scream.

Selecting Effects And Processing

To achieve a mix with screaming vocals, selecting appropriate effects and processing is crucial. Use distortion and saturation to add grit and texture, as well as compression and EQ to control the dynamics and tone.

Mixing screaming vocals perfectly is a challenging task, and it usually depends on the genre of music and personal style. When it comes to selecting effects and processing, it is essential to keep two main things in mind – the song style and vocal type. This sub-topic covers how to choose the right effects, EQ, and compression.

Consider The Song Style

The first step to processing screaming vocals is understanding the type of music style. The song can be aggressive or soft, fast or slow, electronic or instrumental, etc. Depending on the song, the vocal processing might vary. So, before setting up the effects, take the time to listen to the track and understand its style thoroughly.

Choose The Right Effects

The effects you apply to the vocals can turn an average performance into a masterful sound. For screaming vocals, effects such as distortion, delay, and reverb are typically used. Reverb helps to add space, depth, and ambiance to the sound, while delay allows for echo and repetition. While distortion can add grit and character to the vocals. These effects can be subtle or extreme, depending on the outcomes and tastes.

Using Eq And Compression

Equalization (EQ) and compression are vital elements in mixing screaming vocals. EQ can help to accentuate certain frequencies that give the vocals presence and cut unnecessary sound. Compression helps to contain the peaks and valleys of the vocal performance while also providing an even sound. It is essential to use EQ and compression simultaneously, to get the desired effects. A compressor can remove the dynamics of the audio, and the EQ’s role is to equalize the vocals accordingly. To sum up, selecting effects and processing for screaming vocals is highly dependent on the music style and vocal type. It is essential to have a clear understanding of these factors before applying effects and processing vocals. Choosing the right effects, using EQ and compression can significantly contribute to mixing screaming vocals perfectly.

Mixing Screaming Vocals

Credit: majormixing.com

Recording The Screaming Vocals

Recording screaming vocals can add energy and intensity to your music. However, it can be challenging to capture the right sound. Here are some tips to help you record screaming vocals effectively:

Setting Mic Levels

Before you begin recording, you need to make sure your mic levels are set correctly. Adjust the gain on your preamp or audio interface until you get a good signal without any distortion. It’s important to find the right balance between the singer’s natural voice and the screaming vocals to avoid clipping or distorting.

Experimenting With Mic Placement

Mic placement is critical when recording screaming vocals. Experiment with different positions to find the sweet spot for capturing the singer’s voice. Start with the mic about a foot away from the singer and move it closer if needed. You may also want to try angling the mic to capture the nuances of the performance.

Choosing The Right Mic

Choosing the right microphone is essential for capturing screaming vocals accurately. Dynamic mics are often the go-to choice, as they can handle high sound pressure levels and minimize noise pickup. Examples include the Shure SM7B and the Sennheiser e906. However, condenser mics can also work if you’re looking for more high-end detail.

Dynamic MicsCondenser Mics
Shure SM7BAKG C414
Sennheiser e906Neumann U87
Electro-Voice RE20Audio-Technica AT4053b

Ultimately, the right mic depends on the specific sound you’re trying to achieve. When choosing a mic, consider the singer’s vocal tone, the style of music, and the other instruments in the mix.

Mixing Techniques For Screaming Vocals

Achieving a polished mix for screaming vocals requires specific techniques. Compression, EQ, and de-essing are key to bring clarity and balance to the vocals while harmonizing with the overall mix. Balancing the levels of each track is essential in creating a unified and impactful sound.

Screaming vocals are a powerful tool in the arsenal of any metal, hardcore or even punk band. They have the ability to evoke strong emotions and contribute to a track’s energy and intensity. However, mixing screaming vocals can be challenging. Not only do they require special attention to detail, but they also require the use of particular techniques to stand out and blend well with the other instruments. This blog will highlight some mixing techniques for screaming vocals that will make your tracks sound professional and intense.

Adding Reverb And Delay

Adding reverb and delay to screaming vocals is an excellent way to create space and depth, which can enhance their sound. Reverb can help vocals sound larger, adding depth and dimension to the recording, while delay can create a sense of movement and space, giving the vocal a more ethereal quality. When applying reverb and delay, it is essential to use caution because too much can quickly make the vocals sound messy and muddy. A great way to create a balance is to use a pre-delay effect that delays the reverb slightly to prevent it from overloading the vocal. Additionally, adding high-pass and low-pass filters to the effect can help to eliminate unwanted frequencies and echo while retaining the vocals’ clarity and presence.

Creating Atmosphere With Distortion

Distortion is a popular technique used to add character and grit to vocals, which is particularly useful for heavy genres like metal and hardcore. Applying distortion is an excellent way to create atmosphere and help the vocals stand out from the other elements in the mix. When using distortion, it is essential to ensure that the vocal remains intelligible and clear since too much can lead to the loss of clarity. The technique often works best when used with short bursts of vocals, such as in screaming or shouting. Experimenting with different distortion plugins can help you find the perfect balance between grit and clarity.

Sharing Of Frequency Space With Instruments

One of the main challenges of mixing screaming vocals is ensuring they don’t clash with other instruments like guitars and drums. The instruments occupy a similar space in the frequency spectrum, which makes it important to ensure that each element is heard distinctively without overpowering the others. A useful tip is to use EQ to ensure that each element occupies a specific frequency range and doesn’t encroach on the others. For example, cutting low-end frequencies on guitars and bass can help prevent them from conflicting with the vocals. Additionally, using panning and volume adjustments to separate each element can help to create space in the mix and improve clarity. In conclusion, mixing screaming vocals is an art that requires patience, technique, and lots of experimentation. By using these techniques, adding reverb and delay, creating atmosphere with distortion, and sharing frequency space with other elements in the mix, you can create a clear and powerful sound that enhances the guitar and drums’ energy and intensity.

Mixing Screaming Vocals

Credit: m.youtube.com

Post-processing Tricks

Elevate your vocal mixes with these post-processing tricks for screaming vocals. From compressors and EQs to distortion and delay, learn how to achieve the perfect sound and take your productions to the next level.

Mixing screaming vocals can be a challenging task, especially if you’re not familiar with post-processing tricks. However, these tricks can help you take your mix to the next level. Here are some post-processing techniques that can help you achieve a professional sounding mix for screaming vocals.

Stereo Widening Techniques

Widening the stereo image of screaming vocals can make them sound more spacious and immersive. This can be achieved by applying stereo widening effects to the vocal track. Stereo widening effects come in various forms, including stereo imagers, chorus effects and delay effects. Each of these effects can help add depth and space to the vocal track. You can also try using Mid-Side EQ to enhance the stereo image of your vocal track. With Mid-Side EQ, you can boost or cut specific frequencies in the side signal while leaving the mid signal unaffected. This can help enhance the stereo image of the vocal track, making it sound more wide and spacious.

Harmonizing And Doubling Tracks

Doubling and harmonizing screaming vocals can make them sound thicker and fuller. Doubling involves recording the same vocal performance twice and panning one track to the left and the other to the right. This creates a sense of width and presence in the mix. Harmonizing involves adding a second vocal track that harmonizes with the main vocal track. This can be done by recording a second performance or by using pitch-correction software to generate harmonies. It’s important to note that you should never auto-tune screaming vocals since it can change the expressive and emotional nature of the performance.

Leveling And Panning

Leveling and panning are essential parts of mixing screaming vocals. The lead vocal should always be at the center of the mix, while the backing vocals and harmonies should be panned to the left and right. You can also pan the vocals slightly off-center to create an interesting stereo image. It’s important to ensure that each vocal track is leveled properly to avoid any volume discrepancies. You can use compression to even out the dynamic range of each track and make the vocals sit more comfortably within the mix. In conclusion, post-processing tricks can help you mix screaming vocals like a pro. By using stereo widening techniques, harmonizing and doubling tracks, and leveling and panning, you can achieve a professional sounding mix that’s pleasing to the ear.

Mixing Screaming Vocals

Credit: urm.academy

Frequently Asked Questions Of Mixing Screaming Vocals

How Do You Mix Screamed Vocals?

Mixing screamed vocals involves adjusting levels, using appropriate effects like compression and distortion, and ensuring they sit well in the mix. Experiment with different EQ settings and panning to create space for the vocals. Proper use of de-essing, reverb, and delay can also enhance the vocals.

How To Do Screaming Vocals Safely?

To safely do screaming vocals, follow these guidelines: 1. Start with vocal warm-up exercises. 2. Use proper breathing technique. 3. Position the microphone correctly. 4. Don’t push your voice too hard. 5. Take breaks and rest your voice to avoid damage.

Is Screaming A Vocal Technique?

Yes, screaming is a vocal technique that involves producing loud, harsh, and intense sounds using the voice. It is commonly used in various music genres such as rock, metal, and punk, and requires proper control of the vocal cords to prevent damage and injury.

What Are The 6 C’s Of Vocal Mixing?

The 6 C’s of vocal mixing are clarity, consistency, coherence, character, contrast, and compression. Clarity ensures that the vocals are easy to understand and distinguish from other sounds. Consistency maintains the vocal tone and level throughout the track. Coherence makes sure that the vocals match the mood and theme of the song.

Character adds uniqueness and personality to the voice. Contrast creates a dynamic and interesting sound. Compression evens out the vocal volume and makes it sound professional.

Conclusion

Mixing screaming vocals requires a delicate balance between compression, EQ, and effects. Enhancing the vocals’ clarity and presence should be the ultimate goal without sacrificing the raw emotion and power of the screams. Experimenting with different techniques and equipment can lead to unique and exciting results.

Remember to always trust your ears and let the vocals guide you through the mixing process. Keep in mind that with patience, practice, and attention to detail, you can achieve professional-level vocal mixes that will stand out in any genre.

Categories
Archive

How To Set Monitor Gain

To set monitor gain, adjust the level until the audio is at a suitable volume without distortion. Monitor gain is crucial for both recording and playback when it comes to audio quality.

By following a few simple steps, you can set monitor gain correctly. It is important to first set up your studio monitors in a suitable location, then connect your equipment correctly. After that, use a test tone or music to adjust the gain so that the volume is comfortable and distortion is avoided.

Make sure that you use the same level of gain for both speakers for accurate stereo imaging. Finally, test and re-adjust the gain as necessary to adjust to your preferences and to suit the type of audio being played.

How To Set Monitor Gain

Credit: www.reddit.com

Step-by-step Guide To Set Monitor Gain

Setting up your monitor gain correctly is crucial for ensuring a clear and accurate sound in your recording studio. Monitor gain controls the loudness of the audio signal from your monitors, and if it’s set too high, you risk damaging your speakers and your hearing. In this step-by-step guide, we’ll go through the essential steps of setting up your monitor gain to get the best out of your system.

Check The Input Level

The first thing you need to do is to check the input level. Look at the input level meter on your audio interface or mixer to make sure the input signal isn’t too low or too high. If it’s too low, increase the input gain until you see a good level on your meters. But be careful not to push the input too hard, or you’ll end up with distorted audio.

Turn The Volume Down

Before you start adjusting your monitor gain, make sure you turn the volume down on your monitors. This will prevent any sudden loud noises from damaging your ears or your speakers. Set the volume to about 50% of its maximum level so you have room to increase the level as needed.

Play A Reference Track

Play a reference track that you know well, ideally something that has a wide frequency range and dynamic range. This will give you a good reference point to work with so you can hear any changes you make to your monitor gain. Listen to the reference track and adjust the volume until it sounds comfortable.

Adjust The Gain Knob

Now it’s time to adjust the gain knob on your monitors. Gradually increase the gain until the volume of your reference track matches the level you set earlier. Make sure you’re listening at a comfortable level and that the sound isn’t distorted. Keep in mind that different parts of a track may have different levels, so listen carefully and adjust as needed.

Check The Levels Again

After you’ve adjusted the gain, listen to the reference track again and check the level against your meters. Make sure the level isn’t too high or too low and that you’re not pushing your monitors too hard. If necessary, make small adjustments until you’re happy with the sound.

That’s it! By following these simple steps, you’ll be able to set up your monitor gain correctly and get the most out of your studio monitors.

How To Set Monitor Gain

Credit: mrmixandmaster.com

Tips For Setting Monitor Gain

To properly set monitor gain, start by adjusting the output of your source device before adjusting the gain on your monitor. Use reference tracks and meters to ensure accurate levels and avoid clipping.

As an audio engineer or producer, setting the right monitor gain is crucial for producing balanced and professional-sounding audio output. Not only does it ensure that you’re hearing everything accurately, but it also saves your ears from unnecessary damage caused by listening to too-loud audio. Here are some tips to help you set your monitor gain correctly.

Use High-quality Reference Tracks

One of the most effective ways to calibrate your monitor gain is by using high-quality reference tracks that you’re familiar with. These reference tracks should be mixed and mastered by professionals and meet industry standards for audio quality. By playing these tracks at different volumes, you can get a sense of how your own mixes should sound.

Use A Sound Meter For Precision

To ensure precision when setting monitor gain, use a sound meter. This tool helps to measure the loudness of the audio signal coming through your speakers in decibels (dB). For example, if you’re producing music, a common monitor gain level is between 75-85 dB. However, depending on the type of audio you’re working on, you may need to adjust your gain levels up or down.

Be Consistent

When setting your monitor gain, it’s essential to be consistent. If you keep adjusting your levels every now and then, you may become disconnected from your audio output’s real sound, leading to inaccurate and sub-standard mixing results. Therefore, ensure that you spend adequate time deciding and setting your gain levels and stick to them throughout your session.

Know Your Studio Setup

Another crucial factor to consider when setting monitor gain is your studio setup. Knowing your room’s acoustic characteristics is crucial as they significantly impact how you perceive and judge the sound. For example, if you’re working in a small, untreated room, you might experience more low-end build-up, which can mask your midrange and treble frequencies. In such cases, you may need to adjust your monitor gain to counter-balance the effect. In conclusion, setting your monitor gain correctly is essential to achieve balanced and professional-sounding audio output. By using high-quality reference tracks, a sound meter, and being consistent in your approach, you can achieve accurate levels and take your audio production skills to the next level. Remember to play around with your equipment and settings to get the best results.

How To Set Monitor Gain

Credit: www.youtube.com

Frequently Asked Questions On How To Set Monitor Gain

What Does Gain Do On A Monitor?

Monitor gain is the amplification of the incoming signal, and it affects the overall volume and clarity of the sound. The gain monitors and enhances the input level and adjusts it to the optimal level for the output. It is an essential feature for creating the perfect sound mix.

Why Do We Monitor Gain Level?

Monitoring gain level is important to ensure that the audio signal does not clip or distort, which could lead to poor sound quality. It also helps to balance the sound levels, making it easier to mix and master audio recordings.

How Do I Calibrate My Sound Monitor?

To calibrate your sound monitor, use a microphone and software designed for monitor calibration. Follow the software’s instructions to reproduce a series of tones and adjust the monitor’s levels accordingly. Ensure that your room is quiet and that you allow enough time for the process to complete.

What Volume Should I Have My Studio Monitors At?

The ideal volume for studio monitors depends on various factors like room size, speaker placement, and personal preference. However, it’s recommended to keep the volume at around 85dB, which is loud enough for accurate monitoring but not harmful to your hearing.

Use an SPL meter to measure the volume and adjust accordingly.

Conclusion

In short, setting monitor gain helps you to accurately measure and adjust audio levels. By following the simple steps outlined in this guide, you can ensure that your audio recordings are of top-notch quality. Remember to always monitor and adjust your gain to avoid any unwanted distortion or noise.

Implementing these techniques will not only improve your audio quality but also enhance your listener’s experience. Try these tips today and take your audio production to the next level.

Categories
Archive

What Is Soft Clipping

Soft clipping is a technique that controls the level of distortion in audio recordings. Soft clipping is a form of distortion that occurs when a signal exceeds the maximum level that a system can handle.

It is a subtle form of distortion that preserves the tonal character of the original sound while reducing the overall level of the recording. Gentle clipping is particularly useful in music production, where producers often rely on it to add warmth and character to recordings.

Related reading: Use Digital Clipping To Make Your Song Louder and What Is Audio Clipping?: Unraveling the Mystery.

Also, we will explore the concept of gentle clipping in more detail, discussing its uses, benefits, and how you can apply it in various recording contexts. We will also provide tips for achieving optimal results when using gentle clipping in your music production.

What Is Soft Clipping

Credit: sound-au.com

Soft Clipping Explained

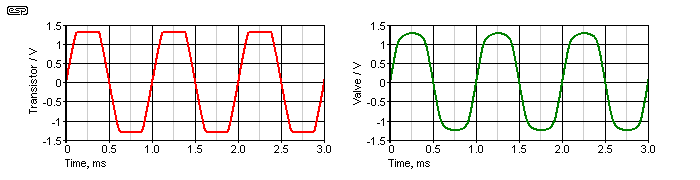
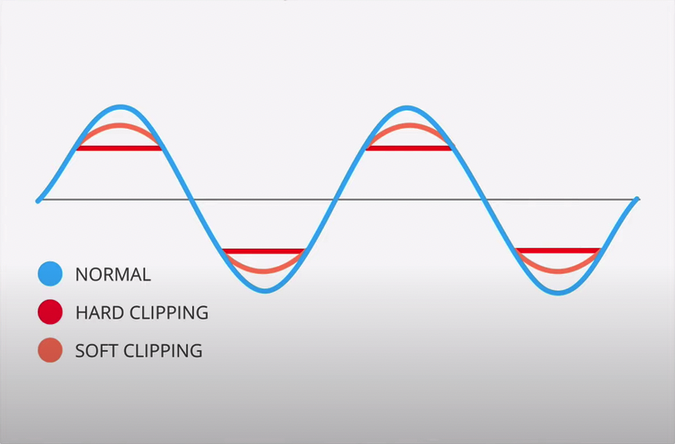
Moreover, gentle clipping is a type of distortion that music producers rely on for a warmer, more natural sound. Unlike hard clipping, which produces a harsh distortion when levels exceed a certain threshold, gentle clipping allows for more subtle distortion and can enhance the character of audio signals.

What Is Soft Clipping?

Gentle clipping is a technique in audio processing that prevents distortion of audio signals, especially when audio levels surpass the maximum allowed level. Gentle clipping works by intentionally distorting the audio waveform gradually, reducing amplitude instead of cutting off the waveform entirely.

Why It Matters in Audio Processing

The importance of gentle clipping in audio processing is hard to overstate. Gentle clipping is crucial in audio production as it helps produce a more natural and warm sound that is pleasant to the ear. Gentle clipping protects speakers and headphones from blowing out especially when the audio levels surge beyond their maximum threshold. It also makes the audio sound fuller in the mix and controls the harshness that comes with high amplitudes that cause distortion, preventing fatigue to the listener’s ear.

In conclusion, gentle clipping is an essential tool in audio processing that helps produce high-quality sound without the harshness that comes with high amplitudes. Whether you’re a music producer, audio engineer or musician, comprehending the importance of gentle clipping in audio processing is an excellent way to elevate your audio production and create a unique sound that’s both natural and enjoyable to the listener.

What Is Soft Clipping

Credit: www.abletonprivatelessons.com

Different Types Of Clipping

Gentle clipping is a type of audio signal processing that can limit distortion in music recordings. It works by rounding off the peaks of the waveform more gradually than hard clipping. This results in a smoother, more natural sound.

Different Types Of Clipping When it comes to audio processing, clipping refers to a type of distortion that occurs when the amplitude of a signal exceeds the maximum capabilities of the processing system. Clipping is a common occurrence in digital audio processing and can result in unwanted distortion or even damage to audio equipment. There are two types of clipping, Hard Clipping and gentle clipping. H3: Hard Clipping Hard Clipping is a type of clipping that occurs when the amplitude of a signal exceeds the clipping threshold and the threshold cuts off the signal completely.

This results in a square waveform with sharp edges and is often heard as a harsh, distorted sound. Guitar distortion pedals and other audio effects often rely on hard clipping for a gritty, crunchy sound. H3: Soft Clipping Soft Clipping, on the other hand, is a type of clipping that occurs when the amplitude of a signal exceeds the clipping threshold and the signal rounds off gradually at that threshold. This results in a more rounded waveform and a softer, more natural distortion.

Practical Tips

Audio engineers often apply gentle clipping to add harmonic distortion to a signal. This can enhance the warmth and richness of the sound. In addition to Hard Clipping and gentle clipping, there are also other types of clipping such as Analog Clipping and Digital Clipping. Analog clipping occurs when the input signal exceeds the maximum output level of the analog circuitry, while digital clipping occurs when the signal exceeds the maximum bit depth of the digital audio processing system.

Understanding the different types of clipping is important for audio engineers and content creators looking to achieve a specific sound or effect. By using the right type of clipping, it’s possible to add character, warmth, and depth to audio recordings, while avoiding unwanted distortion or damage to equipment.

Why It Beats Hard Clipping

Many engineers prefer gentle clipping over hard clipping because it offers more natural and subtle distortion to audio signals, whereas hard clipping creates a harsh, digital distortion. Gentle clipping produces a more pleasing sound by only slightly distorting the loudest parts of the signal.

Soft Clipping Vs. Hard Clipping

When it comes to audio production, clipping is a common problem. Clipping happens when the signal level exceeds the maximum level that the system can handle. If left unmanaged, it results in poor sound quality or even damage to the equipment. You can solve clipping using two methods: gentle clipping and hard clipping. Hard clipping is the process of limiting the signal once it reaches the maximum level. This results in a sharp change in the waveform and a distorted sound. On the other hand, gentle clipping is a more gentle limiting process, which gradually distorts the waveform. This results in a more pleasant sound.

Key Benefits

Engineers prefer gentle clipping over hard clipping for several reasons. Firstly, gentle clipping produces a more natural and pleasant sound than hard clipping. It produces a warmer, more atmospheric sound, which suits many genres of music. Additionally, gentle clipping is easier to manage and control, as it produces fewer artifacts and less distortion than hard clipping. One of the other benefits of gentle clipping is that it protects speakers and other audio equipment from damage.

Hard clipping can produce an excessive amount of distortion that can cause physical damage to speakers and other audio equipment. Gentle clipping, on the other hand, gradually distorts the waveform and avoids causing any physical damage, thus making it a more suitable option for long-term use. In conclusion, gentle clipping is a preferred method of limiting audio signals because it produces a more natural, pleasant sound, is easier to manage, and protects equipment from damage. Consider soft clipping if you want to produce a high-quality, distortion-free sound for your audio productions.

Where It Is Used

Gentle clipping is a digital audio processing technique that rounds off the peaks of sound waves as they approach the maximum level, which prevents harsh distortion. In addition, music producers commonly apply gentle clipping to give sounds a warmer, more natural tone.

Gentle clipping is a crucial technique to prevent any digital distortion or damage to audio. It helps to optimize the performance of electronic devices that process audio signals. Gentle clipping is an easy and preferred method to reduce distortion in digital audio applications such as broadcasting, music concerts, and studios. Let’s delve into how the music and broadcast industries apply gentle clipping.

In Music Industry:

The music industry relies heavily on gentle clipping, which many people call saturation or overdrive. It helps to attain a unique sound that is ideal for some genres. The common applications of gentle clipping in music are distortion guitars, kick drums, and bass. A distorted guitar sound is perhaps the most emblematic example of gentle clipping. Distorted guitars can produce a unique sound that rock and metal artists prefer. It takes the audio signal and increases the amplitude until it starts to distort or clip. This distortion creates a unique tone, and gentle clipping helps to control this distortion. For example, the band Nirvana, famous for their unique sound, extensively used soft clipping in their music production. The crunching sound of guitars was achieved with gentle clipping, which created a high harmonic distortion in the soft clipping stage.

In Broadcast Industry:

The broadcast industry also relies on gentle clipping so that the audience receives high-quality sound. The audio that is broadcasted to the listeners might contain high-level signals that can cause digital distortion in low-quality speakers or earphones. In such cases, gentle clipping comes in handy. It ensures that audio signals do not exceed a certain threshold level to prevent distortion in low-quality devices. For example, FM radio stations use gentle clipping to prevent overdriving of their transmitters and maintain quality sound throughout their broadcast.

Gentle clipping limits the maximum level of the audio signals, thereby protecting the speakers and amplifiers from distortion. In conclusion, gentle clipping is an essential tool for audio engineers and professionals in the music and broadcast industry. It allows them to modify and shape the audio signals to create high-quality sound without distortion or damage. Its applications are not limited to these two industries; any audio-processing device can make use of gentle clipping.

What Is Soft Clipping

Credit: www.researchgate.net

Frequently Asked Questions For What Is Soft Clipping

Is Soft Clipping Good?

Soft clipping can be good depending on the desired effect. Soft clipping is a type of distortion that produces a more gentle and warmer effect than harsh clipping. It can add character and warmth to a sound. But it may not be appropriate for all types of audio content.

What Is Soft Clipping Vs Hard Clipping?

Soft clipping and hard clipping are techniques used in audio signal processing to prevent distortion caused by excessive amplitude. Soft clipping gradually reduces the amplitude of the signal. This results in a rounded or softer distortion, while hard clipping is an abrupt cut-off of the signal, resulting in a harsher distortion.

What Does Soft Clipping Sound Like?

Soft clipping is a distortion effect that music producers rely on. It involves rounding off the peaks of an audio signal to create a warmer, more saturated sound. It adds a subtle crunchiness to the mix without drastically changing the dynamics.

Soft clipping is commonly used on bass and drums to give them more presence and drive.

What Is The Difference Between Hard And Soft Clipping Pedals?

Hard clipping pedals produce a square wave sound by limiting the voltage output. Soft clipping pedals create a smooth distortion by gently rounding off the peaks of the waveform. The choice between the two depends on the type of distortion desired.

Conclusion

Soft clipping is a technique used in music production to prevent audio signal distortion. It applies a subtle form of distortion to the peaks of the signal, creating a more natural and pleasant sound. Soft clipping is a powerful tool that can help you achieve a high-quality sound. But it should be used with care.

Remember to always experiment, test, and trust your ears to make the best decisions. Ultimately, the goal is to create music that sounds great both in headphones and on a speaker system.

For more background, see Clipping (audio) on Wikipedia. You may also like our guide: Stop Master Fader Clipping.

Categories
Archive

Abbey Road Studios

Abbey Road Studios is a legendary recording studio located in London, England that has played host to some of the greatest musicians in history. The studio first opened its doors in 1931, and has since become a landmark destination for music lovers from around the world.

Abbey Road Studios has been the site of some of the most iconic recordings in music history. From The Beatles’ famous Abbey Road album to Pink Floyd’s The Dark Side of the Moon, the studio has played a pivotal role in shaping the sound of modern music.

Today, Abbey Road Studios remains one of the most sought-after recording destinations in the world, and continues to attract top talent from across the globe.

Abbey Road Studios

Credit: www.psaudio.com

History

Abbey Road Studios is a name synonymous with music. It is a recording studio in London, England, that has played a significant role in the music industry. From its founding in the 1930s to now, Abbey Road Studios has been pivotal in the creation of countless iconic albums of popular music, from The Beatles, to Pink Floyd, to Adele.

Founding Of Abbey Road Studios

The history of Abbey Road Studios began in 1931 when the Gramophone Company (now EMI Records) acquired a house on Abbey Road in London and converted it into the world’s first custom-built recording studio. The studio was designed by architect Sir Edward Elgar, who wanted to create a space that would provide the best acoustics and technology available to record music. The first recording at Abbey Road Studios was of classical music, but soon, it became a hub for pop and rock music.

Significance Of The Location

The location of Abbey Road Studios has played a significant role in its success. The studio’s proximity to London’s music scene has made it a go-to destination for musicians from all over the world. The studio has also been the location for many iconic album covers, including The Beatles’ 11th studio album, “Abbey Road,” released in 1969. The album cover featured the fab four crossing the street in front of the studio, and this has become one of the most iconic images in music history.

In conclusion, Abbey Road Studios has a rich history that dates back to the 1930s and has played a significant role in the music industry. The studio’s unique position and close proximity to London’s music scene has been instrumental in its success, and it continues to attract some of the world’s biggest artists today.

Iconic Albums Recorded

Abbey Road Studios, located in London, has been the birthplace of hundreds of iconic albums. Some of the biggest names in music have recorded their most influential albums in this studio, making it one of the most legendary recording studios in the world. Here are a few of the most famous and influential albums that were recorded at Abbey Road Studios:

The Beatles – Abbey Road

Abbey Road Studios is synonymous with The Beatles, who recorded the majority of their music at this studio. They recorded their last album, Abbey Road, in 1969. This album contains some of their biggest hits, including “Come Together” and “Here Comes the Sun”. The iconic image of the band walking across the zebra crossing outside Abbey Road Studios has become one of the most recognizable album covers in history. The legacy of The Beatles and their music has continued to inspire generations of musicians and fans.

Pink Floyd – The Wall

The progressive rock band Pink Floyd recorded their hugely popular concept album, The Wall, at Abbey Road Studios in 1979. This album explores the themes of isolation and self-discovery and has become one of the best-selling albums of all time. The album features hits such as “Another Brick in the Wall” and “Comfortably Numb”. Pink Floyd’s unique sound and the themes explored in their music have made them one of the most influential bands in history.

Radiohead – The Bends

In 1995, Radiohead recorded their second album, The Bends, at Abbey Road Studios. This album marked a turning point in the band’s sound and resulted in several hit singles, including “High and Dry” and “Fake Plastic Trees”. The album’s success helped establish Radiohead as one of the most important bands of the 1990s and the following decades. The Bends’ unique sound and its examination of the themes of alienation and disaffection have made it an important album in rock history.

Abbey Road Studios has been the site of some of the most important and influential albums in music history. The legacy of the iconic musicians who recorded at this studio continues to inspire generations of music lovers and influences modern recording techniques.

Technology

Abbey Road Studios, a British music recording studio located in London, has served as a renowned hub for popular music for over 90 years. With a long, storied history of hosting artists such as The Beatles, Pink Floyd, and Adele, Abbey Road Studios continues to be a mecca for music enthusiasts and producers alike.

Abbey Road Studios has been at the forefront of sound engineering and music production for over 80 years. Since its inception, the studio has continually pushed the boundaries of technology, bringing innovation and creativity into the world of music. With a deep history of music production, Abbey Road Studios has evolved with the changes in technology, providing cutting-edge solutions for artists worldwide.

Innovations In Sound Engineering

Abbey Road Studios is renowned for its unique sound, and it is no coincidence that it has been the birthplace of some of the most significant innovations in sound engineering. The studio was the first to introduce artificial double-tracking, which involved recording the same performance twice to create an enhanced version of the original recording. Another innovation that Abbey Road Studios is credited for is the ‘Direct Injection Box,’ which enabled the studio to record instruments directly into the mixing console, leading to a cleaner sound and less background noise. This invention revolutionized the recording process and gave Abbey Road an edge over its competitors.

Introduction Of Stereo Sound

Abbey Road Studios is also responsible for the popularization of stereo sound. In 1963, the studio recorded the Beatles’ first stereo single, “Please Please Me,” which went on to become a chart-topping hit. The studio’s focus on stereo sound proved to be a massive success, and soon multiple studios worldwide began following Abbey Road’s lead. Abbey Road’s technological innovations are still relevant and influential today. The studio has continued to push the boundaries of sound engineering, introducing new techniques and technologies, such as the state-of-the-art Dolby Atmos mixing system. Abbey Road Studios has become a landmark for music technology, and its reputation for excellence in sound engineering remains untouched.

Abbey Road Studios

Credit: www.alamy.com

Studio Facilities

Abbey Road Studios in London has been the go-to destination for some of the world’s most legendary sound recordings. From The Beatles to Pink Floyd, countless famous musicians have walked the halls of this iconic studio. One of the key reasons for its success has been its state-of-the-art studio facilities. Let’s explore each of them.

Recording Studios

Abbey Road Studios has three world-class recording studios: Studio One, Two, and Three. Each studio boasts an impressive range of equipment and software to cater to the diverse needs of producing sounds of various genres. All three studios are built with sound-proof walls to avoid any outside disturbance and create the desired acoustic ambiance.

Mastering Suites

Abbey Road Studios offers two mastering suites that help polish and perfect the sound quality of your music. These suites are equipped with the latest technology and software to correct any errors that might happen during the recording or mixing process. These sound engineers work to provide you with the best possible listening experience across all supported platforms.

Mixing Rooms

In addition to the recording and mastering facilities, Abbey Road Studios has three mixing rooms—each with its unique sonic qualities. The mixing rooms feature a state-of-the-art sound-proofing system and are famous for their impeccable acoustics. These rooms are equipped with the latest sound mixing software and hardware technology, making the mixing process seamless and efficient.

Summary

In summary, Abbey Road Studios provides musicians with world-class studio facilities to create and perfect their musical creations. With its three recording studios, two mastering suites, and mixing rooms, Abbey Road Studios offers a range of options that cater to the needs of every musician. The best part is that all of these facilities are available at competitive rates, making Abbey Road Studios a popular choice for musicians from all over the world.

Musical Innovations

Abbey Road Studios has been a hotspot for musical innovations since its establishment in 1931. Being the birthplace of iconic albums, such as The Beatles’ ‘Abbey Road’ and Pink Floyd’s ‘Wish You Were Here,’ the studio continues to inspire musicians all around the world.

Abbey Road Studios, located in London, is one of the most famous recording studios in the world, known for its exceptional sound quality and a history of iconic recordings that have shaped the modern music industry. The studio has been at the forefront of musical innovation since its establishment in 1931, and has been a hub for some of the most significant cultural developments in music history. In this blog post, we will take a closer look at the musical innovations that have come out of Abbey Road Studios, including the creation of new sounds and collaborations with musicians.

Creation Of New Sounds

Abbey Road Studios is famous for its pioneering efforts in developing new recording techniques and equipment. The studio’s engineers and producers have always pushed the boundaries of what’s possible from a recording session, and they are credited with discovering new sounds that have shaped many music genres. For example, Abbey Road Studios was one of the first recording studios in the world to use the technique of artificial double tracking, which allows a single performer to sound like a full band. Other innovations that came out of the studio include backward tape loops and phasing effects, which have been used in countless recordings over the years.

Collaborations With Musicians

Another significant innovation that came out of Abbey Road Studios is the unique collaboration that the studio has with musicians. The studio’s engineers and producers work closely with artists to create a sound that reflects the artist’s musical vision. This partnership between producer and artist has resulted in some of the most iconic albums in history, such as The Beatles’ Sgt. Pepper’s Lonely Hearts Club Band and Pink Floyd’s Dark Side of the Moon. The studio’s engineers have also worked with some of the most innovative and daring musicians, including Radiohead, U2, and Oasis. In conclusion, Abbey Road Studios has consistently been a hub of musical innovation, and its contributions range from new recording techniques to partnering with daring and risky musicians. Without Abbey Road Studios, the world of music would be a little less colorful, and it’s no wonder that the studio enjoys an unrivaled reputation as one of the most iconic recording studios in the world.

Film And Tv Scores

Abbey Road Studios has been responsible for producing some of the most iconic film and TV scores of all time. From Star Wars to Harry Potter, their expert sound engineers have helped bring to life some of the most memorable moments in cinema history.

James Bond Theme

Abbey Road Studios has been the creative space for many iconic film and TV scores, including the James Bond Theme. Composed by Monty Norman, arranged by John Barry, and played by the John Barry Orchestra, the James Bond Theme has become an instantly recognizable tune that has accompanied the famous spy on his adventures for decades. The recording of the theme at Abbey Road Studios in 1962 was a defining moment for the studios, cementing their reputation as the go-to destination for recording film scores.

Harry Potter Soundtrack

The Harry Potter Soundtrack also owes its roots to Abbey Road Studios. Composed by John Williams and later by Alexandre Desplat, the music for the wizarding world has become almost as beloved as the franchise itself. “Hedwig’s Theme” has become an instantly recognizable tune that brings back memories of the magical world every time it is heard, while the soaring scores of the later films helped to elevate the series to epic proportions. The Abbey Road Studios provided the perfect space for recording this music, with its state-of-the-art equipment and experienced engineers, ensuring that each note sounded just as magical as it needed to. Abbey Road Studios’ long-standing tradition of recording film and TV scores has cemented its place in musical history, with the James Bond Theme and Harry Potter Soundtrack serving as just two examples. The studio’s continued commitment to providing the best equipment and expertise for all of its recordings ensures that future generations of musicians will be able to create music that truly stands out in the crowded entertainment industry.

Famous Visitors

Famous visitors have graced the Abbey Road Studios, where legendary albums were recorded. The Beatles, Pink Floyd, and Adele are just a few of the notable names that have made their mark in this iconic recording studio.

Abbey Road Studios is one of the most legendary and iconic music recording studios in the world. The list of famous musicians that have recorded at Abbey Road reads like a who’s who of popular music. From The Beatles to Adele, the studio has been home to some of the most influential recordings of modern times. But it’s not just musicians who have made their way through the doors of Abbey Road. The studio has also played host to plenty of celebrity visitors and sightings over the years.

Lists Of Famous Musicians Who Have Recorded At Abbey Road

Abbey Road Studios has been graced by an impressive list of musical legends over the years, from rock and roll royalty to pop superstars. Some of the most famous musicians who have recorded at Abbey Road include:

  • The Beatles
  • Elton John
  • The Rolling Stones
  • Pink Floyd
  • Adele
  • Kate Bush

But that’s only scratching the surface. Many other influential artists have taken advantage of the unique and inspiring atmosphere at Abbey Road to create some of their most memorable work.

Celebrity Sightings

As one of the most well-known recording studios in the world, Abbey Road has also attracted a fair share of celebrity visitors over the years. Some of the most notable celebrity sightings at Abbey Road include:

  • Tom Cruise
  • Jimmy Page
  • Paul McCartney
  • Ringo Starr
  • Kate Middleton

Abbey Road Studios has played a central role in the world of music and popular culture for decades. From hosting some of the most influential musicians in history to attracting celebrities from all walks of life, the famous studio has left an indelible mark on the world.

Abbey Road Studios

Credit: www.cnet.com

Legacy

Abbey Road Studios’ legacy is unparalleled. From The Beatles to Pink Floyd, countless legendary musicians have graced its halls and left their mark on music history. Today, the studio continues to attract artists from all over the world who are eager to create music in its legendary rooms.

Abbey Road Studios has a rich legacy in the music industry that spans over 80 years. The studio has played a pivotal role in shaping the sound of popular music, hosting some of the biggest artists and bands of all time, including The Beatles, Pink Floyd, and Adele. Today, Abbey Road Studios is one of the most iconic recording studios in the world, with a reputation for producing exceptional quality sound.

Influence On Pop Culture

Abbey Road Studios has had a significant influence on pop culture, shaping the sound of music for generations to come. The studio’s unique approach to recording, which includes the use of innovative technology and techniques, has helped to create some of the most memorable and iconic songs of all time. From The Beatles’ “Abbey Road” album, which remains one of the best-selling albums of all time, to Pink Floyd’s “Dark Side of the Moon,” Abbey Road Studios has been the birthplace of some of the most influential albums in the history of music.

Future Of Abbey Road Studios

As the music industry continues to evolve, Abbey Road Studios remains committed to staying at the cutting edge of technology and innovation. The studio has recently undergone a major renovation to ensure that it is equipped with the latest equipment and technology. Additionally, the studio has expanded its services to include music mastering, making it a one-stop-shop for all music production needs. With its rich history and commitment to innovation, Abbey Road Studios is poised to remain at the forefront of the music industry for many years to come. In summary, Abbey Road Studios’ legacy in the music industry is undeniable. Its influence on pop culture has helped shape the sound of music for generations, and its commitment to innovation ensures that it will continue to be a leader in the industry for many years to come.

Frequently Asked Questions For Abbey Road Studios

Why Is Abbey Road Studios So Famous?

Abbey Road Studios is famous because it’s known as the birthplace of the Beatles’ iconic albums. It’s also where many other famous musicians recorded hits, and its innovative equipment and studios helped revolutionize the music industry. Today, it remains a popular destination for music lovers.

What Bands Recorded At Abbey Road Studios?

Abbey Road Studios has been a recording hub for top-notch bands like The Beatles, Pink Floyd, Oasis, Radiohead, and Adele, among others.

Is It Worth Visiting Abbey Road Studios?

Abbey Road Studios is worth visiting for music enthusiasts and fans of the Beatles. You can take a tour and see where some of the most iconic songs were recorded. It offers a unique experience to learn about music history and see the facilities where legendary artists have created music.

Can You Still Record At Abbey Road Studios?

Yes, Abbey Road Studios still offers recording services. However, availability and pricing may vary depending on the specific requirements of each project. It is recommended to directly contact the studios for more information.

Conclusion

Abbey Road Studios has left a profound impact on the music industry. From The Beatles to Pink Floyd, the iconic studio has seen the creation of some of the most influential albums of all time. Its rich history and exceptional recording equipment have made it a landmark in the music world and a must-visit destination for music lovers.

The studio continues to inspire new generations of artists, and its legacy will undoubtedly endure for years to come.

Categories
Archive

What Can Mastering Do

This guide covers mastering process in plain terms. Mastering enhances the sound quality and ensures consistency throughout an album or playlist. With mastering, engineers balance, refine, and optimize recordings for different playback devices and environments.

Also, if you want your music to stand out in a crowded market and sound professional, mastering is essential. It is the final step in the music production process and involves preparing the recordings for distribution by improving their overall sonic quality.

Related reading: AI Audio Mastering and Dolby Atmos Mastering.

During mastering, engineers apply EQ, compression, and limiting to refine the sound, enhance clarity, and add volume. Additionally, mastering ensures that every track in an album or playlist has a consistent volume level and tonal balance. Moreover, this is crucial for ensuring that the music sounds great on different playback systems, from earbuds to high-end speakers. We’ll go over the benefits of mastering, the mastering process, and how to choose a mastering engineer that’s right for your music.

Mastering Process: What Is Mastering

In addition, mastering is the final step of audio post-production. It aims to balance out the individual tracks of a recording, enhance the overall clarity, and ensure consistency across multiple mediums. Through mastering, a track can reach its full potential and sound as intended on any playback device.

Furthermore, mastering is one of the final steps in the production of a music track. It is a process that prepares the final mix for distribution by optimizing and enhancing its sound quality. Every mastering engineer aims to ensure that the music track sounds impressive across various speakers and audio systems.

The Definition Of Mastering

Additionally, to put it simply, mastering is the final step in music production, where the engineer prepares the final mix to ensure the best possible sound quality. The engineer optimizes the overall size, volume, and depth of the track by adjusting equalization, compression, stereo enhancement, and other processing techniques. Mastering also involves adding metadata to the track, such as song titles, artist names, and other details that make it easier for distribution platforms like Spotify, Apple Music, and YouTube to catalog the track.

Mastering Process: Audio Mastering Vs Mixing

Mixing and mastering are two crucial steps in the production of a music track, but they are entirely different processes. Also, mixing involves blending all the individual tracks and instruments of a song into a single, stereo track. It is the step where the sound engineer balances the levels of different components in the mix, enhances the frequency, makes adjustments to the dynamics, and adds effects like reverb or delay. On the other hand, mastering involves optimizing the overall sound of the final mix. It ensures that the track quality is consistent throughout and sounds great across different speakers and playback systems. The mastering engineer uses specific tools and techniques to address any issues and further improve the mix’s quality.

Why Mastering Is Important?

Moreover, mastering can make a vast difference in how a music track sounds and can greatly enhance the listening experience. It helps eliminate any errors or inconsistencies within the mix and optimizes the overall sound quality. A well-mastered track ensures that the final mix sounds great across various platforms, from radio stations and clubs to headphones and home audio systems. It can make the track more attractive to listeners and increase its chances of earning plays and shares across various platforms. In conclusion, mastering is an essential step in ensuring that the final music track sounds the best that it possibly can. It is a process that takes a specialized set of skills and knowledge, and trusting a trained mastering professional is a great way to guarantee that your music sounds great to audiences everywhere.

The Importance Of Mastering

Mastering is a crucial step in the audio production process that can make a world of difference in the final product. It enhances the overall sound quality, improves clarity, and ensures that the track is ready for distribution across various platforms.

With proper mastering, artists can take their music to the next level and stand out in a highly competitive industry.

Mastering is a critical stage in music production that involves fine-tuning and enhancing the final mix before its release. It is an essential step that distinguishes a great song from an average song. Here are some reasons why mastering is vital.

Mastering Process: Improving Audio Quality

Mastering can significantly improve the overall audio quality of your mix. Through mastering, the engineer can bring clarity and punch to the mix, which is especially crucial when playing the song on different platforms. It helps in optimizing the track for specific mediums like radio, streaming platforms, or CDs, ensuring your music sounds the best it can be.

Cohesive Album Production

Mastering can help in creating a cohesive sound across all the tracks on an album. It can even out and enhance the differences between different songs concerning loudness, tone, or feel, making the album sound complete and unified.

Making Tracks Standout In A Competitive Market

In a competitive market, where millions of songs are uploaded daily, mastering can make your tracks stand out and attract more listeners. A well-mastered song has a higher chance of being placed on streaming playlists, receiving radio airplay, or even going viral on social media platforms. Therefore, it is crucial to get your music mastered by an experienced engineer to give it the professional touch it deserves and make it noticeable and competitive. Mastering is indeed a vital stage in the music production process that can make or break the success of a song. It’s essential that the engineer has the right skills, tools, and knowledge to ensure a good result.

The Mastering Process

The mastering process is an essential step in the music production process that can make a significant difference in the final sound quality of a track. It is the final stage where all the individual tracks come together and are balanced, equalized, and enhanced to achieve the final desired sound.

Mastering Process: Pre-mastering Steps

Before the mastering process begins, it is essential to ensure that each track is at its best possible quality. This means removing any unnecessary sounds and ensuring that all tracks have the correct levels and balance. Additionally, it is crucial to ensure that there are no noticeable errors in the individual tracks, including pops, clicks or background noises. Another important step is to ensure that the music is mixed in the right format to achieve the best possible sound quality during the mastering process.

Mastering Techniques

During the mastering process, a mastering engineer works on balancing the volume levels, equalizing the frequency spectrum, and adding compression, harmonics and other effects to enhance the overall sound quality of the track. Several techniques can achieve the desired sound, including equalization, compression, limiting, stereo enhancement, and harmonic distortion. The goal of mastering is to create a final mix that is cohesive and balanced across all listening systems and enhances the musicality of the track.

Mastering Process: Post-mastering Quality Control

After the mastering process is complete, the final mix goes through a series of quality-control checks to ensure that it is of the highest possible quality. Among the tests performed include ensuring that the final mix sounds the same across different listening systems, ensuring that there are no errors, dips or inconsistencies in the audio and mastering levels, and that all levels are consistent across all tracks. Additionally, every final track should be tested in different listening environments, including headphones, speaker systems e.g. on a cell phone, car radio, and club or studio monitors. This ensures that the final track sounds excellent in a variety of settings and is ready for release.

Overall, the mastering process is a crucial step in achieving the best possible sound quality for a song or album. With the right pre-mastering steps and mastering techniques, combined with rigorous post-mastering quality control, a track can be released whose sound is not only balanced and optimized but is also cohesive and consistent across all listening devices and environments.

Do-it-yourself Mastering

Mastering is the final stage of music production, where the audio tracks go through a finely-tuned and professional process to enhance the sound quality. Traditionally, this process was only accessible to studios or professionals with the necessary equipment and expertise. However, with the advancements in technology, mastering can now be done at home with the help of various tools and software.

Mastering Process: Mastering Without Gear And Software

Most of the DIY mastering techniques do require some basic gear such as an audio interface, digital audio workstation (DAW), and studio monitors, but there are also methods for those who don’t have access to these tools. For example, using reference tracks is a simple but effective way of improving the sound quality of your mixes. By comparing your track with a commercial release that has a similar sound, you can get an idea of how your mix should sound and make the necessary adjustments.

Popular Diy Mastering Tools

Although mastering is a complex process that involves various techniques, you don’t necessarily need to have a degree in audio engineering to master your own tracks. There are a number of software and plugins that can help you achieve professional-sounding results. Some of the popular DIY mastering tools include:

  • iZotope Ozone
  • Waves L3-LL Multimaximizer
  • T-RackS 5 Mastering Suite

Each tool has its own unique features and functionalities, but they all aim to make the mastering process more accessible and user-friendly. With these tools, you can adjust the EQ, compress the tracks, and add other effects to improve the overall sound of your mixes.

Mastering Process: Hiring A Professional Mastering Engineer

Mastering enhances the clarity, balance and overall sound quality of your music. A professional mastering engineer brings their skills, experience and specialized equipment to achieve a polished final mix. Hiring a mastering engineer can take your music to the next level.

As a musician or music producer, you put a lot of heart and soul into creating your tracks, and understandably, you want your music to sound the best it possibly can. Enter mastering, the final step in the music production process that can make all the difference in the perceived quality of your music. Mastering can correct any issues with EQ or dynamics, create cleaner sound, and add that extra polish that separates amateur tracks from professional ones. But what exactly is mastering and why is it so important? And when it comes to hiring a professional mastering engineer, what are the factors to consider? We’ll cover all these questions and more below.

Pros Of Hiring An Engineer

Hiring a professional mastering engineer has several advantages over attempting to master your tracks yourself. For one, a professional has trained ears and sophisticated studio equipment that will allow for a more precise, detailed approach to mastering. Secondly, a mastering engineer knows how to balance volume levels and dynamic range, which can make a huge difference in how your music sounds on different playback systems. Lastly, a mastering engineer can provide an objective perspective on your music and determine if anything needs fixing before it goes to distribution.

Factors To Consider When Choosing An Engineer

If you’ve decided to hire a professional mastering engineer, there are a few factors to keep in mind when making your selection. One crucial factor is an engineer’s experience. A more experienced mastering engineer will have a better understanding of how to enhance the sonic qualities of your particular genre of music. Additionally, consider an engineer’s previous work and client satisfaction. Looking at their portfolio or even contacting references can give you an idea of what to expect in terms of quality and communication.

Another important factor is pricing – some mastering engineers offer more affordable options than others, but keep in mind that quality work generally comes at a higher price. Lastly, communication is key. A good mastering engineer will be responsive to your needs and ideas and be able to effectively communicate their approach to mastering your music. Overall, hiring a professional mastering engineer can take your music to the next level and ensure that it competes with the industry’s highest quality tracks.

By considering the pros and cons and selecting an experienced and communicative engineer, you’ll be on the right track to releasing your best-sounding music to date.

Mastering process – What Can Mastering Do for Your Music?

Credit: arstechnica.com

Mastering Process: Famous Mastering Studios

Famous Mastering Studios are dedicated to making your music sound its best. Mastering can add depth, clarity and volume to your mix, creating a polished sound that stands out from the rest. Work with experienced professionals to achieve the sound you want.

Mastering is one of the most critical steps in the music production process. It elevates the sound quality of the final mix by fine-tuning the balance, clarity, and overall sound of the recording. A good mastering engineer can make a world of difference to the final product. This post delves into the top mastering studios globally, showcasing the unique features of each studio, and highlighting some of the most famous studios.

Abbey Road Studios

Abbey Road Studios is among the most renowned studios globally and is synonymous with music greatness. It is located in London and is prominently known for hosting The Beatles’ music production. The studio’s mastering room houses the latest equipment, including PMC Speakers, Sontec, and Crane Song EQs, providing the mastering engineer with unparalleled precision and accuracy. The studio offers diverse sound treatment options, which create uniquely different sound textures, making it a favorite for most artists.

Mastering Process: Sterling Sound

Sterling Sound is a mastering studio centered in New York City with branches in Nashville and New Jersey. It has worked with some of the biggest names in the music industry, including Madonna and Jay Z. The studio is renowned for its top-of-the-line analog gear such as the custom-built Sterling consoles, Manley Massives, and Pultec EQs. Sterling Sound has a team of award-winning engineers who imbue vast experience and expertise into the mastering process.

Metropolis Mastering

Metropolis Mastering is a UK-based mastering studio that has grown in popularity in recent years. The studio boasts of some impressive gear like SADiE DSD Mastering Systems, Maselec MDS-2, and the Prism Sound MEA-2 precision equalizer. It has a colossal clientele list, including legends like The Rolling Stones and Queen, to mention a few. The studio enjoys a rise in popularity, mainly due to its spatial audio mastering technique, which provides a 360-degree, immersive music experience. In conclusion, mastering studios provide different services and experiences, which are unique to each studio. Deciding on the right studio to work with ultimately depends on the budget, desired result, and preference. We hope this article assists musicians in making informed decisions when sourcing for mastering services.

Mastering Myths Debunked

Mastering is often considered as a magical solution that can fix any issues in audio recordings. On the other hand, some people believe that mastering is not necessary at all. However, neither of these two opinions is entirely accurate. In reality, mastering plays a crucial role in shaping the final sound of an audio recording, but it is not an all-powerful tool that can fix everything.

Mastering Can Fix Anything

Even though mastering can do wonders to enhance the overall quality of an audio recording, it cannot fix everything. There are some issues that are best corrected in the recording and mixing stages. For example, if there is clipping or distortion in the original recording, mastering cannot entirely remove these artifacts.

IssueCan be FixedBest Stage to Fix
Timing IssuesPartiallyRecording/Mixing
Volume ImbalancesYesRecording/Mixing
Noise/HumPartiallyRecording
OvercompressionNoMixing
Distortion/ClippingNoRecording/Mixing

The Louder, The Better

Some people believe that the loudness level is the most critical factor in the overall quality of an audio recording. They think that the louder, the better. However, this is not always true. Loudness is just one aspect of mastering, and there are many cases where softer mastering can result in a better sound quality. If the loudness level is pushed too hard, it can introduce distortion, loss of dynamic range, and fatigue to the listener.

To wrap up, mastering is a critical process in producing professional-quality audio recordings. However, it is essential to understand its limitations and debunk the common myths associated with it. With the right approach, mastering can take a good recording to the next level and make it sound exceptional, but it cannot perform miracles.

Frequently Asked Questions On What Can Mastering Do

What Is The Use Of Mastering?

Mastering is the process of fine-tuning a recorded track to achieve optimal sound quality and consistency across different audio systems. It involves adjustments to dynamics, EQ, and stereo imaging, among other things, to make the final product sound polished and professional.

What Are The Effects Of Mastering?

Mastering is the process of preparing and optimizing recorded audio for distribution. It aims to enhance the sonic quality, clarity, and loudness of a track. The effects of mastering include improving the overall sound quality, ensuring consistency across tracks, making the music more appealing to listeners, and enhancing its commercial viability.

Does Mastering Improve Sound Quality?

Yes, mastering improves sound quality. It involves finalizing the mix and adjusting the overall EQ, dynamics, and volume. Mastering also ensures consistency in audio across different devices and platforms. A properly mastered track sounds professional and polished, making it more appealing to listeners.

Does Mastering Make A Difference?

Mastering can make a significant difference in the quality of audio. It can enhance the overall volume, frequency, and dynamics of the tracks. This process can make the audio sound polished and professional.

Conclusion

Mastering is the art of creating a polished and professional final product. Whether it’s music, video, or any other medium, mastering is essential. Mastered content stands out from the rest and attracts a larger audience. It creates a distinct brand identity by enhancing the sound and visuals that represent it.

Hence, mastering should be a crucial part of the creative process. Its ability to enhance and refine content is unparalleled. Invest in mastering, and make your content stand out!

For more background, see Audio mastering on Wikipedia. You may also like our guide: Can Mastering Make Your Song Sound Better.

Categories
Archive

Mixing With Headphones

Mixing with headphones requires a specific approach and proper techniques. In order to achieve accurate and balanced sound, it is important to understand the limitations and advantages of headphones.

Headphones are a popular alternative to traditional studio monitors for recording and mixing music. They offer a more intimate listening experience and can help isolate individual elements in a mix. However, they also have some limitations, such as potential ear fatigue and a lack of physical space and dimension.

To overcome these limitations, experienced engineers often rely on a combination of techniques, including reference tracks, cross-referencing with other listening systems, and using specialized EQ and monitoring plugins. It is also important to choose high-quality headphones that accurately represent the sound and dynamics of the mix. We will discuss the dos and don’ts of mixing with headphones, as well as some essential tips and tricks to help you achieve professional-level results.

Why Mixing With Headphones Is Challenging

Mixing with headphones presents unique challenges due to their closed-back nature that limits the perception of the stereo image and frequency response. Additionally, headphones can cause listener fatigue and lack the physicality of monitors, making it difficult to achieve a balanced mix.

Mixing with headphones has become increasingly common for many producers and engineers, especially those working in home studios or remote locations. Headphones provide a convenient and affordable way to monitor and mix audio, but they also have a unique set of challenges. In this article, we’ll explore some of the reasons why mixing with headphones can be challenging and offer some tips to overcome these challenges.

Lack Of Physical Interaction With Sound

One of the biggest challenges of mixing with headphones is the lack of physical interaction with sound. Unlike speakers, which interact with the room and create a three-dimensional soundstage, headphones deliver sound directly to the ears. This can create a sense of “in your head” sound that can lead to inaccurate monitoring and mixing decisions. It’s important to compensate for this by checking your mix on multiple systems, like car speakers or studio monitors.

Impedance And Frequency Response

Another challenge of mixing with headphones is the impedance and frequency response of different models. Impedance can affect the level of detail and accuracy in your monitoring, while frequency response can alter the perceived balance of different elements in your mix. Choose a pair of headphones that are well-suited for your specific needs, and take the time to understand their technical specifications in order to make informed mixing decisions.

Soundstage Limitations

Finally, another challenge of mixing with headphones is their soundstage limitations. While some headphones have a relatively wide soundstage, others can feel quite narrow and confined. This can make it difficult to hear the true spatial relationships between different elements in your mix. To compensate for this, try using a stereo imaging plugin to enhance the perceived width and depth of your mix. In conclusion, mixing with headphones can be a valuable tool for many producers and engineers, but it requires careful consideration and attention to detail. By recognizing and compensating for the unique challenges of headphone monitoring, you can achieve accurate and effective mixes that will translate to a variety of listening environments.

Mixing With Headphones

Credit: www.soundonsound.com

Advantages Of Mixing With Headphones

Mixing with headphones can offer some significant advantages such as greater accuracy, portability, and a more detailed sonic representation. With the right pair of headphones and a disciplined approach, you can produce high-quality mixes with ease and confidence.

When it comes to mixing audio, headphones have become an increasingly popular alternative to traditional studio monitors. As technology advances, headphones are now able to provide high-quality sound reproduction that is comparable to that of studio monitors. Here are some advantages of mixing with headphones:

Noise Isolation

Headphones are fantastic for mixing because they provide excellent noise isolation. With headphones on, you can completely block out external noise, which is impossible to achieve with studio monitors. This means you can hear every detail in your mix, which is crucial when making decisions about the dynamics and EQ of your audio. Additionally, noise isolation can help keep your mixing environment consistent, regardless of where you are or what time of day it is.

Consistency

Whether you’re in a professional studio or working from home, using headphones ensures consistency in your mixes. Unlike studio monitors, which can sound different depending on the location and position in the room, headphones provide the same sound no matter where you are. This consistency makes it easier to make accurate mixing decisions, as the sound of the mix remains the same.

Convenience

Mixing with headphones is incredibly convenient. You can work from practically anywhere without worrying about the room’s acoustics, and you don’t need to invest in expensive studio equipment. Headphones also make it easy to hear low-frequency sounds clearly, which can be difficult to achieve with monitors in small rooms or untreated environments. Besides, they are portable and can be taken wherever you want. In summary, mixing with headphones offers advantages such as excellent noise isolation, consistency, and unmatched convenience. With the right pair of headphones, you can produce high-quality audio that rivals professional studio monitors.

Tips For Successful Headphone Mixing

Achieving an accurate mix with headphones can be challenging, but it’s essential to ensure your music sounds great across various playback systems. To succeed in headphone mixing, use high-quality headphones, consider adding crossfeed, adjust levels carefully, take breaks to avoid ear fatigue, use reference tracks, and check your mix across other systems.

As a music producer or audio engineer, headphone mixing has become an integral part of the job. With the advancements in technology, headphones have become much more accessible and affordable. However, not all headphones are created equal, and mixing on low-quality headphones can lead to poor translation in different playback systems. Here are some tips for successful headphone mixing.

Use High-quality Headphones

The first tip for successful headphone mixing is to use high-quality headphones. Investing in a good pair of headphones is crucial for accurate monitoring and sound quality. Closed-back headphones are recommended for tracking and overdubbing, whereas open-back headphones are ideal for mixing and mastering.

Calibrate For Flat Frequency Response

The frequency response of headphones plays a significant role in headphone mixing. Each pair of headphones has its own frequency response curve, which affects how the audio sounds. It’s essential to calibrate headphones accurately to achieve a flat frequency response. Many software applications and plugins can help calibrate headphones, including Sonarworks, Waves, and IK Multimedia.

Take Breaks

Finally, taking breaks is crucial while headphone mixing. Listening to music on headphones for extended periods can cause ear fatigue, leading to inaccurate monitoring and mix decisions. Taking regular breaks is a way to give your ears a rest and come back to mixing with fresh ears. It’s advisable to take a 10 to 15-minute break for every hour of headphone mixing. In conclusion, headphone mixing is a useful tool, but it’s essential to use high-quality headphones, calibrate for flat frequency response, and take breaks to avoid ear fatigue. By following these tips, you can achieve a better mix and sound quality, helping your music translate well in different playback systems.

Mixing With Headphones

Credit: vintageking.com

The Future Of Headphone Mixing

The future of music production is here, and it’s all about headphones. Headphone mixing has been around for decades, but recent advancements in technology have made it a viable option for producers and engineers around the world. In this article, we’ll explore the future of headphone mixing and the latest advancements in headphone technology that are making it possible.

Advancements In Headphone Technology

Headphones have come a long way since the first earbuds were invented in the early 1980s. Today, there are headphones for every type of listener, from casual listeners to audiophiles and professional sound engineers. The latest advancements in headphone technology have made it possible to mix and master audio tracks using headphones with near-studio quality results.

New features like noise-cancelling technology, Bluetooth connectivity, and voice assistants like Siri and Amazon’s Alexa have made headphones more versatile than ever before. Take active noise-cancelling, for example – this technology blocks out external noise so you can focus on your music production. Wireless headphones have become popular over the years, which has enabled producers to work remotely while still maintaining high-quality music production.

Virtual Reality Audio

The future of headphone mixing is not only about sound quality and newer features, it’s all about giving a mesmerizing experience to the listeners using virtual reality audio technology. While the music industry is already producing 3D sounds for a few years, it’s the era of binaural beats and 3D sounds that enrich a listener’s experience.

Virtual Reality audio uses 3D audio technology to create a three-dimensional sound field that mimics real-life soundscapes. When using headphones, this technology creates an immersive audio experience that makes you feel like you’re in the middle of a sound field. Many music producers are already using virtual reality audio technology in their productions, and it’s expected to become even more popular as technology continues to advance.

Conclusion

The future of music production lies in headphone mixing, and with the latest advancements in headphone technology and Virtual Reality audio, producers and engineers can create high-quality audio tracks that rival studio recordings. Whether you’re a professional sound engineer or an aspiring music producer, headphone mixing is a tool that you can use to take your creativity to the next level.

Mixing With Headphones

Credit: www.acousticfields.com

Frequently Asked Questions For Mixing With Headphones

Is It Okay To Mix With Headphones?

Yes, it is okay to mix with headphones. However, it is crucial to keep in mind that the mix may sound different when played through different speaker systems. It is recommended to test the mix on several different speakers and headphones to ensure it sounds good on all devices.

Is It Better To Mix On Monitors Or Headphones?

It depends on personal preference and the type of music being mixed. Headphones are great for hearing individual elements in a mix, while monitors provide a more accurate representation of how the music will sound on various playback systems. It’s recommended to use a combination of both to achieve the best results.

Why Does Mix Sound Better In Headphones?

Mixes generally sound better in headphones because the sound is directed right into your ears and can be heard with a higher level of detail, accuracy and clarity. Headphones block outside noise which makes it easier to discern subtle nuances, panning and EQ.

It provides a close-up and concentrated listening experience.

Are Flat Headphones Better For Mixing?

Yes, flat headphones are better for mixing as they produce a neutral and accurate sound that helps in identifying and correcting flaws in the mix. Flat headphones do not artificially enhance any frequency range and provide an uncolored soundstage, making them ideal for mixing and mastering audio.

Conclusion

Using headphones to mix audio tracks comes with a host of advantages. With careful consideration of the limitations of headphones, digital audio workstations with plugin simulation, and attentive listening, you can achieve high-quality and polished audio mixes. Don’t forget to take breaks and ensure your headphones are calibrated correctly.

Happy mixing!

Related: Best Headphones For Mixing

Categories
Archive

Top Five Waves Plugins

The top five Waves plugins are SSL G-Master Buss Compressor, API 2500, CLA-76 Compressor / Limiter, Vocal Rider and Waves Tune Real-Time. These plugins provide high-quality sound and efficient performance for various applications.

Waves Audio is a reputable company that provides audio processing solutions for professional music production and sound engineering. These plugins are designed to enhance the quality of audio signals and provide dynamic control over sound output. Each of these top five Waves plugins has unique features and capabilities that cater to specific audio processing requirements.

SSL G-Master Buss Compressor is modeled after the legendary SSL G-Series console and provides a classic analog sound. API 2500 is a stereo compressor that offers a transparent sound with precise control. CLA-76 Compressor / Limiter is based on the classic UREI 1176 compressor and provides a fast and aggressive sound. Vocal Rider is a vocal compressor that automates the level of vocals in real-time. Waves Tune Real-Time is a pitch correction plugin that corrects vocal pitch on the fly. We will explore the top five Waves plugins and their capabilities, to help you choose the ideal plugin for your audio processing needs.

Overview Of Waves Plugins

Discover the top five must-have Waves plugins for your next music production project. Wave plugins such as SSL G Master Buss Compressor, CLA-76 Compressor/Limiter, and H-Delay Hybrid Delay are essential for professional audio mixing and mastering.

Waves Plugins is an innovative software system used to enhance audio production. The plugins are widely used by engineers, musicians, and producers to create a professional sound and maximize the quality of audio. Waves plugins are developed by Waves audio, which has been a leader in audio production. When it comes to plugins, Waves is the go-to platform for anyone looking to improve their audio production.

The Innovation Of Waves Plugins

Waves Plugins is an innovative solution for audio production. The plugins are designed with advanced algorithms that maximize audio quality. Waves plugins have been engineered with advanced features that allow for seamless integration into any digital audio workstation. The platform has over 200 audio plugins that fit different music genres. This makes the platform flexible and versatile for audio production. Whether you are creating music, podcasts, or movies, Waves plugins will provide you with the tools you need to achieve professional-grade sound quality.

The Benefits Of Using Waves Plugins

Using Waves plugins for audio production has several benefits. Firstly, the plugins are user-friendly, and anyone can use them to enhance their audio production, even beginners. They are also compatible with popular digital audio workstations like Ableton Live, ProTools, and Logic Pro, making it easy to use them regardless of the workstation. Waves plugins are designed to optimize workflow, and this saves time while improving the quality of sound. Another benefit is that there are so many plugins available that you can use to experiment with sound. From equalizers, compressors, reverbs to delays, Waves has it all. Lastly, Waves plugins are cost-effective, considering all the advanced features they come with.

Benefits of Waves PluginsSummary
User-friendlyEasy to use, even for beginners
CompatibleWorks with popular digital audio workstations
Optimize workflowSaves time while improving sound quality
Flexible and versatileHas over 200 audio plugins that fit different music genres
Cost-effectiveConsidering all the advanced features they come with

In conclusion, Waves Plugins is a great choice for anyone who wants to take their audio production to the next level. With its advanced features, user-friendly interface, compatibility, and cost-effectiveness, Waves Plugins is the go-to platform for audio production.

Top Five Waves Plugins

Credit: blog.beatworx.in

Introduction To The Top Five Waves Plugins

Discover the top five Waves plugins for enhancing your audio production. These plugins offer high-quality audio processing and versatile tools for shaping sound. Explore the best options for compression, reverb, EQ, distortion, and more.

Waves Audio is known for providing industry-standard plugins for both mixing and mastering. Choosing the right plugins can influence the outcome of your final mix. With so many plugins available, selecting the most efficient ones can be difficult. In this post, we will dive into the top five Waves plugins available in the market based on ranking factors and criteria for choosing the best plugins.

Factors Considered In Ranking

To provide an unbiased list of the top five Waves plugins, we considered the following factors:

  • Overall plugin quality
  • User feedback and reviews
  • Pricing and affordability
  • Compatibility and ease of use
  • Effectiveness and efficiency in the mixing process

Criteria For Choosing The Best Plugins

After analyzing different Waves plugins and feedback from users, we came up with the following criterias.

  1. Usability: We considered plugins that were easy to use and had user-friendly interfaces
  2. Functionality: The functionality and efficiency of the plugin in the mixing process
  3. Price: The affordability of the plugin considering the user’s budget
  4. Compatibility: We considered plugins that were compatible with various DAWs and operating systems
  5. Reliability: Plugins that are known to give consistent and high-quality results

Based on these criterias, we came up with the following top five Waves plugins that should be considered by music producers, engineers, and mixers.

1. Ssl G-master Buss Compressor

When it comes to audio mixing, the SSL G-Master Buss Compressor is considered as one of the go-to plugins for professionals. This plugin, designed to replicate the classic SSL master bus compressor, has been used in countless hit records and by top engineers around the world. Let’s take a closer look at its features and benefits.

Features Of The Plugin

FeatureDescription
RatioOffers variable attack times and ratios, from 1.5:1 to 6:1.
ThresholdAdjustable threshold control to manage the level signal.
Make-up gainProvides makeup gain up to 20 dB.
SidechainBuilds sidechain filters for stereo imaging and frequency-dependent compression.
Auto ReleaseAuto-release function for easier and quicker adjustments.

Benefits Of The Plugin For Audio Mixing

  • Transparent Compression: SSL G-Master Buss Compressor offers transparent compression and provides the user with a perfect tool to manage the final mix.
  • Harmonics: The plugin increases the harmonics of the mixed audio material, improving the overall sound quality.
  • Dynamic Control: The compressor ensures dynamic control for any style and genre of music.
  • Fidelity: With its accurate analog emulation runtime code, this plugin provides exceptional fidelity, reducing any distortion or noise created by the compression process.
  • Mastering: The SSL G-Master Buss Compressor is widely used for mastering purposes, improving the overall sound quality of the final output.

Using the SSL G-Master Buss Compressor plugin allows every producer and engineer to take their final mix to another level. Whether it be electronic dance music, orchestral or rock music, the SSL G-Master Buss Compressor provides complete control over any mix.

2. Cla-2a Compressor/limiter

The CLA-2A compressor/limiter is one of the most popular plugins created by Waves Audio. It was designed in collaboration with Grammy-winning mixing engineer Chris Lord-Alge, and it has become an essential tool for audio compression in the music industry. The CLA-2A plugin is modeled after the classic Teletronix LA-2A hardware compressor, which was first introduced in the 1960s. With its fully analog design and unique optical gain-reduction element, the LA-2A has become known for its warm, smooth, and transparent compression.

Features Of The Plugin

FeatureFunction
Gain Reduction MeterShows the amount of compression being applied to the signal.
Time Constant SwitchAllows users to switch between slow and fast time constants for different types of signals.
Input/Output GainAllows users to adjust the input and/or output gain of the plugin.
Peak ReductionControls the amount of maximum peak reduction applied by the plugin.

Benefits Of The Plugin For Audio Compression

  • The CLA-2A plugin provides the warmth and transparency of the classic LA-2A hardware compressor with the convenience and flexibility of a software plugin.
  • The plugin is ideal for vocal, guitar, bass, and drum tracks, as well as any other signals that could benefit from smooth compression with minimal artifacts.
  • The Time Constant switch offers two different settings for different types of signals, giving users more control over the compression process.
  • The Gain Reduction Meter allows users to visually monitor the amount of compression being applied to the signal, helping them to make adjustments as needed.
  • The Input/Output Gain controls give users more control over the volume of their tracks, allowing them to balance the compressed and uncompressed signals as needed.

The CLA-2A compressor/limiter plugin is a must-have for any audio engineer or producer looking to add warmth, transparency, and smoothness to their tracks. Whether you’re working on vocals, guitars, bass, drums, or any other type of signal, the CLA-2A plugin has the tools you need to get the job done.

3. H-delay Hybrid Delay

One of the standout plugins in the Waves library is the H-Delay Hybrid Delay. This plugin is known for its versatility and flexibility, making it a popular choice for audio engineers and producers alike.

Features Of The Plugin

  • Hybrid delay plugin combining classic analog and modern digital delay types
  • Variable delay times, feedback, and mix controls
  • Seamless automation and recall
  • Stereo Width control for enhancing the stereo image of delays
  • Tap tempo and BPM sync capabilities for syncing the delay time with your track

The H-Delay Hybrid Delay has a range of features that make it a valuable tool in any producer or engineer’s toolkit. With classic analog and modern digital delay types, variable time controls, and automation and recall options, the plugin provides the flexibility and control needed to fine-tune your sound.

Benefits Of The Plugin For Audio Delay

  • Enhances the rhythmic quality of a track
  • Adds depth and dimension to vocals and instruments
  • Allows for creative sound design and experimentation
  • Can be used to create unique delay effects and textures
  • Allows for precise synchronization with the tempo of a track

As an audio delay tool, the H-Delay Hybrid Delay delivers several benefits. It can add a rhythmic quality to a track, bringing vocals and instruments to life by adding depth and dimension to the sound. It also offers the opportunity for experimentation and creativity, allowing producers to create unique textures and effects.

Top Five Waves Plugins

Credit: www.ifitsoundsgood.com

4. J37 Tape Saturation

The J37 Tape Saturation is one of the top five Waves plugins known for its ability to add warmth and depth to digital recordings. This plugin emulates the unique sound of the original reel-to-reel tape machine, perfect for creating vintage sounds in modern productions.

The J37 Tape Saturation plugin is perfect for adding warmth to your mixes and replicating the sound of vintage analog tape. Developed in collaboration with Abbey Road Studios, this plugin emulates the iconic sound of the J37 4-track recorder used by The Beatles and offers tape saturation, distortion, and tape delay effects. In this section, we’ll discuss the features and benefits of this powerful plugin.

Features Of The Plugin

The J37 Tape Saturation plugin has a range of features that make it an excellent addition to any mixing setup. Some of its key highlights include:

FeaturesDescription
Tape saturation and distortionThe plugin offers a range of tape saturation and distortion effects that can be used to add warmth and character to your tracks.
Tape delayThe J37 also includes a range of tape delay effects that can be used to create unique delays and echoes in your mix.
EQ controlsThe plugin features a set of EQ controls that can be used to shape the tone of your tracks.
Variable speed controlYou can adjust the speed of the tape playback to create unique pitch effects.

Benefits Of The Plugin For Audio Saturation

The J37 Tape Saturation plugin is an excellent choice for those looking to add warmth and saturation to their tracks. Some of its key benefits include:

  • Vintage sound: The plugin is designed to replicate the sound of vintage analog tape machines, offering an authentic, warm sound.
  • Wide range of effects: With tape saturation, distortion, tape delay, and EQ controls, the plugin offers a range of effects that can be used to shape and enhance the tone of your tracks.
  • User-friendly: The J37 is user-friendly and intuitive, making it easy to achieve the sound you’re looking for without getting bogged down in complex settings.

Overall, the J37 Tape Saturation plugin is a fantastic tool for adding warmth and character to your tracks, and is a must-have for anyone looking to achieve a vintage sound in their mixes.

5. Abbey Road Reverb Plates

Abbey Road Reverb Plates is one of the top five Waves Plugins. It brings the sound of the iconic British rock era to your music production with its reverb effect. The plugin is a must-have for those who want to add vintage textures to their music.

Abbey Road Reverb Plates is a Waves plugin that enhances your audio with rich and unique reverb sounds. It was modeled after the four original plates reverb chambers at the world-renowned Abbey Road Studios in London. This plugin provides a classic and authentic reverb sound that can elevate your audio to another level.

Features Of The Plugin

Abbey Road Reverb Plates is a powerful and versatile plugin with several features that make it stand out. Below are some of the features of this plugin:

  • Modeled after the original Abbey Road Studios’ four plate reverb chambers
  • Four preset modes for different plate sizes and tonal characters
  • Integrated modulation section for creating unique reverb effects
  • Simple and intuitive interface for easy tweaking of parameters
  • Mono-to-stereo and stereo components for enhanced stereo imaging

Benefits Of The Plugin For Audio Reverb

Abbey Road Reverb Plates has great benefits when it comes to audio reverb. Below are some of the benefits of using this plugin for your audio:

  1. Provides a classic and authentic reverb sound that can elevate the quality of your audio.
  2. Allows you to create unique and customizable reverb effects for your audio
  3. Easy to use interface that enables you to tweak parameters and get the desired sound quickly
  4. Provides different preset modes for different plate sizes and tonal characters
  5. Gives you a great deal of control over your reverb sound

In conclusion, Abbey Road Reverb Plates is a fantastic Waves plugin that should be in every audio reverb enthusiast’s toolkit. It provides authentic and classic reverb sounds that can give your audio projects an excellent finishing touch. Try it out today and elevate your audio to new levels!

Top Five Waves Plugins

Credit: www.youtube.com

Frequently Asked Questions For Top Five Waves Plugins

What Is The Most Popular Waves Plugin?

The most popular Waves plugin is the CLA-2A compressor/limiter. It’s widely used in the music production industry and favored for its vintage sound and transparent compression.

Do Professionals Use Waves Plugins?

Yes, many professionals in the music industry use Waves plugins as they are renowned for their high-quality sound and versatility. From producers to engineers to musicians, Waves plugins are utilized in a variety of settings and genres.

Do Waves Make Good Plugins?

Yes, Waves is a well-respected brand in the audio industry and their plugins are widely used by professionals in the music, film, and TV industries. Their plugins are known for their high-quality sound and versatility, making them a popular choice among producers, engineers, and musicians.

What Are V14 Waves Plugins?

V14 Waves plugins refer to the latest version of Waves audio plugins, which include improvements in sound quality, processing power, and creative capabilities. They are designed for use in professional audio production and are compatible with a wide range of digital audio workstations.

Conclusion

After looking at the top five Waves plugins, it is clear to see why they are a leader in the audio industry. Each of the plugins mentioned provides unique features and can enhance any audio project. From the renowned equalizers to the powerful limiters, Waves plugins offer a range of tools for music producers and sound engineers.

Whether you are an amateur or a professional, these plugins will take your audio to the next level. So, if you want to produce high-quality audio, make sure to add the Waves plugins to your toolkit.

Categories
Archive

Pro Tools First Spot Mode

Pro Tools’ Spot Mode allows users to accurately position audio clips within a session. With Spot Mode, users can place clips in precise locations based on timecode, bar/beat, or samples.

Pro Tools is industry-standard software for audio production, and its Spot Mode feature is an essential tool. Whether editing music or sound for film, Spot Mode makes it easier to ensure clips are synchronized with the project’s overall timeline. This feature enables users to place audio clips with exceptional precision, thanks to the extensive options for setting clip location.

Spot Mode is an invaluable tool for professionals aiming to perfect their work and deliver high-quality results.

Pro Tools First Spot Mode

Credit: www.mixinglessons.com

Getting Started

Spot mode is an excellent feature of Pro Tools First, ideal for getting started with music production. It enables users to create seamless edits and automatically correct any musical misalignments, resulting in better recordings.

If you’re new to Pro Tools First or just starting out with Spot Mode, we’ve got you covered. This guide will provide clear, step-by-step instructions on how to download and install the software, create a new session and get started with Spot Mode.

Downloading And Installing Pro Tools First

The first thing you need to do is download and install Pro Tools First on your computer. Here’s how to do it:

  1. Go to the Avid website and create an account.
  2. Once you’ve created an account, log in and download the Pro Tools First installer.
  3. Run the installer and follow the on-screen instructions to complete the installation process.
  4. When the installation is complete, launch Pro Tools First.

Creating A New Session

Now that you’ve installed Pro Tools First, it’s time to create a new session. Here’s how to do it:

  1. Click on “File” in the top menu and select “New”, or use the keyboard shortcut “Command” + “Shift” + “N” on a Mac or “Control” + “Shift” + “N” on a PC.
  2. Choose your session settings such as sample rate, bit depth and session length, and then click “Create”.

Using Spot Mode

Spot Mode is a feature in Pro Tools First that makes it easy to spot and edit audio files. Here’s how to use it:

  1. Click on the “Edit” menu and select “Spot Mode” or use the keyboard shortcut “F7”.
  2. Choose the audio file you want to edit and drag it to the Spot Marker located at the top of the screen.
  3. Use the “Spot Conform” tool to align the audio file with the session’s timeline.
  4. Once the file is aligned, you can make edits using the standard editing tools in Pro Tools First.

In conclusion, Pro Tools First Spot Mode makes it easy to edit audio files, and by following these simple steps, you can get started with it in no time.

Using Pro Tools First Spot Mode

Pro Tools First Spot Mode is a powerful tool for precise editing in audio mixing. This feature helps you make minute adjustments to your recordings, allowing you to easily move and place sound accurately.

Pro Tools First Spot Mode is a powerful tool that helps to edit audio files with precision and accuracy. It is extremely useful for aligning multiple tracks or editing audio recordings for music or video projects. In this article, we will be discussing the steps involved in using Pro Tools First Spot Mode with the following H3 headings: Importing Audio Files, Navigating the Spot Mode Window, Setting Spot Points, Editing Spot Points.

Importing Audio Files

To start using Spot Mode in Pro Tools First, you need to import audio files into the session. Click on the File menu and choose Import to select the files that you want to work on. Once the files are imported, you can drag and drop them onto the track where you want to edit them.

Navigating The Spot Mode Window

The Spot Mode Window is where you will perform all the editing tasks for your audio files. To access it, click on the Spot Mode button which is located in the top right corner of the Pro Tools First interface. The Spot Mode Window will then open up, showing a graph display of your audio recordings.

Setting Spot Points

After opening the Spot Mode Window, you can begin setting spot points. Spot points are markers on your audio files that help you align or edit specific sections. To set a spot point, zoom in on the section of the audio recording that you want to edit and hit the “Add Spot” button. This will create a spot point at the position of the playhead.

Editing Spot Points

Once you have set up spot points, you can begin editing them. Simply click on the spot point to select it and then click and drag the marker to move it. You can also use the “nudge” function to move the selected spot point to the left or right using the arrow keys on your keyboard. Additionally, you can extend or shorten the length of the spot point by clicking and dragging the edges of the marker. Spot Mode in Pro Tools First is an excellent tool for editing audio files with precision and accuracy. With the ability to set and edit spot points, you can ensure that your audio recordings are perfectly aligned and edited to your liking. Follow the steps outlined in this article to start using Spot Mode in your Pro Tools First sessions.

Advanced Techniques

Learn advanced techniques in Pro Tools First Spot Mode to produce high-quality audio tracks and recordings with ease. The new feature allows you to align sound clips with precision, making editing a breeze.

Advanced Techniques: Using Spot Mode in Pro Tools First Pro Tools First is a digital audio workstation that allows users to edit and manipulate audio and video tracks. One of its advanced features is Spot Mode, which allows users to place a specific audio segment at a precise timecode position. When it comes to advanced techniques using Spot Mode, users can greatly improve their workflow and achieve a more polished finished product. In this article, we will explore how to use Spot Mode with video, create reminders and notes, and export a spotting list. Using Spot Mode with Video Pro Tools First has a unique feature that allows users to sync their audio with video. Using Spot Mode with video enables users to place an audio segment at a specific timecode position in the video timeline. This can be extremely useful for sound designers who are working on a film or video project. By using Spot Mode, sound designers can create a seamless audio experience that matches the on-screen action. To use Spot Mode with video in Pro Tools First, follow these steps: 1. Import your video file into Pro Tools First. 2. Right-click on the video file and select “Import Audio”. 3. Choose “Create New Audio Track” in the “Import Audio” dialog box. 4. When the Audio Import Options box appears, select “Spot Mode” to sync your audio with the video. 5. Use the Spot tool to place your audio segment at the exact timecode position in the video timeline. Creating Reminders and Notes Pro Tools First Spot Mode also allows users to create reminders and notes for specific timecode positions. This feature can be extremely helpful for editors who need to mark specific audio segments for later use. By using the Spot Mode Note function, users can add information about a particular audio segment, such as the name of the speaker or the content of the dialogue. To create reminders and notes in Spot Mode, follow these steps: 1. Use the Spot tool to place your audio segment at the desired timecode position. 2. Right-click on the audio segment and select “Add Spot Note”. 3. Enter your reminder or note in the “Spot Note” dialog box. Exporting a Spotting List Finally, Pro Tools First Spot Mode also allows users to export a spotting list of all the audio segments placed in the project. This function can be extremely useful for editors who need to reference the audio segments later or share their work with others. To export a spotting list in Pro Tools First, follow these steps: 1. Go to the “File” menu and select “Export”. 2. Select “Spotting List” in the “Export” dialog box. 3. Choose the desired format and save the file. Conclusion: Pro Tools First Spot Mode has a variety of advanced techniques that can greatly improve your workflow. By using Spot Mode with video, creating reminders and notes, and exporting a spotting list, users can achieve a more polished finished product. Whether you’re an audio editor, sound designer, or film and video editor, Pro Tools First Spot Mode is a valuable tool that can take your work to the next level.

Pro Tools First Spot Mode

Credit: www.youtube.com

Troubleshooting Common Issues

To troubleshoot common issues with Pro Tools First Spot Mode, start by checking your audio input settings and ensuring your tracks are armed for recording. If you experience latency or playback issues, adjust your buffer size or disable plug-ins not in use.

Be sure to also stay up to date with software updates to avoid compatibility issues.

Introduction: Pro Tools First is a popular digital audio workstation for music production, recording, and editing. However, even the most experienced and proficient users can encounter issues and problems while using it. The Spot Mode in Pro Tools First is an essential feature that enables users to align audio files in the correct position. However, some users might encounter issues with the Spot Mode while using it. We will explore the most common issues and the best troubleshooting solutions for them. Issues with Audio Files: One of the most common issues users might face while using the Spot Mode in Pro Tools First is with audio files. If an audio file is not imported correctly or in the right format, it might not play as expected or fail to spot correctly. In such cases, users must ensure that the audio file is in the right format, preferably WAV or AIFF. Additionally, users must make sure that the audio file is imported into the project at the correct sample rate and bit depth. Non-native audio files might cause compatibility issues and not play as expected. Spot Points Not Aligning: Another common issue that users might face is Spot Points not aligning in Pro Tools First. The Spot Mode might fail to recognize the correct starting points in the audio file, leading to unsynchronized audio. In such cases, users can try adjusting the Spot Mode settings, such as the Spot Mode Offset or the Spot Mode Sensitivity. These settings can help in adjusting the Spot Points accurately in the audio file. Pro Tools First Crashing: Another frustrating issue that users might face is Pro Tools First crashing unexpectedly. This issue can occur due to various reasons, such as insufficient computer resources, corrupted audio files, or driver conflicts. In such cases, users can try optimizing their computer settings, such as increasing the buffer size or closing unnecessary programs. Additionally, users must ensure that their Pro Tools First version is updated to the latest version, and all plugins and drivers are up-to-date. Conclusion: The Spot Mode in Pro Tools First is a powerful tool that can simplify and streamline audio editing. However, it is essential to understand that issues might arise while using it. Users must try the troubleshooting solutions mentioned above to fix most common issues. Additionally, users must regularly backup their projects and maintain their computer systems to ensure smooth and uninterrupted audio editing experience.

Pro Tools First Spot Mode

Credit: www.independent.co.uk

Frequently Asked Questions For Pro Tools First Spot Mode

What Is Spot Mode?

Spot mode is a camera mode that allows you to focus on a specific area in your image or video. With spot mode, your camera will only detect and adjust the exposure and focus on that specific area, resulting in a clearer, more detailed shot.

What Is Spot Dialog In Pro Tools?

Spot dialog is a feature in Pro Tools that enables users to quickly find and edit specific sections of a recording. This is useful for fixing mistakes, adding effects, or making any necessary changes to the audio. It functions like a marker, allowing users to easily navigate through a session and make edits efficiently.

How Do I Turn On Slip Mode In Pro Tools?

To turn on slip mode in Pro Tools, simply press the “F2” key or click on the slip mode button located on the toolbar. This will activate slip mode, allowing you to move audio clips within a track without affecting the other clips’ positions.

How Do I Change The Start Point In Pro Tools?

To change the start point in Pro Tools, click and drag the timeline ruler to where you want the new start point to be. Alternatively, use the “Location” field in the transport window and type in the new start point timecode or bar/beat value.

Conclusion

To sum up, Pro Tools First Spot Mode is an exceptional feature that gives audio engineers, music producers, and musicians the flexibility to edit audio precisely and effortlessly. This unique feature allows you to Spot audio clips to a specific point on the timeline and adjust the pitch, tempo, and volume for a perfect match.

Not only does this feature save a tremendous amount of time, but it also guarantees an expert outcome. Hence, Pro Tools First Spot Mode deserves commendation for its efficiency and quality.