Categories
Archive

Ultimate Guide For Musicians On Spotify: Boost Your Music Career!

As a musician on Spotify, optimize your profile, engage with fans, and release music regularly. Musicians on Spotify have a unique opportunity to reach a global audience and grow their fanbase.


By following a strategic guide, artists can effectively promote their music, connect with their audience, and increase their streams. From creating a compelling artist profile to utilizing Spotify for Artists tools, there are various ways for musicians to enhance their presence on the platform.


In this guide, we will dive deep into the essential steps that musicians can take to maximize their visibility, engage with fans, and ultimately, thrive in the competitive music industry landscape of Spotify.

Ultimate Guide For Musicians On Spotify: Boost Your Music Career!


Credit: taiandrewsinstrumentals.com

Building Your Profile

Creating a compelling profile is crucial for musicians to stand out on Spotify.

Creatng A Compelling Bio

Write a brief and engaging bio that tells your story and connects with your audience.

Selecting The Right Profile Picture

Choose a high-quality, eye-catching image that represents your brand and music style.


Understanding Spotify’s Algorithm


Understanding Spotify’s Algorithm

Spotify uses a complex algorithm to curate playlists and recommend music to its users. Having a grasp of how the algorithm works is crucial for musicians who aim to maximize their visibility on the platform.

How Spotify’s Algorithm Works

Spotify’s algorithm analyzes user behavior, such as listening history, likes, skips, and playlist creations, to tailor recommendations. Engagement and consistency are key factors in how often a song gets suggested by the algorithm.

Optimizing For Discover Weekly And Release Radar

  • Consistently releasing new music keeps your profile active and increases visibility.
  • Encouraging fans to follow you on Spotify boosts your chances of appearing in Release Radar.
  • Engage with fans through collaborative playlists to enhance Discover Weekly placements.

Growing Your Audience

Growing your audience on Spotify is crucial for every musician. With millions of users, Spotify provides an opportunity to reach a global audience, gain recognition, and increase your fan base. Here are some effective strategies for musicians to grow their audience on Spotify.

Utilizing Spotify For Artists Tools

As a musician on Spotify, utilizing the Spotify for Artists platform is essential for understanding your audience, gaining insights into your listeners’ behaviors, and effectively promoting your music. With this intuitive tool, you can access valuable data such as listener demographics, streams, and playlist placements. By analyzing this information, you can tailor your music and marketing efforts to better resonate with your audience, ultimately expanding your reach.

Engaging With Fans Through Playlists

Engaging with your fans through playlists provides a unique opportunity to foster a deeper connection with your audience. Creating and curating your own playlists offers a personal touch, allowing fans to discover not only your music but also other tracks you love. Additionally, collaborating with other Spotify users by adding your songs to their playlists can significantly increase your exposure. By actively participating in the playlist community, you can attract new listeners and strengthen your relationship with existing fans.

Ultimate Guide For Musicians On Spotify: Boost Your Music Career!


Credit: www.loudlab.org

Promoting Your Music

As a musician on Spotify, one of the key aspects of your success is promoting your music effectively. With millions of artists on the platform, it’s important to stand out and reach a wider audience. In this guide, we will explore two strategies that can help you boost your visibility on Spotify and increase your chances of gaining more listeners.

Utilizing Social Media Integration

Social media is a powerful tool that can greatly enhance your music promotion efforts on Spotify. By integrating your Spotify profile with popular social media platforms, you can reach a wider audience and engage with your fans more effectively. Here are some ways you can leverage social media integration:

  • Share your Spotify playlists and songs across different social media platforms to encourage your followers to listen and share with their own networks.
  • Use eye-catching visuals and compelling captions when posting about your music on social media to grab the attention of potential listeners.
  • Create social media contests or giveaways that involve your Spotify music, encouraging your fans to engage and share your music with others.

Collaborating With Influencers And Playlists

An effective way to increase your visibility on Spotify is to collaborate with influencers and get your music featured on popular playlists. Here are some steps you can take to collaborate and get your music noticed:

  1. Identify influencers in your niche who have a substantial following on Spotify and reach out to them with a personalized message showcasing your music.
  2. Consider creating a collaboration where you feature the influencer’s playlist on your social media platforms, in return for them featuring your music in one of their playlists.
  3. Research and pitch your music to curators of popular playlists on Spotify that align with your genre or sound. Provide them with a brief introduction and an enticing snippet of your music for consideration.
  4. Constantly engage with your new audience by replying to comments and messages, showing appreciation for the support your music receives.

By utilizing these strategies, you can effectively promote your music and increase your chances of being discovered on Spotify. Remember, consistency and continued engagement are key to building a strong presence on the platform.

Maximizing Revenue

As a musician on Spotify, one of your primary goals is to maximize your revenue. Luckily, Spotify offers several ways for artists to earn money beyond just streaming royalties. In this guide, we will explore how you can understand Spotify’s payment system and monetize your audience beyond streaming.

Understanding Spotify’s Payment System

Spotify’s payment system may seem complex at first, but understanding how it works is essential for maximizing your revenue. The platform primarily pays artists based on their share of streams from Spotify’s total revenue. This means that the more streams you receive, the larger portion of the revenue you will earn.

In addition to streaming royalties, Spotify also offers playlist placements through their algorithmic playlists and editorial playlists curated by their team. These playlist placements can significantly boost your streams and increase your revenue. To increase your chances of being featured on playlists, focus on creating high-quality content and engage with your audience regularly.

Monetizing Your Audience Beyond Streaming

While streaming is the core revenue stream on Spotify, there are additional avenues for musicians to monetize their audience. Here are some strategies to consider:

  • Merchandising: Create and sell merchandise such as t-shirts, posters, and other merchandise related to your music. Promote your merchandise on social media and include links in your Spotify profile.
  • Live Performances: Plan and promote live performances, either as solo acts or as a band. Connect with your fans through intimate live sessions or large-scale concerts. Consider partnering with local venues and leveraging social media to promote your events.
  • Brand Partnerships: Collaborate with relevant brands and companies to create sponsored content or endorsements. This can be a win-win situation, allowing you to both promote your music and earn additional revenue.
  • Crowdfunding: Engage with your audience through crowdfunding platforms, such as Patreon or Kickstarter. Offer exclusive content, behind-the-scenes access, or personalized experiences to incentivize your fans to support you financially.

To effectively monetize your audience beyond streaming, it’s crucial to have a strong online presence. Utilize social media platforms to engage with your fans, promote your music and upcoming events, and consistently provide valuable content related to your music.

Remember, maximizing revenue on Spotify requires a multifaceted approach. By understanding Spotify’s payment system and employing strategies to monetize your audience beyond streaming, you can unlock new income opportunities and further grow your music career.

Frequently Asked Questions On Guide For Musicians On Spotify

How Does Spotify Work For Musicians?

Spotify allows musicians to upload their music, reach a global audience, and earn royalties. Artists can track their streaming data and connect with fans. Promoting music through playlists and social sharing is crucial for success on the platform.

Is Spotify Fair To Musicians?

Spotify’s payment to musicians varies, but overall, many feel it’s unfair due to low royalties.

Is Spotify Good For Independent Artists?

Spotify is beneficial for independent artists as it provides a platform for exposure and streaming revenue.

Is Spotify Helping Musicians?

Yes, Spotify helps musicians by providing a platform for their music to reach a wider audience, increasing visibility and potential revenue.

Conclusion

To sum up, mastering Spotify for musicians involves strategic branding, engaging content, and active community engagement. By understanding the algorithms, utilizing analytics, and creating a strong presence, artists can effectively navigate the platform to grow their fanbase. With dedication and persistence, musicians can leverage Spotify to propel their careers to new heights.


Categories
Archive

How to Safeguard Your Melodies: Get Your Music Copyrighted

To get your music copyrighted, submit your work through the official copyright office website. Ensure all required information is correct and pay the registration fee.

Safeguard your music with legal protection against unauthorized use. Protecting your music through copyright provides essential legal rights and protection for your creative work. By registering for copyright, you establish a public record of your ownership and deter others from using your music without permission.

This process grants you exclusive rights to reproduce, distribute, and perform your music, giving you control over its use and potential revenue streams. Adhering to copyright laws is crucial for ensuring that your musical creations are safeguarded and respected in the industry.

The Importance Of Copyrights For Musicians

As a musician, understanding the importance of copyrights is crucial. Protecting your intellectual property is key in the music industry.

Protecting Your Intellectual Property

Copyrights safeguard your original music compositions and ensure you retain ownership of your work.

Understanding Copyright Laws

Educate yourself on copyright laws to know your rights and prevent unauthorized use of your music.

Getting Started With Copyrighting Your Music

Start protecting your music by copyrighting it. Follow these steps to secure your intellectual property and ensure that you receive proper recognition and compensation for your work. With easy-to-follow procedures, you can safeguard your music and establish your rights as a creator.

Understanding What Can Be Copyrighted

In the realm of music, original compositions, lyrics, sound recordings, and musical arrangements can be copyrighted.

The Process Of Registering Your Copyright

The process involves filling out an application with the copyright office, paying a fee, and submitting copies of your work. As an artist, it’s crucial to protect your creations by securing copyright for your music.

Benefits Of Music Copyrights

Music copyrights provide numerous benefits to creators and artists, offering legal protection and the ability to earn royalty and licensing fees.

Legal Protection

Obtaining a music copyright provides legal protection against unauthorized use or reproduction of your work. This protection ensures that you have the exclusive right to distribute, perform, and reproduce your music. Copyrights also allow you to take legal action against anyone who infringes on your rights, safeguarding your intellectual property.

Earning Royalties And Licensing Fees

Music copyrights enable you to earn royalties, granting you compensation each time your music is used or performed. Through licensing agreements, you can generate additional income by allowing others to use your music in various ways, such as in films, commercials, or on streaming platforms.

How to Safeguard Your Melodies: Get Your Music Copyrighted

Credit: www.walmart.com

Challenges And Misconceptions

Navigating music copyright can pose challenges and misconceptions for artists. It’s crucial to register your work promptly to protect your creative rights. Understanding the process and seeking legal guidance can help you secure your music copyright effectively.

Common Misunderstandings

When it comes to copyrighting your music, there are several common misunderstandings that artists often have. It’s important to clear these misconceptions to ensure you protect your creative work effectively.

  1. Registering with a performing rights organization (PRO) is enough: Many artists mistakenly believe that registering their music with a PRO automatically grants them copyright protection. While registering with a PRO is important for royalty collection, it does not provide legal proof of ownership.
  2. Publishing on social media is sufficient proof: Some musicians think that by sharing their music on platforms like YouTube or SoundCloud, they automatically gain copyright protection. However, it is crucial to understand that these platforms do not offer legal protection, and someone can easily steal your work without consequences.
  3. “Poor man’s copyright” is a reliable method: The notion of sending a copy of your music to yourself via registered mail and keeping it unopened, commonly known as the “poor man’s copyright,” is a popular misconception. This method holds no legal weight and will not hold up in court as evidence of ownership.

Dealing With Copyright Infringement

While preventing copyright infringement is ideal, it’s essential to know how to handle situations when infringement does occur. Here are some steps to take if you discover unauthorized use of your music:

  1. Gather evidence: Collect as much evidence as possible to substantiate your claim of infringement. This can include date-stamped files, communication records, or any other documentation that proves your ownership of the music.
  2. Consult an attorney: Seek legal advice from an experienced intellectual property attorney who specializes in music copyright. They can guide you through the necessary steps for filing a lawsuit, sending cease and desist letters, or negotiating settlements.
  3. File a DMCA takedown notice: If your music is being used online without permission, you can submit a Digital Millennium Copyright Act (DMCA) takedown notice. This process allows you to request the removal of infringing content from websites or platforms.

Understanding the challenges and misconceptions surrounding music copyright is crucial for any artist. By debunking common misunderstandings and knowing how to deal with infringement, you can safeguard your creative work and ensure your rights are protected.

Tips For Safeguarding Your Music

When it comes to safeguarding your music, taking the necessary steps to protect your creations is crucial. One of the most effective ways to do so is by copyrighting your music, which grants you exclusive rights to its distribution, reproduction, and public performance. In this post, we will explore some essential tips for safeguarding your music, including documenting your creations and seeking legal advice.

Documenting Your Creations

Documenting your music creations is a crucial step in ensuring copyright protection. One of the simplest ways to document your music is by keeping a detailed record of each work you create. This record should include the song title, lyrics, score, and any other relevant details. Saving digital copies of your compositions is also highly recommended, as it provides additional evidence of your ownership.

In addition to documenting your creations, it is advisable to establish a clear timeline of your work. This can be done by sending yourself a registered letter containing the physical or digital copies of your music. The date of the postmark will serve as proof of the creation date, and this can be invaluable if you ever need to defend your copyright in court.

Seeking Legal Advice

While documenting your music provides some level of protection, seeking legal advice is a crucial step to fully safeguard your work. Consulting with a qualified intellectual property lawyer who specializes in copyright law can help ensure that all the necessary legal requirements are met. A legal professional can guide you through the process of copyright registration, assist with drafting relevant agreements, and provide valuable advice on how to protect your rights.

Additionally, a lawyer can provide guidance on licensing options to consider, helping you navigate the complex world of music rights and maximize your potential earnings. By seeking legal advice, you are taking proactive steps to protect your music and ensuring that you have the necessary legal foundation to enforce your rights if needed.

In Conclusion

By following these tips for safeguarding your music, you can protect your creative work and establish your rights as a music creator. Documenting your creations and seeking legal advice are essential steps in securing copyright protection and asserting your ownership. Remember, it’s always better to be proactive and take the necessary precautions to safeguard your music than to face potential legal complications in the future.

How to Safeguard Your Melodies: Get Your Music Copyrighted

Credit: www.copyright.gov

How to Safeguard Your Melodies: Get Your Music Copyrighted

Credit: www.nashvillechristiansongwriters.com

Frequently Asked Questions For How To Get Your Music Copyrighted

How Much Does It Cost To Copyright Your Song?

To copyright your song, the cost typically ranges from $35 to $55 per registration with the U. S. Copyright Office.

How Can I Copyright My Music For Free?

You can copyright your music for free by registering with the U. S. Copyright Office online. Create an account, complete the application, and submit your music. Make sure your work meets the eligibility criteria and is original. Keep in mind that the process may take some time.

How Do You Get Copyrighted For A Song?

To copyright a song, follow these steps: 1. Create original music. 2. Write down the lyrics and melody. 3. Register your song with the U. S. Copyright Office, or your country’s equivalent. 4. Pay the required fee and submit the necessary paperwork.

5. Receive your copyright certificate.

Does Cd Baby Copyright Your Music?

No, CD Baby does not copyright your music. You retain all the rights to your music when you use their services.

Conclusion

Understanding the process of copyrighting your music is crucial for protecting your work. By following the necessary steps and filing the appropriate paperwork, you can safeguard your creative efforts and ensure that you receive the credit and compensation you deserve.

With these insights, you can confidently pursue copyrighting for your music.

Categories
Archive

Master Your Sound: Essential Compression Settings for Mastering

Compression settings for mastering should aim for a balanced dynamic range without sacrificing clarity or causing pumping artifacts. Achieving optimal compression in mastering requires careful adjustment of threshold, ratio, attack, and release settings to enhance the overall sound quality and cohesion of the mix.

Too much compression can squash the dynamics, while too little may result in an inconsistent sound. It’s essential to find a sweet spot that maintains the dynamics of the mix while ensuring a cohesive and polished final product. In the world of audio mastering, compression plays a critical role in shaping the final sound of a mix.

By understanding how to set compression parameters effectively, mastering engineers can enhance the overall impact of the music while preserving its dynamic range and clarity. Let’s delve deeper into the importance of compression settings for mastering and how they can make a significant difference in the final product.

Understanding Compression For Mastering

Mastering compression requires careful consideration of the settings to strike a balance between control and natural dynamics. Adjusting the threshold, ratio, attack, and release settings plays a crucial role in achieving the desired audio quality while preserving the original dynamics.

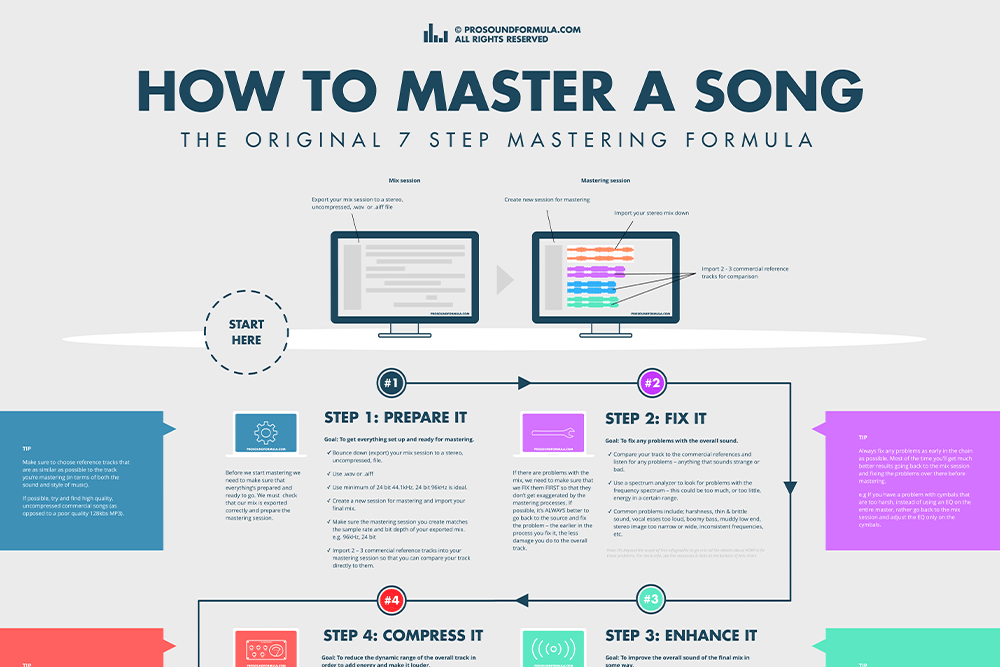
Understanding Compression for Mastering Compression is a vital tool in the mastering process to enhance audio quality. It helps control dynamics and adds cohesion. Compression Techniques Compression Techniques play a crucial role in achieving a polished and professional sound during mastering. Role of Compression in Mastering Compression helps balance the dynamic range, boost overall volume, and increase clarity in the final mix.
Master Your Sound: Essential Compression Settings for Mastering

Credit: prosoundformula.com

Setting Up Your Compression Parameters

When it comes to mastering audio, setting up your compression parameters is crucial for achieving a professional and polished sound. This involves adjusting key settings like Threshold and Ratio, as well as Attack and Release Times. Let’s dive into each of these settings to understand how they impact the final output.

Threshold And Ratio

Threshold: Sets the level at which the compression begins to kick in. Lower threshold values result in more compression being applied.

Ratio: Determines the amount of compression applied once the signal exceeds the threshold. A higher ratio means more compression is applied to the signal.

Attack And Release Times

Attack: Defines how quickly the compressor responds to the signal exceeding the threshold. A faster attack time can help control transient peaks.

Release: Controls how quickly the compressor stops compressing once the signal falls below the threshold. Adjusting the release time impacts the overall dynamics of the audio.

Optimizing Compression Settings For Different Genres

When it comes to mastering audio, optimizing compression settings for different genres is crucial to achieving a professional and polished sound. Tailoring compression techniques to suit the unique characteristics of each musical genre can make a significant difference in the final outcome of a track.

Understanding Genre Characteristics

Before diving into the compression settings for mastering, it’s essential to grasp the distinct characteristics of each musical genre. Different genres exhibit varying levels of dynamics, tempo, and instrumentation, which directly influence the approach to compression. For instance, rock and metal genres tend to feature intense dynamics and powerful instrumentation, while electronic and pop music often require a more controlled and consistent sonic profile.

Tailoring Compression For Each Genre

Adapting compression settings to suit the specific requirements of each genre can greatly enhance the impact and cohesiveness of the mastered audio. By carefully adjusting threshold, ratio, attack, and release parameters, engineers can effectively manage dynamic range and bring out the best in the mix. For example, jazz and classical music benefit from subtle and transparent compression to preserve the natural dynamics, whereas hip-hop and EDM may benefit from more aggressive compression to achieve a punchier and more consistent sound.

Master Your Sound: Essential Compression Settings for Mastering

Credit: www.masteringthemix.com

Avoiding Common Mistakes In Compression For Mastering

Compression is a vital tool in the process of audio mastering, allowing you to control and enhance the dynamics of your music. However, if used improperly, compression can have detrimental effects on the final sound quality. In this article, we will explore some common mistakes to avoid when it comes to compression settings for mastering.

Over-compression Pitfalls

One of the biggest mistakes that many engineers make is over-compressing their masters. When applied excessively, compression can squash the dynamics of your music, resulting in a dull and lifeless sound. It’s important to remember that the goal of compression is not to eliminate all dynamic range but rather to control it.

When setting the compression ratio, it’s crucial to strike a balance between achieving a desired level of loudness and preserving the natural dynamics of the music. Start with a moderate ratio, such as 2:1 or 3:1, and listen carefully to how it affects the overall tonal balance and the perceived loudness of your master. Resist the temptation to dial in extreme compression settings that sacrifice musicality for sheer volume.

Clarity And Dynamics Preservation

Another common mistake is overlooking the importance of preserving clarity and dynamics during the mastering process. While compression helps even out the dynamic range, it should never be used at the expense of clarity and detail in the mix. Here are a few tips to help you maintain clarity:

  • Use a gentle attack time to avoid smearing transients, preserving the punch and definition of percussive elements.
  • Set an appropriate release time to allow the compressor to smoothly recover the sound between musical phrases.
  • Avoid excessive makeup gain, as this can introduce unwanted artifacts and reduce headroom.

Always trust your ears and make adjustments based on how the compression affects the overall sonic character of your mix. Remember that each track may have different requirements, so experimentation is key to finding the right balance between clarity and dynamics preservation.

Conclusion

By steering clear of these common compression mistakes, you can ensure that your mastering process enhances the quality and impact of your music rather than detracting from it. Remember to approach compression as a tool for shaping the sound, rather than an all-out volume booster. With careful attention to detail and a commitment to preserving the natural dynamics of your mix, you’ll achieve mastered tracks that truly shine.

Using Parallel Compression In Mastering

Mastering engineers often use parallel compression with specific settings to enhance dynamics and depth in their tracks. By adjusting compression ratios, thresholds, and attack/release times, they can achieve a well-balanced and polished sound. This technique helps maintain clarity while adding warmth and impact to the final mix.

Enhancing Dynamics

When it comes to mastering, enhancing dynamics is a crucial aspect of achieving a polished and professional sound. Using parallel compression is one technique that can help you take control of the dynamic range of your tracks.

Parallel compression, also known as New York compression or parallel limiting, involves blending a heavily compressed version of your audio with the original uncompressed signal. This approach allows you to add depth and richness to your mix while still preserving the natural dynamics.

In a nutshell, parallel compression works by splitting your audio signal into two separate paths. One path remains untouched, while the other path is heavily compressed using a compressor with fast attack and release settings. The compressed signal is then mixed back in with the original, uncompressed signal to achieve the desired level of compression.

This technique can be particularly effective in bringing out the nuances and subtleties of your mix, enhancing the overall impact and energy of the track.

Maintaining Transients

One concern when applying compression during mastering is the potential loss of transients, which are the initial, sharp peaks in the audio waveform that give it its punch and definition.

However, using parallel compression allows you to maintain the transients while still benefiting from the desirable effects of compression. By blending the heavily compressed signal with the original uncompressed signal, you are able to retain the attack and initial impact of the transients, while also achieving the desired level of compression for the sustained parts of the audio.

This is particularly important for genres such as rock, pop, and EDM, where maintaining the punch and presence of the drums, guitars, and other instruments is crucial for a powerful and impactful sound.

With parallel compression, you can strike a balance between achieving a controlled dynamic range and preserving the transients that give your mix its character and energy.

Master Your Sound: Essential Compression Settings for Mastering

Credit: www.masteringthemix.com

Frequently Asked Questions For Compression Settings For Mastering

What Is The Best Compression Setting?

The best compression setting depends on the specific needs of your project. Experiment with different settings for optimal results.

What Type Of Compression Ratio Is Typically Used For Mastering Music?

The typical compression ratio used for mastering music is around 2:1 to 4:1, aiming to achieve a balanced sound without squashing dynamics. This helps maintain clarity and impact while ensuring compatibility across different playback systems.

What Is A Good Compressor Setting For Audio?

A good compressor setting for audio depends on the specific recording and desired effect. It is recommended to start with a low ratio, around 2:1 or 4:1, and adjust the threshold to control the amount of compression applied. Experimentation and listening are key to finding the perfect setting for your audio.

Should I Put Compression On Master Track?

Yes, you should consider using compression on your master track. It helps to even out the levels and control the dynamics of your mix, making it sound more polished and professional. However, use compression sparingly and make sure to adjust the settings based on the needs of your specific mix.

Conclusion

In mastering, selecting the right compression settings is crucial for achieving a polished and professional sound. By understanding the impact of threshold, ratio, attack, and release, you can enhance the dynamics and balance of your music. Experimenting with different settings and listening critically will help you find the perfect compression settings for your unique sound.


Categories
Archive

Melodyne Vs Flex Pitch : Which Tool Harmonizes Better?

Melodyne offers more advanced control and editing flexibility compared to Flex Pitch in audio editing. While Flex Pitch is simpler, Melodyne provides more precision for detailed pitch and time adjustments, making it ideal for professional music production.

Choosing between the two depends on the level of editing complexity and precision needed for the project. Both tools have their unique features, catering to various user preferences and requirements in audio manipulation. Let’s explore the differences and functionalities of Melodyne and Flex Pitch in detail to help you decide which tool best suits your editing needs.

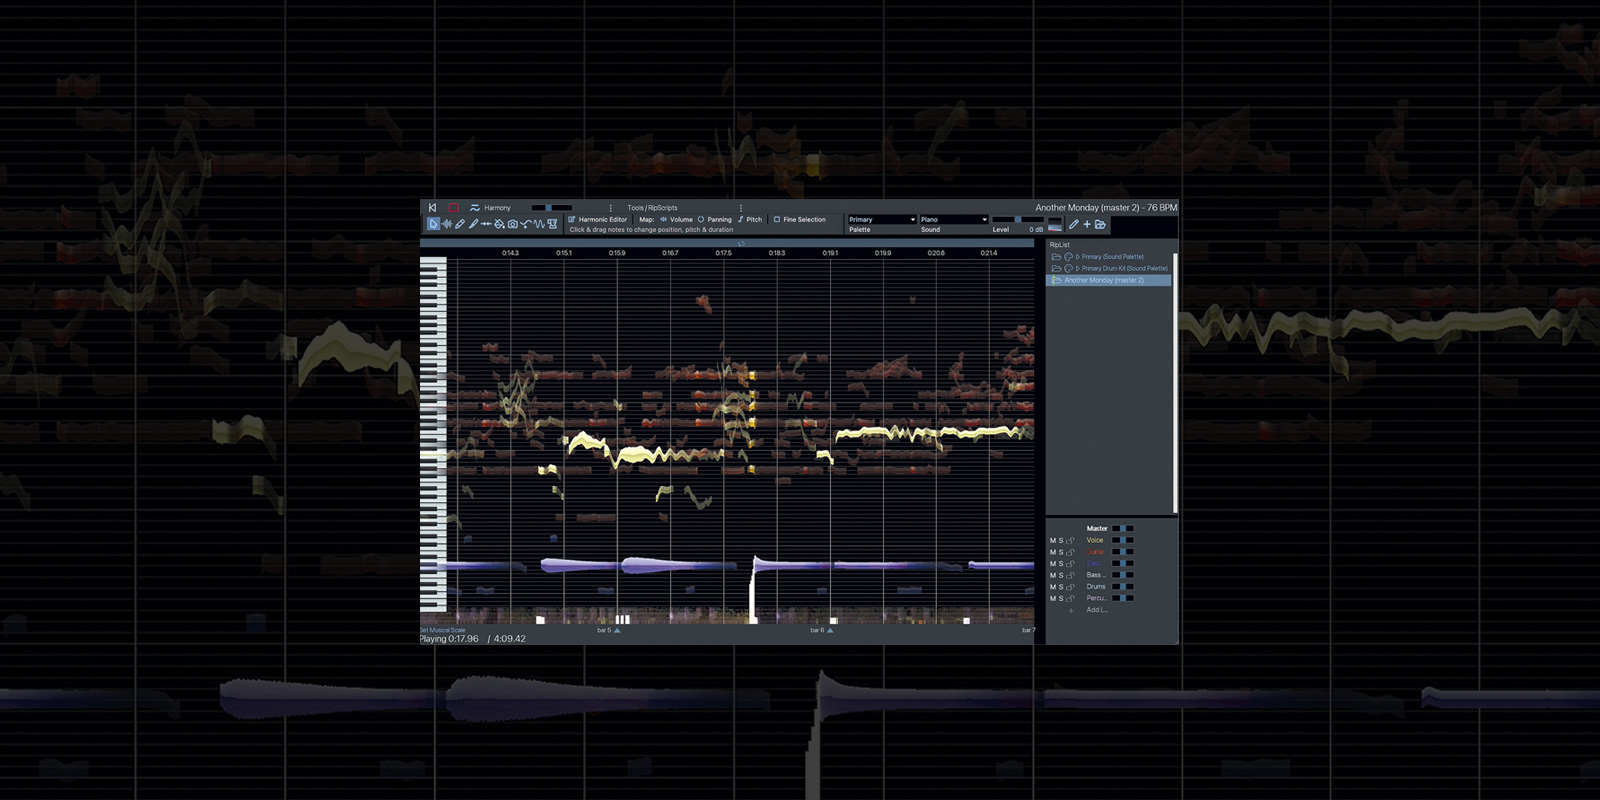
Melodyne Vs Flex Pitch  : Which Tool Harmonizes Better?

Credit: www.youtube.com

Features

Melodyne and Flex Pitch are two powerful pitch correction tools used in music production. While Melodyne offers advanced editing capabilities and precise control over pitch and timing, Flex Pitch provides a more intuitive and integrated solution within Logic Pro X.

Both tools have their own unique features, making them popular choices among musicians and producers.

Features: Pitch Correction: Modern, advanced feature. Corrects pitch inaccuracies in vocal recordings. Provides detailed control over pitch adjustments. Time Correction: Essential for aligning vocals with the tempo of the track. Flex Pitch offers flexible time editing capabilities. In Melodyne Vs Flex Pitch, Melodyne stands out for its intuitive interface and extensive pitch editing tools. Flex Pitch, on the other hand, offers seamless integration within Logic Pro X, making it a preferred choice for Logic users. Each software has unique pitch correction algorithms. Melodyne boasts of its Musical Algorithms that ensure natural-sounding pitch correction. Flex Pitch offers a range of correction options, suitable for various musical genres. Melodyne provides real-time pitch correction, allowing users to monitor changes as they edit. Flex Pitch offers individual note editing, enabling precise adjustments for each note in the vocal track.

User Interface

The user interface of both Melodyne and Flex Pitch plays a crucial role in the overall experience of editing audio pitch and timing. Let’s delve into how they differ when it comes to Ease of Use and Customization.

Ease Of Use

The Ease of Use in Melodyne is its intuitive design, making it simple to navigate for beginners. Flex Pitch also offers a user-friendly interface aimed at streamlining the editing process, catering to all skill levels.

Customization

Customization in Melodyne provides a wide range of advanced settings for precise editing control. On the other hand, Flex Pitch offers customizable options that are more streamlined and user-friendly in comparison, ideal for quick adjustments.


Sound Quality

When it comes to comparing Melodyne and Flex Pitch, one crucial aspect to consider is the sound quality they deliver. Both tools are widely utilized for pitch correction in music production, but the nuances in their sound output can have a significant impact on the final outcome of a project.

Naturalness

The naturalness of the sound achieved with pitch correction software is of utmost importance to ensure that the final product sounds organic and pleasing to the ears. Melodyne excels in this regard, as it is renowned for its ability to preserve the natural timbre and nuances of the original recording. The software’s powerful algorithms ensure that the pitch corrections seamlessly integrate with the existing audio, resulting in a remarkably natural sound.

Artifacts

Artifacts, such as unwanted distortions or robotic artifacts, can diminish the overall quality of a corrected vocal or instrument. Flex Pitch, while proficient in pitch correction, may introduce subtle artifacts, especially when dealing with more complex pitch adjustments. This can sometimes lead to a less organic sound compared to Melodyne’s output.

Melodyne Vs Flex Pitch  : Which Tool Harmonizes Better?

Credit: mixdownmag.com.au

Workflow Integration

Melodyne and Flex Pitch are advanced pitch correction plugins that offer powerful tools for editing and manipulating audio recordings. When it comes to workflow integration, both plugins have their strengths in terms of compatibility and integration with popular digital audio workstations (DAWs).

Compatibility

Melodyne and Flex Pitch are compatible with a wide range of DAWs, making them easy to incorporate into your existing workflow. Whether you are using Pro Tools, Logic Pro, Cubase, Ableton Live, or any other popular DAW, chances are that both plugins will work seamlessly.

Both Melodyne and Flex Pitch also support various audio formats, allowing you to import and export your projects with ease. This compatibility ensures that you can continue working on your projects without any disruptions.

Integration With Daws

When it comes to integration with DAWs, Melodyne and Flex Pitch offer different features and workflows.

Melodyne:

  • Melodyne functions as a standalone application and as a plugin within your DAW.
  • It offers a comprehensive set of features, allowing you to edit pitch, timing, and other parameters with precision.
  • Melodyne’s DNA Direct Note Access technology enables you to work on individual notes within polyphonic audio recordings.
  • The plugin provides a user-friendly interface that allows for efficient and intuitive editing.

Flex Pitch:

  • Flex Pitch is a built-in feature of Logic Pro, making it seamlessly integrated into the DAW.
  • It offers a straightforward and intuitive workflow, allowing you to edit pitch and timing within the track editor.
  • Flex Pitch also provides flexible note editing tools, including pitch correction, quantization, and manipulation of formants.
  • With its seamless integration, Flex Pitch enables efficient editing without the need for additional plugins or external software.

In conclusion, both Melodyne and Flex Pitch offer solid workflow integration with a wide range of DAWs. They provide compatibility and efficient workflows that allow you to achieve professional-level pitch correction and editing.

Melodyne Vs Flex Pitch  : Which Tool Harmonizes Better?

Credit: www.recordingmag.com

Frequently Asked Questions For Melodyne Vs Flex Pitch

Is Flex Pitch Like Melodyne?

Yes, Flex Pitch is similar to Melodyne in that it allows for pitch correction and manipulation. Both tools offer powerful features for editing vocals and other melodic content with precision and flexibility.

What Is The Difference Between Flex Pitch And Variaudio?

Flex Pitch and VariAudio both enable pitch correction in audio editing, but Flex Pitch is for Logic Pro and VariAudio is for Cubase.

Why Is Autotune Better Than Melodyne?

Autotune offers quicker and easier pitch correction compared to Melodyne. Autotune is suitable for real-time usage and live performances.

Is Melodyne An Industry Standard?

Yes, Melodyne is considered an industry standard for professional audio editing and pitch correction. It offers advanced features and precise control for music production. Many top music producers and engineers rely on Melodyne for its high-quality results.

Conclusion

Both Melodyne and Flex Pitch offer powerful tools for vocal editing. However, Melodyne excels in its natural sound and intuitive interface, while Flex Pitch integrates seamlessly with Logic Pro. Ultimately, the choice between the two depends on the user’s specific needs and workflow preferences.

Both programs have their strengths and can elevate the quality of vocal recordings.

Categories
Archive

What is the Difference between Mixing And Mastering Music : Unraveling the Sonic Secrets

Mixing involves blending individual tracks together, adjusting levels, and adding effects, while mastering focuses on refining and optimizing the overall sound of a mix for distribution. Both processes are crucial in the music production chain to ensure a polished and professional final product that sounds great across various devices and platforms.


Mixing allows for the fine-tuning of individual elements of a song, such as vocals, drums, and instruments, to create a cohesive sound. Mastering, on the other hand, enhances the entire mix by balancing frequencies, improving clarity, and ensuring consistency throughout the entire album or playlist.


Understanding the distinction between these two stages is essential for aspiring musicians and producers to achieve high-quality sound in their music projects.


The Art Of Mixing

Mixing music involves blending different audio tracks together harmoniously.

It ensures that each sound complements the others to create a cohesive song.

The Role Of A Mixing Engineer

A mixing engineer uses various tools to adjust levels, balance frequencies, and add effects.

Mastering In A Nutshell

Mastering is the final step in audio production where the overall sound is polished.


Tools And Techniques

Tools and techniques play a crucial role in both mixing and mastering music. Let’s delve into the specific tools and techniques used for each process.

Balancing Tracks

In mixing music, the primary goal is to balance tracks so that each instrument and vocal can be heard clearly.

This involves adjusting the volume levels, panning, and applying EQ to create a cohesive sound.

Applying Audio Effects

Audio effects are essential in both mixing and mastering to enhance the sound quality. In mixing, effects like reverb, delay, and compression are used to shape the individual tracks.

During mastering, effects such as limiting and multiband compression are applied to the overall mix to achieve a polished and professional sound.

The Mastering Process

The Mastering Process is the final step in the music production process, which involves enhancing the overall sound quality of a track and making final touches to ensure it is ready for distribution. Mastering is crucial in achieving a polished, professional sound that is consistent across all playback systems.

Enhancing Overall Sound

During the mastering process, the audio engineer focuses on enhancing the overall sound quality of the track. This involves adjustments in volume levels, equalization, dynamics processing, and stereo enhancement to ensure a balanced and cohesive sound. The engineer also addresses any tonal discrepancies and corrects any imperfections that may be present in the mix.

Final Touches

Once the sound is balanced and cohesive, the mastering engineer applies the final touches to the track. This includes fine-tuning the overall tonal balance, adjusting the spacing between tracks, and ensuring the proper sequencing of songs in an album. Additionally, the engineer applies compression and limiting to optimize the track’s overall loudness and prevent any clipping or distortion.


Key Differences

When it comes to producing high-quality music, mixing and mastering are two vital steps that play distinct roles in the creation process. While both processes focus on enhancing the overall sound of a song, they have different roles and objectives. In this blog post, we will delve into the key differences between mixing and mastering, uncovering their primary objectives and technical aspects.

Primary Objectives

Mixing music involves combining individual audio tracks in a way that creates a balanced and cohesive sound. It aims to refine the individual elements of a song, such as vocals, instruments, and effects, to ensure they work harmoniously together. The primary objective of mixing is to shape the sound, adjust levels and panning, apply equalization and effects, and create a well-balanced stereo or surround sound mix.

On the other hand, mastering music is the final step in the production process before distribution. It focuses on fine-tuning the already mixed track to achieve a polished and professional sound. The core objective of mastering is to optimize the overall sonic characteristics of the song, ensuring it sounds consistent and translates well across different playback systems. This includes tasks such as adjusting the overall volume, enhancing clarity, controlling dynamics, and applying global equalization and compression.

Technical Aspects

When it comes to the technical aspects, mixing primarily deals with individual tracks and their elements. This involves adjusting the volume levels, panning positions, and applying various audio effects to shape the sound. Mixing also involves cleaning up unwanted noise, splicing or rearranging sections, and ensuring smooth transitions between different parts of the song.

Mastering, on the other hand, focuses on the entire mixed track as a whole. It involves making precise adjustments to the overall tonal balance, dynamic range, and stereo image of the song. This is achieved by utilizing advanced tools such as multi-band compression, stereo widening, harmonic excitation, and other mastering-specific techniques. Additionally, mastering also involves applying noise reduction, fade-ins, fade-outs, and adding track spacing to prepare the final master for distribution.

In conclusion, although both mixing and mastering play crucial roles in the music production process, they serve different purposes. While mixing focuses on individual tracks and creating a balanced mix, mastering fine-tunes the overall sound of the entire mixed track. Understanding these key differences is essential for musicians, producers, and sound engineers to ensure their music achieves its full potential and resonates with listeners.

Impact On The Final Product

When it comes to music production, mixing and mastering are two essential steps that play a crucial role in shaping the final product. Each step has its own purpose and distinct impact on the overall sound quality of the music. Understanding the difference between mixing and mastering can help both musicians and producers make informed decisions about their music. In this article, we will explore the impact of mixing and mastering on the final product, focusing on the listener’s experience and the commercial viability of the music.

Listener’s Experience

The mixing process primarily involves adjusting individual tracks, such as vocals, instruments, and effects, to create a well-balanced and cohesive sound. It brings all the individual elements together, making sure that each sound sits in the right place and is audible. Mixing plays a significant role in enhancing the listener’s experience by achieving clarity, cohesion, and dynamics in the music.

During the mixing process, audio engineers may use techniques like equalization, compression, panning, and reverb to shape the sound and create a sense of space. By adjusting the levels and frequencies, they can highlight certain elements, remove unwanted noise, and ensure that every instrument and vocal can be heard clearly. A well-mixed track can make the listener feel immersed in the music, hear the lyrics clearly, and appreciate the nuances of each instrument.

Commercial Viability

On the other hand, mastering is the final step in the production process that gives the music a polished and professional touch. It involves making overall adjustments to the entire mix, ensuring consistency and compatibility across different audio systems and formats. Mastering prepares the music for distribution and commercial release.

During the mastering process, audio engineers optimize the track’s overall volume, frequency balance, stereo width, and dynamic range. They also add final touches like fade-ins, fade-outs, and spacing between tracks. The goal is to ensure that the music sounds great on various playback devices, such as headphones, car speakers, and club sound systems.

Commercial viability is greatly influenced by mastering, as it helps the music stand out when competing with other songs on radio, streaming platforms, and other mediums. A well-mastered track will have a consistent and professional sound throughout, making it more attractive to listeners and increasing its chances of being played on various platforms.

Comparison between Mixing and Mastering
Aspect Mixing Mastering
Focus Adjusting individual tracks Optimizing the overall mix
Impact Listener’s experience, clarity, and cohesiveness Commercial viability, consistency, and compatibility
Techniques Equalization, compression, panning, and effects Volume optimization, frequency balance, and final touches

In conclusion, both mixing and mastering are essential steps in music production, with each step serving a distinct purpose in shaping the final product. Mixing focuses on creating a balanced and immersive listening experience, while mastering ensures commercial viability and polish. By understanding the impact of these two processes, musicians and producers can make informed decisions to create high-quality music that resonates with listeners and stands out in the industry.


Frequently Asked Questions On What Is The Difference Between Mixing And Mastering Music

Which Is Harder Mixing Or Mastering?

Mixing and mastering both require different skills and are equally challenging.

Does Mixing And Mastering Make A Big Difference?

Mixing and mastering does make a big difference in the final sound quality of music. It enhances clarity, balance, and overall professional polish, making the tracks sound cohesive and professional.

What Is Difference Between Mixing And Mastering A Song?

Mixing balances individual tracks, adjusting volume, panning, and effects. Mastering enhances overall audio, ensuring it’s polished and ready for distribution.

What Is The Purpose Of Mastering A Song?

Mastering a song enhances its overall sound quality, balance, and consistency. It ensures that the song sounds good across different audio devices and platforms. Mastering also brings out the best in the mix and prepares the song for distribution and playback.

Conclusion

The nuances between mixing and mastering music are crucial for achieving a polished final product. Understanding the distinctions and their impact on the overall sound is vital for any music producer or artist. By grasping these differences, you can effectively enhance your music and propel it to the next level of professionalism.

Categories
Archive

Waves Tune Vs Melodyne: Which Will Perfectly Harmonize Your Music?

Waves Tune and Melodyne are both vocal tuning plugins but differ in their user interface and flexibility. Waves Tune offers real-time pitch correction with a straightforward interface, while Melodyne provides advanced vocal editing capabilities.


When choosing between Waves Tune and Melodyne for vocal tuning needs, it’s essential to consider the specific requirements of your project. Waves Tune is suitable for quick and easy pitch correction during live performances or recording sessions, whereas Melodyne excels in detailed and precise vocal editing, allowing for manipulation of individual notes and phrases to achieve a natural sound.


Both plugins have their strengths and can be valuable tools for enhancing vocal performances.

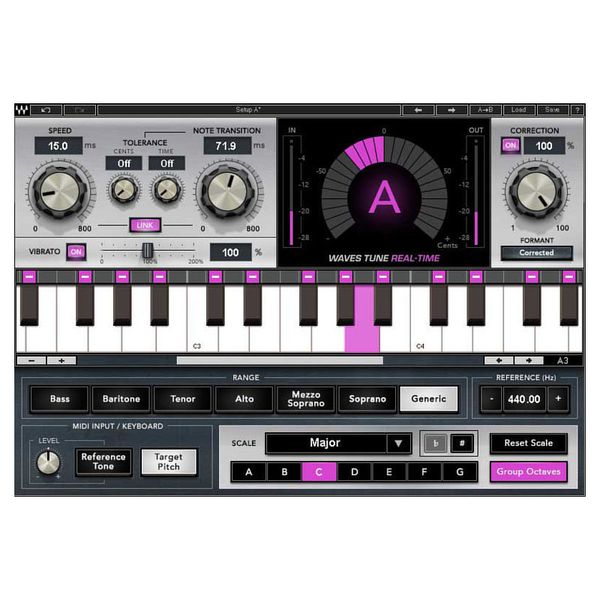
Waves Tune Vs Melodyne: Which Will Perfectly Harmonize Your Music?


Credit: www.thomann.ae

Comparing Features

When comparing Waves Tune and Melodyne, examining their features is crucial to make an informed decision. Let’s delve into the key aspects of these popular pitch correction tools.

Pitch Correction

Waves Tune: Offers real-time pitch correction, allowing you to achieve precise tuning for vocals effortlessly.

Melodyne: Provides unmatched control over individual notes within chords, enabling detailed pitch editing.

Time Correction

Waves Tune: Includes advanced time correction features to align vocals perfectly with the music track.

Melodyne: Employs innovative algorithms for time stretching and manipulation, ensuring seamless time adjustments.


User Interface

Start of User Interface Section

The user interface of a music production software plays a crucial role in ensuring a smooth and efficient workflow. When comparing Waves Tune and Melodyne, the user interface can significantly impact the user experience and the overall quality of music production.

Start of Workflow Efficiency H3 Heading

Workflow Efficiency

Waves Tune offers a user-friendly interface that allows for quick and intuitive pitch correction. Users can easily navigate through the software and make real-time adjustments to vocal recordings. On the other hand, Melodyne provides a more detailed interface with advanced editing features, which may require a learning curve but offer extensive control over pitch and timing.

Start of Customization Options H3 Heading

Customization Options

In terms of customization options, Waves Tune excels in its simplicity, providing preset settings and basic customization tools for quick pitch correction. Melodyne, on the other hand, offers a wide range of customization options, including the ability to adjust individual notes, pitch modulation, and timing with precision.

Flexibility And Control

In the world of audio editing, having the flexibility and control to manipulate pitch and timing is crucial. When it comes to choosing between Waves Tune and Melodyne, the level of flexibility and control each software offers is a key consideration.

Editing Capabilities

Both Waves Tune and Melodyne offer extensive editing capabilities that allow users to precisely adjust the pitch and timing of audio recordings. Waves Tune provides a straightforward interface with real-time pitch correction and time-stretching features, making it ideal for quick and easy editing tasks. On the other hand, Melodyne offers a more in-depth approach, enabling users to manipulate individual notes within a recording. This level of control is particularly beneficial for detailed pitch and timing adjustments.

Compatibility With Daws

When it comes to integrating with digital audio workstations (DAWs), both Waves Tune and Melodyne offer seamless compatibility, allowing users to incorporate their editing capabilities directly into their workflow. Waves Tune is designed as a plugin for popular DAWs, ensuring smooth integration and real-time editing. Similarly, Melodyne offers compatibility with various DAWs, making it a versatile choice for professional audio production.

Sound Quality

When it comes to finding the perfect tool for pitch correction, two popular options that often come up are Waves Tune and Melodyne. Both plugins offer impressive features and functionality, but one crucial aspect that sets them apart is sound quality. Let’s dive deeper into the sound quality of Waves Tune and Melodyne, exploring two significant factors: artifact minimization and natural sound retention.

Artifact Minimization

One aspect that makes Waves Tune and Melodyne stand out is their ability to minimize artifacts during pitch correction. Artifacts are unwanted distortion or anomalies that may occur when altering the pitch of a vocal or instrument. Both plugins excel in this area but in slightly different ways.

With Waves Tune, you can expect exceptional artifact minimization through its advanced algorithms and meticulously designed pitch detection. This allows for seamless pitch correction without compromising the audio quality. Waves Tune ensures that your vocal tracks or instrument recordings remain crisp and natural, free from any noticeable artifacts.

On the other hand, Melodyne offers powerful tools for artifact minimization through its Direct Note Access feature. By using note separation technology, Melodyne can isolate individual notes in a recording, enabling precise adjustments while simultaneously minimizing artifacts. This results in a transparent and artifact-free pitch correction process, allowing for the preservation of the original character of the audio.

Natural Sound Retention

Another vital aspect to consider when comparing Waves Tune and Melodyne is their ability to retain the natural sound of the audio being processed. Maintaining the natural character of a vocal or instrument is crucial for a professional and authentic sound.

Waves Tune excels in this area as it preserves the natural sound of the original recording. By focusing on accurate pitch detection and subtle correction, Waves Tune ensures that the essence and expression of the performance are retained. This plugin empowers you to make precise pitch adjustments while maintaining the integrity and authenticity of the audio.

Similarly, Melodyne is renowned for its exceptional natural sound retention capabilities. The software’s advanced algorithms allow for transparent and unobtrusive pitch adjustments while preserving the original tonal qualities of the recorded material. Melodyne enhances the overall sound without compromising the natural timbre, enabling you to achieve professional results that sound incredibly natural and seamless.

In conclusion, both Waves Tune and Melodyne offer exceptional sound quality when it comes to pitch correction. Whether you prioritize artifact minimization or natural sound retention, these plugins have you covered. Understanding their unique approaches and features will help you make an informed decision based on your specific needs and preferences. So, take your time, experiment, and choose the plugin that best complements your style of music production or audio editing.

Price And Accessibility

When it comes to choosing the right pitch correction software, two popular options that often come up are Waves Tune and Melodyne. Both of these tools offer powerful features for fixing pitch and tuning vocals. However, one factor that greatly influences a musician’s decision is the price and accessibility of these plugins. In this section, we will take a closer look at the affordability of Waves Tune and Melodyne, as well as the availability of free options.

Affordability

When considering the affordability of pitch correction plugins, Waves Tune and Melodyne differ significantly in terms of pricing. Waves Tune, offered by Waves Audio, comes as part of their Waves Tune Real-Time plugin, which is priced at $249 as of April 2021. This plugin provides a budget-friendly option for those who only require real-time pitch correction capabilities without the need for extensive editing.

On the other hand, Melodyne, developed by Celemony, offers a range of versions with varying prices based on the user’s needs. The starting price for Melodyne Essential, which includes basic pitch correction functionality, is around $99. For enhanced features like polyphonic pitch editing, users can opt for Melodyne Editor starting at $399. Although these prices may seem higher compared to Waves Tune, it’s important to consider the additional capabilities that come with the Melodyne software.

Availability Of Free Options

If you’re looking for a more cost-effective solution or simply want to try out pitch correction software without investing money upfront, there are several free alternatives available. One popular option is the free version of Waves Tune, called Waves Tune LT. Though it has limited features compared to its paid counterpart, Waves Tune LT can still provide basic pitch correction functionalities for those on a tight budget.

Additionally, there are free alternatives like GSnap and MAutoPitch. GSnap, created by GVST, is a simple pitch correction plugin that can be used with popular digital audio workstations (DAWs) such as Ableton Live, FL Studio, and Logic Pro. Similarly, MAutoPitch, developed by MeldaProduction, is another free pitch correction plugin that offers a range of adjustable parameters for fine-tuning vocals.

All in all, whether you choose Waves Tune or Melodyne for your pitch correction needs, the cost and accessibility factor depend on your budget and requirements. While Waves Tune provides a more affordable option with its real-time capabilities, Melodyne offers a broader range of features at a higher price point. If you’re just starting or experimenting with pitch correction, the availability of free options like Waves Tune LT, GSnap, and MAutoPitch can be a great way to get started without breaking the bank.

Waves Tune Vs Melodyne: Which Will Perfectly Harmonize Your Music?


Credit: www.gearnews.com

Frequently Asked Questions On Waves Tune Vs Melodyne

Is Waves Auto-tune Any Good?

Yes, Waves Auto-Tune is a good choice for precise pitch correction and creative vocal effects. It offers advanced features and a user-friendly interface for audio editing.

Do Most Artists Use Melodyne?

Many artists use Melodyne for vocal editing, pitch correction, and creative manipulation in their music production process.

What Is The Difference Between Waves Tune And Auto-tune?

Waves Tune focuses on pitch correction for vocals. Auto-Tune corrects pitch for vocals and instruments.

Does Waves Tune Sound Natural?

Yes, Waves Tune sounds natural by correcting pitch while maintaining the original vocal characteristics. Being seamlessly integrated, it preserves the natural nuances of the voice.

Conclusion

Based on the comparison of Waves Tune and Melodyne, both offer unique features for vocal tuning. Waves Tune is known for its real-time pitch correction and user-friendly interface, while Melodyne is praised for its extensive editing capabilities. Ultimately, the choice between the two will depend on individual preferences and specific project needs.

Categories
Archive

Best Open Source DAWs: Unleash Your Musical Creativity Today!

Ardour and LMMS are popular open-source DAWs, offering comprehensive features for music production. These platforms provide efficient tools and interfaces for audio editing and mixing, suitable for both beginners and advanced users.


Are you looking for quality open-source digital audio workstations (DAWs) to enhance your music production skills? In today’s digital era, having access to versatile and cost-effective software can greatly benefit music creators of all levels. Fortunately, there are excellent options available in the form of open-source DAWs.


Two standout choices in this category are Ardour and LMMS. These platforms offer a wide range of features and tools that cater to the diverse needs of musicians and producers. Whether you are just starting out or looking to expand your capabilities, exploring the world of open-source DAWs can be a game-changer in your music production journey.


What Is An Open Source Daw?


Best Open Source DAWs

What is an Open Source DAW?

Open Source DAW (Digital Audio Workstation) software refers to music production programs that are freely available for anyone to use, modify, and distribute.

Benefits Of Open Source Daws

  • Community-driven development fosters innovation.
  • Cost-effective options for aspiring musicians.
  • High level of customization and flexibility.
  • Regular updates and enhancements.

Drawbacks Of Open Source Daws

  • Lack of comprehensive customer support.
  • Potential compatibility issues with hardware.
  • Learning curve for users unfamiliar with open-source software.

In conclusion, Open Source DAWs offer a range of benefits but also come with certain drawbacks that users should be aware of before making a decision.

Best Open Source DAWs: Unleash Your Musical Creativity Today!


Credit: www.groovyspin.com

Top Open Source Daws

Discover the best open-source DAWs that offer high-quality audio production and recording capabilities. With their customizable features and user-friendly interfaces, these DAWs provide a cost-effective solution for music enthusiasts and professional producers alike. Unleash your creativity with these top open-source DAWs.

In the realm of digital audio workstations (DAWs), open-source software provides powerful and versatile options for music production. Let’s explore some of the top open-source DAWs available today.

Ardour

Ardour is a robust and feature-rich DAW that offers professional-grade audio editing capabilities. It supports multi-track recording and editing, along with automation and plugin support.

Lmms (linux Multimedia Studio)

LMMS, also known as Linux MultiMedia Studio, is a popular open-source DAW that provides a user-friendly interface for creating music tracks. It offers tools for composing, sequencing, and mixing audio.

Audacity

Audacity is a versatile audio editing software that is widely used for recording, editing, and mixing audio tracks. Its simple interface and powerful features make it a go-to choice for many music enthusiasts.

Qtractor

Qtractor is a lightweight and easy-to-use DAW that offers MIDI sequencing and audio recording capabilities. It is known for its stability and intuitive workflow, making it a favorite among musicians and producers.

Key Features To Look For

When choosing an open-source digital audio workstation (DAW), it’s essential to consider the key features that will best suit your music production needs. Here are the primary features to look for in a DAW:

Support For Multiple Platforms

A versatile DAW should be compatible with various operating systems, including Windows, macOS, and Linux. Cross-platform support ensures flexibility and accessibility for users with different devices and preferences.

Midi Capabilities

MIDI capabilities are crucial for digital music production, allowing users to create, edit, and playback musical performances. A DAW with robust MIDI functionality enables seamless integration with external MIDI controllers and devices.

Audio Editing And Mixing Tools

Comprehensive audio editing and mixing tools are paramount for achieving professional-quality sound. Look for a DAW that offers a wide range of editing features, such as audio slicing, time-stretching, pitch correction, and advanced mixing capabilities.

Plugin Support

Extensive support for third-party plugins enhances a DAW’s capabilities, allowing users to expand their sonic palette and access additional effects, instruments, and processors. A DAW with plugin compatibility empowers creators to customize their workflow and achieve unique sounds.

Community And Support

When it comes to open-source digital audio workstations (DAWs), having a strong and supportive community is essential. The community of users and developers plays a crucial role in the growth and improvement of these software, providing valuable feedback, bug reports, and even contributing code. This collaborative environment not only ensures the quality and reliability of the DAW but also fosters a sense of inclusiveness and openness.

Active User Community

An active user community is a vital aspect of any open-source project. It not only reflects the popularity of the software but also indicates the level of engagement and dedication of its users. Open-source DAWs have an enthusiastic and thriving user community that constantly interacts and shares their knowledge and experiences. The active community creates an environment of growth, where users are encouraged to learn from one another and explore new possibilities.

Through forums, online communities, and social media groups, users can connect with like-minded individuals who share their passion for music production. They can exchange ideas, seek help with technical issues, and even collaborate on projects. Additionally, the user community often organizes meetups, workshops, and conferences, providing invaluable opportunities to network, learn, and stay up-to-date with the latest developments in the world of open-source DAWs.

Available Documentation And Tutorials

One of the major advantages of open-source DAWs is the wealth of available documentation and tutorials. The dedicated user community, along with the software developers, puts significant effort into creating detailed and user-friendly documentation. This documentation serves as a comprehensive guide for beginners, offering step-by-step instructions on installation, configuration, and usage of the DAW.

Moreover, tutorials, video walkthroughs, and online courses are readily accessible, offering users the opportunity to enhance their skills and knowledge. These learning resources cover a wide range of topics, from basic techniques to advanced mixing and mastering concepts. Users can easily find tutorials for specific features or plugins, enabling them to maximize the potential of the open-source DAW.

Additionally, open-source DAWs often have an extensive plugin library, allowing users to customize their workflows. The documentation and tutorials help users navigate through the vast collection of plugins, guiding them in selecting the most suitable tools for their specific needs. With the abundance of resources available, users can confidently explore and experiment, empowered by the support and guidance of the open-source DAW community.

Making The Right Choice

When it comes to selecting the best open source digital audio workstation (DAW) for your needs, making the right choice is crucial. With so many options available, it’s important to match your workflow and requirements to ensure a seamless music production experience. Additionally, thorough testing and evaluation can help you narrow down your options and find the perfect DAW that suits your music production needs. In this article, we will explore two essential factors to consider when making your decision: matching your workflow and requirements, and the importance of testing and evaluating different DAW options.

Matching Your Workflow And Requirements

Each musician and producer has a unique workflow and specific requirements when it comes to music production. It’s important to find a DAW that aligns with your creative process and caters to your specific needs. Whether you prefer a simple and intuitive interface or require advanced features and extensive customization options, there is a DAW out there that suits your working style.

  • Consider the type of music you produce and the genre-specific tools and effects you might need.
  • Think about your preferred method of composing and arranging music, such as MIDI sequencing, loop-based production, or recording live instruments.
  • Take into account your level of expertise and comfort with different software interfaces.

By carefully considering these factors, you can ensure that the DAW you choose enhances your workflow and enables you to create music more effortlessly.

Testing And Evaluating

Before committing to a particular DAW, it’s crucial to thoroughly test and evaluate different options. This enables you to get a hands-on experience with each software and determine its suitability for your needs. Here are some steps you can take to test and evaluate a DAW:

  1. Download trial versions of various open source DAWs and explore their features and functionalities.
  2. Create a small project and test how each DAW handles your specific music production workflow.
  3. Consider compatibility with your preferred operating system and hardware, ensuring seamless integration.
  4. Read user reviews and forums to understand the experiences and opinions of other musicians and producers.

By following these steps, you can make an informed decision and select the open source DAW that best suits your needs. Remember, the right DAW should align with your workflow, cater to your requirements, and offer a seamless music production experience.


Frequently Asked Questions Of Best Open Source Daws

What Is The Best Free Daw?

The best free DAW is Cakewalk by BandLab. It offers advanced features, user-friendly interface, and professional tools for music production.

Is There A Free Open Source Daw?

Yes, there are free open-source DAWs available for music production, such as Audacity, Ardour, and LMMS.

Is Cakewalk The Best Free Daw?

Yes, Cakewalk is a top choice for a free DAW with its intuitive interface and powerful features.

What Is The #1 Daw?

The #1 DAW is subjective, as it depends on personal preference and specific needs. Some popular options include Ableton Live, Logic Pro, and Pro Tools.

Conclusion

Open-source DAWs offer professional-quality features without the hefty price tag. With an array of options available, producers and musicians can find the perfect DAW to suit their needs. From customizable interfaces to extensive plugin libraries, these open-source DAWs provide endless opportunities for creativity and innovation in music production.

Categories
Archive

Mixing And Mastering Burnout: Expert Tips to Find Your Creative Spark

Mixing and mastering burnout occurs from prolonged audio editing leading to fatigue and reduced creativity. It’s essential to prioritize self-care and take breaks to avoid burnout in the music production process.


As an audio engineer or music producer, the demands and intricacies of mixing and mastering can be overwhelming, resulting in burnout. This can impact the quality and efficiency of your work, leading to unsatisfactory outcomes. By understanding the signs of burnout and implementing strategies to mitigate its effects, you can maintain your passion and quality in music production.


We will explore the causes, symptoms, and effective ways to prevent and overcome mixing and mastering burnout in the music industry.


Recognizing Burnout Signs

Recognizing burnout signs is crucial in the mixing and mastering process. It’s important to be attentive to emotional and physical cues, such as fatigue, decreased productivity, and irritability. Taking timely breaks and seeking support can help prevent burnout and maintain a healthy work-life balance.

Recognizing Burnout Signs

Physical Signs
– Lack of energy and constant fatigue
– Headaches, stomach issues, and muscle tension

Emotional Signs
– Increased irritability and mood swings
– Feelings of cynicism and detachment

Burnout can manifest through various Physical Signs like fatigue and muscle tension. Additionally, Emotional Signs such as irritability and cynicism indicate burnout.

Understanding The Causes

Discover the root causes of mixing and mastering burnout to prevent its negative impacts on your music production journey. Identifying these triggers can help you implement effective strategies to maintain your creativity and passion in the long run.


Workload And Pressure

Balancing a heavy workload and facing immense pressure can lead to burnout.

Work overload and stress can take a toll on mixing and mastering professionals.

It’s crucial to manage tasks effectively to prevent burnout from excessive workload.


Lack Of Inspiration

Facing a lack of inspiration can be a significant cause of burnout in music production.

Creativity is essential in the mixing and mastering process, and without it, burnout looms.

Seeking new sources of inspiration can help combat burnout and revitalize creativity.

Effective Strategies For Overcoming Burnout

Discover practical tactics to combat burnout in the mixing and mastering realm. Implement self-care routines, set boundaries, and seek support to rejuvenate your passion for the craft and maintain peak performance.

Effective Strategies for Overcoming Burnout

Setting Realistic Goals

When dealing with mixing and mastering burnout, it’s important to set realistic goals for your projects. One effective strategy is to break down your tasks into smaller, achievable milestones. This approach can help you maintain a sense of progress and prevent feeling overwhelmed. By setting realistic goals, you can avoid putting undue pressure on yourself and reduce the risk of burnout.

Taking Breaks

Regular breaks are essential for combating burnout. It’s crucial to acknowledge the need for rest and taking breaks in between intense mixing and mastering sessions. Incorporating short, frequent breaks into your workflow can help alleviate mental fatigue, enhance productivity, and provide a much-needed mental respite. Remember, breaks are not a hindrance; they are a strategy for sustaining creativity and mental well-being.

Setting Realistic Goals

When dealing with mixing and mastering burnout, it’s important to set realistic goals for your projects. One effective strategy is to break down your tasks into smaller, achievable milestones. This approach can help you maintain a sense of progress and prevent feeling overwhelmed. By setting realistic goals, you can avoid putting undue pressure on yourself and reduce the risk of burnout.

Taking Breaks

Regular breaks are essential for combating burnout. It’s crucial to acknowledge the need for rest and taking breaks in between intense mixing and mastering sessions. Incorporating short, frequent breaks into your workflow can help alleviate mental fatigue, enhance productivity, and provide a much-needed mental respite. Remember, breaks are not a hindrance; they are a strategy for sustaining creativity and mental well-being.

Incorporating Self-care Practices

When it comes to dealing with burnout as a mixing and mastering professional, incorporating self-care practices becomes crucial. Taking care of your mental and physical well-being is essential to maintain a healthy balance and prevent burnout from taking over. Here are a few self-care practices you can incorporate into your routine to combat burnout:

Mindfulness And Meditation

Mindfulness and meditation can work wonders in reducing stress and promoting relaxation. Taking a few moments each day to focus on your breath and clear your mind can help you regain clarity and improve your overall well-being. Setting aside dedicated time for mindfulness and meditation can be as simple as finding a quiet space, closing your eyes, and focusing on your breath, allowing any stressful thoughts to melt away.

Physical Exercise

Physical exercise not only benefits your body but also has a positive impact on your mental health. Engaging in regular physical activity helps release endorphins, the feel-good hormones, which can boost your mood and alleviate stress. Whether it’s going for a run, taking a yoga class, or simply taking a brisk walk, incorporating physical exercise into your routine can help you combat burnout and maintain a healthy work-life balance.

Seeking Professional Help

Seeking professional help is a crucial step in addressing and managing burnout. When struggling with mixing and mastering burnout, reaching out to trained professionals can provide valuable guidance and support. There are various options available, including therapy and counseling, as well as collaborating with a mentor.

Therapy And Counseling

Therapy and counseling offer a safe space for individuals to explore their burnout-related challenges. During therapy sessions, a licensed therapist or counselor listens attentively, provides empathetic support, and helps individuals develop coping strategies. These professionals can assist in identifying underlying causes of burnout, understanding triggers, and implementing effective stress management techniques.

Collaborating With A Mentor

Collaborating with a mentor who has experience in the music industry can be highly beneficial for individuals experiencing burnout in mixing and mastering. A mentor can offer guidance, share their personal experiences, and provide valuable insights into navigating the challenges of the industry. This collaborative relationship can help individuals gain perspective, learn new techniques, and regain their passion for their work.


Frequently Asked Questions On Mixing And Mastering Burnout

Why Is Mixing And Mastering So Difficult?

Mixing and mastering can be difficult due to the technical skills required for intricate audio adjustments. Achieving a balanced and polished sound involves a deep understanding of sound engineering principles and sophisticated equipment. It demands a keen ear to discern fine nuances and ensure optimal quality.

What Is The Average Mixing And Mastering Rate?

The average rate for mixing and mastering can vary, but it typically ranges from $50 to $150 per song. The cost depends on factors such as the complexity of the project, the experience of the engineer, and the studio’s location.


Be sure to get quotes from different professionals before making a decision.

How Many Hours Does It Take To Mix And Master A Song?

Mixing and mastering a song typically takes between 10-40 hours. The timeframe depends on factors like the complexity of the song, the skill level of the engineer, and any revisions needed. Efficient communication and clear directions can help streamline the process.

What Is The Truth About Mixing And Mastering?

Mixing and mastering are crucial elements in producing high-quality audio tracks. Mixing involves blending individual elements to create a cohesive sound, while mastering focuses on optimizing the final mix for distribution. Both processes are essential for achieving professional-sounding music.

Conclusion

After understanding the serious implications of burnout in the mixing and mastering industry, it becomes evident that safeguarding one’s mental and emotional well-being is crucial. By prioritizing self-care, setting boundaries, and seeking support when needed, music professionals can mitigate the risks of burnout.


Remember, a healthy work-life balance is key to a sustainable and fulfilling career in the music industry.

Categories
Archive

What Does It Mean to Mix And Master a Song? Tips and Tricks

Mixing involves blending individual tracks together, ensuring balance and clarity in the sound. Mastering optimizes the final mix for distribution and playback, enhancing overall quality and coherence.


Mixing combines all elements such as vocals, instruments, and effects in a song to create a cohesive sound. Mastering fine-tunes the mixed track by adjusting levels, EQ, and dynamics to achieve a polished, professional sound. Both processes are essential for producing a high-quality, commercially viable music track that resonates with listeners and meets industry standards.


Whether you are a musician, producer, or audio engineer, understanding the art of mixing and mastering is crucial for achieving a competitive edge in the music industry.


The Basics Of Mixing And Mastering


The Basics of Mixing and Mastering

Mixing is the process of blending individual tracks together to create a cohesive and balanced sound.

Mastering is the final step in the music production process where the song is polished and prepared for distribution.

Mixing

Mixing involves adjusting levels, adding effects, and enhancing the overall quality of each track.

Mastering

Mastering focuses on optimizing the overall sound of the entire song, ensuring consistency and clarity.

What Does It Mean to Mix And Master a Song? Tips and Tricks


Credit: online.berklee.edu

Key Differences Between Mixing And Mastering

When working on a music project, it’s essential to understand the distinctions between mixing and mastering. Each process plays a unique role in shaping the final sound of a song.

Goal Of Mixing

Mixing focuses on blending individual tracks together to create a cohesive and balanced sound.

  • Adjusting levels
  • Applying EQ and effects
  • Panning instruments

Goal Of Mastering

Mastering involves polishing the overall mix to achieve a professional and consistent sound across all playback systems.

  • Enhancing clarity and dynamics
  • Optimizing loudness levels
  • Preparing for distribution

Common Techniques In Mixing

Common Techniques in Mixing are crucial in achieving a high-quality audio product. Skilled engineers utilize various methods to ensure the individual elements of a song blend seamlessly together, ultimately creating a cohesive sound. Let’s explore some of the fundamental techniques used in the art of mixing.

Balancing Levels

Balancing levels is a key aspect of the mixing process. It involves adjusting the volume of each track to ensure that no element overpowers the others, resulting in a well-balanced and harmonious mix. By meticulously adjusting the levels of instruments and vocals, the engineer can create a clear and defined sound.

Panning And Stereo Imaging

Panning and stereo imaging play a pivotal role in creating a sense of space and depth within a mix. By strategically placing the audio elements across the stereo field, the engineer can establish a panoramic sonic landscape. This technique can enhance the listener’s experience, creating a sense of immersion within the music.

Advanced Mixing Tips And Tricks

In the world of music production, mixing and mastering play vital roles in bringing a song to life. While mixing involves blending and balancing different elements of a track, mastering focuses on finalizing the overall sound. In this article, we will delve deeper into some advanced tips and tricks that can enhance your mixing skills and help you achieve professional-sounding results.

Eq And Compression

EQ and compression are two powerful tools that can significantly impact the sound of a mix. Proper utilization of these techniques can bring clarity, definition, and cohesion to individual instruments and the overall mix.

1. EQ:

Equalization, or EQ, allows you to adjust the frequency content of a sound, enabling you to sculpt and shape its tonal balance. Here are a few tips to optimize your use of EQ:

  • Identify and attenuate frequencies that clash or mask each other, to prevent muddiness and improve separation of instruments.
  • Use high-pass filters to remove low-frequency rumble or unwanted noise from each track, freeing up headroom for other elements.
  • Boosting or cutting specific frequencies can emphasize or de-emphasize certain instruments or elements in the mix, bringing them forward or pushing them back.

2. Compression:

Compression helps control dynamic range, ensuring that different elements in a mix sit more cohesively together. Here are some compression tips to enhance your mix:

  • Use compression to tame peaks and even out the levels of individual tracks, making them more consistent.
  • Utilize sidechain compression to create space for important elements by ducking certain frequencies when competing sounds are present.
  • Experiment with different attack and release settings to shape the transient response of instruments, adding punch or smoothing out their dynamics.

Effects And Automation

Effects and automation can add depth, movement, and excitement to your mix, elevating it from a stagnant soundscape to an engaging sonic experience.

1. Effects:

Effects such as reverb, delay, chorus, and distortion can enhance the sonic characteristics of individual instruments or the overall mix. Consider these tips when using effects:

  • Apply reverb and delay strategically to create a sense of space and depth within the mix.
  • Experiment with different types of modulation effects, like chorus or flanger, to add movement and width to instruments.
  • Use distortion or saturation effects subtly to add warmth or edge to specific elements, providing them with character and presence.

2. Automation:

Automation involves changing parameters over time to create dynamic shifts and enhance the emotional impact of a mix. Here are some tips for effective automation:

  • Automate volume levels to emphasize certain parts or bring attention to a particular instrument during important sections of the song.
  • Adjust the panning of instruments using automation to create movement and width, adding depth and dimension to the mix.
  • Automate effect sends to control the intensity or presence of effects on specific parts or individual tracks.

Mastering Best Practices

Mastering is the final step in the music production process. It is the stage where the audio engineer fine-tunes the mix to ensure it sounds polished, balanced, and professional. The goal of mastering is to bring out the best qualities of a song, making it ready for distribution and playback on any system. When it comes to mastering, there are several best practices that audio engineers follow. In this article, we will explore some of the essential techniques used in mastering, including equalization and dynamic range control.

Equalization Techniques

Equalization, often referred to as EQ, is a vital tool in the mastering process. It allows audio engineers to adjust and shape the frequency response of a song. EQ helps in enhancing the clarity, balance, and tonality of individual elements within a mix. By using EQ, audio engineers can emphasize certain frequencies or reduce unwanted ones, ensuring that each instrument and vocal sits well within the mix.

There are various equalization techniques employed during mastering:

  • Broad EQ: This technique involves making subtle adjustments to the overall frequency balance of the mix. It helps in correcting any imbalances and ensuring a smooth and cohesive sound.
  • Narrow EQ: For specific issues like resonant frequencies or harshness, narrow EQ is used. It allows audio engineers to target specific problem areas and fix them without affecting the rest of the mix.
  • Mid-Side EQ: With mid-side EQ, audio engineers have the ability to control the balance between the center and the sides of a mix. This technique is useful for widening the stereo image or enhancing the focus of the vocals.

Dynamic Range And Loudness

Dynamic range refers to the difference between the softest and loudest parts of a song. Maintaining an appropriate dynamic range is crucial in mastering as it ensures that the song does not sound overly compressed or lack depth. Audio engineers utilize various techniques to control the dynamic range and achieve optimal loudness levels, such as:

  1. Compression: Compression is a popular technique used in mastering to control the dynamic range. It helps in reducing the volume of the loud parts while maintaining the overall balance of the mix. By carefully applying compression, audio engineers can enhance the sustain, control peaks, and create a more polished sound.
  2. Limiting: Limiting is a technique used to prevent the audio from exceeding a predetermined loudness level. It effectively acts as an invisible ceiling, ensuring that the loudest parts of the song do not clip or distort. Limiting helps in achieving a consistent and commercially competitive volume for the final mix.
  3. Normalization: Normalization adjusts the overall volume of a song to a specified level. It is commonly used to ensure that multiple songs have a consistent volume level, especially when listening to an album or playlist. Normalization does not affect the dynamic range but rather brings all the songs to a similar perceived loudness.

Mastering, when done correctly, can elevate a song to its full potential. By employing equalization techniques and controlling the dynamic range, audio engineers ensure that the mix sounds balanced, clear, and optimized for all playback systems. These best practices play a crucial role in delivering a professional and impactful musical experience.


Frequently Asked Questions On What Does It Mean To Mix And Master A Song

What Does It Mean To Master Your Song?

Mastering your song means fine-tuning its audio, ensuring balance, clarity, and consistency for optimal sound quality. It involves adjusting levels, EQ, compression, and adding final touches for a polished and professional sound.

What Does Mix Master Mean In Music?

A mix master in music refers to a skilled sound engineer or producer who specializes in blending and enhancing audio tracks.

How Do You Master Mix Music?

To master mix music, focus on balancing levels, EQ, and effects for a cohesive sound. Use reference tracks and practice regularly.

Is Mastering Easier Than Mixing?

Mastering is generally considered easier than mixing. It involves final touches to enhance audio quality and ensure consistency. Mixing, on the other hand, is more complex, involving blending individual tracks to create the final mix. Both are crucial for a polished sound.

Conclusion

The mixing and mastering process is a crucial step in creating high-quality music. Understanding the differences between the two and their individual roles is essential for achieving a professional sound. By working with skilled professionals or learning the techniques yourself, you can ensure that your music reaches its full potential.

Categories
Archive

Amazon Pay Per Stream: Unlocking the Power of Music Monetization

Amazon Pay Per Stream pays artists based on the number of streams their music receives on the platform in a concise manner. Artists earn a fraction of a cent per stream, resulting in revenue based on the total number of streams.


This payment model can provide artists with a steady income stream as their music gains popularity on Amazon Music.


Introduction To Amazon Pay Per Stream

In the digital age, Amazon Pay Per Stream is revolutionizing how artists and creators get paid for their music and content.

What Is Amazon Pay Per Stream?

Amazon Pay Per Stream is a payment model where content creators earn revenue based on the number of streams their music or content receives.

How Does It Differ From Traditional Streaming Models?

  1. Direct Revenue: Content creators earn money based on the actual number of streams, unlike traditional streaming models.
  2. Transparency: Amazon Pay Per Stream offers clear insights into earnings per stream, providing transparency to creators.
  3. Fair Compensation: Artists receive fair compensation for their work as the payment is directly tied to stream counts.

Benefits For Artists And Labels

Amazon Pay Per Stream offers numerous benefits for artists and labels, providing a platform for monetizing their music and connecting with their fan base. From maximizing revenue potential to direct fan engagement, this service has the potential to revolutionize the way musicians interact with their audience.

Maximizing Revenue Potential

With Amazon Pay Per Stream, artists and labels have the opportunity to generate income through the streaming of their music. This payment model ensures that artists are rewarded for each individual playback of their songs, providing a steady revenue stream that can grow with the popularity of their music.

Direct Engagement With Fans

One of the most significant advantages of Amazon Pay Per Stream is the direct engagement it allows artists and labels to have with their fans. By offering their music through this platform, musicians can interact with their audience, build a loyal fan base, and gather insights into their listeners’ preferences. This direct connection fosters a deeper connection between artists and fans, leading to increased support for their work.

Navigating Challenges And Opportunities

As Amazon Pay Per Stream continues to reshape the landscape of music consumption, it presents both challenges and opportunities for artists, content creators, and listeners alike. In this article, we will explore two key aspects of this phenomenon – the impact on music consumption habits and the delicate balance between monetization and audience reach.

Impact On Music Consumption Habits

Amazon Pay Per Stream has fundamentally changed the way people listen to music. With the ability to stream their favorite songs instantly, listeners now have access to an unbelievable variety of music at their fingertips. This shift has revolutionized music consumption habits, as people are no longer bound by physical albums or limited radio rotations.

The convenience and affordability of streaming services have propelled the growth of subscription-based music platforms. With Amazon Pay Per Stream at the helm, listeners are empowered to discover new genres, artists, and songs effortlessly.

Additionally, personalized recommendations based on listening history and preferences have further enhanced the overall music discovery experience.

Balancing Monetization With Audience Reach

While artists and content creators appreciate the visibility and exposure that Amazon Pay Per Stream can bring, finding a balance between monetization and audience reach remains a challenge.

On one hand, streaming platforms offer a vast reach to global audiences, giving artists the opportunity to connect with a larger fan base. The potential for increased exposure, brand recognition, and even live performance opportunities for emerging artists is unparalleled.

On the other hand, streaming services also encounter criticism for the royalties paid to artists. With an ever-expanding catalog, the challenge lies in ensuring that artists receive fair compensation for their work while maintaining a sustainable streaming model.

This delicate balance requires continuous dialogue and collaboration between streaming platforms, artists, and industry stakeholders to establish a system that fairly rewards creators while providing affordable and accessible music to listeners.

In conclusion, the rise of Amazon Pay Per Stream presents exciting opportunities for music lovers and creators. As the industry navigates the challenges associated with this new era of music consumption, it is imperative to strike a balance that supports both artistic expression and economic sustainability.

The Future Of Music Monetization

Trends In Pay Per Stream Models

The music industry has experienced a significant shift in recent years, with digital music streaming platforms becoming the primary mode of music consumption. With this shift, the traditional revenue models for musicians and artists have also undergone a transformation. One of the emerging trends in the music industry is the introduction of pay per stream models, where artists are compensated based on the number of streams their music receives. This model has gained popularity due to its potential for providing a more transparent and fair method of monetizing music.

With pay per stream models, artists can earn revenue directly from their music in a way that aligns more closely with the value it generates. Instead of relying on album sales or digital downloads, artists now have the opportunity to earn income with every stream their music receives. This shift in monetization presents a significant opportunity for independent artists and emerging talent who may not have access to traditional revenue channels.

Moreover, pay per stream models enable artists to connect directly with their audience and gain valuable insights into their music consumption habits. Streaming platforms like Amazon Music provide artists with detailed data on the number of streams, listener demographics, and geographic locations. Armed with this information, artists can make better-informed decisions about their marketing strategies, tours, and collaborations.

Innovations And Potential Disruptions

As the music industry continues to evolve, innovations and potential disruptions are bound to arise in pay per stream models. One notable development is the integration of blockchain technology to enhance transparency and streamline royalty payments. By leveraging blockchain, artists can ensure accurate and timely compensation, reducing the need for intermediaries in the payment process.

Another area of innovation is the exploration of tokenization as a means of monetizing music. Tokenization involves creating unique digital tokens that represent ownership or access rights to music. This approach opens up new possibilities for artists to engage directly with their fans, offering exclusive content, and creating a sense of ownership in the music itself. By tokenizing music, artists can tap into a dedicated community of supporters while also generating revenue.

However, potential disruptions to pay per stream models may arise from shifts in consumer behavior or technological advancements. The rise of voice-controlled smart devices, for example, could lead to changes in how people access and listen to music. Streaming platforms will need to adapt to these new interfaces and ensure a seamless user experience.

Furthermore, as the music streaming landscape becomes even more crowded, platforms will need to differentiate themselves by offering unique features and tailored experiences for listeners. This could involve personalized playlists, curated content, and immersive audio experiences. By staying ahead of these trends and expectations, streaming platforms can continue to attract users and drive engagement.


Frequently Asked Questions Of Amazon Pay Per Stream

How Much Does 1,000 Streams Pay?

1,000 streams typically pay around $4 to $7, depending on the streaming platform and location.

How Many Music Streams Does It Take To Make $100?

It typically takes around 50,000 music streams to earn $100 from streaming platforms, such as Spotify or Apple Music.

What’s The Highest Paying Streaming Service?

HBO Max is the highest paying streaming service. With exclusive content and premium features, it offers top earnings for creators.

How Much Does Amazon Unlimited Music Pay Per Stream?

Amazon Unlimited Music pays an average of $0. 004 per stream, but the actual amount can vary.

Conclusion

Amazon Pay Per Stream offers a lucrative opportunity for artists. With its transparent payment system and vast audience reach, it provides a promising platform for artists to monetize their music. As the streaming landscape continues to evolve, Amazon’s model holds the potential to offer fair compensation and increase artist earnings.