Categories
Archive

How To Gain Stage Confidence: Proven Techniques

To gain stage presence, master your material and practice regularly. Engage with your audience through eye contact and body language.


Mastering stage presence is an essential skill for any performer, public speaker, or individual who finds themselves in the spotlight. It involves conveying confidence, connecting with the audience, and delivering your message with impact. This begins with a deep familiarity with your material, ensuring that its delivery appears effortless.


Regular practice, both in private and before smaller audiences, fine-tunes your performance. Confidence emerges not only from what you say but how you say it; your body language, eye contact, and movement across the stage all play critical roles. Effective stage presence can captivate an audience, make your delivery more compelling, and leave a lasting impression on those who witness your performance. Remember, a comfortable and polished delivery transforms good content into a great presentation.


The Impact Of Stage Fright

Imagine stepping onto the stage, lights beaming down, an audience awaiting your performance. Excitement fills the air, but so does the grip of stage fright. This tension is a common hurdle for many performers, affecting novices and veterans alike. Its impact extends beyond a fleeting moment of nervousness, often leading to a series of physical symptoms and mental barriers that can hinder stage confidence.

Physical Symptoms Of Performance Anxiety

Stage fright manifests in various physical symptoms that can be quite unsettling. These bodily reactions directly impact a performer’s ability to deliver their best. Below are common signs of performance anxiety:

  • Rapid heartbeat that can cause discomfort.
  • Sweaty palms making it hard to grip instruments.
  • Trembling hands or voice affecting performance quality.
  • Difficulty breathing, leading to vocal strain.
  • Nausea that distracts and discomforts.

Mental Barriers To Stage Confidence

Mental hurdles often accompany the physical signs of stage fright. They create invisible walls that can stop performers from expressing their true potential. Common mental barriers include:

  1. Fears of judgment or embarrassment.
  2. Worries about forgetting lines or choreography.
  3. Negative self-talk that undermines confidence.
  4. Overwhelming focus on perfection at the expense of enjoyment.

Addressing both physical and mental aspects of stage fright is crucial for gaining stage confidence. With effective strategies, performers can transform their fears into fuel for a memorable and enjoyable stage presence.

Technique 1: Deep Breathing Exercises

‘Technique 1: Deep Breathing Exercises’ unlocks the gateway to calmness. Conquer stage fright with this simple tool. The key lies in regular practice; build a fortress against nervousness. Breathe right, perform better – let’s learn how.

Mastering Diaphragmatic Breathing

Mastering diaphragmatic breathing is your first step. This technique fills your lungs, maximizes airflow, and calms your nerves. Let’s explore:

  1. Sit or stand comfortably, spine straight.
  2. Place one hand on your chest, another on your belly.
  3. Inhale slowly through your nose. Feel your belly rise, not your chest.
  4. Exhale slowly through your mouth. Belly falls, stress fades.
  5. Repeat for 3 to 5 minutes, focus on the rhythm.

Integrating Breathwork Into Daily Routine

Make deep breathing a daily habit. Consistency builds confidence and reduces stage fear. Follow these tips:

Time Activity
Morning A few minutes after waking up.
Breaks Between work or study sessions.
Evening Before sleep to unwind.

Embed this ritual in the morning, during breaks, and before bed for maximum ease on stage.

Technique 2: Visualization Success

Technique 2: Visualization Success harnesses the power of your mind to prepare for an outstanding performance. This mental tactic involves picturing your success before stepping onto the stage. Let’s explore this valuable process further.

Creating A Mental Blueprint

Picturing every stage detail in your mind forms a mental blueprint. It’s like having a map. You need it to know where you’re going. Start by envisioning the venue. See yourself walking onto the stage. Feel the lights on your face. Hear the crowd’s applause. This blueprint lays the foundation for your confidence.

Regular Practice Of Visualization

Practice makes perfect, right? It’s true for visualization too. Integrate this practice into your daily routine. Find a quiet spot. Close your eyes. Take deep breaths. Picture your success for 10 minutes. See yourself performing flawlessly. Feel the joy of the audience’s cheer. This daily habit sharpens your focus and boosts performance. Let’s break it down with these steps:

  • Choose a Time: Same time, every day. Your mind gets ready to picture success.
  • Quiet Space: Find a spot with no noise. This helps your focus stay strong.
  • Consistent Practice: Do it daily. Over time, your mind gets really good at it.

Technique 3: Progressive Muscle Relaxation

Feeling frazzled before hitting the stage? Technique 3: Progressive Muscle Relaxation can be your secret weapon. This method gently eases tension, leaving your body calm and ready for a standout performance.

Understanding Muscle Tension Release

Stress can cause muscles to contract, making movements stiff while on stage. Progressive Muscle Relaxation (PMR) tackles this issue head-on. By systematically tensing and relaxing different muscle groups, PMR helps loosen the grip of stress, promoting a sense of tranquility that can vastly improve stage presence.

Step-by-step Guide To Muscle Relaxation

  1. Find a quiet place where you won’t be disturbed.
  2. Start by taking deep breaths to set a calm tempo.
  3. Tense each muscle group for about five seconds, then release.
  4. Notice the sensation of relaxation that follows tension.
  5. Move through muscle groups in a sequence: feet, legs, abdomen, arms, and so on.
  6. Visualize stress melting away with each cycle of tension and release.
  7. Repeat the process until you’ve covered all major muscles.
  8. End with a few moments of stillness, enjoying the relaxed state.

Practice PMR regularly to master the art of relaxation. With each session, climbing onto the stage will feel more like stepping into your comfort zone.

Technique 4: Practice Makes Perfect

Mastering the art of performance takes more than just talent. Technique 4: Practice Makes Perfect plays a crucial role in becoming a seasoned performer. Consistent and focused practice elevates skills and builds onstage confidence. This technique is not just about repeating actions but improving with each session.

Building Confidence Through Rehearsal

Repetition is the mother of skill. Rehearsing the same act multiple times ingrains it into memory. It ensures that every movement and word becomes second nature. This preparation builds a solid foundation for confidence. Performers can focus on expression, not just execution.

  • Memorize your material completely.
  • Repeat until movements feel natural.
  • Refine your pace and timing.

The Role Of Mock Performances

Mock performances are dress rehearsals in front of a select audience. They serve as valuable practice runs. Feedback from these sessions can be transformative. Mock performances highlight areas needing improvement before the main event.

Benefits of Mock Performances Examples
Real-time Feedback Comments from friends or mentors
Pressure Handling Practicing under stage-like stress
Adjustment Opportunity Modifying performance based on reactions

Incorporate regular mock performances into practice sessions. They transform theoretical knowledge into practical experience. Take each comment seriously and work on it before the spotlight hits.


Technique 5: Cognitive Restructuring

Embracing the spotlight can evoke a mix of emotions. Among those, fear often takes center stage, inadvertently affecting your performance. Technique 5: Cognitive Restructuring is a powerful tool in your arsenal to combat performance anxiety. It revolves around identifying and altering negative thinking patterns. These patterns can cripple confidence and undermine stage presence. Cognitive restructuring empowers you to challenge and change these thoughts.

Challenging Negative Thoughts

Negative thoughts can distort reality, affecting how you perceive your abilities. By challenging these thoughts, you can see things clearly. Start by writing down negative thoughts that arise. Ask yourself, “Is this thought based on facts or just my feelings?” Practicing this will help you recognize and separate irrational thoughts from your true capabilities.

  • Identify the negative thought.
  • Assess its accuracy.
  • Ask for evidence of this thought.

Replacing Fear With Constructive Criticism

Once you challenge your negative thoughts, it’s time for replacement. Swap out destructive criticism for constructive feedback. Constructive criticism is specific, actionable, and focused on improvement. Keep a journal to document your thoughts and progress. This methodical approach will gradually reduce your fears and amplify your confidence.

  1. Pinpoint the thought to change.
  2. Develop a more positive outlook.
  3. Maintain a journal for persistent tracking.


Harnessing The Power Of Body Language

Harnessing the Power of Body Language is a game-changer on stage. When you step into the spotlight, your words matter. Yet, it’s your body that speaks volumes before you even make a sound. Master your body language. Engage your audience. Transform your stage presence. Let’s explore how to use this silent language to captivate and convey confidence with every move you make.

Using Posture To Project Confidence

Your posture is a pillar of strength on stage. Stand tall and command the space. Picture an invisible string pulling you up from the top of your head. This simple imagery aligns your spine, levels your shoulders, and opens your chest. It broadcasts a signal of assurance and authority. Maintain this posture whether you’re standing still or moving across the stage. It tells everyone you’re confident and in control.

  • Stand firmly, weight balanced equally on both feet
  • Shoulders back and down, chest open
  • Head held high, chin parallel to the ground

The Importance Of Eye Contact And Gestures

Eye contact is a bridge that connects you to your audience. It’s a sign of respect and an invitation to listen. Maintain eye contact with different people for about three seconds at a time. It makes each person feel recognized and valued. Balanced with purposeful gestures, eye contact can spotlight key points and maintain interest.

Feature Benefit
Consistent Eye Contact Builds trust and engagement.
Expressive Gestures Highlights important ideas, adds energy.

Your hands tell a story too. Gestures should harmonize with your words. They emphasize your points and keep your audience locked in. Keep movements fluid and natural to match the tone of your message. Avoid rapid or repetitive motions that can distract. Gestures and eye contact are the subtle tools that, when used wisely, can powerfully underscore your spoken words.


Seeking Constructive Feedback

Everyone aiming for success on the stage needs feedback. It helps you grow. It pushes you forward. Let’s explore how to welcome feedback and use it to your advantage.

Learning From Criticism

Listening is key. When you get feedback, listen. Really listen. Don’t argue. Don’t make excuses. Just hear what others say about your performance. They see things you might miss. Make notes if you need to.

  • Ask specific questions. This gets you detailed feedback. Not just “It was good” or “It was bad.”
  • Thank them. Even if it’s hard to hear, thank the person. They took time to help you.

Reflect on what they say. Take your time. Think about the feedback. See where they’re coming from. Choose what to work on. Remember, not all feedback will fit. Use what helps you improve.

Building A Support System

Surround yourself with people who want your success. Find friends, family, teachers, or mentors who support you. They will give honest, helpful feedback. Be open with them. Share your goals and fears.

  1. Create a feedback circle. Pick a small group. Meet regularly. Share your progress. Get their thoughts.
  2. Embrace their diversity. Different people see things in unique ways. That’s good. You get a mix of perspectives.
  3. Set ground rules. Make sure feedback is always respectful and constructive.

Having a strong support system means you’re never alone. You have a team. They believe in you and want to see you on top.

Embracing The Journey To Confidence

Stepping into the spotlight is not just about bold leaps; it’s about recognizing the path to confidence as a series of steps. Those who excel on stage didn’t just wake up one day and decide to be confident. Instead, they embraced every moment of their journey, celebrating each tiny victory and establishing habits that foster growth. This section of our post dives into how you can do the same, building your confidence one day at a time.

Celebrating Small Victories

Behind every confident person on stage is a trail of small wins. Recognizing these moments is crucial. They prove that you are making progress. Even something as simple as practicing in front of a mirror or learning a new chord merits recognition. Here’s how to celebrate properly:

  • Keep a journal of your achievements.
  • Share your progress with friends or mentors.
  • Set mini-rewards for each completed goal.

Maintaining Momentum With Positive Habits

The journey to confidence is ongoing. What helps you continue? Positive habits. These actions set the foundation for your growth. Here are positive habits to maintain your momentum:

Positive Habit Benefits
Daily Practice Builds Muscle Memory
Visualization Techniques Enhances Performance
Goal Setting Keeps You Focused
How To Gain Stage Confidence: 5 Proven Techniques


Credit: www.briantracy.com


Frequently Asked Questions On How To Gain Stage


What Is Gain Staging In Audio Production?


Gain staging refers to the process of managing sound levels within each step of the audio signal path. It ensures optimal audio quality and prevents distortion by maintaining proper headroom.


Why Is Proper Gain Staging Important?


Proper gain staging is important as it preserves audio integrity, prevents noise and distortion, and provides the best signal-to-noise ratio. This leads to clean, clear recordings and mixes.


How Does One Achieve Optimal Gain Staging?


Optimal gain staging is achieved by carefully adjusting input and output levels at each stage. This includes your instrument, preamp, converters, and software faders to maintain a clean signal.


Can Improper Gain Staging Affect My Mixdown?


Yes, improper gain staging can greatly affect your mixdown by introducing noise or causing clipping. This results in a poor-quality final mix that may sound unprofessional.


Conclusion


Mastering the art of stage presence takes practice and dedication. Implement the tips shared throughout this post, and your confidence will soar. Remember, connecting with your audience is key. Keep honing your skills, and soon, you’ll captivate audiences with ease.


Ready to shine? Take that stage and make it yours!

Categories
Archive

Best De-Esser Plugins for Vocals

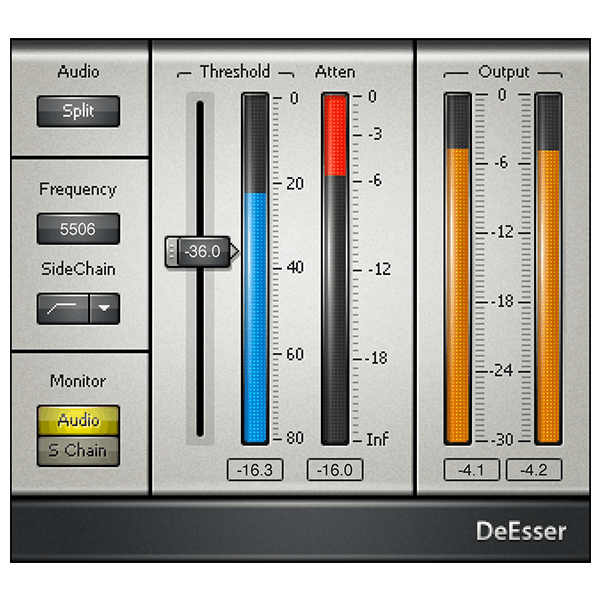
The FabFilter Pro-DS and Waves DeEsser rank among the best de-esser plugins available. These tools are essential for smoothing out harsh sibilance in vocal recordings.


Perfect vocals are essential in audio production, and one of the keys to achieving them is effective sibilance control. Enter de-esser plugins, designed specifically to tame those pesky, high-frequency ‘s’ and ‘t’ sounds that can distract the listener from your music’s overall quality.


Whether you’re mixing a podcast or polishing a vocal track for a song, the right de-esser can make a world of difference. Audio engineers and producers constantly seek top-tier plugins like the FabFilter Pro-DS for its precision and the Waves DeEsser for its ease of use and effectiveness. These plugins not only fix sibilance issues but do so without compromising the natural tonality of the vocal, ensuring a clean, professional sound. With a high-quality de-esser in your toolkit, you’re well on your way to producing clear and polished audio.

Best De-Esser Plugins: Top Picks for Pristine Vocals


Credit: www.adsrsounds.com


Introduction To De-essing

Audio clarity is critical for any recording, especially for vocals. De-essing is a process used to reduce the harsh “sibilant” sounds – like “s”, “sh”, or “z” – that can occur during singing or speaking. These sounds, known as sibilance, can cause distortion and discomfort in the listening experience. Implementing a de-esser helps smooth out these vocal imperfections without affecting the overall clarity and brightness of the recording.

The Role Of A De-esser

  • Targets specific frequency ranges: A de-esser functions by identifying and attenuating frequencies where sibilance typically lives.
  • Improves listener comfort: By controlling sibilance, a de-esser ensures a more pleasant listening experience.
  • Preserves natural sound: Rather than applying blanket compression, a de-esser works subtly to maintain vocal character.

Benefits For Vocal Recording

Applying a de-esser offers numerous benefits:

Benefit Description
Balanced Vocals Ensures vocal tracks are even and polished, avoiding distracting spikes in high frequencies.
Enhanced Clarity Reduces muddiness for crystal-clear articulation, making every word easily understandable.
Increased Versatility Allows recordings to easily fit into various mixes, fostering greater flexibility in post-production.

De-esser Plugin Fundamentals

Imagine smoothing out sharp, hissy sounds in recordings. De-esser plugins do just that. They are vital for clean audio production. In this section, let’s explore the nuts and bolts of de-essing.

How Does a De-Esser Work?

How Does A De-esser Work?

De-essers tame the harsh ‘s’ and ‘sh’ sounds in audio. They act like focused compressors. They pinpoint specific high frequencies. When these frequencies get too loud, the de-esser turns them down. Think of it as a targeted volume knob for sibilance.

Key Features To Look For

Choosing the right de-esser plugin is crucial. Look for these key features:

  • Frequency Range Adjustment: Lets you find the exact sibilant spot.
  • Threshold Control: Sets the level where de-essing kicks in.
  • Visual Display: Shows where and how much de-essing happens.
  • Stereo or Mid-Side Processing: Offers more control over the audio space.
  • Presets: Provides starting points tailored to various needs.

Top Rated De-esser Plugins

In the world of audio production, a crisp, clear sound is always the goal. De-esser plugins are crucial for removing harsh sibilance from vocal tracks, and professionals constantly seek the best on the market. The top-rated de-esser plugins combine user-friendly interfaces with powerful processing, ensuring your vocals are smooth and professional.

Industry Favorites

The battle for the best de-esser is fierce, with several contenders consistently leading the pack. Whether you’re fine-tuning a studio recording or cleaning up a live performance, these industry favorites stand out:

  • FabFilter Pro-DS: Known for its intelligent and transparent operation.
  • Waves DeEsser: A classic choice with precision controls.
  • iZotope RX Spectral De-ess: Offers spectral editing for detailed work.

Cutting-edge Features

What makes a de-esser plugin shine are features that push the envelope in audio processing. The cutting-edge functionalities that audio professionals love include:

  1. Split-band processing for targeted sibilance control.
  2. Real-time visual feedback for immediate corrective action.
  3. Machine learning algorithms to adapt to different voices.

These features ensure that your de-essing is not just effective but done with precision and ease.

Budget-friendly De-essers

Recording crisp audio is an art, but harsh ‘s’ sounds can spoil your masterpiece. High-quality de-essers can be pricey, but budget-friendly options exist. They can be gentle on your wallet and tough on those pesky sibilants. Let’s explore the affordable options that bring quality without the astronomical price tag.

Affordable Options

Top-tier de-esser plugins may offer a galaxy of features, but not all are essential. Affordable de-essers deliver core functionalities—precisely what you need to produce clean audio. Contrast between major de-esser plugins and budget-friendly ones shows you don’t always need to spend more for quality results.

  • TDR Nova – A dynamic equalizer that includes de-essing capabilities, striking a balance between simplicity and precision.
  • Spitfish – A straightforward de-esser, perfect for those who need a no-fuss solution.
  • Eareckon Eareverb 2 – Offers a versatile algorithm that can function as a de-esser when tweaked correctly.

Quality Without The Price Tag

Expensive doesn’t always mean better. Some de-esser plugins offer an incredible value proposition—robust performance at a fraction of the cost. These plugins rival their high-end counterparts with impressive precision and ease of use.

Plugin Key Features Price Range
Lisp Automatic sibilance control, adjustable detection threshold. Under $25
Esspresso Intuitive interface, frequency-focused sibilance targeting. Under $50
DeEsser by Klanghelm Ultra-responsive waveform display, dual-band targeting. Under $30

These plugins ensure that you don’t need to break the bank to remove unwanted hisses. Budget-friendly de-essers can be powerful allies in your audio editing arsenal. They help you polish your tracks without compromising on quality or draining your funds.

High-end De-esser Suites

Stepping into the realm of High-End De-Esser Suites, sound engineers and producers find a treasure trove of audio refining tools. These suites come packed with cutting-edge features designed to eliminate sibilance and preserve vocal quality. Such premium tools bring out the pure sound of vocals, ensuring a crystal-clear listening experience.

Professional-grade Plugins

At the pinnacle of sound editing technology, Professional-Grade Plugins stand out for their precision and efficiency. They offer:

  • High-resolution processing for subtle adjustments
  • Versatile controls to target specific frequency ranges
  • Different modes of operation tailored to various vocal performances

With these plugins, seasoned sound engineers gain the power to shape audio with meticulous detail.

Advanced User Capabilities

Advanced User Capabilities expand the possibilities of sound engineering. Users can:

  1. Access sophisticated analysis tools to diagnose issues
  2. Customize user interfaces for an optimized workflow
  3. Experiment with side-chain and parallel processing techniques

This fosters an environment where professionals can craft perfect vocals with confidence and skill.

Specialized De-essers

Specialized de-esser plugins cater to complex audio scenarios. Unlike standard de-essers, they offer refined controls. They tailor to specific issues such as sibilance in vocal tracks or high-frequency distortion.

Niche Focus

These tools shine in particular situations where general de-essers fall short. Let’s explore their targeted benefits:

  • Vocal production: Tailor de-essing for solo vocals or choirs.
  • Instrument isolation: Focus on specific instrument tracks.
  • Genre-specific presets: Setups for rock, pop, classical, and more.

Unique De-essing Solutions

Each specialized de-esser plugin comes with unique features. They help sound engineers achieve perfection. Here are some examples:

Plugin Name Unique Feature User Interface
Sibilance Stealth Dynamic frequency targeting Intuitive, easy navigation
Vocal Shine Enhancer Harmonic enhancement Graphic display of sibilance
Ess Control Pro Multi-band operation Customizable user presets

These plugins provide solutions well-suited for dealing with sibilance in high-resolution audio. They deliver precise control over problematic frequencies.

User Reviews And Testimonials

Diving into what actual users think about the top de-esser plugins can lead to valuable insights. Here, we’ll explore how these digital tools fare in real-world applications. First-hand experiences shed light on their ease of use, effectiveness, and overall satisfaction.

Real-world Opinions

User reviews often highlight personal experiences with these plugins. They give us a glimpse into daily use cases. Positive testimonials endorse specific features, such as the user interface or the subtlety of processing. Critiques, on the other hand, provide constructive feedback on areas like CPU usage and compatibility with various digital audio workstations (DAWs). Let’s look at some key opinions:

  • Intuitive controls make quick work for beginners and pros alike.
  • Veteran engineers praise the transparent sound quality.
  • Occasionally, concerns about presets not fitting all vocal types surface.

How They Perform In Mixes

Professional mixing and mastering engineers often share their experiences with de-esser plugins. Their testimony relates directly to the end product — polished and balanced tracks. Below, aspects that professionals highlight are quantified to give a clearer picture.

Plugin Name Performance Rating User Comments
DeEsser A 4.7/5 Excels in taming sibilance without affecting the high end.
DeEsser B 4.2/5 Users mention a slight learning curve but appreciate the versatility.
DeEsser C 4.8/5 A hit for its minimalistic approach and CPU efficiency.

Professionals stress the importance of a de-esser plugin that can perform well in various mixes. They prefer those with adjustable parameters that can precisely target sibilant frequencies without coloring the sound.

Best De-Esser Plugins: Top Picks for Pristine Vocals


Credit: www.iconcollective.edu


Integration With Daws

Let’s dive into the world of De-Esser plugins. A great tool, it blends into Digital Audio Workstations (DAWs) like salt in a soup. When picking the best De-Esser plugins, think about how they team up with your DAW.

Compatibility Considerations

Not all De-Esser plugins play nice with every DAW. Some are buddies with specific ones. Check the list below to see if your DAW and plugin are a match:

  • AAX – For Pro Tools lovers.
  • VST – Compatible with most DAWs out there.
  • AU – If you’re an Apple fan, this is your go-to.

Read the plugin’s specs to ensure a perfect fit. Your workflow will thank you.

Setting Up Your De-esser

Once you got the right plugin, setup is a breeze. Follow these easy steps:

  1. Open your DAW and find the plugin manager.
  2. Scan for new plugins if it’s not showing up.
  3. Drag and drop the De-Esser onto your vocal track.
  4. Tweak the settings to kiss those harsh ‘s’ sounds goodbye.

The right De-Esser can make your vocals shine. It’s like having a magic wand for your audio!

A/b Testing De-esser Plugins

Choosing the right de-esser plugin can be crucial for crisp, clean vocal tracks. A/B testing de-esser plugins ensures you find the perfect fit for your sound. The process is simple: apply different de-essers to the same audio and compare. Let’s delve into practical ways to set up your tests and accurately hear the differences.

Practical Comparisons

The key to effective A/B testing lies in consistency. Start by loading two de-esser plugins onto separate tracks. Ensure both tracks have identical audio. Now, let’s prepare a setup for easy comparison:

  • Match Levels: Adjust the output levels so they’re the same. This keeps volume changes from biasing your perception.
  • Instant Switching: Map a key to switch between tracks quickly. Immediate switching helps identify subtle differences.
  • Blind Testing: Hide the plugin names. Making decisions based on sound rather than brand is important.

Create a scenario where the only variable is the de-esser itself. Document your observations to reference later.

Hearing The Difference

The real test is in our hearing. Train your ears to distinguish nuances:

  1. Focus on sibilant sounds. Listen for harsh ‘s’ and ‘t’ sounds and how each plugin handles them.
  2. Note the transparency. A great de-esser should reduce esses without impacting other frequencies.
  3. Assess the artifacting. Listen for any unnatural sounds introduced by the de-essing process.

Remember, the goal is a natural-sounding vocal. Trust your ears; they are your best tool.

Assign specific listening sessions and rest your ears in between. Fresh ears provide more reliable judgments.

Through practical comparisons and focused listening during A/B tests, you’ll confidently select the best de-esser plugin that suits your needs.

Best De-Esser Plugins: Top Picks for Pristine Vocals


Credit: www.waves.com


Optimizing Plugin Performance

Getting the most out of your de-esser plugins means having them perform at their peak. Key to that is fine-tuning settings and understanding the tools at your disposal. We’ll guide you through essential best practices and address any common issues you might face.

Best Practices

Implement ideal settings for the specific vocal track you’re working on. No one-size-fits-all setting exists. Start with presets and tweak as necessary.
Analyze your audio to identify problematic frequencies before applying the de-esser.

  • Use high-quality recordings to ensure the de-esser can perform effectively.
  • Keep an eye on CPU usage. Running multiple plugins can slow down your system.
  • Match attack and release times to the dynamics of your vocal to maintain naturalness.

Combine de-essing with complementary plugins like EQs and compressors for a clean mix. Chain them correctly to avoid signal processing conflicts.

Troubleshooting Common Issues

If you encounter problems, start by checking these common areas:

Issue Solution
Excessive sibilance persists Adjust threshold and frequency range or try a different de-esser plugin.
Audio artifacts appear Reduce de-essing intensity or increase attack time.
CPU overload occurs Limit the number of active plugins and optimize buffer size.
Natural vocal quality is lost Use a less aggressive setting and automate de-essing only where needed.

For stubborn issues, consider manual de-essing techniques such as volume automation or spectral editing. Always ensure your plugin is compatible with your digital audio workstation and that you are running the latest version to prevent glitches.

Frequently Asked Questions For Best De Esser Plugins


What Are De-esser Plugins Used For?


De-esser plugins are specialized audio tools. They reduce sibilance in vocal tracks. Sibilance consists of harsh ‘s’ and ‘t’ sounds. These plugins help to achieve a smoother vocal performance in recordings.


Which De-esser Plugins Do Professionals Recommend?


Professionals often recommend FabFilter Pro-DS, Waves DeEsser, and iZotope RX’s spectral de-ess. These plugins are known for their precision and ease of use. They cater to both studio and live sound applications.


How Do De-esser Plugins Improve Vocal Recordings?


De-esser plugins target and diminish excessive high-frequency sounds. They maintain the natural tone of the vocal. This ensures clarity without the distracting harshness sibilants can cause in recordings.


Can De-essers Be Used On Non-vocal Tracks?


Yes, de-essers can also be applied to non-vocal tracks. They control high-frequency harshness in cymbals, guitars, or any instrument. This versatility makes them valuable tools in audio mixing and mastering.


Conclusion


Navigating the sea of de-esser plugins can be overwhelming. But now you have a solid starting point with the best in the business. Remember, a clear, sibilance-free mix is within reach. Your perfect vocal track awaits, and one of these top de-esser plugins could be the key.


Happy mixing!


Categories
Archive

What Is Sibilance In Audio: Unraveling Sharp Sounds

Sibilance in audio refers to the pronounced “sshh” or “s” sounds in speech recordings. It often results from high-frequency resonances and can be perceived as a harsh or piercing sound.


Sibilance can detract from the listening experience by drawing attention to the “s,” “sh,” or “ch” sounds that seem overly prominent or sharp. This effect occurs predominantly in vocal tracks and can be problematic in both recording and playback of audio content.


Effective recording techniques, microphone placement, and post-production tools like de-essers are essential in managing sibilance. Producers and sound engineers focus on ensuring sibilance doesn’t detract from the clarity and quality of the audio, particularly in music and spoken word productions.


Sibilance In Audio: The Basics

Imagine listening to your favorite song. You love the clear vocals. But sometimes, sounds like ‘sss’ seem too sharp. This is sibilance in audio. It’s common in recordings. In this blog, we’ll look at why sibilance happens and how to spot it.

Defining Sibilance

Sibilance refers to a specific hissing sound. It comes when someone says words with ‘s’, ‘sh’, or ‘z’. These sounds can sometimes be too loud in recordings. This makes listening less enjoyable. We hear sibilance more in microphones and speakers.

Sibilant Sounds Characterization

Sibilant sounds share unique features:

  • High frequency: They live in the 2-10 kHz range.
  • Sharp: They can sound piercing to our ears.
  • Stand out: They often sound louder than other sounds.


These characteristics can cause discomfort to listeners. For a great audio experience, we adjust sibilance. We use tools and techniques in audio editing to fix it.

What Is Sibilance In Audio: Unraveling Sharp Sounds


Credit: www.amazon.com


Causes Of Sibilance

The sibilance in audio can be jarring, turning a smooth listening experience into a sharp and unpleasant one. Understanding its causes is vital to producing cleaner sound. Here we delve into what sparks this hissing phenomenon.

Microphone Techniques

Sibilance often starts at the source – the microphone. Certain techniques can lead to an excessive sibilant sound:

  • Close Proximity: Standing too close to the microphone boosts high frequencies.
  • Off-Axis Positioning: Misaligning the microphone with the sound source affects sound capture.
  • Improper Pop Filter Use: Pop filters help, but if not used correctly, sibilance slips through.

Recording Environments

The recording space plays a crucial role in the quality of the audio:

  • Reflective Surfaces: Hard walls and floors reflect high-frequency sounds, amplifying sibilance.
  • Background Noise: Unexpected high-pitched noises from the environment can be mistaken for sibilance.
  • Room Size and Shape: These dictate how sound waves travel and can enhance sibilant frequencies.

Common Sibilant Sounds

If you love crisp, clear audio, understanding sibilance is key. Sibilance refers to the hissing sounds that sometimes occur. These sounds can distract listeners. Recognizing common sibilant sounds helps us reduce unwanted noise. Let’s explore what they are.

Examples From Speech

Sibilant sounds are common in speech. They come from consonants. Examples include:

  • ‘S’ as in “sun”
  • ‘SH’ as in “she”
  • ‘Z’ as in “zebra”
  • ‘CH’ as in “chase”
  • ‘J’ as in “juice”

Frequency Ranges Affected

Sibilant sounds live in high frequencies. They mostly affect 4kHz to 8kHz. This table shows the ranges:

Consonant Low Range (kHz) High Range (kHz)
‘S’ 4 kHz 8 kHz
‘SH’ 2 kHz 6 kHz
‘Z’ 1 kHz 5 kHz
‘CH’ 3 kHz 7 kHz
‘J’ 1 kHz 4 kHz

The right balance makes speech clear. If these sounds are too loud, they hurt our ears. If too quiet, words sound muffled. With a good mix, audio sounds pleasant.

Impact Of Sibilance On Audio Quality

Sibilance in audio can significantly affect the listening experience. It refers to those sharp “s”, “sh”, and “z” sounds that stand out unpleasantly in recordings. Not only does it cause listener discomfort, but it can also detract from the overall clarity of music and speech. Proper understanding and control of sibilance are therefore crucial for high-quality audio production.

Listener Fatigue

Excessive sibilance often leads to listener fatigue. When the ear is bombarded with too many sharp, high-pitched tones, the listening experience becomes tiring. This discomfort often prompts listeners to reduce their listening time, affecting their enjoyment and engagement with the audio content.

Clarity In Music And Speech

Clarity in music and speech is essential for a pleasurable audio experience. Sibilance, when poorly managed, can cause words and notes to blend, making them difficult to distinguish. For vocal performances and podcasts, reducing sibilance enhances intelligibility, ensuring the listener catches every word and the intended emotion.

  • Sharper sounds interfere with audio harmony
  • Understanding lyrics and dialogue becomes harder
  • Sibilance control ensures clean, crisp audio

Detecting Sibilance In Audio Recordings

Detecting sibilance in audio recordings is critical for producing clear and high-quality sound. Sibilance refers to the intense ‘sss’ or ‘shh’ sounds that can cause distortion and affect the listening experience. Audio engineers and editors often seek ways to identify and minimize this phenomenon.

Auditory Cues

Listening is key to identifying sibilance. It often appears during consonant sounds like ‘s’, ‘z’, and ‘sh’. These sounds can be jarring and excessively prominent. Here’s how you can detect them:

  • Focus on the high-end frequencies, where sibilance lives.
  • Listen for sharp, hissing sounds that stand out.
  • Notice if these sounds cause discomfort or fatigue over time.

Visualizing With Spectrograms

Audio editing software features spectrogram displays to help visualize sibilance. These tools can be incredibly helpful:

Function Description
Frequency Analysis Shows the intensity of frequencies in the audio.
Sibilant Zones Highlights areas where ‘s’ sounds are dominant.
Temporal Resolution Maps sibilance over time to pinpoint issues.

By combining both auditory and visual methods, professionals can accurately detect and address sibilance in audio recordings.

Tools For Controlling Sibilance

Sibilance in audio refers to the intense ‘s’ or ‘sh’ sounds that can cause a hiss or harshness in recordings. It can distract listeners from the message of audio content. Professionals use several tools to manage sibilance and enhance audio quality.

De-essers Explained

A de-esser is a specialized tool to target and reduce sibilance. It works by identifying high-frequency sounds that cause harshess.

  • De-essers can be hardware or software-based.
  • Threshold and range are key settings to adjust.
  • Users can set the frequency to target specific sibilant sounds.

Dynamic Eq And Multiband Compression

Dynamic EQ and Multiband Compressors are advanced tools for controlling sibilance.

Dynamic EQ adjusts specific frequencies dynamically. It can reduce unwanted frequencies only when they are detected.

  1. Select the sibilant frequency range.
  2. Set the threshold so it engages during sibilant sounds.
  3. Compression will be applied based on detected sibilance.

Multiband Compression divides the audio spectrum into various bands. You can process each band independently.

  • It allows for precise control over sibilant frequency ranges.
  • Compress the problematic band without affecting other sounds.


Techniques For Minimizing Sibilance During Recording

Sibilance in audio can be a pesky issue for any recording professional. It’s that hissing sound when someone pronounces ‘s’ and ‘sh’ sounds. It can distract listeners from the message of the recording. Let’s explore some effective techniques to reduce sibilance during recording.

Mic Placement Best Practices

The first step to managing sibilance starts with mic placement. By positioning the microphone carefully, you can significantly lessen unwanted sibilant sounds.

  • Avoid direct speech flow towards the mic. Aim it slightly off-axis from the mouth.
  • Place the mic below the mouth. This captures a fuller sound and less sibilance.
  • Keep a proper distance. Too close can enhance sibilance; too far can weaken vocals.

Pop Filters And Their Role

Pop filters are essential tools in battling sibilance.

They serve as a barrier between the mic and the artist, eliminating sharp breath sounds.

  1. Attach a pop filter 2 to 6 inches from the mic.
  2. Ensure it’s secure and covers the entire mic front.
  3. Choose a double-layered filter for better sibilance control.

Post-production Processes

After recording, audio needs polishing to reach its full potential. This is where post-production comes into play. Post-production is where unwanted sounds get removed, and the audio quality improves. One common issue dealt with after recording is sibilance. Sibilance refers to a hissing sound that can occur when someone speaks. It often happens with words that contain ‘s’ or ‘sh’ sounds. Proper techniques during post-production can reduce or remove sibilant sounds, making the audio much more pleasant to listen to. Let’s explore the tools and techniques that help in this process.

Editing Software Options

Selecting the right editing software is crucial. Various options offer different tools to tackle sibilance. Here are some popular choices:

  • Audacity: A free, open-source option suitable for basic de-essing.
  • Adobe Audition: A professional suite with advanced features.
  • Pro Tools: Widely used in the industry, known for precision.
  • Logic Pro: A favorite among Mac users, it offers comprehensive functions.

Manual Vs. Automatic De-essing

De-essing can be done manually or automatically, each with pros and cons:

Method Pros Cons
Manual De-Essing Customized control, precise adjustments. Time-consuming, requires skill.
Automatic De-Essing Quick, easy for beginners. Less control, can affect audio quality.

Manual de-essing involves listening to the track and adjusting sibilant sounds individually. Automatic de-essing uses a plugin that detects and reduces sibilance. Skilled editors might prefer manual de-essing for its precision. Beginners or those with limited time might opt for automatic processors.

Real-world Applications And Case Studies

Exploring real-world applications of sibilance, we dive into its impact on audio clarity. Case studies and everyday scenarios give us insight into how sibilance can make or break audio quality. Let’s delve into specific fields where sibilance handling is crucial.

Sibilance Handling In Podcasting

Podcasters are storytellers. They rely on clear audio to connect with listeners. Yet, sibilant sounds can distract and annoy audiences. Effective sibilance management ensures a smooth listening experience. Here’s how professionals tackle it:

  • Using pop filters to minimize plosives and sibilance.
  • Applying de-essing plugins during post-production.
  • Adjusting mic angles and distances to reduce harsh ‘s’ sounds.
  • Regularly testing audio setups for sibilance issues.

Case studies show that these techniques vastly improve podcast quality. Listeners stay tuned in, without being sidetracked by audio imperfections.

Sibilance In Vocal Performances

Singers face the challenge of expressing emotion with clarity. Sibilance can overshadow lyrical beauty. Professionals use various methods to overcome this:

  • Expert vocal coaching to control sibilance.
  • Strategic microphone selection and placement.
  • Sound engineers applying dynamic processing tools.
  • Live feedback loops for on-the-spot adjustments.

Successful cases demonstrate a notable increase in audience engagement and appreciation. Vocalists deliver performances without the distraction of sibilant sounds.

Best Practices For Consistent Audio Quality

To achieve pristine audio quality, understanding and mitigating sibilance is crucial. Sibilance refers to the hissing sounds that often plague audio recordings, particularly when pronouncing the ‘s’ and ‘sh’ sounds. These can cause harshness in the sound, distracting listeners and degrading the clarity of the audio. To ensure listeners stay engaged and receive clear, consistent audio, certain best practices must be followed. These range from the way voice talent approach their craft to the upkeep of audio equipment.

Training And Technique For Voice Talent

Tackling sibilance starts with the person behind the microphone. Proper training and technique are key:

  • Enunciation practice helps minimize excessive sibilant sounds.
  • Mic technique, such as speaking off-axis, can reduce sibilance pickup.
  • Consistent hydration ensures a smooth delivery without mouth noises.

Maintaining Equipment For Optimal Performance

Audio quality thrives on well-maintained equipment:

  • Regularly clean microphones to remove dust and spit.
  • Use pop filters to tame plosives and sibilance.
  • Ensure cables are free of wear and tear.
  • Update software for noise reduction plugins as needed.


Frequently Asked Questions On What Is Sibilance In Audio


What Causes Sibilance In Audio Recordings?


Sibilance in audio often results from exaggerated “s” or “sh” sounds. It comes from high-frequency consonant sounds that create a hiss-like effect. Incorrect microphone technique or poor recording environments can exacerbate this issue. Equalization and de-essing tools are typically used for mitigation.


How Does Sibilance Affect Vocal Clarity?


Sibilance can cause vocal recordings to sound piercing and uncomfortable to listeners. It can also distract from the intended message or performance by drawing attention to the hissing sounds. Properly controlling sibilance is crucial for maintaining vocal clarity and listener comfort.


Can Sibilance Be Fixed During Mixing?


Yes, sibilance can be managed during mixing by using de-essing techniques. This involves tools that selectively reduce the volume of sibilant frequencies. Adjustments to equalization and careful use of compression can also help in reducing unwanted sibilance in the final mix.


Is Sibilance Only A Problem In Singing?


No, sibilance is not exclusive to singing; it can occur in any spoken vocal content. Podcasts, voiceovers, and dialogue in video production are also prone to sibilant sounds. The same techniques used for music vocals can be applied to mitigate sibilance in these formats as well.


Conclusion


Understanding sibilance is crucial for producing clean, professional audio. By managing those sharp “s” sounds, we improve clarity and listener comfort. Remember, tools like de-essers and proper mic technique are invaluable. Embrace the techniques shared, as they are your key to mastering pristine sound quality.


Keep refining, and let your audio shine!

Categories
Archive

Pro Tools Keyboard Shortcuts: Discover More

Pro Tools keyboard shortcuts streamline audio editing and mixing workflows. Mastering these shortcuts improves efficiency in professional audio production.


An effective toolkit for audio professionals is found in Pro Tools, the industry-standard software for music and audio post-production. To maximize productivity and navigate seamlessly through the multitude of features in Pro Tools, familiarizing yourself with its keyboard shortcuts is essential.


From recording and editing to mixing and mastering, each shortcut provides a means to bypass multi-step processes, turning what used to be complex tasks into simple, quick keystrokes. Aspiring sound engineers, producers, and musicians can benefit significantly by learning these shortcuts, as they are fundamental to a swift and smooth creative process. By integrating these keystrokes into your daily work, you enhance not only your productivity but also your ability to focus on the creative aspects of production without getting bogged down by technicalities.


Pro Tools Keyboard Shortcuts: Boost Your Editing Speed

Editing audio like a pro demands speed and precision. Pro Tools keyboard shortcuts are essential tools that elevate your editing workflow. They save time and streamline your creative process. Let’s unlock the power of Pro Tools and make your editing faster than ever!

The Importance Of Efficiency In Audio Editing

Time is money in the studio. Efficient audio editing not only saves precious hours but also allows for more creative freedom. Shortcuts cut down on repetitive tasks, letting you focus on perfecting your sound.

Getting Familiar With Pro Tools Workspace

A well-organized workspace sets the stage for success. Knowing Pro Tools inside out means you can navigate with ease. Here’s a quick guide to the shortcuts that will transform your editing workflow:

  • Play/Stop: Spacebar
  • Record: F12 or Command+Space (Mac) / Ctrl+Space (Windows)
  • New Track: Shift+Command+N (Mac) / Shift+Ctrl+N (Windows)
  • Zoom In/Out: Command+[/] (Mac) / Ctrl+[/] (Windows)

Keep these shortcuts close at hand for a smoother, more productive editing session. Remember, mastery of these keys is a step towards becoming a Pro Tools wizard. Happy editing!


Basic Command Mastery

To master Pro Tools, knowing the basic commands is essential. Keyboard shortcuts save time and streamline your workflow. Get ready to unlock your audio editing superpowers by learning these essential shortcuts. They will turn complex tasks into simple, quick actions.

Essential Playback And Navigation Shortcuts

Control your tracks effortlessly with these basic playback and navigation commands:

  • Space Bar – Play/Stop Toggle
  • Return – Go to Start
  • Shift + Return – Go to End
  • Option + Counter Click – Play from Click Position
  • P – Move Up to Previous Track
  • ; – Move Down to Next Track

Quick Editing Tool Selection

Switch between tools like a pro. Use these shortcuts to select editing tools on the fly:

Shortcut Tool
F7 Trim Tool
F8 Selector Tool
F9 Grabber Tool
F10 Scrubber Tool
Command+1 (Mac) / Control+1 (PC) Zoom Tool
Command+2 (Mac) / Control+2 (PC) Trim Tool
Command+3 (Mac) / Control+3 (PC) Selector Tool
Command+4 (Mac) / Control+4 (PC) Grabber Tool
Command+5 (Mac) / Control+5 (PC) Smart Tool

Editing Like A Pro

Pro Tools offers an array of keyboard shortcuts to streamline your editing workflow. Knowing these shortcuts ensures that you can edit faster and more efficiently. With the right keystrokes, you can trim, fade, and zoom in your audio project like a true professional. Let’s delve into some essential Pro Tools shortcuts that will transform the way you interact with your sessions.

Trimming And Fading With Keystrokes

Trimming clips and creating fades are everyday tasks in audio editing. These actions can be done quickly with shortcuts. Here are the keystrokes every editor needs to know:

  • T – Trim the start of a clip to the cursor.
  • Option + T – Trim the end of a clip to the cursor.
  • D – Create a fade-in from the start of the clip.
  • G – Create a fade-out at the end of the clip.
  • F – Add a crossfade between two clips.

These shortcuts help save time and keep your workflow smooth. No more dragging and dropping for basic edits!

Zoom In And Out Instantly

Seeing the details in your audio waveform is crucial. With shortcuts, you can zoom in and out of your tracks instantly. Here’s how:

Action Shortcut
Zoom In R
Zoom Out T
Zoom to Selection Option + A
Zoom Out Full Option + E

Use these keystrokes for quick navigation through your projects, helping you to detect precise points for editing without any fuss.


Mixing Shortcuts

Pro Tools takes your mix to the next level with powerful keyboard shortcuts. These shortcuts speed up your workflow and reduce the need for mouse clicks. Let’s dive into mixing shortcuts that can transform the way you work inside this leading audio editing software.

Fast Track And Plugin Management

Managing tracks and plugins quickly is crucial for a smooth mixing process.

  • Toggle Inserts A-E on all selected Tracks: Alt + Command + Click (Mac) | Alt + Control + Click (Windows)
  • Toggle Inserts F-J for fast plugin access: Shift + Alt + Command + Click (Mac) | Shift + Alt + Control + Click (Windows)
  • Show/Hide all floating windows to declutter your screen: Command + Option + Control + W (Mac) | Control + Start + Alt + W (Windows)
  • Copy plugins and settings between tracks effortlessly: Option + Drag (Mac) | Alt + Drag (Windows)
  • Bypass all plugins on a track: Control + Command + Click (Mac) | Control + Start + Click (Windows)

Balance And Automation Shortcuts

Balancing tracks and automating processes is smoother with these shortcuts.

  • Fine-tune track volume with precision: Control + Up/Down Arrow (Mac) | Start + Up/Down Arrow (Windows)
  • Write to all enabled Automation parameters: Option + Command + Click (Mac) | Alt + Control + Click (Windows)
  • Nudge automation data for detailed adjustments: Minus or Plus Key
  • Quickly switch Automation modes: Command + Click (Mac) | Control + Click (Windows) on Automation Mode Selector
  • Mute automation for silencing specific parts: Command + M (Mac) | Control + M (Windows)

Record, Loop, And Transport Controls

The very heart of music production in Pro Tools revolves around efficient use of ‘Record, Loop, and Transport Controls’. Mastering keyboard shortcuts for these functions speeds up your workflow, reduces tedious mouse-clicking, and keeps the creative juices flowing. Let’s explore some of the essential shortcuts that can make your recording sessions more productive.

One-key Record Functions

To make recording a breeze, learn these one-key shortcuts:

  • F12 – Starts and stops recording
  • Cmd+Spacebar (Mac)/Ctrl+Spacebar (Windows) – Toggles Play/Record

Loop Playback And Recording

Looping is a game-changer for perfecting sections of music. Below are the shortcuts to help you loop like a pro:

Action Shortcut
Enable/Disable Loop Playback Option+Cmd+L (Mac)/Alt+Ctrl+L (Windows)
Enable/Disable Loop Recording Option+L (Mac)/Alt+L (Windows)

These shortcuts ensure you stay in the flow, adjusting loops rapidly without breaking focus.

Organizing Sessions

Quick and easy Pro Tools session organization is essential for smooth music production. Keyboard shortcuts can dramatically speed up this process. Let’s dive into some simple ways to keep sessions clean with key commands.

Track Grouping Made Simple

Group tracks effortlessly with a few keystrokes. This helps manage multiple tracks with ease. Dynamic control over groups can transform your workflow.

Shortcut table for track grouping

Action Shortcut
Create Group Cmd + G (Mac) / Ctrl + G (Win)
Enable/Disable Groups Cmd + Shift + G (Mac) / Ctrl + Shift + G (Win)
Suspend All Groups Cmd + Shift + A (Mac) / Ctrl + Shift + A (Win)

Markers And Regions Quick Steps

Markers and regions allow navigating sessions with precision. Use shortcuts to insert or go to markers instantly.

Shortcut list for markers and regions

  • Add Marker: Enter (on Numeric Keypad)
  • Previous Marker/Region: Option + Tab (Mac) / Alt + Tab (Win)
  • Next Marker/Region: Option + Tab + Tab (Mac) / Alt + Tab + Tab (Win)


Advanced Editing Commands

Mastering Advanced Editing Commands in Pro Tools can transform your workflow. These shortcuts can make editing lightning fast. Learn how Time-Saving Clip Grouping Tricks and The Power of Strip Silence can elevate your production quality.

Time-saving Clip Grouping Tricks

Editing multiple clips is a breeze with these Pro Tools shortcuts:

  • Command+G (Mac) or Ctrl+G (Windows): This instantly groups selected clips. It saves heaps of time.
  • Command+Shift+G (Mac) or Ctrl+Shift+G (Windows): Quickly ungroup clips with this shortcut.
  • Option+Cmd+G (Mac) or Alt+Ctrl+G (Windows): Create a new clip group from selection.

The Power Of Strip Silence

Strip Silence is a magical tool for editors. Use it to clean up audio in a flash:

  • Command+U (Mac) or Ctrl+U (Windows): Opens the Strip Silence window.
  • Start/End Pad: Adjusts the non-silent sections before and after the strip point.
  • Clip Hold Time: Sets the minimum duration for a clip to be considered non-silent.

Using Strip Silence, you rid your tracks of unwanted noise fast.

Shortcut Action
Cmd+U (Mac)/Ctrl+U (Win) Open Strip Silence window
Adjust Start/End Pad Modify non-silent regions
Set Clip Hold Time Determine non-silent minimum duration
Pro Tools Keyboard Shortcuts: Master Editing Fast!


Credit: m.youtube.com


Customizing Your Workflow

Customizing Your Workflow in Pro Tools can transform your production process. Keyboard shortcuts save time and effort. Making these shortcuts fit your style boosts efficiency. Get ready to personalize Pro Tools for faster editing and mixing.

Creating Your Own Shortcut Keys

Pro Tools allows for shortcut customization. This means you can set keys to execute frequent actions.

  • Open Pro Tools and go to Setup > Preferences.
  • Select the Keyboards tab.
  • Choose a command from the list.
  • Click ‘Add’ to assign a key.

Save your set of shortcuts and use them in all projects. This cuts down your work time.

Leveraging Keyboard Focus Mode

Keyboard Focus Mode in Pro Tools is a game-changer. It activates single key shortcuts. This feature simplifies complex actions.

Action Key
Split Clip B
Ripple Edit G

To turn on Focus Mode:

  1. Find the small A–Z button on the Edit window.
  2. Click it to highlight.

Remember, Focus Mode works for the Edit window. It does not affect the Mix window. Use shortcuts to speed up tasks.

Practice Habits For Shortcut Proficiency

Mastering Pro Tools Keyboard Shortcuts can transform your production workflow. It’s about developing quick fingers. Think like playing a piano. Each day, a little practice goes a long way. Follow these habits. Watch your speed soar.

Effective Exercises To Build Muscle Memory

Just like athletes train, you must exercise your fingers. Start simple. Pick a few shortcuts. Repeat them daily. Make your fingers learn the moves. Soon, they’ll remember without your brain’s help.

  • Drill Repetition: Choose 5 shortcuts. Practice every day.
  • Visual Aids: Create a cheat sheet. Place it by your screen.
  • Speed Tests: Time how fast you can execute a sequence. Beat your record.

Incorporating Shortcuts Into Daily Work

Practice meets reality here. Use shortcuts in real projects. Start with simple tasks. Build up to complex ones. You’ll make mistakes. That’s fine. Each mistake teaches you more.

  1. Start with editing tasks. Cut, copy, paste.
  2. Move on to mixing controls. Learn mute, solo, and record arm.
  3. Keep track. Note which shortcuts you use most. Focus on them.

Remember, the more shortcuts you use, the better you’ll get. Keep pushing. Your efforts will pay off.

Frequently Asked Questions For Pro Tools Keyboard Shortcuts


What Are Essential Pro Tools Shortcuts?


Essential Pro Tools shortcuts include ‘Cmd + Space’ to play/stop the track, ‘Cmd + =’ to toggle the Mix and Edit windows, and ‘Cmd + S’ for quick saving. Mastering these can significantly speed up your workflow.


How To Zoom In Pro Tools With Keyboard?


To zoom in using the keyboard in Pro Tools, press ‘Cmd’ (Mac) or ‘Ctrl’ (Windows) along with the bracket keys ‘[‘ to zoom out or ‘]’ to zoom in. This facilitates efficient navigation through your sessions.


Can You Customize Keyboard Shortcuts In Pro Tools?


Yes, Pro Tools allows users to customize keyboard shortcuts through the Keyboard Shortcuts dialog window. Access this under the ‘Setup’ menu to tailor your shortcuts to your personal workflow.


What Is The Shortcut For Pro Tools’ Grid Mode?


The shortcut for switching to grid mode in Pro Tools is ‘F4’. This quickly enables aligning your edits to the session grid, which is vital for precise timing adjustments.


Conclusion


Mastering Pro Tools keyboard shortcuts can significantly enhance your audio editing efficiency. By embedding these tips into your workflow, you unlock a faster, smoother creative process. Remember, practice leads to speed and precision, transforming your production experience. Embrace these shortcuts for improved Pro Tools mastery.

Categories
Archive

History Of Vinyl Records: Discover The Truth

Vinyl records were first introduced in the 1940s, revolutionizing music consumption. They peaked in popularity by the 70s before declining with the rise of cassette tapes and CDs.


Vinyl records hold a special place in the chronicles of music history, emerging as a beloved medium for audiophiles and collectors alike. Originating in the 20th century, these grooved, analog discs provided a new way to listen to and appreciate music, with a tangible, visceral experience that digital formats have struggled to replicate.


Uniting art with sound, the cover artwork on vinyl records became as iconic as the tracks pressed into the vinyl. Despite a dip in usage in favor of newer technologies during the 80s and 90s, vinyl has experienced a resurgence in the 2000s. Music enthusiasts often praise vinyl for its warmer, richer sound quality and for the ritualistic experience of needle-to-groove playback, keeping the vinyl tradition spinning into the 21st century.

History Of Vinyl Records: Grooves to Revolution


Credit: www.amazon.com


Vinyl Records’ Inception

The story of vinyl records begins over a century ago. These musical discs have left a timeless mark in the world of audio. Starting from humble beginnings, they’ve evolved through the years. Let’s dive into the history and uncover the early days of vinyl records.

From Phonograph To Turntable

Thomas Edison invented the phonograph in 1877. It was the first device that could record and play sound. Musicians would record on cylinders made of tin foil. Still, these were difficult to mass-produce.

The invention of the gramophone by Emile Berliner changed everything. He introduced flat discs, making it easier to produce and distribute music. This was the first step to what we now know as the turntable. Over time, turntables became more sophisticated, with improved sound and functionality.

Material Evolution: Shellac To Pvc

Shellac was the chosen material for records in the early 1900s. But it had limitations. Shellac records were brittle and noisy.

War-time innovation led to a big change. Polyvinyl Chloride, or PVC, became the new standard. PVC made records more durable and offered better sound quality. Vinyl records using PVC hit the market, becoming a hit for music lovers everywhere.

In summary, vinyl records started with the phonograph and matured into modern turntables, transitioning through materials from shellac to PVC. This journey shaped the music industry, giving us the classic vinyl record experience we cherish today.

History Of Vinyl Records: Grooves to Revolution


Credit: www.quarto.com


Grooves And Sound

The journey of listening to music on vinyl records is magical. It begins with a simple groove. Let’s delve into the world where grooves turn to sound. Vinyl records hold music in lines that spiral. These lines have tiny bumps and dips. When a needle runs through them, it makes sounds. Sounds that carry tunes from decades ago or fresh beats from today. This unique audio journey makes vinyl a treasure for many music lovers.

Anatomy Of A Vinyl Record

The anatomy of a vinyl record is as fascinating as its sound. Records are flat discs made to store music. They have two main parts. These are labeled sides A and B. Each side has its grooves. At the center, there’s a hole. This hole fits on a turntable. The edge of the record is smooth. This is where the needle drops. The act starts. Then the needle moves to the middle by following grooves. The journey ends as the last song on the record plays.

  • Label: Middle part with the record’s details.
  • Grooves: Circular lines with the stored music.

How A Needle Reads Music

Now, how does a needle read these grooves? It’s a delicate dance. A needle, also known as a stylus, sits at the tonearm’s end. When placed on the vinyl, it fits into the grooves. As the record spins, the needle follows the pattern. This makes it vibrate. These vibrations turn into electrical signals. They then become the music we hear through speakers.

Part Function
Stylus Touches the grooves to read the music data
Tonearm Arm that holds the needle and moves over the record
Turntable Spins the record to play music

Heyday Of Vinyl

The ‘Heyday of Vinyl’ stands as a nostalgic nod to when music physically spun its magic into the hearts of listeners. It was an era defined by rich sound quality and tangible connection to the music. Through the grooves and artwork, vinyl albums told stories beyond the audio experience. This period witnessed an explosion of both record sales and cultural impact.

Golden Era Of Albums

In the Golden Era of Albums, typically recognized as the 1960s to the 1970s, vinyl records flourished. Music enthusiasts gathered to experience full-length albums in a way that today’s digital snippets rarely offer. The format’s popularity soared, turning vinyl into the favorite medium for album listening.

  • Album artwork grew into an art form itself.
  • Collectors prized first pressings and rare editions.
  • The warmth and depth of sound on vinyl records became a gold standard.

Iconic Artists And Vinyl Releases

Countless iconic artists left their mark on the vinyl era. Their releases became legendary, not just for the music, but for the cultural changes they inspired.

Artist Album Year
The Beatles Sgt. Pepper’s Lonely Hearts Club Band 1967
Michael Jackson Thriller 1982
Pink Floyd The Dark Side of the Moon 1973

Each release brought with it a unique sound and an album cover that often became as iconic as the music itself. Albums like these changed the way people listened to and thought about music.

Competition Arrives

The landscape of music was about to change forever. Vinyl records had enjoyed their time in the sun. But like all great eras, a challenge was on the horizon. New formats began to emerge, offering convenient alternatives to the beloved vinyl record. Let’s dive into the rise of these competitors and assess their impact on the vinyl industry.

The Rise Of The Cassette Tape

In the 1960s, a new contender stepped into the ring. Cassette tapes offered users portability, a concept vinyl couldn’t compete with. People now carried music in their pockets. Small and compact, these tapes made music personal and accessible.

  • Portability: Easy to carry and play on the go
  • Customization: Users could record mixtapes
  • Recording: Allowed recording over older audio

Cassette tapes quickly became a hit, thriving particularly among young audiences. Walkmans became the new symbol of music freedom. Vinyl records now had to share the stage with these lightweight champions.

Digital Technology And Cds

By the 1980s, another breakthrough was set to redefine music consumption. Digital technology led to the invention of the Compact Disc (CD). CDs offered a new level of sound clarity, unblemished by the pops and hisses of vinyl and cassettes.

Feature Description
Clarity: Crisp and clear sound quality
Durability: Less prone to wear and tear
Storage: Holds more music than vinyl and tapes

CDs became the new favorite, leaving vinyl records and cassettes in the dust. They were easier to produce, distribute, and store. Music lovers embraced the digital revolution. The sleek design of CD players and increasing album availability in CD format signaled a new era for the music industry.


The Decline Of Records

Vinyl records, once the pinnacle of music enjoyment, faced a stark decline. This era marked the end of what many considered the golden age of vinyl. Let’s explore what led to the retreat of this beloved format.

Shift In Consumer Behavior

Changes in how we enjoy music greatly influenced vinyl’s popularity.

  • Cassettes and CDs: Smaller, more portable music formats arrived.
  • User convenience: People sought more convenient ways to listen
  • Cost: New formats often cost less than vinyl records.

The Impact Of The Digital Revolution

Technology advancements forever altered our music experiences. Digital music introduced unparalleled accessibility and variety.

Event Effect on Vinyl
Introduction of MP3 Reduced demand for physical formats.
Online Music Stores Instant access diminished vinyl allure.
Streaming Services Users preferred subscription over ownership.

Vinyl’s Cultural Impact

The resurgence of vinyl records in the digital age speaks volumes about their cultural significance. Vinyl has woven its way into the fabric of music history, influencing how we appreciate and consume music. Its impact extends beyond just sound quality. It shapes our interactions with music as a tangible and immersive experience.

Album Art And Music Presentation

Album art transformed the experience of music listening into a visual journey. Artists like Pink Floyd and The Beatles turned LP covers into iconic art pieces. These visuals became cultural symbols, often recognized even beyond the music itself. Vivid colors, striking images, and innovative designs on record sleeves set the tone for the music before the first note played.

Gatefold sleeves and lyric inserts provided fans with a deeper connection to the music. Fans didn’t just listen—they engaged with the art, reading lyrics and pondering the imagery. This multisensory experience solidified vinyl’s role in music presentation.

The Record Store Experience

Stepping into a record store is like walking into a music lover’s paradise. The scent of vintage vinyl, the sound of a needle finding its groove, it’s an adventure. Record stores became cultural hubs where music aficionados met, discussed, and discovered new and old tunes alike.

  • Exclusive releases and in-store performances turned these shops into community landmarks.
  • Album signings and special editions gave fans memorable experiences and cherished collectibles.

Frequenters of record stores know the thrill of the hunt. There’s the quest for that rare or original pressing, and the joy of stumbling upon an unexpected gem. These experiences foster a sense of community and shared passion that digital platforms struggle to replicate.

Resurgence Of Vinyl

Despite the rise of digital music, vinyl records have made a remarkable comeback. This resurgence is more than nostalgia; it marks a shift in how listeners value music. The tactile experience and rich sound of vinyl are attracting both young and seasoned music lovers. Let’s dive into the reasons behind this vinyl revival.

Collectors And Audiophiles Spark Interest

Collectors and audiophiles are the cornerstone of the vinyl resurgence. They treasure records for their artistic covers and superior sound quality. A vinyl record offers a full sensory experience. The needle drop on a record produces a unique warmth in sound that digital formats can’t match. The large album covers and inserts also provide an artistic flair that enhances the listening experience. Enthusiasts flock to record stores, seeking rare editions and limited releases to add to their growing collections.

  • Superior sound quality
  • Artistic album covers
  • Physical connection to music
  • Limited edition releases

Vinyl In The Age Of Streaming

Even in an era where millions of songs are just a click away, vinyl offers something streaming cannot: tangibility and ownership. Music fans are rediscovering the joy of building a personal music library. Record sales thrive alongside digital streaming services, often seen as their analog counterpart. The ritual of flipping through a collection and selecting a record to play is an experience that music streamers find appealing.

Streaming Vinyl
Convenient Tangible
Instant Access Engaging Experience
Infinite Library Curated Collection

Record labels and artists recognize the trend towards vinyl. They often release new music on records. This strategy caters to the growing demand for vinyl’s physical form. Events like Record Store Day highlight the importance of vinyl culture. They draw crowds eager to find exclusive deals and limited releases. The vinyl resurgence seems to only grow stronger, proving it’s more than just a passing fad.

  1. Collectors value tangible music formats
  2. Artists release new music on vinyl
  3. Record Store Day boosts sales
  4. Growth in vinyl popularity persists


Future Of Vinyl Records

The future of vinyl records shines with innovation and sustainability. As music lovers cherish their tactile appeal, the industry evolves. Record enthusiasts have a lot to look forward to.

Sustainable Vinyl Production

Environmental awareness calls for change in every sector, including vinyl production. Sustainable practices now lead the way. A greener future for vinyl is on the horizon.

  • Recycled materials form the basis of newer records.
  • Manufacturers reduce waste with eco-friendly packaging.
  • Energy-efficient presses lower the carbon footprint.

Innovations In Vinyl Playback Technology

Playback technology flourishes with new designs and features. Listeners experience enhanced audio quality and convenience. Here are recent advances:

  • Turntables now include digital interfaces for easy integration.
  • Wireless connectivity brings vinyl sound to modern speakers.
  • Innovative systems provide clearer and richer audio.
Feature Benefit
USB outputs Digitize your records
Bluetooth® capability Stream to any device
Advanced stylus designs Better sound fidelity

Frequently Asked Questions Of History Of Vinyl Records


When Were Vinyl Records First Introduced?


Vinyl records debuted in the late 1940s, with Columbia Records releasing the first commercial LP in 1948.


What Caused The Decline Of Vinyl Popularity?


Vinyl records saw a decline in the late 1980s due to the rise of cassette tapes and CDs, offering greater convenience and portability.


How Have Vinyl Records Made A Comeback?


Vinyl has experienced a resurgence since the 2000s, with audiophiles and collectors valuing its tangible format, artistry of album covers, and warm sound quality.


What Is The Difference Between Lp And Ep?


LP stands for Long Play, typically containing an album’s worth of music, whereas EP, or Extended Play, is shorter, often featuring a few tracks or singles.


Conclusion


The journey of vinyl records is a testament to the resilience of physical media in a digital age. Embracing the past while spinning into the future, vinyl enthusiasts and collectors ensure these disc-shaped storytellers remain ever-present. Whether for nostalgia or audio purity, vinyl’s saga continues, echoing through the grooves of time.


Keep the record playing.

Categories
Archive

What Is LUFS? Learn More Now

The LUFS loudness standard is how modern music loudness is measured. LUFS stands for Loudness Units Full Scale, a standard measurement of audio loudness. It helps ensure consistent playback volume.


Understanding LUFS is essential for content creators, sound engineers, and broadcasters aiming to optimize audio levels. This measurement reflects the perceived loudness of audio content, which is crucial for delivering a uniform listening experience across various platforms. A key advantage of LUFS is its ability to match loudness levels, making it a preferred standard in music production, television, and podcasting.


By adhering to LUFS guidelines, producers can prevent sudden volume spikes and ensure compliance with broadcasting standards, thereby enhancing the audience’s auditory experience. Adopting LUFS metrics into audio workflows allows professionals to maintain competitive quality and accessibility in the world of digital media.


Intro To Lufs: LUFS loudness standard

Welcome to the world of LUFS, a key term in audio production and broadcasting. LUFS stands for Loudness Units relative to Full Scale. It measures audio signals to ensure consistent loudness. Understanding LUFS is essential for creators, engineers, and broadcasters. Let’s dive into the basics of LUFS and its importance in our digital audio landscape.

The Quest For Consistent Loudness

In the past, different platforms had different loudness levels. This inconsistency led to the need for a standard way to measure audio loudness. LUFS emerged as the solution. Designed to reflect perceived loudness, LUFS provide a consistent reference, making audio levels match across various listening environments.

Lufs In The Digital Audio Age

Today, the digital age demands uniform audio loudness. LUFS are vital in audio production. Streaming platforms use LUFS to normalize their audio content. This helps ensure users enjoy a seamless listening experience. By using LUFS, creators can avoid the pitfalls of overly loud or quiet content and produce audio that meets industry standards.

LUFS loudness standard - What Is LUFS?: Unveiling Audio's Loudness Standard


Credit: www.radioworld.com


Decoding Lufs

Understanding LUFS unlocks the secret to balanced audio. LUFS stands for Loudness Units Full Scale. It’s a standard that measures audio loudness. Movie makers, music producers, and podcasters use LUFS. It helps them make sure their sound is just right. Let’s explore what LUFS means for audio.

Measuring Loudness Units

Loudness units capture how we hear sound. Measuring these units lets us compare different sounds. It’s like using a ruler for volume. The unit for measuring loudness is LU, while LUFS relates to a digital scale.

  • One LU is one decibel change.
  • LUFS works with audio files on your computer
  • It balances your favorite songs and movies.

To understand LUFS, picture a seesaw. When sounds are too low or too high, LUFS helps level them out. Now, every sound plays at a similar volume. No more reaching for the volume knob!

Understanding Full-scale Levels

Full-scale levels relate to the maximum volume. Imagine a cup filled to the top with water. That’s your full-scale level in audio. Zero LUFS is the loudest sound without distortion. Most streaming services recommend -14 to -16 LUFS for the best listening experience. This ensures you enjoy clear and balanced sound.

Service Recommended LUFS
Spotify -14 LUFS
Apple Music -16 LUFS
YouTube -14 LUFS

Understanding LUFS is easy. Just think of it as a helpful guide that ensures sounds are friendly to our ears. With these insights, content creators deliver seamless audio experiences.

Lufs And Broadcasting

LUFS stands for Loudness Units relative to Full Scale. It is the standard for measuring audio levels. It helps keep the volume consistent. This is very important for radio and TV. With LUFS, your favorite shows sound just right.

Regulating Loudness In Tv And Radio

TV and radio have a big job. They need to make sure the volume is comfy for our ears. No one likes when a quiet movie suddenly gets too loud! That’s where LUFS comes in. It’s like a volume guard, setting the rules for how loud shows can be.

  • No sudden loud ads to startle you.
  • Even volume across different programs.
  • Peaceful watching and listening for everyone.

The Calm Act And Global Loudness Standards

The CALM Act keeps TV in the USA at a good volume. It says shows and ads can’t be too loud. Many countries follow similar rules. They all use LUFS to keep our ears happy. Check out these cool facts.

Region Standard LUFS Level
USA CALM Act -24 LUFS
Europe EBU R128 -23 LUFS
Australia OP-59 -24 LUFS

Now, no matter where you live, you can enjoy your shows without reaching for the remote!

Lufs In Music Production

Exploring the realm of music production, professionals rely on various standards to measure audio levels. LUFS, or Loudness Units Full Scale, plays a critical role. It gives a consistent reference for loudness in the creation of music. This ensures that the final product sounds its best across all platforms and devices.

Balancing The Mix

In the studio, balancing the mix is a pivotal step. LUFS helps mixing engineers achieve this balance. It measures the perceived loudness of a track. Engineers aim for a target LUFS value to maintain a consistent volume. This ensures that no instrument or vocal overpowers another. By doing so, every element in the song finds its rightful place in the mix. This leads to a sonically pleasing track that listeners enjoy.

  • Set a LUFS target for balance
  • Adjust track volumes to meet this target
  • Ensure vocals and instruments blend seamlessly

Mastering For Streaming Services

After the mix, mastering tailors a track for its final format. LUFS is essential here, especially for streaming services. Services like Spotify, Apple Music, and YouTube have loudness standards. Match your track to these standards to avoid unwanted volume changes. A track too loud or too soft can be penalized by these platforms.

Streaming Service Target LUFS Level
Spotify -14 LUFS
Apple Music -16 LUFS
YouTube -13 to -15 LUFS

By mastering to these targets, your music is ready for the world. It plays back at the right volume, giving listeners the best experience. Thus, LUFS empowers producers and musicians to maintain quality control. It ensures the music hits just the right note, no matter where it’s played.


The Impact Of Lufs On Streaming

In a world where music is increasingly consumed through streaming services, understanding LUFS (Loudness Units Full Scale) is crucial. This measurement ensures consistency in audio playback. Streaming services rely on LUFS to provide listeners with an enjoyable experience. Let’s explore how LUFS impacts what we hear online.

Normalization And Perceived Loudness

Normalization is a key concept in the streaming industry. It’s a process that levels out the volume of different tracks. This process uses LUFS to measure loudness. Normalization helps maintain a consistent volume for listeners. This means no sudden jumps or drops in loudness. Here’s how it affects the user experience:

  • Enhanced Listening Comfort: Users don’t have to adjust the volume for each song.
  • Better Sound Quality: Reduces the risk of distortion caused by excessive volume.
  • Improved Playlist Flow: Smooth transitions between tracks regardless of their original loudness.

How Streaming Services Use Lufs

Streaming platforms have their own LUFS standards. These standards ensure that all songs play at a similar volume. Here’s a closer look at the process:

Streaming Service Target LUFS Level
Spotify -14 LUFS
Apple Music -16 LUFS
YouTube -13 to -15 LUFS

These targets can change, so artists and producers must be aware. Mixing and mastering tracks to meet these standards is essential. It ensures that songs are not turned down or penalized for being too loud. This maintains clarity and dynamic range.

Understanding LUFS is not just technical. It’s about preserving artistic intent. It stands at the core of music distribution in the digital age. For artists and listeners alike, LUFS brings balance to the world of streaming music.

Lufs In Film And Gaming

LUFS (Loudness Units Full Scale) plays a pivotal role in film and gaming industries.

Understanding LUFS helps creators deliver the best sonic experience.

From explosive blockbusters to immersive games, LUFS ensures audio consistency and quality.

Creating Dynamic Audio Experiences

Engaging sound is essential for captivating audiences.

Dynamic audio creates depth and excitement.

Films use contrasting volumes to enhance storytelling.

Games adjust sound in real-time based on player actions.

LUFS helps balance quiet dialogue and loud action.

Loudness Standards In Interactive Media

Loudness standards ensure a uniform audio experience.

Interactive media such as games pose unique challenges.

The sound adapts to player inputs and environments.

LUFS levels keep the audio consistent and engaging.

  • Regulations vary across different platforms.
  • Audio teams aim for standardized LUFS targets.
  • Consistent loudness enhances the user experience.

Analyzing Loudness With Lufs

Analyzing the loudness of audio tracks is vital for quality sound production. LUFS, or Loudness Units Full Scale, serves as a standard for measuring the perceived loudness of audio files. This ensures a consistent listening experience across various platforms and devices.

Tools For Measuring Lufs

Diverse software and hardware tools offer reliable LUFS readings. Professionals and hobbyists alike use these specialized tools for accurate loudness measurement.

  • Youlean Loudness Meter: A plugin for detailed loudness reporting.
  • Waves WLM Plus Loudness Meter: An industry-standard tool for mixing and mastering.
  • Orban Loudness Meter: Free software for real-time loudness monitoring.

Reading And Interpreting The Meters

Understanding LUFS meters is key to achieving optimal loudness levels. Here’s a simple guide to help you:

  1. Integrated Loudness: Reflects overall track loudness.
  2. Short-term Loudness: Indicates momentary loudness over a short duration.
  3. True Peak: Identifies the highest signal peak to prevent distortion.

By tracking these metrics, you can maintain consistent audio quality, critical in music production, broadcast, and podcasts.

What Is LUFS?: Unveiling Audio's Loudness Standard


Credit: pluginfox.com


Best Practices For Lufs

Loudness units relative to full scale (LUFS) are essential in the audio world. They measure loudness levels to ensure consistency across various playback systems. Whether you’re mixing a podcast or mastering a music album, understanding and applying best practices for LUFS is crucial.

Optimizing Recordings For Lufs Targets

Setting the right LUFS target ensures your audio meets industry standards. Aim for a target suitable for your content type:

  • -19 LUFS for dynamic podcasts.
  • -16 LUFS for mobile and streaming platforms.
  • -14 LUFS for louder, competitive sounds.
  • -23 LUFS for broadcast standards in Europe.

Use a LUFS meter plugin during mixing and mastering to stay on target. Adjust the levels as needed to reach the desired LUFS without compromising quality.

Maintaining Dynamic Range

Dynamic range gives life to your audio. Avoid squeezing the life out of your tracks with these tips:

  1. Record at moderate levels to avoid clipping.
  2. Mix with headroom in mind, peaking around -6dB.
  3. Use compression wisely, keeping the original feel.
  4. Keep an eye on the LUFS meter and dynamic range indicator.
  5. Avoid over-normalizing which can squash dynamics.

The Future Of Lufs

Loudness Units Full Scale (LUFS) is the standard for measuring audio levels. Experts predict LUFS will become more important in balancing sound across platforms. The future brings sophisticated ways to assess audio to deliver consistent listening experiences.

Evolving Standards In Audio

Audio production constantly evolves. LUFS is key in these changes. Music streaming services, TV broadcasters, and podcasts all rely on LUFS. They do this to maintain level consistency. This means loudness standards will keep evolving. Professionals must stay updated on LUFS guidelines to meet industry demands.

  • New technologies improve LUFS measurement.
  • Global standards may emerge for better consistency.
  • Users will benefit from seamless audio experiences.

The Role Of Ai In Loudness Measurement

Artificial Intelligence (AI) is transforming loudness measurement. AI algorithms can analyze audio faster and more accurately than traditional methods. This ensures audio levels are consistent without manual interference.

Traditional Measurement AI-powered Measurement
Manual checking Automated analysis
Time-consuming Efficient
Subject to human error Precision with machine learning

Future AI could predict optimal LUFS levels before audio is finalized. Tailored adjustments for specific platforms could become effortless. This innovation signifies a major leap in audio production and distribution.


Frequently Asked Questions For What Is Lufs


What Is Lufs In Audio Processing?


LUFS stands for Loudness Units Full Scale. It measures audio signal’s perceived loudness. This unit is vital for maintaining consistent loudness in broadcasting and music production, ensuring comfortable listening experiences across different media platforms.


How Does Lufs Affect Music Mastering?


In music mastering, LUFS is used to achieve a target loudness level that matches industry standards. It ensures that music playback is consistent across various streaming services and can prevent audio from being turned down by automatic volume normalization algorithms.


Why Is Lufs Important In Broadcasting?


LUFS is important in broadcasting to comply with loudness regulations, like the CALM Act. It helps to avoid abrupt loudness changes between programs and commercials, ensuring a uniform audio experience for the audience.


Can Lufs Levels Impact Streaming Platforms?


Yes, streaming platforms often normalize audio based on LUFS levels to provide a consistent listening volume. Music tracks mastered with high LUFS might be turned down, potentially affecting the intended dynamism and impact of the audio.


Conclusion


Understanding LUFS is crucial for anyone working with audio production. It ensures your material meets industry standards, maintaining clarity and quality. Embrace this knowledge for better sound control. Remember, mastering LUFS means optimal listening experiences for your audience. Elevate your audio projects by applying what you’ve learned today.

For more background, see LKFS on Wikipedia. You may also like our guide: Lufs Loudness Unit Full Scale.

Categories
Archive

RMS in Audio: Understanding the Power of Sound Waves

RMS, or Root Mean Square, is a key metric in audio that quantifies the average power output of an amplifier or the power handling capability of a speaker. It indicates the continuous power level that audio equipment can handle or produce while maintaining quality sound.


Understanding RMS (Root Mean Square) is essential for anyone involved in audio production or sound systems. It serves as a reliable indicator of performance, helping users compare and select audio components based on their power output and quality. As RMS describes the average power an audio device can manage without distortion, it’s a critical factor in achieving optimal sound reproduction.


A speaker or an amplifier with a high RMS rating typically delivers more consistent performance at varying sound levels, ensuring a clearer audio experience. RMS values offer a more realistic understanding of audio equipment potential compared to peak power ratings, which can sometimes be misleading. By focusing on RMS, you are better equipped to make knowledgeable decisions about your audio system for sustained quality and durability.


Rms Audio Power: Why It Matters

RMS (Root Mean Square) audio power is crucial in the world of sound. It tells you how powerful an audio system is. Think of RMS as the muscle of your speakers or amplifier. It can help you pick the best audio system for your needs. An amplifier with a higher RMS rating will deliver more consistent power to your speakers. This means better and clearer sound over time. Let’s dive into why this matter.

Decibels And Perceptions

Understanding decibels, or dB, is key to knowing why RMS matters. Decibels measure the intensity of the sound. Here’s how RMS power and decibels link:

  • More RMS power means the potential for louder volumes.
  • Higher decibels mean a sound is louder to our ears.
  • A sound system’s RMS rating can help predict its maximum decibel output.

Steady State Vs. Peaks

Sound isn’t just about loudness; it’s about consistency and quality. RMS deals with steady state power – the power an audio system can handle continuously. This is different from peak power, which is the maximum power it can handle in short bursts.

Steady state power affects how your music feels. It’s like running a marathon at a steady pace instead of sprints. For audio, this means:

RMS Power Effect
High RMS Smooth, consistent quality
Low RMS Potential for distortion at high volumes

Root Mean Square Explained

When talking about audio, RMS explains how powerful a sound is. It measures this power over time. The RMS value helps us compare different audio systems. It shows how loud and clear they can play music or sounds.

Math Behind The Magic

RMS isn’t just about audio; it’s a math formula. First, we square all the sound waves’ heights. Next, we find the average of those squares. Last, we get the square root of that average. This final number is the RMS.

Here’s a simple step-by-step:

  1. Square each sound wave height.
  2. Average these squares.
  3. Take the square root of that average.

This math tells us the sound wave’s steady strength.

From Electrical To Acoustic Energy

RMS helps us know how speakers change electric signals into sound. The RMS value says how good a speaker is at this job.

Sound systems turn electrical energy into sounds. This energy moves the speaker parts to make the air move. That moving air reaches our ears as sound. RMS shows how well this change happens.

  • Higher RMS – Louder and clearer sound.
  • Lower RMS – Softer and maybe unclear sound.

The higher the RMS value, the more powerful the output. This means the speaker can play sounds louder without harm.

Gauging Audio Equipment

When choosing audio equipment, understanding RMS (Root Mean Square) is key. It tells you how much power a speaker can handle. Let’s explore what specs to look for and clear up some marketing misconceptions.

Specifications To Look For

To gauge audio equipment properly, focus on these specifications:

  • Power Output: Measured in watts, it indicates the speaker’s volume capacity.
  • RMS Rating: This tells you the continuous power it can handle, not just peak moments.
  • Frequency Response: Shows the range of sound a speaker can reproduce.
  • Sensitivity: Measures how loudly a speaker plays per watt of power.
  • Impedance: Lower impedance means more power draw from the amplifier.

Misconceptions In Marketing

Audio equipment marketing can be misleading. Here’s what to watch out for:

Misconception Truth
“More watts means louder.” RMS is a better loudness indicator.
“Bass boost equals good sound.” True quality comes from balanced audio, not just bass.
“Higher Peak Power is better.” RMS value is more reliable for sustained performance.

Measuring Sound: Tools And Techniques

Understanding the power of sound is key in many industries. It helps audio engineers, musicians, and even hobbyists improve the quality of their work. The process involves the use of specialized tools and techniques. Let’s dive into some popular methods for measuring the intensity and clarity of sound.

Common Devices Used

Professionals rely on certain devices to capture sound data accurately. These tools provide clear insights into audio quality. Let’s look at some of the most trusted ones.

  • Sound Level Meters – Portable gadgets that measure sound pressure levels.
  • Audio Analyzers – Provides in-depth analysis of sound frequency and distortion.
  • Decibel Meters – Handy for quick checks on volume intensity.

Diy Measurement Approaches

Creative and cost-effective methods can also yield useful sound measurements. These approaches can be fun and educational.

  1. Using smartphone apps to approximate sound levels can be a great start.
  2. Building a simple decibel meter with a microcontroller for hands-on learning.
  3. Setting up a home-based audio testing lab using computers and software.


Implications For Audio Engineers

The concept of RMS in audio is paramount for audio engineers. RMS, or Root Mean Square, is a measure of the continuous power of an audio signal. It represents the average level of audio and helps engineers maintain consistent sound quality. With this in mind, let’s delve into how audio engineers apply RMS in different settings.

Recording Studio Standards

In a studio environment, RMS levels guide the recording process. Engineers use RMS to ensure recordings meet industry standards for loudness. Table 1 illustrates standard RMS values used in professional recording studios:

Genre RMS Level (dB)
Rock -9 to -12
Pop -8 to -11
Classical -14 to -20

Adhering to these levels ensures recordings play back properly on most devices, avoiding distortions or inaudible sections in the final product.

Live Performance Applications

During live performances, RMS is equally influential. Setting appropriate RMS levels ensures the sound is powerful and immersive to the audience. For live settings, see the bullet points below detailing the significance of RMS:

  • Avoiding speaker damage from excessively high levels
  • Balancing the sound in different areas of the venue
  • Ensuring vocal clarity throughout the performance
  • Minimizing ear fatigue for the audience

RMS levels are adjusted in real-time to adapt to the dynamics of the live music and the audience’s response. An optimal RMS level balances intensity with clarity, a critical aspect for a memorable live audio experience.


Comparing Rms To Other Audio Metrics

Understanding how different audio metrics work is crucial for anyone interested in high-quality sound. Root Mean Square, or RMS, is one metric used to help listeners gauge a speaker’s average power output. Compare RMS with other audio measures to get a clearer picture of a speaker’s true sound quality.

Peak Power Vs. Rms Power

Peak power and RMS power are both ways to measure a speaker’s abilities. Peak power shows the highest level of power a speaker can handle in short bursts. RMS power represents the average power a speaker can handle continuously. RMS is often seen as more reliable because it reflects normal usage over time.

  • Peak Power – Maximum power during short spikes
  • RMS Power – Average continuous power

Choose speakers with a high RMS rating for everyday use. A high peak power is less important for sound quality and more about withstanding power spikes.

Total Harmonic Distortion And Rms

Total Harmonic Distortion, or THD, measures how much a speaker’s output differs from the original audio source. A lower THD means a clearer, more accurate sound. When paired with RMS, these two metrics paint a full picture of a speaker’s performance.

THD Rating Sound Quality
Lower than 1% High-quality sound
1% – 10% Decent sound quality
Higher than 10% Poor sound quality

Speakers with low THD and high RMS are ideal. Always look at RMS values when considering a speaker’s power. Together with THD, RMS helps determine audio clarity and quality.

Impact Of Rms On Listening Experience

Root Mean Square (RMS) is key in audio quality. It measures speaker power. High RMS means louder, clearer sound. It shapes how we hear music and movies. Good RMS creates unforgettable listening.

Speaker Selection

Picking speakers is more than just size or brand. RMS value matters greatly. It shows the speaker’s continuous power handling. This is not about short bursts but consistent sound quality.

Better RMS, better sound. Listeners want clear, distortion-free audio. Speakers with high RMS ratings deliver this. They produce powerful sound for any room size. This leads to a more impressive listening experience.

Room Acoustics And Rms

The room’s shape and size affect sound. High RMS doesn’t mean every room benefits. Rooms with poor acoustics can lead to bad sound even with good speakers. Match RMS to room acoustics for the best effect.

  • Large rooms need high RMS for full sound.
  • Small rooms with too much power can cause echo.
  • Soft furnishings absorb sound, so adjust RMS accordingly.

RMS and acoustics work together. Balance is critical for perfect audio. This combination guides us to a better listening journey.

RMS in Audio: Understanding the Power of Sound Waves


Credit: www.soundlabsgroup.com.au


Advancements In Sound Wave Technology

Sound wave technology has leaped forward. Today’s groundbreaking audio innovations transform how we experience sound. From the sharp tick of a hi-hat to the deep rumble of a bass, RMS (Root Mean Square) in audio has been pivotal in measuring sound quality. Let’s unlock the wonders of these advancements together.

Innovation In Audio Electronics

Refinements in audio electronics have brought stunning clarity and fidelity to our ears. High-resolution audio formats have raised the bar. They turn ordinary listening into an extraordinarily vivid sonic journey.

Advances like Class-D amplifiers now offer efficiency and precision. These amplifiers use innovative RMS calculations to deliver cleaner sound, with less power wastage.

  • Smart amplifiers tailor audio performance in real-time.
  • Digital Signal Processing (DSP) tweaks sound to near-perfection.
  • High-resolution converters detail every audio nuance.

Future Trends And Research

Audio’s future shines with possibility. Researchers are now exploring quantum acoustics, aiming to revolutionize RMS in audio. This could mean even deeper insights into sound wave behavior.

Exciting developments such as 3D audio and immersive soundscapes are on the horizon. The table below highlights the trends to watch:

Trend Description
3D Audio Sound that moves around you in three dimensions.
Immersive Soundscapes A full sensory experience resembling real-life environments.
AI in Audio Smart algorithms shaping sound based on listening habits.

Voice-control interfaces are becoming sleeker. They are taking user interactivity to new levels. With advances in machine learning, audio devices learn and adapt to personal preferences.

  1. Smarter noise-cancellation technologies.
  2. Audio equipment with built-in health tracking.
  3. Inductive charging for wireless audio devices.

As we push the boundaries, tomorrow’s RMS in audio will likely be unrecognizable. It will be precision-engineered to provide experiences that are more authentic and enveloping than ever before. Stay tuned for a symphony of innovation that will resonate with each one of us.

Frequently Asked Questions On Rms In Audio


What Does Rms Stand For In Audio?


RMS stands for Root Mean Square. It’s a statistical measure used to denote the continuous power that an audio amplifier can output, or a speaker can handle. It reflects the average level of power over time, providing a realistic indication of audio performance.


How Does Rms Power Affect Sound Quality?


RMS power influences the maximum volume a system can sustain without distortion. Higher RMS ratings generally mean louder, clearer sound at peak volumes. However, RMS alone doesn’t guarantee sound quality, which also depends on factors like the signal source and speaker design.


Can Rms Value Predict Audio Loudness?


RMS value gives a rough estimate of an audio system’s potential loudness but isn’t the sole determinant. Sensitivity, enclosure, and total harmonic distortion also play crucial roles. Loudness perception varies with frequency and human hearing sensitivity as well.


Is Higher Rms Better For Subwoofers?


A higher RMS rating for subwoofers implies greater power handling capability, which can lead to increased output and better performance. However, optimal listening depends on matching the RMS to the amplifier’s output and considering the subwoofer’s build quality.


Conclusion


Understanding RMS in audio allows for a clearer grasp of sound quality and equipment performance. By considering RMS values, you make informed choices for your audio setup. Let this guide empower your audio decisions, ensuring a superior listening experience. Seek clarity in sound?


Remember, RMS is key.

Categories
Archive

Wired Vs Wireless Headphones: Discover The Truth

Wired headphones offer a consistent, stable connection. Wireless headphones provide freedom of movement and convenience.


Choosing between wired and wireless headphones can be pivotal to your audio experience. Wired models boast unparalleled sound quality due to their direct device connection, eliminating the potential for Bluetooth compression issues. On the flip side, wireless headphones reign supreme in portability and ease of use, unshackling users from cords and offering seamless integration with modern, mobile lifestyles.


They typically run on rechargeable batteries, which means keeping an eye on power levels is essential. Sound aficionados and professional settings often prefer wired headphones for their reliability and high-fidelity sound, while gym-goers and commuters tend to favor the cordless convenience of wireless models. Understanding your priorities in sound quality, convenience, and use case is key to making the right choice.


Evolution Of Headphones

The Evolution of Headphones is a tale of innovation and style. Starting as bulky devices tied to communication and recording equipment, headphones have become personal, portable, and a powerful symbol of modern music culture. They have journeyed from necessary tools to fashion statements, integrating cutting-edge technology and convenience.

From Wires To Wireless Technology

The transformation from wired to wireless headphones marks a significant leap in listening convenience. Here’s a brief timeline to highlight the shift:

  • 1890s: Earliest headphones, mostly used by phone operators.
  • 1970s: Introduction of lightweight, portable models.
  • 2000s: Advancements in Bluetooth tech make wireless options possible.
  • Present: Truly wireless earbuds dominate the market.

The Journey From Studio Gear To Fashion

Headphones have progressed from strictly professional use to becoming a fashion icon. The timeline below showcases this evolution:

Year Development Impact
1970s-1980s Studio headphones enter consumer space. Listeners embrace high-fidelity sound.
1990s-2000s Headphones get stylish, colorful designs. They join the realm of personal accessories.
2010s Celebrity endorsements and collaborations. Headphones as a status symbol.

The Sound Quality Debate

When choosing between wired and wireless headphones, sound quality fuels a passionate debate. Music lovers and audiophiles have strong opinions on which type offers a superior experience. In this section, we dive deep into the intricacies of audio fidelity to see how wired and wireless options measure up.

Assessing Audio Fidelity

Audio fidelity, or the accuracy of sound reproduction, is crucial for immersing yourself in music. Wired headphones often get praise for their reliable, high-quality audio signal. There’s no need for data compression, meaning the sound remains pure and unaltered from its original form.

Wireless headphones, on the other hand, have leapfrogged in technological advancements. They offer impressive sound quality that continues to close the gap with wired models. Yet, some nuances in sound might get lost due to data compression used in Bluetooth transmission.

The Impact Of Bluetooth On Music

Bluetooth technology has transformed the way we listen to music. It allows freedom of movement without the hassle of cables. The convenience is unmatched, but it comes at a cost. Bluetooth compresses audio data, which can affect the nuances of sound.

  • Sound Compression: Bluetooth uses codecs like aptX, AAC, and SBC to compress and decompress music data. This process can slightly impact the richness of sound.
  • Latency: Wireless headphones can experience a tiny delay known as latency. This delay is rarely noticeable in casual listening but can be evident when watching videos or gaming.

Newer Bluetooth versions and advanced codecs have reduced the quality gap. Audiophiles with finely-tuned ears may notice the difference, but many users find the convenience outweighs any minor loss of sound quality.

Feature Wired Headphones Wireless Headphones
Connectivity Direct, Cable Bluetooth
Sound Quality High fidelity, Uncompressed High quality, Potentially compressed
Latency Minimal Can vary
Convenience Restricted movement Free movement

Comfort And Design

The battle between wired and wireless headphones extends beyond simple audio quality or convenience. Comfort and design play significant roles in a user’s experience. While comfort addresses how enjoyable headphones are to wear over periods, design adds a layer of style and functionality that can sway buyers.

Ergonomics Of Wear

Headphones should feel like a natural extension of your body. Factors influencing this include:

  • Weight: Wireless headphones often house batteries, making them heavier than wired ones.
  • Pressure: The clamping force can cause discomfort over time. Wired options may exert less pressure.
  • Ear padding: Quality padding ensures comfort during long listening sessions.
  • Headband adjustment: Both types offer adjustable bands, allowing for a custom-fit experience.

For sports enthusiasts, wireless design offers freedom of movement. In contrast, wired models eliminate worries about battery life or connection issues.

Style Versus Functionality

Fashion trends influence headphone design. Sleek, minimalist models often attract style-conscious consumers. Yet, functionality must not be compromised for style. A balance between the two includes:

Feature Style Functionality
Material Premium finishes Durable build
Controls Seamless buttons Intuitive access
Shape Unique contours Ergonomic design
Colors Vibrant options Colorfast materials

Wireless headphones often boast modern aesthetics plus touch controls for a futuristic feel. Wired headphones maintain classic vibes with reliable plug-and-play simplicity.


Connectivity And Compatibility

Connectivity and Compatibility are key factors in choosing headphones. Your device and headphones must talk to each other. Both wired and wireless options have unique ways to connect. Let’s explore these options.

Wired Headphone Connectivity

Wired headphones plug into your device. Look for a 3.5mm jack port on your device. This port lets headphones connect. No need for setup. Just plug in and enjoy steady sound. No lag. No battery needed. Always ready to use.

Bluetooth Pairing And Wireless Range

Wireless headphones need Bluetooth. Turn on Bluetooth on both devices. Find your headphones in the device list. Click ‘Pair’. Once paired, they connect automatically next time. Wireless headphones work within a range. This range is often about 33 feet (10 meters). Walls and obstacles can shorten this range. Be sure your device and headphones stay close enough for best sound.

Feature Wired Headphones Wireless Headphones
Connection Setup Plug-and-play Bluetooth pairing
Compatibility Devices with a headphone jack Bluetooth-enabled devices
Use Range Length of cable Up to 33 feet (10 meters)

Battery Life And Portability

When picking headphones, two crucial factors stand out: battery life and portability. Both can make or break your audio experience.

Charging Times

Wired headphones eliminate charging worries, always ready for use.

Wireless models require charging. You should consider charging speed and battery capacity.

Wireless Headphone Type Average Charging Time Playback Duration
In-Ear 1-2 hours Up to 8 hours
On-Ear 2-3 hours Up to 24 hours
Over-Ear 3-4 hours Up to 40 hours

On-the-go Considerations

Wireless headphones offer freedom and flexibility.

  • Perfect for travelers and active lifestyles.
  • No cables to tangle or restrict movement.
  • Compact cases often charge and protect your device.

Wired pairs are plug-and-play. Simple to use without battery worries.

  1. Extend playtime indefinitely.
  2. Ideal for studio work or desk jobs.
  3. Often lighter due to lack of batteries.
Wired Vs Wireless Headphones: Sound Clash Showdown


Credit: www.imore.com


Durability And Maintenance

Choosing the right headphones means considering how long they’ll last and how simple they are to keep in great shape. Wired and wireless headphones offer different experiences in both aspects. Let’s dive into what sets them apart.

Build Quality And Lifespan

Build quality directly influences how long your headphones will serve you. Wired headphones often boast strong cables and connections that can withstand regular use. Wireless headphones, on the other hand, rely on battery life, which can diminish over time.

Metal components tend to outlast plastic ones, so checking what your headphones are made from is key. Let’s compare in a simple table:

Feature Wired Headphones Wireless Headphones
Materials Used Metal, durable plastics, fabrics Varied, often lighter materials for portability
Battery Dependency None High
Typical Lifespan Longer due to physical connections Shorter, battery replacements needed

Ease Of Repair And Cleaning

When your headphones need a fix or a clean, the type matters. Wired headphones can sometimes be easier to repair because of their simpler build. The wired design allows easy access to cables and jacks.

  • Cable replacement can be straightforward.
  • Ear pads are often replaceable.
  • Cleaning is typically less complex.

Wireless headphones might present challenges:

  1. Batteries are often not user-replaceable.
  2. Complex circuits can make DIY repairs tricky.
  3. Need special care when cleaning electronic components.

Maintaining your headphones ensures they last longer, providing consistent quality sound over the years.


Pricing And Value For Money

Pricing and Value for Money are critical factors when choosing between wired and wireless headphones. The right choice balances cost and quality. Let’s dive into the cost implications and the value you can expect from each option, considering your listening habits.

Cost Comparison

Different headphones come with different price tags. Wired headphones often cost less than wireless ones. This is because they don’t have Bluetooth technology or batteries. But the price of wireless headphones has been dropping. More affordable options are now on the market.

Headphone Type Low-End Price High-End Price
Wired Headphones $10 $200
Wireless Headphones $20 $500+

Investment For Audiophiles Vs. Casual Listeners

Audiophiles seek the best sound. They might prefer high-end wired headphones for optimal sound quality. Casual listeners might opt for the convenience of wireless headphones.

  • Audiophiles: May invest in expensive wired headphones for finer sound details.
  • Casual Users: Often prefer wireless headphones for ease and mobility.

Value for money doesn’t mean the cheapest option. It means getting the best experience for the price paid.

End of the blog post section. Content adheres to HTML syntax suitable for WordPress.


Environmental Impact

Choosing between wired and wireless headphones isn’t just about sound quality or convenience. It also affects our planet. Let’s discuss the environmental impact, focusing on e-waste and sustainability.

E-waste Considerations

E-waste grows as electronic devices reach their end. Headphones are part of this problem. Wired headphones often have a longer lifespan. This means less waste over time. On the other hand, wireless headphones might get thrown away more often. This is due to battery life limits and fast tech changes.

  • Long-lasting materials help reduce e-waste.
  • Recycling old headphones can help the environment.
  • Battery disposal needs careful handling.

Sustainability Of Wired Vs. Wireless

Sustainability involves making things last long without harming our planet. Wired headphones use simple technology. They can last many years with good care. Wireless models may need new batteries. These batteries can harm the earth if not disposed of correctly.

Feature Wired Headphones Wireless Headphones
Battery Use No batteries Needs frequent replacing
Materials Less complex More complex with electronics
Lifespan Often longer Shorter due to battery

Consumer Preferences And Trends

People love music. They want good sound. Some like wires. Others like no wires. We look at what people like more. We use facts and guess the future.

Market Statistics

Numbers tell us a story. We see many picking wireless. But, wired ones still have fans. Let’s dive into facts.

  • Wireless popularity grows – More people buy Bluetooth headphones.
  • Wired loyalists – Some still choose wired for the price and quality.
  • Youth trends – Young users prefer wireless for style and ease.

Here is the data in a table.

Year Wireless Sales Wired Sales
2021 60% 40%
2022 65% 35%
2023 70% 30%

Future Predictions In Headphone Technology

What’s next for headphones? We think about it. We make good guesses. Let’s see what could happen.

  1. Better battery life – Wireless will last longer.
  2. Smart tech – Headphones may talk to us more.
  3. Eco-friendly options – More will care about our Earth.

Change is coming. We may see cool stuff in our headphones. We are excited!

Making The Right Choice

Choosing between wired and wireless headphones can be tricky. Think about what matters to you. Do you want freedom to move? Do you need the best sound? Your choice impacts your music, gaming, and calls.

Personal Needs Assessment

Start by asking yourself a few questions:

  • How long do I listen to music each day?
  • Do I need headphones for sport or travel?
  • Is sound quality my top priority?
  • How much can I spend?

Think about battery life for wireless choices. Remember, wired headphones don’t need charging. They offer consistent audio quality. They usually cost less too.

Recommendations For Various Scenarios

Scenario Wired Headphones Wireless Headphones
Long Flights Good choice. No battery worries. Great if they have long battery life.
High-Intensity Workouts They can get in the way. Not ideal. Perfect. They offer more freedom.
Audiophile Listening Best sound accuracy. Preferred. Can be good, but check the quality.
Tight Budget More affordable. Many options. Can be pricey. Look for deals.

Frequently Asked Questions Of Wired Vs Wireless Headphones


What Are The Pros Of Wired Headphones?


Wired headphones offer superior sound quality due to a direct electrical connection. There’s no battery life to worry about, and they’re usually more affordable than wireless options. Plus, they’re plug-and-play with no need for Bluetooth pairing.


Can Wireless Headphones Cause Connectivity Issues?


Yes, wireless headphones can sometimes face connectivity issues. This is because they rely on Bluetooth, which can be disrupted by interference or range limitations. However, advancements in technology are reducing these problems over time.


Are Wired Headphones More Durable Than Wireless?


In many cases, wired headphones can be more durable since they have fewer components that could malfunction, such as batteries or wireless circuitry. This simplicity can lead to a longer lifespan and less need for repairs or replacements.


Do Wireless Headphones Have Better Features?


Wireless headphones often come with advanced features such as noise cancellation, touch controls, and integration with voice assistants. As technology evolves, they continue to offer a more convenient and feature-rich listening experience.


Conclusion


Deciding between wired and wireless headphones boils down to lifestyle and preference. Consider the sound quality, convenience, and price tag. Your decision reflects your listening habits and tech desires. Explore both options; the perfect audio experience awaits. Let your ears choose their comfort.

Categories
Archive

Best Guitar Picks: Unleash Ultimate Strumming

The best guitar picks combine comfort, durability, and precision to enhance playability. Popular choices include Jim Dunlop, Fender, and Dragon’s Heart for their reliable performance across styles.


Selecting the ideal guitar pick is crucial for guitarists seeking to optimize their playing experience. Beginners and professionals alike understand that the right plectrum can influence their control, speed, and tone quality. Picks come in a plethora of shapes, sizes, and materials, catering to the varied preferences and techniques of players.


A good pick should feel like an extension of the fingers, allowing for seamless interaction with the strings. Many guitarists develop a preference for a particular type of pick based on their playing style, be it strumming chords or shredding solos. A top-notch guitar pick not only withstands the rigors of regular use but also contributes to the clarity and articulation of each note played. Therefore, investing in quality picks is a small yet significant step toward mastering the guitar.


Strumming Precision Secrets

Unlocking the skills for perfect strumming involves a tiny, yet mighty tool: the guitar pick. This essential accessory transforms your music. It can make or break the clarity of your strumming. To dive deep into the strumming precision secrets, consider the role of the right pick. It enhances control and brings out the best in your guitar playing.

The Magic Of The Right Pick

Every pick holds potential; yet, not all picks create the same sound. A pick that matches your style elevates your music. It ensures each strum resonates with intent. Soft melodies or blazing solos, the right pick works like a wand in your hands, making music magic. Let’s uncover the traits that make a pick perfect for you.

Grip, Flexibility, And Material

Controlling a pick is crucial for striking the strings accurately. Picks with a textured surface or ergonomic design provide a non-slip grip. This grip allows precise strumming without fearing the pick might slip away.

  • Flexibility impacts how the pick responds to the strings. Thin picks bend easily, great for a softer sound. Thicker picks give you a sharp, loud tone.
  • Materials vary widely, from plastic to metal to wood. Each material offers a unique sound and feel. Nylon picks are gentle and malleable. Tortex picks provide durability and a bright, clear tone.

Choosing the right pick takes your strumming to higher levels of accuracy and sound quality. Test different picks to find your match. Remember, the secret lies in a pick that feels like a part of you. It should glide over the strings effortlessly, leaving a trail of perfect notes behind.

Pick Characteristics Guide
Thickness Flexibility Material Sound Quality
Thin High flexibility Nylon Softer, more muted
Medium Moderate flexibility Celluloid Well-balanced, versatile
Thick Low flexibility Tortex Loud, clear tones
Best Guitar Picks: Unleash Ultimate Strumming Precision!


Credit: www.amazon.com


History Of Guitar Picks

Guitar picks have shaped music history for centuries, evolving with the times. Used by players to strum and pick guitar strings, they are as important to a guitarist’s tool kit as the guitar itself.

Early Materials And Shapes

Before modern plastic, picks came from natural materials. Early musicians shaped picks from shells, wood, metal, bone, and even amber.

Tortoiseshell – offered warm tonesWood – gave a soft touchBone – was durable and sharp

Their shapes varied from simple rounded forms to the more refined, heart-like contours musicians recognize today.

Evolution To Modern Picks

Advances in technology brought new materials such as celluloid, then later nylon and Tortex.

Transition to Modern Picks
Material Characteristics Introduced
Celluloid Versatile tone, colorful designs Early 1900s
Nylon Durable, wide range of gauges Mid 1900s
Tortex Mimics tortoiseshell, consistent quality Late 1900s

Today’s guitar picks offer an array of shapes, sizes, and textures, catering to various playing styles.

With striking technological advancements and a vast selection, guitarists can now find picks that perfectly match their needs.

Types Of Guitar Picks

Guitar picks come in different shapes, sizes, and materials. They can change how a guitar sounds. Picks let players hit strings in unique ways. This makes playing the guitar more fun and diverse. Let’s explore the various types of guitar picks available.

Standard Shapes And Sizes

Standard guitar picks are classics. Most players use them. They fit well in your hand. They give good control over strings.

  • Standard: The teardrop shape is popular. It works for many styles.
  • Jazz: Smaller and sharper for precision.
  • Triangle: Bigger with three tips to use.

Thickness is important too. Thin picks bend easily. Thick picks give a heavier sound. Medium picks offer balance.

Thickness Sound Characteristic
Light (<0.60mm) Bright and snappy
Medium (0.60mm – 0.80mm) Balanced tone
Heavy (>0.80mm) Warm and full-bodied

Innovative Picks On The Market

Guitar picks have evolved. New picks offer fresh ways to play. Creativity leads to better sound and comfort.

  • Ergonomic Picks: Fit better between fingers.
  • Textured Grips: Prevent slippage when playing.
  • Finger Picks: Loop around fingertips.

Materials make a difference too. Plastic, metal, wood, and stone change the tone. Players can pick the sound they like best.

  1. Plastic picks are versatile.
  2. Metal picks bring brightness.
  3. Wooden picks produce a warm tone.
  4. Stone picks offer unique richness.

Material Matters

When selecting a guitar pick, the material can transform your playing experience. Guitar picks come in various materials, each offering unique tones and grip levels. From the traditional celluloid to the innovative use of woods and metals, let’s explore how different materials can shape your sound.

Classic Celluloid Picks

Celluloid picks are the originals that many guitarists swear by. Available in a wide range of shapes and thicknesses, celluloid provides a smooth, warm tone. They are known for their versatility across music genres. Despite their popularity, these picks can wear down with heavy use. Here’s why many prefer them:

  • Natural feel that mimics the touch of tortoiseshell.
  • Smooth playing experience for fast runs and strumming.
  • Vibrant colors and patterns add a classic aesthetic.

Modern Nylon And Delrin

More recent advancements introduced nylon and Delrin picks. These synthetic materials offer increased durability and a different sound profile. Nylon picks are softer, giving a muted, mellow tone. They work well for strumming acoustic guitars. Delrin, on the other hand, is stiffer. It provides a more precise, crisp sound perfect for fast picking. Features include:

  1. Improved grip texture to prevent slipping.
  2. Consistent wear for a longer lifespan.
  3. A range of thicknesses for stylistic versatility.

Exotic Woods And Metals

Makers now craft picks from exotic materials like woods and metals, providing distinct tonal properties. Wooden picks can produce warm, organic tones. They uniquely respond to your playing dynamics. Metal picks, such as those made from copper or stainless steel, yield bright, sharp tones. They’re very durable but can also be more abrasive on your strings. The characteristics of these picks include:

Material Tone Quality Durability
Wooden Picks Warm and Rich Varies by Wood Type
Metal Picks Bright and Sharp High

Each material brings its unique flair to your music, and your choice can define your signature sound.

Thickness And Playing Styles

Guitar picks come in different thicknesses for unique playing styles. The thickness of a pick can change the sound and feel of play. It influences how a guitar responds to your touch. Whether you strum chords or pick individual notes, there’s a pick for you.

Thin Picks For Strumming

Thin picks are perfect for strumming acoustic guitars. Their flexibility creates a softer, more mellow sound. They glide across strings easily. This makes them a top choice for folk and acoustic pop.

  • Great for beginners
  • Less force needed
  • Produces a bright tone

Thick Picks For Articulation

Thick picks offer more control for articulate playing. They are ideal for electric guitars and solos. You get a pointed, clear note every time. Jazz and metal players often prefer these picks.

Pick Thickness Sound Quality Playing Style
Medium to Heavy Bold & Clear Lead Guitar & Solos
Extra Heavy Sharp & Precise Technical Riffs

Guitar Pick Grip Techniques

Mastering guitar pick grip techniques is key to improving control and comfort while playing. Different grips can change the sound and playability. Let’s explore techniques that help maintain a firm hold on your pick.

Textured Surfaces

Grip can slip when fingers sweat. Picks with textured surfaces provide extra hold. Here are ways they help:

  • Raised logos give thumbs a touch point.
  • Indented grips prevent pick spin.
  • Grooves and ridges enhance overall traction.

Texture varies from subtle to aggressive for different preferences.

Ergonomic Designs

Picks designed to fit the hand’s natural contours are ergonomic. Below are features:

Feature Benefit
Curved shape Reduces hand strain
Thick body Improves hold and reduces slipping
Tapered edges Allows smooth strumming

Players with different styles find ergonomic picks diverse and comfortable.

Custom Picks And Personalization

Welcome to the world of custom guitar picks and personalization. Guitar picks may seem like simple tools, but they hold the power to transform your playing style. Personalized picks offer a unique experience for every guitarist. Discover how to make your mark with branded options and creating custom designs.

Branded Options

Branded picks elevate your status on stage. They merge functionality with style. You can choose from a variety of established brands. Each brand comes with its signature design and material. See the following table for popular brands and their characteristics:

Brand Material Thickness Shape
Fender Celluloid Medium Classic
Dunlop Tortex Heavy Teardrop
Ernie Ball Delrin Extra Heavy Triangle

Creating Custom Picks

Creating your own personalized picks is a game-changer. These are the steps you take:

  1. Choose material (plastic, wood, metal).
  2. Decide on thickness (thin, medium, thick).
  3. Select a shape that fits your style (standard, jazz, teardrop).
  4. Design with graphics, text, or logos.
  5. Confirm your design and order quantity.

These picks can feature your band’s logo, your signature, or custom artwork. They are not just tools; they are your identity. High-quality printing services ensure your designs stay vibrant and clear, even after heavy use. Check out some unique pick designs:

  • UV-printed picks for bright, long-lasting images.
  • Laser-engraved picks for a tactile feel.
  • 3D-printed picks for intricate custom shapes and designs.

Own your sound and style with customized guitar picks. Let your creativity flow and make a statement with every strum!


Experts’ Picks And Recommendations

Finding the best guitar picks could take your playing to new heights. Expert guitarists have shared their favorites, and these picks are game-changers. Whether you strum acoustic melodies or shred electric riffs, choosing the right pick is vital. Let’s dive into the picks that professionals love and the popular choices across different music genres.

Professional Guitarists’ Favorites

  • Jim Dunlop Jazz III: Known for its precision and grip, a top choice among lead guitarists.
  • Fender 351 Classic Celluloid: The versatile shape and material offer a traditional feel beloved by many.
  • D’Addario Planet Waves: Eco-friendly options that don’t sacrifice tone or durability.

Many professional players opt for customizable picks too. They tweak thickness, shape, and material for the perfect feel. Popular custom brands include V-Picks and Gravity Picks. These picks are designed to match the unique playing style and preferences of the guitarist.

Popular Picks In Different Genres

Genre Preferred Pick Reason
Rock Tortex by Dunlop Offers strong attack and durability.
Blues National Metal Finger Picks Allows nuanced control for expressive playing.
Jazz Wegen Gypsy Jazz Picks Thick with a rounded edge for smooth, fast playing.
Acoustic D’Andrea Pro Plec Delivers a warm tone ideal for strumming.
Metal Ultex Sharp by Dunlop Provides precision and crisp sound for heavy riffs.

In different genres, thickness and pick shape directly influence sound and performance. Acoustic players often favor softer picks for a fuller sound, while rock and metal guitarists may choose sharper, thicker picks for more attack and speed.

Sustainable Picks For Eco-conscious Musicians

Sustainable Picks for Eco-Conscious Musicians are a game-changer. These picks align with a greener planet. They satisfy the need to create beautiful music. They also protect our environment. Discover how you can strum in tune with nature!

Biodegradable Options

Biodegradable picks are incredible. They’re made from natural materials, mostly. When discarded, they break down naturally. This means no harm to the earth. Some popular materials include:

  • Wood – Warm tone, unique feel
  • Stone – Durable, distinct sound
  • Starch-based plastics – Plant-based, renewable

These picks show that sustainability and quality can coexist. They function as well as traditional picks. But they leave a much lighter footprint on the earth.

Recycled Material Picks

Recycled material picks champion sustainability. They are crafted from used plastics and other materials. This practice prevents waste from ending up in landfills. Recycled picks often come from these sources:

Source Material Benefits
Old CDs Durable, glossy finish
Plastic Bottles Flexible, promotes recycling awareness
Credit Cards Firm grip, perfect for strumming

These picks bring new life to what once was waste. Musicians love them for their story and contribution. Industries innovate to turn trash into musical treasure.


Picks And Sound Dynamics

Did you know that a tiny guitar pick can shape the sound of music? It’s true! Picks, those small pieces of plastic, wood, or metal, play a big role in music. They help guitarists make different sounds. It’s like painting with new colors each time you switch picks. Let’s dive into how picks influence your guitar’s tone and how they vary across different music styles.

Impact On Tone

A guitar pick can change the sound of your music. A thick pick might make your guitar sound bold and strong. A thin pick might be better for a softer, gentler tune. Many musicians even choose picks based on their material for unique sounds. Here’s a look at how pick thickness and material can affect music:

Pick Thickness Sound Quality
Thin (less than 0.60mm) Bright and light
Medium (0.60mm to 0.85mm) Balanced with a mix of bass and treble
Heavy (more than 0.85mm) Rich and full with strong bass

Next, consider the material your pick is made from:

  • Plastic – Bright and snappy
  • Nylon – Mellow and warm
  • Wood – Varied tone with natural feel
  • Metal – Sharp and piercing

Variations Across Music Genres

Picks can also help you fit into a musical style. Different genres often favor certain pick types. For instance, rock guitarists might use thick picks for power chords. Folk musicians might choose thinner picks for strumming. Here are some common picks used in different genres:

  1. Rock: Thick picks for driving riffs
  2. Jazz: Dense picks for articulated notes
  3. Acoustic: Thin to medium picks for softer sound
  4. Blues: Various for personal style

Understanding the relationship between picks and the sounds they produce is crucial. Try experimenting with different picks. You might be surprised at how much your playing can change with this small, but important, accessory.

Caring For Your Picks

Guitar picks are essential to your playing style. Just like your guitar, they need care. Proper maintenance extends their life. Storage preserves their shape and sound. Every guitarist should know how to care for their picks.

Maintenance And Storage

Keep your picks performing with these steps:

  • Clean them regularly with a soft cloth and mild soap.
  • Dry them completely to prevent warping.
  • Store picks in a cool, dry place.
  • Use a pick holder or case for better organization.

Store picks away from direct sunlight. This prevents damage to materials like celluloid.

Consistent care extends your pick’s performance. It also ensures a flawless playing experience.

Preventing Loss And Wear

Picks can vanish or wear down. Avoid this with these hacks:

  1. Attach adhesive pick grips to keep them in hand.
  2. Rotate picks to distribute wear evenly.
  3. Use a pick punch to make new ones from old cards.
  4. Stay organized with dedicated pick pockets in gig bags.

Prevent loss by attaching picks to mic stands or using pick holders.

Avoid over-gripping, which can cause unnecessary wear and fatigue.

Maximizing Performance With The Right Pick

The right guitar pick can elevate your playing to new heights. The journey to find the perfect pick is crucial. Picks shape your sound and comfort. Let’s dive into how to choose the one that maximizes your performance.

Testing Different Picks

Experimentation is key as a guitarist. Various thicknesses, shapes, and materials affect your play style.

  • Thin picks: Offer a lighter, brighter sound. Great for strumming.
  • Medium picks: Balance flexibility and firmness. Versatile for different styles.
  • Thick picks: Produce a warmer, more controlled tone. Ideal for intricate solos.

Don’t forget to test your grip. Texture matters for control. Record your sessions to hear the differences. Your choice should complement your technique and genre. Use a simple rating system to judge the picks on feel, sound, and playability.

The Final Verdict: Choice Matters

The right pick can make or break a performance. It’s the bridge between you and your guitar.

Feature Impact on Performance
Thickness Determines flexibility and tone
Shape Influences precision and comfort
Material Affects sound character and durability

Remember, the goal is to find your unique sound and feel. A pick that is too flimsy may not sustain through aggressive strums. One that is too stiff could hinder your strumming patterns. Balance is essential.

Your selection should align with your playing style. Pick thickness = Tone + Control. Sharp tips for precision, wider tips for a softer attack. Ultimately, personal preference defines your choice. Commit to a pick that feels right and watch your playing improve.


Frequently Asked Questions For Best Guitar Picks


What Are The Top Guitar Picks For Beginners?


For beginners, lighter guitar picks between 0. 44mm and 0. 7mm are best. They offer easier strumming and a smoother learning curve. Popular choices include the Dunlop Tortex Standard and Fender Premium Celluloid picks. Comfort and control are key for starters.


How Do Guitar Pick Thicknesses Affect Tone?


Thicker picks, often ranging from 0. 8mm to 1. 5mm, produce a deeper, fuller tone with more attack. They’re preferred for precision and control during solos. In contrast, thinner picks give a brighter sound and are more suited for strumming chords.


Personal preference plays a significant role in the chosen thickness.


Can Pick Shape Influence Guitar Playability?


Yes, pick shape can significantly affect playability. Standard teardrop picks offer a good balance for beginners. Jazz picks, with a sharper tip, provide precision for lead guitarists. Triangular picks offer more surface but can be less maneuverable. Experimentation is key to find the shape that complements your playing style.


Why Choose Textured Guitar Picks?


Textured guitar picks provide extra grip, reducing the chance of the pick slipping during play. This can be beneficial for players with sweaty hands or those needing more control during fast or technical pieces. Examples include the Max Grip series from Jim Dunlop.


Conclusion


Choosing the right guitar pick can elevate your playing and tone. From flexibility to material, your selection shapes your music’s sound and feel. Don’t hesitate to experiment with different picks to discover your unique style and comfort. Let your pick be the bridge between you and your guitar, enhancing every strum and pluck.

Categories
Archive

Aac Vs Mp3: Unveiling the Best Audio Format!

AAC provides better sound quality at the same bitrates as MP3, making it the superior format for audio compression. MP3, however, is more universally compatible across various devices and platforms.


Audio format discussions often highlight AAC and MP3, two methods of compressing digital audio without significant quality loss. AAC, which stands for Advanced Audio Coding, has gained a reputation for delivering higher audio quality than MP3 at equivalent bitrates. This efficiency makes AAC a preferred choice for streaming services and modern devices.


Still, MP3 remains the most widely supported audio format, renowned for its compatibility and the ease with which users can playback on almost any digital device. Providing a balance between file size and audio fidelity, both AAC and MP3 have solidified their presence in the digital audio sphere, each with their unique advantages for listeners and content creators. As technology progresses, the debate between AAC and MP3 continues, with each format catering to different needs within the audio industry.


Aac And Mp3 Defined


AAC and MP3 are two audio encoding formats widely used for digital sound. While MP3 is known for its ubiquity and decent sound quality, AAC offers improved compression and sound over MP3 at equivalent bit rates, making it a preferred choice in modern applications.

When we talk about digital audio, two formats often come to the forefront: AAC and MP3. These file types have revolutionized how we listen to music, providing a way to enjoy tunes without physical media. Understanding their differences and strengths allows users to select the best audio format for their listening needs. Let’s decode the basics of these popular audio codecs.

Aac: Advanced Audio Coding

AAC stands for Advanced Audio Coding. It’s a digital audio codec that compresses files with a higher efficiency than MP3. The main goal of AAC is to deliver high-quality sound in a smaller file size. This makes AAC the preferred codec for platforms like iTunes and YouTube. Here are some key points:

  • High Efficiency: Delivers better sound quality at the same bit rate.
  • Apple’s Choice: The default format for the iTunes store and Apple products.
  • Supports: Surround sound and is ideal for higher-resolution audio.

Mp3: The Pioneering Music Codec

MP3, short for MPEG-1 Audio Layer III, is an audio codec that uses lossy data compression to encode data. MP3 became the standard for digital music files in the early internet era and paved the way for today’s streaming services. Despite newer codecs, MP3 remains widely used due to its universality and compatibility with virtually all playback devices. Key features include:

  • Wide Compatibility: Plays on nearly every digital device.
  • History Maker: Led to the popularization of digital music.
  • Smaller Files: Allows for large music libraries in limited space.
Aac Vs Mp3: Unveiling the Best Audio Format!


Credit: www.sageaudio.com


Evaluating Sound Quality

When choosing between AAC and MP3, sound quality plays a big role. How do these formats stack up? Let’s delve into the specifics.

Compression And Audio Fidelity

AAC (Advanced Audio Coding) and MP3 (MPEG Audio Layer III) are both audio compression formats. Compression reduces file size.

But it can also affect sound quality. AAC was designed to be the successor of MP3. It often provides better sound quality at the same bit rate.

Here are some comparisons:

  • Compression Efficiency: AAC is more efficient than MP3.
  • File Size: AAC files are smaller than MP3 files with similar audio quality.
  • Audio Fidelity: AAC tends to preserve more sound details than MP3.

AAC uses a more advanced compression algorithm. This helps keep sounds clear and crisp.

Subjective Listening Tests

Listening tests give us real feedback. People listen and judge the quality of the sound.

In subjective tests:

  1. Listeners compare AAC and MP3 files.
  2. They rate sound clarity, richness, and enjoyment.
  3. Tests often show AAC outperforms MP3 in quality.

Many report AAC files sound clearer. This is especially true at lower bit rates.

Distinguishing between formats can be tough with high-quality files.

But AAC generally gets better reviews from listeners for overall sound.

Decoding Compatibility

As we dive into the world of digital audio, compatibility remains a key concern. Users often wonder whether their favorite tunes will play seamlessly across a range of gadgets. Let’s unravel the compatibility of AAC and MP3 formats. Each possesses unique traits that influence their playback across various devices.

Ubiquity Of Mp3 Players

The MP3 format is practically synonymous with digital audio. Since its inception, MP3 has established a mighty presence. Nearly every digital device supports MP3 playback. From early iPods to car stereos, MP3’s compatibility is virtually unmatched.

  • Smartphones: All can play MP3 files.
  • Computers: Whether Windows, macOS, or Linux, MP3s work smoothly.
  • MP3 players: Dedicated to playing MP3s without a hitch.
  • Home theater systems: Crafted to pump out MP3 tunes effortlessly.

Aac Adoption In Modern Devices

AAC, the Advanced Audio Coding format, offers improved sound over MP3 at similar bitrates. Modern gadgets are embracing AAC due to its superior audio clarity.

Device Type AAC Compatibility
Smartphones iPhone and Android devices include built-in support for AAC files.
Computers Mac computers favor AAC, often used within iTunes. Windows 10 and newer also support AAC playback.
Game Consoles Modern consoles like PlayStation and Xbox support AAC for a richer gaming experience.
Streaming Services Many prefer AAC for streaming music, given its high-quality audio at lower bandwidths.

Portable speakers and modern car entertainment systems align with this trend, ensuring AAC files play seamlessly.

File Size And Storage Considerations

Choosing between AAC and MP3 often depends on file size and storage. Both have pros and cons. Let’s dive into how these formats differ in terms of storage space and what that means for users.

Comparing Bit Rates And File Sizes

Bit rate affects audio quality and file size. AAC files often sound better than MP3s at the same bit rate. Yet, this can lead to larger files for AAC. The table below shows typical sizes for a 3-minute song:

Format Bit Rate (kbps) File Size (MB)
AAC 256 ~6.0
MP3 256 ~5.8

At the same bit rate, file sizes are close, but AAC files may be slightly larger.

Storage Impact On User Experience

File size directly impacts how much music you can store. On a device with limited storage:

  • AAC might mean less songs.
  • MP3 could offer more tunes.

Choosing a lower bit rate can save space, but may reduce audio quality. It’s all about balancing needs. More storage allows for higher-quality files and better user experience.

Consider this for different devices:

  • Phones: More songs or better quality?
  • Music Players: Space matters less with expandable storage.


The Role Of Bitrate

When discussing the quality of audio files, bitrate plays a crucial role. Bitrate refers to the amount of data processed per second in a digital audio file. Both AAC (Advanced Audio Coding) and MP3 (MPEG Audio Layer III) are audio coding formats. They use different compression mechanisms. Bitrate affects the sound quality and file size of AAC and MP3 formats. Let’s dive into understanding bitrate and how to select the optimal rate.

Understanding Bitrate Levels

Higher bitrate means more data, which usually leads to better sound quality. However, it also increases the file size. Bitrate is measured in kilobits per second (kbps). AAC and MP3 files can range from low to high bitrates.

Bitrate Quality AAC MP3
Low (<128 kbps) Fair Poor
Medium (128-256 kbps) Good Fair to Good
High (>256 kbps) Excellent Very Good

AAC is known for better sound quality at the same bitrate. This efficiency makes it a preferred format by many streaming services.

Optimal Bitrate Selection

  • Consider the playback device
  • Balancing between file size and sound quality
  • Usage: streaming or storage

Selecting the ideal bitrate depends on your needs. Portable devices with limited space benefit from lower bitrates. High-fidelity systems shine with higher bitrates. For AAC, 256 kbps offers a good blend of quality and file size. On the other hand, MP3 files sound best at 320 kbps. Yet, they will take up more space. Choose the optimal bitrate after considering your storage and quality requirements.


Example code snippet for setting bitrate when encoding AAC or MP3
ffmpeg -i input.wav -codec:a libfdk_aac -b:a 256k output.m4a

Experiment with different bitrates to find the best quality-to-size ratio for your needs.

Licensing And Restrictions

When picking audio formats, licensing and restrictions matter a lot. MP3 and AAC have different rules that affect their use. Knowing these can help you choose the right format for your needs. Let’s look at the expenses and policies linked to MP3 and AAC.

The Cost Of Using Mp3

MP3 was once under a strict patent and licensing regime. This meant users had to pay fees. Now, the patent has expired. Anyone can use MP3 without cost. This change made MP3 a strong choice for creators.

Aac And Its Licensing Policies

AAC, known for better sound at the same bitrate, has its own rules. Fraunhofer IIS develops it, and using AAC may require licensing fees. The costs vary based on application and volume. AAC’s quality benefits make it worth considering despite this.

Here’s a quick comparison:

  • MP3: Free to use, no longer under patent
  • AAC: May require licensing fees, offers better quality


Impact On Streaming Services

The ‘Impact on Streaming Services’ has become a pivotal discussion with the rise of digital audio. As streaming reigns supreme in delivering music to the masses, the format of that audio—whether AAC or MP3—plays a crucial role. Both have unique traits influencing quality, compatibility, and efficiency.

Adoption By Major Streaming Platforms

Major streaming services have carefully selected their preferred audio formats. Their choices significantly affect user experience and tech advancements. Let’s explore the dominant platforms and their picks:

  • Spotify: Ogg Vorbis, with plans to use AAC for better quality
  • Apple Music: Heavily invested in AAC due to its enhanced sound at lower bitrates
  • Amazon Music: Offers a range of formats, including MP3 and AAC

Bandwidth Utilization

Bandwidth is a hot commodity in the streaming industry. AAC and MP3 handle it differently:

Format Bandwidth Efficiency
AAC More efficient, uses less data for high quality
MP3 Less efficient, requires more data for comparable quality

In an era where data limits exist, AAC’s efficiency is a big win for users and services alike. It translates to smoother streaming, even on slower networks.

Aac Vs Mp3: Unveiling the Best Audio Format!


Credit: www.amazon.com


Looking To The Future

Looking to the Future, the debate between AAC and MP3 formats is evolving. Music lovers and audiophiles are always on the lookout for high-quality audio experiences. Innovative formats and changing listening habits highlight the progression in how we consume music and audio content.

Emerging Audio Formats

New audio codecs emerge, promising enriched sound quality and improved compression. Consider the following:

  • Opus – boasts versatility, great for music and speech.
  • MPEG-H 3D Audio – delivers immersive 3D soundscapes.
  • Dolby Atmos Music – creates a multi-dimensional audio experience.

Trends In Digital Audio Consumption

Listening habits have shifted dramatically:

  1. Streaming Services gain momentum, offering vast libraries.
  2. Smart Devices and voice assistants push hands-free listening.
  3. High-Resolution Audio gains traction among audiophiles.

Better technology paves the way for these advancements in audio consumption.


Frequently Asked Questions On Aac Vs Mp3


What Is The Difference Between Aac And Mp3?


AAC is a newer audio codec that provides better sound quality at similar bitrates compared to MP3. It uses advanced compression techniques to deliver cleaner audio. While MP3 is more universally compatible and has been the standard for years, AAC is preferred for better sound.


Is Aac Better Than Mp3 In Quality?


Yes, AAC generally offers better audio quality than MP3 at the same bitrate. It’s designed to achieve higher sound quality with efficient compression, making it a preferred format for modern audio applications and streaming.


How Does Aac Compression Compare To Mp3?


AAC compression uses a more advanced algorithm than MP3, resulting in higher sound quality at similar or even lower bitrates. This efficiency makes AAC a superior choice for compressing audio without significant quality loss.


Can Mp3 Players Support Aac Files?


Not all MP3 players support AAC files. Compatibility depends on the device and firmware. However, many newer MP3 players and multimedia devices have AAC support due to its growing popularity and better sound quality.


Conclusion


Navigating the nuances between AAC and MP3 can significantly impact your digital audio experience. As you curate your music library or produce content, remember that AAC offers better sound quality at the same bitrate. Yet, MP3 remains the universal format, compatible across various devices.


Choose wisely to suit your needs and ensure an optimal auditory journey.