Categories
Archive

La2A Hardware Vs Plugin

The La2A hardware and plugin each have their own advantages and disadvantages. The hardware provides a warm and organic sound but can be expensive, while the plugin is more affordable and easier to use but lacks the same analog feel.

The music-production community has widely debated LA2A hardware versus the plugin. Studios have relied on LA2A hardware for decades, and it has a reputation for a warm and organic sound. However, due to the high demand for analog equipment, the hardware can be quite expensive and challenging to maintain.

Related reading: MIDI, Controllers and Hardware: The Complete Guide Hub and Api 2500 Compressor. For background, see www.uaudio.com on Wikipedia.

On the other hand, the La2A plugin is more affordable and easier to use than the hardware, making it more accessible to home-studio producers. However, the plugin lacks the analog feel present in the hardware and can sometimes sound sterile. We will explore the differences between La2A hardware and plugin to help producers choose the best option for their recording needs.

Overview Of La2a Hardware

The La2A hardware is a classic compressor/limiter that adds warmth and character to sound recordings. It is often compared to plugin versions of the device, which aim to replicate its unique sound in a more convenient digital format. While plugins can be more affordable and easier to use, many producers and musicians swear by the authentic analog sound of the hardware.

La2A is a legendary analog compressor/limiter that has been a staple in music production for over half a century. It first appeared in the 1960s, and engineers have since used it on countless hit records. The La2A has a reputation for smooth and natural compression, which comes from its optical gain reduction system. The hardware version is considered by some to be the holy grail of compressors, while the plugin version is a popular choice for those who want to achieve the same sound without the high cost of the hardware unit.

LA2A Hardware: Design And Features

The La2A hardware unit has a distinctive look that sets it apart from other compressors. It has two large knobs for input and gain reduction, as well as smaller knobs for output and metering. The metering on the La2A is unique, with a large needle that responds to both input and gain reduction. One of the standout features of the La2A is its optical gain reduction system. This works by using a light-sensitive resistor to control the gain of the signal passing through the compressor. As the signal gets louder, the resistor becomes more resistant to the light, which reduces the gain of the signal passing through.

Sound Quality

The sound quality of the La2A hardware unit is often described as warm and natural. Its optical gain reduction system is the key to this sound, providing a smooth and transparent compression that is difficult to achieve with other compressors. The La2A plugin also aims to replicate this sound, although some argue that it doesn’t quite match up to the hardware version. However, the plugin is still a popular choice for those who want the La2A sound without the high cost of the hardware unit.

LA2A Hardware: Pros And Cons

Pros of La2A Hardware:Cons of La2A Hardware:Pros of La2A Plugin:Cons of La2A Plugin:
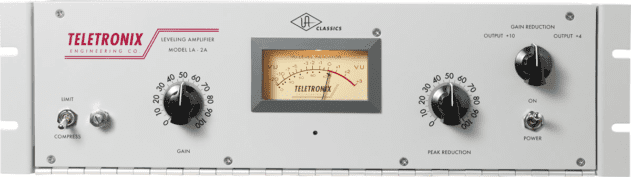
La2A Hardware Vs Plugin

Credit: www.attackmagazine.com

LA2A Hardware: Overview Of La2a Plugin

When it comes to choosing between using hardware or software-based processing for your audio projects, it can be a difficult decision to make. The La2A compressor is a classic piece of analog hardware equipment that has been used in studios for decades. Its warm, smooth sound has made it a favorite among many producers and engineers. In recent years, however, many developers have created software versions of the La2A compressor that emulate its sound and behavior. In this article, we will discuss the La2A plugin in detail and compare it to the hardware version.

Design And Features

The design of the La2A plugin is straightforward and simple. It typically consists of a single interface with just a few knobs and buttons. This minimalist design is intentional, as it reflects the original hardware unit. The plugin interface usually includes the input and output gain knobs, as well as the peak reduction knob that controls the compression level. Some plugins also include a switch that allows you to choose between the different “character” options, which vary the amount of harmonic distortion in the signal.

Sound Quality

In terms of sound quality, the La2A plugin is a very close emulation of the original hardware unit. Most developers use advanced modeling algorithms and digital signal processing techniques to recreate the sound and behavior of analog hardware. While there will always be some differences between software and hardware, the quality of recent plugins has reached a point where it can be almost impossible to distinguish the two without close listening.

Pros And Cons

ProsCons
– Cost-effective option compared to owning the hardware
– Easy to use and configure
– Takes up less physical space compared to the hardware
– More options and presets available
– Requires a computer with high processing power to run
– Can sound “too clean” compared to analog
– Can be tedious for users who prefer the tactile experience of adjusting hardware
– Plugins often need updating and maintenance

Ultimately, the decision to use a hardware La2A compressor or a software plugin comes down to personal preference and workflow. For those who want the classic analog sound and hands-on experience, hardware is the way to go. However, for those who want an affordable and easy-to-use alternative that still sounds great, a La2A plugin is a viable option.

Ease Of Use

The difference between La2A hardware and plugin has been a discussion among sound professionals for some time. One of the critical factors that affect the choice between these two is ease of use. This section examines the ease of use of the La2A Hardware and Plugin.

Hardware Vs. Plugin

When it comes to ease of use, there are significant differences between La2A hardware and plugin.

HardwarePlugin
Physical device, requires space, power, and manual operationSoftware-based, minimal physical space, and easy-to-access interface
Precise sound control for a professional audio engineerQuick and easy controls for even a non-sound professional
Expensive, requires maintenance and repairAffordable with free updates and minimal system requirements

LA2A Hardware: Workflow Comparison

The workflow difference between La2A hardware and plugin also impacts ease of use.

  1. The hardware takes time to warm up, while the plugin is ready for use instantly.
  2. The use of a hardware device requires knowledge about audio-routing, while the plugin is easily accessible within the DAW (Digital Audio Workstation) workflow.
  3. The hardware requires cables and patching, while the plugin requires only a mouse or a controller device.
  4. The hardware may require more effort, tools, and time for use, while the plugin can work ‘plug-and-play’.

In conclusion, while La2A hardware offers precision and is favored by professional audio engineers, the plugin is easier to use, quicker, and affordable. This makes it more accessible to a broader range of users and fits well with modern workflow preferences. Your choice depends on your budget, workspace, and desired audio quality.

La2A Hardware Vs Plugin

Credit: m.youtube.com

Flexibility

When it comes to recording, processing, and editing audio, choosing the right gear is crucial. Among many audio processors available, the La2A is still one of the most popular tools due to its unique warmth and character. The La2A has been an essential device for many engineers and producers over the years. It’s clear, however, that with the development of new technology and the rise of software emulation, there is now a tough decision to make: to go for the physical hardware or the software plugin version of the La2A. In this blog post, we’ll focus on the flexibility aspect of both hardware and plugin versions and help you decide which works best for you.

Hardware Vs. Plugin

One of the primary concerns when choosing between the hardware and plugin version is the flexibility. Hardware units are fixed, and once you purchase them, you are limited to using them only in the studio. On the other hand, plugins offer much more flexibility which is crucial for some recording settings.

LA2A Hardware: Customization Options

When it comes to customization, software plugins undoubtedly win. Unlike hardware, software offers an endless array of options to tweak and fine-tune the sound. You can customize things like attack, release, ratio, and threshold, among others, making it more flexible in a recording session. For instance, you can easily automate parameters of the plugin to create time-based effects, something that would obviously be impossible with hardware. Additionally, plugins often come with presets that can help you jumpstart your work and achieve desired sounds quickly.

On the other hand, hardware units are more straightforward in their design and operation. They can sometimes be limiting in terms of availability of features and customization options as they have a set circuitry that cannot be changed. However, the lack of features in the hardware versions can make it easier to get a great sound quickly, compared to a plugin, which might need a lot of parameter tweaking before it sounds great.

In conclusion, hardware and software offer different levels of flexibility. If you are limited by space, budget, or need to use the La2A on the go, then the plugin is the obvious choice. Hardware units have a unique way of handling dynamics and they are preferred by many users as they provide a more “authentic” sound. Whatever your choice, both the hardware and plugin versions have their advantages, and the decision ultimately depends on your individual preferences and needs.

Pricing

The La2A hardware and plugin options come with different pricing structures. While the plugin is more affordable, the hardware option features old-school analog warmth that can be worth the extra investment for certain types of music production. Ultimately, the choice between the two options depends on the individual needs and budget of the user.

When it comes to choosing between a hardware La2A compressor or a software plugin, pricing is often a key consideration. With the hardware being a physical unit and the plugin being a software product, the costs can vary significantly. This section will break down the costs of each option and explore whether they offer value for money.

Hardware Costs

The hardware La2A compressor is a classic studio staple that has been sought after for decades. It is a physical device that requires manufacturing, shipping, and handling – all of which contribute to the cost. The cost can vary depending on the condition and age of the unit, but brand new units can range anywhere from $2,500 to $4,000. These costs can be a significant investment for studios, especially for those just starting up.

LA2A Hardware: Plugin Costs

In recent years, software plugins have become increasingly popular alternatives to hardware units. They offer the same functionality and sound quality as their physical counterparts, and at a fraction of the cost. Plugin costs can vary greatly, with some being free to download and others being priced at several hundred dollars. As with most things, you get what you pay for, so it is important to research and invest in high-quality plugins to get the best results.

Value For Money

When it comes to value for money, there is no one-size-fits-all answer. It ultimately depends on the needs and budget of the individual. For those who can afford it, investing in a hardware La2A compressor can be a valuable asset to their studio setup. However, for those on a tighter budget, investing in high-quality plugins can provide similar results without breaking the bank. It is important to consider the overall cost, longevity, and effectiveness of each option before making a decision.

Real-world Examples

The La2A hardware and plugin are two options available for music production and differ in terms of cost and performance. Real-world examples show that the hardware offers a warm analog sound while the plugin is more convenient and budget-friendly.

Real-World Examples: When it comes to recording and producing music, using the right equipment can make a world of difference in the quality of the final product. In recent years, there has been a great debate between using hardware or software plugins for various effects. One of the most contested comparisons is between the classic LA-2A hardware and its plugin counterpart. Here we will compare the real-world examples of hardware and plugin use in both professional studios and home studios.

Hardware Use in Professional Studios: The LA-2A hardware is a renowned piece of equipment used in many professional studios around the world. It is widely considered to add warmth, depth and character to vocal recordings, guitars, and other instruments. By using analog circuitry and vacuum tubes, the LA-2A hardware imparts a unique sonic signature to the source material, creating a natural compression effect that gives recordings a sense of fullness and clarity. This is particularly valuable in high-end studios, where quality and attention to detail are paramount.

LA2A Hardware: Tips

Plugin Use in Home Studios: In contrast, plugin versions of the LA-2A have become more and more popular among home studio producers. These digital versions are convenient since they don’t require the expensive hardware and associated maintenance costs. The software version of the LA-2A plugin aims to emulate the original hardware, using various algorithms and software programming to replicate its analog sound. Despite some subtle differences, plugins have a significant advantage in terms of cost, integration, and flexibility. Comparing Results: Both the hardware and plugin versions of the LA-2A have pros and cons.

However, the real question is, how do the results compare? In a side-by-side comparison, many producers found that the digital emulation was almost as good as the hardware itself. While the hardware may have a more organic sound, the plugin can be more precise. Furthermore, the plugin version of LA-2A adds to the convenience as it is entirely integrated into most DAWs. The hardware version of the LA-2A may require the need for additional equipment to be used, and recent hardware can cost thousands of dollars.

In conclusion, whether to choose hardware or a plugin depends on various factors, such as budget, workflow, sonic aesthetic, and personal preferences. Based on real-world examples, we can state that while plugins are getting closer to their hardware counterparts, they still can’t perfectly match all the behaviours of how the hardware works. However, plugins remain a popular choice among the contemporary music producers, especially for home studios, where convenience and workflow dominate over sonic aesthetic.

La2A Hardware Vs Plugin

Credit: gearspace.com

Frequently Asked Questions Of La2a Hardware Vs Plugin

Why Is La-2a So Good?

The LA-2A is a high-quality compressor due to its unique analog circuit, which delivers warmth and character to audio. Its electro-optical design allows it to react quickly and smoothly to changes in the audio signal. Its simplicity makes it easy to use even for beginners.

What Is The Difference Between 1176 And La-2a For Vocals?

1176 is a FET compressor that can add punch and presence to vocals, while the LA-2A is an optical compressor that adds warmth and smoothness. Both are popular for vocals, but the choice depends on the desired sound and style of the song.

What Type Of Compressor Is La-2a?

The LA-2A compressor is a tube optical compressor.

How Do You Use 1176 And La-2a Together?

To use 1176 and LA-2A together, first insert the 1176 before the LA-2A in your signal chain. Use the 1176 to add fast, aggressive compression. Then use the LA-2A to add smooth, transparent compression. The combination of the two can create a professional and engaging sound.

Conclusion

After analyzing both the La2A hardware and plugin, it’s clear that both offer exceptional sound quality. While the hardware may be more expensive and require more space, it provides a unique analog warmth that’s hard to replicate with a plugin.

On the other hand, a plugin is more flexible, cost-effective, and convenient, making it a great choice for those looking to have a similar sound without the price tag of hardware. In the end, it all comes down to personal preference, workflow, and budget.

Categories
Archive

How To Use Saturation

Knowing how to use saturation is one of the quickest ways to make digital productions sound warmer, fuller and more exciting. In audio, saturation is the gentle distortion that happens when a signal pushes analog gear such as tape, tubes or transformers. It adds harmonics, softens peaks and makes sounds feel more present, often without making them noticeably louder.

What Saturation Does to a Sound

When a signal is driven into saturation, the circuit or algorithm starts to round off the tops of the waveform. That creates new harmonics, which are frequencies related to the original notes.

  • Even-order harmonics (2nd, 4th) tend to sound warm and smooth. They’re often associated with tube circuits.
  • Odd-order harmonics (3rd, 5th) tend to sound edgier and more aggressive. They’re associated with tape and transistor clipping.

Saturation also acts a little like a soft compressor, because peaks get rounded off. That’s why a saturated drum bus can feel denser and glued together. For the theory in more depth, read what audio saturation is.

Common Types of Saturation

Tape

Tape saturation softens transients, adds subtle compression and can add low-end warmth. Many tape emulations also model wow, flutter and hiss. It’s great on drums, buses and whole mixes.

Tube

Tube-style saturation adds richness and thickness, especially in the low mids. It suits vocals, bass and keys.

Transformer and Console

These are subtle colorations modeled on mixing desks and transformers. They’re often used lightly across many channels for a cohesive “analog” feel.

Clipping and Distortion

Harder clipping adds aggression and can raise perceived loudness on drums and 808s. Push it further and it becomes an obvious creative distortion.

How to Use Saturation Step by Step

  1. Set your input level. Most saturators react to how hard you drive them. Start with the drive low.
  2. Increase drive slowly until you hear the sound thicken, then back off slightly.
  3. Match the output level. Saturation often adds volume. Compensate so you’re judging tone, not loudness.
  4. Use the mix (dry/wet) control. Parallel saturation blends added harmonics with the clean transient.
  5. EQ after saturating if needed. Added harmonics can build up harsh highs or muddy low mids.

Where Saturation Works Best

Bass and 808s

Low bass notes can disappear on small speakers that can’t reproduce the fundamental. Saturation adds upper harmonics that the ear uses to “fill in” the missing low note, so the bass line stays audible on phones and laptops. It’s one of the most useful saturation tricks in modern production.

Drums

On a drum bus, tape or console saturation can glue the kit together and tame spiky transients. On snares, a little extra drive adds crack and body.

Vocals

Gentle tube saturation helps a vocal cut through a dense mix without heavy EQ boosts. Use the dry/wet control to keep it natural.

Synths and Pads

Soft saturation adds movement and analog character to sterile digital synths.

Mix Bus

A very light touch can add cohesion. Keep it subtle, because it affects every element.

For combining saturation on the low end, see how to glue kick and bass with saturation.

Common Saturation Mistakes

  • Saturating everything heavily. Stacked harmonics on every track lead to a harsh, fatiguing mix.
  • Not level-matching. Louder will always seem better at first listen.
  • Ignoring aliasing. Some digital saturators create unwanted high-frequency artifacts. Oversampling options can reduce this.
  • Losing transients. Too much tape-style saturation can flatten drums. Use parallel processing to keep punch.

Choosing a Saturation Plugin

You don’t need expensive tools to start. Many DAWs include a saturator, and plenty of free options exist. Our list of the best free saturation plugins is a good starting point. Look for a dry/wet control, output gain, a choice of saturation styles and oversampling.

Saturation vs Distortion vs Overdrive

These terms overlap, and plugin makers use them loosely. A useful way to think about them is as points on one scale:

  • Saturation is the subtle end. You feel the added warmth and density more than you hear obvious distortion.
  • Overdrive is the middle ground, often associated with guitar amps pushed just past clean. The grit is audible but still musical.
  • Distortion is the heavy end, where the waveform is clipped hard and the effect becomes a defining part of the sound.

The same plugin can often cover all three, depending on how hard you drive it. Start subtle in a mix, and save heavier settings for creative sound design.

A Quick Saturation Checklist

Before you move on from a saturated sound, run through a few quick checks. Bypass the plugin at matched volume and confirm the sound is genuinely better. Listen in the context of the full mix, not in solo. Check the low end on headphones and small speakers. Finally, make sure the harmonics haven’t made the high end harsh. If everything passes, you’ve used saturation well.

Frequently Asked Questions

Is saturation the same as distortion?

Saturation is a mild form of distortion. Saturation usually means subtle, musical harmonics, while distortion often refers to heavier, more obvious effects.

Should I saturate before or after compression?

Both work. Saturating before a compressor gives the compressor a denser signal. Saturating after adds color to the already-controlled sound. Try both and listen.

Can I use saturation in mastering?

Yes, but very gently. Small amounts can add cohesion and perceived loudness, while too much will make a master harsh.

Why does my bass sound louder on phones after saturation?

Saturation adds upper harmonics that small speakers can reproduce, so your ear perceives the bass note even when the speaker can’t play the fundamental.

For more background, see Distortion (music) on Wikipedia.

Categories
Archive

How To Mix A Vocal

To mix a vocal, first, make sure the vocal track is recorded clearly, then apply EQ, compression, and effects based on the style and genre of the song. Mixing vocals can be challenging, but with the right techniques and tools, you can produce a polished and professional sound.

Mixing a vocal is a crucial part of music production. It can make or break the quality of the song. In order to mix a vocal, you need to have a clear understanding of the sound you want to achieve, as well as the tools and techniques needed to achieve that sound.

Typically, you will start by focusing on the individual vocal track, making sure it is clear and without any unwanted background noise or distractions. From there, you will apply EQ, compression, and other effects that will enhance the overall sound and bring it to life. With a little practice and patience, you can become an expert at mixing vocals and taking your music to new heights.

How To Mix A Vocal

Credit: www.soundonsound.com

Setting Up Your Mixing Station

Setting up your mixing station for vocal mixing requires careful consideration of microphone placement, signal flow, and EQ settings. With the right tools and techniques in place, you can achieve a balanced and polished vocal mix that brings out the best in your performer’s voice.

Choosing The Right Environment

Creating a comfortable and conducive environment for mixing vocals is crucial in ensuring you obtain the best quality of sound. Aim to work in a quiet space that is free from distractions such as loud background noise, interruptions, or echoes. The basic setup should include a studio space, a desk, a computer, monitors, appropriate lighting, power strips, and sufficient space for your mixing console and outboard processors. Proper room acoustics and soundproofing treatments such as bass traps, diffusers, and absorbers should be in place to minimize room reflections and standing waves.

Getting Your Recording Set-up Right

Before you begin mixing your vocals, ensure that your recording equipment is properly connected and set up. Plug in your microphone, audio interface, and other necessary sound equipment and test them for connectivity. Check that your levels are correct, record in a quiet space, and be mindful of your recording techniques. For vocalists, consider the proximity effect and adjust your mic placement to capture the best sound. Recording in a less reverberant and drier room will also contribute to a cleaner vocal recording.

Setting Up Your Mixing Desk

When setting up your mixing desk, have a well-defined workflow to speed up the process. Arrange your workstation with all necessary gear within reach and with appropriate labels for routing. Ensure all levels are trimmed and calibrated to avoid clipping, mixing with too low audio levels, or other distortions that will affect your final mix. For vocal processing, you must have the essential tools such as equalizers, compressors, and, in some instances, reverb. Setting up sends and returns can help route each vocal track to specific aux busses to allow for more detailed adjustments later in the mixing process.

In conclusion:

Getting your vocal mix right is often a balancing act between technical skills, the right tools, and creativity. The first step in achieving a professional-sounding mix is setting up your mixing station correctly. By choosing the right environment, recording with the correct setup, and correctly setting up your mixing desk, you can control the variables to create an ideal setting for your project.

Preparing Your Vocal Files

Mixing vocals can be a daunting task, but with the right preparation, you can make the process a lot smoother. One of the most important aspects of vocal mixing is preparing your vocal files. In this section, we’ll cover the three steps to do just that.

Organizing Your Recording Sessions

The first step in preparing your vocal files is to organize your recording sessions. This means naming your tracks, labeling your takes, and making sure that everything is properly sorted before you begin mixing. One of the easiest ways to achieve this is to use a standard naming convention, such as [Artist Name] – [Song Title] – [Take Number]. Using a consistent naming convention will help you keep track of your takes and make sure that everything is in order.

Cleaning Up The Recorded Audio

The second step in preparing your vocal files is to clean up the recorded audio. This means removing any unwanted noise, clicks, pops, or other artifacts that may have been picked up during the recording process. One way to achieve this is to use a noise gate or noise reduction plugin to remove unwanted background noise. You can also use a de-esser plugin to tame any harsh sibilants or high-frequency sounds.

Editing And Compiling The Takes

The final step in preparing your vocal files is to edit and compile your takes. This means cutting and pasting the best parts of each take to create a final comp track. You can use tools like crossfades and fade-ins/outs to smooth out any transitions between takes. It’s important to listen to your comp track all the way through to make sure that everything sounds natural and there are no awkward transitions between takes.

By following these three steps, you’ll be well on your way to preparing your vocal files for mixing. With everything sorted, cleaned up, and compiled into a comp track, you can focus on the fun part – mixing!

Eq And Compression Best Practices For Vocals

Proper use of EQ and compression is essential for achieving a polished vocal mix. EQ should be used to remove unwanted frequencies and enhance the strengths of the vocal, while compression helps to control dynamics and add warmth. Following these best practices can greatly improve the sound quality of your vocal mix.

Optimizing your vocal tracks’ EQ and compression settings is essential to achieve a clear, polished sound. The correct use of these techniques will help you bring out the best in the vocals and create well-balanced mixes. In this section, we’ll cover some of the best practices for EQ and compression for vocal tracks.

Optimizing Your Eq Settings Using High-pass Filters

One essential EQ technique for vocals is using high-pass filters. High-pass filters are used to eliminate low-frequency content that can muddy up the mix. Vocals are typically in the mid-range frequency range, and reducing the low-end will help them stand out more. When using a high-pass filter, set the frequency filter between 100Hz to 200Hz, as this is where the low-end rumble usually resides. Adjust the cutoff frequency until you hear a clear difference in your mix.

Using Compressors To Control Dynamic Range

Compressors are essential tools for controlling the dynamic range of vocal tracks. Vocals have various volume levels, from soft whispers to powerful belting. Compression allows you to even out those levels, making them more consistent throughout the track. When setting the compressor, start with a medium attack and release time, a ratio of 2:1 to 4:1, and a threshold level that reduces only the loudest parts of the vocals. Adjust the settings until you achieve a smooth and balanced sound.

Using De-essers The Right Way

De-essers are used to reduce the harsh “S” and “T” sounds in vocals. However, using de-essers too aggressively can result in an unnatural and dull sound. To use them effectively, set the de-esser’s frequency range between 5kHz to 10kHz, as this is where most sibilance occurs. Adjust the threshold until the de-esser only affects the harsh sounds. Use a gentle reduction ratio, somewhere from 2:1 to 3:1, and a medium attack and release time to avoid unwanted artifacts. In conclusion, using the right EQ and compression settings is crucial in achieving a clear and polished sound in your vocal tracks. By following these best practices, you’ll be on your way to creating well-balanced mixes that stand out.

How To Mix A Vocal

Credit: www.supremetracks.com

Adding Special Effects

If you want to make your vocal tracks stand out from the crowd, adding special effects can help you achieve that. When used creatively and correctly, effects such as reverb, delays, chorus, flangers, and phasers can enhance the emotional impact of a vocal track and give it a unique character. In this guide, we’ll show you how to add special effects to your vocal mix and use them to your advantage.

The Secret To Using Reverb For Vocals

Reverb is one of the most commonly used effects in vocal mixing, and for good reason. When used properly, it can add depth, warmth, and space to a vocal track, making it sound more natural and polished. Here are some tips for using reverb on vocals:

  • Apply reverb to the sends: Instead of adding reverb directly to the track, create a send and apply reverb to that. This allows you to control the amount of reverb and blend it in with the dry signal to create a more nuanced effect.
  • Choose the right type of reverb: Different types of reverb have distinct characteristics, so choose one that fits the mood and style of your track. For example, a plate reverb creates a bright, clear sound, while a hall reverb creates a more spacious and ambient sound.
  • Adjust the decay time: The decay time determines how long the reverb lasts. For vocals, you generally want a shorter decay time to avoid muddiness.

How To Use Delay Effects Creatively

Delay is another effect that can add depth and space to a vocal track. It can create a sense of rhythm and movement, and even be used to create harmonies. Here are some tips for using delay on vocals:

  • Experiment with different delay times: Different delay times can create different effects. For example, a short delay time can create a slapback effect, while a longer delay time can create a rhythmic effect.
  • Try using a ping-pong delay: A ping-pong delay alternates between the left and right channels, creating a bouncing effect that can add movement and excitement to a vocal track.
  • Create harmonies with delay: By setting a delay time that corresponds to a musical interval (e.g. a third or a fifth), you can create a harmony effect that adds richness to the vocal.

Effectively Using Chorus, Flangers, And Phasers

Chorus, flangers, and phasers are modulation effects that can add depth, width, and movement to a vocal track. They work by modulating the pitch and frequency of the signal in different ways. Here are some tips for using these effects on vocals:

  • Use chorus to fatten up vocals: Chorus adds a thickening effect to vocals, making them sound fuller and richer. Be careful not to overdo it, as too much chorus can sound artificial.
  • Try flanging for a psychedelic effect: Flanging creates a sweeping, psychedelic effect that can add a unique character to a vocal track. Use it sparingly, as it can be overwhelming in large doses.
  • Use phasing for a subtle effect: Phasers create a subtle, swirling effect that can add a touch of depth and movement to a vocal track without overwhelming it.

Balancing And Panning Your Vocals

When it comes to mixing vocals, balancing and panning are two critical elements to achieve a professional-quality sound. Properly balancing your vocals makes sure they sit well within a mix and don’t overpower or get buried beneath other elements. On the other hand, panning ensures that each vocal track is distributed evenly throughout the stereo field, giving the mix width and depth.

Achieving Balance With Pan Knobs

To balance your vocals, the pan knobs are your best friend. They allow you to pan each track to the left, center, or right of the stereo field. An essential aspect of panning your vocals is to keep them relatively centered in the mix. You may have seen some producers panning vocals hard left and hard right, but this can lead to an unnatural sound and leave gaps in the middle of the mix.

Instead, pan the main vocal track to the center and adjust the pan of additional vocal tracks accordingly. Typically, you would pan backing vocals to the extremes, but this depends on the genre and desired effect.

Using Aux Channels And Sends Creatively

Another way to balance your vocals is to use auxiliary channels and sends creatively. Essentially, an aux channel is like a mixer within a mixer, allowing you to send multiple vocal tracks to a single channel. From there, you can add effects like compression, EQ, and reverb.

For example, you might want to apply a touch of reverb to the backing vocals only. You can achieve this by routing the backing vocals to an aux channel with a reverb plugin inserted. By adjusting the send level of each backing vocal track, you can control how much reverb is applied. This technique saves CPU power and keeps your mix tidy.

The Art Of Doubling And Panning Vocals

Doubling and panning vocals can create a sense of depth and richness in a mix. This technique involves copying a vocal track and applying slight variations to the original, such as a different tone or timing. Then, you can pan each track to opposite sides of the stereo field, creating a subtle stereo image.

However, be wary of overdoing the doubling and panning, as it can create a messy and distracting sound. Also, make sure to check your mix in mono mode, as any vocals that are too wide may disappear in mono playback.

Automation And Final Touches

For the final touches of mixing a vocal, automation is key. Use automation to control volume, EQ, and effects to ensure a balanced and polished sound. Make subtle adjustments to individual sections and notes to further improve the overall mix.

Automation and Final Touches: Once you’ve finished processing your vocal tracks, the final step in mixing vocals is to add automation and finishing touches. These steps allow you to fine-tune your mix and make it sound more polished and professional. Here are some tips to help you with automation and finishing touches for your vocal mix.

Creating Envelope Automation:

One way to add movement and dynamics to your vocal mix is by using envelope automation. This technique involves adjusting the volume envelope of your vocal track to create subtle changes in volume over time. You can use envelope automation to emphasize specific phrases, words, or syllables in the vocal performance. To create envelope automation, start by selecting the volume automation tool in your DAW. Then, draw in your desired volume changes directly on the waveform of your vocal track. Be sure to keep the changes subtle and gradual, as extreme volume changes can sound jarring and unnatural.

Adding Finishing Touches With Saturation And Analog Emulation Plugins:

To add warmth and depth to your vocal mix, try using saturation and analog emulation plugins. Saturation plugins simulate the sound of analog tape, adding subtle harmonic distortion and compression to your vocal track. Analog emulation plugins recreate the sound of vintage analog gear like compressors and EQs, providing a unique character to your mix. When using saturation and analog emulation plugins, be careful not to overdo it. Too much saturation or distortion can make your vocals sound muddy and cluttered. Start with small amounts and build up as needed, making sure your vocals retain their clarity and definition.

Bouncing Your Final Vocal Mix:

Once you’ve finished fine-tuning your mix, it’s time to bounce your final vocal track. Bouncing your mix involves exporting it as a single stereo file, which you can then use for mastering or final delivery. Before bouncing, be sure to check your levels and make any necessary adjustments. Ensure that your vocal track is balanced with the rest of your mix and that it sounds cohesive and polished. Once you’re happy with your mix, export it as a high-quality WAV or AIFF file, ready for mastering or final delivery. In conclusion, automation and finishing touches are crucial for a professional-sounding vocal mix. By using envelope automation, saturation and analog emulation plugins, and bouncing your final mix, you can elevate your vocal tracks and make them sound their best.

How To Mix A Vocal

Credit: emastered.com

Frequently Asked Questions For How To Mix A Vocal

What Are The 6 C’s Of Vocal Mixing?

The 6 C’s of vocal mixing are Clarity, Consistency, Compression, Character, Creative Effects, and Cutting out unwanted frequencies. These elements work together to create a professional and polished vocal sound in a mix.

How Do You Mix Voice Audio?

To mix voice audio, you need to adjust the levels of each track to achieve the desired overall sound. Use editing tools like EQ, compression, and noise reduction to clean up the audio and make it sound more professional. You can also add effects like reverb or delay to create a specific atmosphere.

Experiment with different settings until you’re satisfied with the final mix.

How Do You Send Vocals To Be Mixed?

To send vocals for mixing, you need to have the vocals recorded in a high-quality format, preferably with minimal background noise. Then, you can either upload the files to a designated online platform provided by the mixing engineer or send it through file-sharing websites such as Dropbox or WeTransfer.

It is also important to communicate with the mixing engineer regarding your requirements and expectations.

How Do You Mix Vocal Volume?

To mix vocal volume, use a digital audio workstation (DAW) to adjust the levels of the vocal recordings. Start by ensuring the vocals are properly recorded and edited. Use compression, EQ, and automation to adjust levels and balance the vocals with other elements in the mix.

Make sure to also consider the genre and style of the song when mixing vocals.

Conclusion

After following these tips, you should be able to mix your vocals like a pro! Remember to start by setting the levels and EQing your tracks, then add compression and reverb to give the vocals some depth. Don’t forget to use automation to adjust the volume levels throughout the track.

With practice and experimentation, you’ll be able to create polished, professional sounding mixes that will take your music to the next level. Happy mixing!

Categories
Archive Gear

Condenser Microphone

A condenser microphone is a type of microphone that uses a capacitor to convert sound waves into an electrical signal. It is widely used for professional recording, broadcasting, and live sound reinforcement applications due to its high sensitivity and clarity in capturing sound.

With its advanced technology, a condenser microphone has become an essential tool for musicians, podcasters, and sound engineers. Unlike other types of microphones that use a magnet and coil to convert sound waves into electrical signals, a condenser microphone uses a thin diaphragm and a charged capacitor to achieve high sound quality and sensitivity.

It can capture sound with greater detail and accuracy, making it perfect for recording vocals, acoustic instruments, and other sound sources that require precision. We’ll dive deeper into the features and benefits of a condenser microphone, and explore its various applications in the music and entertainment industry.

Condenser Microphone

Credit: www.hollyland.com

Types Of Condenser Microphones

Condenser microphones come in various types, including large-diaphragm, small-diaphragm, and electret condensers. These microphones are active, requiring DC power to operate, and are commonly used for recording vocals and acoustic instruments due to their clarity and sensitivity.

Types of Condenser Microphones When it comes to picking the right microphone for recording purposes, sound engineers and music producers have a lot of options. However, one type of microphone that is widely popular in the field of music production, broadcasting, and podcasting is the condenser microphone. These microphones are known for their sharp and clear sound quality, ability to capture even the slightest nuances of the sound and are also the preferred microphones for studio recordings. In this section, we will talk about the types of condenser microphones. Large Diaphragm Large diaphragm condenser microphones are one of the most commonly used mics in the studio. Their diaphragm size is typically 1 inch or larger. Due to their larger surface area, they capture more sound waves and have a broader frequency response range, which makes them ideal for recording vocals and larger instruments such as drums, bass, and guitar amps. They have a lower self-noise level, which means they can capture quieter sounds without producing noise interference. Small Diaphragm Small Diaphragm condenser microphones are often used for recording acoustic instruments such as violin, piano, and horns. These microphones have a smaller diaphragm size, typically less than 1 inch, which allows them to pick up high-frequency sounds with exceptional detail. Smaller diaphragm mics have a flatter frequency response compared to larger diaphragm microphones, which makes them suitable for recording classical music and other genres where an accurate representation of the sound is necessary. Tube Condenser Tube condenser microphones use vacuum tubes to amplify the sound. They produce a warm, rich, and full-bodied sound and add a subtle analog distortion that many producers and engineers find desirable. Tube mics are typically more expensive than other types of condenser, but they are worth the investment for vocal recordings, large jazz ensembles, and other music genres where warmth and harmonics are essential. In conclusion, each type of condenser microphone has its own unique characteristics, and the choice largely depends on the recording situation and what type of sound is desired. Understanding the differences between them can help sound engineers and music producers select the right microphone for their needs.

Condenser Microphone

Credit: www.amazon.com

How Condenser Microphones Work

Condenser microphones work by translating sound waves into electrical signals through a vibrating diaphragm and charged metal backplate. The diaphragm is sensitive to variations in air pressure, capturing the nuances of the sound and producing higher-quality audio than other types of microphones.

Condenser microphones have been around for over a century. They continue to be widely used today for both professional and personal purposes. But, have you ever wondered how they actually work? In this section, we will discuss the inner workings of condenser microphones, focusing specifically on the diaphragm and backplate, as well as Electret condenser vs. True condenser microphones.

Diaphragm And Backplate

At the core of a condenser microphone are two key components: the diaphragm and backplate. The diaphragm is a thin, flexible membrane that vibrates in response to sound waves, while the backplate is a stationary metal plate with an electric charge. The diaphragm and backplate are placed in close proximity to each other, with a small gap between them. When sound waves reach the diaphragm, it vibrates back and forth, causing the distance between the diaphragm and backplate to change. As the distance changes, the capacitance between the two components also changes. This variation in capacitance results in an electrical signal that is an exact replica of the sound waves that caused the vibration in the first place.

Electret Condenser Vs. True Condenser

There are two main types of condenser microphones: Electret condenser and True condenser. Electret condenser microphones utilize a special material called an electret, which has a permanent electrical charge. This eliminates the need for an external power source to supply the backplate with an electrical charge. Electret condenser microphones are often less expensive and more compact than true condenser microphones. True condenser microphones, on the other hand, require an external power source, typically in the form of phantom power, to supply the backplate with an electrical charge. This results in a more robust and precise signal, making true condenser microphones the preferred choice for professional audio recording studios. In conclusion, condenser microphones are an essential tool for many different audio applications. Understanding the inner workings of these microphones can help you choose the best microphone for your specific needs. Whether you choose an electret or true condenser microphone, it’s important to consider factors like sound quality, price, and convenience before making a decision.

Choosing The Right Condenser Microphone

Choosing the right condenser microphone can be a challenge for beginners. It’s important to consider factors such as polar patterns, frequency response and sensitivity when selecting the right microphone for your recording needs. Researching and comparing different options can help you make an informed decision.

When it comes to selecting the right condenser microphone, it’s important to consider several factors that can heavily influence your final decision. A condenser microphone can make a significant difference in the quality of sound you produce, whether recording vocals, instruments, podcasts, or other types of audio content. In this article, we’ll explore the essential factors to consider when selecting the most suitable condenser microphone for your needs.

Frequency Response

The frequency response is a crucial factor to consider when choosing a condenser microphone. It refers to the range of frequencies that a microphone is capable of capturing. If you’re recording vocals or instruments with different ranges of frequencies, you’ll need a microphone that can capture a wide range of frequencies. A microphone with a frequency response of 20Hz-20kHz is ideal for most recording applications. However, if you’re recording vocals, you may prefer a microphone with a frequency response of 80Hz-15kHz to reduce low-frequency noise.

Polar Pattern

The polar pattern of a microphone refers to the directional sensitivity of a microphone. There are three primary polar patterns to consider when choosing a condenser microphone, including cardioid, omnidirectional, and figure-eight. If you’re recording from a single source, such as a singer or an instrument, a cardioid polar pattern is ideal as it is directional and captures sound from the front of the microphone while rejecting sound from the sides and back. On the other hand, if you’re recording ambient sound or group vocals, an omnidirectional polar pattern is preferred as it captures sound from all directions equally.

Sensitivity And Spl Handling

The sensitivity of a microphone refers to the amount of sound pressure that it can convert into an electrical signal. The higher the sensitivity, the lower the sound pressure required to create a louder recording. If you’re recording louder sound sources, such as drums or electric guitars, you’ll need a microphone with a higher SPL handling capacity. A microphone with a sensitivity of 10-20mV/Pa and an SPL handling capacity of at least 140dB is ideal for louder sound sources. In conclusion, selecting the right condenser microphone requires careful consideration of various factors, including frequency response, polar pattern, sensitivity, and SPL handling. By choosing the most suitable microphone for your recording needs, you can ensure that your audio content stands out with the highest quality sound.

Applications Of Condenser Microphones

Condenser microphones are widely used in professional audio recording, live sound reinforcement, and broadcasting for their high sensitivity and frequency response. They can capture the nuances of acoustic instruments, vocals, and room ambience with exceptional clarity and detail.

Condenser microphones have become a popular choice for recording audio due to their ability to pick up sound with high sensitivity and accuracy. They are used in studios, live performances, and even for podcasting and voiceover. Let’s dive into each application and see how condenser microphones have contributed to enhancing the quality of audio recorded in each of these areas.

Studio Recording

In studio recording, condenser microphones are the preferred choice for capturing audio with precision and clarity. These microphones are commonly used for recording vocals, acoustic guitars, pianos, drums, and other acoustic instruments. The sensitivity and accuracy of condenser microphones make them ideal for picking up subtle nuances in sound, resulting in a more natural and realistic sound for recorded audio.

Live Performances

Condenser microphones are also used in live performances, especially for capturing the sound of choirs, instrumental ensembles, and orchestras. They are typically placed in front of the performers to capture the sound accurately, regardless of the distance or position of the performer from the microphone. Condenser microphones are also used for recording sound effects in theater productions, providing a natural and realistic sound.

Podcasting And Voiceover

Condenser microphones have revolutionized the way podcasting and voiceovers are produced, enabling professionals to record high-quality audio without the need for a professional recording studio. These microphones are perfect for recording podcasts, interviews, audiobooks, and even voiceovers for videos. With their exceptional accuracy and ability to render crisp vocals, condenser microphones ensure a professional sound quality. In conclusion, the applications of condenser microphones are diverse, with their high sensitivity and accuracy making them a preferred choice for recording audio for different purposes. Whether it’s for studio recording, live performances, or podcasting, condenser microphones have helped to enhance the quality of audio and revolutionize the way we produce and record sound.

Setting Up And Using A Condenser Microphone

Setting up and using a condenser microphone requires proper attention to detail. Begin by selecting the right type of microphone, then invest in a quality preamp and audio interface to ensure optimal results. Additionally, be sure to follow proper recording techniques such as mic positioning and gain adjustments to achieve professional-grade sound.

As a content creator, owning a high-quality microphone is essential in ensuring your audience hears you loud and clear. One popular option among podcasters, voice-over artists, and musicians is the condenser microphone. With its ability to capture detail and clarity in sound, these mics are a great investment. In this article, we will discuss the importance of setting up and using a condenser microphone. We will delve into the three main factors to consider when setting up your condenser mic: phantom power, distance and positioning, and the use of pop filters and wind screens.

Phantom Power

Before starting any recording, ensure that you have the necessary power supply for your microphone. Most condenser microphones require phantom power to operate. This power can be supplied by either a mixer, an audio interface, or an external power supply. When using a mixer or interface, ensure that phantom power is turned on during the recording process. Failure to supply your mic with the appropriate phantom power will result in a weak or non-existent signal.

Distance And Positioning

Proper distance and positioning of your condenser mic are vital in producing high-quality sound. Place the microphone at least 6 inches away from your mouth to avoid popping sounds, but still close enough to capture the detail in the sound. Position the mic at a 45-degree angle and slightly below your mouth. This technique will capture the fundamental frequencies of your voice or instrument while minimizing the capture of unnecessary breath and mouth noise. Adjust the positioning until you find the “sweet spot” that captures the best sound.

Pop Filters And Wind Screens

Pop filters and wind screens are essential accessories when using a condenser mic. Pop filters minimize or eliminate the popping sounds that occur when air hits the microphone’s diaphragm. Wind screens help reduce wind noise, rustling sounds, or breath sounds during outdoor recordings. Invest in a good quality pop filter and wind screen to ensure your recording stays clear and concise. In conclusion, having a professional setup that includes a high-quality condenser microphone is essential for recording high-quality audio. Remember to consider the necessary phantom power, distance and positioning, and the use of pop filters and wind screens when setting up and using your condenser microphone. By following these simple steps, you can achieve clear and concise recordings that will make your content stand out.

Maintaining And Troubleshooting A Condenser Microphone

Maintaining and troubleshooting a condenser microphone is crucial to ensure good audio quality. Regular cleaning and care, checking for loose connections, and adjusting the polar pattern can solve many issues. It’s important to properly handle and store the microphone to avoid damaging it.

Maintaining and Troubleshooting a Condenser Microphone Condenser microphones are popular in recording studios and live audio performances because of their clear and accurate sound reproduction. However, like any other equipment, these microphones require proper maintenance and troubleshooting to ensure continued optimal performance. In this section, we’ll discuss the essential tips for maintaining and troubleshooting a condenser microphone. Cleaning the Microphone Regular cleaning is vital for a condenser microphone, particularly if it’s frequently being used. Dirt, dust, and debris can obstruct the microphone’s diaphragm, leading to poor sound quality and low output levels. Here are some cleaning tips: – Use a clean, damp cloth to wipe the microphone body gently. – Avoid getting moisture on the microphone’s diaphragm as it may damage the microphone’s electronics. – Use an air blower to remove dust and dirt from the grille of the microphone. Storage and Handling How you store and handle a condenser microphone is essential in maintaining its optimal performance. These are some storage and handling tips: – Always store your microphone in a dry and cool place and avoid exposure to direct sunlight and moisture. – Transport your microphone in a hard case or a protective bag to prevent damage due to accidental bumps or drops. – Use a pop filter or windscreen to avoid harsh sounds and ensure you’re recording the voice without any plosives or harsh sounds. Common Issues and Fixes Despite proper maintenance, there may still be problems with your condenser microphone. Before sending it for repair or replacement, there are some common issues that you can fix: – Low output level: Check the microphone’s cable and connector for any damage or aging. Replace them if necessary. – Distorted sound: Check if the microphone’s diaphragm is damaged or clogged with dirt and debris. Clean it gently with a soft brush or replace it if it’s damaged. – Noisy signal: Check the microphone’s cables and connectors for looseness or damage. If they’re loose, tighten them, or replace them if they’re damaged. – Interference: Check if there are other electronic devices close to the microphone. Move the microphone to a different location or switch off other electronic devices that may cause interference. In conclusion, maintaining and troubleshooting a condenser microphone can seem daunting at first, but with proper care and attention, your microphone will continue to deliver excellent sound quality for years to come. Remember always to clean the microphone regularly, handle it with care, and troubleshoot common issues before seeking professional assistance.

Condenser Microphone

Credit: www.amazon.com

Frequently Asked Questions On Condenser Microphone

What Is A Condenser Mic Used For?

A condenser microphone is mainly used for recording high-quality audio such as music, vocals, podcasts, and voice-overs. It is preferred by professionals for its sensitivity, clarity, and ability to pick up a vast range of sound frequencies. The mic uses a capacitor for its mechanism and requires a power source.

What Is The Difference Between A Condenser Microphone And A Regular Microphone?

A condenser microphone is more sensitive and produces a higher-quality sound than a regular microphone. It uses an electrically charged diaphragm that converts sound waves into an electrical signal. A regular microphone, on the other hand, uses a magnetic diaphragm to create an electrical signal.

Condenser microphones are popular in studio and professional settings, while regular microphones are more commonly used in everyday situations.

What Are The Disadvantages Of A Condenser Microphone?

Condenser microphones can be costly and require an external power source such as batteries or phantom power. They are also more sensitive to handling noise and environmental factors such as humidity. Additionally, they can be prone to distortion when recording loud sounds and may pick up unwanted background noise.

Does A Condenser Mic Make You Sound Better?

Yes, a condenser mic can make you sound better due to its ability to capture a wider frequency range and produce a more detailed and accurate sound. It is also more sensitive to subtle nuances in the voice or instrument being recorded.

However, the overall quality of sound also depends on other factors such as the person’s technique and the quality of the recording equipment.

Conclusion

A condenser microphone is an essential tool for any audio professional or enthusiast. With its superior sensitivity and ability to capture sound with clarity, it is the preferred option for recording vocals, instruments, and even ambient noises. Investing in a quality condenser microphone can greatly enhance the overall quality of your audio recordings, making it a worthwhile investment for any serious audio producer.

By understanding the different types of condenser microphones and their various applications, you can ensure that you make the right choice when selecting a condenser microphone that meets your needs.

Categories
Archive

Bounce Audio

To bounce audio is to render tracks, effects and automation from your DAW into a new audio file. You do it to deliver a finished mix, to send stems to a collaborator or mastering engineer, to free up CPU, or to commit to a sound. This guide explains the main types of bounce, the export settings that matter, and generic steps for Ableton Live, FL Studio, Logic Pro, Pro Tools and Reaper.

Ways to Bounce Audio

There are three common kinds of render:

  • Full mix export: the whole session summed to a stereo file, usually from the master output.
  • Stem export: groups of tracks rendered separately, such as drums, bass, vocals and music, each lined up from the same start point so they can be reassembled elsewhere.
  • Bounce in place: a single track or region rendered to a new audio track inside the project, often to commit virtual instruments or heavy plugins.

Some DAWs also offer freezing, which renders a track temporarily to save processing power but lets you unfreeze and edit later. Freezing is reversible; a true bounce in place creates fixed audio.

Whichever method you choose, it is good practice to bounce audio to a dedicated folder inside the project so renders stay with the session and are easy to find later. Keep the original MIDI or unprocessed tracks muted and hidden rather than deleted, in case you need to change a part.

Export Settings That Matter

File format

WAV and AIFF are uncompressed and are the standard for mixing, mastering and archiving. MP3 and AAC are lossy formats for previews and quick sharing. If a file is going to be processed further, deliver WAV or AIFF.

Sample rate

Export at the project’s native sample rate unless the recipient asks otherwise. Common rates are 44.1 kHz and 48 kHz, with 48 kHz typical for video work. Converting rates adds a processing step, so do it once, at the end, if at all.

Bit depth

For files that will be mixed or mastered further, 24-bit fixed or 32-bit float preserves headroom and detail. A 32-bit float file can even hold peaks above 0 dBFS without clipping, which is useful for stems. For a final 16-bit master, such as a CD-standard file, apply dither.

Dither

Reducing bit depth discards the lowest bits of each sample and creates quantisation error. Dither adds a very low level of noise that turns that error into benign hiss rather than harsh distortion. The Wikipedia article on dither covers the theory, and our post what is dither and does it matter explains when to use it. Apply dither only once, at the final reduction in bit depth, and do not dither 24-bit or float stems that are headed for more processing.

Level and headroom

Leave headroom on mixes going to mastering, with peaks a few decibels under 0 dBFS, and avoid a limiter on the master unless asked. Check the master meter for clipping before you render.

Length and tails

Set the render range to include reverb and delay tails. A common mistake is cutting the export at the last note so the final echo is chopped off. Add a bar or two of silence, or use the DAW’s tail option. For stems, start every file at the same point, usually bar 1, so they line up when imported.

How to Bounce Audio in Popular DAWs

Menu names change between versions, so check your DAW’s manual if something looks different.

Ableton Live

  • Full mix: File > Export Audio/Video. Choose Rendered Track: Main (Master in older versions), set the range, sample rate, bit depth and dither, then Export.
  • Stems: in the same window choose All Individual Tracks, or select specific tracks first and choose Selected Tracks Only.
  • In place: right-click a track and use Freeze Track, then Flatten to commit. Recent versions also include Bounce Track in Place.

FL Studio

  • Full mix: File > Export > WAV file, choose a location, then pick Song mode, quality and bit depth in the render window.
  • Stems: route instruments to separate mixer tracks, then enable Split mixer tracks in the render window.
  • In place: use the mixer’s Render to wave file option for armed tracks, or Consolidate in the Playlist.

Logic Pro

  • Full mix: File > Bounce > Project or Section, then choose PCM format, resolution, sample rate and dither in the dialog.
  • Stems: File > Export > All Tracks as Audio Files, choosing whether to include effects and volume or pan automation.
  • In place: right-click a track or region and choose Bounce in Place.

Pro Tools

  • Full mix: File > Bounce Mix (Bounce to Disk in older versions). Select the output bus, file type, bit depth and sample rate. Recent versions offer offline bouncing, which renders faster than real time.
  • Stems: select multiple sources in the bounce dialog where supported, or bounce each group bus in turn.
  • In place: use Commit or Track Bounce to render tracks to new audio inside the session.

Reaper

  • Full mix: File > Render. Set Source to Master mix, define the bounds, then choose format, sample rate and bit depth.
  • Stems: set Source to Stems (selected tracks) or use the master plus stems option.
  • In place: select items and use Apply track/take FX to items as new take, or render tracks to stem tracks from the track context menu.

A Pre-Export Checklist

Before you bounce audio for anyone else, run through this list.

  • Unmute or remove tracks deliberately; check solo buttons are off.
  • Confirm the render range includes count-ins, intros and full tails.
  • Match sample rate to the project; choose 24-bit or 32-bit float for further work.
  • Dither only for a final 16-bit file.
  • Name files clearly with the song title, stem name, tempo and sample rate.
  • Listen back to every rendered file before sending.
  • Keep an archive copy of the session, so you can bounce audio again if a client asks for a revision.

Final Thoughts

A clean bounce is the last step that turns a session into something you can share. Choose the right type of render, keep the format and resolution suitable for the next stage, leave room for tails, and dither only at the end. Once those habits are in place, you can bounce audio from any DAW quickly and with confidence.

Categories
Archive

Adding Vocals to Your Song

To add vocals to your song, record your vocals separately and then mix them into your instrumental track in a Digital Audio Workstation (DAW). This allows for precise control of the volume, EQ, and effects of the vocals in relation to the instrumental track.

Additionally, you can use techniques such as double tracking, harmonies and vocoders for added vocal texture and depth. With a little practice, anyone can add professional sounding vocals to their songs. Just follow these simple steps and let your creativity flow.

Your vocal performance is the most important aspect of your song, as it’s the part that listeners will connect with and remember the most. So, it’s essential to get the recording right. Once you have a solid take, you can move on to mixing and adding effects. We’ll explore the process of adding vocals to your song and provide tips on how to make your vocals stand out and sound professional. So, grab your microphone and let’s get started.

Choosing The Right Microphone

When it comes to recording vocals for your song, choosing the right microphone is crucial. A high-quality microphone can make the difference between a raw, unpolished sound and a professional-sounding recording. In this article, we’ll explore the different types of microphones you can choose from and help you decide which type is right for your recording needs.

Dynamic Microphones

Dynamic microphones are a popular choice for vocal recording due to their durability and versatility. These microphones are typically less expensive than other types, and they don’t require any external power source. The design of a dynamic microphone makes it ideal for recording loud vocals or instruments like electric guitars and drums.

However, dynamic microphones are generally less sensitive than other types. They can also produce a sound that is less detailed compared to what you may get with a condenser microphone. Specifically, they tend to have a narrower frequency response range and a lower sensitivity level.

Condenser Microphones

If you’re looking for a more detailed, nuanced sound, a condenser microphone may be the best choice for you. These microphones are more sensitive than dynamic microphones and can capture a wider frequency range.

However, condenser microphones require an external power source to operate, which can be a disadvantage when recording in a remote location. Additionally, they may pick up unwanted background noise or electrical interference if not properly shielded.

Ribbon Microphones

Ribbon microphones are another excellent choice for vocal recording, offering a unique sound that is warm, smooth, and natural. These microphones use a thin strip of metal to pick up sound vibrations, making them incredibly sensitive and responsive to changes in sound and movement.

However, ribbon microphones are expensive and may be prone to damage from rough handling or loud sound sources. They may also require additional equipment or preamp to work properly with your recording setup.

Choosing the right microphone for your vocal recording is an essential part of creating a professional-sounding track. Whether you opt for a dynamic microphone, a condenser microphone, or a ribbon microphone, each type offers its unique advantages and drawbacks. Take time to consider your recording needs, and invest in a high-quality microphone that will help you bring your music to life.

Adding Vocals to Your Song

Credit: m.youtube.com

Setting Up Your Recording Environment

Recording vocals can be challenging, but with the right setup, you can achieve a professional sound. The first step in recording vocals is to ensure that your recording environment is optimized for quality sound. The goal is to create a space that is as isolated and acoustically sound as possible.

Soundproofing Your Space

Soundproofing is the process of preventing sound from entering or leaving a room. This is important because sound can interfere with your recording, leading to a less than desirable final product. There are various techniques you can use to soundproof your recording space:

  • Use acoustic foam to cover walls, and ceilings to reduce sound reflections.
  • Install soundproof curtains or blankets to absorb sound waves.
  • Seal any gaps around doors, windows, or electrical outlets.

Optimizing Your Room’s Acoustics

Acoustics refers to the way sound behaves in a space. An optimally acoustically designed space should have minimal echoes, reverberation, or other unwanted sounds that could affect your recording. Here are some tips to optimize your room’s acoustics:

  • Choose a room with minimum echo, often a smaller room works best.
  • Place absorbent materials, such as carpets, curtains, or furniture, to minimize reflections.
  • Use diffusers, such as bookshelves or sound panels, to spread the sound through the room.

With the right soundproofing and optimization, your recording space can create a controlled environment for high-quality sound. Taking the time to set up your environment correctly before recording vocals can save you time and ensure you get the best results possible from your recording.

Selecting The Right Recording Software

Selecting the right recording software is crucial when it comes to adding vocals to your song. Look for a program that allows you to easily record and edit your vocals, as well as add effects to enhance your sound. Make sure to research and compare different options before making a final decision.

Selecting the right recording software is one of the most crucial steps in the process of adding vocals to your song. With so many options available, it can be overwhelming to select the appropriate software. Different software programs offer different features and functionalities that suit your needs and requirements. In this section, we will discuss the various factors that you need to consider when choosing your software program for adding vocals to your song.

Daws Vs. Recording Programs

When it comes to selecting the right recording software, you have two main options to choose from: Digital Audio Workstations (DAWs) and Recording Programs. DAWs are comprehensive software programs that provide a wide range of features and tools for audio recording, editing, and mixing. Examples of popular DAWs include Ableton Live, Logic Pro X, and Pro Tools. Recording programs, on the other hand, are more limited in their functionality and are designed primarily for recording audio. Examples of popular recording programs include Audacity and GarageBand.

Factors To Consider When Choosing Your Software

Here are some factors that you need to consider when selecting the right recording software for adding vocals to your song:

  • Compatibility: Ensure that the software you select is compatible with your computer operating system and hardware.
  • Features: Look for software that offers the features you need, such as audio editing tools, virtual instruments, plugins, and effects.
  • Budget: Determine your budget for the software and find a program that suits your financial constraints.
  • Usability: Look for software that is easy to use and intuitive. Complicated software programs can make the recording process challenging and time-consuming.
  • Support: Ensure that the software you select comes with good customer support and has online documentation available if you need help.

Keep these factors in mind when choosing your software program, and you’ll be well on your way to creating high-quality vocals for your song. Remember, the right software will make all the difference in the final product.

Recording Your Vocals

To add vocals to your song, recording them properly is crucial. Make sure you have a good microphone and a quiet space to record in. Experiment with different positions and distances from the mic to find the optimal sound for your voice.

Recording vocals can be a challenging task, especially if you are not a professional singer. But with the right techniques and equipment, you can capture a great vocal performance that elevates your song. In this section, we will explore some recording techniques and tips that can help you record your vocals like a pro.

Recording Techniques

Recording techniques play a vital role in capturing a great vocal performance. Here are some techniques you can try:

  • Double Tracking: This technique involves recording two vocal parts that are almost identical and then panning them hard left and right. This creates a fuller sound and adds a professional touch to your recording.
  • Layering: Layering involves recording multiple takes of the same vocal part and blending them together to create a more polished sound. You can also use this technique to add harmonies and ad-libs to your song.
  • Comping: Comping involves recording multiple takes and then selecting the best sections from each take to create a final vocal track. This technique helps you create a flawless vocal performance.

Tips For Capturing The Best Vocal Performance

Capturing a great vocal performance requires more than just having a good microphone. Here are some tips that can help you capture the best vocal performance:

  1. Warm-up: Warm-up your voice before recording. Sing some scales and do some vocal exercises to ensure that your voice is ready to perform.
  2. Mic Placement: Place the mic at the right distance and angle to capture a clear and balanced vocal sound.
  3. Headphones: Use headphones to monitor your performance while recording. This helps you hear your voice clearly and adjust your performance accordingly.
  4. Breathing: Take deep breaths and exhale slowly while singing. This helps you control your breathing and improve your vocal technique.
  5. Emotion: Focus on conveying the emotion of the song through your vocals. This helps you connect with the audience and create a memorable performance.

With these techniques and tips, you can record vocals that enhance your song and connect with your audience. Experiment with different techniques and find the ones that work best for you. Remember, the key to a great vocal performance is practice, patience and passion.

Editing Your Vocal Tracks

Editing your vocal tracks can be the key to adding the perfect vocals to your song. By using a combination of EQ, compression, and effects, you can enhance the quality and clarity of your vocals and make them sound more professional.

Editing Your Vocal Tracks is a crucial step in producing a high-quality song. It can make or break the sound of your vocals. Fine-tuning your vocals can give it a polished and professional touch. In this article, we’ll be discussing two key aspects of editing your vocal tracks, which are Adjusting Pitch and Timing, and Applying Effects and Processing.

Adjusting Pitch And Timing

Pitch and timing are two essential elements in music production. They can cause a significant impact on the overall quality of your track. Correcting pitch inaccuracies and timing issues can ensure that your vocals are in sync with the rest of the music. Using a pitch correction tool can help smoothen out any rough patches in your vocals, making them sound more fluid and balanced. Similarly, timing correction tools can enhance the rhythm and tempo of your vocals. Once you have corrected pitch and timing errors, it’s essential to check that they are in sync with the rest of the music. Make sure to listen to your vocals and the music together and make adjustments if required.

Applying Effects And Processing

After adjusting pitch and timing, the next step is to add effects to your vocals. This can be reverb, delay, compression, or any other effect that you think will enhance the overall sound. Reverb can add depth and space to the vocals, making them sound larger than life. Delay can add an echo effect, giving the vocals a sense of ambiance and atmosphere. Compression can help control the dynamics of the vocals, bringing up the quieter parts and leveling out the louder parts. It’s important to remember not to overdo it with the effects. Applying too many effects can overwhelm the vocals, making them sound unnatural. Use your judgement to decide what fits best for the vocals and the track.

Conclusion

Editing your vocal tracks can bring your song to life. Adjusting pitch and timing, and applying effects and processing can transform a raw recording into a polished and professional track. By following these steps, you can ensure that the vocals are in sync with the rest of the music while also enhancing its overall sound.

Mixing Your Song

If you want to take your song to the next level, adding vocals is a great way to do so. Once you’ve recorded your vocals, you need to mix them into your song. Mixing your song can be a bit tricky, but with a few tips and tricks, it can be a seamless process. In this article, we will discuss how to mix your song and create space for the vocals, balance levels, and use panning and EQ.

Creating Space For The Vocals

When adding vocals to your song, it’s important to create space for them in the mix. This means adjusting the levels of other instruments to ensure that the vocals stand out. One way to do this is by using panning. By placing different elements of your song in different parts of the stereo field, you can create space for the vocals. For example, you can pan a guitar to one side and a keyboard to the other, leaving the center of the mix free for the vocals.

Balancing Levels

Another important aspect of mixing your song is balancing levels. This means adjusting the volume levels of each individual track to ensure that they are all audible and working together in harmony. To do this, start by soloing each track and adjusting its level until it sounds good on its own. Then, gradually add in the other tracks, adjusting their levels as you go.

Panning And Eq

Panning and EQ are two powerful tools that you can use to get the most out of your mix. Panning lets you place instruments and sound effects in different parts of the stereo field, while EQ lets you shape the frequency response of each individual track. When it comes to panning, try to create a sense of space and balance by placing different elements in different parts of the stereo field. As for EQ, use it to cut out any unwanted frequencies and enhance the parts of the track that you want to be more prominent.

Mastering Your Finished Song

Enhancing your finished song with vocals is a crucial step in music production. It helps bring the emotions of the song to life and adds depth to the melody. Follow these tips to master adding vocals to your song and create a well-balanced, harmonious masterpiece.

Preparing Your Track For Mastering

Before mastering your finished song with vocals, it’s important to ensure that your track is mixed and balanced correctly. This means that all of the individual elements of your song, such as drums, bass, and synths have been carefully mixed and equalized to create a cohesive sound. To prepare your track for mastering, start by exporting an uncompressed mix of your song in high resolution WAV or AIFF format. This will provide the audio engineer with a clear audio signal to work with during the mastering process.

Final Tips And Techniques

When it comes to mastering your track with vocals, there are a few final tips and techniques you can follow to ensure your song sounds its best. Firstly, it’s important to be aware of the loudness levels of your track. While having a loud and punchy track may sound great, it’s important to ensure that your song is not over-compressed as this can lead to distortion and a loss of dynamic range. Secondly, it’s a good idea to listen to your track on a variety of different sound systems to ensure that it sounds good on all devices. This could include listening on studio monitors, headphones, and even on your car stereo. Finally, it’s worth considering getting a professional mastering engineer to work on your track. A professional audio engineer will have the experience and knowledge to take your track to the next level and ensure that your vocals sound their best. In conclusion, mastering your finished song with vocals is an essential step in creating a high-quality track. By following these tips and techniques, you can ensure that your vocals sound their best and your track is ready to be released to the world.

Adding Vocals to Your Song

Credit: www.airgigs.com

Promoting And Sharing Your Music

Adding vocals to your song is a great way to make it stand out, but getting your music heard by a wider audience is equally important. Here are some key strategies to promote and share your music:

Creating A Buzz

If you want to get people talking about your music, creating a buzz is the key. Some effective tactics include:

  • Sharing teasers on social media platforms like Twitter and Instagram to build excitement for your new release.
  • Collaborating with influencers and other artists, who can help promote your music to their fanbase.
  • Submitting your music to blogs and websites that cover your genre, encouraging them to feature your music.

Building A Fanbase

A loyal fanbase is essential for any musician looking to make a name for themselves. Here are some ways to build your fanbase:

  • Engaging with your fans by responding to comments and messages in a timely manner.
  • Offering exclusive content, such as behind-the-scenes videos and early access to new tracks, to your most dedicated fans.
  • Playing live shows and touring; this gives fans an opportunity to see you perform in person and connect with you on a personal level.

Marketing Your Music

To get your music in front of as many people as possible, you’ll need to invest in some marketing efforts, such as:

  • Creating a professional website that showcases your music and allows fans to purchase your music and merchandise.
  • Running social media ads; this can help get your music in front of people who may not have discovered it otherwise.
  • Using platforms like Spotify, Apple Music, and Amazon Music to distribute your music and reach a wider audience.
Adding Vocals to Your Song

Credit: www.adorama.com

Frequently Asked Questions For Adding Vocals To Your Song

How Do You Add Vocals To Music?

To add vocals to music, you can use a recording software or app, connect a microphone to your computer, and record your vocals with the music playing in the background. After recording, you can edit, mix, and master the vocals to fit the music perfectly.

You can also use plugins or effects to enhance the vocals and eliminate unwanted background noise.

How Do You Fit Vocals Into A Song?

Fitting vocals into a song is crucial for a well-balanced sound. Start by determining the key and tempo of the song, then identify where the vocals will fit best. Record multiple takes and experiment with effects and mixing to achieve the desired sound.

Always prioritize the emotion and storytelling in the vocals.

Where Can I Get Vocals For My Song?

You can get vocals for your song from various sources such as hiring a professional singer, collaborating with other artists, using online vocal libraries, or purchasing pre-recorded vocal samples. It’s important to choose the option that best fits your budget and project goals.

How Can I Increase The Vocal Sound Of A Song?

To increase the vocal sound of a song, you can try these techniques: adjust the EQ to boost mid-range frequencies, use compression to even out dynamics, add reverb or other effects, double-track the vocals, and try using a different microphone or preamp combination.

Experimenting with these methods can help you find the best results for your song.

Conclusion

Adding vocals to your song can take it from good to great, and it doesn’t have to be a daunting task. By following these steps and tips, you can create a standout vocal performance that will elevate your music to the next level.

Remember to practice and experiment with different techniques to find what works best for you. With patience, dedication, and creativity, you can produce a song that resonates with your audience and leaves a lasting impact. Start incorporating these tips into your music-making process today and watch your vocals soar.

Categories
Archive

Spectrum Analyser

A spectrum analyzer is a device that measures the strength of different frequencies in a signal. It is commonly used in the fields of electronics and telecommunications.

Spectrum analyzers are essential tools for analyzing and troubleshooting electronic devices and systems. They work by detecting the different frequencies in a signal and displaying them graphically on a screen. This allows engineers and technicians to analyze the performance of a system and identify any issues or interference.

Spectrum analyzers are used in a variety of applications, from testing radio and TV broadcasts to examining the output of electronic components such as semiconductors and transistors. They are also used in the development of wireless technology, such as Wi-Fi and Bluetooth, as well as in the aerospace and defense industries. With their ability to detect and analyze the entire frequency spectrum of a signal, spectrum analyzers are an essential tool for any electronic engineer or technician.

Types Of Spectrum Analysers

There are different types of spectrum analysers, each designed to suit specific needs. By understanding the different types of analysers, you can determine which one is best suited for your needs.

A real-time spectrum analyser is a type of analyser that is capable of displaying the spectrum of a continuous signal in real-time, without the need for any sweeping or scanning. This type of analyser is commonly used in applications where the signal is changing rapidly and needs to be analysed in real-time. Real-time analysers are commonly used in audio and video production, radio and television broadcasting, and telecommunications.

A swept-tuned spectrum analyser is a type of analyser that relies on a sweeping or scanning mechanism to produce a spectrum display. The analyser sweeps a range of frequencies and measures the amplitude of the signal at each frequency point. Swept-tuned analysers are commonly used in radio frequency applications, where they can be used to measure the frequency response of components, detect interference, and analyse modulated signals.

Within swept-tuned spectrum analysers, there are two different types – superheterodyne and vector signal analysers. Superheterodyne spectrum analysers use an intermediate frequency to downconvert the signal to a lower frequency, while vector signal analysers are capable of analysing both the amplitude and phase of a signal.

Overall, the choice of spectrum analyser depends on the application requirements, such as the frequency range, dynamic range, resolution bandwidth, sensitivity, and accuracy required.

Spectrum Analiser

Credit: micronix-jp.com

Real-time Spectrum Analysers

Spectrum Analyser is a vital tool for electronic engineers and enthusiasts to identify and analyze radio frequency (RF) signals. Spectrum analyzers help in measuring the strength, frequency, bandwidth, and power of an RF signal. They range from basic, low-frequency analyzers to advanced instruments designed for complex communication systems. In this blog, we will discuss one such type of Spectrum analyzer, Real-time Spectrum Analyzers.

Working

In Real-time Spectrum Analyzers, the input signal is digitized into samples and processed through FFT algorithm. The signal is then displayed in real-time on a graphical user interface. These Spectrum Analyzers are capable of covering a wide frequency range and provide a high-speed update rate, making them ideal for monitoring and analyzing rapidly changing RF signals.

Applications

Real-time Spectrum Analyzers have vast applications in various fields, including telecommunications, aerospace and defense, research and development, and broadcasting. Some of the common uses of Real-time Spectrum Analyzers are:

  • Monitoring wireless signals to identify and locate interference sources.
  • Analyzing the performance of advanced communication systems such as 5G, Wi-Fi, and satellite communication.
  • Measuring phase noise and jitter in oscillators and other electronic circuits.
  • Studying the frequency response of filters and amplifiers, including their linearity and gain.
  • Testing and validating antennas and their radiation patterns.

In conclusion, Real-time Spectrum Analyzers are advanced instruments with fast update rates and high sensitivity, making them perfect for analyzing complex RF signals. They have a broad range of applications, from monitoring wireless communications to analyzing the performance of electronic circuits.

Swept-tuned Spectrum Analysers

Swept-tuned spectrum analyzers are powerful instruments used for frequency analysis in different industries, including aerospace, telecommunications, and defense. They work by scanning through a range of frequencies and identifying signals with high accuracy, making them essential tools in RF and microwave measurements.

Spectrum analysers are essential tools for analyzing and visualizing RF signals. One type of spectrum analyser is swept-tuned, which performs a sweeping action across a range of frequencies. Swept-tuned spectrum analysers are also known as swept spectrum analyzers, swept-frequency spectrum analysers, or simply swept analyzers. In this section, we’ll discuss how swept-tuned spectrum analysers work and their applications.

Working

Swept-tuned spectrum analysers operate by sweeping a signal or a section of the frequency spectrum under test at different frequencies one after the other. The process generates an output display that shows the amplitude (power or strength) of each frequency component. Swept-tuned spectrum analysers use local oscillator circuits to heterodyne the input signal down to a lower, more manageable frequency for further processing. A swept-tuned spectrum analyser with a resolution bandwidth of 1 kHz and a frequency range from 100 MHz to 1 GHz will sweep frequencies from 100 MHz to 1 GHz at 1 kHz intervals.

Applications

Swept-tuned spectrum analysers are used in a variety of applications such as:

  1. RF and microwave circuit analysis
  2. Wireless system design and development
  3. EMI/EMC pre-compliance testing and debugging
  4. Satellite communication testing
  5. Signal monitoring and analysis

Swept-tuned spectrum analysers are also used for testing and analyzing the components of electronic equipment such as filters, amplifiers, and mixers. Swept-tuned spectrum analysers are also used for signal measurements and frequency response testing. Wherever a signal needs to be examined over a range of frequencies, a swept-tuned spectrum analyser is an ideal tool.

Conclusion

Swept-tuned spectrum analysers are versatile tools that can provide valuable information about the frequency spectrum under test, making them essential in numerous applications such as wireless system design, RF circuit analysis, and EMI/EMC testing. By sweeping a signal over a range of frequencies and measuring the resulting signals, swept-tuned spectrum analysers allow electronics engineers to gain insights into the components of electronic equipment and to examine signals over a wide range of frequencies.

Spectrum Analiser

Credit: www.siglent.eu

Important Factors To Consider

When considering a Spectrum Analyzer, it’s important to take into account factors such as frequency range, resolution bandwidth, and dynamic range. Other important factors include input/output interfaces and portability. Ensuring that the Spectrum Analyzer meets your specific needs is imperative for accurate and efficient analysis.

Important Factors to Consider If you are looking for an instrument that can analyze the frequency spectrum, then a spectrum analyzer is an ideal choice. It provides detailed information about the frequency distribution of signals. However, when you are considering buying one, it is important to understand several key factors which affect its quality. In this post, we will discuss four important factors to consider: Frequency Range, Resolution Bandwidth, Sensitivity, and Dynamic Range.

Frequency Range

Frequency Range is one of the critical factors that determines the usability of a spectrum analyzer. It decides how high or low the frequency range the analyzer can capture. Different analyzers come with different frequency ranges and thus it’s important to select the one that suits your requirements. Generally, the frequency range varies from a few Hz to a few GHz.

Resolution Bandwidth

Resolution Bandwidth (RBW) is the frequency width of the filter that is applied to the signal during measurement. In other words, it specifies the smallest signal that the analyzer can resolve. The RBW value of a spectrum analyzer can be set manually or automatically. The smaller the value, the more accurate the measurement. A common range of RBW varies from a few Hz to a few MHz.

Sensitivity

Sensitivity is another important factor that determines the quality of the analyzer. It is the minimum signal level that the analyzer can detect and measure. Sensitivity is usually measured in units of dBm or µV. A high sensitivity ensures that the analyzer can detect weak signals that might not be visible to the naked eye.

Dynamic Range

Dynamic Range is the ratio between the smallest and the largest signals that the analyzer can measure. It determines how well the analyzer can handle both weak and strong signals. A good dynamic range indicates that the analyzer can capture the entire spectrum range effectively. It is usually measured in dB, and a higher value indicates better quality. In conclusion, while choosing a spectrum analyzer, it’s important to consider factors such as frequency range, resolution bandwidth, sensitivity, and dynamic range. By carefully considering these factors, you can choose an analyzer that is suitable for your needs.

Applications Of Spectrum Analysers

Spectrum analysers play a crucial role in measuring the frequency and amplitude of different signals in a variety of applications. This includes testing and developing new electronic devices like cellular phones, Wi-Fi modems, and radar systems. They are also used in music production to ensure that sound frequencies are properly balanced.

Spectrum analysers are essential tools for engineers, technicians, and hobbyists involved in the design, development, and testing of electronic systems. They are widely used in a variety of applications to measure and analyse the frequency spectrum of signals.

Audio Analysis

Spectrum analysers are used extensively to measure audio signals and analyse their frequency content. They are used in the design and development of audio equipment, such as amplifiers, mixers, and speakers. Spectrum analysers help engineers and technicians to identify and eliminate distortions, noise, and other unwanted frequency components from the audio signal. They are also used in audio production and recording to achieve high-quality sound output.

Wireless Communication

Spectrum analysers are critical tools for wireless communication systems. They are used to measure the frequency spectrum of wireless signals and ensure that they are operating within the assigned frequency band. Spectrum analysers can detect interference from other wireless signals and help engineers and technicians troubleshoot wireless communication problems. They are used in the design and development of wireless communication systems, such as cellular networks, radio systems, and satellite communication.

Satellite Communication

Spectrum analysers are used in satellite communication to measure the frequency spectrum of signals transmitted and received by the satellite. They play a crucial role in the design, development and testing of satellite communication systems. Spectrum analysers help engineers and technicians to investigate and resolve signal interference, distortion and other issues related to satellite communication.

Signal Monitoring

Spectrum analysers are used to monitor signals continuously over time, to detect any changes that may occur in the signal frequency content. They are used to monitor signals in a variety of settings, such as radio and television broadcasting, telecommunication, and military communications. Spectrum analysers help in early detection and correction of signal issues, thereby improving the quality of communication and decreasing the likelihood of communication failure. In summary, spectrum analysers are essential tools used in a wide variety of applications, from audio analysis to satellite communication and signal monitoring. Whatever the task at hand, the spectrum analyser is a versatile and indispensable tool for those working with electronic systems.

Tips For Choosing The Right Spectrum Analyser

Choosing the right spectrum analyser can be a daunting task, but with some careful consideration, it can be simplified. Look for features such as frequency range, resolution bandwidth, and measurement speed, as well as consider your budget and intended application to make the best decision.

If you’re looking for a spectrum analyser, you know there are a ton of options out there. It can be overwhelming to choose the right one, especially if you’re not sure what you need. Here are some tips to help you choose the right spectrum analyser for your needs.

Determine Your Needs

The first step in choosing the right spectrum analyser is to determine what you need it for. This will help you determine what features are necessary and what the budget will be. Here are some questions to ask yourself:

  • What frequency range do I need?
  • What is my maximum input power?
  • What level of sensitivity do I need?
  • How often will I be using the device?

Once you have an idea of what you need, you can start to narrow down your options.

Consider Your Budget

Spectrum analysers come in a wide range of prices, from a few hundred dollars to tens of thousands of dollars. It’s important to consider your budget when choosing a device. Here are some things to think about:

  • What is your maximum budget?
  • Are you willing to invest in a higher-end device that may have additional features and better performance?
  • Do you need any additional accessories, such as software or cables?

By considering your budget, you can narrow down your options further.

Check For The Required Features

Once you have an idea of what you need and what your budget is, it’s time to start looking at specific devices. Here are some features to consider:

FeatureDescription
Frequency RangeDetermine the minimum and maximum frequency range you need.
SensitivityDetermine the minimum level of sensitivity you need.
Dynamic RangeDetermine the minimum and maximum power levels you need.
Resolution BandwidthDetermine the minimum resolution bandwidth you need.
PortabilityDetermine if portability is a requirement and if so, what size and weight is acceptable.

By checking for these features, you can find a device that meets your needs.

Conclusion

Choosing the right spectrum analyser can seem overwhelming, but by determining your needs, considering your budget, and checking for the required features, you can find a device that meets your needs.

Spectrum Analiser

Credit: signalhound.com

Frequently Asked Questions On Spectrum Analiser

Who Would Use A Spectrum Analyzer?

A spectrum analyzer is used by engineers, technicians, and hobbyists to analyze the frequency spectrum of signal sources. It is commonly used in the fields of telecommunications, audio engineering, and electronics manufacturing to troubleshoot, design and test radio frequency devices.

What Is Spectral Analysis Used For?

Spectral analysis is used to study the properties of sound and light waves. It helps in identifying the various frequencies present in a given signal, and can be used to determine the composition of substances based on their spectral patterns.

What Does An Optical Spectrum Analyzer Do?

An optical spectrum analyzer analyzes the spectral characteristics of light. It measures the intensity of light at various frequencies along the electromagnetic spectrum. This device helps to identify the wavelength, frequency, and power of light to provide detailed insights into the properties of the light source.

What Are The Two Types Of Spectrum Analyzer?

The two types of spectrum analyzer are real-time spectrum analyzers and swept-tuned spectrum analyzers.

Conclusion

The Spectrum Analyzer is an essential tool for sound technicians, audio engineers, music producers and enthusiasts who are working with sound frequency. This device has the ability to visualize sound frequency and signal strength in real-time, allowing users to identify and resolve audio-related issues with ease.

The Spectrum Analyzer’s effectiveness in identifying and troubleshooting technical problems has made it a top choice in the audio industry. So, if you are looking for a reliable and affordable tool to optimize your sound system, the Spectrum Analyzer is definitely worth investing in.

Categories
Archive

List of Artists: Influential Music Producers by Genre

This list of artists focuses on influential music producers and producer-artists, grouped by genre. Studying the people who shaped modern music is one of the best ways to sharpen your own production skills. Each entry notes a widely recognized contribution, so you know where to start listening. Use the list as a study guide: pick one artist, listen closely to their key work, and try to recreate elements of their sound in your DAW.

The list is not exhaustive. It highlights artists whose influence is widely documented, so their key records are easy to find on any streaming service.

Pop and Rock Producers

George Martin

George Martin produced the vast majority of the Beatles’ recordings and is often called “the fifth Beatle.” His orchestral arrangements and studio experimentation helped turn the recording studio into a creative instrument.

Quincy Jones

Quincy Jones produced Michael Jackson’s Off the Wall, Thriller and Bad. Thriller is widely cited as one of the best-selling albums of all time.

Max Martin

Swedish songwriter-producer Max Martin has written or co-written a huge number of chart-topping pop hits for artists including Britney Spears, Katy Perry, Taylor Swift and The Weeknd.

Nile Rodgers

Nile Rodgers co-founded Chic and produced records for David Bowie (Let’s Dance) and Madonna (Like a Virgin). He also collaborated with Daft Punk on “Get Lucky.”

Rick Rubin

Rick Rubin co-founded Def Jam Recordings. He is known for his stripped-back production across hip-hop, rock and country, working with Run-DMC, the Beastie Boys, Red Hot Chili Peppers and Johnny Cash.

Butch Vig

Butch Vig produced Nirvana’s Nevermind and is the drummer and co-founder of the band Garbage.

Hip-Hop Producers

Dr. Dre

Dr. Dre was a member of N.W.A. His album The Chronic popularized the G-funk sound. He also helped launch the careers of Snoop Dogg and Eminem.

J Dilla

J Dilla is famous for his loose, “drunk” off-grid drum programming and soulful sampling. His album Donuts remains a landmark of beat-making.

Timbaland

Timbaland is known for his unusual rhythms and inventive sound design on records for Missy Elliott, Aaliyah and Justin Timberlake.

Pharrell Williams

Pharrell Williams is one half of the production duo The Neptunes with Chad Hugo. He produced a long run of hip-hop and pop hits with minimal, percussive arrangements.

Kanye West

Before his solo career, Kanye West produced tracks for Jay-Z’s The Blueprint. He became known for his sped-up “chipmunk soul” samples.

Metro Boomin

Metro Boomin is one of the defining producers of modern trap. He’s known for dark, cinematic beats and his collaborations with Future and 21 Savage.

Electronic Music Producers

Giorgio Moroder

Giorgio Moroder co-wrote and produced Donna Summer’s “I Feel Love.” Its sequenced synth bass was hugely influential on disco, synth-pop and electronic dance music.

Frankie Knuckles

Frankie Knuckles is often called “the Godfather of House Music” for his role in developing house in Chicago.

Juan Atkins, Derrick May and Kevin Saunderson

This trio, known as the Belleville Three, is credited with pioneering Detroit techno.

Daft Punk

The French duo blended house, disco and funk on albums like Homework and Discovery. Their filtered, sample-based sound influenced a generation of producers.

Aphex Twin

Richard D. James, known as Aphex Twin, is a leading figure in experimental electronic music and IDM. Selected Ambient Works 85–92 is a classic of ambient techno.

Skrillex

Skrillex helped bring a heavy, aggressive style of dubstep to mainstream audiences and has won multiple Grammy Awards.

Kraftwerk

The German group Kraftwerk pioneered electronic pop with synthesizers, drum machines and vocoders on albums like Autobahn and Trans-Europe Express.

Burial

Burial is known for the atmospheric, crackling textures and shuffled UK garage rhythms on Untrue.

Ambient and Experimental Producers

Brian Eno

Brian Eno coined the term “ambient music” with Ambient 1: Music for Airports. He also produced albums for Talking Heads, U2 and Coldplay.

Reggae and Dub Producers

King Tubby

Jamaican engineer King Tubby is credited as a pioneer of dub. He turned the mixing desk into an instrument with echo, reverb and dramatic muting.

Lee “Scratch” Perry

Lee “Scratch” Perry was a legendary producer known for experimental dub productions at his Black Ark studio. He also worked with Bob Marley and the Wailers.

R&B and Soul Producers

Jimmy Jam and Terry Lewis

This duo produced Janet Jackson’s Control and Rhythm Nation 1814, shaping the sound of modern R&B with punchy drum machines and synths.

How to Learn From These Artists

  • Active listening: focus on one element at a time, such as drums, bass or vocals.
  • Reference tracks: load a song into your DAW and compare tone, loudness and balance with your mix.
  • Recreate sounds: try rebuilding a bassline or drum pattern to understand the technique. Our Serum sound design tips can help.
  • Study arrangement: map out where sections start and which elements enter or drop out.

For mixing technique, see our EQ frequency guide.

Frequently Asked Questions

Who is the most influential music producer?

There’s no single answer. George Martin, Quincy Jones, Dr. Dre and Brian Eno are frequently named among the most influential.

Who invented house music?

House music developed in Chicago clubs. Frankie Knuckles is widely called “the Godfather of House Music.”

Who pioneered Detroit techno?

Juan Atkins, Derrick May and Kevin Saunderson, known as the Belleville Three, are credited as its pioneers.

How can I learn production from famous producers?

Use their tracks as references, study the arrangements and recreate parts of their sound in your DAW.

Categories
Archive

Api 5500 Review

The API 5500 is a high-end equalizer for professional audio mastering. It offers exceptional sound quality and versatility for studio recording use.

The API 5500 is a premier equalizer for the professional recording industry. Its high-end features, precision, and sound quality make it ideal for mastering in a recording studio. The 5500 offers a range of frequencies and the ability to make fine adjustments to the sound.

It is durable and rugged, built to handle even the most demanding recording applications. With its classic design and modern features, the API 5500 is an essential tool for any serious audio professional.

Features Of Api 5500

The API 5500 is a versatile equalizer for any studio or live performance. It features dual equalization curves with nine selectable filter choices for precision and control over your sound. The unique band-pass filter is perfect for a range of applications and the analog design provides warmth to your audio.

The API 5500 is a four-band equalizer known for its signal path that ensures a quality sound output. This high-performance equipment is used to enhance audio recordings without sacrificing signal integrity. Furthermore, the device’s adjustable frequency range gives users the ability to tune their audio output exactly how they want it. Below are the main features that make the API 5500 a must-have for sound engineers.

Quality Sound

The API 5500 is specifically designed to provide the best possible sound quality. It has a low noise floor that ensures lower distortion, allowing for clean and clear audio output. Additionally, the 5500’s output transformer guarantees that the sound quality is unmatched.

Four Bands Of Equalization

This device comes equipped with four bands of equalization that allow users to adjust sound frequencies to their taste. Each of these bands has a gain control with a range of 12dB offering the flexibility to shape sound and voice.

Adjustable Frequency Range

The API 5500 has an adjustable frequency range from 20Hz to 20kHz, making it ideal for any recording situation. This wide range of frequencies also allows the user to process a wide variety of sound signals. In conclusion, the API 5500 is an excellent option for sound engineers who want to achieve quality sound. The four-bands of equalization and adjustable frequency range make the equipment suitable for use in a wide variety of sound recording situations.

Api 5500 Review

Credit: audiosciencereview.com

Comparison With Other Equalizers

The Api 5500 Equalizer stands out from its competitors due to its unparalleled sonic clarity and the ability to adjust individual frequencies. Compared to other equalizers, the Api 5500 offers a more precise and customizable sound, making it a top choice for professional audio engineers and enthusiasts alike.

When it comes to mixing and mastering audio, having the right tool for the job is essential. The API 5500 is a high-quality equalizer that has gained popularity among audio engineers and music producers. However, when it comes to choosing an equalizer, there are several options on the market. In this article, we will compare the API 5500 with two other popular equalizers – Waves SSL E-Channel and Universal Audio’s Pulteq EQP-1A.

Versus Waves Ssl E-channel

The Waves SSL E-Channel is a software equalizer that emulates the sound of the legendary SSL 4000 console. It offers a simple and intuitive user interface and has gained popularity among users who prefer a digital workflow. However, when it comes to sound quality, the API 5500 is hard to beat. The API 5500 has a warm and musical sound that adds character to any mix. In contrast, the Waves SSL E-Channel can sound sterile and clinical. Additionally, the API 5500 has a wider frequency range and more precise controls than the Waves SSL E-Channel.

Versus Universal Audio’s Pulteq Eqp-1a

The Universal Audio’s Pulteq EQP-1A is a hardware equalizer that is prized for its musical and warm sound. It is a faithful reproduction of the classic Pultec EQP-1A and has been used on countless records. However, while the Pulteq EQP-1A adds warmth to a mix, it can also mask certain frequencies. The API 5500, on the other hand, offers more precise control over the frequencies and can help to bring out details in a mix that would otherwise be lost. Additionally, the API 5500 has a more modern sound than the Pulteq EQP-1A, which may appeal to users who prefer a more modern sound. In conclusion, while the API 5500 is not the only equalizer on the market, it is a high-quality tool that offers a warm and musical sound, precise controls, and a wide frequency range. When compared to the Waves SSL E-Channel and Universal Audio’s Pulteq EQP-1A, the API 5500 stands out for its precise control and modern sound. Whether you are mixing music or mastering audio, the API 5500 is a versatile tool that can help you achieve your desired sound.

Pros Of Api 5500

API 5500 is a legendary equalizer designed by Automated Processes Inc., known for its excellent sound quality and functionality. The device has garnered high praise from both professionals and enthusiasts in the audio industry. In this article, we will dive into some of the most outstanding benefits of API 5500, particularly its advanced equalization features, high-quality build, and great-sounding analog gear.

Advanced Equalization Features

The API 5500 boasts a range of advanced equalization features that make it a must-have device for audio professionals. It offers four overlapping frequency bands and seven switchable filter frequencies, ranging from 50 Hz to 15 kHz. This breadth of options allows for a broad range of tonal shaping and precision in audio corrections. API 5500’s filters are also highly musical, making it easy to sculpt the sound, even for beginners. Unlike digital equalizers, API 5500’s equalization is entirely passive, which means it doesn’t add any coloration to the sound and sound remains true to the original source.

High Quality Build

API 5500’s build quality is unmatched, and this is immediately apparent from its design. It has a sturdy and solid look, with a metal chassis that exudes an impression of durability. The knobs have a fantastic feel while adjusting the frequencies, giving users a sense of precision and control that only comes with top-of-the-line devices. Additionally, API 5500 is built to last, ensuring that users can make use of it for an extended period without the need for any repairs or part replacements.

Great Sounding Analog Gear

The API 5500 is highly regarded for its fantastic sound, making it a popular choice for recording, mixing, and mastering professionals worldwide. It is an invaluable tool when it comes to capturing and enhancing the harmonics present in both analog and digital sources. By utilizing the device’s discrete op-amp, transformer input, and output stages, the sound produced by API 5500 analog gear is richer, warmer, and more musical than many other units in the market. This benefit is particularly evident when used on drums, bass, and guitar tracks.

In conclusion, API 5500’s advanced equalization features, high-quality build, and great sounding analog gear make it a worthy investment for any recording professional seeking an equalizer that delivers both usability and exceptional sound quality.

Api 5500 Review

Credit: www.sweetwater.com

Cons Of Api 5500

While there are many advantages to using the API 5500, it’s important to consider some of the disadvantages before making a purchase. Here are some cons of API 5500:

High Price Point

The API 5500 is a high-end product and comes with a correspondingly high price tag. At over $1000 per unit, it may not be accessible to everyone, particularly those with a limited budget. However, for those who require the highest quality sound and precision, the cost may be worth it.

Consumes A Lot Of Rack Space

Another issue with the API 5500 is that it consumes a lot of rack space. This can be a problem if you have limited space in your studio or live rig. Its size can also make it difficult to transport if you plan on using it for live performances, especially if you’re on a tight schedule.

Despite its drawbacks, the API 5500 offers exceptional sound quality, precise equalization, and versatile features that make it a valuable addition to any sound engineer’s toolkit. However, it’s important to weigh the pros and cons before making a purchase decision based on your specific needs and budget.

User Reviews For Api 5500

The API 5500 is a popular equalizer used by a wide range of sound engineers, music producers, and recording enthusiasts. If you’re interested in purchasing this device for your workspace, you might be wondering what others think about it. In this section, we’ll dive into user reviews from sound engineers and music producers, as well as sound recording enthusiasts.

Reviews From Sound Engineers And Music Producers

Sound engineers and music producers rely on the API 5500 to help them achieve their desired sound quality. According to reviews, this device is a go-to for many professionals. Here are some of the things they had to say:

ReviewFeedback
“The API 5500 is a game changer.”The API 5500 provides unmatched sound quality that enhances music production.
“I couldn’t imagine doing a mixing session without it.”The API 5500 is a reliable device that has become an essential part of many people’s studios.
“The high frequencies are crisp and clear.”The device delivers a remarkable sound quality that is unmatched by many others.

Reviews From Sound Recording Enthusiasts

If you’re a sound recording enthusiast, you might be wondering if the API 5500 is worth the investment. Here’s what others have said about their experiences with the device:

  • “I was skeptical at first, but after using the API 5500 to record a few sessions, I was blown away.”
  • “The frequency response is so much better than what I was getting before.”
  • “The device is user-friendly, even for someone like me who’s relatively new to sound recording.”

Overall, users raved about the API 5500’s sound quality, reliability, and user-friendliness. Despite its relatively high price point, many users believe that it’s worth the investment for the remarkable sound quality it provides.

Api 5500 Review

Credit: m.youtube.com

Frequently Asked Questions For Api 5500 Review

What Is The Api 5500?

The API 5500 is a high-end equalizer that provides a range of powerful EQ tools for enhancing audio.

How Does The Api 5500 Work?

Using advanced algorithms, this equalizer boosts certain frequencies while reducing others to create a more balanced and powerful sound.

What Are The Benefits Of Using The Api 5500?

The API 5500 provides highly precise sound adjustment, making it a must-have tool for audio professionals seeking to create top-quality audio recordings.

Is The Api 5500 User-friendly?

Yes, this equalizer is designed with ease-of-use in mind, and provides a user-friendly interface for fast and simple sound adjustment.

Conclusion

The API 5500 is a highly versatile and efficient tool for audio engineers looking to enhance their projects. With its exceptional sound quality, flexible EQ settings, and user-friendly interface, the 5500 offers a seamless experience for professionals and beginners alike.

Its ability to tackle any genre or application makes it a must-have for anyone serious about achieving true audio perfection. Whether you’re producing music, recording podcasts, or mastering sound for film, the API 5500 is an investment worth making. Upgrade your audio game and hear the difference for yourself!

Categories
Archive

Sample Rate For Recording

The sample rate for recording refers to the frequency at which audio recordings are sampled. It is a crucial factor in determining the quality of a recording.

A higher sample rate can result in better sound quality, but also increases file size and requires more processing power. The most commonly used sample rates for music production and audio recording are 44. 1 kHz and 48 kHz. However, higher sample rates, such as 96 kHz or 192 kHz, can provide greater detail and accuracy in sound reproduction.

It is important to choose a sample rate that is appropriate for the intended use of the recording. We will explore the importance of sample rates in recording and how to choose the right one for your projects.

Sample Rate For Recording

Credit: www.joecrowtheaudiopro.com

Factors To Consider When Choosing Sample Rate

Choosing the right sample rate is essential for recording high-quality audio. Factors to consider include the desired sound quality, available storage space, and compatibility with editing software.

Factors to Consider When Choosing Sample Rate When it comes to digital recording, sample rate refers to the number of samples per second of audio that are recorded. The sample rate you choose can have a significant impact on the quality, storage space, and compatibility of your recordings. Here are the key factors to consider when choosing the best sample rate for your needs. Audio Quality The sample rate you select will determine the frequency response of your recordings. Higher sample rates provide a wider frequency range and more accurate representation of audio, especially in higher frequencies. For high-quality recordings, you should consider a sample rate of 48 kHz or higher. However, keep in mind that higher sample rates come with larger file sizes, requiring more storage space. Storage Space The sample rate you choose has a direct impact on the size of your audio files. The higher the sample rate, the larger your audio files will be. This means that if you’re on a limited storage budget, it’s best to use a lower sample rate. A sample rate of 44.1 kHz is commonly used for music recordings, but if you’re recording vocals or speech, you could get away with a 22.05 kHz sample rate. Compatibility The sample rate you choose must be compatible with the devices and software you intend to use to edit and playback your recordings. Most modern devices support a range of sample rates, so you shouldn’t experience any issues as long as you choose a commonly used sample rate. For instance, a sample rate of 48 kHz is supported by most recording software. In conclusion, selecting the right sample rate for your recording requires careful consideration of the audio quality, storage space, and compatibility. While higher sample rates may offer better audio quality, keep in mind the larger file sizes that come with them. Lastly, ensure that the sample rate you choose is supported by your recording device and editing software.

Sample Rate For Recording

Credit: www.soundonsound.com

Common Sample Rates Used In Recording

Sample rate is the number of samples of audio carried per second, expressed in Hertz (Hz). It determines the quality of audio recordings. The higher the sample rate, the better the audio quality. Common sample rates used in recording include 44.1 kHz, 48 kHz, 88.2 kHz, and 96 kHz.

44.1 Khz

44.1 kHz is the sample rate used in CDs. It provides high-quality audio recordings and is supported by most digital audio equipment. It is a standard sample rate for audio recording in music production, podcasting, and other audio content. It is a reliable option for recording, editing, and producing quality audio.

48 Khz

48 kHz is the sample rate used in digital video production. It is also standard for audio recording in film soundtracks and TV broadcast productions. This sample rate provides high-quality audio recordings with improved frequency and dynamic range. It is a good option for recording studio-quality music and creating immersive sound experiences.

88.2 Khz

88.2 kHz is a high-resolution sample rate used in audiophile digital music repositories and high-quality audio recording applications. It provides high-fidelity audio recordings with superior clarity and details. This sample rate is useful for recording orchestral music, jazz, and other genres that require high dynamic range and fine nuances of sound.

96 Khz

96 kHz is the highest common sample rate used in professional audio recording. It provides ultra-high-quality audio recordings with exceptional clarity and accuracy. This sample rate is useful for recording classical music, opera, and other genres that require the highest level of audio performance.

Choosing the right sample rate depends on the intended use of your audio recording. Higher sample rates provide better audio fidelity but require larger file sizes and more processing power. Consider your project requirements and equipment capabilities when selecting your sampling rate.

How To Choose The Right Sample Rate For Your Recording

Choosing the appropriate sample rate is crucial in achieving high-quality recording results. It determines the accuracy of the recorded sound, with higher sample rates providing better sound quality but requiring more storage space and processing power. To find the right sample rate for your recording, you should consider your equipment, the type of recording you are making, and your intended final output.

Choosing the right sample rate for your recording is a crucial step in audio production. Sample rate refers to the number of samples per second taken from an audio signal and is measured in Hertz (Hz). A higher sample rate provides better quality audio, but it also requires more storage space. In this article, we’ll help you choose the right sample rate for your recording by considering three factors: the genre of music, the type of instrument, and the destination of the recording.

Genre Of Music

The genre of music you’re recording can have an impact on the sample rate you choose. If you’re recording classical or acoustic music, a higher sample rate (e.g. 96kHz) may be necessary to capture the nuances of the performance, as these genres are often recorded in more quiet environments. However, for genres such as hip-hop or EDM, a lower sample rate (e.g. 44.1kHz) can still produce high-quality audio that matches the production style.

Type Of Instrument

The type of instrument being recorded can also affect the sample rate you choose. For example, recording a solo vocalist may not require a high sample rate since the human voice doesn’t have the same frequency range as some instruments like a drum kit, piano, or strings. A low to medium sample rate like 44.1kHz or 48kHz can suffice for vocal recording. On the other hand, for percussive instruments like drums, a higher sample rate like 96kHz may be needed to capture the transient details of the instrument.

Destination Of The Recording

Consider the destination of the recording when choosing your sample rate. If you’re recording for CD release, then the standard sample rate of 44.1kHz with a bit depth of 16-bit is all you need. However, if you’re recording for film or video games, then a higher sample rate like 48kHz or even 96kHz (with 24-bit depth) may be necessary to ensure compatibility. In some cases, the destination may require lower sample rates, such as when streaming audio to mobile devices.

Conclusion

In conclusion, choosing the right sample rate for recording is based on the genre of music, type of instrument and the destination of the recording. By considering these factors, you can ensure that your recordings sound great and are compatible with various platforms. Remember that higher sample rates come with larger file sizes, so choose the sample rate that fits the recording’s needs without sacrificing quality.

Sample Rate For Recording

Credit: www.production-expert.com

Frequently Asked Questions For Sample Rate For Recording

Is It Better To Record In 44.1 Or 48?

It depends on the intended use of the recording. For music, 48 kHz is generally preferred for higher fidelity. However, for audio that will only be used online or for speech, 44. 1 kHz is sufficient and produces smaller file sizes.

The main goal is to choose a sample rate that matches your project’s needs and requirements.

At What Sample Rate Should I Record?

Record at a sample rate of 44. 1 kHz or 48 kHz for most applications. These rates are standard for audio production and provide a good balance between audio quality and file size. However, you may need to adjust the sample rate based on the specific needs of your project or equipment.

Should I Record 48khz Or 96khz?

Recording at 48kHz will suffice for most applications. It is a standard sampling rate and produces good quality sound. However, if you plan to manipulate the audio extensively or want to capture more detail, 96kHz would be a better choice.

Keep in mind, higher sampling rates require more storage space.

What Is A Good Sample Size For Recording?

The minimum sample size needed for reliable recordings varies depending on the type and purpose of the recording. Generally, a sample size of at least 30 is considered acceptable, but the larger the sample size, the more accurate the results will be.

Conclusion

Recording with the appropriate sample rate is crucial for achieving high-quality audio output. Selecting the right sample rate and bit depth combo depends on the desired final output and the environment where it is used. These factors impact the overall consumer experience positively or negatively.

Understanding the importance of sample rate in recording enables artists and creators to deliver exceptional audio content. Optimize your audio recording’s quality by choosing the correct sample rate—the key to enhance your listeners’ audio experience.