Categories
Archive

Types Of Reverb: Crafting Sonic Depth in Music Production

Types of reverb include room, hall, plate, spring, and digital algorithmic reverbs. Each type offers different acoustic characteristics suited to varying audio production needs.


Reverb, or reverberation, is an essential element in audio production, helping to create depth and space in sound recordings. It’s the effect that you hear when sound bounces off surfaces and returns to the listener’s ear, creating a sense of environment.


Traditionally, reverbs are categorized based on the medium they use to produce the effect or the space they emulate. Room reverbs simulate the sound reflections of small spaces; hall reverbs are designed to imitate the expansive sound of concert halls. Plate reverbs recreate the distinctive echo of sound waves vibrating through a large sheet of metal, while spring reverbs use a coiled spring to achieve their characteristic twang. Lastly, modern digital reverbs harness algorithms to mimic these physical phenomena or create entirely new and unique reverb profiles. Understanding these types can be crucial for musicians, sound engineers, and producers aiming to craft a specific sonic landscape in their work.

Types Of Reverb: Crafting Sonic Depth in Music Production


Credit: undergroundtalent.co.uk

The Role Of Reverb In Music Production

Reverb is crucial in shaping the sound and feel of a track. It’s like the air around the notes, filling the space in music. Producers use reverb to add depth, character, and dimension to their creations. Let’s explore how reverb can create atmosphere and evoke emotions in music production.

Creating Atmosphere

Reverb sets the stage for a song. It can transport listeners from a small room to a grand hall. Below are ways reverb can create different atmospheres:

  • Small Room: Tight, quick echoes for an intimate vibe.
  • Large Hall: Expansive waves for a majestic feel.
  • Plate: Smooth, rich textures for a vintage flair.
  • Spring: Twangy, unique tones for a retro touch.

By adjusting reverb type and parameters, the right atmosphere complements the song’s mood.

Emotional Impact

Music touches hearts with reverb. This effect can amplify emotions in a song. It brings warmth to a sad ballad or energy to an upbeat track. Here’s how:

Song Type Reverb Usage Impact
Ballads Long, reflective reverb Heightens sentimentality and depth
Dance Tracks Snappy, short reverb Creates rhythm and movement
Rock Anthems Large, bold reverb Adds power and scale

Reverb can turn simple melodies into powerful emotional experiences. It’s a tool for producers to dial up the drama or soften the sound.

Types Of Reverb: Crafting Sonic Depth in Music Production


Credit: www.abletonprivatelessons.com

Natural Vs Artificial Reverb

Reverb adds magic to music, making every note feel alive. Knowing the difference between natural and artificial reverb helps create the perfect sound.

Real Acoustic Spaces

Natural reverb happens in actual rooms and halls. It’s the sound bouncing off walls and objects. Different places have unique echoes.

  • Cathedral: Long, majestic echo
  • Bathroom: Sharp, bright reflections
  • Forest: Soft, scattered echoes

Real spaces shape the sound, giving music a special touch.

Digital Reverberation

Artificial reverb is made with technology. It can mimic real places or create new sounds.

Type Sound
Plate Crisp, controlled echo
Spring Twangy, unique vibration
Room Simulates small spaces

Digital effects let you shape sound in new ways, making the impossible possible.

Spring Reverb: Vintage Vibe

The sound of classic rock and surf music often carries a distinctive echo. This echo is the magic of spring reverb. Present in vintage amplifiers and standalone units, spring reverb has a charm that modern effects can only imitate.

How It Works

Spring reverb generates its effect mechanically. It uses a set of springs within a metal box. When sound enters this device, it rattles the springs. This creates multiple echoes that blend and bounce back. The combined echoes create the reverb sound.

  • A signal enters through a transducer at one end.
  • The springs vibrate, carrying the signal.
  • Another transducer picks up the vibrations at the opposite end.
  • The output mingles with the original signal for an effect.

Characteristics In Sound

Spring reverb’s sound is unmistakable. It’s warm and twangy with a unique charm.

Quality Description
Warmth It has a soft, lush tone that fills the music.
Boingy Echoes Striking sounds create a boing-like echo.
Dwell How long the sound lingers before it fades.
Twang Gives guitars a bouncy, vibrant character.

Known for its use in surf rock and retro records, spring reverb adds depth without overwhelming. It’s perfect for adding that vintage touch to modern tracks.


Plate Reverb: The Studio Workhorse

Plate reverb has etched its place in music history.
This reverb type is famous for adding depth to sounds in a mix.
Music producers love plate reverb for its unique qualities.
It shines in the studio, blending seamlessly with various instruments.

The Mechanics Behind Plate Reverb

Plate reverb works through vibration.
A large metal plate vibrates to create reverb sounds.
An audio signal hits the plate and then bends it.
This bending produces the echo effect we hear in songs.
Adjustments can make the reverb sound different.

  • Size of the plate: Changes the reverb quality
  • Dampening: Controls the reverb’s duration
  • Drive signal: Affects the reverb’s intensity

Applications In Modern Music

Today, plate reverb is everywhere in music.
Its versatility makes it a favorite for many genres.
You can hear its lush sound in pop, rock, jazz, and more.
With modern tech, digital emulations mimic these reverbs in software.

Genre Common Use
Pop Music Vocals and snare drums
Rock Guitars and Vocals
Electronic Synthesizers and percussive elements

Whether in a physical studio or on a computer, plate reverb is essential.
It adds richness and character to sounds, shaping modern music’s landscape.

Room Reverb: Mimicking Spaces

When we clasp our hands and shout in a room, the sound bounces around, creating an echo. Room reverb is that echo. It’s a trick sound experts use to make us feel like we’re in a big hall or a cozy closet without leaving our seats. Different sizes of rooms give different vibes. Let’s explore how small and large room reverbs change what we hear.

Small Vs Large Rooms

Small rooms give sounds a quick, sharp echo. It’s like whispering in a closet. Large rooms have longer echoes, like shouting in a gym. Sound moves slower in big spaces, so the reverb lasts longer.

Room Size Reverb Quality
Small Room Quick and intimate
Large Room Full and grand

Influence On Perception

Reverb doesn’t just change sounds. It changes how we feel about a place. Small room reverb can make us feel snug and safe. Large room reverb can make us feel awe or even tiny. Movie makers use reverb to help us connect with the characters, like we’re right there with them.

  • Small room reverb feels personal and close.
  • Large room reverb adds drama and scale.

Hall Reverb: Symphonic Expanses

Hall reverb brings to life the grandeur of symphonic music. It mirrors the sonic footprint of cavernous spaces like concert halls. Musicians and producers use it to create a sense of depth and richness in their recordings. This feature adds vastness to sound, often desired in classical and orchestral recordings.

Orchestral Hall Sound

The orchestral hall sound is famous for its warm and enveloping reverb. This reverb type imitates the acoustics of a large concert hall, where orchestras perform. Notes linger in the air, creating a blanket of sound that carries the listener through a musical journey. Hall reverb ensures every instrument’s tone is lush and full.

  • Bold violins
  • Sweeping harps
  • Resonant brass

Each finds its place within the wide expanse of hall reverb.

Tailoring Decay And Size

Adjusting decay and size is crucial in hall reverb. Decay controls how long the reverb lasts. Size affects the perceived space the reverb emulates. Shorter decay and smaller size settings work for intimate pieces. Longer decay and larger sizes fit epic compositions. Adjusting these settings allows precise control over the soundstage.

Setting Small Ensemble Large Orchestra
Decay Short to Medium Long
Size Small to Medium Large to Massive

Digital Reverb Algorithms

Reverb adds depth and space to sounds in music and audio production. Digital reverb is a tool that uses complex algorithms to simulate this effect. Two types stand out. These are Convolution Reverb and Algorithmic Reverb. Let’s dive into these magical digital tools.

Convolution Reverb

Convolution Reverb uses real-world space recordings to create reverb.

  • This type maps an audio signal to a specific space.
  • It creates highly realistic sound environments.
  • Producers pick from different spaces, like halls or rooms.

This reverb uses audio snapshots called impulse responses. These capture a location’s sound. Convolution reverbs then apply these responses to any audio, making it sound like it’s in that space.

Algorithmic Vs. Impulse

Algorithmic Reverb Impulse Reverb (Convolution)
Creates reverb through algorithms. Uses recordings of actual spaces.
Adjustable parameters for unique sounds. Relies on pre-recorded impulses.
Flexible and often CPU-friendly. Can be more CPU-intensive for high-quality.

In the battle of Algorithmic Reverb vs. Impulse Convolution Reverb, both have their place. Algorithmic reverbs provide flexibility. They create virtual spaces that don’t exist in the real world. Impulse reverbs boast realism. They replicate real acoustic spaces. This gives a true-to-life reverb effect. The choice depends on the desired outcome and sound character.

Modulated Reverb: Adding Movement

Imagine a room where walls dance. That’s Modulated Reverb. It’s a type of reverb with a twist. It not only gives you the echo but also adds a wavy, swooshing sound. This makes sounds rich and more lively. Musicians love this for its dreamy vibe. It’s like giving sound a life of its own. Let’s delve into how modulated reverb brings motion to the table.

Chorus And Flange Effects

Chorus and flange effects are stars in the modulated reverb universe. They mimic the magic of multiple sounds at once. Here’s how they shine:

  • Chorus: This effect doubles your sound. It’s like a choir from just one voice.
  • Flange: Think of a jet plane’s woosh. That’s flange. It gives a futuristic swirl.

Both bring a unique spin to reverb. They make guitars lush and voices fuller. It’s like painting with sonic colors. Listen to your songs come alive with these effects.

Creating Ethereal Textures

Modulated reverb lets you craft ethereal textures. These textures are like a whisper from a dream. They add depth and mystery to music. Here are ways to create these textures:

  1. Fiddle with decay settings. Long decays make sounds float.
  2. Mix in modulation. A little goes a long way.
  3. Play with different intensities. Find your perfect spacey sound.

Such textures suit ambient music or cinematic scores. They fill the room with a veil of mystery. Let your listeners lose themselves in this sound blanket.

Chamber Reverb: The Sound Of History

Chamber reverb whispers tales from the golden age of music recording. It wraps vocals and instruments in a warm, natural echo. This timeless effect stems from spaces designed to capture rich, resonant sounds. Let’s explore the chambers that made music history and how to achieve that classic tone today.

Historic Recording Studios

Legendary studios had rooms called echo chambers. They crafted unique sound vibes. Walls made of smooth, hard surfaces created long, lush reverberations. A speaker at one end and a microphone at the other would capture the magic.

  • Abbey Road Studios – The Beatles’ iconic sound
  • Sunset Sound Recorders – The Doors, Prince
  • Motown’s Hitsville U.S.A. – The sound of “Motor City”

Achieving A Classic Tone

Today’s technology brings the past to present studios. Digital effects and plugins recreate the sound chambers electronically, saving space and cost. For true enthusiasts, building a small chamber or using convolution reverbs is an option.

Adjusting decay time, pre-delay, and diffusion mimics the chamber sound. Experimenting with these controls can produce vintage vibes similar to historic recordings.

Advanced Techniques In Reverb Usage

Experts use advanced techniques in creating perfect sound spaces with reverb. These techniques give tracks depth and feeling. Understanding and using them effectively unlocks the full potential of reverb in any mix. Let’s dive into some of these techniques that professionals use to create stunning auditory landscapes.

Layering Different Reverbs

Layering reverbs allows unique sound textures. Think of it as a chef using multiple spices to create complex flavors. By combining different reverb types, you craft nuanced spaces. Each reverb type has its strength, and blending them can highlight different elements of a track.

  • Room and Hall: Add body with room and depth with hall reverb.
  • Plate and Spring: Plate adds richness and spring injects liveliness.
  • Digital and Convolution: Use digital for control and convolution for realism.

Play with the mix percentage for each reverb. Start with subtlety, then adjust to taste. Matching decay times creates a cohesive space while contrasting them adds complexity.

Automation For Dynamic Changes

Reverb automation makes a mix dynamic. It’s like animating a painting to shift with the storyline. Automating parameters like reverb amount, decay time, or wet/dry mix bring parts of a track forwards or backwards in the mix.

Automation Parameter Dynamic Effect
Decay Time Creates build-up or drop-off effects
Wet/Dry Mix Shifts from subtle to pronounced space
Pre-Delay Alters the sense of distance

Automate during transitions to highlight shifts. For instance, increasing reverb on a snare during a breakdown can create a sense of expansion. Remember, subtle movements often work best.

Choosing The Right Reverb

Choosing the right reverb is a key step in music production. It can turn a flat recording into a vibrant soundscape. Different types of reverb fit different music genres. Knowing which one to use will elevate your sound.

Matching Reverb With Genre

Each music genre has its signature sound. Choose a reverb that complements it. Here’s a quick guide:

  • Rock – Plate reverb for a classic, punchy effect.
  • Pop – Hall reverb adds depth without muddying the mix.
  • Jazz – Spring reverb can create a vintage ambiance.
  • Classical – Concert hall reverb for a natural, expansive sound.
  • Electronic – Gated reverb for that 80s synth vibe.

Listening Examples

Examine these reverb types in action:

Genre Reverb Type Song Example
Rock Plate “When the Levee Breaks” – Led Zeppelin
Pop Hall “Bad Guy” – Billie Eilish
Jazz Spring “So What” – Miles Davis

Mixing Tips For Reverb


Amazing Mixing Tips for Reverb That Will Transform Your Tracks

Reverb adds depth to your tracks.

Let’s dive into how to mix reverb like a pro.

We will explore balancing signals, and pre-delay and EQ tips.

Balancing Wet and Dry Signals

Balancing Wet And Dry Signals

Balancing wet and dry signals is key.

  • Wet signal is the reverb.
  • Dry signal is the original sound.

A mix of both signals brings tracks to life.

Too Dry Too Wet
Sound is flat Sound gets lost

Find a balance for clarity and depth.

Pre-Delay and EQ Considerations

Pre-delay And Eq Considerations

Pre-delay separates dry and wet signals.

It can make vocals stand out.

EQ shapes the reverb’s tone.

Cut low frequencies to reduce muddiness.

Enhance highs for a brighter space.

  1. Adjust pre-delay for space.
  2. EQ to fit the mix.

Every track deserves unique settings.

Frequently Asked Questions On Types Of Reverb

What Are The Main Types Of Reverb?

Reverb effects can be broadly classified into four types: Room, Hall, Plate, and Spring. Each type simulates different acoustic environments. Room and hall replicate varying venue sizes, while plate and spring mimic hardware reverb units used in studios.

Why Is Plate Reverb So Popular In Recordings?

Plate reverb is popular because it adds depth and richness to audio without muddying the mix. Its smooth decay is ideal for vocals and drum sounds, giving a classic vibe that fits well in modern and retro productions alike.

Can Digital Reverb Replicate Spring Reverb Realistically?

Modern digital reverb can accurately emulate the distinctive twang and boing of spring reverb. Advanced algorithms capture the nuances of its sound, making digital spring reverb a versatile and maintenance-free alternative.

How Does Room Size Affect Reverb Sound?

The size of a room directly affects reverb characteristics. Larger rooms have longer decay times and can create a more expansive sense of space, while smaller rooms produce tighter and more immediate reverberation effects.

Conclusion

Exploring the realm of reverbs reveals a landscape rich with sonic textures. Each type offers a unique flavor, essential for crafting distinct audio environments. Whether you dive into spring, plate, or algorithmic reverb, the right choice elevates your sound. Unleash your creativity and let your projects resonate with character.


Happy mixing!
Categories
Archive

Flanger vs Phaser: Unveiling Sonic Effects Mastery

Flangers and phasers are both audio effects that modulate sound but with distinct sonic characteristics. A flanger creates a swooshing sound, while a phaser offers a more subtle swirling effect.

Music producers and audio engineers often use flangers and phasers to add depth and movement to sounds. Flangers work by mixing the original signal with a delayed version of itself, periodically changing the delay time, which results in a series of peaks and troughs in the frequency spectrum.

This process produces the characteristic ‘jet plane’ effect. In contrast, phasers achieve their effect through phase-shifting; they split the original signal and adjust the phase of one of the paths, creating notches in the frequency response. Both tools can drastically alter the texture of instruments or entire tracks, and selecting between them depends on the desired impact on the music. Understanding their unique sonic qualities enables producers to enhance their mixes creatively.

Flanger vs Phaser: Unveiling Sonic Effects Mastery

Credit: www.arturia.com

Flanger Vs Phaser: Unveiling Sonic Effects Mastery

Music creators and audio enthusiasts often explore the depths of sound using various effects. Among these, Flanger and Phaser stand out, crafting unique soundscapes. This post dives into what sets them apart and their rich sonic heritage.

Introduction To Flanger And Phaser

What are Flanger and Phaser? Both are effects used in music to add texture to sounds. They make waves of peak and trough in audio signals. This causes a cool swirling effect. It’s like the sound is spinning around the listener.

Flanger Phaser
Combines sound with a slightly delayed copy. Filters sound to create peaks and troughs in the spectrum.
Delay time changes to create a ‘whooshing’ effect. Creates a ‘swooshing’ by changing phases.

Historical Evolution Of Sonic Effects

The journey of these effects began decades ago. Flanger and Phaser effects have roots in tape recording. Artists in the ’60s used tapes to create natural delays and phase shifts. This changed sonic landscapes forever. Let’s see how these techniques developed over time.

  • The Flanger effect was born from manipulating reel-to-reel tape machines.
  • Phaser effects emerged by altering electronic circuits.
  • Both effects evolved with digital technology.

Today, Flanger and Phaser are available as pedals, plugins, and built-in DAW effects.

The Flanger Effect: Twisting Soundwaves

Imagine a rollercoaster for sound. That’s the flanger effect. It takes a note and spins it around, making a whooshing sound like a jet plane. Music gets this cool, spacey vibe. With the flanger effect, guitars, keyboards, and even vocals transform into something magical and otherworldly.

Mechanics Behind Flanging

Flanging is all about echoes. It mixes the original sound with its delay. But here’s the twist: the delay time keeps changing. Think of two tapes playing the same note. If one tape slows down and then catches up, you hear a sweeping sound. That’s flanging. It works like this:

  • Record a sound onto two tapes.
  • Play them together.
  • Press on one reel to slow it down.
  • Release to let it catch up.
  • The swoosh you hear is the flanger effect.

Hear The Sweep: Signature Flanger Sounds

Flangers make a sound that sweeps up and down. It feels like a wave in the ocean of sound. You can hear it in funky bass lines or soaring guitar solos. It brings a sense of drama, of motion. Here are some places to spot the flanger in action:

  1. Classic rock songs often use it for a psychedelic touch.
  2. Electronic music loves it for robotic twists.
  3. Pop tracks add it to make the chorus stand out.

The Phaser Effect: Cyclical Magic

The Phaser Effect: Cyclical Magic captivates listeners with its supernatural sound. This effect bends waves of sound. It creates spirals in the air that tickle our ears. Now, let’s dive into the details of this enchanting audio phenomenon.

Understanding Phase Shifting

Phase shifting is the heart of the phaser effect. It plays with sound waves to create unique tones. It shifts sound by milliseconds. This creates a series of peaks and troughs. These are known as notches. When the original sound mixes with these shifted waves, we enter a surreal soundscape.

  • Splits the sound into two paths
  • Shifts one path slightly
  • Combines both paths to create the phaser effect

Each sound path dances with the other, creating magical cycles. It’s like a sonic carousel!

Phaser’s Distinctive Swirl And Whoosh

The swirl and whoosh of a phaser are its signature moves. Musicians often turn to phasers for this reason. This effect brings depth and movement to music. It’s like a gentle breeze that turns into a vibrant whirlwind.

Sound without Phaser Sound with Phaser
Flat Dynamic
Monotonous Engaging

Phasers add an unmistakable whoosh to melodies. They sweep through frequencies. They give each note a life of its own. Imagine a bird gliding on a gust of wind. That’s what phasers add to sound.

Flanger vs Phaser: Unveiling Sonic Effects Mastery

Credit: breakthroughguitar.com

Technical Differences Clarified

Diving into the sound waves, flanger and phaser effects might seem similar at first listen. Both add a distinct, swirling component to the music. Yet, technically, they process audio signals in different ways. Here, we clarify these differences, so musicians and producers can make informed decisions about their soundscapes.

Signal Processing: Flanger Vs Phaser

At the heart of these effects lies signal processing. A flanger combines two identical signals, with one delayed slightly. This creates a series of peaks and troughs in the sound wave, known as ‘comb filtering’. It results in a whooshing or jet plane effect.

A phaser, on the other hand, employs all-pass filters to split the audio signal into two. One path stays unaltered, while the other’s phase is modulated. The paths then merge back. This causes some frequencies to cancel out and others to reinforce, producing a sweeping, spacey sound.

  • Flanger: Combines delayed copies of the same signal.
  • Phaser: Modulates the phase of split audio signals.

Flanger And Phaser In The Studio

In recording studios, artists often wrestle with the choice between flanger and phaser. The flanger effect works well to create a bold, aggressive tone. It’s stellar for guitar parts or synthesizers in rock and electronic music.

The phaser effect is subtler and often used for rhythm guitar or background synths. It’s a favorite in funk, pop, and psychedelic music. By adjusting the rate and depth, artists can tailor the phaser’s effect to suit the mood of the track.

  1. Flanger: Adds a dramatic flair to lead instruments.
  2. Phaser: Offers a gentle undulation perfect for blendable background textures.

Artists And Their Pedals: A Legacy

Exploring the sonic landscapes of iconic music, the use of guitar effects pedals like flangers and phasers has crafted legendary sounds that have defined eras. Such audio tools have been pivotal in creating the memorable soundtracks of our lives, echoing through the halls of music history. Artists and their pedals share a legacy, where a simple stomp changes the canvas of sound. This artistic partnership has given birth to some of the most iconic tracks and classic songs we know and love today.

Iconic Tracks With Flanger

Flanger pedals create a unique swirling effect, adding a futuristic vibe to any track. Let’s explore some unforgettable tunes that feature this effect:

  • “Barracuda” by Heart thrives on the flanger’s swoosh to amplify its rock edge.
  • The rolling waves of sound in The Police’s “Walking on the Moon” are flanger magic at work.
  • Van Halen’s “Unchained” introduces a sonic punch thanks to the flanger’s distinctive sound.

Classic Songs Featuring Phaser

Phaser pedals offer a phase-shifted, psychedelic feel and have been featured prominently in:

  1. “Paranoid Android” by Radiohead uses a phaser to create its otherworldly atmosphere.
  2. The dreamy essence in Tame Impala’s “Eventually” is courtesy of a phaser’s sweep.
  3. Led Zeppelin’s classic “Kashmir” embeds the phaser’s charm for an epic sonic journey.
Flanger vs Phaser: Unveiling Sonic Effects Mastery

Credit: noisegate.com.au

Usage In Modern Music Production

The soundscapes of today’s music heavily rely on unique audio effects. Producers leverage various techniques to craft signature sounds. Among such effects, flangers and phasers stand out. They infuse tracks with a surreal and spacey quality. Their use goes beyond genre boundaries, fascinating listeners with their distinctive sonic characteristics.

Flanger And Phaser In Electronic Music

Electronic music thrives on innovation. The flanger effect creates a swirling sound. This makes it a go-to for danceable tracks. A phaser, with its sweeping effect, adds a sense of movement. It often appears in trance and psychedelic tunes. DJs and producers frequently use these effects to alter the texture of synthesizer pads, leading sounds, and percussion loops.

  • Flangers add intensity to build-ups.
  • Phasers create a floating feel during breakdowns.

Cross-genre Appeal And Applications

Music has no limits. Artists across genres embrace flangers and phasers. These effects inject songs with depth and personality. In rock, flangers give guitars a jet-like whoosh. Phasers, on the other hand, make riffs stand out. In pop, subtle use of these effects can add a playful twist to vocals or a memorable hook.

Genre Flanger Use Phaser Use
Rock Guitar Solos Drum Fills
Pop Vocal Layers Keyboard Lines
RB Background Vocals Bass Grooves

Flangers and phasers help create timeless music. Their flexibility ensures that they find a place in various music studios. Producers craft unique sonic experiences. Both experts and beginners experiment with these effects.


Making The Choice: Which Effect To Use?

Making the choice between a flanger and a phaser can feel like an enigma for musicians and producers. Both effects add unique qualities to your sound. Yet, knowing when to use each can be the key to taking your music to the next level. Let’s unlock the mystery together and make an informed decision on which effect to add to your sonic toolkit.

Considering The Genre And Texture

Your music genre plays a significant role in choosing the right effect. Boldly stating, certain effects just naturally complement specific styles.

  • If you’re into rock or metal, a phaser could enhance your heavy riffs.
  • For funk or retro pop, a flanger might be the secret ingredient for that classic swirling sound.

Texture is paramount. Think of the effect as a brush in a painter’s hand. The question is, do you need bold and broad strokes (flanger) or fine and subtle ones (phaser)?

Practical Tips On Selecting The Right Effect

Here’s a straightforward approach to choosing the right effect:

  1. Assess the context of the track – busy mixes might benefit from the subtlety of a phaser.
  2. Consider the desired mood – for an otherworldly or spacey feel, flangers often do the trick.
  3. Test the effect in solo and mix context – ensure it complements other elements.
  4. Don’t overdo it – effects should enhance, not overwhelm.

Remember, experimentation is key. Trust your ears and let creativity lead your choice. Armed with these tips, you’re ready to create a soundscape that captivates and inspires.

Diy Audio Experimentation

Welcome to the world of DIY audio experimentation, where creativity meets technical skill. Crafting your sound effects, like flangers and phasers, brings a unique touch to music. With simple components, you can build devices that transform audio signals in fascinating ways. Let’s dive into the process of building these circuits from scratch and see how to integrate them into live performances.

Building A Basic Flanger Or Phaser Circuit

Starting a project to make a flanger or phaser is an exciting challenge. Aspiring sound engineers and hobbyists can follow these steps:

  • Gather materials: You will need resistors, capacitors, and an operational amplifier (op-amp).
  • Understand the schematic: Study circuit diagrams for flangers and phasers.
  • Solder carefully: Connect components on a breadboard or PCB.
  • Test the circuit: Use a signal generator and oscilloscope to adjust the effect.

Here’s a simple table indicating the parts you need:

Part Quantity Use
Resistors Various Control current
Capacitors Various Store and filter
Op-amp 1 Amplify signal

From Concepts To Concerts: Integrating Effects

After building your circuit, bring it to life on stage. Ensure it’s durable for live settings:

  1. Encase your circuit: Protect it with a sturdy box.
  2. Connect to your instruments: Wire the device to guitars or keyboards.
  3. Test before the show: Double-check all connections and settings.

Engage your audience with a unique sound! Show off your DIY effects and make each performance memorable.

Conclusion: Endless Sonic Horizons

The battle between flanger and phaser effects has revolutionized music. These sound effects have opened doors to uncharted sonic territories. Artists and sound engineers continually push the boundaries using these tools. Each effect has its unique flavor, adding richness and dimension to soundscapes.

The Ongoing Evolution Of Sound Effects

Sound effects like flanger and phaser are in a constant state of evolution. Innovative technology keeps them fresh and exciting. They are vital for creating fresh sounds in modern music. From subtle waves to intense swirls, these effects will remain central in audio production for years to come.

  • Advancements in digital effects
  • New hardware that redefine capabilities
  • Emergence of software plugins
  • Growth in artificial intelligence for sound design

Further Resources For Aspiring Sound Engineers

Eager to learn more? A wealth of resources exists for aspiring sound engineers. Explore below:

  1. Online tutorials and courses
  2. Books on sound theory and practical application
  3. Forums for community support and expert advice
  4. Workshops and webinars

Keep exploring, experimenting, and creating. The journey into sound is never-ending. Your next discovery could change music forever.

Frequently Asked Questions On Flanger Vs Phaser

What’s The Difference Between Flanger And Phaser Effects?

Flangers and phasers create unique sound effects by manipulating audio signals. Flangers mix a delayed signal with the original, creating a sweeping effect. Phasers filter the signal, creating peaks and troughs for a swirling effect. Flanging often has a more pronounced, jet-like sound, while phasing is more subtle and otherworldly.

How Do Flanger Pedals Affect Guitar Tone?

Flanger pedals add a distinctive swirling or whooshing texture to the guitar tone by mixing the original signal with a delayed, modulated one. This can make the sound richer and more dynamic, often resembling a jet plane’s roar, thus enhancing the sonic palette available to guitarists.

Can You Achieve Phaser Effects Without Pedals?

Yes, phaser effects can be replicated without pedals using digital audio workstations (DAWs) with built-in phaser plugins or external rack-mounted units. Producers often use these tools in studio recordings to apply the phasing effect to various instruments or tracks post-recording.

Are Flangers Or Phasers Better For Live Performances?

The choice between flangers and phasers for live performances depends on the desired sound. Flangers create a dramatic, intense effect, while phasers offer a subtler, textured sound. Both can enhance live music, but the selection comes down to the musician’s personal preference and the genre of music being played.

Conclusion

Embarking on the sonic journey between flangers and phasers brings us to a key point of understanding: both effects offer musicians unique soundscapes. Choosing one over the other rests on the desired texture and depth in your music. Remember, experimenting is your path to a signature sound.

Whether it’s the sweeping motion of a flanger or the rhythmic pulse of a phaser, your perfect wave of sound awaits.

Categories
Archive

Major Vs Minor Chords: Harmonize Your Music Skills!

Major chords sound bright and happy, whereas minor chords have a darker, sadder tone. The difference lies in the third note of the scale used to build the chord.


Major and minor chords are fundamental elements in the creation of music, shaping the mood and feel of a piece. Each major chord consists of a root note, a major third, and a perfect fifth, producing a sound that feels stable and uplifting.


Conversely, minor chords, built with a root note, a minor third, and a perfect fifth, convey a sense of melancholy or introspection. Musicians and composers often choose between these chords to align the harmonic structure with the emotional content of the song or piece. Understanding the impact of major and minor chords is crucial for anyone delving into music theory, songwriting, or composition, providing the tools to evoke the desired response in listeners.


Introduction To Chords

When we dive into the world of music, chords form the heart of songs. Chords are groups of notes played together to create harmony. They add emotion and depth to melodies. Understanding the difference between major and minor chords is key to appreciating music’s diverse landscapes.

The Basics Of Harmonic Structures

Harmonic structures, or chords, are essentials in music theory. A chord needs at least three notes, called a triad. These triads blend sounds that musicians use to convey feelings.

Here’s a basic breakdown of a chord’s anatomy:

  • Root: The note that names the chord.
  • Third: Determines if the chord is major or minor.
  • Fifth: Often a perfect fifth from the root.

All chords start with these core notes. They create a strong foundation for songs.

Journey Through Major And Minor Sounds

Chords carry us on a journey between joyful peaks and solemn valleys. Major chords shine with a happy, bright sound. They use a major third above the root note.

Chord Type Emotion Third Interval
Major Bright, Happy Major Third
Minor Somber, Sad Minor Third

In contrast, minor chords express a sadder, more reflective emotion. They have a minor third, which is one half-step lower than a major third.

This minor shift in pitch changes the mood of the music. It can tug at our heartstrings and evoke deep feelings.

The Nature Of Major Chords

The sound of a major chord strikes with clarity and brightness, echoing the feelings of happiness and upliftment. These triads are the backbone of Western music, offering a sense of resolution and fulfillment. Dive into the world of major chords and discover how they construct an emotional soundscape.

Construction Of A Major Chord

A major chord is built of three notes:

  1. Root note: the base sound
  2. Major third: four half-steps from the root
  3. Perfect fifth: seven half-steps from the root

Together, these notes form a rich and complete sound.

Chord Notes Half-steps
C Major C – E – G 4 – 3
G Major G – B – D 4 – 3

Emotional Impact Of Major Chords

Major chords resonate with emotions that lift the spirit. Their bright tone often conveys:

  • Optimism
  • Confidence
  • Joy

Songs in major keys can make hearts feel light and buoyant.

Exploring Minor Chords

Exploring Minor Chords takes us into the depths of music’s emotional spectrum. Minor chords create moods that major chords cannot touch. They often bring feelings of sadness, introspection, or even tension into a piece. Let’s dive into the components that make up these expressive sounds.

Building Blocks Of Minor Chords

Minor chords have a simple yet profound structure. They consist of three notes: the root, the minor third, and the perfect fifth. This trio forms the cornerstone of the minor chord’s sound. To create a minor chord, start with the root note. Then, count three half-steps, or semi-tones, to reach the minor third. Finally, count four more half-steps from the minor third to find the perfect fifth.

Chord Component Steps from Root
Root Note 0
Minor Third 3 half-steps
Perfect Fifth 7 half-steps

The difference between a major and minor chord is the third. In major chords, the third is four half-steps from the root. In minor chords, it’s only three.

The Mood Palette Of Minor Chords

Minor chords are the artists of music, painting emotions with every strum. They can evoke deep sorrow, touch on delicate nostalgia, or call to the mystique. These chords are essential for expressing complex emotions in music.

  • Sorrowful: Minor chords often sound sad, perfect for heartfelt ballads.
  • Mysterious: They can create an air of mystery or suspense.
  • Introspective: Musicians use minor chords for thoughtful, reflective pieces.
    • Minor chords hold power in their versatility. They help tell stories and convey feelings without words. Listening to minor chords can make us think, feel, and maybe even understand a little more about ourselves and the world around us.


Playing Techniques

Delving into the realm of music theory unveils a stark contrast between major and minor chords. Not merely in sound, but in approach and technique as well, these chords form the backbone of many musical pieces. Understanding the nuances of playing techniques can make a world of difference in performance. Whether a beginner or a seasoned player, grasping the fingering differences and strumming patterns is crucial for that perfect chord rendition.

Fingering Differences

Playing chords correctly starts with placing your fingers in the right spots. The positioning of your fingers influences the chord’s harmony and dynamics. Let’s break it down:

  • Major Chords: Often require a firm finger placement to create a clear, bright sound.
  • Minor Chords: They demand subtle shifts to express their melancholic tone.

For instance, transitioning from an A major to an A minor simply involves moving one finger. However, this small change requires practice for smooth execution.

Chord Type Finger Positions
A Major Index on 2nd, middle on 2nd, ring on 2nd – all on different strings.
A Minor Index on 1st, middle on 2nd, ring on 2nd – a slight shift for the index.

Strumming Patterns For Character

Strumming does more than play chords; it brings out their character. Here’s a simple guide:

  • Major Chords: Use a bright, steady rhythm to enhance their happy mood.
  • Minor Chords: Try a slower, more deliberate strum for emotional depth.

Consider using varied strumming patterns to express the mood of the song:

  1. Downstrokes for forceful impact in rock songs.
  2. Gentle upstrokes in ballads for a softer touch.

The shift from aggressive downstrokes to gentle upstrokes can turn a song’s feeling around instantly.

Progressions And Transitions

In the enchanting world of music, chords form the backbone of any tune. The delicate dance between major and minor chords creates a tapestry of emotional landscapes. Chord progressions and transitions are vital to giving a piece character and guiding the listener through a musical journey. Let’s delve into how to use these elements to create mesmerizing music.

Crafting Progressions With Major And Minor Chords

Have you ever felt a chill from a haunting melody, or an upbeat vibe from a cheerful tune? That’s all about chord progressions. When you use a series of chords, you’re paving a path for melodies and harmonies. Progressions give life to music. To craft compelling ones:

  • Start simple with the I-IV-V progression. It’s classic and reassuring.
  • Invoke emotion by using minor chords. They often carry a deep, introspective feel.
  • Contrast them with major chords that bring brightness and joy.
  • Experiment by mixing major and minor, like C major to A minor.

Combine them to craft a mood. For example, here’s a classic progression:

C major -> G major -> A minor -> F major

This sequence is beloved for its warm resolution and emotional versatility.

Smooth Transition Tips

To create seamless transitions between chords:

  1. Practice changing chords swiftly and without hesitation.
  2. Keep fingers close to the fretboard to minimize movement.
  3. Use a metronome to maintain a steady timing between changes.
  4. Understand the circle of fifths for harmonically related chords.

With these tips, shifting from a C major to an A minor will feel like a gentle breeze.

Technique Description
Pivot Fingers Use one finger as an anchor while changing chords for stability.
Common Tones Look for shared notes between chords to make transitions smoother.

Context And Usage

Context and usage shape the emotional palette of music. Major chords sparkle with brightness; they shout joy and confidence. Minor chords whisper in shadows; they speak of sadness or tension. Musicians paint with these sonic colors, creating a mood or telling a story. Let’s dive into how these chords work their magic in different settings.

Genre-based Applications

In music, genre dictates the chord mood. Pop often leans on major chords for catchy, upbeat songs. Rock mixes majors and minors, building energy and depth. Blues and jazz thrive on the complexity of minor chords, adding layers of soul. Folk music tells its tales with both, painting pictures of life’s ups and downs.

  • Pop: Major chords for happiness
  • Rock: Both for energy and emotion
  • Blues/Jazz: Minor chords for soulful depth
  • Folk: Both for storytelling

Iconic Songs And Their Chord Choices

The Beatles loved color in music. “Let It Be” shines in major chords, symbolizing hope. Nirvana‘s “Smells Like Teen Spirit” contrasts majors and minors, crafting angst. Bill Withers explored the depths with minor chords in “Ain’t No Sunshine”. Each choice sets the scene, defines a vibe, and etches songs into hearts.

Song Artist Chord Type Mood
“Let It Be” The Beatles Major Hopeful
“Smells Like Teen Spirit” Nirvana Mixed Rebellious
“Ain’t No Sunshine” Bill Withers Minor Soulful

Theory And Practice

Theory and Practice breathe life into music’s structural backbone. Understanding how major and minor chords shape music’s emotional landscape is vital. Delve into how these chords work theoretically and practically.

Harmony Theory Essentials

Harmony theory lights the way to understanding music’s emotional core. Major chords sound happy and bright. Minor chords sound sad and dark. This emotional color comes from the chord’s notes and how they interact:

  • Major chords consist of a root note, a major third, and a perfect fifth.
  • Minor chords have a root note, a minor third, and a perfect fifth.

The critical difference lies in the third. It’s only one semitone apart in major and minor chords, yet it changes everything. This switch alters the chord’s mood entirely.

The following table highlights the difference between C major and C minor:

Chord Type Notes Mood
C Major C, E, G Happy, Bright
C Minor C, E♭, G Sad, Dark

Practical Exercises For Mastery

Practical exercises help embed these chord differences in your musical mind. Start simple:

  1. Play each chord to hear and feel the difference.
  2. Switch between major and minor chords.
  3. Sing or hum the root, third, and fifth of each chord.

Progress to chord progressions. This means playing a series of chords to understand how they connect. For example, play a C major chord followed by an A minor chord to sense the contrast. Record or write down your findings.

Explore songs you enjoy. Try to identify the major and minor chords. Play along to reinforce your learning.

Creativity And Composition

Diving into the world of music, creativity sparks with every chord. Major and minor chords paint different emotions in compositions, like colors on a canvas. Understanding how to use these chords unlocks endless musical possibilities. Let’s explore crafting unique harmonies and melodies.

Innovating With Major And Minor

Major chords bring a sense of happiness and brightness, while minor chords evoke a deeper, sometimes sad feeling. Blend them to create contrast and depth in your music.

  • Experiment with chord progressions: Mix major and minor chords to feel their effects.
  • Change it up: Start with a major chord; switch to minor for surprise.
  • Listen and learn: Hear how your favorite songs use these chords.

Composing Your Own Music

Compose music telling your story. Start with a chord, major for joy, minor for sorrow.

  1. Pick a starting chord: Choose major or minor to set the mood.
  2. Build your progression: Add chords that flow well together.
  3. Create a melody: Let it dance over your chords.

Remember, rules in music are a start point. Trust your ears to guide you. Use major and minor chords to share your feelings through music. Your unique sound awaits!

Enhancing Listening Skills

Mastering the piano or any musical instrument calls for sharp listening skills.

Distinguishing between major and minor chords is essential.
This ability enriches a musician’s understanding and can lead to creating more nuanced performances.

Let’s dive into exercises that help identify chords by ear and boost auditory discrimination.

Identifying Chords By Ear

One must listen closely to unveil each chord’s unique qualities. Major chords often sound happy or bright. Minor chords can sound sad or melancholic. The difference is subtle, but noticeable.

  • Begin with clear examples: Listen to known major and minor chords.
  • Use reference songs: Associate chords with songs you know well.
  • Challenge your ears: Randomly play chords and try to identify them without looking.

Exercises For Auditory Discrimination

Training your ear involves practice and effective exercises.

  1. Active listening: Focus on music, dissecting layers to identify chord types.
  2. Repetition: Regularly practicing strengthens recognition skills.
  3. Music software: Use tools to slow down songs, making it easier to hear chords.


Advanced Concepts

Exploring advanced concepts in music takes us beyond the simple major and minor chords that form the backbone of countless songs. An adventurous musician often seeks more complex and rich harmonies.

Major-minor Hybrid Chords

Hybrid chords blend different feels and sounds into a unique musical expression. These are not your typical triads. A major-minor hybrid chord, also known as a dominant seventh sharp five chord, mixes a major triad with a minor seventh. This creates a sound full of tension and intrigue. Imagine a major chord with a twist – it’s like a familiar face dressed in an unexpected outfit.

Beyond The Basics: 7th, 9th Chords, And More

When a musician ventures further, they encounter 7th and 9th chords. These add layers of complexity to a chord’s character. Here’s a brief look at these harmonies:

  • Seventh Chords: Add a seventh note from the scale to your triad for a deeper sound.
  • Ninth Chords: Include the ninth note for an even more textured harmony.

These chords can further be dressed up or altered with sharp or flat notes to taste. A musician mastering these sounds unlocks new emotional depths in their music.

Chord Type Notes (C as Root) Character
C Major 7th C, E, G, B Warm and full
C Minor 7th C, Eb, G, Bb Soft and melancholic
C Dominant 9th C, E, G, Bb, D Bright with an edge

For a musician ready to explore beyond the basics, understanding these advanced chords opens the door to a world of richer, more expressive music.

Performance And Expression

Understanding major and minor chords is crucial for musicians, but bringing them to life is all about performance and expression. The emotional impact of a piece often hinges on how performers use these chords. The dynamics, articulation, and expressive techniques contribute to a captivating delivery. Let’s dive into how artists can effectively use these elements to enhance their musical storytelling.

Expressive Techniques For Performers

Expressive techniques provide performers with tools to convey emotions. With major chords often depicting happiness and minor chords often reflecting sadness, musicians can emphasize these moods. Here are a few techniques to consider:

  • Vibrato: Adds warmth and richness to sustained notes.
  • Legato: Smoothly connecting notes can enhance a melancholic theme.
  • Staccato: Short, detached notes can make a piece feel lively and energetic.
  • Bending: Altering pitch slightly can evoke deep feelings.
  • Dynamic contrast: Switching between loud and soft playing can create tension and release.

Dynamics And Articulation In Performance

Dynamics and articulation are essential to shaping a piece’s character. Consider the following:

Technique Dynamic Level Articulation Type Emotional Effect
Crescendo Soft to Loud Gradual Increase Intensity
Decrescendo Loud to Soft Gradual Decrease Intensity
Accent Variable Sudden Highlight Importance
Tenuto Variable Sustained Adds Stress
Forte Loud Strong Conveys Power
Piano Soft Gentle Conveys Delicacy

Ultimately, the choice of dynamics and articulation shapes the emotional narrative of a performance. Skilled performers switch between them to reflect the nuances of the music, whether they are playing soothing major chords or introspective minor ones.

Chords And Technology

Major and minor chords form the backbone of music. With today’s technology, we have incredible tools at our fingertips. These tools help musicians explore chords in diverse and innovative ways.

Musical Software Tools

A variety of musical software tools allow users to play with both major and minor chords. These tools can simulate different instruments and sounds, giving musicians the ability to compose without physical instruments. Below is a list of must-try software:

  • Virtual Instruments – simulate real-life instruments
  • Chord Analyzers – help in understanding chord structures
  • Music Production Suites – for more advanced composing

Recording And Editing Chord Tracks

Technology has simplified the process of recording and editing chord tracks. The table below shows this process with software:

Stage Action Outcome
Recording Capture live performance Raw audio of chords
Editing Adjust pitch and timing Polished chords
Finalizing Apply effects Enhanced sound

Artists can take recorded major and minor chords and polish them. They use tools to cut, paste, and blend sounds together. Compelling music is created in this digital space.

Frequently Asked Questions For Major Vs Minor Chords

What Are Major Chords In Music?

Major chords, often associated with happy and bright sounds, are built from a root note, a major third above the root, and a perfect fifth above the root. They create a full, resonant sound that’s fundamental in Western music.

How Do Minor Chords Differ From Majors?

Minor chords have a root, a minor third, and a perfect fifth. The minor third gives them a sadder or more serious tone compared to the upbeat feeling of major chords. They evoke a wide range of emotions in music.

Can You Switch From Major To Minor Chord?

Yes, you can switch from a major to a minor chord by lowering the third note of the chord by a half step. This subtle change alters the chord’s mood, offering a different emotional impact within a musical piece.

Why Do Minor Chords Sound Sad?

Minor chords sound sad because the minor third interval between the root and the third note is a semitone lower than in major chords. This creates a more somber and melancholic sound, which is often perceived as sad or reflective.

Conclusion

Understanding major and minor chords is fundamental for musicians and enthusiasts alike. Their differences shape music’s emotion and character. Embrace their distinct qualities to enhance your musical expression. Dive into their unique worlds; let each chord’s essence inspire your creative journey.


Keep exploring, keep learning, and let the harmony unfold.

Categories
Archive

Compression On Vocals: Key to Dynamic Vocal Tracks!

Compression on vocals is vital for achieving a balanced, polished mix. It reduces the dynamic range, smoothing out volume spikes.

In the world of audio production, vocal compression stands as a critical technique for both studio recording and live performance. By aptly applying compression, sound engineers and producers ensure that the vocalist’s performance is clear and consistent throughout the track.

This process not only enhances the overall sound but also allows the vocals to blend seamlessly with other instruments. Skillful compression settings can bring out the emotion and presence in a vocal performance, making it a fundamental tool for creating professional-quality music. It’s important to strike the right balance, as too much compression can result in a lifeless sound, while too little may leave the vocals lost in the mix.

The Role Of Compression In Vocal Processing

Vocal compression is a vital tool for polishing vocal tracks in any mix. By managing dynamic range, it ensures clarity and smoothness throughout a performance. Whether in a studio recording or a live setting, understanding compression’s role can be the difference between an amateur and professional sound. Let’s dive into how compression can enhance vocal consistency and achieve balance in the mix.

Enhancing Vocal Consistency

One of the key benefits of compression is its ability to create a consistent vocal level. When a singer’s performance includes a mix of soft and loud parts, compression can help to even these out. Using a compressor, loud volumes are reduced, and quieter parts are made louder. This results in a vocal that sits nicely in the mix without any abrupt jumps in volume.

  • Smooth out volume spikes
  • Increase audibility of soft tones
  • Prevent vocals from overwhelming other instruments

Achieving Balance In The Mix

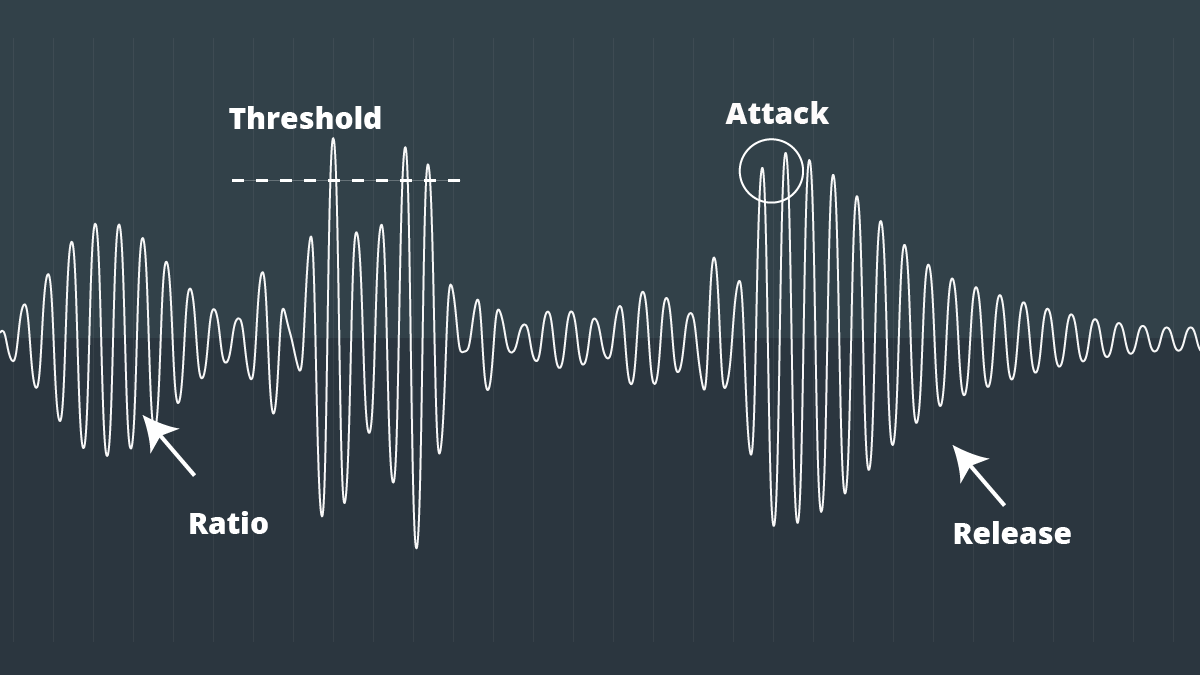
Compression is also crucial for balance in a mix. It ensures vocals don’t get lost or overpower other elements. A well-compressed vocal track can stand up against loud guitars, booming drums, and other instruments. By carefully setting the compressor’s threshold, ratio, attack, and release, an engineer gives the vocal presence and punch while maintaining harmony with the rest of the tracks.

Setting Purpose
Threshold Determines when compression starts
Ratio Sets the level of compression
Attack Controls how quickly compression engages
Release Dictates the time for compression to stop

With these settings, every vocal detail shines through without clashing with other sounds.

Fundamentals Of Compressor Mechanics

Understanding how a compressor works is key to controlling the dynamics of your vocals. This process can make sure your voice sits perfectly in the mix. Let’s explore the mechanics of a compressor: how it functions and the settings that shape your sound.

Threshold And Ratio Explained

The threshold and ratio are two fundamental aspects of compression. The threshold is the volume level at which the compressor starts to work. Imagine it like a gate; only when a sound is loud enough does it open. The ratio determines how much compression is applied once the threshold is crossed. A 2:1 ratio means for every 2 dB over the threshold, the output is 1 dB.

Attack And Release Parameters

These settings affect the timing of compression. Attack is how quickly the compressor starts after reaching the threshold. Release is how soon it stops once the volume drops below the threshold. Fast attack can control sharp hits, while slow release prevents a pumping sound.

Knee: Hard Vs. Soft

The knee affects how the compressor transitions from uncompressed to compressed sound. A hard knee responds aggressively, giving a punchy effect, ideal for drums. A soft knee is more gradual, often suited for vocals or instruments, bringing natural-sounding compression.

Choosing The Right Compressor For Vocals

Compression is a must-have tool in vocal production. It can turn a good vocal take into a great one. But with so many types of compressors available, it’s crucial to know which one fits your vocal track. Each compressor type has its characteristics, capable of imparting unique texture and dynamics to your sound.

Optical And Vca Comparisons

Optical compressors offer smooth compression. They are known for their musical response. VCA compressors are versatile and precise. They’re ideal for detailed dynamic control. Here are the key differences:

  • Optical Compressors: Gentle, musical, perfect for a natural sound.
  • VCA Compressors: Accurate, clean, great for tight dynamics management.

Tube And Fet Varieties

Tube compressors add warmth and fullness, enhancing vocals beautifully. FET compressors are known for their aggressive character and quick response. Consider these nuances:

  1. Tube Compressors: Warm, rich harmonics, suited for a vintage vibe.
  2. FET Compressors: Aggressive, snappy, ideal for presence and energy.

Digital Vs. Analog Emulations

Digital compressors offer precision, recall, and flexibility. Analog emulations bring classic sounds to digital formats. Both have their place in a vocal chain. Balance your choice based on these aspects:

Digital Compressors: Analog Emulations:
Clean, modern, highly controllable. Characterful, timeless, a touch of tradition.

Choosing the right compressor for your vocals is about matching the compressor’s characteristics to the desired outcome for your track. Whether you’re after smoothness, precision, warmth, or aggressiveness, the right compressor is out there.

Compression On Vocals: Key to Dynamic Vocal Tracks!

Credit: emastered.com

Common Compression Techniques For Vocals

Compression is essential for vocals in music production. It ensures the voice sits well in the mix. Vocal tracks can cut through and have consistent volume. Each technique has its place. Let’s explore how compression shapes the vocal sound.

Parallel Compression For Depth

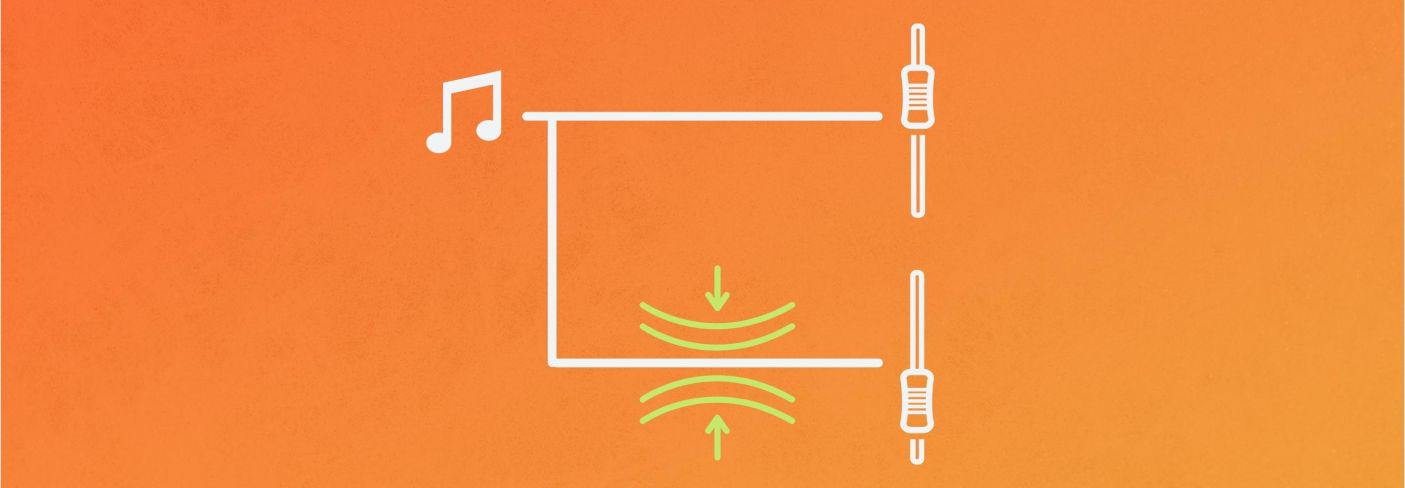
Parallel compression, also called ‘New York compression’, adds richness and depth without losing dynamics. It works by mixing an unprocessed ‘dry’ vocal with a heavily compressed version of itself. This technique:

  • Enhances vocal presence
  • Maintains natural dynamics
  • Creates a thicker overall sound

Serial Compression For Control

Serial compression uses multiple compressors in a chain. Each one handles a different task. This process provides refined control over dynamics. It smooths out vocal performance effectively.

  1. First compressor catches peaks
  2. Second compressor shapes the tone
  3. Result is even, controlled vocals

Side-chain Compression For Clarity

Side-chain compression reduces vocal clutter when the singer isn’t singing. It’s tied to another source, like a kick drum. When the kick hits, the vocal dips slightly in volume. Clarity is the result.

When Action Effect on Vocals
Kick hits Vocals dip More space in the mix
No kick Vocals return to normal Clearer lead vocal

Fine-tuning Compression Settings

Getting vocal compression right enhances a mix, making vocals sit perfectly. Fine-tuning compression settings requires careful consideration of the vocal performance, music genre, and technical challenges like sibilance and plosives. Let’s dive into how to optimize these settings for a stellar vocal sound.

Adjusting To Vocal Performance

  • Monitor the dynamic range: Adjust threshold and ratio to suit the vocalist’s range.
  • Set a fast attack: This tames peaks while keeping the performance natural.
  • Use a gentle release: This avoids abrupt changes in vocal volume.
  • Experiment with knee settings: A ‘soft knee’ can give gradual compression.

Genre-specific Compression Settings

Different genres demand unique compression approaches. Punchier compression suits rock, while softer compression works for ballads. Tailoring the compressor to the style ensures vocal character aligns with genre expectations.

Genre Threshold Ratio Attack Release
Pop -20 dB 4:1 2 ms 50 ms
Rock -15 dB 6:1 5 ms 100 ms
Jazz -25 dB 2:1 10 ms 150 ms

Dealing With Sibilance And Plosives

High-frequency bursts and pops can be distracting. Use de-essers to smooth out sibilance. High-pass filters aid in managing plosives.

  1. Identify the problem areas: Listen and mark points of harsh sibilance or plosives.
  2. Set de-esser frequency: Target the specific frequencies causing sibilance.
  3. Adjust de-esser threshold: Find the level where sibilance is controlled without dulling the vocal.
  4. Use filters wisely: Cut out plosive frequencies without affecting the body of the vocal.
Compression On Vocals: Key to Dynamic Vocal Tracks!

Credit: www.soundgym.co

Listen And Adjust: The Art Of Compression

Mastering the art of compression is a critical step for achieving professional vocal sounds. It’s about more than just tweaking knobs; it’s a refined process of listening and adjusting. The right compression settings can bring vocals to life, ensuring they cut through the mix while maintaining dynamic consistency. This section dives deep into the intricacies of fine-tuning vocal compression for the best possible sound.

A/b Testing For Perceptual Changes

Understanding the subtle nuances in vocal compression requires attentive listening. A/B testing is a practical approach to compare compressed and uncompressed vocals. Follow these tips:

  • Alternate rapidly between settings to perceive the differences.
  • Do not be fooled by louder sounds seeming better; focus on quality.
  • Meticulously note any changes in tone, presence, and clarity.

Gain Staging For Optimal Results

Gain staging sets the foundation for stellar vocal compression. Before compressing, ensure signals have adequate headroom. Steps to achieve this:

  1. Check that the input level is optimal without clipping.
  2. Adjust output to match uncompressed levels for fair comparison.
  3. Use consistent gain staging to preserve audio integrity throughout the signal chain.

Compression In Different Stages Of Production

Compression is a critical tool in the arsenal of music production. It helps smooth out audio levels and brings clarity to a mix. Let’s journey through the different stages of production and discover how compression is applied.

Tracking With Compression

Tracking refers to the initial stage of recording vocals. Applying compression during this stage can provide a consistent level for the vocal track. This makes it easier for producers and engineers to blend the vocals with other elements later.

  • Prevents Peaks: By controlling audio spikes, it ensures clean recording.
  • Consistent Performance: Delivers even vocal dynamics for enhanced clarity.
  • Better Monitoring: Aids artists and engineers in hearing the processed sound in real-time.

Mixing And Mastering Dynamics

When we enter the mixing phase, compression becomes pivotal. It not only balances vocals with instruments but also adds punch and presence.

  1. Blends Vocals: Smoothly integrates with background instruments and rhythm sections.
  2. Adds Cohesion: Makes all parts sound as one unified whole.
  3. Shapes Tone: Tailors the vocal character for the desired sonic impact.

In mastering, the final compression polishes the track. It ensures the song’s dynamics are radio-ready and will sound great on any system.

  • Level Consistency: Achieves uniform loudness throughout the album.
  • Final Polish: Adds the last touch to give the track a professional sheen.

Avoiding Common Compression Pitfalls

When you’re mixing vocals, applying compression can be a bit of a tightrope walk. It’s essential to strike the right balance. Too little, and your vocals may fail to stand out in the mix; too much, and you might strip away their natural charm. Let’s explore some common traps and learn to navigate around them, keeping your vocal tracks compelling and captivating.

Overcompression And Its Side Effects

Knowing when to say ‘enough’ to compression is key. Overcompression leaves vocals sounding squashed and lifeless. Here’s what too much squeezing does:

  • Reduces dynamic range: It makes loud and soft parts too similar.
  • Squashes transients: The initial punch of words gets lost.
  • Causes pumping and breathing: Unnatural swells in volume can become distracting.
  • Maintaining Vocal Dynamics And Emotion

    Vocal expression conveys the song’s heart. Compression should preserve this, not hinder it. Keep these tips in mind:

    1. Use automated gain adjustments for problem areas instead of heavy-handed compression.
    2. Apply gentle ratio settings to allow for natural fluctuation in vocal intensity.
    3. Consider parallel compression to blend processed and unprocessed signals for a more dynamic sound.

    Monitoring With Different Listening Environments

    Testing how compression affects vocals across various speakers is a step you can’t skip. Different environments reveal nuances you may miss on your primary studio monitors:

    Environment Purpose
    Studio Monitors Check the clarity and balance in a controlled setting.
    Headphones Isolate vocals to hear finer compression details.
    Consumer Devices Understand how vocals perform on standard playback systems.

    Remember to take regular breaks to rest your ears. Fresh ears catch compression issues better.


The Future Of Vocal Compression

Vocal compression is evolving. With rapid technological advancements, the future promises more dynamic and intuitive ways to shape vocal tracks. Artists and producers look forward to new possibilities in sound design and music production.

Technological Advancements

Artificial Intelligence (AI) is transforming vocal compression. AI algorithms can now analyze vocal recordings in real-time. These systems suggest compression settings tailored to the singer’s style. This allows for a more natural and expressive vocal performance.

Digital Signal Processing (DSP) technology is also seeing leaps in progress. DSP chips are becoming more powerful. They now handle complex compression tasks with ease. This means better sound quality with lower latency.

New software plugins emerge regularly. They offer innovative features. Some plugins can emulate classic hardware compressors. Others offer new compression methods that were not possible before.

Innovative Approaches And Techniques

Producers now experiment with side-chain compression. This technique uses the dynamics of one sound to control another. It helps vocals stand out in a mix without overpowering other instruments.

There is a trend towards multiband compression. It applies different amounts of compression to different frequency ranges. This allows for precise control over the vocal sound.

  • Parallel compression blends the original and compressed signals. This brings out vocal nuances.
  • Digital emulations of vintage compressors provide warmth and character to digital recordings.
  • Dynamic EQs combine equalization and compression for refined vocal sculpting.

Interactive educational tools are also on the rise. They help beginners understand compression techniques easily. Advanced tutorials and virtual mentorship programs train the next generation of audio engineers.

Compression On Vocals: Key to Dynamic Vocal Tracks!

Credit: justaskjimvo.studio

Frequently Asked Questions For Compression On Vocals

What Is Compression Used For On Vocals?

Compression on vocals is utilized to even out dynamic ranges, making performances more consistent in volume. It helps in ensuring the vocals sit well within a mix, enhancing clarity and presence without peaks overpowering other instruments.

How Do You Properly Compress Vocals?

Proper vocal compression involves setting the right threshold, ratio, attack, and release times tailored to the vocal track. Gentle ratios with moderate attack times maintain vocal dynamics while providing control, and soft knee settings often yield natural-sounding results.

Can Compression Affect Vocal Tone?

Yes, compression can significantly impact vocal tone. It can add warmth and fullness, or when overused, can make vocals sound lifeless and over-processed. Applying compression carefully is key to preserving the natural tone while improving overall sound quality.

What’s The Best Compressor For Vocals?

The best compressor for vocals depends on the desired sound and context. Renowned hardware models like the LA-2A or 1176LN are often emulated in software for their musical characteristics. It’s important to choose one that complements the specific vocal texture and style of the production.

Conclusion

Mastering compression for vocals can truly elevate your music production. By understanding various techniques, you can enhance clarity and bring out the best in vocal tracks. Remember, subtle tweaks often lead to professional results. Embrace compression as an essential tool, and watch your vocal mixes come to life.

Keep experimenting and listening closely—the perfect sound awaits.

Categories
Archive

Flowkey Review: Unveiling the Pros and Cons for Pianists

This guide covers Flowkey review in plain terms. Flowkey is an intuitive app for learning piano that offers a broad selection of songs and real-time feedback. This platform suits beginners and intermediate players seeking interactive piano lessons.


Also, embarking on a musical journey requires the right tools, and Flowkey provides a comprehensive solution for those aspiring to play the piano. Also, with its user-friendly interface, the app guides users through various songs, from classical to contemporary hits, making it an ideal choice for a diverse range of musical tastes.

Related reading: Pianoforall Review: Uncover the Secrets to Melodic Mastery! and Piano Eq. For background, see the Wikipedia article on Piano pedagogy.

Moreover, it adapts to different learning speeds, ensuring that each user can progress at a comfortable pace. In addition, flowkey’s ability to listen and provide immediate feedback on your performance sets it apart, granting a feel akin to personal tutoring. Whether using a keyboard or a grand piano, the app’s compatibility with different devices ensures accessibility and ease of use. The combination of visual and auditory learning aids fosters a conducive environment for mastering the piano.


Introduction To Flowkey

In addition, welcome to our in-depth review of Flowkey , your potential new piano-learning companion. For example, in this introduction, we will explore why Flowkey stands out in the crowded field of music education apps. Whether you are a beginner or eager to brush up on your existing skills, Flowkey promises a comprehensive and interactive experience.

The Beginnings Of Flowkey

Furthermore, the birth of Flowkey traces back to a group of music enthusiasts and tech experts in Berlin. As a result, their mission was simple: make piano learning accessible to everyone, everywhere. This vision transformed into an innovative platform that blends traditional learning methods with modern technology, offering a unique educational adventure for piano learners.

How Flowkey Fits Into Piano Learning

Additionally, with the emergence of digital education, Flowkey has carved out a significant niche for itself. However, it offers a friendly, adaptable approach to piano learning. The platform provides real-time feedback, a vast library of songs, and a seamless learning curve suited to each individual’s pace. Here’s how Flowkey fits in:

  • Also, real-time feedback: Flowkey listens as you play, giving instant advice on how to improve.
  • Moreover, wide-ranging library: Song choices span genres and difficulty levels, catering to all preferences.
  • In addition, personalized pace: Users progress at a speed that matches their comfort and skill level.

Getting Started With Flowkey

Furthermore, are you ready to dive into the world of music with Flowkey? Then, this intuitive app is perfect for both beginners and seasoned pianists. Let’s explore how easy it is to start your journey towards becoming a piano maestro with Flowkey.

Setting Up An Account for Flowkey Review

Additionally, creating a Flowkey account is a breeze and you’ll be playing in no time. All you need is:

  • Also, a compatible device (smartphone, tablet, or computer)
  • An email address
  • A password of your choice

Moreover, head over to the Flowkey website or download the app. In short, fill in the required details, and voilà! You’re in.

Navigating The Interface for Flowkey Review

In addition, the Flowkey interface is user-friendly and inviting. Similarly, with clear instructions and a sleek design, you’ll find:

Feature Description
Dashboard Your personal progress tracker
Song Library A vast selection of music pieces
Learning Modes Adjustable settings for practice
Settings Manage your account with ease

Furthermore, simply click on a song and start your piano journey. With split-screen technology, Flowkey shows your hands in action while providing real-time feedback. Also, you will be playing your favorite tunes in no time!

Catalogue Depth And Variety for Flowkey Review

Additionally, choosing the right music learning app can be tricky. With so many options, it’s vital to pick one that offers a rich selection of songs. In addition, let’s dive into the catalogue depth and variety of Flowkey to see how it stands out.

Genre Diversity In Flowkey’s Library

Also, Flowkey caters to diverse musical tastes. For example, whether you love classical masterpieces, rock anthems, or soothing jazz, Flowkey’s library has something for everyone. The app’s extensive song collection spans a rainbow of genres:

  • Classical
  • Pop
  • Rock
  • Jazz
  • Soundtracks
  • Traditional songs

Moreover, this variety ensures that users can always find something to match their mood and interest.

Song Difficulty Levels for Flowkey Review

Flowkey doesn’t just impress with song variety; it also offers a graded approach to playing. As a result, the app offers songs at four distinct difficulty levels:

Level Description
Beginner Simple melodies, easy to follow
Intermediate More chords, richer rhythms
Advanced Complex pieces, technical skills
Pro Challenging compositions, mastery required

In addition, Users can progress through levels at their own pace, making Flowkey ideal for lifelong learning.


Learning Tools And Features

Furthermore, discovering the right tools to learn piano can feel like striking a chord in a complex melody. Flowkey not only simplifies this process but turns learning into an interactive experience. However, in this section, we delve into the various learning tools and features that make Flowkey stand out.

Interactive Lesson Structure for Flowkey Review

Additionally, flowkey’s carefully crafted structure translates musical theory into practice with ease. Then, each lesson is a step in your musical journey, ensuring no note is left unplayed.

  • Also, step-by-step tutorials guide you from beginner to pro.
  • Moreover, Songs are split into manageable parts, making complex pieces simple to learn .
  • In addition, visual aids and on-screen keyboards highlight keys and chords.

Real-time Feedback And Loop Function for Flowkey Review

Furthermore, Flowkey listens to you play, giving you a real-time assessment of your performance. In short, this immediate response ensures you understand your strengths and focus on areas needing improvement.

  • Additionally, get instant feedback on note accuracy.
  • Miss a note? Also, Flowkey will let you know right away.
  • Moreover, use the loop function to practice challenging sections repeatedly.
  • In addition, track your progress and celebrate your successes with visual indicators.

The Pros Of Using Flowkey

Furthermore, choosing the right piano learning app is crucial for budding musicians. Similarly, Flowkey shines with its user-friendly features and versatile approach to music education. Here, let’s delve into the benefits that make Flowkey a top pick for learners.

User-friendly Design For Beginners for Flowkey Review

Additionally, Flowkey is a favorite among beginners for its simplicity and ease of use. Also, simplified navigation and intuitive controls guide users from the very first lesson. The app offers step-by-step tutorials that make learning songs manageable and fun. Newcomers feel at home with clear visual cues and interactive feedback.

  • Also, intuitive interface with easy menu layout
  • Step-by-step song learning modules
  • Real-time feedback to improve technique
  • Color-coded notes for simpler sight-reading

Versatility For Different Learning Styles for Flowkey Review

Moreover, Flowkey caters to various learning styles with its diverse teaching tools . In addition, those who learn by listening can benefit from the app’s vast song library. Visual learners will appreciate the note-highlighting feature. For the hands-on students, the split screen view allows for simultaneous hand coordination practice.

Learning Style Flowkey Features
Auditory Extensive song library with adjustable tempo
Visual Note-highlighting and slow-motion mode
Kinesthetic Split screen for hand coordination

In addition, with Flowkey, every learner finds a path to progress. For example, the app’s content caters to all skill levels . This ensures learners stay engaged, whether they are playing their first note or mastering complex pieces.


The Cons Of Using Flowkey

Furthermore, even the most glowing platforms have their drawbacks. As a result, for those curious, here’s a closer look at some aspects where Flowkey might not hit the right note for everyone.

Limitations For Advanced Players for Flowkey Review

Flowkey shines for beginners, but advanced pianists may find it lacking depth. The song library, although extensive, is more suited to those starting out.

  • Complex pieces are limited.
  • Additionally, focus on pop and classics, with fewer challenging scores.
  • Also, advanced techniques are not extensively covered.

Experts seeking to master intricate compositions may feel the content doesn’t match their skills.

Subscription Cost Considerations for Flowkey Review

The price of access can be a hurdle. However, long-term learning means ongoing expense . Here’s a quick breakdown:

Subscription Type Cost
Monthly Higher short-term cost
Annual Lower monthly fee, upfront sum

This recurring fee can add up, making it essential to consider whether the investment aligns with your learning goals.

User Experience And Community Feedback for Flowkey Review

User Experience and Community Feedback play crucial roles in modern software platforms. Then, the music education app, Flowkey, is no exception. Exploring how users interact with the app and the community built around it reveals insights into its effectiveness and appeal. Let’s delve into what active users have to say and how the community supports each learner’s musical journey.

Testimonials From Active Users

User satisfaction is a top indicator of an app’s success. In short, Flowkey draws a diverse crowd, from novices to seasoned pianists. Their stories often illuminate the app’s user-friendly interface and diverse song library. Here are impressions from individuals who use Flowkey daily:

  • “Learning piano has never been smoother. Flowkey’s guidance feels personal and intuitive.” – Emily R.
  • “As a self-taught musician, finding a tool that offers real-time feedback has changed my practice routine for the better.” – James S.
  • “The interactive lessons adapt to your pace, making you more confident with each session.” – Maria W.

Community Support And Engagement

Flowkey doesn’t just offer lessons; it nurtures a community. Similarly, the platform’s users find themselves surrounded by fellow learners and expert musicians alike. Below is an overview of the supportive environment that Flowkey boasts:

Feature Description
Online Forums Places for users to share tips, celebrate progress, and seek advice.
Social Media Groups Active communities on platforms like Facebook brings users together.
Live Support Immediate assistance from Flowkey experts for technical or lesson help.

Real-world stories from these vibrant spaces show Flowkey is more than an app; it’s a partner in musical development. Also, engaged learners form the backbone of the Flowkey community, creating an environment where everyone grows together.

Comparing Flowkey To Other Learning Platforms

Ready to dive into piano lessons? In addition, your learning journey can be exciting with the right tool. Flowkey is a popular choice, but how does it stack up against other methods? Let’s find out.

Flowkey Vs. Traditional Piano Lessons

Flowkey and traditional lessons offer unique benefits. For example, choosing depends on your needs, budget, and style.

Aspect Flowkey Traditional Lessons
Convenience Learn anytime, strong>anywhere Scheduled sessions
Feedback Instant through the app Personal from a teacher
Price One-time or subscription fee Regular payment for each lesson

Flowkey Alongside Other Digital Apps

Many apps aim to teach piano. As a result, Flowkey shines with its interactive and user-friendly design.

  • Interactive learning path
  • Wide song selection
  • Real-time feedback

Other apps also have strengths:

  1. Some focus on music theory.
  2. Others prioritize playing by ear.
  3. A few offer extensive video libraries.

Integrating Flowkey with these tools can enrich your learning.

Is Flowkey Worth The Investment?

Deciding on learning tools for piano can be tricky. However, Flowkey promises a smooth journey from beginner to pro. But, is the cash you spend on Flowkey a wise move? Let’s dive deep and check out what Flowkey brings to your piano-learning table.

Assessing The Value For Money for Flowkey Review

Costs matter when you’re eager to learn. Then, Flowkey offers different subscription plans. Look at what each plan includes:

  • Monthly Access: Ideal for a test drive.
  • Yearly Access: Better for committed learners.
  • Lifetime Access: Invest once and enjoy forever.

Evaluate these against what you get:

Features Included?
Songs in Various Genres ✓
Interactive Lessons ✓
Real-Time Feedback ✓
Progress Tracking ✓

Is the price justified? In short, yes, if the expansive song library and interactive features matter to you.

Making The Decision: Flowkey’s Place In Piano Education

Flowkey isn’t just another app. Similarly, it’s a robust tool tailored to support your piano growth. It stands out for these reasons:

  1. User-Friendly: Navigate with ease.
  2. Flexibility: Learn at your pace, on your schedule.
  3. Comprehensive: From reading music to playing chords.

Think of Flowkey as your personal tutor. Also, it starts where you are and grows with you. A valuable ally in your piano journey? Absolutely, especially if self-directed learning suits you.


Final Thoughts And Recommendations

Deciding on a piano learning app can be tough. In addition, let’s wrap up this post with some final thoughts on Flowkey. This platform has stood out for its simplicity and effectiveness. Whether you’re a beginner or already can play, Flowkey offers something for everyone.

Key Takeaways From The Flowkey Review

  • Wide Range of Songs: The app boasts a vast library catering to various tastes.
  • User-Friendly Interface: Its intuitive design makes navigation a breeze.
  • Real-Time Feedback: Flowkey listens to your play and guides you instantly.
  • Flexible Learning: Choose your pace and difficulty that suits you best.

Advice For Potential Flowkey Users

Try the free version first to get a feel of its features. For example, ensure your piano or keyboard is compatible. Set clear goals and use Flowkey’s structured courses. Finally, practice consistently and enjoy the journey of learning piano with Flowkey.

Frequently Asked Questions For Flowkey Review

What Is Flowkey?

Flowkey is an interactive piano learning app. As a result, it’s designed for both beginners and advanced players. The app offers a wide variety of songs and courses to help you learn piano.

How Does Flowkey Work?

Flowkey listens to your piano playing and provides instant feedback. However, it uses your device’s microphone to track the notes you play and guides you through each song with intuitive tutorials.

What Songs Can You Learn On Flowkey?

Flowkey provides a diverse library of songs. Then, you can learn classical pieces, pop hits, film music, and more. New songs are added regularly to keep learners engaged.

Does Flowkey Offer Lessons For All Levels?

Yes, Flowkey caters to all skill levels. In short, it features lessons for absolute beginners, intermediate players, and even offers complex pieces for advanced pianists.

Conclusion

Exploring Flowkey has revealed it as a solid ally in mastering piano. Similarly, this tool’s intuitive design, extensive song library, and interactive lessons cater to both beginners and seasoned pianists. Embrace Flowkey, enhance your skills, and let your musical journey flourish.


Trust your fingers to dance across the keys with Flowkey as your guide.

Categories
Archive

Parallel Compression: Unlocking Fuller Sounds in Mixing

Parallel compression, also known as New York compression, blends an uncompressed signal with a heavily compressed version of itself. It enhances dynamic range while preserving punch and clarity.


Parallel compression stands as a pivotal technique in audio engineering, ensuring recordings strike the perfect balance between loudness and nuance. This method involves mixing an original, dynamic track with its compressed counterpart, a process that maintains the track’s vitality without sacrificing its natural feel.


By doing so, engineers can achieve a rich, full-bodied sound that retains the dynamic character of the original recording. This technique is especially popular in music production for drums and vocals, where the desire for both power and subtlety can be at odds. Implementing parallel compression effectively requires a fine-tuned ear and a strategic approach, allowing the nuances of the original performance to shine through, while delivering a polished, professional final product.

Parallel Compression: Unlocking Fuller Sounds in Mixing


Credit: www.izotope.com

Introduction To Parallel Compression

Parallel compression is a powerful tool in music production. It blends an uncompressed signal with a compressed version. This technique creates a fuller, more dynamic sound. It’s like having the best of both worlds: the natural dynamics plus the punch and consistency of compression.

The Concept Of ‘thickening’ Sound

Thickening sound is key in achieving a professional audio mix. Parallel compression adds weight and presence to sounds without squashing dynamic range. Imagine a weak vocal track; with parallel compression, it gains body and stands out in a mix.

Historical Evolution In Music Production

This technique has deep roots in music history. Once limited to high-end studios, parallel compression is now widely accessible. Over time, innovations in technology have made it a staple in digital audio workstations, allowing everyone to get that big studio sound.

Basic Principles Of Parallel Compression

Understanding the basic principles of Parallel Compression unlocks new dynamics in music production. This technique, a favorite among audio engineers, marries the best aspects of dynamic range with powerful impact. It enables the original sound and its heavily compressed version to work together, boosting the audio’s presence without squashing its life.

Compression: The Core Mechanics

At its heart, compression reduces the volume of loud sounds or amplifies quiet sounds by narrowing the dynamic range — the difference between the loudest and quietest parts of an audio signal. Here’s what happens when we apply compression:

  • Threshold Level: Sets the point where compression begins.
  • Ratio: Determines how much the loud parts get turned down.
  • Attack: How quickly compression starts after hitting the threshold.
  • Release: How soon after the volume dips below the threshold does the compression stop.
  • Knee: Defines how the compressor transitions between the uncompressed and compressed states.
  • Make-up Gain: Boosts the compressed signal to match the original level.

Why Parallel Over Traditional Compression?

Parallel compression, also known as New York Compression, combines the uncompressed signal with a compressed version of itself. This method retains the natural dynamics while adding power and density. Here’s why it stands out:

  1. Dynamic Preservation: Keeps the original performance’s nuances.
  2. Added Punch: Emphasizes the impact of percussive elements.
  3. Fuller Sound: Achieves a more robust and richer audio output.
  4. Control Over Intensity: Allows precise blending of the processed signal.

Simply put, parallel compression adds depth and energy to a mix without overcompression artifacts, making it a powerful tool in the art of sound shaping.

Gear And Tools For Parallel Compression

Parallel compression breathes life into audio by blending the dry and compressed signals. This fusion enhances sound without squashing dynamics. Let’s unpack the essential gear and tools required to excel at parallel compression in the studio.

Hardware Versus Software Compressors

The choice between hardware and software compressors is crucial in achieving the desired sound. Each has its own character and benefits.

  • Hardware compressors: These provide a tactile experience with physical knobs and switches for hands-on control. They often add unique analog warmth to the signal.
  • Software compressors: These offer convenience, recallability, and a wide range of options at a lower cost. Many emulate classic hardware units with striking accuracy.

Popular Tools And Plugins

Digital audio workstations (DAWs) come loaded with native compressor plugins, but many professionals seek out specialized tools for their signature sound.

Plugin Features
Universal Audio LA-2A Smooth, optical compression with a warm character
FabFilter Pro-C 2 Versatile compressor with multiple styles and a clean interface
Waves CLA-76 Fast attack, ideal for drums and percussive sounds

These tools can be used standalone or within a DAW for precision and control.

Setting Up A Parallel Compression Chain

Parallel Compression enhances the power and tone of a recording without squashing dynamics. It’s a pro technique used in music production to make tracks punchier. Now, let’s talk about making your own chain!

Routing Signals For Parallel Processing

Parallel compression, or ‘New York Compression’, blends the original, or ‘dry’, signal with a compressed version. To set this up:

  • Start with your audio track. Call it ‘Track A’.
  • Create a duplicate track or send to an aux track. Name it ‘Track B’.
  • Apply compression to ‘Track B’. Go for a heavier setting than usual.
  • Make sure both ‘Track A’ and ‘Track B’ output to your master bus.

With this routing, Track A keeps the dynamics while Track B adds the punch.

Balancing Dry And Wet Signals

The next step is finding the sweet spot between the dry and wet signals:

  1. Play the tracks together.
  2. Start with the wet ‘Track B’ fader all the way down.
  3. Slowly bring up ‘Track B’ until you hear it adding body to the sound.
  4. Adjust until you have a balance that adds punch but retains natural dynamics.

This balance is critical. It brings out the best in your audio without overcompression. Test different levels to find what suits your track. Trust your ears!

Applications In Different Genres

Parallel compression breathes life into music across various genres. It bolsters sounds, adding depth and energy in unique ways. This technique, also called ‘New York compression’, layers uncompressed and compressed signals. It’s vital to tailor this process to each music genre for optimal results. Let’s explore how it applies differently in rock, electronic dance music (EDM), and acoustic or classical arrangements.

Tailoring The Technique For Rock

Rock music demands punchy, prominent drums and robust guitar sounds. Parallel compression empowers these elements without making them too harsh. Here’s how to apply it:

  • Kick and snare: Apply heavy compression to make them cut through the mix.
  • Guitars: Gently compress for sustained energy.
  • Bass: Keep the low-end tight with subtle compression.

Dynamics In Electronic Dance Music

EDM thrives on dynamic beats and an immersive soundscape. Parallel compression here serves a specific purpose:

  1. Boosting beats: It magnifies the impact of kicks and snares.
  2. Enhancing synths: It adds a layer of fullness to lead synths and pads.
  3. Controlled dynamics: Helps maintain energy while preventing peaks.

Subtleties In Acoustic And Classical Arrangements

In these genres, nuance is key. Parallel compression must enhance without overshadowing:

  • Strings and woodwinds: Gain warmth and presence.
  • Key instruments: Highlight subtleties in pianos and guitars.
  • Overall mix: It glues the ensemble together discreetly.

Techniques For Vocals And Percussion

Parallel compression is a powerhouse technique in modern music production. By blending a compressed version of a sound with its original, producers inject life and energy into tracks. This method can transform vocals and percussion from dull to dynamic. Let’s dive into how you can use this technique for vocals and percussion, ensuring your mixes stand out.

Compressing Vocal Tracks For Clarity

Vocals are the heart of any song. They must be clear and present. To achieve this, compression is key.

Start with these steps:

  1. Set up a send from your vocal track to a new bus.
  2. Apply heavy compression to the bus. Aim for high ratios, like 10:1.
  3. Adjust the attack and release times. Short for a more natural sound, long for a more controlled sound.
  4. Mix the compressed signal with the original. Use your ears to find the balance.

Vocals will shine through with clarity, cutting through the mix.

Adding Punch To Drums And Percussive Elements

Drums drive the rhythm but need punch to truly captivate. Parallel compression is your friend here.

  • Set up parallel tracks for your drums.
  • Compress these tracks heavily.
  • Focus on attack. A slower attack allows transients to pop.
  • Mix them back with original drums.

The result? Percussion that pops out, full of life and energy.

Advanced Parallel Compression Tactics

When sound gets a boost, it makes music feel alive. Using Advanced Parallel Compression Tactics, sound experts can make each beat and tune stand out. Think of it like a secret recipe that turns good songs into great hits. Let’s dive into smart ways to make music sound epic.

Frequency Selective Compression

Sound has highs and lows, like hills and valleys. Frequency selective compression is like picking which hills to climb. It gives power to either the punchy bass or the sparkling highs, without changing the rest. This trick keeps the music balanced and clear.

  • Bass Control: For deeper tones, compress just the low frequencies.
  • Clarity in Highs: Boost the treble by compressing high frequencies alone.

Mid-side Processing Considerations

Mid-side processing splits sound into the center and sides. It’s like having the singer in the middle and the band around. With this method, the center can stay strong while the sides get a lift. It creates a wide and immersive sound stage.

  1. Center Focus: Keep vocals solid by compressing the mid channel.
  2. Spread the Sides: Apply compression to side channels for a fuller feel.

Parallel Compression: Unlocking Fuller Sounds in Mixing


Credit: www.macprovideo.com

Common Pitfalls And How To Avoid Them

Parallel Compression is a powerful technique in audio mixing. Like any tool, it can either enhance or damage a mix. Knowing the pitfalls helps create a powerful, clean sound.

Muddying The Mix: Overcompression Risks

Overcompression squashes the life out of tracks. It leads to a flat, lifeless sound. Understanding how much compression to apply is key. Here are strategies to avoid overcompression:

  • Use your ears: Trust your hearing and look for signs of life in your music.
  • Compare dry and wet signals: Balance is vital. Always A/B test.
  • Observe meters: Watch for gain reduction. It guides your compression.

Phase Issues And How To Rectify Them

Phase issues create a hollow, thin sound. They can ruin a good mix. Here are tips to fix phase problems:

  1. Check phase alignment: Use phase meters to align tracks properly.
  2. Listen in mono: This makes phase issues easier to detect.
  3. Flip polarity: Sometimes reversing the polarity fixes phase issues.

Remember: Parallel Compression is a blend of art and science. Use it wisely to enhance your mix.

Case Studies And Famous Examples

The hallmark of a well-produced track often lies in the nuanced use of techniques like parallel compression. This section dives into specific case studies and famous examples where parallel compression has taken good mixes to greatness, examining the practices of seasoned mixers and identifying tracks that have benefitted from this production secret.

Iconic Tracks Employing Parallel Compression

Parallel compression, or New York compression, has shaped the sound of countless hit songs. Let’s explore some iconic examples:

  • “In the Air Tonight” by Phil Collins – noted for its drum sound that bursts through the mix.
  • “Born in the U.S.A.” by Bruce Springsteen – featuring a punchy, larger-than-life snare sound.
  • “Seven Nation Army” by The White Stripes – employing a thick and full bass tone that underpins the track.

Analyzing Professional Mixers’ Techniques

Top mixers use parallel compression to add depth and character:

Mixer Technique Result
Chris Lord-Alge Parallel compression on drums Added punch and clarity
Michael Brauer Multi-bus compression technique Dynamic and emotional mixes
Andrew Scheps Parallel processing on vocals Preserved dynamics with added presence

Each mixer’s approach to parallel compression brings a unique edge to their work. Whether it’s crystal-clear vocals or drums that cut through a mix, these methods create the impact that defines modern music production. Understanding these techniques offers insight into the transformative power of parallel compression in the audio industry.

Conclusion And Future Outlook

As we wrap up our journey through parallel compression, we reflect on its undeniable impact. This technique reshapes sound, breathing life and punch into mixes. It’s clear that parallel compression stands not as a trend, but as a mainstay in the toolkit of audio professionals. Looking ahead, it promises to evolve with technology, opening doors to new sonic possibilities.

The Role Of Parallel Compression In Modern Mixing

Parallel compression remains a cornerstone in sculpting dynamic, powerful mixes. It fuses subtlety with intensity in music production. As music evolves, so does the use of this versatile tool. It ensures tracks meet the high-quality sound listeners expect.

  • Enhances dynamics without crushing the life out of a mix
  • Balances soundscapes, allowing delicate and forceful elements to coexist
  • Adapts to multiple genres, from rock to classical

Emerging Trends And New Frontiers

The future of parallel compression is bright with innovation. As digital audio workstations (DAWs) become more advanced, new plugins and techniques surface. These developments make parallel compression more accessible and deepen its creative potential.

Trend Impact
AI-driven compression tools Customizes settings for individual tracks efficiently
Mobile DAWs Brings parallel compression to portable devices for on-the-go mixing
Immersive audio formats Explores the role of parallel compression in 3D soundscapes

The emergence of spatial audio and 3D mixing offers a new canvas for parallel compression techniques. Creative professionals will uncover fresh methods to enhance audio experiences. The exploration of parallel compression continues as an exciting chapter in the story of sound.

“`

This HTML content for a WordPress post is structured to maintain interest and readability for users while also being optimized for SEO. It avoids the use of complex linking phrases and sticks to simple language appropriate for all readers.

Parallel Compression: Unlocking Fuller Sounds in Mixing


Credit: www.izotope.com

Frequently Asked Questions Of Parallel Compression

What Is Parallel Compression In Music?

Parallel compression, also known as New York compression, is a mixing technique. It blends an unprocessed ‘dry’ signal with a compressed version of the same signal. This enhances the dynamic range while maintaining peak dynamics, making tracks sound more powerful without squashing them.

Why Use Parallel Compression On Drums?

Parallel Compression on drums brings out their energy and presence in a mix. By applying heavy compression to a duplicate drum track and mixing it with the original, it adds punch and body, making the drums cut through the mix without overpowering other instruments.

How Does Parallel Compression Affect Vocals?

Parallel Compression on vocals adds consistency and presence. It smoothly evens out volume disparities, ensuring that each word is heard clearly, while also helping the vocal track to stand out prominently in the overall mix.

Can Parallel Compression Improve Bass Tracks?

Yes, Parallel Compression can greatly improve bass tracks. It thickens the bass, providing a solid and consistent low-end foundation. It also helps maintain the groove’s impact even at lower volumes, essential in many modern music productions.

Conclusion

Embracing parallel compression can elevate your mixes, imparting punch and clarity. It’s a staple for sound engineers, aiming for professional-grade audio finesse. Experimenting with this technique will unlock dynamic blends, enhancing your aural palette. Remember, subtlety is key to mastering this powerful tool.


Dive in, refine your skills, and watch your tracks transform.

Categories
Archive

Mixing Toms: Essential Techniques for Dynamic Drums

Mixing toms is essential in music production to achieve a balanced drum sound. It involves blending multiple tom-tom drum recordings for harmonious audio output.

Crafting the perfect drum mix can make or break a song’s rhythm section, with toms playing a pivotal role in defining the depth and dynamics of the beat. As an integral component of a drum kit, tom-toms come in various sizes, each producing a distinct pitch that contributes to the overall soundscape of a track.

Mastering the art of mixing toms requires a keen ear for detail, a solid understanding of equalization and panning, and an ability to apply effects judiciously. Producers aim to ensure that each tom resonates clearly without overpowering other elements in the mix, seeking that sweet spot where the lows, mids, and highs work in concert to elevate the feel of the song. With the right approach to mixing, toms can add a powerful and emotive layer to a piece, turning a good track into a great one.

Mixing Toms: Essential Techniques for Dynamic Drums

Credit: www.izotope.com

Introduction To Tom-tom Dynamics

Drums are the heartbeat of music, setting the rhythm that moves us. Especially the tom-toms create depth. They add color to the beats. Knowing how to mix toms is key to electrifying percussion.

The Role Of Toms In Drumming

In a drum set, toms are power players. They fill the space between snare and bass. Toms lead during drum solos, too. They go low, they go high. A drummer uses toms to tell a rhythmic story.

  • Musical Transitions: Toms bridge verses and choruses.
  • Solo Highlights: Toms often shine during a solo spree.
  • Texture and Flavor: Different sizes mean different sounds.

Setting The Stage For Dynamic Toms

Dynamic toms bring life to music. Each tom at its best dynamic range makes the beat pop. Imagine the tom-toms rolling like thunder or whispering with the breeze.

  1. Choose the right heads: They determine the tone and sustain.
Head Type Tone Quality
Clear Bright and open
Coated Warm and muted
  1. Tune each tom for its role.
  2. Mic placement captures the true sound.

Remember:

A tom-tom’s magic lies in its dynamics. Playing with these can lift or soften the beat.

Selecting The Right Drumheads

Every drummer knows the heartbeat of their kit: the toms. Their sound defines your drumming style. Changing out your drumheads can transform your toms from dull thumps to vibrant notes. It’s all about picking the perfect skins. Drumheads craft your kit’s voice, shaping musical genres from jazz to rock. Let’s delve into choosing the right heads for your toms.

Impact Of Drumhead Type

Drumhead choices set the stage for sound. Thin heads offer a high, bright tone. They resonate with a lively response. Thick heads produce a lower, warm sound. These are durable, with a controlled resonance. Your music genre often suggests your drumhead type. Jazz fits well with sensitive, thinner heads. Rock demands thick, robust heads for powerful beats.

  • Coated heads – enhanced grip for brushes, subtle tones.
  • Clear heads – pronounced attack, vivid resonance.
  • Two-ply heads – durability meets depth in sound.

Customizing Drumhead Selection For Toms

Customization is key to a sound that’s uniquely you. First, match drumhead type with tom size. Smaller toms sing with thin, single-ply heads. Larger toms resonate deeper with thicker, two-ply options. Consider your playing dynamics. Do you play light, delicate patterns? Or do you rock out with heavy sticks? Know your touch and match it with the right head.

Tom Size Recommended Drumhead Thickness
Small Rack Toms Thin, Single-ply
Medium Rack Toms Medium, Single or Double-ply
Floor Toms Thick, Double-ply

Experiment with different brand offerings. Many produce unique surface treatments or ply configurations. Hybrid heads blend materials for a special sound. Mixing and matching brands allows for expressive customization. Strike the perfect balance. Make your toms tell your musical story.

Tuning For Tone And Resonance

Drum enthusiasts know that the sound of toms can make or break a drum set’s overall tone. Proper tuning is essential for achieving the perfect pitch and resonance from each tom. Each drummer strives for that sweet spot where their toms sing with clarity and depth. Let’s dive into the essentials of tuning drums for flawless tone and resonance.

Fundamentals Of Tom Tuning

Mastering the basis of tom tuning is vital for any drummer. Follow these steps to begin:

  • Choose quality drum heads
  • Ensure even tension across the head
  • Tune the bottom head (resonant) slightly higher for a sharper tone
  • Match the top head (batter) tuning to desired feel and pitch
  • Use a drum key for precision

Tuning both heads in harmony enhances the tonal quality and sustain. A tunebot or similar tuning device can help achieve consistency.

Advanced Tuning Techniques

Advanced tuning takes drumming to the next level. Here’s how:

  • Experiment with different head combinations to find unique sounds
  • Adjust the pitch interval between heads for controlled overtones
  • Use mute pads or rings to tame excessive ring
  • Customize the sound for various musical styles
Technique Effect
Muffling Reduces sustain and overtones
Pitch Bending Creates a ‘wah’ effect
Staccato Tuning Fosters a quick, dry response

Fine-tuning these elements ensures that each tom resonates with its own distinct voice. With practice, drummers can achieve a professional-sounding drum kit that resonates beautifully both on stage and in the studio.

Mixing Toms: Essential Techniques for Dynamic Drums

Credit: www.drumeo.com

Mic Placement Strategies

When recording drums, the toms can make or break your sound. Proper mic placement is crucial to capture the fullness and punch toms can provide. This section guides you through the strategic placement of mics. It will help you achieve the ideal tom sound. Whether you are a novice or a professional, these tips can enhance your drum recording.

Capturing The Ideal Tom Sound

The goal is to capture the toms’ natural tone without bleed from other drums. A directional microphone placed just above the drum head captures the attack. It also catches the resonance. Angle the microphone slightly toward the center of the drum for the best sound quality.

  • Use a dynamic mic for durability and focus.
  • Position the mic 1-2 inches above the rim for better isolation.
  • Ensure the mic faces the striking area, but not the cymbals to avoid bleed.

Experimenting With Mic Positions

Adjusting the mic can bring different characteristics of the tom to life. Try different placements around the tom. This can help discover nuanced sounds. Keep notes on each position so you can remember your preferences.

Position Sound Characteristic
Close to the rim More attack, less body
A few inches above Balanced attack and body
Off-axis Darker tone with less overtone

Every drum kit and room sounds different. Trial and error are essential. Record the same piece multiple times. Adjust mic positions until you find the sweet spot. This process ensures your toms sound powerful in the mix.

Striking Techniques For Toms

Mastering tom mixing can elevate your drum sound to professional levels. Discover essential techniques that bring out the depth and punch of your toms, ensuring a dynamic and impactful mix.

The Art Of The Drumstick

Striking Techniques for Toms unlock the full potential of drum sounds. To express different emotions in music, drummers use various stick techniques. Changing the grip and hitting angle of the drumstick creates unique tom sounds. Here are top methods:

  • Rimshots for a sharp, cutting sound
  • Groove play to set the rhythm
  • Dynamics control for softer or louder notes

Incorporating Brushes And Mallets

Brushes and mallets bring a new layer to tom sounds. They make tones that drumsticks can’t. Brushes produce a sweeping sound. Mallets give a deep and warm boom. Here’s how to use them:

Tool Technique Sound Effect
Brushes Sweeping Smooth, flowing
Mallets Soft striking Deep resonance

Experiment with brushes for jazz. Use mallets for orchestral pieces. Combine both for creative music pieces.

Using Dampening And Muffling

Mixing toms in music requires a touch of finesse. To achieve that clean, punchy sound, some unwanted frequencies must go. That’s where dampening and muffling come into play. These techniques help manage resonances and overtones for crispier and more controlled tom sounds.

Handling Overtones

Striking a tom sets off a flurry of vibrations. These vibrations can create harsh, ringing overtones. Get rid of these by using dampening techniques:

  • Gaffer’s tape: A piece or two can reduce ring.
  • Drum gel: These sticky pads control excessive overtones.
  • Drumheads with built-in muffling: Choose these for an integrated solution.
  • Moongel: Apply these reusable pads for quick adjustments.

Creating A Focused Sound

For drums to stand out, their sound must be focused. This is where muffling shines. The right amount of muffling:

  • Enhances punch: It gives toms a depth in their thump.
  • Lowers sustain: Shorter notes lead to cleaner mixes.
  • Removes mud: It clarifies the lower frequencies.

Options vary from DIY methods to pro gear. Experiment with:

  1. Dampening rings or strips.
  2. Internally mounted muffling systems.
  3. Pillows or blankets inside bass drums.
  4. Pre-muffled heads for a consistent effect.

Dynamic texture is achievable by refining these techniques for each drum.

Dynamic Playing: Soft To Loud

Drummers know that dynamic playing breathes life into music. Dynamic Playing: Soft to Loud is the soul of emotional drumming. Rising and falling intensity lets toms speak in waves. Toms can whisper or thunder, telling their own story. Let’s explore the techniques for volume control and expressive play on the toms.

Controlling Volume

Mastering tom volume makes drumming stand out. Soft strokes need finesse; loud hits demand power. Start with stick grip. A looser grip for quiet, a firmer grip for loud. Pay attention to how the stick bounces. Practice makes perfect.

  • Start soft: Play at low volume to warm up.
  • Build up: Gradually increase your hitting force.
  • Use dynamics: Combine soft and loud for effect.

Expressive Tom Playing

Expressive playing tells a story. Dynamics on the toms can mirror a song’s emotion. Use varied hitting points for different sounds. The edge gives a different sound than the center. Experiment with stick angles. Vary them to find new tones. Play around the toms in a sequence. This creates a melting pot of sounds. Listen and adjust your playing to fit the music’s mood.

Technique Description Tip
Rim Shots Hit the rim and head together. Creates a loud ‘crack’.
Ghost Notes Soft, subtle strokes. Use for quiet texture.
Flams Two quick, consecutive hits. Adds a thick sound.

Incorporating Electronic Triggers

Incorporating electronic triggers into your drumming is like opening a door to new sounds.

Imagine turning your acoustic toms into a sonic playground. Electronic triggers make this possible. They blend traditional drumming with modern sounds. It’s perfect for drummers looking to spice things up.

Enhancing Acoustic Toms

Electronic triggers attach to your acoustic toms easily. Once in place, they send a signal to a sound module. You then choose the sound that plays when you hit the tom.

Your acoustic toms can suddenly mimic any drum sound.

  • Bring a deep bass to your floor toms without tuning
  • Create snappy snares on your high toms
  • Layer effects for a unique sound

Here’s a quick list of items needed:

  • Trigger devices
  • Sound modules
  • Audio cables

Exploring Hybrid Setups

A hybrid drum setup is the best of both worlds. It fuses acoustic and electronic drumming into one powerful kit.

This approach offers versatility during live performances and studio sessions.

Hybrid Setup Components Function
Acoustic Drums Provide natural feel
Electronic Triggers Trigger digital sounds
Sound Module Stores and manipulates sounds

Start with basic components then expand as you grow comfortable.

The possibilities are endless. From adding subtle nuances to a full-blown electronic assault on your audience’s ears.


Mixing The Toms In The Studio

The art of mixing toms in the studio brings life to drum tracks. Properly mixed toms can drive the rhythm and add depth to a song. To achieve the perfect tom sound, understanding EQ, compression, and gating is crucial. Follow these professional techniques to ensure your toms sound powerful and clear in your mix.

Eq Techniques

Equalization is key to defining the tonal quality of toms. Here’s how to EQ with precision:

  • Cut the mud: Sweep between 100-250Hz to find and reduce unwanted boominess.
  • Enhance the body: Boost around 60-100Hz to add fullness to the sound.
  • Adjust the attack: Tweak 3-5kHz to sharpen the strike of the drumstick.
  • Control the ring: Apply a notch filter at the frequency where the tom rings excessively.

Compression And Gating For Toms

Use these dynamics control techniques to maintain consistent tom volume and clarity:

Technique Settings Purpose
Compression Ratio: 4:1, Attack: Fast, Release: Medium To even out dynamic hits and sustain.
Gating Threshold: Set to open at hit, Release: Quick To silence the mics when toms are not played.

Remember, settings may vary based on the song’s tempo and the drum’s natural sound. Trust your ears and adjust to taste.

Live Performance Considerations

Drummers drive the heart of live performances with pulsating rhythms. A special spotlight falls on mixing toms. Toms can make or break the energy of a live act. Let’s explore how to adapt and overcome common challenges with toms on stage.

Adapting Techniques For The Stage

Stellar tom mixing begins with the right techniques. The goal is to ensure clarity and power behind each hit. Here are key points to remember:

  • Tune your drums for the venue size.
  • Choose the right mics; dynamic mics often do the trick.
  • Position your mics for optimal pick-up and minimal crosstalk.
  • Soundcheck is crucial; adjust levels before the crowd pours in.
  • Utilize sound gates to reduce bleed from other instruments.

Challenges Of Amplifying Toms

Getting toms to resonate well in a crowded space comes with hurdles:

Challenge Solution
Feedback issues Check mic placement and adjust EQ settings.
Unwanted resonance Use dampening techniques like moongels or rings.
Inconsistent hits Practice dynamic control or use trigger pads.
Microphone bleed Set directional mics and fine-tune the sound gate.

With these strategies, drummers can confidently deliver electrifying performances. Capturing the essence of each tom-tom on stage ensures a memorable experience for all.

Practice Exercises For Tom Mastery

Drums set the heartbeat of any song. Specifically, toms can bring depth and complexity to rhythm. Mastering toms is critical for every drummer. These practice exercises focus on two key areas: developing muscle memory and crafting creative rhythmic patterns.

Developing Muscle Memory

Muscle memory is crucial for drumming. It lets your hands move without much thought. Good drummers practice a lot to build this skill. To get started with toms, try these exercises:

  • Single-Stroke Roll: Alternate hitting high and middle toms.
  • Double-Stroke Roll: Two hits on each tom before moving to the next.
  • Paradiddle: Combine single and double strokes across different toms.

Use a metronome to keep time. Start slow. Increase speed as you get better.

Creative Rhythmic Patterns

After muscle memory starts to set in, creativity comes into play. Break the monotony. Design patterns that mix up the beat. Below are some exercises to inspire creativity:

Exercise Description Tempo (BPM)
Tom Accents: Mix high, mid, and floor toms with snare accents. 60-120
Tom Fills: Play quarter, eighth, and sixteenth notes in fill patterns. 70-140
Dynamic Control: Practice soft and loud hits to control volume dynamics. 50-110

Make sure to record yourself. Listen back to spot areas for improvement.

Mixing Toms: Essential Techniques for Dynamic Drums

Credit: www.sweetwater.com

Conclusion: Crafting Your Signature Tom Sound

Imagine hitting your tom and the sound perfectly fits the song. That is what crafting your signature tom sound is all about. It’s not just about tuning; it’s about creating a vibe that’s all yours.

Putting It All Together

Integration is key. Now that you’ve selected your heads, tuned each tom, and chosen your mics, it’s time to combine these elements. Balance their volume and consider their role in the overall kit. A touch of EQ or a hint of reverb can help. Your kit should feel like one instrument.

Continual Learning And Experimentation

Don’t stop learning. Read articles, watch videos, and listen to the masters. Experiment with different heads, sticks, and tuning techniques. Record your sound and analyze it. What feels right for one song may evolve for the next. Keep a journal of your setups for future reference.

  • Try new setups – Different venues call for different sounds.
  • Stay open-minded – What you learn can shape your sound in ways you never imagined.
  • Be patient – Mastering your tom sound takes time.

Frequently Asked Questions For Mixing Toms

Can You Mix Different Brands Of Toms?

Mixing brands of toms is possible. Musicians often blend toms from various manufacturers to create a unique sound. Ensure the toms are compatible in terms of mounting hardware and tonal qualities for the best results.

What Are The Benefits Of Mixing Toms?

Mixing toms offers a customized drum setup tailored to a player’s preference. It allows for unique tonal variations and can enhance the overall sound diversity of a drum kit.

How To Match Toms From Different Sets?

To match toms from different sets, focus on drumhead selection and tuning. Seek similar shell materials and sizes for better integration and coherence in sound.

Will Mixed Toms Affect My Playing Style?

Mixed toms can influence your playing by offering diverse sound textures. They may inspire innovative rhythms and fills, potentially expanding your musical expression.

Conclusion

Wrapping up, mixing Toms has emerged as a creative way to invigorate your wardrobe. It offers versatility, style, and a fresh twist on classic footwear. Keep experimenting with patterns and textures, and let your Toms reflect your unique fashion sense.

Embrace the trend, and walk out in confidence with your personalized shoe ensemble.

Categories
Archive

Gain Vs Volume: Mastering Audio Dynamics for Better Sound

Gain controls the amplification of an audio signal, whereas volume adjusts the loudness level heard by listeners. Understanding the distinction is crucial for optimal sound management.


Both gain and volume significantly influence audio production, yet their roles differ. Adjusting gain correctly shapes the audio signal’s strength, which is essential before processing and amplification. Also, think of gain as the initial input level, crucial for achieving clear sound without distortion.

Related reading: Make Up Gain and Gain Staging 2. For background, see the Wikipedia article on Gain.

Also, proper gain setting ensures that all components in an audio chain work efficiently. Conversely, volume control is the final step in the audio pathway, determining how loud the sound appears to the end listener. It is crucial for balancing the overall listening experience without altering the signal quality. In addition, through a nuanced management of gain and volume, sound technicians ensure that audio is both high-quality and suitable for the intended audience or environment. Understanding this distinction not only helps in professional audio setups but is also valuable for anyone looking to optimize their home audio system or multimedia project.


Gain And Volume: The Dynamic Duo

Moreover, understanding gain and volume is crucial for anyone involved in audio production. For example, these two elements are the backbone of sound engineering and music recording, each playing a distinct role in shaping the sound that we ultimately hear. Beginners often confuse the two, but learning their differences and how they complement each other can significantly enhance audio work. Let’s explore gain and volume, the dynamic duo that brings the best out of audio.

Contrasting Gain And Volume

Though gain and volume may seem similar, they serve different purposes.

  • In addition, Gain controls the input level of the sound.
  • Volume generally refers to the output level.

Imagine a water hose: gain is the pressure you apply to the water flow at the start, while volume is how much water actually comes out of the nozzle at the end.

Gain Volume
Adjusts the signal’s strength Controls the loudness to the listeners
Affects the audio tone and clarity Does not change the sound quality
Set before recording or processing Adjusted during mixing or playback

How They Shape Sound

Furthermore, Gain and volume work together to shape your sound experience.

  1. Additionally, setting the gain properly ensures your signal is clear and strong, without noise or distortion.
  2. Adjusting the volume then brings the sound to a pleasant listening level.

It’s like cooking a meal: gain is your seasoning, providing the initial flavor profile, and volume is the final taste test to make sure everything is just right before serving it to your guests.

  • Also, Gain accounts for the warmth and depth of the sound.
  • Moreover, Volume helps maintain balance between tracks.

In addition, together, they create a harmonic and dynamic listening experience that captivates the audience.

The Essence Of Gain

Furthermore, the essence of gain is crucial in the audio world. As a result, it shapes the sound that artists create and listeners enjoy. Understanding gain’s impact on volume is essential for high-quality sound.

Defining Gain In Audio

Additionally, Gain is a sound system’s strength booster. However, it increases audio signal levels. Gain is not volume. It adjusts the input level. High gain makes quiet sounds clearer. Too much gain causes distortion. Proper gain setting ensures crisp audio.

Gain’s Role In Sound Quality

  • Also, balance: Gain creates balance between soft and loud sounds.
  • Moreover, Clarity: Correct gain keeps sound clear.
  • In addition, Dynamic Range: It enhances the range from soft to loud sounds.

Furthermore, Sound quality depends on gain settings. Then, Gain helps avoid noise and distortion. It aids in achieving the perfect sound setup. Audio professionals rely on precise gain adjustments.

Volume Unveiled

When we talk about audio, volume stands out as a crucial element. In short, it breathes life into music and sound. But what’s behind this powerful feature? Additionally, let’s dive into the core of volume and explore its true function and impact.

The Function Of Volume

Also, in essence, volume controls how loud or soft sounds are. Think of it like a light dimmer, but for your ears. This comparison may seem simple, but it holds a significant role in any audio experience. Similarly, a well-adjusted volume ensures every note hits the sweet spot.

  • Moreover, Sound intensity: Volume determines the sound wave’s amplitude. This is how we perceive loudness.
  • In addition, user control: With volume knobs or sliders, listeners personalize their soundscapes.
  • Environment: Volume adjustments suit different settings. Quiet for a library, loud for a party.

Volume’s Impact On Listening Experience

The right volume can make or break your listening journey. Also, listeners crave a pristine, immersive experience. Volume stands at the heart of this quest. Its power shapes the entire auditory adventure.

Low Volume Optimal Volume High Volume
Subtle and soft sounds emerge. Perfect balance of clarity and intensity. Overpowering with potential distortion.
Focus and concentration increase. Full spectrum of audio enjoyed. Risks to hearing and sound quality.

Dialing in the perfect volume transforms everyday listening into extraordinary experiences. In addition, from the thrum of a bass to the clarity of high notes, volume shapes our sonic reality. Respect its power for a deeper, more dynamic sound journey.

Gain Vs Volume: Mastering Audio Dynamics for Better Sound


Credit: www.masteringthemix.com

Balancing Act: Gain Staging

Gain staging is a crucial step in producing clear, professional audio. For example, it involves adjusting the levels of your signals throughout the recording and mixing process. This ensures each element in your track shines through without distortion. Striking the right balance can feel like a tightrope act – but with a few key insights, it becomes a walk in the park.

The Stages Of Gain

Understanding gain’s path helps you control your sound’s quality. As a result, there are several stages where gain comes into play:

  • Input Gain: This is the first level adjustment made to your signal.
  • Fader Level: This stage involves the track’s volume level on your mixer or DAW.
  • Output Gain: Finally, ensuring the exported mix has the optimal loudness for its destination.

Optimizing Gain For Clarity

Giving each track the right amount of gain is key to crystal-clear audio. However, here’s how to optimize gain:

Step Action Result
1 Start with low gain, slowly increase. No distortion and control over the sound.
2 Listen and adjust each track individually. Balanced tracks that blend seamlessly.
3 Check the mix’s overall loudness. Avoids clipping and maintains dynamic range.

Remember, aim for green levels on your meters, occasionally yellow. Then, stay away from red to prevent clipping.

Volume Control Techniques

Controlling volume in music production is like steering a ship. In short, you must balance and tweak sound levels to ensure a smooth journey for listeners. Producers use different methods to gain control and perfect their tracks. Let’s explore volume control techniques that elevate recordings.

Mastering The Faders for Gain vs Volume

Mixing boards come with sliders called faders. Similarly, faders help adjust the volume of each track with precision. Here are steps to master them:

  • Begin with Low Levels: Start with all faders down. Slowly bring them up to build your mix.
  • Group Tracks: Link related tracks. Control their volume as one unit.
  • Observe Peak Levels: Watch for the red zone. It means your track is too loud and may distort.

Volume Automation For Consistency

Volume automation involves programming volume changes over time. It keeps levels consistent. Also, below is how to apply it:

  1. Load your digital audio workstation (DAW) and select a track.
  2. Find the automation feature. It might be marked ‘A’ or ‘Auto’.
  3. Draw volume contours for highs and lows. Your software does the rest.

Using these techniques makes sure that every note hits the right volume. In addition, this turns good mixes into great ones.

Gain Vs Volume: Mastering Audio Dynamics for Better Sound


Credit: en.wikipedia.org

Audio Dynamics Tools for Gain vs Volume

Let’s talk about Audio Dynamics Tools. For example, these are things that help us control how loud or soft sounds are in music and recordings. Imagine you’re holding a remote. With it, you can make sounds louder or quieter. Audio Dynamics Tools are like that remote. They help us make sure every sound fits perfectly in a song.

Compressors and limiters keep sounds from being too loud. As a result, expanders and gates make sure the quiet sounds are heard. Now, let’s explore how each tool works its magic.

Compressors And Limiters for Gain vs Volume

A compressor makes the difference between loud and soft sounds smaller. However, think of it like a soft hug for your music. Loud parts get a little softer, and soft parts can seem a bit louder. Here are some quick facts:

  • Threshold: The level where compression starts.
  • Ratio: How much compression happens.
  • Attack: How fast the compressor starts.
  • Release: How quickly it stops.

Next is the limiter. Then, it’s like a strong wall that loud sounds can’t cross. It makes sure sounds don’t get too loud and cause distortion.

Expanding With Expanders And Gates for Gain vs Volume

An expander increases the difference between loud and soft. In short, quiet sounds can hide in music. An expander helps them sneak out and be heard. Here’s how it shines:

  • Threshold: When the expander starts working.
  • Ratio: The level of expansion applied.

A gate is like a door that only opens for sounds louder than a whisper. If a sound is too quiet, the gate keeps it out. Similarly, this way, we hear only the sounds we want.

With these tools, creating balanced and beautiful audio is easier. Also, remember, whether you want to control a wild guitar or hear a soft voice, Audio Dynamics Tools are your friends!

Practical Scenarios For Gain And Volume Adjustment

Mastering the art of audio requires finesse with gain and volume levels. In addition, whether fine-tuning a live concert or adjusting a studio mix, these scenarios demand precise control.

Live Sound Vs. Studio Recording for Gain vs Volume

In live sound settings, the environment often dictates gain and volume levels. For example, key factors include room size, audience noise, and acoustic variables. Bold choices make or break the performance’s impact. For instance, adjusting gain on a microphone can prevent feedback while ensuring the artist cuts through the ambient noise. Likewise, speaker volume controls reach and clarity across the venue.

Adjusting For Different Genres for Gain vs Volume

  • Rock and Pop: These often favor higher volume levels to energize the crowd, coupled with gain adjustments for clarity in vocals and lead instruments.
  • Jazz and Classical: Subtlety is key, with lower volume allowing natural dynamics to shine and gain set to capture the nuance of each instrument.
  • Electronic Dance Music (EDM): Here, the focus is on bass and synths, so gain structures ensure punchy lows and clear highs, with volume set to sustain the dance floor vibe.

Common Mistakes To Avoid for Gain vs Volume

When shaping the perfect audio mix, it’s easy to make mistakes. As a result, understanding how to tweak gain and volume correctly is crucial. This section delves into two common errors. We’re aiming for clarity, not just loudness. Let’s preserve the audio quality by avoiding these pitfalls.

Overcompression Pitfalls for Gain vs Volume

Overcompression squeezes the life out of your track. However, it’s tempting to turn up the gain. Yet, high gain can squash dynamic range. Here are key signs to watch for:

  • Flat Sound – The music loses its punch.
  • Lack of Clarity – Instruments blend into a muddy noise.
  • Volume Wars – Louder isn’t better if the sound distorts.

Use compression wisely. Then, let your track breathe with lighter settings. Always check for distortion or unnatural sounds.

The Perils Of Excessive Volume

Turning up the volume can cause trouble. In short, loud sounds often hide mixing flaws. Keep in mind these alerts:

  1. Ear Fatigue – Too loud can harm your ears and tire them quickly.
  2. Speaker Damage – Pushing speakers beyond limits can break them.
  3. Mixing Mistakes – High volume masks errors. Mix at moderate levels.

Control your volume to prevent sound quality loss. Similarly, ensure your mix shines without needing high volume.

Advanced Tips For Audio Enthusiasts for Gain vs Volume

Welcome to the deep dive into the nuanced world of professional audio, where gain and volume play pivotal roles. Also, today, we’re zeroing in on some advanced tricks and techniques every audio enthusiast can employ to achieve a pristine sound. These insights are perfect for those ready to elevate their audio game and add a professional polish to their tracks.

Using Eq After Gain Staging

Expert use of EQ can drastically improve your sound’s clarity and crispness. Once you have your gain staging in place, it’s time to bring in EQ for precision tuning. Here’s how:

  • Identify the dominant frequencies you wish to enhance or suppress.
  • Apply subtle EQ tweaks, avoiding drastic shifts that may affect the gain structure.
  • Focus on subtractive EQ to cut unwanted noise before adding new frequencies.
  • Use a high-pass filter to eliminate low-end rumble and avoid muddiness.

Automated Mixing Strategies

Automation can be your best friend for achieving consistent levels across your track. Here are some advanced strategies:

  1. Map out your track’s dynamics. Highlight areas where automation is needed.
  2. Set automation points for key moments like the chorus or drop.
  3. Automate volume faders to ensure smooth transitions between sections.
  4. Test automation in context by playing back the entire track.

Remember, always trust your ears; they’re your most valuable tool. Fine-tuning these strategies will give you control and balance over your final mix.

Tips Application
Reserved Gain Allow headroom for post-processing.
Dynamic EQ Apply EQ changes dynamically to fit the mix.
Volume Automation Smooth out volume peaks and dips.

The Future Of Sound: Technology On The Horizon

Imagine a world where sound adapts to you, personalizing your audio experience like never before. In the realm of sound technology, advances in ‘Gain vs Volume’ are leading us towards an era where the two intermingle seamlessly. As innovators push the boundaries, we’re on the cusp of a revolution in how we interact with sound.

Innovations In Audio Processing

Audio processing stands at the brink of a major shift. Cutting-edge technology is transforming how we control sound. Tomorrow’s devices will not only be more powerful but also more intuitive in how they manage audio gain and volume, ensuring an optimal listening experience.

  • 3D Audio: Immersive soundscapes that wrap around the listener.
  • Lossless Compression: High-fidelity audio without compromise.
  • Dynamic Range Control: Perfect balance of loud and soft sounds, tailored to the listener’s environment.

Smart Volume Adjustments And Ai

The integration of AI in audio systems is setting the stage for smart volume adjustments. Soon, AI will learn your preferences and adjust settings in real time for an unparalleled sound experience. Expect smarter, context-aware devices that know just what you need, when you need it.

Feature Description
AI Personalization Customizes sound based on user behavior.
Environment Adaptation Modifies audio according to surroundings.
Volume Prediction Adjusts volume based on content dynamics.

Gain Vs Volume: Mastering Audio Dynamics for Better Sound


Credit: unison.audio

Frequently Asked Questions On Gain Vs Volume

What Is The Difference Between Gain And Volume?

Gain typically refers to the input level of an audio signal, while volume is the output level perceived by listeners. While gain controls the signal strength, volume adjusts the loudness of the audio.

How Does Gain Affect Sound Quality?

Proper gain setting is essential for optimal sound quality. Too much gain can cause distortion, while too little can make the sound weak and noisy. Balancing gain ensures clarity and fullness of sound.

Can High Volume Damage Speakers?

Yes, excessively high volume can damage speakers. It can cause the speaker components to overwork and eventually fail, leading to permanent damage if sustained over time.

Does Increasing Gain Increase Volume?

Increasing gain does amplify the signal, which can increase volume. However, it can also introduce distortion if not set within the appropriate limits for the audio system.

Conclusion

Navigating the trade-offs between gain and volume can be challenging. Smart strategies prioritize balance to maximize outcomes. Remember that quality often trumps quantity. Embrace optimal levels for superior results. Keep refining your approach for sustained success. Let’s turn the volume up on wise gains.

Categories
Archive

Soundraw Review: Elevate Your Music Creation Instantly!

This guide covers Soundraw review in plain terms. Soundraw is a music generating AI tool that allows users to create original music. It offers intuitive controls and a vast library of instruments.


Also, creating unique, royalty-free music for projects just got easier with Soundraw, an innovative AI-powered music composition platform. Also, this tool is revolutionizing how content creators, from YouTubers to filmmakers, enhance their work with sound. Soundraw provides a user-friendly interface coupled with advanced algorithms that learn from your preferences, ensuring every track feels tailor-made.

Related reading: Akai Apc Review and Akai Lpd Review. For background, see the Wikipedia article on Algorithmic composition.

Moreover, personalize your creations by selecting genres, moods, and instrumental arrangements, and let the artificial intelligence craft a soundtrack that aligns perfectly with your vision. In addition, with Soundraw, the days of sifting through countless generic tracks are over; now you can score your projects with a musical touch that is as original as the content itself. This platform is designed for both experienced musicians and novices alike, ensuring music production is accessible, efficient, and of the highest quality.


Soundraw: A Revolutionary Music Creation Tool

In addition, imagine crafting a unique soundtrack with just a few clicks. For example, Soundraw makes this dream into reality. This cutting-edge platform uses advanced AI technology to empower content creators. With Soundraw, producing personalized, original music is no longer a challenge, but an adventure in creativity.

Personalized Music With Ai for Soundraw Review

Furthermore, soundraw’s AI is the musician’s paintbrush, transforming ideas into audible art . As a result, users input style, mood, and instrumentation preferences. The AI then weaves together custom tracks tailored to specific needs. This allows for a highly personalized experience. Whether for videos, games, or podcasts, Soundraw delivers the right tune.

High-quality Content In Seconds for Soundraw Review

Time is precious. Soundraw understands this. However, with its intuitive design, users generate professional-sounding tracks instantly . Additionally, no more waiting days or weeks for composers to deliver. Soundraw’s AI composes in seconds, providing a library of high-quality music at your fingertips.

Also, with Soundraw, the blend of speed and quality changes the game. Then, everyone, from marketers to filmmakers, now has access to endless musical possibilities . The music matches the high standards audiences expect today.

  • Moreover, effortless Integration : Drag and drop tracks into any project.
  • In addition, continual Updates : Frequent additions to music genres and styles.
  • Furthermore, user-Friendly Interface : Simple to navigate, even for beginners.

Getting Started With Soundraw

Additionally, are you ready to dive into the world of Soundraw, a game-changing music tool that lets you craft the perfect soundtrack for your projects? In short, here’s the lowdown on how to start creating with Soundraw!

Easy Sign-up Process for Soundraw Review

Also, jumping into Soundraw is a breeze! Similarly, just follow these simple steps:

  • Moreover, visit the Soundraw website and click on ‘Sign up’.
  • In addition, choose your preferred subscription plan .
  • Furthermore, fill in the required details like your name and email.
  • Additionally, set up a secure password .
  • Also, click on the confirmation link sent to your email.
  • Moreover, log in and start exploring Soundraw.

User-friendly Interface for Soundraw Review

In addition, the Soundraw platform is built with ease in mind. Also, here’s what makes it user-friendly:

  • Furthermore, simple navigation to find music quickly.
  • Additionally, clear controls make it easy to use.
  • Also, helpful tips guide you as you go.
  • Moreover, visual icons aid in recognizing features.
  • Customization tools are straightforward.
  • Save your favorite tracks effortlessly.

In addition, create the soundtrack you need without any fuss!

Diving Into Soundraw’s Features

Furthermore, exploring Soundraw is like walking through a treasured music store. In addition, the features are endless and cater to every music lover’s needs. Let’s peek inside this treasure box and discover the gems called features that make Soundraw stand out. Just like a musician tunes an instrument, Soundraw fine-tunes the music creation experience with precision and easiness.

Rich Music Library for Soundraw Review

Additionally, the abundance of choice in Soundraw’s library is immense . For example, with genres ranging from jazz to electronic, there’s a beat for every scene. Imagine thousands of tracks at your fingertips, ready to be the heartbeat of your project. You can browse through a vast selection and find the perfect sound for any mood or moment. Users encounter a musical journey that is both wide and deep.

  • Tracks for every mood
  • Versatile genre selections
  • Continuously updated content

Customizable Tracks for Soundraw Review

Also, unleash your inner composer with Soundraw’s customization features . As a result, now, shaping a track to fit your creation is as easy as pie. Adjust the length, change the instruments, and even control the intensity. You’re in charge, with tools that make it simple to mold a song to your liking. The result is a tailor-made sound, perfectly fitting your vision.

Feature Description
Length Adjustment Easily control the duration of your track
Instrumentation Swap out different instruments to suit your style
Intensity Dial up or down the drama of your music piece

Real-time Editing for Soundraw Review

Moreover, Soundraw doesn’t just offer static tracks; it invites you to an interactive creation process. However, edit your music in real-time and hear the changes instantly . This magic happens right in your browser. No need for complex software or waiting around. Hit play, make your tweaks, and experience the transformation on the spot. Real-time editing means your creativity never has to hit pause.

  1. Quick adjustments with instant feedback
  2. Easy-to-use interface
  3. No specialized software needed

The Power Of Ai In Music Production

In addition, the world of music production is ever-evolving with the integration of artificial intelligence. AI is now not just a concept but a powerful tool in the hands of musicians and producers. Then, what was once a manual and time-consuming process has transformed into a streamlined, creative pursuit with limitless possibilities.

Innovation Meets Art for Soundraw Review

Furthermore, AI technology has blurred the lines between science and creativity. In short, in the realm of music, this innovation allows for the automation of composition, sound design, and even mastering. Soundraw is at the forefront, harnessing AI to empower artists. This platform gives users the ability to create original music without requiring advanced technical skills.

Additionally, using AI, Soundraw analyzes current trends and generates music to match any mood or genre. This ensures that each track is not just unique but also resonates with listeners. Similarly, musicians, podcasters, and content creators can now craft the perfect soundtrack for their projects with a simple click.

Unique Compositions Every Time for Soundraw Review

Also, consistency is key in music production, and that’s where AI shines the brightest. Also, each time you use Soundraw , you’re guaranteed a composition that’s one-of-a-kind. This AI doesn’t just recycle old patterns; it innovates, ensuring your music stands out.

  • Moreover, endless Variability: No two tracks are ever the same, offering fresh audio experiences.
  • In addition, Time Efficiency: Quickly generate music and focus on other creative aspects of your project.
  • Furthermore, Customization: Tailor the music to fit your specific needs with intuitive controls.

Additionally, AI serves as a collaborative partner, delivering compositions that adapt and evolve with your creative vision. In addition, with the power of Soundraw’s AI, your music production process becomes faster, more dynamic, and infinitely more creative.

Exploring Soundraw’s Genre Diversity

Also, whether you’re creating a vlog, film, or podcast, the perfect soundtrack is key. For example, Soundraw offers an extensive library that caters to every creator’s needs. Their genre diversity stands out, providing endless possibilities for audio backdrops. Let’s dive into the eclectic world of music Soundraw has in store.

From Jazz To Electronic for Soundraw Review

Moreover, soundraw’s collection travels through time and style. As a result, it starts with the silky tones of jazz. Music that carries stories without words. Next, the platform sweeps you into the future with electronic beats. These sounds fill spaces with energy and innovation. The range touches every corner of the musical spectrum.

  • In addition, Jazz : Smooth, classic vibes for a timeless feel.
  • Furthermore, Electronic : Bold, synthesized tunes for a modern edge.
  • Additionally, more Genres : Acoustic, Rock, Pop—the list goes on.

Soundtracks For Every Mood

Also, Soundraw curates soundtracks that resonate with every emotion. However, sad scenes, joyful moments, or tense cliffhangers, there’s a track ready to enhance the experience. This versatility ensures that creators can find music matching their content’s mood precisely.

Mood Music Genre Use Case
Sad Piano Ballads Emotional scenes
Happy Upbeat Pop Celebratory moments
Tense Suspenseful Scores Edge-of-the-seat sequences

Creative Control And Customization

Moreover, for music enthusiasts and content creators, ‘Creative Control and Customization’ stands as the heart of Soundraw. Then, this platform elevates your auditory experience by offering remarkable flexibility. Imagine tweaking to perfection every beat and note in your masterpiece!

Adjusting Individual Elements for Soundraw Review

Soundraw thrusts precision into your hands with its user-friendly interface. This empowers creators to:

  • Alter volumes of distinct sounds.
  • Modify the pitch to match your project’s mood.
  • Control the length of tracks for seamless integration.
  • Select instruments that resonate with your creative vision.

With these personalized tweaks, your audio aligns perfectly with your project’s essence.

Building Your Sound for Soundraw Review

Soundraw acts as your personal music studio, where building your sound becomes a joyride. Creators can:

  1. Choose genres from an expansive library.
  2. Layer melodies to craft depth in your tracks.
  3. Experiment with different tempos and rhythms.

Each project shines with uniqueness as you build a sound that’s exclusively yours. In short, Soundraw ensures your imagination finds its auditory match!

Efficiency For Professionals And Amateurs

Soundraw empowers both seasoned pros and budding creators. Similarly, it streamlines music production, enabling unique creations swiftly and effortlessly. Diverse skill levels benefit equally, ensuring no one feels left behind in the quest for musical excellence.

Saving Time With Ai for Soundraw Review

With Soundraw’s AI technology, time is no longer a barrier to great music production. Also, watch as the AI effortlessly crafts tunes catering to specific moods and genres. What once took hours now unfolds in minutes.

  • Quick Selection: Choose the style, and let the AI do the rest.
  • Instant Customization: Easily tailor tracks without the long hours.
  • Accelerated Workflow: Generate and implement music faster than ever.

Focus On Creativity, Not Complexity for Soundraw Review

Soundraw favors intuitive use, placing creativity at the forefront. Complex software often hinders artistic flow — but not here. In addition, Soundraw invites you to express freely, no advanced tech skills needed.

  • Intuitive Design: Navigate with ease, focus on your art.
  • Musical Freedom: Experiment without fear of technical hitches.
  • Empowered Expression: Let your ideas take flight unimpeded.

Soundraw Review: Elevate Your Music Creation Instantly!


Credit: appsumo.com

Membership Plans And Pricing

Exploring Soundraw’s various membership options reveals tailored solutions for both casual creators and seasoned professionals. For example, users choose from diverse plans, each earmarked for distinct needs and budgets. Let’s dive into the details to make an informed choice.

Free Vs. Premium

Soundraw offers both free and premium plans to cater to different user requirements:

  • Free Plan: Ideal for trying out basic features without any cost.
  • Premium Plans: These are split into various tiers, granting access to a comprehensive library and advanced functions.
Plan Features Price
Free Limited access to music tracks and simple editing tools. $0
Premium Unlimited downloads, full library access, and advanced features. Varies by tier

Each premium level increases the quantity and quality of available features. Prices scale accordingly, offering flexibility for different budgets.

Choosing The Right Plan For You for Soundraw Review

Finding your perfect Soundraw plan involves evaluating your creative scope.

  1. Consider the volume of music you need.
  2. Assess the complexity of your projects.
  3. Determine your budget for music licensing.

An individual with occasional needs may find the free plan sufficient. As a result, in contrast, businesses or frequent content creators might require one of the premium tiers to unlock the full potency of Soundraw .

Community And Support

Soundraw’s Community and Support features offer invaluable resources to users. However, engage with a vibrant creator network and access top-notch customer support for an enhanced experience.

Networking With Other Creators for Soundraw Review

Connecting with peers can inspire your creative projects. Then, soundraw’s community is teeming with talented individuals. Here’s how you can network effectively:

  • Join exclusive Soundraw forums and groups.
  • Participate in community challenges and events.
  • Share tips and tricks with fellow creators.
  • Collaborate on projects for diverse viewpoints.
  • Get feedback on your work from seasoned artists.

Accessible Customer Service

Should you encounter any hiccups, Soundraw’s customer service shines. Here are the highlights:

  • 24/7 support so help is always a click away.
  • Quick response times mean less waiting, more creating.
  • Helpful guides aid you in using Soundraw to its full potential.
  • Direct contact with experts for personalized solutions.
  • Regular updates keep you informed of new features.

Real-world Applications Of Soundraw

Imagine elevating your project with the perfect soundtrack. In short, Soundraw brings this vision to life. Their platform allows users to produce unique music for various applications. Now, let’s dive into how creatives around the world are harnessing the power of Soundraw in their projects.

Music For Video Content

Video creators know the impact of a good soundtrack. Similarly, Soundraw steps in with its innovative tools . Below are ways they’ve transformed the audio landscape:

  • Filmmakers craft custom scores.
  • YouTubers add flair to their content.
  • Advertisers captivate audiences with catchy tunes.

Live-streaming And Podcasts

Live-streamers and podcasters also benefit from Soundraw. Also, here’s how they use it:

  1. Streamers enhance live sessions with dynamic backgrounds.
  2. Podcasters use unique intros and outros to stand out.
  3. Music sets the tone for live Q&As.

Comparing Soundraw To Traditional Music Software

Exploring the world of music production introduces us to a variety of tools. In addition, each tool offers unique features for creating tunes. Soundraw stands out as a game-changer for music creators. Today, we compare Soundraw with traditional music software.

Cost And Resource Efficiency

Cost plays a big role in choosing music software. For example, Traditional software often requires a hefty upfront payment or periodic subscriptions. These costs can add up, especially with required upgrades or additional sound libraries. Tables below compare the typical costs.

Software Type Initial Cost Upgrades Additional Libraries
Traditional $100-$900 $50-$200 Varies
Soundraw Free Plan Available Included Included

Moreover, traditional music tools demand powerful computers and ample storage. As a result, Soundraw minimizes these requirements . As an AI-powered tool, it uses cloud computing, saving local resources and boosting efficiency.

Creative Uniqueness

Originality in music is priceless. However, Traditional software offers templates and samples. But they might limit creativity if overused. Soundraw, however, generates unique compositions using AI algorithms.

  • Freshness: Soundraw provides fresh tracks with every input.
  • Personalization: Users mold creations to their taste with ease.
  • Versatility: Soundraw caters to a broad spectrum of genres.

This approach ensures that every track stands out. Then, Music creators can infuse their identity into each piece. Soundraw turns a simple melody into a piece radiating originality.

Choosing between Soundraw and traditional music tools depends on needs. In short, consider both cost efficiency and creative potential. Soundraw offers a powerful alternative to the norm, empowering creators to break boundaries in music production.


Final Thoughts On Soundraw

After thorough testing and exploration, our ‘Final Thoughts on Soundraw’ section aims
to provide a concise verdict. Similarly, this innovative platform claims to revolutionize your music creation process.

Empowering Musical Expression for Soundraw Review

Soundraw acts as your personal music composer. Also, it empowers users to craft original tracks without needing expert skills. Whether for videos, podcasts, or games,
you unlock endless possibilities. Users select genres, moods, and instruments, and Soundraw generates
unique compositions
. This tool is perfect for content creators who crave
speed and originality.

The Future Of Music Production

Soundraw is not just a tool; it’s a glimpse into the future. In addition, with AI technology, producers and filmmakers can streamline their workflow. They save on costs and time.
The ease of generating music with Soundraw suggests a future where creativity
meets technology. Music production is more accessible and less intimidating.

  • Intuitive Interface: Simple for all skill levels
  • AI-Driven: Smart algorithms create custom tracks
  • Time-Efficient: Quick turnaround for projects

As we delve into the depths of Soundraw, we see more than a tool. For example, we discover a partner for creative minds , shaping the sound of tomorrow’s media.
Its impact on music production heralds a major shift. A shift towards innovation, inclusion,
and inspiration.

Soundraw Review: Elevate Your Music Creation Instantly!


Credit: www.popularaitools.ai

Frequently Asked Questions For Soundraw Review

What Is Soundraw And Its Purpose?

Soundraw is an AI-powered music composition tool designed for creators who need royalty-free music. As a result, it generates unique soundtracks for videos, games, and other multimedia projects. It’s user-friendly and requires no musical expertise to use.

How Does Soundraw Enhance Video Production?

Soundraw provides an extensive library of customizable music tracks. However, users can easily tailor music to their videos, improving the production value and viewer engagement without the need for a composer or licensing fees.

Can You Personalize Tracks With Soundraw?

Yes, Soundraw offers personalization options for its music tracks. Then, users can alter the mood, style, instruments, and length to fit their specific project needs, making each soundtrack feel custom-made.

What Are The Pricing Plans For Soundraw?

Soundraw typically offers a range of pricing plans, including monthly and annual subscriptions. In short, each plan has different features and track download limits to cater to various user needs, from individual creators to large teams.

Conclusion

Embracing creativity with Soundraw is seamless. Similarly, this AI composition tool breathes life into projects, ensuring a standout soundtrack. Ideal for content creators, it simplifies scoring to a click. Indeed, Soundraw’s innovative approach earns a solid recommendation for your audio arsenal.


Revolutionize your sound, discover Soundraw’s potential.

Categories
Archive

Best Vocoder Plugins: Elevate Your Audio Game Now!

The best vocoder plugins combine advanced synthesis with user-friendly interfaces, like XILS-lab XILS Vocoder 5000 and iZotope VocalSynth 2. Producers seeking classic robotic vocals or transformative texture effects will find these tools indispensable.


Vocoder plugins are crucial for music producers and sound designers aiming to create distinctive vocal effects and synthetic choir sounds. They work by processing vocal signals through a synthesizer, enabling the creation of harmonically rich textures and futuristic tones popular in electronic music.


Emulating the iconic sounds of the past while pushing into new sonic territories, these plugins offer artists the power to morph voices into instruments seamlessly. The selection and use of a vocoder plugin can greatly influence the creative direction of a track or performance, making it a key component in a music producer’s toolkit. With easy-to-navigate layouts and a plethora of adjustable parameters, these vocoders allow for precision and exploration within a mix.


The Magic Behind Vocoder Plugins

The allure of the vocoder plugins lies in their ability to morph human voices into electronic symphonies. Notably, vocoders unlock a realm where the distinction between organic and synthetic sounds becomes beautifully blurred.

From Robot Voices To Harmonic Richness

Vocoder plugins are not just about creating the classic ‘robot voice’. They have evolved to craft layers of harmonic richness that can elevate any track. Here’s how vocoders offer more than the iconic robotic sound:

  • Multiple Carrier Signals: From simple sine waves to complex synth textures.
  • Voice Modulation: Artists can transform their voice into new instruments.
  • Dynamic Expression: Vary the intensity for soft whispers or powerful choruses.

How Vocoders Transform Sound

At their core, vocoders are about alchemy. They seamlessly fuse the human voice with electronic signals. Here is the process:

  1. The user’s voice enters the vocoder plugin.
  2. It is split into different frequency bands.
  3. A synth provides a carrier signal.
  4. The vocoder modulates this signal with the voice.
  5. The result is a harmonious blend of vocals and electronics.

Best Vocoder Plugins: Elevate Your Audio Game Now!


Credit: www.izotope.com

History Of The Vocoder

Imagine robotic voices in music taking you to outer space. This magic comes from vocoders. They turn speech into electronic sound. Our journey begins with secret messages in wars. Now, artists use vocoders to make hit songs.

Origins in Cryptography and Military Communication

Origins In Cryptography And Military Communication

The vocoder story started with secrets. It began as a tool for hiding talks. Bell Labs made the first one in 1928. It was for sending private messages. The army used it in World War II. The vocoder kept their talks safe from enemies.

Evolution from Hardware to Software

Evolution From Hardware To Software

After the war, the vocoder left the army. It joined music studios. It started as big machines. Now, it lives inside computers. Small plugins replaced the old hardware. This change made creating music with vocoders easy and fun.

Choosing The Right Vocoder For Your Needs

Finding the perfect vocoder plugin can transform your music productions. Vocoders enable unique sound manipulation, fusing vocals with synthesized textures. Every artist’s requirements differ, so let’s explore how to pinpoint the ideal one.

Types Of Vocoder Plugins

Diverse vocoders offer a range of sounds. Some replicate vintage hardware; others are futuristic. Main types include:

  • Analog emulations for classic warmth
  • Digital implementations for clarity and precision
  • Spectral vocoders for detailed manipulation
  • Polyphonic capabilities for chords

Key Features To Consider

Identify specific features for your creative needs. Here’s what to look for:

Feature Importance Description
Formant Control High Shapes vocal character
Carrier Options Medium Defines the synthetic aspect
Preset Library Low Provides quick starting points
MIDI Control High Enables dynamic performance

Ensure your choice has an intuitive interface and quality filters. User support and regular updates matter too.

Popular Vocoder Plugins On The Market

Exploring the Popular Vocoder Plugins on the Market

Vocoder plugins transform voices into electronic soundscapes. Producers from various music genres use them to craft unique textures. Let’s dive into the industry favorites and find out what makes them stand out. We’ll also spotlight the new competitors shaking things up in the vocoder world.

Breakdown Of Industry Favorites

Several vocoder plugins have conquered the market. They’re known for quality, versatility, and ease of use. Here’s a look at the cream of the crop:

  • XILS-lab Vocoder 5000: Revered for its analog warmth.
  • VocalSynth 2 by iZotope: Combines vocoders with advanced processing.
  • TAL-Vocoder: A free plugin loved for its vintage charm.

These tools have stood the test of time. They offer a range of sounds for beginners and pros alike.

Emerging Players In The Vocoder Scene

New vocoder plugins enter the market, bringing fresh features. They challenge the status quo with innovative designs. Here are the novice entrants:

  1. Waves OVox Vocal ReSynthesis: Blends vocoder with advanced synthesis.
  2. Soundtoys Little AlterBoy: Offers pitch and formant shifting.
  3. Devious Machines Pitch Monster: A powerhouse of pitch processing.

These emerging plugins excite music creators. They push creative boundaries offering new sonic possibilities.

Integration With Music Production Software

Vocoder plugins bridge human vocals with synthesized textures, vital for modern music production. Seamless integration with your chosen DAW (Digital Audio Workstation) is crucial. The right plugin not only fits your workflow but also unleashes your creative potential.

Compatibility Across Daws

  • Universal Format Support: Best vocoders work with popular formats like VST, AU, and AAX.
  • Comprehensive DAW Support: They run smoothly on Ableton Live, FL Studio, Logic Pro, and more.
  • Check Compatibility: Always review the plugin’s compatibility list before downloading.

Setting Up For Optimal Performance

Optimization ensures your plugin runs without glitches. Here’s how to set it up:

  1. Update Your DAW: Work with the latest version of your music production software.
  2. Adjust Buffer Sizes: Lower for recording, higher for mixing to balance latency and performance.
  3. Read Manuals: Manuals often have tips for getting the best out of your plugin.

Creative Techniques With Vocoder Processing

Vocoder processing opens up a universe of sonic possibilities. Musicians and producers wield it to transform voices into instruments, add textures to tracks, and craft unique soundscapes. Explore how creatives bend and shape the vocoder’s capabilities into art.

Classic Vocoder Applications

The vocoder’s roots run deep through music’s history. Its signature sound graces legendary recordings.

  • Robot Vocals: Giving voice an unmistakable, mechanical twist.
  • Harmonizing: Layering voices for richer, fuller sounds.
  • Textural Effects: Background ambience to lead lines, it adds depth.

Innovative Uses In Modern Music

Artists today push the vocoder beyond the traditional. They reimagine its role and utility.

  1. Unconventional Instruments: Guitars, drums, even noise, now speak vocoded phrases.
  2. Beatboxing: Vocoder meets the human drum machine for futuristic rhythms.
  3. Live Performance: Dynamic stage shows use vocoders for instant vocal transformation.

Sound Designing With Vocoders

Vocoders are secret weapons for music producers. They make robots sing and voices dance. Turn plain sounds into wild noises with vocoders. Now, let’s dive into making unique sounds!

Crafting Unique Textures

Create new sounds no one has heard before.

  • Start simple: Use basic synth waves as carriers.
  • Pick unusual modulators: Try using drum loops or ambient noise.
  • Use layering: Combine multiple vocoder effects.

Let your imagination run wild. Test different combinations. Surprise listeners with fresh textures.

Advanced Modulation Tips

Become a modulation master. Twist and shape sounds with these tips.

  1. Envelop Followers: Make your vocoder respond to sound dynamics.
  2. Put LFOs to work: Use Low-Frequency Oscillators for waves of change.
Parameter Technique
Filter Width Adjust for sharper or softer tones.
Release Time Play with it for smooth or choppy effects.

Keep tweaking until it’s perfect. Use these tips to make stand-out tracks!

User Tips And Best Practices

Exploring the realm of vocoders in music production opens up a sea of creative potential. To harness this vast ocean, knowing the best vocoder plugins is just the start. The real secret lies in using these plugins effectively. Follow these user tips and best practices to craft sounds that truly resonate with your audience.

Making The Most Of Your Vocoder Plugin

Unlock the full power of your vocoder plugin with these targeted tactics:

  • Experiment with Modulator Inputs: Your voice isn’t the only modulator. Try synths and drums!
  • Tweak Formant Frequencies: Adjusting these can dramatically alter the vocal character.
  • Blend Wet and Dry Signals: Find the sweet spot between processed and original sounds.
  • Use MIDI Control: Play your vocoder with a keyboard for melodic lines and harmonies.
  • Opt for Clarity: Use clear articulation to ensure your spoken or sung input shines through.

Avoiding Common Pitfalls

Steer clear of these frequent mistakes for cleaner, more impactful vocoder effects:

  • Ignore Default Settings: Don’t settle for presets. Personalize to suit your track.
  • Avoid Muddy Mixes: Cut low frequencies from your modulator to prevent a cluttered mix.
  • Monitor Input Levels: Too loud or too quiet signals can degrade the vocoder’s performance.
  • Skip Over-compression: Keep dynamics alive. Don’t squash them with heavy compression.
  • Be Wary of Phase Issues: Align modulator and carrier signals to ensure cohesiveness.

Artists And Tracks That Made The Vocoder Famous

Think vocoder, and your mind might race to robotic voices and funky jams. This unique sonic tool has shaped the sound of various genres. It’s not just an effect; it’s a piece of music history. Below, let’s explore the giants who’ve etched the vocoder into the annals of music, and how you might do the same.

Iconic Uses In Music History

When we scan through the annals of music, the vocoder stands tall as a muse for innovation.

  • Kraftwerk’s ‘Autobahn’ prophesied a future where machines and humans meld in harmony.
  • Daft Punk took the vocoder to star status with their galactic anthem ‘Harder, Better, Faster, Stronger’.
  • Witness Herbie Hancock’s dazzling keyboards meet vocoder in ‘I Thought It Was You’.
  • Zapp & Roger offered a funktastic voyage with ‘More Bounce to the Ounce’.

Inspiration For Your Next Project

Aspiring to leave a mark with your music? A vocoder might be your ticket. Here’s how you can harness this sonic wizardry:

  1. Start with a simple melody. Let your vocoder inject it with character.
  2. Pair with a drumbeat. A vocoder can turn a humdrum pattern into a catchy rhythm.
  3. Use the vocoder to add layers. Background vocals or a standout bridge can transform with its touch.

Remember, the best vocoder plugins provide versatility and ease of use, allowing your creativity to soar without bounds.


The Future Of Vocoder Technology

The future of vocoder technology is an exciting journey through sound manipulation and synthesis. Steered by innovation and creativity, the vocoder landscape continues to evolve. It transforms how music producers and audio engineers harness the power of the human voice. Let’s dive into the current trends and what we might expect in the near future.

Trends Shaping The Vocoder Landscape

Vocoder plugins have come a long way from their analog predecessors. Here are the key trends:

  • A.I. Integration: Smart algorithms learn and adapt to different vocal styles.
  • Real-Time Flexibility: Instantaneous control during live performances.
  • Enhanced Clarity: Crisp and articulate voice modulation with minimal noise.
  • User-Friendly Interfaces: Streamlined designs make complex processing accessible to all.
  • Collaborative Platforms: Cloud-based sharing elevates collaborative opportunities.

Anticipating The Next Audio Breakthrough

Imagine a world where vocoders extend beyond traditional usage. The budding horizon might include:

Innovation Impact
Immersive 3D Soundscapes Experience sounds with spatial awareness, mimicking real-life.
Personalized Voice Signatures Create unique vocal identities that are as distinctive as fingerprints.
Gesture-Based Modulation Control vocoders through motion sensors, crafting sound with movement.
Integrated Machine Learning Allow vocoders to evolve and improve over time with user interaction.

The possibilities are vast, and the excitement is palpable for audio enthusiasts and professionals alike. The next audio breakthrough could redefine the role of vocoders in music and sound design.

Best Vocoder Plugins: Elevate Your Audio Game Now!


Credit: www.native-instruments.com

Frequently Asked Questions On Best Vocoder Plugins

What Are Vocoder Plugins Used For?

Vocoder plugins morph the human voice with synthesized sounds, creating distinctive robotic or musical effects. They’re commonly used in music production to blend vocal tracks with other sounds, adding a futuristic or electronic vibe to a track.

How Do I Choose The Best Vocoder Plugin?

Selecting the best vocoder plugin depends on your production needs, interface preferences, sound quality, and plugin compatibility with your DAW. Consider trying free demos or reading reviews to gauge the plugin’s performance before purchasing.

Can Vocoder Plugins Replicate Famous Robot Voices?

Yes, some high-quality vocoder plugins can replicate famous robot voices by precisely blending synthesis with your vocal input. Experimenting with settings can yield a voice reminiscent of popular robot personas from music and movies.

Are There Free Vocoder Plugins Available?

Indeed, there are free vocoder plugins that offer basic features for voice processing. While they may lack some advanced functionalities of premium versions, they’re great for experimenting or entry-level production.

Conclusion

Exploring the right vocoder plugin can transform your production experience. We’ve highlighted some of the best options available to enhance your tracks. Aim for the one that fits your creative needs and workflow. With the perfect pick, your music is poised to dazzle and inspire.


Happy mixing!