The Master Bus is the final stage of mixing audio in a digital audio workstation. It consolidates all individual tracks into a single audio track for output.
When mixing audio in a digital audio workstation, the final stage involves consolidating all individual tracks into a single audio track for output. This stage is called The Master Bus, and it is essential in creating a final mix that sounds polished and professional.
The Master Bus typically includes a variety of processing tools, such as equalizers, compressors, and limiters, which help to balance and enhance the sound of the final mix. Proper use of The Master Bus can significantly improve the overall quality of the audio mix, making it sound more cohesive and full-bodied. We’ll explore The Master Bus in more detail and provide tips for using it effectively in your own audio mixing projects.
Understanding The Components Of A Master Bus
If you are into music production, you might have come across the term “Master Bus”. The Master Bus is the final stereo mix that is sent to the mastering engineer for final processing. It is where you can add, adjust, and fine-tune the overall sound of your mix. However, to fully understand how the Master Bus works, you need to know its main components. In this section, we’ll break down the three main components of a Master Bus: Mix Bus, Master Fader, and Stereo Bus.
Mix Bus
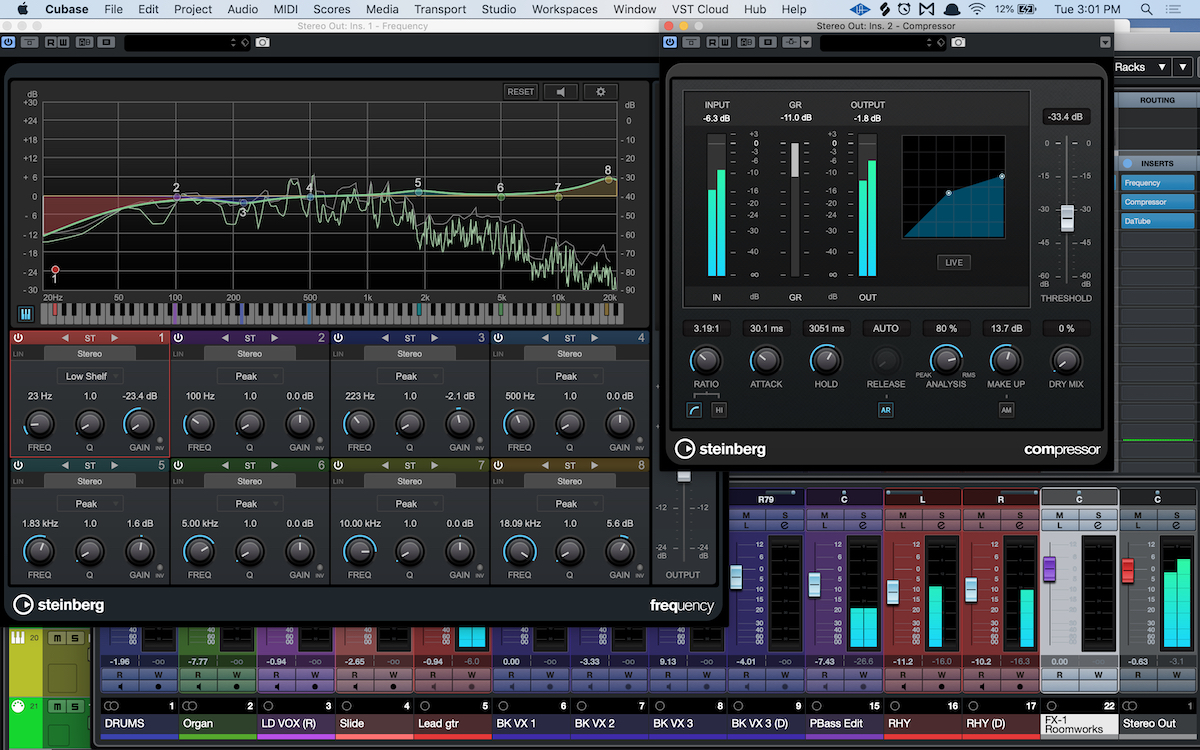
The Mix Bus is where all the tracks in your mix converge. It’s like a central hub where all the individual tracks meet. The Mix Bus typically consists of plugins, which are used to add color, shape, and character to the overall mix. One example of a plugin is a limiter, which helps control the dynamic range of the mix and prevents clipping. Another example is a compressor, which helps balance out the levels of the individual tracks while maintaining their dynamics.
Master Fader
The Master Fader is the control that adjusts the overall level of the mix. It’s like the volume knob for the entire song. Adjusting the Master Fader can make the mix louder or softer. However, it’s important to note that the Master Fader affects the overall level of the mix, not the individual levels of each track. So, if you want to adjust the level of an individual track, you need to do it on that track’s fader, not on the Master Fader.
Stereo Bus
The Stereo Bus is where you can apply stereo processing to the entire mix. Stereo processing involves manipulating the left and right channels of the stereo track independently. One example of stereo processing is stereo widening, which makes the mix sound wider and more spacious. Another example is panning, which involves placing sounds more to the left or right of the stereo field. Stereo processing can help add depth and dimension to your mix.
In conclusion, understanding the components of a Master Bus is crucial for any music producer or audio engineer. By knowing how the Mix Bus, Master Fader, and Stereo Bus work, you can fine-tune your mixes and make them sound more polished and professional.
Master Bus Processing Techniques
Master Bus processing techniques involve using effects and tools on the final bus where all audio tracks converge. This allows for global sound shaping, EQ, compression, and more, giving a cohesive and professional finish to a mix.
Master bus processing is the final stage of the mixing process. It helps to enhance the overall sound and ensure that the mix sounds cohesive. Different mastering techniques, such as mastering bus compression, equalization, limiting, and saturation can be used to achieve this.
Master Bus Compression
Using a compressor on the master bus is a popular technique used by audio engineers. It helps to control the dynamic range of the mix, resulting in a more polished sound. A slow attack and fast release time can be used to glue the mix together. The goal of the master bus compression is to achieve a good balance between the loudest and softest parts of the mix.
Equalization
Equalization can be used on the master bus to shape the overall tonality of the mix. It helps to adjust the frequency balance and bring out certain elements. A subtle boost in the high frequencies can add clarity and bring out the vocals. Cutting the low end can help to prevent muddiness in the final mix.
Limiting
Limiting is a technique used to control the peaks in the mix. It can help to increase the loudness of the track without causing distortion. The output ceiling should be set to around -0.3 dB, leaving enough headroom for playback on various devices.
Saturation
Saturation is an analog-style effect that can be used to add warmth and character to the mix. It can also be used to tame harsh high frequencies and add harmonics to the low end. Saturation should be used sparingly and should not cause any audible distortion or artifacts. Overall, using these mastering bus techniques can help to bring out the best in your mix. With careful use and observation, these techniques can help to achieve a final product that sounds professional, polished, and cohesive.
Tips For Mastering Your Music With A Master Bus
Learn how to master your music like a pro by using the master bus. This powerful tool allows you to make important adjustments to the overall sound of your tracks, giving your music a professional and polished finish. With these tips, you’ll be able to take your music to the next level.
The master bus is a mixing technique used to process the entire mix as a single unit. This technique can help you achieve a cohesive and balanced sound that translates well across different playback systems. However, using the master bus can be tricky if you don’t know what you’re doing. In this article, we will share some tips for mastering your music with a master bus that will help you get the most out of this powerful tool.
Balance Your Mix Before Processing
Before you start processing your mix with the master bus, it’s important to ensure that the individual tracks are balanced and properly leveled. This will prevent you from overloading the master bus and help you get the best possible sound. Make sure that each track has its own space in the frequency spectrum and that no single part is too loud or too soft. You can use a reference track to compare your mix to a professionally mixed song and make sure that your levels are similar.
Use Your Ears To Determine Processing Needs
When processing your mix with the master bus, it’s important to use your ears to determine what needs to be done. Don’t rely on presets or rules of thumb, as every mix is different and requires a unique approach. Listen carefully to the mix and identify any problem areas, such as harshness, muddiness, or lack of clarity. Once you have identified the problem areas, you can use the appropriate tools to address them, such as EQ, compression, or saturation.
Be Subtle With Processing
When processing your mix with the master bus, it’s important to be subtle and avoid over-processing. The goal is to enhance the mix, not to completely transform it. Use gentle settings and make small adjustments until you achieve the desired result. Remember, less is often more, and too much processing can lead to a loss of dynamics and an unnatural sound. Use your ears and trust your instincts to make the right decisions.
Use Reference Tracks
Finally, when processing your mix with the master bus, it’s important to use reference tracks to ensure that your mix translates well on different playback systems. Choose a professionally mixed song that has a similar genre and sound to your mix and compare the two. Pay attention to the overall balance, tonality, and dynamics of the reference track and make adjustments to your mix if needed. This will help you achieve a mix that sounds great on any system. In conclusion, mastering your music with a master bus can be a powerful tool to achieve a professional-sounding mix. However, it’s important to approach it with care and use your ears to make the right decisions. By balancing your mix before processing, using your ears to determine processing needs, being subtle with processing, and using reference tracks, you can achieve a cohesive and balanced sound that brings out the best in your music.
Credit: hub.yamaha.com
Common Mistakes When Using A Master Bus
Using a master bus is a crucial part of creating a great mix, as it is the final stage before exporting your track. However, even experienced producers can make mistakes when using a master bus. Here are some common ones to avoid:
Overprocessing
It’s easy to fall into the trap of thinking that adding more processing to your master bus will make it sound better. However, overprocessing can actually have the opposite effect, leading to a muddy mix, loss of dynamics, and even distortion. Instead, focus on using only the necessary tools and settings to improve your mix, and be sparing with any additional processing.
Not Understanding The Signal Flow
Without a clear understanding of how the signal flows through your master bus, you may inadvertently be working against yourself. Make sure you know the order of your effects and that they are applied in the correct sequence. Misunderstanding the signal flow can lead to an unbalanced mix, which may be challenging to fix later on.
Ignoring Gain Staging
Gain staging is the process of setting the levels of each track in your mix to ensure that they are balanced and not clipping. Neglecting gain staging on your master bus can lead to an overall sound that is too low or too loud, limiting your dynamic range and potentially creating distortion. Be sure to check the levels of all your tracks and use a gain plugin to make any necessary adjustments.
Not Using Reference Tracks
Reference tracks are essential for comparing the sound quality of your mix to professionally mastered tracks. By using a reference, you can get a sense of what your mix should sound like and whether there are any particular issues that need addressing. Not using reference tracks can result in an unbalanced mix that lacks clarity, punch or dynamics.
In conclusion, the mistakes made when using a master bus can impact the overall quality of your mix. By avoiding overprocessing, obsessing gain staging, ignoring the signal flow, and not using reference tracks, you can ensure that your mix is properly balanced, dynamic and highly polished. Keep these tips in mind when working with your master bus, and you’re sure to create great-sounding tracks every time!
Frequently Asked Questions For The Master Bus
What Is The Master Bus?
The master bus, also known as the mix bus or stereo bus, is the final stage in a mixing console where all channels are summed together to create a stereo mix. It’s where effects and processing are applied to the overall sound before sending it to a recording or playback device.
What Effects Should Be On The Master Bus?
Keep it simple. Effects you should consider for the master bus include compression, EQ, reverb, and stereo imaging. These can bring balance, polish, and depth to your mix. Use them wisely, as they significantly impact the overall sound.
What Is The Difference Between Master Bus And Mix Bus?
The master bus refers to the stereo output of the mixing console, while the mix bus is a subgroup output. Master bus applies overall processing and level adjustments, while mixbus processes a subgroup of tracks before sending to the master bus.
What Do You Put On A Master Bus When Mixing?
When mixing, you can put a variety of things on the master bus, including EQ, compression, saturation, reverb, and delay. These effects help to enhance the overall sound of the mix and create a cohesive and polished final product.
Conclusion
To sum up, the Master Bus is an invaluable tool for modern music production. Its ability to unify a mix and add cohesion cannot be overstated. By utilizing this technique, producers and engineers can elevate their mixes and create a more polished and professional sound.
The potential applications of the Master Bus are numerous, making it a key component in any producer’s toolbox. Keep in mind the importance of careful and intentional use, as improper use can lead to negative effects on the final mix.
Overall, the Master Bus technique is a must-have skill for any modern music producer.