To set compressor attack release times, first consider the type of sound source and dynamic range. Adjust the attack time to control the initial rise in volume and the release time to control the decay.
After adjusting both, listen closely to determine if further tweaking is necessary. Compressor attack and release times can be crucial to achieving the desired sound quality for your recordings. Understanding the basic principles of compression is essential before you start adjusting the attack and release times.
It is also important to note that there is no one-size-fits-all approach to setting the attack and release times, as each sound source and dynamic range may require different adjustments. To find the perfect balance, you need to use your ears and make changes accordingly. This article will guide you through the process of setting compressor attack and release times, step-by-step.
Understanding Compressor Attack Release Times
Achieving the perfect sound with a compressor requires understanding attack and release times. By setting these correctly, you can shape the dynamics of your audio and create a more polished production. Experimentation is key, but this guide will help you get started.
When it comes to audio compression, the attack and release times are two of the most important settings to consider. These settings determine how fast a compressor reacts to incoming signals and how long it takes to release the gain reduction. Understanding compressor attack release times can help you achieve the desired level of compression and ensure that your audio sounds balanced and clear. In this post, we will discuss the importance of proper settings and how to set compressor attack and release times effectively.
Attack And Release Times
Attack time refers to how quickly the compressor starts reducing gain when the incoming signal exceeds the threshold. A fast attack time means that the compressor will start reducing gain almost immediately, while a slow attack time will allow the transient to pass through. Release time refers to how quickly the compressor stops reducing gain once the signal goes below the threshold. A fast release time means that the gain reduction will stop almost instantly, while a slow release time will allow the gain to ramp back up gradually.
Importance Of Proper Settings
Properly adjusting the attack and release times can have a significant impact on the sound of your audio. If the attack time is too fast, it can cause unwanted distortion, especially on percussive sounds. Conversely, if the attack time is too slow, it can allow unwanted transients to pass through and make the overall sound less coherent. Similarly, if the release time is too fast, it can cause noticeable pumping and breathing, while a slow release time can cause a loss of level and make the sound less punchy. To ensure you achieve the desired level of compression, it’s essential to properly dial in the attack and release times. The best approach is to start with moderate settings and make incremental adjustments until you achieve the desired result. For instance, increasing the attack time can help you add more punch and definition to a snare drum, while decreasing the release time can help you tighten up the sustain of a bass guitar. In conclusion, understanding compressor attack release times is crucial if you want to create balanced and professional-sounding audio. Taking the time to adjust these settings correctly can help you achieve the desired level of compression while preserving the natural dynamics of the audio. Use this guide as a starting point and experiment with different settings to find what works best for your specific application.
Credit: theproaudiofiles.com
Factors To Consider When Setting Attack Release Times
When it comes to setting compressor attack and release times, there are several factors you should consider in order to achieve the desired effect. These factors include the genre of music, the type of instrument being used, the dynamic range of the performance, and your mixing goals. Here’s what you need to know about each of these factors:
Genre Of Music
The genre of music you’re working with can have a big impact on the attack and release times you choose for your compressor. For example, a fast-paced genre like techno or dance music might require shorter attack times to keep up with the pace of the music. In contrast, a slower genre like folk or jazz might require longer attack times to allow the natural dynamics of the performance to shine through.
Type Of Instrument
The type of instrument you’re compressing can also have an impact on your attack and release times. For example, a compressor used on a bass guitar might require a longer release time to allow the low frequencies to fully decay. On the other hand, a compressor used on a snare drum might require a shorter release time to avoid muddying the sound.
Dynamic Range Of The Performance
The dynamic range of the performance you’re working with should also be taken into consideration when setting attack and release times. If the performance has a wide dynamic range, you might need to use a higher ratio or faster attack times to prevent the louder parts of the performance from peaking. If the performance has a narrow dynamic range, you can afford to use slower attack and release times to allow the natural dynamics to come through.
Mixing Goals
Your overall mixing goals should also play a role in determining the attack and release times you use. If you’re going for a heavily compressed, “in your face” sound, you might want to use shorter attack and release times to achieve that effect. On the other hand, if you’re going for a more natural, “uncompressed” sound, you might want to use longer attack and release times to avoid squashing the dynamics too much.
Remember, there is no one-size-fits-all solution when it comes to setting compressor attack and release times. By taking into account these factors, you can determine the best attack and release times for your specific situation and achieve the desired effect.
Setting Attack Release Times
Setting the attack and release times on your compressor is crucial to achieving balanced and professional-sounding recordings and mixes. Attack time refers to how quickly the compressor reacts to the incoming signal, while release time refers to how quickly the compressor stops attenuating the signal. In this article, we’ll discuss how to set compressor attack release times using three different methods: starting points, adjusting for the performance, and using your ear to fine-tune.
Starting Points
If you’re new to compressor settings, it’s a good idea to start with some typical settings for your attack and release times. These settings will vary depending on the source material and the effect you’re trying to achieve, but here are some general guidelines:
| Source Material | Attack Time | Release Time |
|---|---|---|
| Vocals | 5-30 ms | 50-300 ms |
| Drums | 1-10 ms | 50-300 ms |
| Guitar/Bass | 10-50 ms | 100-500 ms |
These settings are just starting points, and you may need to adjust them to suit the specific performance and mix. However, they can be useful as a reference point when you’re starting out.
Adjusting For The Performance
Once you’ve set your compressor to some starting point settings, it’s time to listen to the performance and make adjustments as needed. Here are some tips for adjusting your attack and release times:
- Attack time: If the attack time is too fast, it can make the performance sound unnatural and reduce the sustain. If it’s too slow, it will allow too much transient energy through, making the performance sound too dynamic. Listen to the performance and adjust the attack time until it sounds natural and balanced.
- Release time: If the release time is too fast, it can cause unwanted pumping and breathing effects. If it’s too slow, it can cause the compressor to stay engaged for too long, reducing the punch and clarity. Listen to the performance and adjust the release time until it sounds smooth and transparent.
Using Your Ear
While starting point settings and performance adjustments can be helpful, ultimately the best way to set your compressor’s attack and release times is by using your ear. Here’s how:
- Set the attack and release times to their fastest settings.
- Slowly increase the attack time until you start to hear the performance lose its natural feel.
- Slowly increase the release time until you start to hear unwanted artifacts, such as pumping or breathing.
- Adjust the attack and release times until you find a balance that suits the performance and sounds natural and transparent.
Double-checking With Meters
While your ears are the most important tool in setting attack and release times, it can be helpful to double-check your settings with a meter. Most compressor plugins or hardware units will have meters that show the amount of gain reduction that’s occurring. Here’s how to use the meter to double-check your settings:
- Set the threshold so that the busiest part of the performance is triggering the compressor.
- Set the ratio to a moderate setting, around 2:1.
- Adjust the attack and release times until you’re getting the desired amount of gain reduction.
- Check the meter to make sure that the gain reduction is occurring in a musical and natural way.

Credit: www.masteringthemix.com
Common Mistakes To Avoid
If you’re new to audio production and learning how to use a compressor, setting attack and release times can be a daunting task. It’s crucial to understand how attack and release times affect the sound and avoid some common mistakes that can ruin your mix. In this post, we will discuss how to set compressor attack and release times and some common mistakes to avoid.
Using One-size-fits-all Attack Release Times
One of the biggest mistakes that beginners make when setting attack and release times is using the same settings on every track. Every instrument and sound has its unique characteristics and requires different compressor settings. Use your ears and listen to how the compressor affects the sound before applying settings. A kick drum needs a slower attack and a faster release, while a vocal track requires a fast attack and a slow release. Remember that the attack and release times should be set to match the natural rhythm of the sound.
Over-compressing
Over-compressing is another common mistake that can ruin your mix. When you apply too much compression, the sound becomes unnatural and loses its dynamics. Setting a high ratio and low threshold can result in an over-compressed sound. Ideally, you should aim for 1-3dB of gain reduction to control the dynamic range of the sound without affecting its natural characteristics. Keep in mind that over-compression can lead to distortion and pumping, so always use compression in moderation.
Overlooking The Effect On The Sound
Another mistake that beginners make when using a compressor is overlooking the effect on the sound. A compressor can change the tonality of the sound, and it’s essential to listen to the result while adjusting the settings. A slow attack can result in a dull and lifeless sound, while a fast attack can create a punchy and aggressive sound. Similarly, a fast release can make the sound choppy and unnatural, while a slow release can create a smooth and natural-sounding track. Always use your ears when setting attack and release times and aim for a balanced and natural sound.
In Conclusion
Setting compressor attack and release times is a skill that requires practice and patience. Always listen to the effect on the sound and avoid common mistakes such as using one-size-fits-all attack release times, over-compressing, and overlooking the effect on the sound. With these tips, you can create balanced and natural-sounding tracks that stand out from the crowd.
Tips And Tricks
Learn the art of setting compressor attack and release times with these essential tips and tricks. Get a perfect and polished sound for your music recordings by mastering the use of these settings.
Tips And Tricks For Setting Compressor Attack Release Times
Are you struggling to set the attack and release times on your compressor? Keeping up with the different settings can be daunting, but don’t worry, we’ve got you covered. In this article, we will discuss tips and tricks to help you set the compressor attack and release times correctly.
Using Sidechain Compression
Sidechain compression is a common technique used to mix two audio sources together. Using a sidechain input on a compressor allows you to trigger the compression on one signal using the amplitude of another signal. This technique is useful for reducing low-frequency rumble or pumping drums while keeping the other instruments audible.
Parallel Compression
Parallel compression is another popular technique that involves blending a heavily compressed signal with an uncompressed signal to create a dynamic mix. To use parallel compression, duplicate the audio and add a compressor to the duplicate track with heavy compression settings. Then mix the compressed and uncompressed signals to achieve the desired effect.
Using Multiple Compressors
Using multiple compressors allows you to achieve a more nuanced and dynamic sound. For instance, you can use one compressor to handle the overall dynamics and another to deal with peaks and transients. When using multiple compressors, ensure each compressor is set appropriately, and the order of the compressors in the signal chain is optimal.
Summary
In conclusion, setting compressor attack and release times correctly is essential for achieving a professional sound. Remember to experiment and try different techniques until you find the one that works for your mix. Whether it’s using sidechain compression, parallel compression, or multiple compressors, the most important thing is to trust your ears and mix with intention.
Credit: majormixing.com
Frequently Asked Questions For How To Set Compressor Attack Release Times
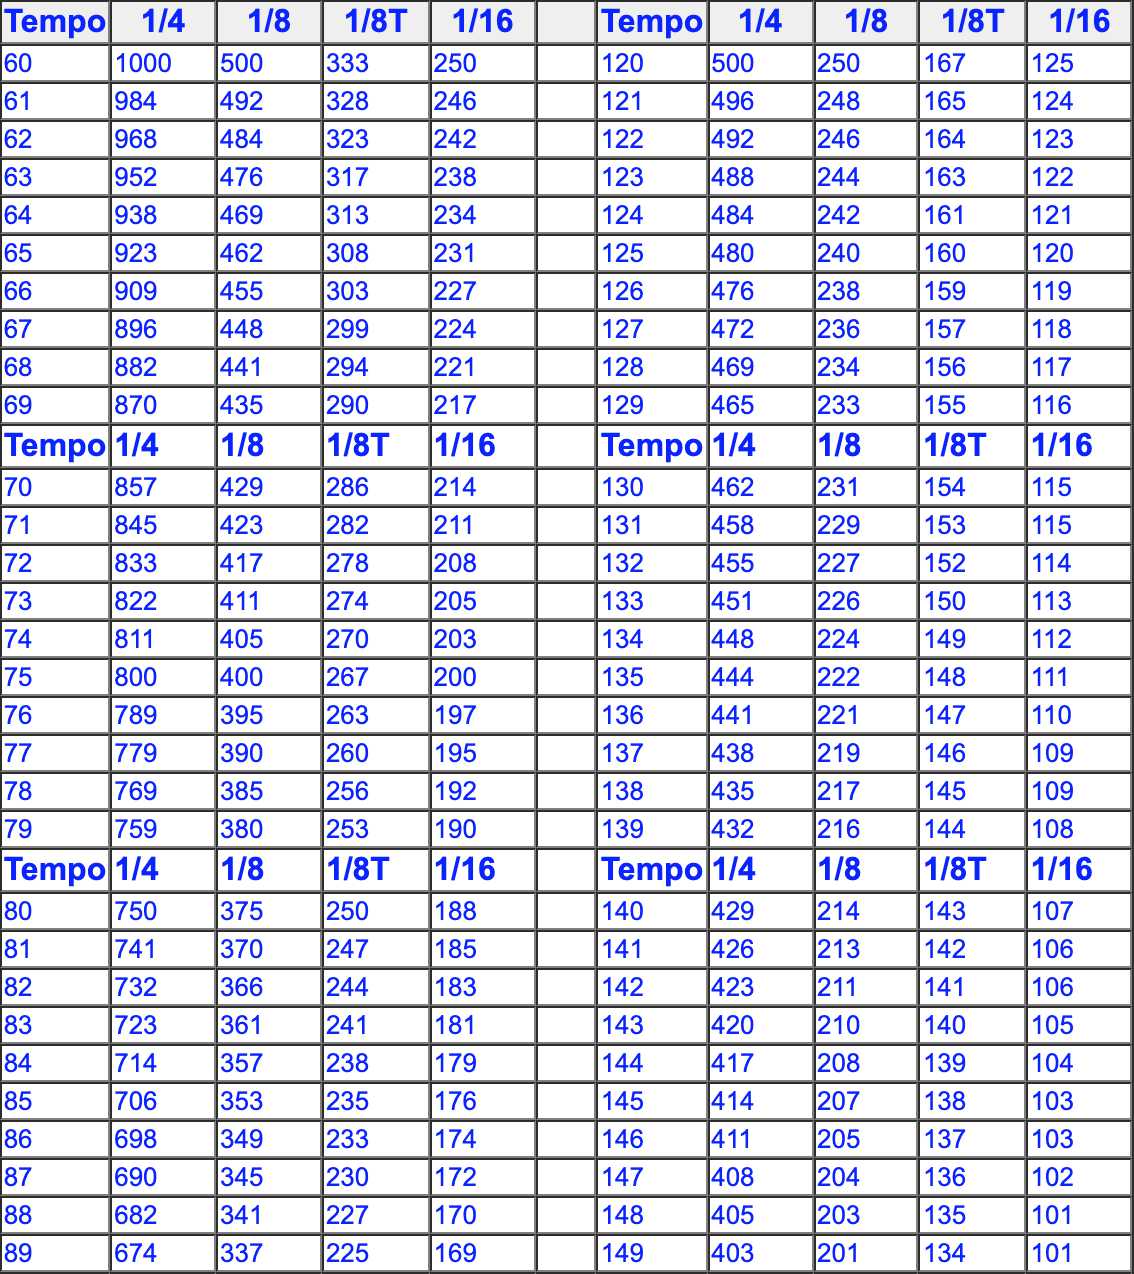
How Do You Calculate Attack And Release Time On A Compressor?
Attack and release time on a compressor are calculated based on the tempo of the music track. It is typically set to match the tempo of the song, with a shorter attack time for faster songs and a longer release time for slower songs.
The time is adjusted until the compressor effectively controls the dynamic range of the audio.
What Is The Best Compressor Release Time?
The best compressor release time depends on the specific audio source, context, and desired effect. Generally, a faster release time allows for greater dynamic range control and a more punchy sound, while a slower release time provides a smoother and more natural sound.
It’s important to experiment and adjust the release time to achieve the desired result.
What Should The Attack And Release Settings Be For Mastering Compressor?
For the attack and release settings in mastering compressor, there is no one-size-fits-all solution. These settings should be adjusted to suit the dynamics of the particular mix. The attack should be fast enough to control the peaks while the release should not be too long or too short.
It’s recommended to experiment with different settings to achieve the desired effect.
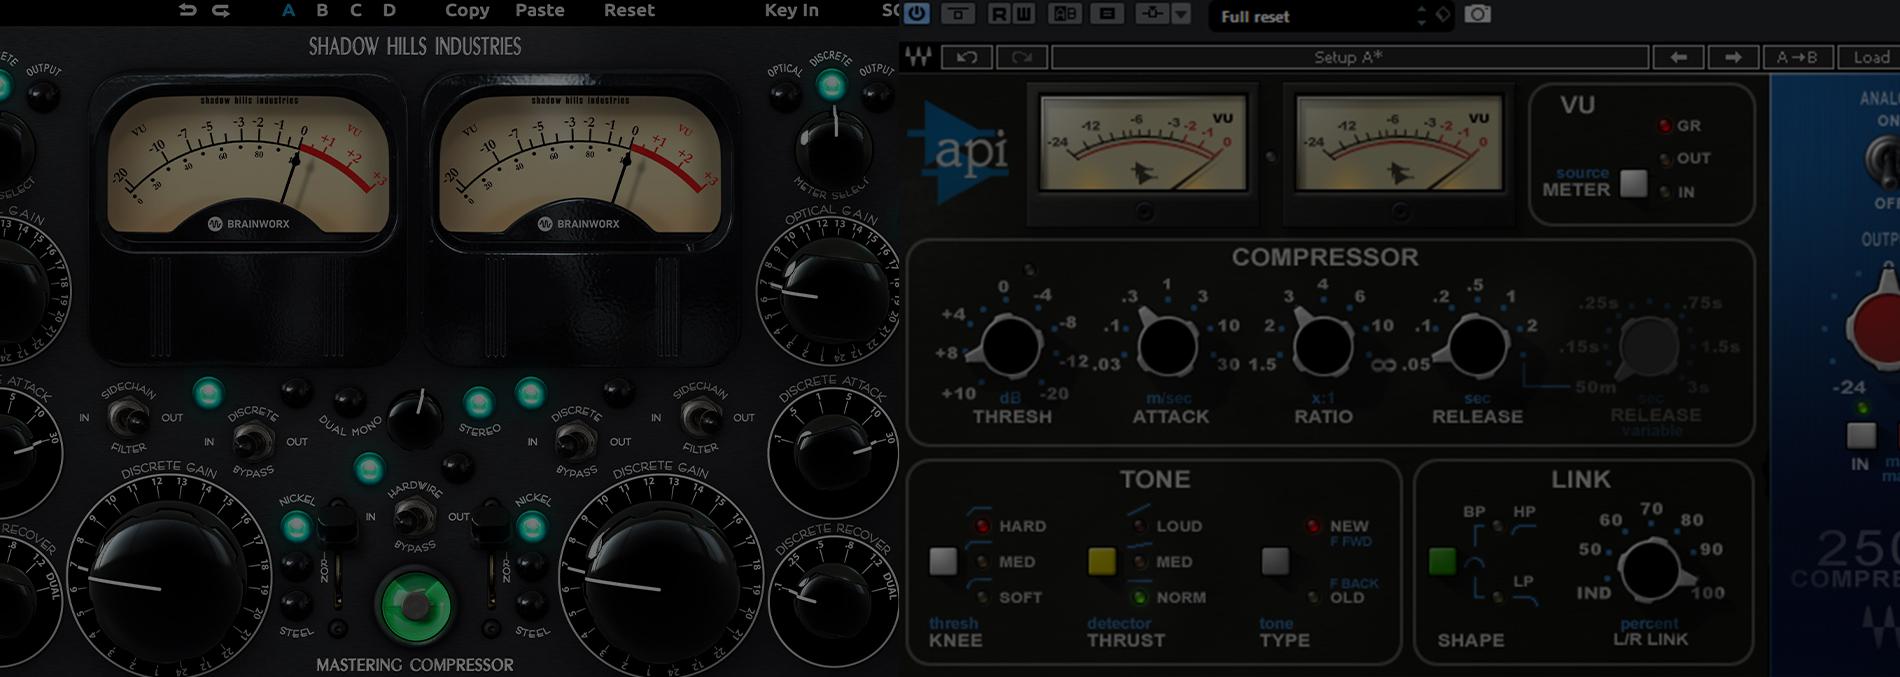
What Is The Attack Setting On A Compressor?
The attack setting on a compressor refers to how quickly the compressor responds to changes in signal level. It is essentially the time taken for compression to kick in once the signal exceeds the threshold. A fast attack time will respond to sudden changes in volume, while a slower attack will allow for more dynamic range before compression sets in.
Conclusion
The attack and release times on your compressor are essential components that can help you achieve balance and clarity in your music production. Keep in mind that setting the right attack and release times should be based on the nature of the audio content and the desired outcome.
Always trust your ears and experiment with different settings until you find the perfect match. With these tips, you’re well on your way to producing great-sounding music. Happy mixing!