To render tracks for mixing, export each track individually as high-quality audio files. Ensure your DAW settings are optimized for export quality.
In the music production process, rendering tracks for mixing is a crucial step that involves exporting each track individually as audio files to prepare them for the mixing stage. By ensuring you have high-quality audio exports and the correct settings in your Digital Audio Workstation (DAW), you set yourself up for a seamless mixing process.
This initial phase of rendering tracks helps maintain the integrity of each individual element of a song, providing a clean canvas for mixing engineers to work their magic. Mastering this step is essential for achieving a professional-sounding mix that showcases the full potential of your music.
The Basics Of Track Rendering
Learn the essentials of track rendering for mixing to achieve professional sound quality. Understand the process and techniques of rendering tracks to optimize your mixing workflow and enhance the overall audio production. Mastering the art of track rendering is crucial for achieving polished and dynamic mix results.
Although it might sound technical, rendering tracks for mixing is an essential part of the music production process. For beginners, knowing the basics of track rendering can improve the overall quality of your music.
Preparing Your Daw
1. Open your DAW software. 2. Ensure all tracks are properly named. 3. Adjust the project settings accordingly. 4. Organize tracks in a logical order.
Setting Track Parameters
1. Select the track you want to render. 2. Adjust the start and end points. 3. Set the file format and bit depth. 4. Choose the desired rendering quality. By following these steps, you can effectively prepare and render your tracks for mixing.
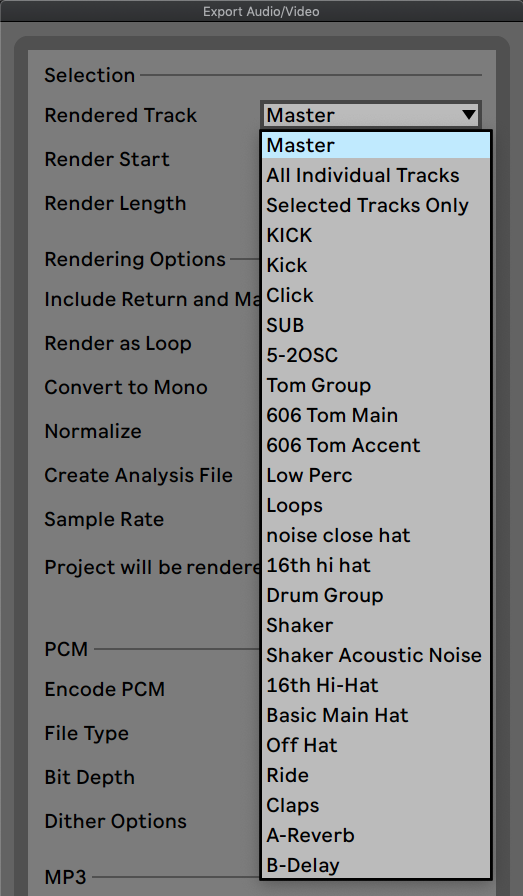
Credit: www.aulart.com
Optimizing Track Rendering
Utilize effects judiciously to enhance audio quality.
Automate parameters for consistency and precision.
Achieving The Best Sound Quality
When it comes to mixing and producing music, achieving the best sound quality is paramount. One crucial aspect of this process is rendering tracks for mixing. This step involves exporting audio files with the highest possible quality, ensuring that the mix engineer has the best material to work with. Understanding the various technical aspects related to rendering tracks is essential in achieving the best sound quality for your music.
Understanding Sample Rate And Bit Depth
Sample rate and bit depth are essential factors that influence the quality of audio recordings. The sample rate determines how often the audio is sampled per second, while the bit depth defines the dynamic range and resolution of the audio. Setting a higher sample rate and bit depth during the rendering process can capture more detail and nuances in the sound, ultimately resulting in higher quality audio.
Exporting In High-quality Formats
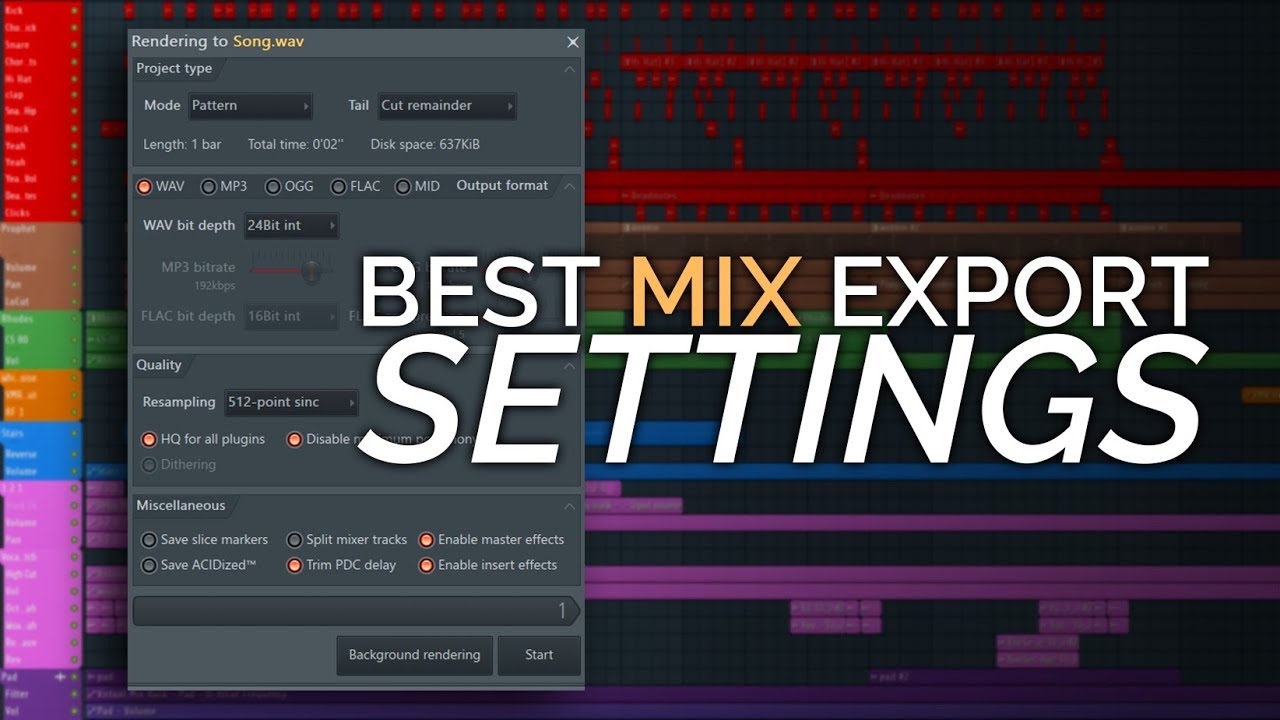
When exporting audio for mixing, it is crucial to choose high-quality file formats such as WAV or AIFF. These formats support uncompressed audio, retaining all the subtle nuances and sonic details in the music. Additionally, using lossless compression formats like FLAC can also ensure the preservation of audio quality during the rendering process.
Rendering Techniques For Different Instruments
When it comes to mixing a track, one crucial step is rendering the individual instruments. Rendering allows you to convert MIDI tracks into audio files, giving you more control over the final sound. Each instrument requires specific techniques to achieve the best results. In this post, we will explore rendering techniques for vocals and acoustic instruments, as well as electric and bass guitars.
Vocals And Acoustic Instruments
Rendering vocals and acoustic instruments involves capturing the essence and nuances of the performance to create a polished final mix. Here are some techniques to consider:
- Clean Up and Edit: Before rendering, ensure that vocals and acoustic instruments are properly edited. Remove any unwanted breaths, clicks, or noise that might distract from the performance.
- Signal Processing: Apply appropriate signal processing to enhance the sound. Consider adding EQ to shape the tone, compression to control dynamics, and reverb or delay for spatial effects.
- Panning and Placement: Place vocals at the center of the stereo field to ensure clarity and focus. For acoustic instruments, experiment with panning to create a sense of width and depth.
- Blend with the Mix: Pay attention to how vocals and acoustic instruments blend with other elements in the mix. Adjust levels and EQ to achieve a balanced and cohesive sound.
Electric And Bass Guitars
Rendering electric and bass guitars requires different techniques to bring out their unique characteristics and fit them seamlessly into the mix. Here are some techniques to consider:
- Amp Simulation: Use high-quality amp simulation plugins to achieve the desired guitar tone. Experiment with different amp models, cabinet simulations, and effects to find the perfect sound.
- Multitracking: Consider recording multiple guitar tracks with different settings and performances. This can add depth and thickness to the guitar sound during the rendering process.
- EQ and Compression: Apply EQ to shape the guitar tone and cut through the mix. Compression can help control dynamics and add sustain.
- Bass Guitar Focus: When rendering bass guitar, pay attention to its low-end presence and ensure it’s not overpowering other elements in the mix. Enhance the low frequencies while maintaining clarity.
By employing these rendering techniques for vocals, acoustic instruments, electric and bass guitars, you can take your mix to the next level. Remember to experiment, trust your ears, and make adjustments to achieve the desired sound for each instrument. Happy mixing!
Troubleshooting And Fine-tuning
When it comes to rendering tracks for mixing, troubleshooting and fine-tuning are crucial steps to ensure optimal results. In this section, we will cover two important aspects: dealing with latency issues and refining rendered tracks.
Dealing With Latency Issues
Latency can be a common problem when rendering tracks for mixing. It refers to the delay between playing a MIDI or audio signal and hearing it through your speakers or headphones. Latency can disrupt your workflow and make it challenging to mix tracks effectively. Here are a few tips to help you address latency issues:
- Adjust buffer size: Increasing the buffer size can reduce latency but may increase CPU usage. Experiment with different buffer sizes until you find the right balance.
- Optimize your computer: Close unnecessary programs and processes running in the background to free up CPU resources and minimize latency.
- Use direct monitoring: If your audio interface supports it, enable direct monitoring to bypass any latency introduced by software monitoring.
- Update drivers: Make sure your audio interface drivers are up to date. Outdated drivers can cause compatibility issues and increase latency.
Refining Rendered Tracks
Once you have successfully dealt with latency issues, it’s time to refine and fine-tune your rendered tracks. Here are some key steps to ensure the best possible mix:
- Check for phase issues: Use a phase correlation meter to identify any phase cancellation or alignment problems between tracks. Adjust the phase or alignment to achieve a more cohesive mix.
- Trim unnecessary audio: Clean up your rendered tracks by removing any unwanted silence, clicks, or pops. This will help create a cleaner and more professional mix.
- Identify frequency conflicts: Use an EQ plugin to identify frequency clashes between tracks. Make necessary cuts or boosts to improve clarity and separation in the mix.
- Apply subtle compression: Use compression to even out the dynamics of each track and enhance the overall balance. Avoid excessive compression that can lead to an unnatural sound.
By following these troubleshooting and fine-tuning techniques, you’ll be able to overcome latency issues and refine your rendered tracks for a polished and cohesive mix.
Credit: m.youtube.com
Credit: www.nextlevelsound.com
Frequently Asked Questions For How To Render Tracks For Mixing
How Do You Render Tracks For Mixing Effectively?
Rendering tracks for mixing is essential to ensure a smooth workflow and optimal sound quality. To do this effectively, start by selecting the tracks you want to render, consolidating any MIDI or virtual instruments into audio files. Then, export the tracks individually or as stems, ensuring they are in a lossless format.
Finally, organize the rendered files in a clear folder structure for easy access during the mixing process.
What Is The Purpose Of Rendering Tracks?
Rendering tracks serves multiple purposes in the mixing process. It helps to conserve CPU resources by converting MIDI and virtual instrument tracks into audio files. This allows for smoother playback and more efficient processing. Rendering also allows for exporting individual tracks or stems, which can be further edited or mixed in different DAWs or sessions.
Can I Make Changes To Rendered Tracks After Exporting?
Once tracks are rendered and exported, they become fixed audio files and cannot be modified directly. However, you can make changes by reverting to the original project file, adjusting the settings, and re-rendering the tracks. It’s important to keep backups of the project files to have the flexibility to make changes in the future if needed.
What Are The Recommended Settings For Rendering Tracks?
When rendering tracks for mixing, it’s important to use appropriate settings to achieve the desired sound quality. Generally, it is recommended to export in a lossless format like WAV or AIFF to preserve audio fidelity. Use a bit depth of at least 24 bits for better dynamic range, and a sample rate matching the original project’s settings (typically 44.
1kHz or 48kHz). Finally, rendering individual tracks with no effects or processing will provide maximum flexibility during mixing.
Conclusion
Understanding how to render tracks for mixing is crucial for achieving high-quality sound production. By applying the proper techniques and using the right tools, you can ensure that your tracks are well-prepared for the mixing process. This will ultimately result in a more polished and professional-sounding final product for your music or audio projects.