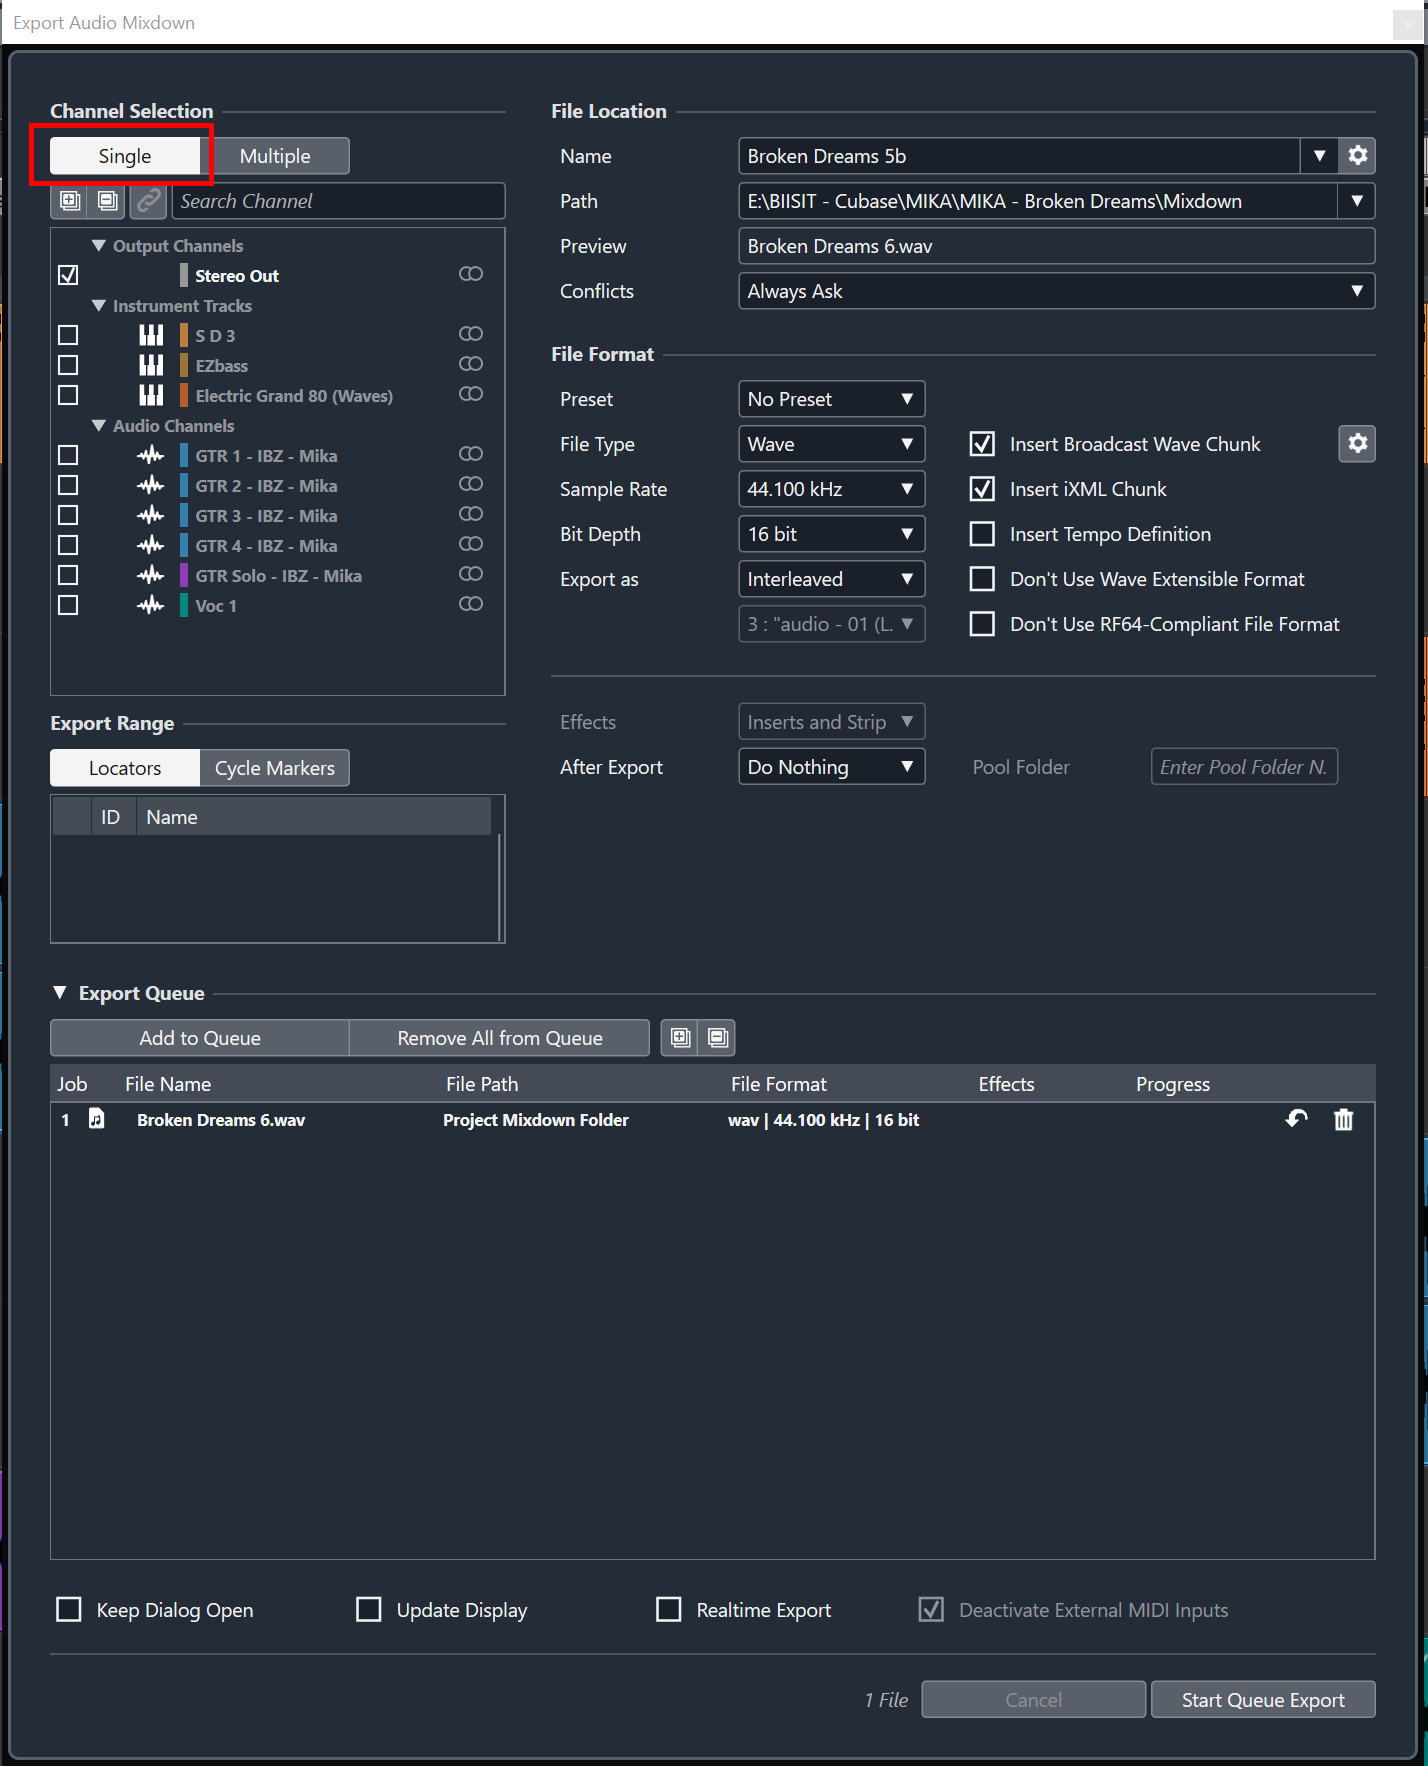
To export multiple tracks in Cubase, select the tracks you want to export and go to File > Export > Audio Mixdown. In the Export Audio Mixdown window, select “Multiple” in the “Channel Selection” section and choose your desired export settings.
Cubase is a popular digital audio workstation that is used by musicians and producers to create music and audio content. Often, creators will have multiple tracks that they want to export at once, either to share with collaborators or to use for different purposes.
We will explore how to export multiple tracks in Cubase, step by step. Whether you are new to the software or a seasoned user, this guide will help you streamline your workflow and get your music out into the world more efficiently.
Set Up Export Settings
To export multiple tracks in Cubase, first, open the Export Audio Mixdown window. Then, select the tracks and channels you want to export and set up the export settings, including file type, bit depth, sample rate, and destination folder. Finally, hit the Export button to save your audio files.
Select Multiple Tracks
To export multiple tracks in Cubase, the first step is to choose which tracks you want to export. You can choose tracks by selecting them in the Mixer or the Project window. To select multiple tracks, hold down the Ctrl key (Windows) or the Command key (Mac) and click on each track you want to export. You can also click and drag to select adjacent tracks.
Choose Export Audio Mixdown
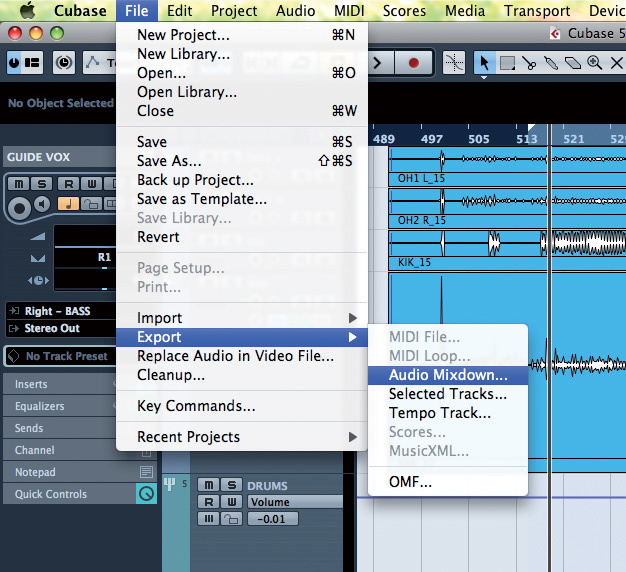
Once you have selected the tracks you want to export, the next step is to choose the Export Audio Mixdown option. This option can be found in the File menu or by using the keyboard shortcut Ctrl+Shift+E (Windows) or Command+Shift+E (Mac).
Configure Export Settings
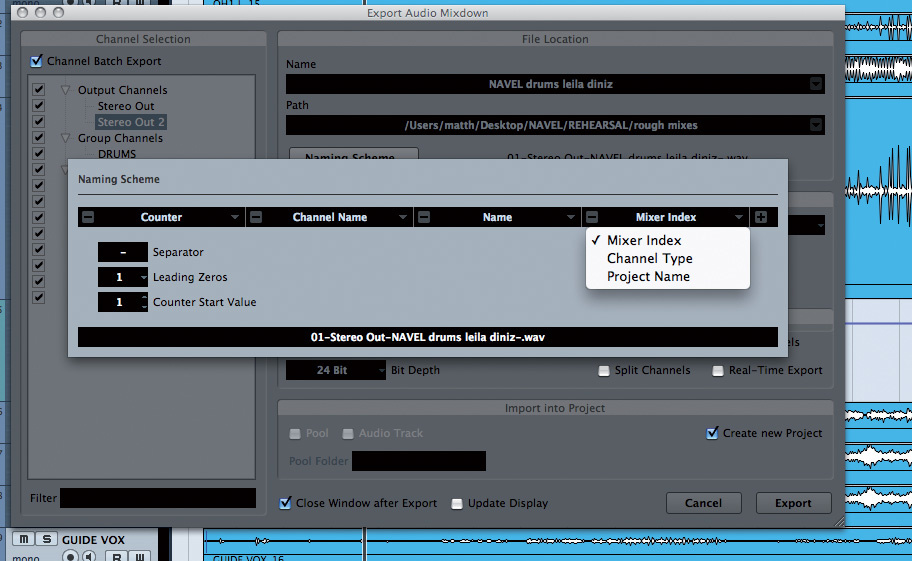
The final step is to configure the Export Settings. This includes choosing the file format, the bit depth, the sample rate, and the location where the exported files will be saved. You can access the Export Settings dialog box by clicking on the Settings button or by pressing the F11 key. When configuring the Export Settings, it’s important to ensure that the settings match your project settings to avoid any unwanted alterations to the audio. You can also choose to export your tracks as a single file or as multiple files by selecting the ‘Split Channels’ option in the Export Settings dialog box. Once you have configured the Export Settings, you can click on the Export button to start the export process and create your audio files. Exporting multiple tracks in Cubase may seem complicated, but by following these simple steps and keeping the Export Settings in mind, you’ll be able to easily export your project audio files.
Credit: forums.steinberg.net
Exploring Export Options
When it comes to exporting multiple tracks in Cubase, the possibilities are endless. Exploring export options enables us to have more control over how we want our music to be exported. In this blog post, we will explore different export options and their functionalities.
Export Individual Tracks
Exporting individual tracks allows us to keep each track as a separate file. This option comes in handy when working on larger projects with multiple tracks or if you need to mix and master tracks separately. We can export individual tracks by following these simple steps:
- Select the tracks you want to export.
- Go to File and select Export Audio Mixdown.
- Select the individual track option.
- Choose the format and destination folder.
- Click Export.
Export Groups
Exporting groups allows us to export specific groups of tracks as a single file. This option is useful when exporting audio for different sections of the song, like the intro, verse, and chorus. We can export groups by following these simple steps:
- Select the group you want to export.
- Go to File and select Export Audio Mixdown.
- Select the group option.
- Choose the format and destination folder.
- Click Export.
Export Stems
Exporting stems is the process of exporting a group of tracks but with all the signal processing and effects intact. When exporting stems, it’s crucial to have all the effects in the mix, so the exported files can be used in other projects without any issues. We can export stems by following these simple steps:
- Select the tracks you want to include in the stem mix.
- Go to File and select Export Audio Mixdown.
- Select the stem option.
- Choose the format and destination folder.
- Click Export.
Export Cycle Markers
Exporting cycle markers allows us to export different sections of the song quickly. We can set cycle markers at different sections of the song and export them as separate files. This option comes in handy when exporting audio for different sections of the song, like the verse and chorus. We can export cycle markers by following these simple steps:
- Set the cycle markers to the sections you want to include in the export.
- Go to File and select Export Audio Mixdown.
- Select the cycle marker option.
- Choose the format and destination folder.
- Click Export.
Exporting Using Batch Export
If you are working on a project with several tracks in Cubase, exporting them one by one can be quite tedious. However, with the ‘Exporting Using Batch Export’ feature, you can export multiple tracks at once, saving you time and effort. In this article, we will focus on the steps to follow when exporting using Batch Export in Cubase. We will also explore the different H3 headings that will guide you through the process.
Setting Up Batch Export
Before you begin exporting multiple tracks, it’s important to set up Batch Export in Cubase. Here’s how to do it:
- Go to the ‘File’ tab and select ‘Export’.
- Click on ‘Batch Export’ on the options window that appears.
- In the Batch Export window, select the audio engine you wish to use.
- Choose the format you want for your exported files.
Select Tracks To Export
After setting up Batch Export, you can then select the specific tracks you want to export. Here’s how to do this:
- Go to the ‘Project’ window and select the tracks you want to export.
- Hold the ‘Shift’ button and click on each track you wish to export.
- You can also hold the ‘Ctrl’ button and click on the individual tracks you want to export.
Customize Export Settings
Once you’ve selected the tracks to export, you can customize the export settings to suit your preferences. Here are the steps to follow:
- On the Batch Export window, click on ‘Customize’.
- Choose the export preset you want to use from the dropdown menu.
- Make any necessary adjustments to the export settings.
- Click ‘Add Preset’ to save the custom settings for future use.
Batch Export All Tracks
Once you’ve selected your tracks and customized the export settings, you can now use Batch Export to export all tracks at once. Here’s how to do it:
- On the Batch Export window, select ‘All Tracks’.
- Click on ‘Export’.
- Choose the folder you want to save the exported tracks in.
- Click ‘Export’ to begin the process.
Credit: www.soundonsound.com
Exporting Using Generic Remote
To export multiple tracks in Cubase, using the Generic Remote is an effective method. This allows for the customization of parameters and the ability to export individual channels or groups of tracks.
If you’re a Cubase user, you know how important it is to have a versatile and efficient exporting capability. Thankfully, with the introduction of Cubase 10, there’s a new option for exporting multiple tracks quickly and easily – “Export using Generic Remote.” This feature is an excellent choice for users who have multiple tracks that they want to export all at once, without having to select each one manually.
Configure Generic Remote
Before we start exporting multiple tracks using Generic Remote feature, it is essential to configure it properly. Here are the steps to configure Generic Remote:
- Open the studio setup in Cubase
- Click on the “Add Device” option
- Select “Generic Remote” from the list
- Configure the ports and settings according to your needs
Once you’re done with the configuration, let’s move to export.
Export Using Generic Remote
Exporting multiple tracks using Generic Remote is easy. Here’s what you need to do:
- Select the tracks you want to export
- Go to “File” and then select “Export”
- From the Export window, choose “Audio Mixdown”
- Next, select “Generic Remote” from the “Audio Mixdown Export Options” window
- Finally, press “Export” to save your exported tracks to your desired location
One of the biggest advantages of using the Generic Remote feature is that you can export multiple tracks with just a few clicks. It saves you time and effort, and you can even export them with different settings in one go. In conclusion, the Generic Remote feature in Cubase is an excellent option for users who want to export multiple tracks quickly and easily. By following the steps outlined above, you can configure Generic Remote and start exporting multiple tracks in just a few clicks.
Credit: www.soundonsound.com
Frequently Asked Questions Of How To Export Multiple Tracks In Cubase
How Do I Export Different Tracks In Cubase?
To export different tracks in Cubase, click on “File” and select “Export” from the dropdown menu. In the export window, select the desired format and then select the tracks you want to export by checking the corresponding boxes. Finally, click “Export” to save the tracks to your desired location.
How Do I Export Stems In Cubase 12?
To export stems in Cubase 12, go to “File” and select “Export” and then “Audio Mixdown. ” Choose the settings you prefer and then select the tracks or channels you want to export as stems. Finally, click “Export” and choose the location to save your stems.
How Do I Send Multiple Tracks To A Group In Cubase?
To send multiple tracks to a group in Cubase, simply select the desired tracks, right-click and choose “Add to Group. ” Then, select the group you want to add them to. Alternatively, you can create a new group track, select the tracks you want to add, and drag and drop them onto the new group track.
How Do I Export Selected Events In Cubase?
To export selected events in Cubase, click on the events you want to export and select “Export> Selected Tracks” from the File menu. You can then choose your preferred export settings and save the files to your desired location.
Conclusion
Exporting multiple tracks in Cubase can be a tricky task for beginners, but with the right guidance, it can become a seamless process. Follow the steps mentioned and you’ll be able to export your multiple tracks in no time.
Keep in mind the importance of choosing the right file format, bit-depth, and sample rate to ensure the highest quality. Practice these techniques and enjoy the pride of sharing your music with the world!