To export individual tracks in Pro Tools, open the session, select the tracks, and then choose the export option. Pro Tools allows users to easily export individual tracks by following these steps.
Whether you’re sharing your tracks with collaborators or creating stems for mixing and mastering, exporting them is essential for a seamless workflow. By exporting individual tracks, you can ensure that each element of your project is properly isolated and ready for further processing.
This simple process streamlines your workflow and allows for greater flexibility in your production process. In this guide, we will walk you through the steps to export individual tracks in Pro Tools efficiently and swiftly.
Credit: promixacademy.com
Choosing The Right Workflow
Choosing the Right Workflow is essential when exporting individual tracks in Pro Tools. This involves Understanding Export Options and Setting Up Session for Export effectively.
Understanding Export Options
- Select the individual track you want to export
- Access the ‘File’ menu and choose the ‘Export’ option
- Explore various export formats like WAV, MP3, or AIFF
- Ensure to set the correct bit depth and sample rate
Setting Up Session For Export
- Organize your tracks and mute any that you don’t want to include
- Set the playback range for the specific track you’re exporting
- Check the levels and apply any necessary plugins for optimization
Preparing Individual Tracks
Preparing individual tracks in Pro Tools is crucial for a smooth and efficient export process. Follow these simple steps to ensure your tracks are properly named and adjusted before exporting.
Naming Tracks
1. Click on the track name in the Edit window. 2. Input the desired name for the track.
Adjusting Track Settings
1. Access the track settings by right-clicking on the track header. 2. Make adjustments to volume, panning, and effects as needed.
Exporting Individual Tracks
Exporting individual tracks in Pro Tools allows you to easily share, collaborate, and transfer your audio projects. This process is essential for producing professional-quality music and audio recordings. In this blog post, we will explore the three simple steps to export individual tracks in Pro Tools, empowering you to efficiently manage and share your audio creations.
Selecting Tracks For Export
Before exporting individual tracks in Pro Tools, you must first select the specific tracks that you wish to export. To do this, navigate to the tracks list and click on the track names to highlight them. You can select multiple tracks by holding down the Ctrl (Command for Mac) key while clicking on each track. Ensure that you have accurately chosen the tracks that you want to export, as this selection will determine the content of your exported files.
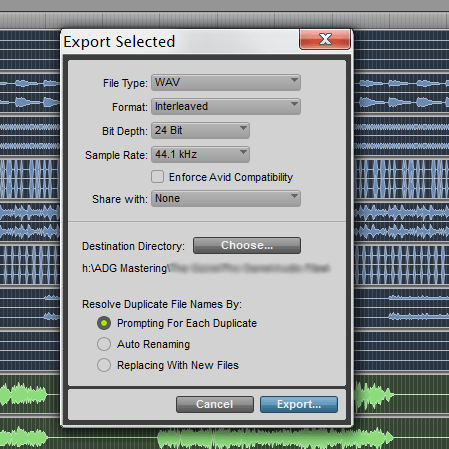
Applying Export Settings
Once you have selected the desired tracks, it is time to apply the export settings. Navigate to the “File” menu and select the “Export” option. A submenu will appear, offering various export formats such as WAV, AIFF, MP3, and more. Choose the format that best suits your requirements. You can adjust additional settings such as sample rate, bit depth, and file name conventions. Double-check that you have configured the export settings according to your preferences, ensuring that the exported tracks will meet your specific needs.
Verifying Exported Tracks
Verify exported tracks in Pro Tools in 3 simple steps. After exporting individual tracks, ensure accuracy by listening to each one meticulously. Check for any anomalies in the audio, such as clipping or distortion, to guarantee a flawless export process.
Once you have successfully exported your individual tracks in Pro Tools, it is essential to verify that the exported files are in the correct format and that they sound as intended. This step is crucial in ensuring that your exported tracks can be easily integrated into other projects or shared with collaborators.
Checking File Format
One of the first things you need to do when verifying exported tracks is to confirm that the file format is suitable for your intended use. Pro Tools offers various export options, including WAV, AIFF, MP3, and others. Different formats have different characteristics and compatibility, so it’s important to choose the format that best suits your needs.
Here is a table comparing some commonly used file formats:
| File Format | Characteristics | Compatibility |
|---|---|---|
| WAV (Waveform Audio File Format) | Lossless audio quality | Compatible with most audio software and platforms |
| AIFF (Audio Interchange File Format) | Lossless audio quality | Compatible with most audio software and platforms |
| MP3 (MPEG Audio Layer-3) | Compressed audio format | Widely supported, suitable for online streaming and sharing |
By ensuring your exported tracks are in the correct format, you can optimize their compatibility and maintain the intended audio quality.
Listening To Exported Tracks
Another vital step in verifying exported tracks is to listen to them carefully to ensure they sound as expected. This involves playing each exported track and comparing it to the original recordings or mix within Pro Tools. Here are some guidelines to follow:
- Use high-quality headphones or monitors to accurately hear the nuances in the tracks.
- Listen for any unwanted artifacts, distortion, or anomalies that might have been introduced during the export process.
- Compare the exported tracks with the original recordings or mix to check for any discrepancies or alterations in sound.
- If you are collaborating with others, share the exported tracks for feedback and incorporate any necessary revisions.
By actively listening to the exported tracks and ensuring their fidelity and quality, you can address any issues before finalizing your project or delivering the tracks to clients.
Advanced Tips And Considerations
Exporting individual tracks in Pro Tools allows you to have more control over your audio files and is a great way to collaborate with others or work on multiple projects simultaneously. While the basic steps of exporting tracks in Pro Tools are relatively straightforward, there are some advanced tips and considerations that can greatly enhance your workflow and save you time and effort. In this section, we will explore two essential aspects of exporting tracks: batch exporting tracks and dealing with bus and group tracks.
Batch Exporting Tracks
Batch exporting tracks is a valuable technique that enables you to export multiple tracks simultaneously, saving you significant time and effort. Rather than exporting each track individually, you can select multiple tracks and export them all at once. Here’s how you can do it:
- Select the tracks you want to export by holding down the Ctrl (Windows) or Command (Mac) key and clicking on the desired tracks.
- Go to the File menu and select “Export” to open the Export Audio dialog box.
- In the Export Audio dialog box, choose your desired export settings including file format, sample rate, bit depth, and file location.
- Click “OK” to start the batch export process. Pro Tools will export each selected track individually and save them to the specified location.
Dealing With Bus And Group Tracks
When exporting individual tracks that are routed through bus or group tracks, it’s important to ensure that the exported audio files capture the full audio signal. Here’s what you need to keep in mind:
- If you have tracks routed through bus or group tracks, make sure to enable the option to include these tracks in the export process. This ensures that the exported audio files contain the audio from the bus or group tracks as well.
- Double-check your routing and ensure that the bus or group tracks are set up correctly. This ensures that the audio signals are properly routed to the desired bus or group tracks.
- Consider using individual auxiliary tracks for your bus or group processing. This allows you to easily export the processed audio separately without affecting the original tracks.
- When exporting tracks with bus or group processing, it’s crucial to listen to the exported files to ensure that the audio signals are properly captured and that no artifacts or unwanted effects are present.
By following these advanced tips and considerations, you can ensure that you export individual tracks in Pro Tools efficiently and accurately. Whether you need to export multiple tracks at once or deal with bus and group tracks, mastering these techniques will enhance your Pro Tools workflow and help you achieve professional-grade audio exports.

Credit: blog.hootsuite.com
Credit: www.adgmastering.com
Frequently Asked Questions Of How To Export Individual Tracks In Pro Tools In 3 Steps
How Do I Export Individual Tracks In Pro Tools?
Exporting individual tracks in Pro Tools is easy. Simply select the track you want to export, go to the File menu, choose Export, and select the desired format. Make sure to check the “Selected Tracks Only” option to export only the selected track.
Can I Export Multiple Tracks At Once In Pro Tools?
Yes, you can export multiple tracks at once in Pro Tools. Simply select the tracks you want to export, go to the File menu, choose Export, and select the desired format. Check the “Selected Tracks Only” option and Pro Tools will export all the selected tracks as separate files.
What File Formats Can I Export Individual Tracks In Pro Tools?
Pro Tools allows you to export individual tracks in various file formats, including WAV, AIFF, MP3, and more. Choose the format that suits your needs and select it in the export settings. Pro Tools will export the individual track in the selected format.
Can I Export Effects Applied To Individual Tracks In Pro Tools?
Yes, you can export effects applied to individual tracks in Pro Tools. When exporting a track, make sure to check the “Include Inserts and Sends” option in the export settings. This will export the track with all the effects applied to it.
Conclusion
Ready to master the art of exporting individual tracks in Pro Tools? With just three simple steps, you can effortlessly streamline your workflow and create professional-grade mixes. By following these steps, you’ll gain more control over your music production and achieve a polished, studio-quality sound.
Start maximizing your Pro Tools proficiency today!