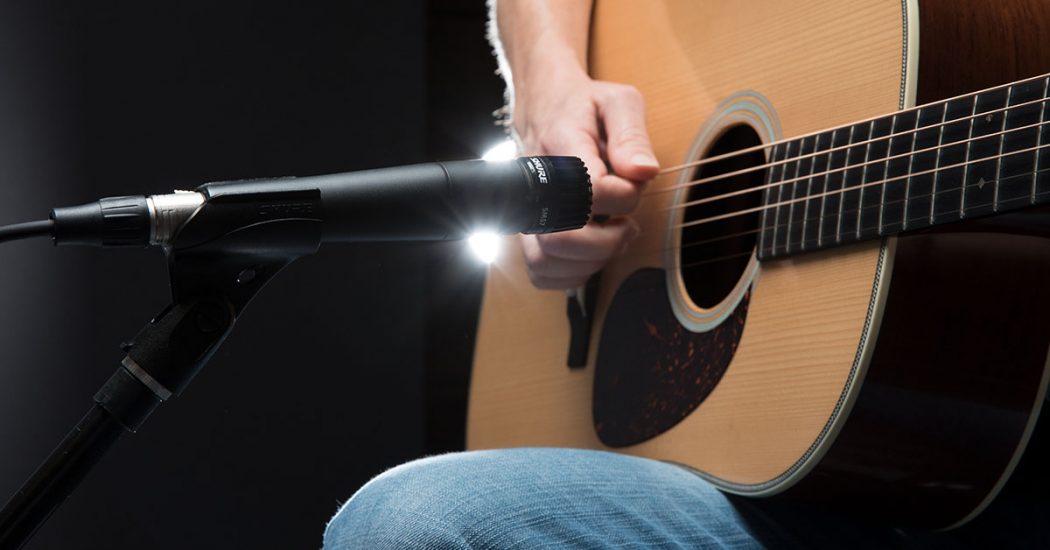
To record acoustic guitar with just one mic, position the mic around the 12th fret for balanced tone. Adjust distance and experiment for best sound.
Recording acoustic guitar with just one microphone can be a simple yet effective way to capture the rich, authentic sound of the instrument. By strategically placing the microphone near the 12th fret, you can achieve a balanced tone that highlights both the low and high frequencies of the guitar.
Experimenting with the distance between the mic and the guitar can help you find the sweet spot for optimal sound quality. Whether you are a beginner or a seasoned musician, mastering the art of recording acoustic guitar with one mic can elevate your music production to new heights.
Credit: www.sweetwater.com
Selecting The Right Microphone
Selecting the Right Microphone is crucial for capturing the natural sound of your acoustic guitar. To ensure a high-quality recording, pay attention to the ‘Consider the Mic Polar Pattern’ and ‘Understanding Frequency Response’.
Consider The Mic Polar Pattern
The microphone’s polar pattern determines how it picks up sound. For recording acoustic guitar, choose a cardioid pattern for focused sound capture.
Understanding Frequency Response
The frequency response of a microphone indicates how it captures different frequencies. Look for a mic with a flat frequency response for accurate acoustic guitar recordings.
Positioning The Microphone
When recording acoustic guitar with just one mic, positioning the microphone plays a crucial role in capturing the best sound. It’s important to experiment with different placements until you find the ideal spot that strikes a perfect balance between clarity and warmth.
Finding The Acoustic Sweet Spot
To find the acoustic sweet spot, place the microphone around 12-18 inches away from the guitar, pointing towards the 12th fret. This spot typically offers a balanced tone and captures the instrument’s natural resonance.
Dealing With Phase Issues
When the microphone is too close to the guitar, phase issues can arise, resulting in muddiness or thinness in the sound. To avoid this, ensure the mic is equidistant from the soundhole and the neck to maintain optimal phase alignment.
Optimizing Room Acoustics
When it comes to recording acoustic guitar with just one mic, optimizing room acoustics is crucial to achieving a natural, well-balanced sound. Controlling unwanted reflections and utilizing natural ambiance are two key strategies to consider when setting up your recording space for capturing the best possible acoustic guitar sound.
Controlling Unwanted Reflections
To control unwanted reflections in your recording space, you can make use of acoustic treatment materials such as sound-absorbing panels and bass traps. These can help minimize the amount of sound bouncing off the walls and ceiling, reducing the potential for unwanted reverb and ensuring a cleaner recording. Additionally, positioning the microphone in a way that minimizes direct reflections from nearby surfaces can further help in controlling unwanted reverberations.
Utilizing Natural Ambiance
When recording acoustic guitar with just one mic, the natural ambiance of the room can play a significant role in capturing the unique character of the instrument’s sound. Consider the size and characteristics of the recording space, as larger rooms tend to provide a more spacious and open sound, while smaller rooms may offer a more intimate and focused tone. Experimenting with microphone placement and room positioning can help you capture the best qualities of the room’s natural ambiance, adding depth and dimension to your recording.
Credit: woodandsteel.taylorguitars.com
Techniques For Recording
When it comes to recording acoustic guitar with just one microphone, it’s crucial to utilize the right techniques in order to capture the best sound. In this section, we will explore various techniques that will help you achieve a professional-quality recording. From experimenting with mic placement to utilizing compression and EQ effectively, these techniques will ensure that your acoustic guitar recordings shine.
Experimenting With Mic Placement
Proper mic placement is key to capturing the true essence of your acoustic guitar. By experimenting with different mic positions, you can achieve a variety of tones and textures. Here are a few techniques to try:
- 12th Fret: Placing the microphone near the 12th fret focuses on the mid-range frequencies, resulting in a balanced and full sound.
- Soundhole: Positioning the microphone near the soundhole emphasizes the low-end frequencies, producing a warm and resonant tone.
- Fingerboard: Placing the microphone closer to the fingerboard captures more of the higher frequencies, resulting in a brighter and articulate sound.
Remember to experiment and find the position that best suits the style and sound you want to achieve. Don’t be afraid to make adjustments during the recording process to ensure optimal placement.
Utilizing Compression And Eq
Compression and EQ are powerful tools for enhancing the tone and dynamics of your acoustic guitar recordings. Here’s how you can use them effectively:
- Compression: Apply a moderate amount of compression to even out the volume levels and control any peaks. This will result in a more polished and professional sound.
- EQ: Use EQ to shape the tonal balance of your acoustic guitar. Boost the presence or brilliance to add clarity, reduce muddiness by cutting unnecessary low frequencies, and make subtle adjustments to highlight specific frequencies that complement the overall mix.
Remember to use compression and EQ subtly, as over-processing can lead to an unnatural or artificial sound. Always trust your ears and make adjustments based on the specific characteristics of the recording.
Post-processing Tips
Recording acoustic guitar with just one microphone is a great way to capture a natural and intimate sound. However, it’s in the post-processing stage that you can take your recording to the next level. Applying reverb and delay as well as mixing for a natural sound are essential techniques that can enhance the overall quality of your acoustic guitar recording.
Applying Reverb And Delay
Reverb and delay are two popular effects that can add depth and ambience to your acoustic guitar recording. By carefully dialing in the right amount of each effect, you can create a sense of space that complements the natural sound of the guitar.
To apply reverb, start by selecting a suitable reverb plugin or effect unit. Experiment with different types of reverbs, such as hall, room, or plate, to find the one that adds the desired ambience to your guitar recording. Adjust the decay time and wet/dry mix to control the length and intensity of the reverb effect. Remember, the goal is to enhance the recording, not to overpower it.
Delay can be used to create echoes and add a sense of dimension to your acoustic guitar recording. Start by setting the delay time to match the tempo of the song or the desired effect. Adjust the feedback and mix controls to control the number of echoes and their intensity. Be mindful of the balance between the original guitar sound and the delayed echoes, ensuring they blend harmoniously.
Mixing For A Natural Sound
When mixing your acoustic guitar recording, the key is to achieve a natural and balanced sound. Here are a few tips to help you in the process:
- Start by cleaning up any unwanted noise or background sounds using a noise gate or a gentle EQ.
- Use subtle compression to even out the dynamic range of the guitar recording and add sustain if needed. Avoid excessive compression that can squash the natural dynamics.
- Pan the guitar slightly off-center to create a sense of stereo width without sacrificing the mono compatibility of the recording.
- Add a touch of EQ to enhance the desired frequencies of the acoustic guitar. Boosting the low end can add warmth, while taming any harsh frequencies can result in a smoother and more pleasing sound.
- Consider using a gentle stereo enhancement plugin or technique to add a subtle sense of stereo width to the guitar recording.
Remember, the goal is to enhance the natural characteristics of your acoustic guitar recording, so always trust your ears and make adjustments accordingly. By applying reverb and delay effectively and employing careful mixing techniques, you can transform a simple one-mic recording into a professional and captivating acoustic guitar track.

Credit: www.micandmod.com
Frequently Asked Questions For How To Record Acoustic Guitar With Just One Mic
How Can I Record Acoustic Guitar With Just One Mic?
To record acoustic guitar with just one mic, position the microphone about 6-8 inches away from the guitar’s sound hole. Experiment with mic placement to find the sweet spot and adjust the angle for the desired tone. Use a cardioid condenser mic for clearer sound and minimize background noise.
What Type Of Microphone Is Best For Recording Acoustic Guitar?
A small diaphragm condenser microphone is ideal for recording acoustic guitar. It captures the natural sound with great detail and clarity. A cardioid pickup pattern helps to isolate the guitar’s sound while minimizing room ambience. Experiment with different mics and positions to find the best sound for your specific setup.
Can I Use A Dynamic Microphone For Recording Acoustic Guitar?
Yes, you can use a dynamic microphone for recording acoustic guitar, but keep in mind that it may not capture the same level of detail as a condenser microphone. Dynamic mics are more rugged and can handle high sound pressure levels, making them suitable for recording louder guitar playing styles.
Experiment with different mic types to find your preferred sound.
Conclusion
Recording acoustic guitar with just one mic can produce professional-quality results. By following the tips and techniques outlined in this blog post, you can achieve a clear, natural sound that captures the richness and depth of your instrument. Experimentation and practice will lead to finding the perfect setup for your unique sound.