Cubase not recording audio? Check your audio interface settings and cables.
If you’re experiencing the frustration of trying to record audio in Cubase and finding that it’s not working, there could be a few reasons for this. One of the most common is an issue with the configuration of your audio interface settings or possibly a problem with connectivity between your interface and computer.
While it might be tempting to jump on forums and search for detailed solutions, the key to fixing the issue is often a simple one. We’ll take a closer look at some of the things you can do if you find yourself unable to record audio in Cubase.

Credit: forums.steinberg.net
Check Audio Interface
Check your audio interface if Cubase won’t record audio. This could be caused by a faulty connection or incorrect settings.
Ensure Audio Interface Is Connected
If Cubase isn’t recording audio, the best thing to do is to check if your audio interface is properly connected. Ensure that all cables are plugged in their respective ports and make sure the interface is powered on. If your audio interface has multiple input/output channels, double-check if the correct channels are configured in Cubase’s preferences. If everything looks alright, but you’re still not getting any audio, try replacing the interface’s USB/FireWire cable as it might be faulty.
Update Audio Interface Drivers
An outdated audio interface driver can cause compatibility issues with your computer and cause Cubase to malfunction. Therefore, it’s important to check if there are any new updates for your audio interface’s driver and install them immediately. You can find the latest driver version from the manufacturer’s website or from Cubase’s website. Once you’ve downloaded the driver, install it on your computer following the provided instructions. Furthermore, you can try troubleshooting the audio driver from the Windows Device Manager or the Mac’s Audio MIDI Setup. If any issues are found, you can attempt to resolve them from there. If the problem persists even after updating the driver, consider contacting the manufacturer’s customer support for further assistance. In summary, if Cubase won’t record audio, you should start by checking if your audio interface is connected and configure the correct input/output channels. If everything seems fine, proceed to update your audio interface’s driver to ensure compatibility and eliminate the chance of malfunction. Keeping your audio drivers updated is a crucial task as they will ensure the smooth running of your audio interface and Cubase.
Check System Settings
Introductory paragraph
If you are experiencing audio recording problems in Cubase, checking the system settings is the first step to troubleshooting the issue. In this section, we will explore the important system settings to check when Cubase won’t record audio and provide some solutions to the problem.
H3 Heading 1
Check Input And Output Settings
Ensure that your input and output settings are correctly configured. To do this, go to the “Devices” menu and click “Device Setup.” Then, make sure that the proper input and output devices are selected. If you are using an external audio interface, ensure that it is properly connected to your computer and is selected as your audio device in the device setup menu.
H3 Heading 2
Check Sample Rate And Bit Depth
Another important system setting to check is the sample rate and bit depth of your audio interface. Cubase requires that your audio interface matches the sample rate and bit depth of your project. To check your computer’s sample rate and bit depth settings, go to the “VST Audio System” menu under the “Devices” tab. If the settings do not match, adjust your interface settings to match your project settings.
Check Cubase Settings
To troubleshoot Cubase’s failure to record audio, checking the settings is crucial. Ensure that the selected audio input device and input channels match the one connected to the computer. Also, check the audio driver and sample rate settings under the device setup menu.
If you are facing issues with recording audio in Cubase, the problem may lie with the settings. To fix the issue, you need to check the Cubase settings and ensure that they are configured correctly. Here are a few things to check.
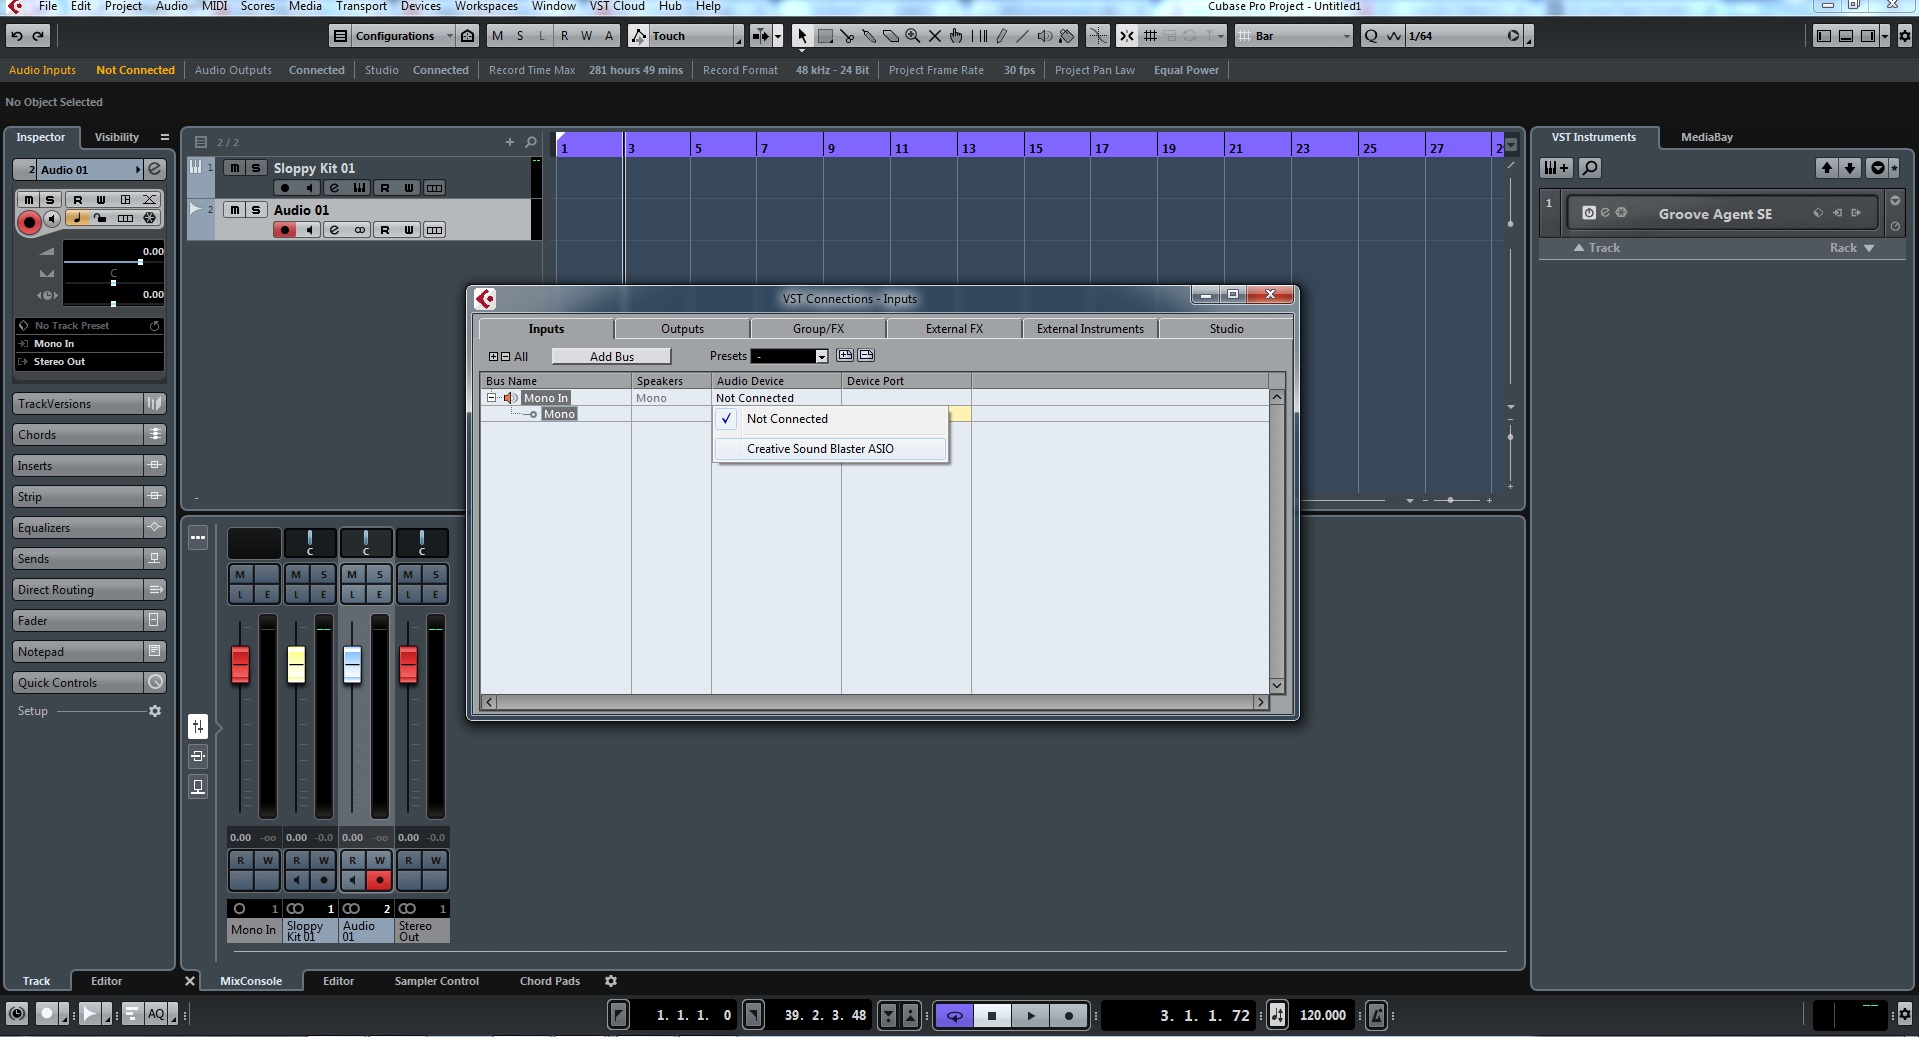
Check Audio Connections In Vst Connections
The VST Connections window is where Cubase manages all inputs and outputs. If your audio interface is not connected properly, you won’t be able to record any audio in Cubase. To fix this, open the VST Connections window and check if your audio inputs and outputs are configured correctly.
Check Input And Output Buses In Audio Connections
In the VST Connections window, you will also find Input and Output Buses. Each input and output bus must be correctly assigned to an audio interface, and audio channels must be activated for recording. If you are trying to record audio from an external device, such as a microphone or guitar, make sure that it is selected as the input source.
Check Sample Rate And Bit Depth
The sample rate and bit depth also play a critical role in recording audio in Cubase. Make sure that both are correctly set in Cubase and your audio interface. Using the wrong settings can result in distorted audio or no audio at all.
Restart Your Computer And Audio Interface
If all else fails, restarting your computer and audio interface may help. This simple fix can resolve any conflicts that may be causing Cubase not to record audio. By checking the Cubase settings, you can resolve most issues with recording audio in Cubase. Follow these steps, and you’ll be recording audio in no time.
Credit: forums.steinberg.net
Check Track Settings
If you are a fan of using Cubase for recording audio and you are experiencing an issue where Cubase won’t record audio, there could be various reasons why. However, one of the most common reasons for this issue is due to the incorrect settings on your track. Therefore, to resolve this problem, you should start by checking the track settings to ensure they are correctly configured.
Check Track Input Routing
The first thing you need to consider when checking your track settings is the input routing. You need to make sure that you have selected the appropriate input routing for your device. Cubase allows you to select from different input options like mono, stereo, and group channels. Therefore, if you have selected the wrong input option, your audio won’t get recorded. To check the input routing of your track, follow the steps below:
- Click on the track where you want to check the input routing.
- Open the mixer view by clicking on the mixer icon on the left-hand side of the screen.
- From the mixer view, locate the input routing selector, and ensure you have selected the right option for your device.
Check Track Monitoring
The second track setting you need to check is the monitoring settings. Monitoring allows you to hear the live input from your device. If you have not enabled the monitoring settings, you won’t be able to hear any sound when you are trying to record. To check the monitoring settings of your track, follow these steps:
- Click on the track where you want to check the monitoring settings.
- Locate the monitoring section and check if the monitor button is activated.
- If it’s not activated, click on it to enable monitoring.
By doing the above checks, you should be able to sort out any configuration issues with your track settings and start recording audio in Cubase.
Check Recording Settings
To troubleshoot Cubase not recording audio, make sure to check your recording settings. It’s possible that the input source or audio interface is not configured properly, which can prevent audio recording.
If Cubase won’t record audio, it’s essential to check the recording settings. The issue may arise if the settings are not configured correctly. You can begin by checking the record enable and arming the track for recording.
Check Record Enable
The first thing to do when you encounter recording problems is to check if the record enable button is activated for the track. The record enable button is akin to the record arm button on other DAWs, but this button is specific to Cubase. The record enable button must be active for the audio track you intend to record. To verify this, you can access the track via the Cubase mixer, then navigate to the track that is not recording. Next, locate the record enable button, which is usually found on the left-hand side of the mixer channel. If the button is not activated, click on it to enable it.
Check Arm Track For Recording
Another reason why Cubase may not be recording audio is if the track is not armed for recording. Arming a track for recording is a necessary step to ensure that audio can be recorded on that track. To arm a track for recording, click the “Arm for Record” button, which is typically located near the Track Visibility Settings. You can also arm a track by pressing the record enable button on your device controller. You can ensure that the track is recording by looking at the level meters next to the track. If you see a signal when making sound into the microphone, then the track is recording, and you’re good to go. In summary, when encountering issues with Cubase not recording audio, check if the recording settings are correctly configured. Ensure that the record enable button is activated, and the track is armed for recording. Following these steps will likely fix the problem.
Check Signal Flow
To troubleshoot Cubase not recording audio, it’s important to check signal flow. Make sure your microphone and audio interface are properly connected, and check that your input and output routing is correct in Cubase’s mixer. Double-check your settings and restart your computer if necessary.
If you are trying to record audio with Cubase and you are facing issues with no audio being recorded or recorded audio is silent or cuts out then the first step in troubleshooting should be to check the signal flow. Signal flow refers to the path of audio from your audio source all the way to Cubase for recording. It is essential to ensure that the audio signals are traveling in the right direction and connections are established properly.
Check Instrument Or Mic Cables
Check the cables that connect your musical instrument or microphone with the audio interface if the audio interface recognizes your instrument or microphone, but the sound is not being captured or is too low. Ensure that all cables are plugged in properly and no cables are obstructed or damaged. Ensure that the appropriate input is being used for your instrument or microphone type.
Check Audio Signal Chain
The audio signal chain from your instrument or microphone to Cubase is crucial, and a break in the chain may result in errors. Check your audio interface if it is correctly set up and responds appropriately. Ensure that all input and output levels are optimal, and that the correct input is being used on the audio interface. Check the routing of signals from the audio interface to Cubase. Ensure that the signal is routed to the correct channel and that the correct channel is selected for recording in Cubase. In summary, when dealing with Cubase issues, the most crucial first step is to check the audio signal flow. Check your cables, audio interface, and routing in Cubase, and you should be able to isolate any signal flow glitches and rectify the issue.
Check Cubase Version Compatibility
To ensure proper recording of audio on Cubase, always check compatibility with your software version. This step can help you avoid any technical issues that may arise from running an unsuitable version of the program.
Are you encountering issues with Cubase not recording audio? One possible cause could be an incompatibility with your system’s audio interface or Cubase version. Before delving into more complex solutions, it’s wise to first cross off compatibility issues.
Check If Audio Interface Is Compatible
The audio interface is the hardware that permits audio input and output from your computer. For Cubase to record audio, it needs to have access to the audio interface. If your audio interface isn’t compatible with your version of Cubase, this can be the root of the problem. Before checking if your Cubase version supports the audio interface, make sure you have the latest version of the audio interface drivers installed and properly configured.
Check If Cubase Version Is Supported
Another compatibility issue that can impact Cubase’s ability to record audio is whether your version of Cubase is supported. This can occur if you’re using an older version of Cubase with a more modern audio interface or vice versa. Confirm whether your version of Cubase is suitable for recording audio or if it requires additional updates or upgrades. Additionally, ensure your hardware and operating system meet the required specifications for your version of Cubase. In conclusion, Cubase not recording audio can be caused by a variety of reasons, starting with compatibility issues. Be sure to check if your audio interface is compatible and if your Cubase version is supported by reviewing the system specifications and updating drivers and software.
Check For Software Conflicts
To troubleshoot Cubase not recording audio, check for software conflicts in the system. Make sure there are no other audio software programs running at the same time. This can cause conflicts and prevent Cubase from recording audio.
When Cubase won’t record audio, it can be a frustrating experience. However, one of the reasons this error occurs is due to software conflicts. Check for software conflicts by following these simple steps.
Close Other Audio Applications
The first step is to ensure that any other audio applications are closed. If multiple audio applications are open simultaneously, they can cause conflicts and prevent Cubase from recording audio correctly. Close any audio applications that might be running in the background before you try to record audio in Cubase.
Check For Audio Plug-in Conflicts
The next step is to check for audio plug-in conflicts. Audio plug-ins can cause issues if they are not compatible with Cubase or if they conflict with other plug-ins in use. To resolve such conflicts, you need to check the plug-ins and see which one is causing the problem. One way to do this is to disable all third-party plug-ins in the “Plug-In Information” window. Once disabled, test to see if Cubase records audio correctly. If the problem persists, then try disabling any other VST instruments, effects, or MIDI devices that you’re not using. This can help isolate the issue and determine which plug-in is causing problems. In summary, when Cubase won’t record audio, it’s essential to check for software conflicts to get to the root of the problem. By closing other audio applications and checking for audio plug-in conflicts, you can ensure that Cubase works correctly and records your audio without any issues.
Credit: forums.steinberg.net
Frequently Asked Questions Of Cubase Won’t Record Audio
Why Can’t I Record In Cubase?
You may not be able to record in Cubase due to incorrect audio device settings, unavailable inputs or outputs, or incompatible driver updates. Check your audio settings and ensure that your device is properly connected and selected in Cubase’s device setup.
Additionally, update your audio drivers and try resetting your preferences if necessary.
Why Is Cubase Not Making Sound?
Cubase may not be making sound due to various reasons such as incorrect audio device settings, faulty cables or speakers, or audio driver issues. Check the device settings, connections, and update the audio drivers to resolve the issue.
Why Can’t I Hear Sound When I Record?
If you can’t hear sound when recording, check if your audio is properly plugged in, and your device isn’t muted. Ensure that the microphone is not obstructed and has sufficient battery life. Moreover, allow microphone access to your device and ensure that your recording software settings are correct.
How Do I Enable Recording In Cubase?
To enable recording in Cubase, follow these steps: 1. Open a new project in Cubase. 2. Go to “Devices” and select “Audio Device Settings”. 3. Ensure that your audio interface is selected. 4. Go to “Devices” again and select “VST Connections”.
5. Configure your input and output buses, then select a stereo or mono bus for recording.
Conclusion
Troubleshooting Cubase’s audio recording problems can be a daunting task, but it is not impossible to fix. With the proper knowledge and expertise, one can identify and solve the root cause of the issue. Whether it is a hardware or software issue, do not hesitate to seek technical support or consult online resources for more information.
By doing so, you can get back to making music without any interruptions.