To zoom in or out in Pro Tools, use the keyboard shortcut “Command + [plus/minus sign].” This allows you to easily adjust the timeline view and magnify or shrink audio waveforms.
Zooming in or out is a useful feature in any digital audio workstation, especially for precise editing and audio analysis. Pro Tools is a staple in the audio industry, providing professionals with powerful tools to edit, mix and produce music and sounds.
Whether you’re working on post-production for film, music production, or sound design, Pro Tools has a wide range of features to meet your needs. One such feature is the ability to zoom in or out, which can be done using a simple keyboard shortcut. The zoom function allows you to get a closer look at audio waveforms, making it easier to edit and manipulate them with precision. We will take a closer look at how to zoom in or out in Pro Tools and explore some of the benefits this feature can bring to your workflow.
Credit: prorec.com
How To Zoom In And Out
Pro Tools is a powerful digital audio workstation that is widely used in the music and audio production industry. If you work with Pro Tools, you know the importance of zooming in and out of your project. Zooming in and out can help you focus on a specific part of your project or get a bird’s-eye view of your entire session. In this blog post, we will cover two ways to zoom in and out in Pro Tools: keyboard shortcuts and the zoom tool.
Using Keyboard Shortcuts
Using keyboard shortcuts is a quick and easy way to zoom in and out in Pro Tools. Here are the keyboard shortcuts:
| Action | Shortcut |
|---|---|
| Zoom in horizontally | Option + Right Arrow |
| Zoom out horizontally | Option + Left Arrow |
| Zoom in vertically | Option + Up Arrow |
| Zoom out vertically | Option + Down Arrow |
Using The Zoom Tool
The zoom tool is another way to zoom in and out in Pro Tools. Here are the steps:
- Select the zoom tool from the toolbar or press ‘Z’.
- To zoom in, click and drag across the area you want to zoom in on.
- To zoom out, hold ‘Option’ and click on the area you want to zoom out on.
Zooming in and out in Pro Tools is crucial for efficient and effective workflow. Whether you prefer keyboard shortcuts or the zoom tool, make sure you utilize these techniques to get the most out of your session.
Credit: promixacademy.com
Different Zooming Techniques
Zooming in or out in Pro Tools can be done using various techniques, such as using the Zoomer tool or keyboard shortcuts like Command + and Command -. These techniques are essential for efficient editing and navigating through an audio project.
Different Zooming Techniques Zooming in and out in Pro Tools is a crucial aspect of audio editing. It helps you see your audio waveforms and make precise edits to your tracks. There are three primary zooming techniques that you can use when working in Pro Tools – horizontal zooming, vertical zooming, and time-based zooming.
Horizontal Zooming
Horizontal zooming, as the name suggests, increases or decreases the horizontal size of your audio waveforms. To zoom in horizontally, hover your mouse cursor over the bottom border of the edit window and click and drag upward. This action increases the waveform’s size, allowing you to see more detail in your audio track, making it easier to perform detailed edits. Alternatively, to zoom out horizontally, click and drag downward on the bottom border. This action makes the waveform smaller, allowing you to see more of your audio track. Horizontal zooming is an excellent technique to use when you want to edit small sections of your audio track.
Vertical Zooming
Vertical zooming, on the other hand, increases or decreases the size of your audio waveforms vertically. It helps you see the amplitude of the waveform clearly. To zoom in vertically, hover your mouse cursor over the right border of the edit window and click and drag to the right. This action increases the height of the waveform, allowing you to see the amplitude of the audio track better. To zoom out vertically, click and drag to the left, making the waveform smaller. Vertical zooming is an ideal technique to use when you need to edit a track with a wide range of amplitude levels.
Time-based Zooming
Time-based zooming allows you to focus on a specific time range in your audio track. You can zoom in to view a fraction of a second or zoom out to view an entire session. To zoom in time-wise, use the keyboard shortcut “T.” To zoom out, use the keyboard shortcut “R.” Alternatively, you can use the zoom tool to draw a rectangle around the region you want to zoom in on. In conclusion, zooming in and out using different techniques is an important aspect of audio editing in Pro Tools. Using horizontal, vertical, and time-based zooming techniques, you can fine-tune your audio tracks, making them sound better.
Changing The Zoom Settings
Adjusting the zoom settings in Pro Tools allows you to zoom in or out of your audio tracks for better editing precision. You can use keyboard shortcuts or the zoom tool to easily adjust your view.
Changing The Zoom Settings Zooming in and out of your Pro Tools project is an essential function for a smooth workflow. It helps you navigate and edit the session with ease. You can change your zoom settings to suit your preferences. Here are some ways to customize your zoom settings in Pro Tools. Customizing Keyboard Shortcuts Pro Tools allows you to customize your keyboard shortcuts to zoom in and out of your session easily. You can assign shortcuts to increase and decrease the zoom level, or even to zoom to a specific level. This saves time and increases your productivity. To customize your keyboard shortcuts, go to the “Edit” menu and select “Keyboard Shortcuts.” Adjusting Zoom Preferences In Pro Tools, you can also adjust the zoom preferences to match your workflow. You can set the default zoom level for different types of tracks or adjust the zoom speed. You can also choose whether or not to zoom to the position of your cursor. To adjust your zoom preferences, go to the “Setup” menu and select “Preferences.” Using Zoom Controls Pro Tools also provides easy-to-use zoom controls to change the zoom level quickly. You can find these zoom controls at the bottom of the edit window. You can use these controls to zoom in or out, or even to fit the session to the window. In conclusion, changing the zoom settings is an excellent way to improve your workflow in Pro Tools. Customizing keyboard shortcuts, adjusting zoom preferences, and using zoom controls will make editing and navigating your session quicker and easier.
Using Zoom In The Edit Window
If you are working on an audio project in Pro Tools, you will definitely have to zoom in and out of the edit window to make specific edits and ensure high-quality audio. Zooming in to a waveform allows you to get a closer look at a specific section of audio and zooming out will give you an overview of your entire session. So, let’s explore the different ways of using zoom in the edit window in Pro Tools.
Zoom Out And See All
Zooming out in the edit window gives you a bird’s eye view of your session. To zoom out, you can use the “-” (minus) key on your keyboard or use the zoom slider at the bottom right corner of the edit window. Zooming out is a quick way to check your progress and ensure that your session is well-organized.
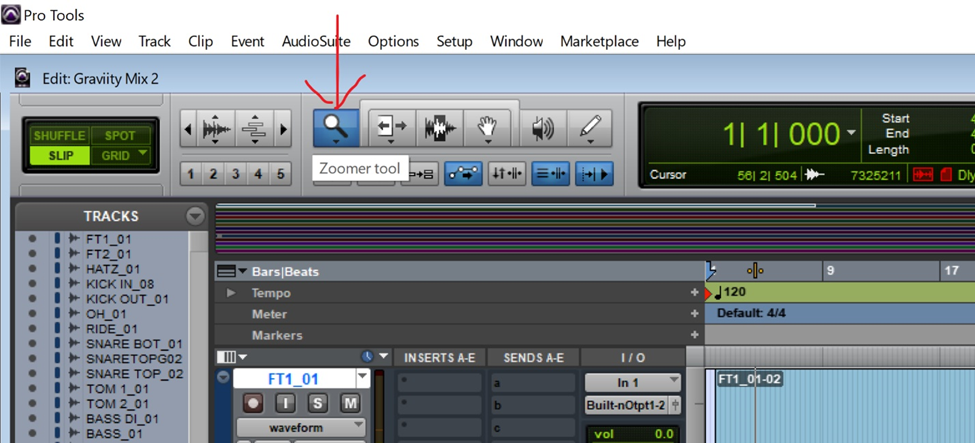
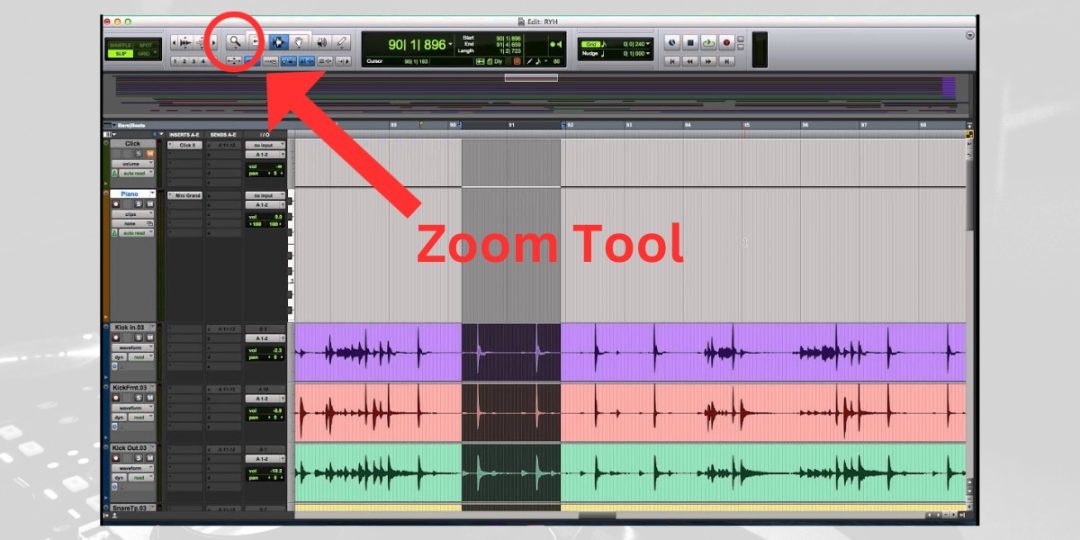
Using The Zoomer Tool
If you want to zoom in on a specific section of audio, you can use the zoomer tool. This tool can be found at the top left corner of the edit window. Click and drag over the waveform to select a specific section that you want to zoom in on. Once you have made your selection, you can press the “z” key to zoom in. You can also use the zoom slider to make more precise adjustments.
Magnifying Parts Of The Waveform
If you want to magnify specific parts of the waveform, you can use the magnify tool in Pro Tools. This tool can be found next to the zoomer tool at the top left corner of the edit window. Click and drag over the waveform to select the section of audio you want to magnify. Once you have made your selection, you can press the “m” key to magnify the waveform. You can use this tool to make precise edits and ensure that your audio is of the highest quality.
Zooming In The Mix Window
In Pro Tools, zooming in the mix window is essential for precise editing. Whether you need to focus on a specific region of your audio or just need to see your waveforms more clearly, the zooming functions in Pro Tools will help you achieve your desired results quickly and efficiently.
If you’re a music producer, you know how important it is to get the right mix in your tracks. One of the tools that you can use to perfect your mix is Pro Tools. With this software, you can zoom in and out of your mix window to get a better view of your tracks and make any necessary adjustments.
Changing Zoom Settings In The Mix Window
To change the zoom settings in the mix window, you can use the View menu or keyboard shortcuts. When you use the View menu, you can choose the zoom level that you want to use. Additionally, you can select the bars and beats, minutes and seconds, or samples time display options to adjust the time scale.
Using The Zoom Bar
The zoom bar is an alternative to using the View menu. With the Zoom bar, you can quickly zoom in and out of your mix window by scrolling left or right. Additionally, you can also use the Zoom Toggle button to switch between the previous zoom level and the last zoom level that you used. In conclusion, adjusting the zoom settings in the mix window can help you get a better view of your tracks and make any necessary changes to your mix. Whether you use the View menu or the Zoom bar, finding the right zoom level can make a significant difference in your music production process.

Credit: www.mixinglessons.com
Frequently Asked Questions Of Zooming In Or Out In Pro Tools
Which Option Is Used To Zoom In Or Out?
To zoom in or out, you can use the “Zoom” option available in most software and applications. This option is typically located in the view or settings menu, and allows you to adjust the size of the content on your screen.
How Do You Control Zoom In And Out?
To control zoom in and out, you can use keyboard shortcuts on your computer or pinch gestures on a touchscreen device. On a Windows computer, hold down the “Ctrl” key and use the “+” or “-” keys to zoom in or out.
On a Mac, hold down the “Command” key and use the “+” or “-” keys. On a touchscreen device, pinch your fingers together to zoom out or spread them apart to zoom in.
What Is The Shortcut For Zoom Toggle In Pro Tools?
The shortcut for zoom toggle in Pro Tools is “Option+Ctrl+Scroll” on Mac or “Alt+Ctrl+Scroll” on Windows.
How Do I Reset Vertical Zoom In Pro Tools?
To reset vertical zoom in Pro Tools, click the Zoomer tool in the Edit window or Mix window. Then, click and drag upward or downward on the track height indicator until the desired zoom level is achieved. Alternatively, use the keyboard shortcut “Ctrl + Shift + Up/Down arrow” to reset the vertical zoom.
Conclusion
Pro Tools allows for easy zooming in and out to achieve the desired level of precision and control in your audio editing. It is a useful tool for music and post-production professionals alike. Understanding the various methods of zooming in or out can save time and effort that can be invested in other creative endeavors.
Taking advantage of this essential feature will result in greater productivity and improved workflow. So, don’t hesitate to explore this functionality today!