Audio compressors meters provide a visual representation of an audio signal’s energy level and gain reduction. Understanding these meters is essential for proper compressor usage.
Compressors are one of the most important tools in audio engineering, used to control dynamics and level inconsistencies in recordings. Understanding how to read and use compressors is crucial for achieving a polished and professional sound in music production, podcasting, and other audio applications.
However, compressors can be a daunting topic for beginners, especially when it comes to reading and understanding compressor meters. This article will demystify compressor meters and help you confidently harness the power of compressors in your audio projects. We’ll cover the different types of compressor meters, what they measure, and how to use them effectively. Let’s dive in.
Credit: www.don-audio.com
Types Of Compressor Meters
Compressors are essential tools in audio processing. They help control dynamic range and provide consistency to audio signals. There are different types of compressor meters that measure audio signals and provide feedback to the user. Each type has a specific purpose, and understanding them can help in better audio processing.
Vu Meter
The VU (Volume Unit) meter is one of the most commonly used types of compressor meters. It helps measure the average level of an audio signal in relation to a reference level. The VU meter is designed to respond slowly to the signal changes and is calibrated to 0dB VU at an RMS level of -20 dBFS. The meter readings are typically represented by a needle pointing to a scale, representing the loudness of the audio signal. A VU meter is handy when setting input levels and applying compression to achieve desired levels for broadcast or mastering.
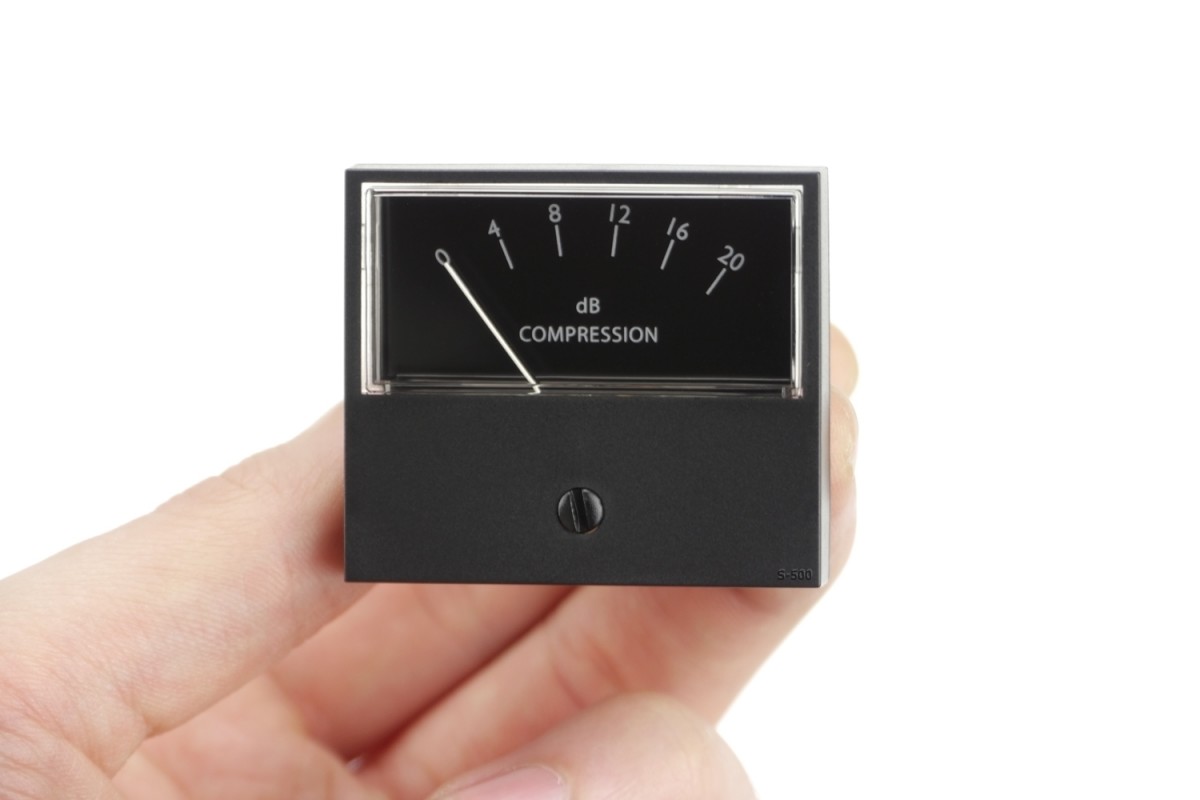
Gain Reduction Meter
A Gain Reduction Meter helps measure the amount of gain reduction being applied by the compressor. The meter displays information on how much the compressor is attenuating the signal level based on the ratio setting. It is designed to provide an accurate visual representation of the compressor’s action, enabling users to make informed decisions regarding ratio and threshold settings. In some compressors, the Gain Reduction Meter is integrated into the VU meter, providing a more comprehensive view of the audio signal.
Multi-functional Meter
A multi-functional meter combines both VU and Gain Reduction meters, providing users with more detailed feedback on the audio signal. It enables users to monitor the signal level, gain reduction amount and ratio simultaneously and helps in setting the parameters correctly. A multi-functional meter is handy in complex projects and can help in achieving a more refined audio output.
Understanding The Vu Meter
Understanding the VU Meter is crucial in comprehending the dynamics of Audio Compressors Meters. The VU Meter tracks the average audio level, providing an accurate representation of the audio signal and allowing efficient compression of the audio.
Audio compression is vital in music production and engineering, and understanding the meters used to evaluate it is essential. One of the most commonly used meters is the VU meter, which stands for Volume Unit meter. The VU meter was introduced in the 1930s as part of the effort to standardize broadcast audio levels. Since then, it has become a staple tool for measuring and evaluating audio levels.
History Of The Vu Meter
The VU meter was first introduced in the 1930s by the company Western Electric as a way to standardize broadcast audio levels. It was created to help engineers and technicians monitor the average levels of audio signals. The original design included a needle that moved in response to the audio signal, displaying the average volume level in decibels.
Features Of The Vu Meter
The VU meter is a simple but effective tool that provides a visual representation of audio levels. It has a range of features that make it ideal for measuring and evaluating audio levels. The most notable feature of the VU meter is its ability to display an average volume level, rather than a peak volume level. This is important because it gives a more accurate representation of how loud a signal is over a longer period of time. Other important features of the VU meter include its ability to handle both AC and DC voltages, and its logarithmic scale. The logarithmic scale of the VU meter allows for more precise measurements of audio levels, as it takes into account the way our ears perceive sound.
Uses Of The Vu Meter
The VU meter has a wide range of uses in music production and engineering. It is used to set input levels during recording, monitor output levels during mixing, and control levels during mastering. The VU meter is also used to evaluate the dynamic range of a recording, and to monitor the level of compression being applied to a signal. In conclusion, the VU meter is an essential tool for anyone working with audio. Understanding its history, features and uses can help to improve the quality of any recording or production.
Understanding The Gain Reduction Meter
Audio compression is an important tool for enhancing the overall sound quality of a recording. One crucial aspect of audio compression is understanding the gain reduction meter, which displays the amount of signal reduction that occurs when the compressor is active. In this article, we will focus on understanding the gain reduction meter and its features.
How The Gain Reduction Meter Works
The gain reduction meter provides a visual representation of how the compressor is affecting the audio signal, measuring the amount of gain reduction applied to the incoming audio. When the compressor is active, the gain reduction meter will display the amount of reduction in decibels (dB). The meter typically ranges from 0dB to 20dB or more, depending on the compressor device.
In general, the greater the amount of gain reduction, the more compressed the audio signal will be. By monitoring the gain reduction meter, audio engineers can ensure that their signal stays within the desired range, avoiding clipping or distortion.
Features Of The Gain Reduction Meter
The gain reduction meter is a simple but essential tool for audio compression. Some of its features include:
- Displays the amount of gain reduction in decibels
- Helps maintain signal levels within the desired range
- Prevents distortion or clipping
- Offers a visual representation of the compressor’s impact on the audio signal
Uses Of The Gain Reduction Meter
The gain reduction meter is used in a variety of audio engineering contexts, including:
- Music production and recording
- Live sound engineering
- Podcast or video production
By monitoring the gain reduction meter, audio engineers can ensure that their audio is compressed and adjusted to the desired level, resulting in a more polished and professional sound. When used in conjunction with other tools like limiters and equalizers, the gain reduction meter can help take audio quality to the next level.
Understanding The Multi-functional Meter
Audio compressors meters are vital tools in understanding the multi-functional meter. These meters enable sound engineers to monitor and control the levels of audio signals for better sound quality. Understanding their functions is essential in achieving the best audio output.
Understanding the Multi-Functional Meter: Audio compressors are fundamental tools used in music production, and they come with meters that allow you to monitor the audio signal being processed. One essential meter you’ll come across is the multi-functional meter. This meter provides various features that help you achieve the desired compression level. Understanding how to use this meter will make a massive difference in the quality of music production you’ll deliver. So let’s dive deeper into the features and uses of this meter. Features of the Multi-Functional Meter: The multi-functional meter has three features that are essential in controlling the compressor. These are: 1. Input Level Meter: The input level meter helps you monitor the incoming signal level in dB. This is crucial in setting the compressor’s threshold level. If the signal is too low, it won’t trigger the compressor, and if it’s too high, it might distort the sound. 2. Gain Reduction Meter: This meter measures the amount of gain reduction applied to the audio signal. It helps you know how much compression is occurring and if you’re achieving the desired level of dynamic control. 3. Output Level Meter: The output level meter displays the output signal level in dB. It is vital in level matching the pre and post-compression signals. Uses of the Multi-Functional Meter: The multi-functional meter has several uses in audio compression, and some of these are: 1. Setting the Threshold Level: The input level meter helps in setting the threshold level. The ideal threshold level is -20dB to -10dB, depending on the track’s dynamic range. 2. Controlling the Gain Reduction: The gain reduction meter helps in controlling the amount of compression applied to the audio signal. You should aim to have a gain reduction of 3dB to 6dB for vocals and 6dB to 10dB for instruments. 3. Adjusting the Output Level: The output level meter helps in matching the pre and post-compression levels. This ensures consistency in the overall audio level and ensures the final mix is a coherent and balanced piece of music. In conclusion, understanding the function of the multi-functional meter is essential in achieving the desired compression level. You need to take time and understand every feature and usage of this meter, as it contributes significantly to the overall audio quality. Take advantage of this tool, and you’ll be sure to deliver top-notch music productions.
Applications Of Audio Compressor Meters
Understanding audio compressor meters is essential for every sound engineer and music producer. It provides an insight into the sound level and dynamic range of the audio signal, ensuring that the audio output is of high quality. Different industries and applications rely on audio compressor meters for various purposes. Let’s explore some of these applications.
Professional Recording Studios
Recording studios are the primary users of audio compressor meters. These meters are used to maintain consistent audio levels and prevent clipping during recording sessions. A recording studio’s compressor meters have specific controls, such as threshold, attack, release, and ratio ratios. They help engineers manage the dynamic range of the audio signal, ensuring that each instrument sits perfectly in the mix.
Live Sound Reinforcement
Audio compressor meters are essential in live sound reinforcement too. It helps in controlling the dynamic range of the audio signal and ensures consistent sound levels during concerts, music festivals, and other live events. The audio compressor meters in live sound applications are calibrated to protect the audience from damaging sound levels. Moreover, it helps to maintain a balance between the low and high-frequency sounds, ensuring that every sound is heard crystal clear by the audience.
Broadcasting
Audio compressor meters are crucial in broadcasting, such as radio and television broadcasting. In broadcasting, audio signals pass through various devices before being transmitted. Audio compressor meters are used to ensure that the transmitted sound signal is of the highest quality. It helps to maintain a consistent level of volume and prevents sudden spikes and low or high-frequency sounds that could damage equipment and annoy listeners or viewers. Broadcasting audio compressor meters help in managing noise and reverberation and ensuring that every sound is well balanced.

Credit: www.123rf.com
Tips For Properly Using Audio Compressor Meters
If you are familiar with audio production, then you know how important it is to use an audio compressor. An audio compressor is a device that helps to ensure that the loud and quiet parts of an audio recording are balanced for clarity and consistency. However, getting the best results from a compressor can be a bit of a challenge, particularly when it comes to using the compressor meter. In this section, we will explore some tips for using audio compressor meters to achieve the best results in your production.
Setting The Threshold
The threshold control sets the level at which the compressor starts to work. The level is measured in decibels (dB), and it is usually set by the user. The threshold level will vary depending on the dynamic range of the recording. To set the threshold, adjust the control until the compressor starts to work only on the loudest parts of the audio.
Setting The Ratio
Setting the ratio is crucial in determining how much sound will be compressed once it exceeds the threshold. The ratio is usually expressed as a ratio of the input signal level to the output signal level. For instance, a ratio of 2:1 means that for every two decibels over the threshold, the output is increased by one decibel. Determine the appropriate ratio for your recording by adjusting the control until the sound is even and smooth.
Adjusting Attack And Release Times
The attack and release times determine how quickly the compressor reacts to changes in audio dynamics. The attack time controls how quickly the compressor starts to work after a sound exceeds the threshold, while the release time regulates how quickly the compressor stops working once the audio falls below the threshold. The attack time should be slow for strong vocals, while faster attack times are suitable for percussion instruments. Adjust the release time until the audio sounds natural and balanced.
Understanding audio compressors is essential for audio production. By properly using compressor meters, you can achieve a balanced and polished audio recording. Setting the threshold, ratio, and adjusting attack and release times are the key tips for getting the best results from your compressor meter.
Frequently Asked Questions Of Understanding Audio Compressors Meters
What Is A Good Db For A Compressor?
A good dB level for a compressor depends on the audio source and the desired result. Typically, a range of 2-6 dB gain reduction is considered good for most audio signals. However, it ultimately depends on what sounds good to the individual user and the specific context in which the audio will be used.
What Is A Good Compressor Setting For Audio?
A good compressor setting for audio is subjective and can vary based on the specific needs of the project. Generally, a compressor ratio of 2:1 to 4:1, a threshold set to the average volume level, and a medium attack and release time can provide a good starting point.
However, it’s important to adjust the settings based on the type of audio and desired outcome.
How Do You Calculate Audio Compression?
To calculate audio compression, determine the difference between the loudest and quietest parts of a track. This is known as dynamic range. Compression reduces the dynamic range, making quieter sounds louder and louder sounds quieter. The amount of compression is typically measured with a ratio, such as 2:1 or 4:1.
What Threshold Should A Compressor Be At For Mastering?
The threshold level for a compressor during mastering varies depending on the track and the desired result. It’s important to consider the dynamic range, genre, and overall loudness. Aim for a threshold that achieves the desired amount of compression while preserving the integrity and character of the original track.
Experimentation and critical listening are crucial in finding the right threshold for each individual track.
Conclusion
Understanding audio compressor meters is crucial for achieving balanced and professional sound in your music productions. The Threshold, Ratio, Attack, and Release parameters come in handy when setting up your compressor for optimal results. Remember to use your ears, experiment, and trust your instincts when mastering audio compression.
With practice, you’ll become a skilled producer who knows how to use audio compressors to add dynamics and energy to your music. Happy producing!