When recording acoustic guitars, choose the right microphone and placement for optimal sound quality. Recording acoustic guitars can be a challenging task, especially if you want to achieve professional-sounding results.
One of the key factors in recording acoustic guitars is selecting the right microphone. Moreover, the placement of the microphone also plays a crucial role in capturing the sound accurately. We will discuss some tips for recording acoustic guitars, including selecting the right microphone, placement techniques, and other useful tips to help you achieve excellent results.
By following these tips, you can be assured of capturing the unique characteristics and nuances of your acoustic guitar’s sound.
Choosing The Right Room
When it comes to recording acoustic guitars, choosing the right room is crucial for achieving excellent audio quality. The room you record in can have a significant impact on the acoustic properties of your recordings, so it’s important to select the right space.
Room Acoustics
The acoustics of the room you choose to record in will heavily influence the sound of your acoustic guitar recordings. Many professional studios have acoustically designed rooms with carefully treated walls, floors, and ceilings to minimize external reflections and standing waves.
While you may not have access to such a space, there are some things you can do to improve the acoustics of the room you choose. Here are some tips:
- Choose a room that has a natural, warm sound. A room with lots of reflective surfaces, such as hard floors, walls, or ceilings, can result in a harsh, reverberant sound.
- Add acoustic treatment to the room if possible. Acoustic panels, diffusers, and bass traps can help absorb reflections and tame standing waves, resulting in a more even and balanced acoustic environment.
- You can also improvise by placing blankets or drapes on the walls to absorb some reflections.
Avoiding Background Noise
Another significant consideration when choosing a room to record in is background noise. Background noise such as traffic, computer fans, and air conditioning can significantly affect the quality of your recordings. Here are some tips to minimize background noise:
- Choose a room in a quiet location, away from main roads or other sources of noise.
- Turn off all unnecessary electrical equipment, such as fans, computers, or air conditioners, that can create background noise.
- If you’re using a microphone, make sure it’s directional and placed close to the guitar to reduce the amount of background noise picked up.
- If you’re using an audio interface, make sure it’s well away from any sources of electrical noise, such as power adapters or computer monitors.
By following these tips, you can significantly improve the frequency response and tonality of your acoustic guitar recordings, and eliminate unwanted background noise to achieve the best possible quality recordings.

Credit: www.soundonsound.com
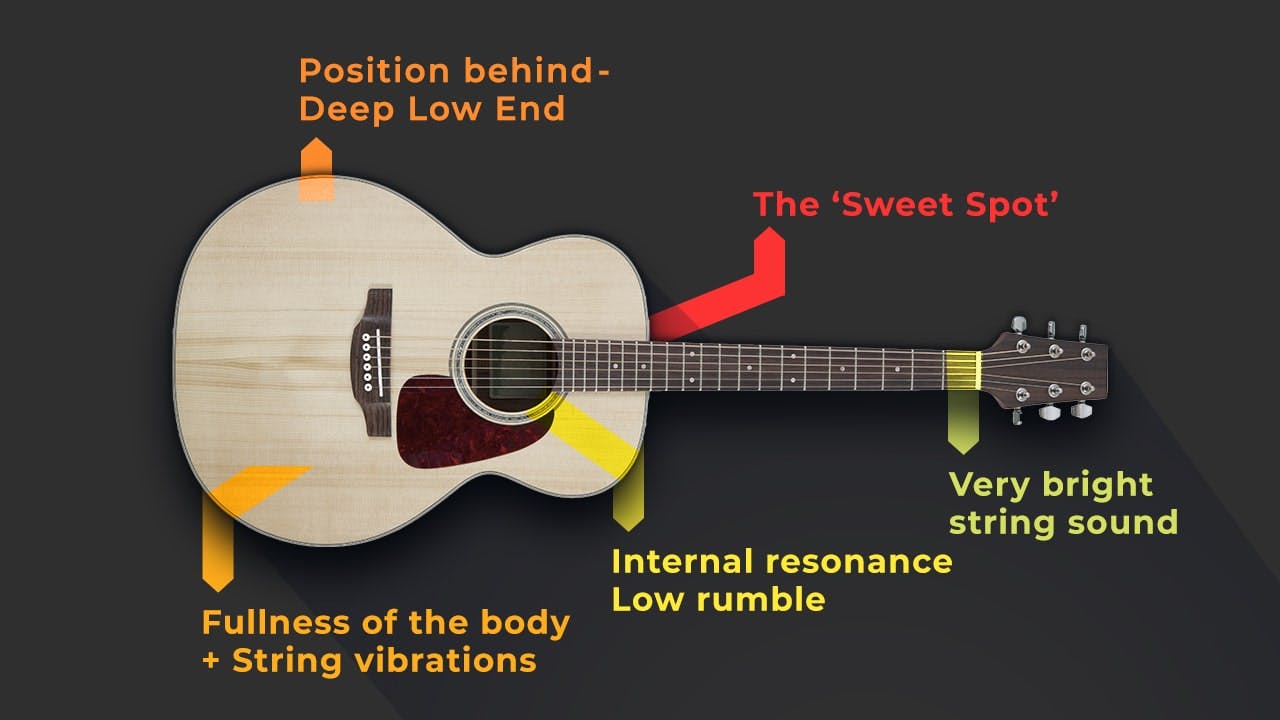
Proper Microphone Placement
When recording acoustic guitars, proper microphone placement is crucial for a clean and balanced sound. To achieve the best results, place the microphone at the 12th fret of the guitar, use a cardioid or omni-directional microphone, and experiment with different distances and angles to find the sweet spot.
Selecting The Right Microphone
When it comes to recording acoustic guitars, selecting the right microphone is crucial to ensure clear, crisp sound. A condenser microphone would be an ideal choice due to its sensitivity and ability to capture high frequencies. Dynamic microphones, on the other hand, are better suited for live performances. It’s worth mentioning that there are many types of condenser microphones available in the market, from large-diaphragm to small-diaphragm ones, each with their distinct sound characteristics. Therefore, it’s advisable to experiment with different microphones to determine which one suits your acoustic guitar.
Positioning The Microphone
Positioning the microphone correctly is equally important as selecting the right one. Here are the three most common microphone placements for recording acoustic guitars:
| Placement | Pros | Cons |
|---|---|---|
| Sound Hole | Produces a full-bodied sound | May result in boomy or muddy sound |
| Fingerboard | Produces a balanced sound | May lack warmth or low-end |
| Above the Bridge | Produces a bright sound | May sound thin or harsh |
While these are general guidelines, the actual positioning may depend on your acoustic guitar’s unique sound and your personal preference. Once you have identified the best placement, ensure that the distance between the microphone and guitar is consistent throughout the recording. In conclusion, proper microphone placement is crucial when it comes to recording acoustic guitars. By choosing the right microphone and experimenting with different placements, you can achieve a clear, crisp sound that captures the true essence of your guitar’s sound.
Preparation And Setup
Recording acoustic guitars can prove to be a daunting task, but with a few tips and tricks up your sleeve, you can ensure your recording turns out smooth and levelled-up. Proper preparation and setup is the key to a great recording session.
Warm Up The Guitar
Before hitting the record button, it’s important to warm up your guitar. This will help you gauge your guitar’s tone and ensure it is in the best condition to be recorded. Play some warm-up exercises and run through a few scales to get your fingers and your guitar ready.
Tuning
One of the most important aspects of recording an acoustic guitar is ensuring your guitar is in tune. Use an electronic tuner to ensure each string is in tune as even a slightly out of tune note can ruin the recording. However, keep in mind that an overly precise tuning can result in an unnatural recording. So, use your ear to ensure a balanced and natural sound.
String Noise Reduction
Many guitarists struggle with string noise while recording. Some common noises include squeaks, slides and scrapes. These noises can be quite audible and can hamper the quality of the recording. To avoid these noises, use proper finger positioning and pressure along with some string noise reduction techniques such as using a lighter touch, using your fingertips, and muting.
Recording Techniques
To capture the true sound of an acoustic guitar during recording, it’s important to choose the right microphone placement, use high-quality equipment, and adjust the room acoustics. Other tips include experimenting with different microphone types and positions, playing with fingerpicking techniques, and maintaining consistency throughout the recording process.
Acoustic guitars are versatile instruments that produce warm and organic sounds that can add character to any recording. However, capturing the best sound of an acoustic guitar can be a challenging task, especially if you are not familiar with the essential recording techniques. In this article, we will discuss the three essential recording techniques used to record an acoustic guitar: Mic Techniques, Playing Technique, and Multiple Mic Placement.
Mic Techniques
One of the critical components of recording acoustic guitars is mic placement. The placement of the microphone can significantly impact the sound quality and tone of the recorded instrument. When positioning the microphone, the rule of thumb is to aim at the 12th fret of the guitar. This spot is known to produce warm and balanced sound. If you want to capture the warmth and depth of the guitar, you can use a large diaphragm condenser microphone. If you prefer a brighter and sharper sound, use a small diaphragm condenser microphone. Additionally, you can try using dynamic microphones or ribbon microphones to add a natural and warm tone to the recorded sound.
Playing Technique
Playing technique is another factor that can affect the recorded sound of an acoustic guitar. The way you play your guitar will influence the sound quality, dynamics, and tonality of the recorded instrument. When recording an acoustic guitar, it is essential to consider the way you play your guitar and to adjust your approach according to the sound you want to achieve. For instance, if you want a softer and gentler sound, use fingerpicking technique. If you prefer a louder and brighter sound, strumming with a pick can deliver the desired results. Playing technique is an important factor in recording acoustic guitars, and it is something that should be considered carefully to attain the desired sound.
Multiple Mic Placement
When recording an acoustic guitar, using multiple microphones can provide a fuller and richer sound. Using multiple microphones, you can capture different aspects of the guitar’s sound, such as the body and string sound. To achieve this, you need to position the microphones strategically, either in an X-Y pattern, spaced pair pattern, or mid-side pattern. When using multiple mics, it is essential to consider the phase relationship between the microphones. If the microphones are placed too far from each other, it can result in phase cancellation, which can cause the recorded sound to be thin and hollow. In conclusion, recording an acoustic guitar requires a good understanding of the essential recording techniques. By using the right mic placement, playing technique, and recording setup, you can capture a warm and organic sound that can enhance your music recordings. With the tips discussed in this article, you can now experiment with different recording techniques to achieve the desired sound.
Post-recording Editing
To ensure the best possible acoustic guitar recording, post-recording editing is vital. Some tips to improve your acoustic guitar recordings include experimenting with mic placement, controlling the room’s acoustics, and using high-quality mics and preamps. Proper editing can enhance the guitar’s natural sound and make it stand out in the mix.
After recording your acoustic guitar, the next important step is to edit your recording for a polished, professional sound. Editing can make or break the final result, so it’s crucial to know what you’re doing. In this section, we’ll discuss two essential techniques for post-recording editing: equalization and compression, and effects and reverb. We’ll also cover common editing mistakes and how to avoid them.
Equalization And Compression
Equalization and compression are two studio staples that can help you perfect the sound of your recorded acoustic guitar. Equalization helps to balance the frequencies in your recording, making sure every tone is present and accounted for. Compression, on the other hand, helps to even out the dynamic range of your recording, ensuring that no notes or chords are lost in the mix. When using EQ and compression, keep the following in mind:
- Be subtle with your adjustments – less is often more
- Listen to your track as a whole and adjust accordingly
- Don’t be afraid to experiment with different settings
Effects And Reverb
Effects and reverb can add depth and dimension to your acoustic guitar recording. Reverb, in particular, can make your recording sound like it was played in a space larger than the room it was recorded in. Effects like delay or chorus can add richness and texture to individual notes or sections of your recording. As with EQ and compression, it’s important to use effects and reverb sparingly and intentionally.
Editing Mistakes
Editing mistakes can ruin an otherwise great recording. Here are some common mistakes to avoid:
- Over-editing – don’t edit the life out of your recording
- Skipping EQ and compression – these tools are essential for a polished sound
- Ignoring timing and tuning – make sure your recording is in time and in tune
- Forgetting to save backups – always back up your original recording before editing
By understanding these common mistakes, you can avoid them and create a flawless recording.
Credit: www.waves.com

Credit: www.youtube.com
Frequently Asked Questions On Tips For Recording Acoustic Guitars
How Can I Record My Acoustic Guitar Better?
To record your acoustic guitar better, you can try these tips: use a microphone instead of a pickup, place the microphone at the right distance and angle, experiment with mic placement, use a pop filter to reduce plosives, consider using two microphones, and use a quality audio interface.
What Is The 3 To 1 Rule Acoustic Guitar?
The 3 to 1 rule for acoustic guitar refers to the ratio of the bass string diameter to the treble string diameter. The bass strings should have three times the diameter of the treble strings to achieve a balanced sound and avoid overpowering the higher strings.
Is It Better To Record Acoustic Guitar With Mic Or Direct?
It depends on the sound you want. Recording with a microphone captures the natural tone and character of the guitar, while direct input provides a cleaner sound. Experiment with both methods to see which works best for your project.
What Is The Best Equipment For Recording Acoustic Guitar?
The best equipment for recording acoustic guitar includes a good quality mic, a preamp, and an audio interface. A cardioid or condenser microphone works well to pick up the intricate sounds of the guitar. Using a preamp helps to reduce background noise and an audio interface transfers the sound to your computer for editing.
Conclusion
To sum it up, recording an acoustic guitar requires attention to detail and a combination of techniques. From choosing the right microphone to creating a suitable environment, every step is crucial. Paying attention to the different elements that contribute to the quality of the sound is important.
By following the tips discussed you can create an impressive recording that showcases the true potential of your guitar. Keep experimenting and always strive for excellence!