Pro Tools’ edit modes streamline your editing process, allowing for more precise and efficient edits. These modes provide specific editing tools and shortcuts, catering to different editing needs such as trimming, scrolling, and selecting clips.
Editing audio tracks can be a tedious task, especially when dealing with large amounts of audio. With Pro Tools’ edit modes, you can save a significant amount of time and effort, helping you work more efficiently. These editing modes provide a range of tools, from simple trimming and selecting to more complex editing techniques, allowing you to make precise cuts and edits quickly without interrupting your workflow.
We will explore the different edit modes available in Pro Tools and how to use them to streamline your editing process.
Credit: m.youtube.com
Pro Tools Navigation Basics
For those looking to streamline their editing process with Pro Tools, mastering the different Pro Tools edit modes is crucial. With a good understanding of basic navigation, users can manipulate audio clips quickly and easily, improving workflow and productivity.
Pro Tools is a digital audio workstation used extensively in the music and audio industry. Its editing capabilities are second to none, and the navigation of the software is streamlined to ensure that users can move around the interface with ease. In this section, we will cover Pro Tools Navigation Basics to help you get started with this powerful software.
Getting Familiar With The Pro Tools Interface
The Pro Tools interface can be overwhelming when you first launch the software. However, by taking some time to familiarize yourself with the different windows and menus, you can navigate the software with ease. The main windows and menus are:
- Mix Window
- Edit Window
- Transport Window
- Window Menu
- Toolbar
The Mix and Edit windows are where most work is done. The Mix window is where you can adjust levels, panning, and make changes to the mix. The Edit window is where you can see your audio tracks, MIDI data, and make edit changes.
Basic Navigation Shortcuts
Pro Tools has some basic navigation shortcuts that allow you to move around the software quickly. Here are some of the most commonly used shortcuts:
| Shortcut | Action |
|---|---|
| Tab | Switch between Edit and Mix Windows |
| Spacebar | Start or stop playback |
| Option + Click | Set a marker |
| Command + E | Edit Selection |
| Command + D | Duplicate Selection |
These navigation shortcuts can save you a significant amount of time when working with Pro Tools. By memorizing these shortcuts and using them frequently, you can streamline your editing process and increase productivity. In conclusion, getting familiar with the Pro Tools interface and using basic navigation shortcuts can help you move around the software more quickly and increase your efficiency. By taking time to master these basics, you’ll be able to focus on the creative aspects of editing and create better audio content.
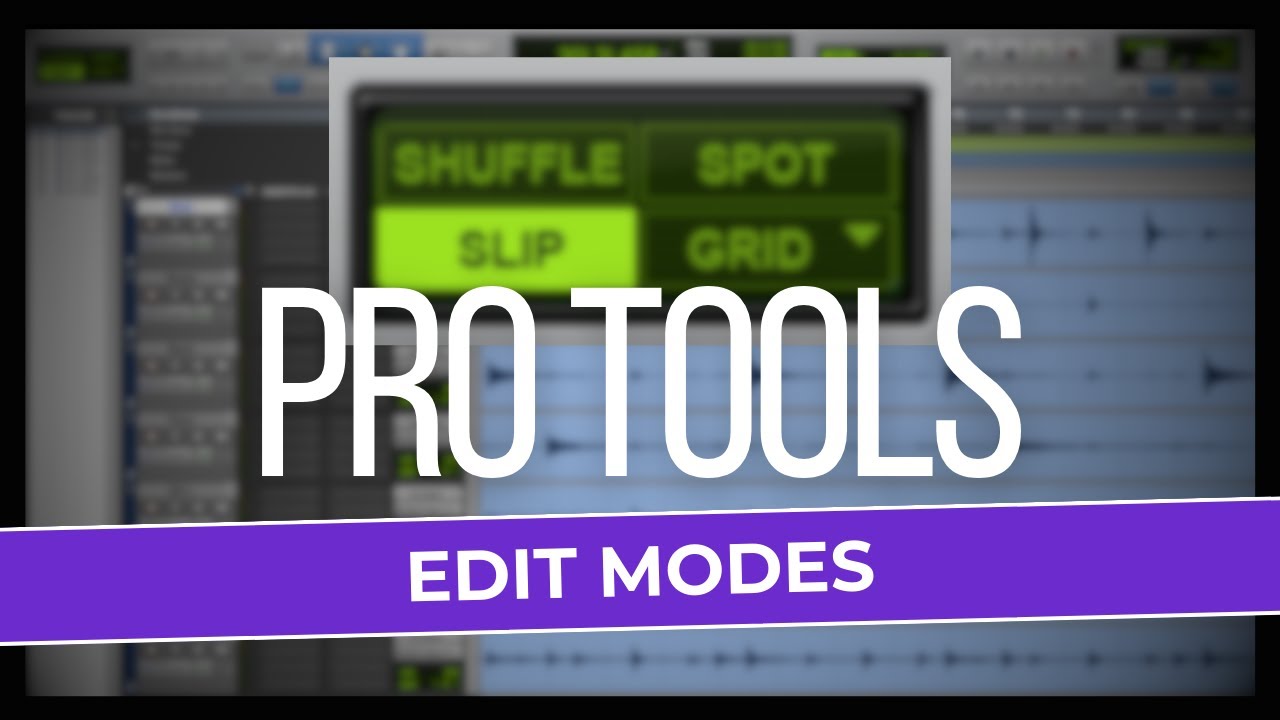
Pro Tools Edit Modes
Pro Tools Edit Modes are a set of tools that enable you to work more efficiently when editing audio. They allow you to streamline your editing process by providing specific modes that enhance your ability to manipulate different types of audio content, such as pitch and rhythm, with precision and ease.
If working with audio editing is a regular part of your job, then you have probably come across Pro Tools. This digital audio workstation (DAW) software is considered to be the industry standard. One of the key features of Pro Tools is its edit modes. In this post, we’ll focus on Pro Tools edit modes and how they can help streamline your editing process.
What Are The Different Pro Tools Edit Modes?
Pro Tools edit modes are different ways of editing audio that allow you to perform specific tasks quickly and efficiently. The following are the different Pro Tools edit modes:
| Edit Mode | Description |
|---|---|
| Shuffle Mode | Moves clips and fills gaps automatically, allowing you to quickly rearrange a mix. |
| Slip Mode | Allows you to move the contents of a clip around within its boundaries, so you can quickly adjust timing without affecting other clips. |
| Grid Mode | Makes it easy to make adjustments in time by snaping clips to a grid. |
| Spot Mode | Precisely places the start time of a clip at an exact location in the timeline or at a specific timecode. |
| Slience Mode | Removes audio segments from the timeline, replacing it with silence. |
| Elastic Audio Mode | Allows you to manipulate audio without changing the pitch and time, so you can easily match the tempo and key of different clips. |
When To Use Each Edit Mode
Knowing when to use each edit mode will help you streamline your editing process and create a more polished and cohesive mix. Here are some examples of when to use each edit mode:
- Shuffle mode is useful when you want to quickly rearrange the order of clips and fill gaps automatically.
- Slip mode is useful when you want to adjust the timing of a clip without affecting other clips.
- Grid mode is useful when you want to make adjustments to the timing of clips based on a consistent grid.
- Spot mode is useful when you want to precisely place the start time of a clip at a specific location or timecode.
- Silence mode is useful when you want to remove audio segments from the timeline and replace them with silence.
- Elastic Audio mode is useful when you want to manipulate audio without changing the pitch and time, so you can match the tempo and key of different clips.
Using the different Pro Tools edit modes will help you speed up your editing process and allow you to create a more polished and cohesive mix. Try experimenting with each edit mode to see which works best for each situation.
Slip And Grid Modes
Streamline your editing process in Pro Tools with Slip and Grid Modes. These editing modes allow for precise adjustments to your audio tracks, making it easier to perfect your project and achieve a polished final product.
Slip and Grid Mode are two of the most important and useful edit modes available in Pro Tools. Slip Mode is particularly useful for small adjustments, whereas Grid Mode allows for more precise editing. These modes can significantly streamline your audio editing workflow, saving you valuable time and effort. In this post, we will take a closer look at how to use Slip and Grid modes in Pro Tools.
How To Use Slip Mode
Slip Mode is a quick and easy way to make small adjustments to the timing of clips without affecting their overall position in the timeline. With slip mode, you can adjust the in and out points of a clip without changing its start or end position on the timeline. Here’s how you can use Slip Mode in Pro Tools:
- Select the Slip Mode from the Edit Modes selector.
- Click and drag the clip you wish to edit to the left or right.
- Release the clip once you have made the required adjustments.
- To make more precise adjustments, hold down the Option key and click and drag the clip.
How To Use Grid Mode
Grid Mode is used to make precise edits to the timing of clips. It moves clips to a specific point in the timeline, based on the defined grid value. Here’s how you can use Grid Mode in Pro Tools:
- Select Grid Mode in the Edit Modes selector.
- Set the grid value by clicking on the Grid Value button and selecting the required value.
- Click and drag the clip to move it to the required position on the grid.
- If you wish to make more precise adjustments, hold down the Option key and click and drag the clip.
In conclusion, Slip and Grid Modes are essential tools for anyone looking to streamline their audio editing workflow. With these modes, you can quickly and easily make small adjustments or precise edits to the timing of your clips. So, the next time you are working on a project in Pro Tools, be sure to try using Slip and Grid Mode to save yourself time and effort.
Credit: m.youtube.com
Shuffle And Slip Shuffle Modes
Streamline your editing process in Pro Tools with Shuffle and Slip Shuffle Modes. These helpful tools allow for easy rearrangement and alignment of audio clips, making editing more efficient and accurate.
Editing audio tracks can be a time-consuming task, but Pro Tools Edit Modes makes editing a breeze. In this section, we will focus on the Shuffle and Slip Shuffle Modes used for streamlining your audio editing tasks.
How To Use Shuffle Mode
Shuffle mode is used to synchronize and rearrange clips on a track. It is widely used for radio production, music production, and sound design. Shuffle mode helps you edit tracks by inserting and deleting elements while ensuring that the gaps between clips remain closed. To use Shuffle mode, simply follow the steps outlined below:
- Select the Shuffle button on the edit window.
- Click on the region that you want to move and drag it to the desired position.
- Pro Tools will automatically close the gap between the clips and adjust the overall timeline of the track.
How To Use Slip Shuffle Mode
Slip Shuffle Mode allows you to freely adjust the content within a clip without affecting the surrounding clips. This is especially useful when you want to adjust the content of a clip without moving the start or end markers. To use Slip Shuffle Mode, simply follow the steps outlined below:
- Select the Slip Shuffle button on the edit window.
- Double click on the clip that you want to adjust.
- Drag the clip left or right to adjust it while viewing the waveform in the preview window.
- Release the mouse button to complete the adjustment.
In Conclusion
By using the Shuffle and Slip Shuffle Modes in Pro Tools, you can streamline your editing tasks and save time. These modes allow you to easily synchronize clips and adjust content without affecting the rest of the track. Give them a try and experience the benefits of efficient audio editing!
Spot Mode And Object Grabber Tool
The Spot Mode and Object Grabber Tool are two powerful editing modes in Pro Tools that can help streamline your editing process. With Spot Mode, you can easily move or replace audio clips with precision, while Object Grabber Tool allows you to manipulate multiple clips simultaneously.
These tools can save you time and effort, making your editing tasks more efficient and effective.
Editing audio files can be a time-consuming task, especially when dealing with complex projects. But with Pro Tools Edit Modes, you can simplify the process and work faster. Two of the most useful features are Spot Mode and the Object Grabber Tool.
What Is Spot Mode And How To Use It?
Spot mode is a Pro Tools Edit Mode that allows you to precisely place audio clips on the timeline. Using this mode, you can specify the exact start and end points of a clip and place it at any point in your session. To use Spot Mode:
- Select the clip you want to edit.
- Click on the Spot mode button on the toolbar, or press “F6” on your keyboard.
- Click on the timeline where you want to place the clip. Alternatively, you can enter the timecode manually in the Spot dialog box.
- Press “Enter” to place the clip in the selected location.
What Is Object Grabber Tool And How To Use It?
The Object Grabber Tool is another powerful feature of Pro Tools Edit Modes. It lets you easily move, duplicate or delete audio clips on your timeline, without accidentally affecting other tracks. To use the Object Grabber Tool:
- Select the Object Grabber Tool from the toolbar or press “F7” on your keyboard.
- Select the clip you want to edit by clicking on it.
- To move the clip, click and drag it to a new location on the timeline.
- To duplicate the clip, hold down the “Option” key (Mac) or “Alt” key (Windows) and click and drag the clip to a new location.
- To delete the clip, select it and press the “Delete” key on your keyboard.
In conclusion, by mastering Pro Tools Edit Modes like Spot Mode and the Object Grabber Tool, you can make editing audio clips in Pro Tools a breeze. Whether you’re a beginner or an experienced audio engineer, these features can help streamline your workflow and save you time and effort.
Using Edit Modes In Practice
To streamline your editing process in Pro Tools, it’s essential to master edit modes. With these modes, you can effectively edit audio clips, MIDI notes, and automation data, making the workflow much smoother and more efficient. By utilizing edit modes, you can take your audio editing skills to the next level and create high-quality audio projects.
Using Pro Tools edit modes can help streamline your editing process and increase your efficiency. However, it’s essential to understand how to use these modes in practice so that you can take full advantage of their benefits. In this section, we’ll cover how to edit audio with Pro Tools edit modes, and we’ll also share tips and tricks for efficient editing.
Editing Audio With Pro Tools Edit Modes
When editing audio in Pro Tools, it’s crucial to choose the right edit mode for the job. Here are some of the most commonly used edit modes you can use:
| Edit Mode | Description |
|---|---|
| Shuffle Mode | Versatile for editing clips with or without other clips in tracks adjacent to the area you’re working on. |
| Slip Mode | Allows you to move an audio clip’s head and tail independently. |
| Grid Mode | Aligns audio clips to the session grid, making it ideal for quick and precise editing. |
| Spot Mode | Allows you to specify the exact location where a clip will be placed during the editing process. |
Tips And Tricks For Efficient Editing
Here are some tips and tricks for efficient editing when using Pro Tools edit modes:
- Use keyboard shortcuts to switch between edit modes quickly.
- Set up your keyboard shortcuts to move the insertion point to the start or end of a clip.
- Use the zoom function to get closer to the waveform and make more precise edits.
- Hold down the Option key (Mac) or Alt key (Windows) to make a copy of a clip while dragging it.
- Reorder your clip list to suit your workflow by holding down the Shift key while clicking and dragging clips in the list.
- Use the Auto-Select feature to automatically select tracks that a clip is on when you click on it.
In conclusion, using edit modes in Pro Tools can significantly enhance the efficiency of your editing process. By mastering the different edit modes, you can work more quickly and precisely, allowing you to focus on the creative aspects of your project.
Frequently Asked Questions For Streamline Your Editing With Pro Tools Edit Modes
What Are The 4 Editing Modes In Pro Tools?
Pro Tools offers four editing modes: Slip, Grid, Shuffle, and Spot. Slip mode allows adjusting audio within regions, Grid mode aligns audio to a predetermined tempo, Shuffle mode enables rearrangement of audio within a session, and Spot mode places audio precisely on a timeline.
How Do You Cycle Through Edit Modes In Pro Tools?
In Pro Tools, you can cycle through edit modes by pressing the F6 key.
What Are The Two Basic Editing Modes Used In Pro Tools?
The two basic editing modes used in Pro Tools are “shuffle mode” and “slip mode. ” Shuffle mode enables the user to move clips around in a track and shorten or lengthen them. Slip mode allows for adjusting the in and out points of a clip while keeping its overall length the same.
What Are The Four Edit Modes Available In The Edit Window?
The four edit modes available in the Edit window are Shuffle, Slip, Spot, and Grid.
Conclusion
Overall, Pro Tools Edit Modes offers a variety of options for streamlining your editing process. Whether you need to make precision edits or quickly select and move regions, the various modes provide a range of tools to help you work efficiently.
Utilizing these modes can save time and enable you to focus on the creative aspects of your work rather than getting bogged down in technical details. So why not give them a try and see how they can enhance your workflow?