Recording vocals in a small room requires proper acoustic treatment and mic placement. In small rooms, sound tends to bounce around and cause unwanted reflections, leading to a subpar recording quality.
To ensure a high-quality recording, consider investing in acoustic panels or foam to absorb the sound and reduce reflections. Additionally, try positioning the microphone at the optimal distance and angle to capture the best sound. Experiment with different placements and techniques, and record in different parts of the room to find the best results.
With these tips, you can achieve a professional-sounding vocal recording even in a small space.
The Challenges Of Recording Vocals In Small Rooms
Recording vocals in small rooms can be challenging due to the lack of good acoustics. The sound waves tend to bounce off the walls and create unwanted echos. This can affect the clarity and quality of the vocals. Professional recording studios use soundproofing and acoustic treatment to create a controlled environment.
However, for those recording at home, there are some tips and tricks to improve the sound quality in a small room.
Recording vocals in a small room is one of the most challenging tasks for a recording engineer. The smaller the room, the more challenging it becomes to capture a clean and accurate sound. Small rooms are typically reflective, leading to unwanted frequency buildups and cancellations, which affect the overall sound quality. Therefore, a recording engineer needs to solve these problems before they start recording to ensure they get the best vocal recording possible.
Importance Of Good Acoustics
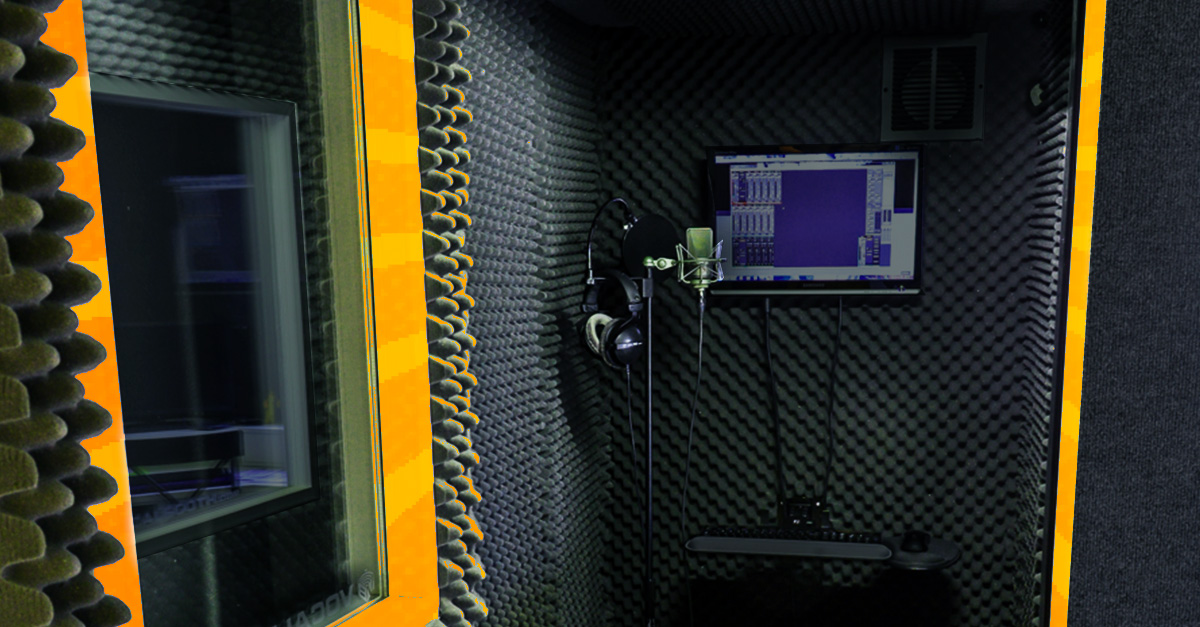
Good acoustics are essential for recording vocals in small rooms. The room must be acoustically treated to create a neutral and controlled recording environment. This treatment typically involves adding sound-absorbing panels and diffusers to the walls and ceiling of the room. Sound-absorbing panels help reduce unwanted reflections, while diffusers help scatter sound waves and provide a more natural-sounding recording environment.
Reflections And Resonances
Reflections and resonances are the main issues when recording vocals in small rooms. The sound waves reflecting off the walls, ceiling, and floor create resonances and standing waves, which can cause frequency buildups and cancellations. These reflections and resonances can be controlled by adding sound-absorbing materials and diffusers in strategic locations throughout the room. Also, using microphones that are directional can help eliminate unwanted reflections from the sides and back of the microphone.
Compromising On Control Room Space
One of the methods to overcome the challenges of recording vocals in small rooms is to compromise on control room space. The recording engineer may need to find alternative ways to monitor the recording without using a traditional control room setup. For example, using headphones can be an effective way to monitor the recording, or a portable recording setup, such as a laptop and audio interface, can be used. In conclusion, recording vocals in small rooms is a challenging task that requires proper planning and execution. Creating a neutral and controlled recording environment by acoustically treating the room, controlling reflections and resonances, and compromising on control room space can help achieve the best possible vocal recording.
Credit: flypaper.soundfly.com
Preparing Your Small Room For Optimal Vocals Recordings
Optimizing a small room for recording vocals takes some planning. Furnishing it with soft surfaces such as curtains, carpet or foam tiles can help to reduce unwanted ambient noise. Additionally, experimenting with microphone placement and investing in noise-cancelling headphones can also improve the quality of your recordings.
Preparing Your Small Room for Optimal Vocals Recordings: Recording vocals in a small room can be a bit difficult as it can quickly become challenging to manage acoustics and the background noise. However, with the right techniques and preparation, it’s possible to get excellent recordings without breaking the bank. Here are a few tips to maximize your small room and get the best out of your recording. Treating Your Room Acoustics: The first and foremost thing to do is to consider room acoustics. Rooms with walls made of brick, wood, or concrete cause audio waves to bounce off them, leading to reverberation and an echo effect. One way to solve this problem is to place acoustic foam panels on your walls. The foam reduces sound reflections, leading to clearer sound recordings. Controlling Background Noise: Background noise is a common problem that can ruin your vocal recordings. Air conditioning, computer fans, traffic, and other unexpected noises can enter your microphone, leading to an undesirable recording. One way to reduce background noise in a small room is to soundproof it. Soundproofing the room involves using materials such as sound curtains or thick blankets to absorb sound. You can also place weather stripping on doors, which can help prevent sounds from leaking in or out. Locating the Ideal Mic Positioning: A Mic is one of the most important elements when it comes to vocal recordings. You should ensure that you have the appropriate microphone for the tone you are looking to capture. After you have installed acoustic foam and soundproofing materials, start experimenting with the positioning of your microphone. Finding the perfect position will depend on the size of the room, the acoustics, style of recording, and the microphone capabilities. As a general rule, the closer the mic is to the sound source, the less background noise you’ll pick up. Similarly, the further the mic is from the wall, the less sound reflections will be picked up. In conclusion, preparing your small room is crucial for optimal vocals recordings. Ensuring proper room acoustics, soundproofing, and ideal microphone positioning can make all the difference. With these tips in mind, you can produce excellent recordings without spending much, and your audience will enjoy listening to your well-recorded vocals.
Essential Equipment For Recording Great Vocals In A Small Room
Achieving great vocal recordings in a small room requires essential equipment. Invest in a high-quality microphone, pop filter, and a reflection filter to eliminate unwanted noises and echoes. These tools can make a big difference in your vocal recordings.
Recording vocals in a small room can be a tricky task, but having the essential equipment can make a big difference in the quality of the final recording. In this post, we will discuss the must-have equipment for recording great vocals in a small room.
Microphones For Small Room Recording
The quality of a vocal recording depends largely on the microphone used. For a small room recording, a condenser microphone is the best choice as it is highly sensitive and captures detailed nuances of the voice. Among condenser microphones, large diaphragm microphones are the go-to choice for capturing warm and crisp vocals.
Budget-friendly Alternatives To Stellar Mics
If you are on a tight budget, you don’t have to compromise on the quality of your vocal recording. There are budget-friendly alternatives available that can give stellar results. One such alternative is the dynamic microphone. Although it is not as sensitive as the condenser mic, it is great for capturing loud vocals and rejecting background noise. Another option is the USB microphone, which is easy to use, budget-friendly and can produce decent quality recordings.
Pop Filters And Reflection Filters
Pop filters and reflection filters are essential accessories for a small room recording setup. A pop filter prevents popping sounds caused by plosive consonants such as ‘p’ and ‘b’ and helps in producing a clear vocal tone. A reflection filter or a vocal booth is used to control the room reflections and echoes, which can negatively impact the recording quality. In conclusion, having the right equipment can make a huge difference when it comes to recording great vocals in a small room. Investing in a good quality microphone, pop filter and reflection filter can help you achieve professional-sounding vocal recordings, even in a small room setup.
Credit: www.primacoustic.com
Tips And Tricks For Recording Vocals In A Small Room
Achieving high-quality vocal recordings in a small room can be a daunting task, but with the right approach, it’s possible. Tips and tricks such as selecting the right microphone, using acoustic treatment, and adjusting the positioning can significantly improve the overall sound of your recordings.
Recording vocals in a small room can be quite challenging for musicians and sound engineers alike. However, with the right tips and tricks, you can achieve a professional sound that matches that of big-budget studios. In this blog post, we’ll share some tips and tricks to optimize your recording quality and ensure your vocals sound great in a small room.
Choose The Right Vocal Performer
One of the most critical factors when recording vocals in a small room is choosing the right performer. A vocal performer who uses a gentle style of singing can help minimize issues like excessive room reflections that can occur in a small recording environment. Look for a versatile performer who can sing softly and forcefully and emphasize the right notes to create dynamics that complement the acoustics of the room. By choosing the right performer, you can help minimize drawbacks that stem from limited space in your recording room.
Use Headphones: Be The Performer
When recording vocals in a small room, it’s essential to counteract the adverse effects of acoustics by getting closer to the microphone. This means singing without worrying about how much your voice fills the room but instead focus on ensuring the vocals sound great in the microphone. One surefire way of achieving this is by using headphones to hear yourself better. By using headphones, you hear the sound you’re producing and keep adjusting until it matches the required quality. Moreover, headphones help reduce background noise from the room and enable you to focus on your performance.
Optimize Your Recording Techniques
In a small recording room, every little detail counts when it comes to recording techniques. Try to adjust your microphone settings and placement to minimize the room reflections and create a dry sound with a minimum amount of sounds from the room. Furthermore, try to use pop filters to prevent plosives, sibilance, and hissing sounds that may arise from consonants such as ‘s,’ ‘p,’ and ‘t.’ Additionally, placing a blanket or sound-dampening material on the floor and wall behind the singer can absorb the excess sound reflection and enhance the quality of the vocal recording. In conclusion, recording vocals in a small room requires attention to detail and optimal techniques that match the available space. By choosing the right performer, using headphones, and optimizing your recording techniques, you can achieve a professional sound that matches that of big-budget studios.
Post-production Tips For The Vocal Recordings
Learn how to make the most out of recording vocals in a small room with these post-production tips. With careful attention to noise reduction and EQ adjustments, you can achieve a professional-sounding vocal track that captures the emotion and character of the singer.
When it comes to recording vocals in a small room, post-production tips are essential to achieve a professional sound. The editing process can make a big difference in the quality of the final product. Below are some tips on how to effectively process and enhance the vocals for a polished and clean recording.
Eq And Compression
When recording vocals, it is important to have balance and clarity in the sound. EQ and compression are two essential tools to achieve this. EQ allows you to adjust the frequency levels of the vocals, while compression helps to even out the levels of the recording. When processing the vocals, start by using EQ to remove any unwanted frequencies that may be present in the recording. Then, apply compression to help even out the levels of the vocals. Be careful not to over-compress the vocals as this can result in an unnatural sound.
Adding Reverb To Enhance Space
Reverb is a great tool to create space in the vocals and add a sense of depth to the recording. When adding reverb, it is important to keep in mind the type of sound you want to achieve. A shorter reverb time works well for a more intimate sound, while a longer reverb time is better for a more spacious sound. Experiment with different reverb settings to find the perfect balance for your recording.
Additional Effects And Processing
In addition to EQ, compression, and reverb, there are other effects and processing techniques that can be used to enhance the vocals. These include adding delay, chorus, or distortion to the recording. However, it is important to use these effects sparingly as they can quickly become overpowering and detract from the overall quality of the recording. Experiment with different effects to find the perfect balance for your recording. In conclusion, post-production tips are essential when recording vocals in a small room. EQ, compression, and reverb are just a few of the tools that can be used to enhance the vocals and create balance and clarity in the sound. With practice and experimentation, you can achieve a polished and professional recording that is sure to impress.

Credit: www.soundonsound.com
Frequently Asked Questions On Recording Vocals In Small Room
Should You Record Vocals In A Small Room?
Yes, you can record vocals in a small room. However, it’s vital to ensure the room is acoustically treated to avoid audio issues such as echoes and room noise. Additionally, using high-quality recording equipment and a pop filter can further improve the sound quality of the vocals.
Can You Record In A Small Room?
Yes, you can record in a small room, but acoustic treatment is important to minimize unwanted echo and reverberation. You can also use a portable vocal booth to create a more controlled recording environment.
How Do You Record Audio In A Small Room?
To record audio in a small room, you can follow these tips: 1. Choose a quiet room with minimal background noise. 2. Add sound-absorbing materials such as curtains or blankets to the room. 3. Use a directional microphone to capture clear audio.
4. Close all windows and doors to block out external noise. 5. Position the microphone close to the sound source for optimum recording.
What Size Room Is Best For Recording Vocals?
The best room size for recording vocals is around 10×10 feet with a ceiling that is at least 8 feet tall. A smaller room helps to prevent echoes and reverb while a higher ceiling allows for better ventilation and less sound reflections.
The room should also have good acoustics and be free of outside noise.
Conclusion
Creating a professional vocal recording in a small room requires careful consideration of the space, equipment, and techniques used. While it may seem challenging, with the right approach and a focus on improving recording quality over time, you can produce great vocal tracks.
By experimenting with positioning, acoustics, and investing in quality equipment, you can take your vocal recording to the next level. Remember to keep practicing and refining your techniques to achieve the best possible results.