Recording drums with one microphone is possible; however, it requires proper placement and technique. To achieve a balanced sound, the microphone should be placed halfway between the kick drum and snare drum, and pointing towards the center of the kit.
In addition, the drummer should play evenly and adjust volume accordingly. Recording drums with one mic can be a challenging yet rewarding task for any home recording engineer looking to capture the genuine acoustic sound of the drums. While many professional studio drum recordings use multiple mics to achieve optimal sound production, one microphone can still produce a great sound by careful placement and technique.
Whether you’re an experienced drummer or a beginner, recording drums with one mic can test your drumming control and engineer skills, resulting in a unique, one-of-a-kind sound. We will discuss the best ways to record drums with one mic and achieve a balanced drum sound.
Credit: soundcloud.com
Preparing For Recording
To record drums with one mic, it’s important to prepare the room and the drum set beforehand. Make sure the kit is tuned properly, set up the mic at a distance from the drummer’s perspective, and consider using acoustic panels to control any unwanted reflections.

Credit: www.youtube.com
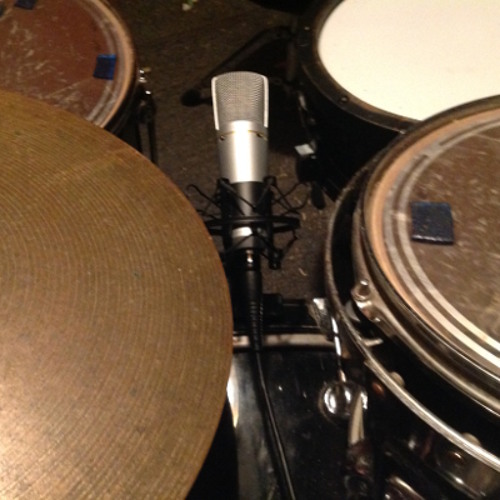
Techniques For Recording With One Mic
Recording drums can be a daunting task, especially if you don’t have a lot of microphones or recording equipment. However, with the right techniques, you can record an amazing drum sound with just one mic. In this post, we’ll explore some techniques for recording with one mic and how to get the best results.
The Overhead Technique
The overhead technique is a popular method for recording drums with a single mic. To use this technique, place the mic about 3 to 4 feet above the drum kit, pointed towards the center of the kit. This will capture the overall sound of the drums and cymbals. Since the mic is pointed downwards, it will also capture some of the room sound, giving you a more natural and ambient overall sound.
The Front Of Kit Technique
The front of kit technique involves placing the mic in front of the kit, about 1 to 3 feet away from the bass drum, pointed towards the snare drum. This technique will give you a more focused sound, with less room ambiance. You can experiment with moving the mic closer or further away from the kit to adjust the balance between the drums and cymbals.
The Room Mic Technique
The room mic technique involves placing the mic at a distance from the drum kit, usually 6 to 8 feet away, facing the kit. This technique captures a lot of room sound, giving you a more ambient and natural sound. To get the best results, make sure the room you’re recording in has a good sound and good acoustics.
Blending Multiple Techniques
While each of these techniques can be effective on their own, blending multiple techniques can give you an even better overall sound. For example, you could use the overhead and front of kit techniques together to capture both the overall sound and the focused sound of the drums. Or you could use the room mic technique along with one of the other two techniques to add more room sound to the mix.
| Technique | Placement | Sound Characteristics |
|---|---|---|
| Overhead | 3-4 feet above kit, pointed towards center | Overall sound, captures some room sound |
| Front of kit | 1-3 feet away from bass drum, pointed towards snare | Focused sound, less room ambiance |
| Room mic | 6-8 feet away, facing kit | Ambient, natural sound with a lot of room sound |
- Experiment with different mic positions and distances to find the best sound
- Use headphones to monitor the sound while recording
- Consider using a pop filter or windscreen to reduce plosives and other unwanted sounds
- Make sure the gain level on your recording device is set correctly to avoid distortion
By using these techniques, you can record an amazing drum sound with just one mic. Whether you’re recording at home or in a professional studio, these techniques will help you get the best possible sound out of your drum kit.
Tips For Getting The Best Results
Recording drums with only one mic can be challenging, but with careful planning, you can achieve great results. Below are some tips to help you get the best results when recording drums with one mic.
Ensuring Proper Drum Tuning
Before you start recording, it’s crucial to ensure that the drums are tuned properly. A poorly tuned drum can overwhelm the mic, making it difficult to achieve clarity in the recording. Ensure that the drummer or a professional has tuned the drums accurately.
Using Proper Drumsticks And Mallets
The type of drumstick or mallet you use can affect the quality of the recording. For example, using wooden drumsticks may produce a brighter sound, while using nylon-tipped drumsticks may produce a more mellow sound. Experiment with different types of drumsticks to find the ones that work best with your mic and recording setup.
Considering The Drummer’s Playing Style
The drummer’s playing style can also affect the quality of the recording. For example, if the drummer hits the drums with a lot of force, it may overload the mic, making the recording sound distorted. Ensure that the drummer plays with the appropriate force and that the mic is placed in the right position to capture the sound accurately.
With these tips in mind, you can achieve great results when recording drums with only one mic. Remember to experiment with placement and techniques to find the perfect sound for your recording.
Mixing And Mastering The Recording
Record drums with just one mic and achieve a high-quality sound with proper mixing and mastering. The key is to position the mic in the right spot and adjust the placement for different drum components.
After having successfully recorded drums with just one microphone, the next step is mixing and mastering the recording. This step is crucial to ensure that the final mix sounds great and can be enjoyed by listeners. Here are some tips on how to mix and master a single mic drum recording.
Adjusting Sound Levels
The first step in mixing a single mic drum recording is to adjust the sound levels of each drum. Start with the kick drum and adjust its level to a suitable volume, then move to the snare and do the same. Next, listen for cymbals and toms and adjust their levels to create a balanced mix. Keep in mind that the volume of each drum should be adjusted according to its importance in the music.
Adding Effects And Plugins
After setting the basic levels, it’s time to add some effects and plugins to enhance the sound quality of the drum recording. You can start by adding some EQ to the kick, snare, and other drums to enhance their frequencies. Compression can also be used to bring out the dynamics of the drums. If required, you can add some reverb to create a sense of space and depth in the recording.
Mastering The Final Mix
Now that the mix sounds great, it’s time to start mastering the final mix. This process involves using tools such as a limiter, equalizer, and compressor to ensure that the mix sounds great across all listening devices. Some final touches include adjusting the volume of the mix, making sure it’s not too loud or too quiet, and making sure the drums sound cohesive with the other instruments in the mix. In conclusion, mixing and mastering a single mic drum recording may seem daunting, but it’s a great way to create a unique and authentic sound. By following these tips, you’ll be able to create a high-quality recording that sounds great across all listening devices.

Credit: m.youtube.com
Frequently Asked Questions On Record Drums With One Mic
Can You Use 1 Mic To Record Drums?
Yes, you can use one mic to record drums, but the resulting sound quality may not be as desirable compared to using multiple mics. With one mic capturing all the sounds, it may be difficult to balance the mix and accurately capture each drum element.
However, it can still produce decent results for home recordings or demos.
How To Record Drums With One Sm57?
To record drums with one sm57, place it in front of the snare drum at a distance of 2-3 inches. Position the microphone at a 45-degree angle towards the center of the drumhead. Adjust the level to ensure there is no clipping.
Keep experimenting with positions and levels to get the perfect sound.
Can You Use One Overhead Mic For Drums?
Yes, you can use one overhead mic for drums. However, it may not capture all the nuances of the different drums and cymbals in the kit. It is better to use multiple mics to properly capture the individual sounds of each element in the drum kit.
Where Is The Best Mic Placement For One Mic Drum Recording?
The best mic placement for one mic drum recording is between the snare and the kick drum. This placement gives an overall balanced and authentic sound. Situate the mic a few inches above the drumhead and angled slightly towards the center of the kit.
Experimenting with placement can help you find the best sound for your recording.
Conclusion
To sum it up, recording drums with only one mic isn’t impossible, but it requires careful placement, acoustically suitable space, adjustments to the drummer’s technique, and post-processing enhancements. Whether you’re a home studio owner or a professional sound engineer, this technique offers convenience and cost-effectiveness, but it won’t replace the rich and dynamic sound of a multi-mic setup.
With these tips and tricks, you can experiment with different mic positions and find the sweet spot that works for your sound and style. Happy drumming!