Proper audio recording levels are crucial for achieving high-quality sound. Having optimal recording levels is vital to prevent distortion and maintain clarity.
Recording audio is an art that requires skill, precision and the right tools. The recording process begins with setting proper audio recording levels, which are the foundation of high-quality audio. The levels determine the strength of the signal that is being recorded and must be carefully monitored during the recording process.
Proper recording levels help prevent distortion, noise, and other unwanted artifacts that can compromise the overall quality of the recording. The ideal recording level varies from one recording situation to another and depends on the type of sound source, the microphone used, and the desired outcome. We will explore the importance of proper recording levels and provide tips on how to achieve the best results.

Credit: www.lennyb.com
Understanding Decibels
Recording audio is a vital part of creating high-quality content, and setting the proper audio levels is crucial for getting the best results. To get a more detailed understanding, it’s essential to start with the basics, particularly understanding decibels. Decibels are a unit of measurement used to calculate the power, intensity or loudness of sound or audio.
What Are Decibels?
Decibels, or dB, are a logarithmic unit of measurement that express the ratio between two values. In the context of audio, dB is used to measure a sound’s intensity or volume in relation to the threshold of hearing, on a scale from zero to about 194. However, the human ear’s threshold of pain usually occurs around 120dB.
How Are Decibels Used To Measure Audio Levels?
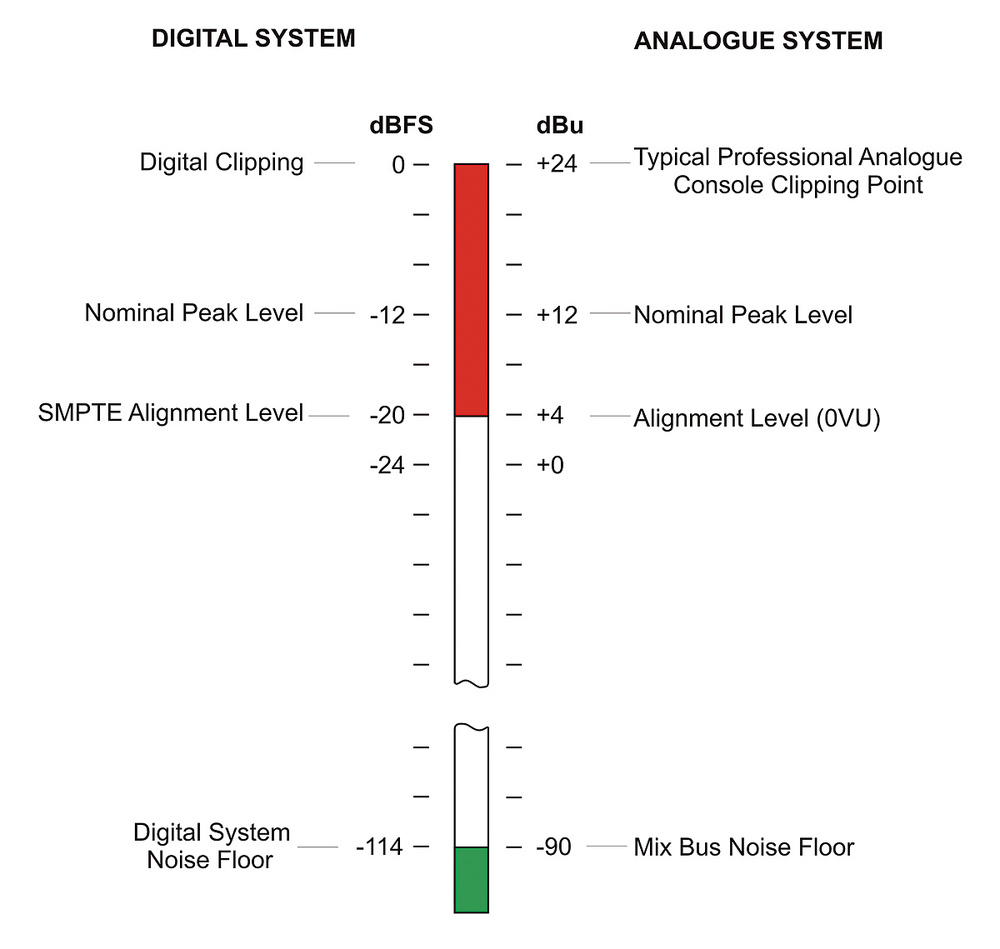
When recording audio, decibels represent the level of sound energy, and a proper reading needs to be taken while recording to obtain the ideal level. Decibel readings range from -60dB, which represents the sound of leaves rustling, to 0dB, the maximum level that audio recordings should ever reach.
Typically, recordings average between-18dBFS and -6dBFS, which means that the loudest sounds that were recorded fell somewhere between -18dB and -6dB. This range is known as the optimal range and ensures that the sound quality isn’t compromised while still preventing distortion.
When recording sound, the best option is to aim for -12dBFS, as this ensures a consistent level of sound quality throughout the recording. However, some circumstances might require a level slightly higher or lower to achieve the desired outcome. Setting the recording levels too high can lead to distorted audio, while setting them too low can result in low-quality audio.
Understanding decibels and how they are used to measure audio levels is essential in getting the best results when recording audio. By keeping the levels within the optimal range, you can ensure that your audio sounds great and doesn’t compromise the overall quality of your content.

Credit: www.mixinglessons.com
Ideal Audio Recording Levels
Recording audio at the proper levels is crucial for achieving high-quality sound. Set the gain level so that sound isn’t too low while avoiding distortion caused by levels that are too high. Ensure that the audio levels are consistent throughout the recording.
What Are The Ideal Audio Recording Levels?
Proper audio recording levels are essential to produce high-quality audio output. The ideal audio recording levels refer to the amount of audio signal being captured by the recording device, such as a microphone or digital audio workstation (DAW). The right recording levels will provide the best signal-to-noise ratio, maintaining the audio’s integrity without introducing unwanted noise and distortion. In general, the ideal recording levels for audio should be between -12dB and -6dB. This range offers ample headroom for post-production and ensures that the signal level does not peak or distort, which can cause irreparable damage to the audio quality.
How To Set The Right Audio Levels?
Setting the proper audio recording levels requires a few steps to ensure optimal performance. Follow the steps below to set the right audio levels:
- Connect your microphone or audio source to your recording device.
- Open your DAW and set the input levels. This can be done with the Input Gain or the Trim control on your audio interface.
- Record a test track to check the levels. Start with low-level sounds and gradually increase the volume until it peaks around -6dB.
- Adjust the input levels if necessary and repeat the test until you achieve the desired audio levels.
If your audio source has a preamp or amplifier, ensure that it is set to an appropriate level to avoid overloading the signal.
What Are The Risks Of Setting Levels Too High Or Too Low?
Setting the audio levels too high or too low can significantly affect the audio quality. If the levels are set too low, it can introduce background noise and unwanted electrical interference to the recording, making the audio difficult to hear. On the other hand, if the levels are set too high, it can cause distortion, clipping, and other audible artifacts that can compromise the audio’s overall quality. This could lead to irreparable damage and affect the overall performance of the final output. Therefore, it is essential to set the audio recording levels correctly and consistently to ensure high-quality audio production.
Tools For Setting Audio Levels
Proper audio recording levels are essential to producing high-quality recordings. There are a variety of tools available to help set and maintain these levels, including audio meters, gain controls, and limiter/compressors.
As a content creator, the last thing you want is for your audience to be distracted by poor audio quality. One of the essential steps in audio recording is setting the proper audio levels. The right audio level ensures that your audio is clear and consistent. However, finding the right audio level can be a bit challenging without the help of tools. In this section, we’ll go through the necessary tools for setting audio levels and how to use them correctly.
What Tools Are Necessary?
To set your audio levels, you will need the following tools:
- Headphones
- Audio Interface
- Recording Software
Using headphones allows you to monitor the audio recording in real-time, ensuring that you get the best quality. The audio interface is an essential tool that converts the analog signals to digital signals, making it easy to record and edit on your computer. Your recording software is another essential tool that lets you record and edit your audio.
How To Use These Tools?
Here are the steps to follow when setting your audio levels:
- Connect your headphones to your audio interface.
- Connect your microphone to the audio interface.
- Open your recording software.
- Set the audio interface as your input/output device within the recording software.
- Test your microphone to ensure that the levels are not too high or too low.
- Start recording while monitoring the sound with your headphones.
- Watch the peak meters on your audio interface to ensure that the levels are not too high.
- Adjust the gain accordingly to ensure that the levels are right.
- Save your recording and edit accordingly.
In conclusion, setting proper audio recording levels is crucial in creating high-quality audio content. With the right tools and knowledge, you can achieve the best results. Ensure that you use headphones, an audio interface, and recording software to set the proper audio levels. By following these guidelines, you’ll be well on your way to producing excellent audio content.
Tips To Maintain Proper Audio Levels
Maintaining proper audio levels is crucial for high-quality audio recordings. It’s important to ensure that the input levels are at the ideal range, avoiding distortion and noise in the recording. Proper gain staging, monitoring, and calibration can all help achieve consistent and clear audio levels.
Recording audio can be a tricky job, especially when it comes to ensuring the proper audio levels. Maintaining proper audio levels helps in attaining high-quality audio that is pleasant to listen to, easy to understand, and professional. In this blog, we will provide some useful tips to maintain proper audio levels while recording.
How To Monitor Audio Levels While Recording?
Monitoring audio levels while recording is a crucial step to maintain proper levels. The best way to monitor audio levels is to use headphones and check the audio metering available on your recording device. Adjusting the input level between -12db and -6db will help you get a clean and clear audio recording. Make sure to monitor the levels throughout the recording and make adjustments when necessary.
Eliminating Background Noise While Recording
Background noise can ruin an otherwise perfect audio recording. To avoid this, choose a quiet location, use a high-quality microphone, and turn off all other devices in the recording area. Engage in soundproofing the room to further eliminate background noise. Placing a rug, curtains, or foam panels on walls, ceilings, and floors can help reduce the unwanted echoes and reverberations.
Importance Of Pre-production And Post-production In Maintaining Levels
Pre-production and post-production processes play a vital role in maintaining proper audio levels. Pre-production includes planning, setting up, and testing the equipment and the recording environment, while post-production includes editing, cleaning, and mastering the audio. In pre-production, make sure to choose the right equipment, test the microphone levels, and eliminate any background noise. In post-production, adjust the levels, remove noise, add necessary effects, and master the audio to get a polished final product. In conclusion, maintaining proper audio levels while recording is crucial to ensure high-quality audio. Use headphones and the audio metering available on your recording device to monitor the levels. Eliminate background noise by choosing a quiet location, using a high-quality microphone, and soundproofing the room. Finally, pay attention to both the pre-production and post-production processes to attain a professional and polished audio recording.
Common Mistakes When Setting Audio Levels
When setting audio levels, there are common mistakes people make that can affect the overall quality of the recording. Some of these mistakes include not using headphones, not checking for background noise, and setting levels too high or too low.
It’s important to follow proper guidelines to achieve the best recording possible.
What Are The Common Mistakes Made While Setting Audio Levels?
When it comes to recording audio, it is crucial to get the levels right. There are many common mistakes that people make while setting audio levels, which can negatively impact the quality of the recording. Below mentioned are some of the most common mistakes that people make:
- Recording levels too high or too low: One of the most common mistakes is setting the recording levels too high or too low. If the levels are too high, it will cause distortion and clipping, resulting in poor audio quality. On the other hand, if the levels are too low, it may lead to a weak signal, which will make it hard to hear the audio clearly.
- Not using a Pop filter: Another common mistake is not using a pop filter. The pop filter helps to reduce popping sounds that occur when pronouncing certain letters such as “P” or “B.” This can help to improve the audio quality and make it easier to listen to.
- Not monitoring the audio: Failure to monitor the audio during recording can also lead to poor audio quality. It is essential to use headphones or speakers to monitor the sound and make necessary adjustments in real-time.
- Not paying attention to the environment: Recording audio in an improper environment can also lead to poor audio quality. Background noise can cause interference and make it difficult to hear what is being said. It is essential to record in a quiet environment to improve the clarity of the audio.
How To Avoid These Mistakes?
Avoiding these mistakes is critical to getting high-quality audio recordings. Below mentioned are some tips to help avoid these mistakes:
- Use a limiter: A limiter is a device that helps to prevent distortion caused by high levels. It is important to set a limiter to ensure that the levels do not go beyond the desired range.
- Set levels correctly: Properly setting audio levels is crucial for high-quality recordings. It is essential to set levels based on the loudest sound, ensuring it doesn’t go beyond 0 dB.
- Use a pop filter: A pop filter can significantly reduce popping sounds that may interfere with the audio quality. It is an affordable solution that can make a big difference.
- Monitor the audio: It is essential to monitor the audio while recording to avoid any issues in real-time. Use headphones or speakers to monitor the sound and make necessary adjustments if required.
- Use the right environment: The environment plays a crucial role in the quality of the audio. Recording in a quiet space can help avoid background noise that can impact the audio quality.
Recording proper audio levels is essential for producing high-quality audio recordings. Avoiding these common mistakes and following best practices can help to produce exceptional sound quality.
Credit: www.soundonsound.com
Frequently Asked Questions For Proper Audio Recording Levels
What Is A Good Audio Level For Recording?
The ideal audio level for recording is between -12 and -6 decibels (dB) on your recording device. This range ensures that the sound is not too quiet and not too loud, allowing for clear and balanced audio. It’s important to avoid recording levels above 0 dB, as this can cause distortion and a poor listening experience.
What Are The Optimum Levels For Recording Audio Between?
Optimum levels for recording audio usually range from -18 dBFS to -12 dBFS. However, it ultimately depends on the equipment being used and the type of audio being recorded. It’s best to consult with the equipment manufacturer or a professional audio engineer for specific recommendations.
How Proper Recording Levels Are Set?
Proper recording levels are set by adjusting the gain levels of the recording equipment to avoid clipping or distortion. It is best to start at a lower gain level and gradually increase it until the desired volume is achieved. It is also important to monitor the levels during recording and adjust as necessary.
What Level Should Vocal Recording Be?
The ideal vocal recording level is typically between -18 and -12 decibels, which ensures the recording has enough headroom for post-production editing without introducing distortion or clipping.
Conclusion
Maintaining proper audio recording levels is a crucial factor to keep in mind for achieving clear and high-quality recordings. Neglecting to pay attention to the recording levels can result in poor sound quality, and lead to the loss of important information in the audio.
Always use the right equipment, ensure that all levels are set correctly, and regularly monitor the levels to obtain the best results. By following these guidelines, you’ll be on your way to producing content that sounds professional and polished. Happy recording!