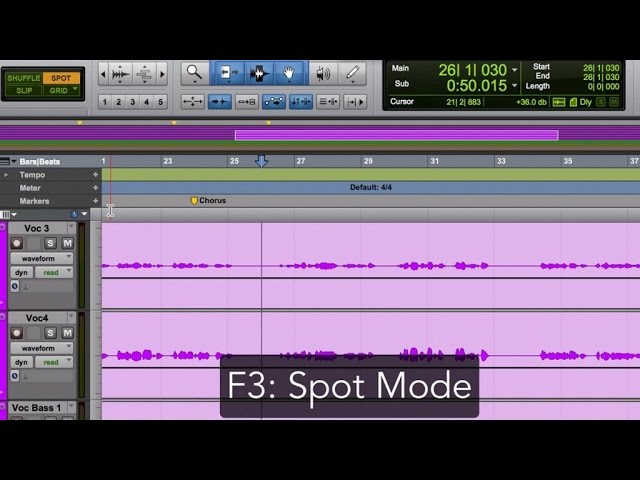
Pro Tools’ Spot Mode allows users to accurately position audio clips within a session. With Spot Mode, users can place clips in precise locations based on timecode, bar/beat, or samples.
Pro Tools is industry-standard software for audio production, and its Spot Mode feature is an essential tool. Whether editing music or sound for film, Spot Mode makes it easier to ensure clips are synchronized with the project’s overall timeline. This feature enables users to place audio clips with exceptional precision, thanks to the extensive options for setting clip location.
Spot Mode is an invaluable tool for professionals aiming to perfect their work and deliver high-quality results.

Credit: www.mixinglessons.com
Getting Started
Spot mode is an excellent feature of Pro Tools First, ideal for getting started with music production. It enables users to create seamless edits and automatically correct any musical misalignments, resulting in better recordings.
If you’re new to Pro Tools First or just starting out with Spot Mode, we’ve got you covered. This guide will provide clear, step-by-step instructions on how to download and install the software, create a new session and get started with Spot Mode.
Downloading And Installing Pro Tools First
The first thing you need to do is download and install Pro Tools First on your computer. Here’s how to do it:
- Go to the Avid website and create an account.
- Once you’ve created an account, log in and download the Pro Tools First installer.
- Run the installer and follow the on-screen instructions to complete the installation process.
- When the installation is complete, launch Pro Tools First.
Creating A New Session
Now that you’ve installed Pro Tools First, it’s time to create a new session. Here’s how to do it:
- Click on “File” in the top menu and select “New”, or use the keyboard shortcut “Command” + “Shift” + “N” on a Mac or “Control” + “Shift” + “N” on a PC.
- Choose your session settings such as sample rate, bit depth and session length, and then click “Create”.
Using Spot Mode
Spot Mode is a feature in Pro Tools First that makes it easy to spot and edit audio files. Here’s how to use it:
- Click on the “Edit” menu and select “Spot Mode” or use the keyboard shortcut “F7”.
- Choose the audio file you want to edit and drag it to the Spot Marker located at the top of the screen.
- Use the “Spot Conform” tool to align the audio file with the session’s timeline.
- Once the file is aligned, you can make edits using the standard editing tools in Pro Tools First.
In conclusion, Pro Tools First Spot Mode makes it easy to edit audio files, and by following these simple steps, you can get started with it in no time.
Using Pro Tools First Spot Mode
Pro Tools First Spot Mode is a powerful tool for precise editing in audio mixing. This feature helps you make minute adjustments to your recordings, allowing you to easily move and place sound accurately.
Pro Tools First Spot Mode is a powerful tool that helps to edit audio files with precision and accuracy. It is extremely useful for aligning multiple tracks or editing audio recordings for music or video projects. In this article, we will be discussing the steps involved in using Pro Tools First Spot Mode with the following H3 headings: Importing Audio Files, Navigating the Spot Mode Window, Setting Spot Points, Editing Spot Points.
Importing Audio Files
To start using Spot Mode in Pro Tools First, you need to import audio files into the session. Click on the File menu and choose Import to select the files that you want to work on. Once the files are imported, you can drag and drop them onto the track where you want to edit them.
Navigating The Spot Mode Window
The Spot Mode Window is where you will perform all the editing tasks for your audio files. To access it, click on the Spot Mode button which is located in the top right corner of the Pro Tools First interface. The Spot Mode Window will then open up, showing a graph display of your audio recordings.
Setting Spot Points
After opening the Spot Mode Window, you can begin setting spot points. Spot points are markers on your audio files that help you align or edit specific sections. To set a spot point, zoom in on the section of the audio recording that you want to edit and hit the “Add Spot” button. This will create a spot point at the position of the playhead.
Editing Spot Points
Once you have set up spot points, you can begin editing them. Simply click on the spot point to select it and then click and drag the marker to move it. You can also use the “nudge” function to move the selected spot point to the left or right using the arrow keys on your keyboard. Additionally, you can extend or shorten the length of the spot point by clicking and dragging the edges of the marker. Spot Mode in Pro Tools First is an excellent tool for editing audio files with precision and accuracy. With the ability to set and edit spot points, you can ensure that your audio recordings are perfectly aligned and edited to your liking. Follow the steps outlined in this article to start using Spot Mode in your Pro Tools First sessions.
Advanced Techniques
Learn advanced techniques in Pro Tools First Spot Mode to produce high-quality audio tracks and recordings with ease. The new feature allows you to align sound clips with precision, making editing a breeze.
Advanced Techniques: Using Spot Mode in Pro Tools First Pro Tools First is a digital audio workstation that allows users to edit and manipulate audio and video tracks. One of its advanced features is Spot Mode, which allows users to place a specific audio segment at a precise timecode position. When it comes to advanced techniques using Spot Mode, users can greatly improve their workflow and achieve a more polished finished product. In this article, we will explore how to use Spot Mode with video, create reminders and notes, and export a spotting list. Using Spot Mode with Video Pro Tools First has a unique feature that allows users to sync their audio with video. Using Spot Mode with video enables users to place an audio segment at a specific timecode position in the video timeline. This can be extremely useful for sound designers who are working on a film or video project. By using Spot Mode, sound designers can create a seamless audio experience that matches the on-screen action. To use Spot Mode with video in Pro Tools First, follow these steps: 1. Import your video file into Pro Tools First. 2. Right-click on the video file and select “Import Audio”. 3. Choose “Create New Audio Track” in the “Import Audio” dialog box. 4. When the Audio Import Options box appears, select “Spot Mode” to sync your audio with the video. 5. Use the Spot tool to place your audio segment at the exact timecode position in the video timeline. Creating Reminders and Notes Pro Tools First Spot Mode also allows users to create reminders and notes for specific timecode positions. This feature can be extremely helpful for editors who need to mark specific audio segments for later use. By using the Spot Mode Note function, users can add information about a particular audio segment, such as the name of the speaker or the content of the dialogue. To create reminders and notes in Spot Mode, follow these steps: 1. Use the Spot tool to place your audio segment at the desired timecode position. 2. Right-click on the audio segment and select “Add Spot Note”. 3. Enter your reminder or note in the “Spot Note” dialog box. Exporting a Spotting List Finally, Pro Tools First Spot Mode also allows users to export a spotting list of all the audio segments placed in the project. This function can be extremely useful for editors who need to reference the audio segments later or share their work with others. To export a spotting list in Pro Tools First, follow these steps: 1. Go to the “File” menu and select “Export”. 2. Select “Spotting List” in the “Export” dialog box. 3. Choose the desired format and save the file. Conclusion: Pro Tools First Spot Mode has a variety of advanced techniques that can greatly improve your workflow. By using Spot Mode with video, creating reminders and notes, and exporting a spotting list, users can achieve a more polished finished product. Whether you’re an audio editor, sound designer, or film and video editor, Pro Tools First Spot Mode is a valuable tool that can take your work to the next level.
Credit: www.youtube.com
Troubleshooting Common Issues
To troubleshoot common issues with Pro Tools First Spot Mode, start by checking your audio input settings and ensuring your tracks are armed for recording. If you experience latency or playback issues, adjust your buffer size or disable plug-ins not in use.
Be sure to also stay up to date with software updates to avoid compatibility issues.
Introduction: Pro Tools First is a popular digital audio workstation for music production, recording, and editing. However, even the most experienced and proficient users can encounter issues and problems while using it. The Spot Mode in Pro Tools First is an essential feature that enables users to align audio files in the correct position. However, some users might encounter issues with the Spot Mode while using it. We will explore the most common issues and the best troubleshooting solutions for them. Issues with Audio Files: One of the most common issues users might face while using the Spot Mode in Pro Tools First is with audio files. If an audio file is not imported correctly or in the right format, it might not play as expected or fail to spot correctly. In such cases, users must ensure that the audio file is in the right format, preferably WAV or AIFF. Additionally, users must make sure that the audio file is imported into the project at the correct sample rate and bit depth. Non-native audio files might cause compatibility issues and not play as expected. Spot Points Not Aligning: Another common issue that users might face is Spot Points not aligning in Pro Tools First. The Spot Mode might fail to recognize the correct starting points in the audio file, leading to unsynchronized audio. In such cases, users can try adjusting the Spot Mode settings, such as the Spot Mode Offset or the Spot Mode Sensitivity. These settings can help in adjusting the Spot Points accurately in the audio file. Pro Tools First Crashing: Another frustrating issue that users might face is Pro Tools First crashing unexpectedly. This issue can occur due to various reasons, such as insufficient computer resources, corrupted audio files, or driver conflicts. In such cases, users can try optimizing their computer settings, such as increasing the buffer size or closing unnecessary programs. Additionally, users must ensure that their Pro Tools First version is updated to the latest version, and all plugins and drivers are up-to-date. Conclusion: The Spot Mode in Pro Tools First is a powerful tool that can simplify and streamline audio editing. However, it is essential to understand that issues might arise while using it. Users must try the troubleshooting solutions mentioned above to fix most common issues. Additionally, users must regularly backup their projects and maintain their computer systems to ensure smooth and uninterrupted audio editing experience.
Credit: www.independent.co.uk
Frequently Asked Questions For Pro Tools First Spot Mode
What Is Spot Mode?
Spot mode is a camera mode that allows you to focus on a specific area in your image or video. With spot mode, your camera will only detect and adjust the exposure and focus on that specific area, resulting in a clearer, more detailed shot.
What Is Spot Dialog In Pro Tools?
Spot dialog is a feature in Pro Tools that enables users to quickly find and edit specific sections of a recording. This is useful for fixing mistakes, adding effects, or making any necessary changes to the audio. It functions like a marker, allowing users to easily navigate through a session and make edits efficiently.
How Do I Turn On Slip Mode In Pro Tools?
To turn on slip mode in Pro Tools, simply press the “F2” key or click on the slip mode button located on the toolbar. This will activate slip mode, allowing you to move audio clips within a track without affecting the other clips’ positions.
How Do I Change The Start Point In Pro Tools?
To change the start point in Pro Tools, click and drag the timeline ruler to where you want the new start point to be. Alternatively, use the “Location” field in the transport window and type in the new start point timecode or bar/beat value.
Conclusion
To sum up, Pro Tools First Spot Mode is an exceptional feature that gives audio engineers, music producers, and musicians the flexibility to edit audio precisely and effortlessly. This unique feature allows you to Spot audio clips to a specific point on the timeline and adjust the pitch, tempo, and volume for a perfect match.
Not only does this feature save a tremendous amount of time, but it also guarantees an expert outcome. Hence, Pro Tools First Spot Mode deserves commendation for its efficiency and quality.