Parallel drum compression involves blending a compressed and uncompressed signal together, resulting in a more balanced and controlled drum sound. Drum compression is an essential tool in music production, shaping the dynamics and impact of the drums in a mix.
However, traditional drum compression can often lead to a loss of natural feel and tone, as drum transients and nuances are squashed. Parallel drum compression offers a solution by allowing the engineer to blend a compressed and uncompressed signal together, retaining the natural dynamics while also providing more control and balance.
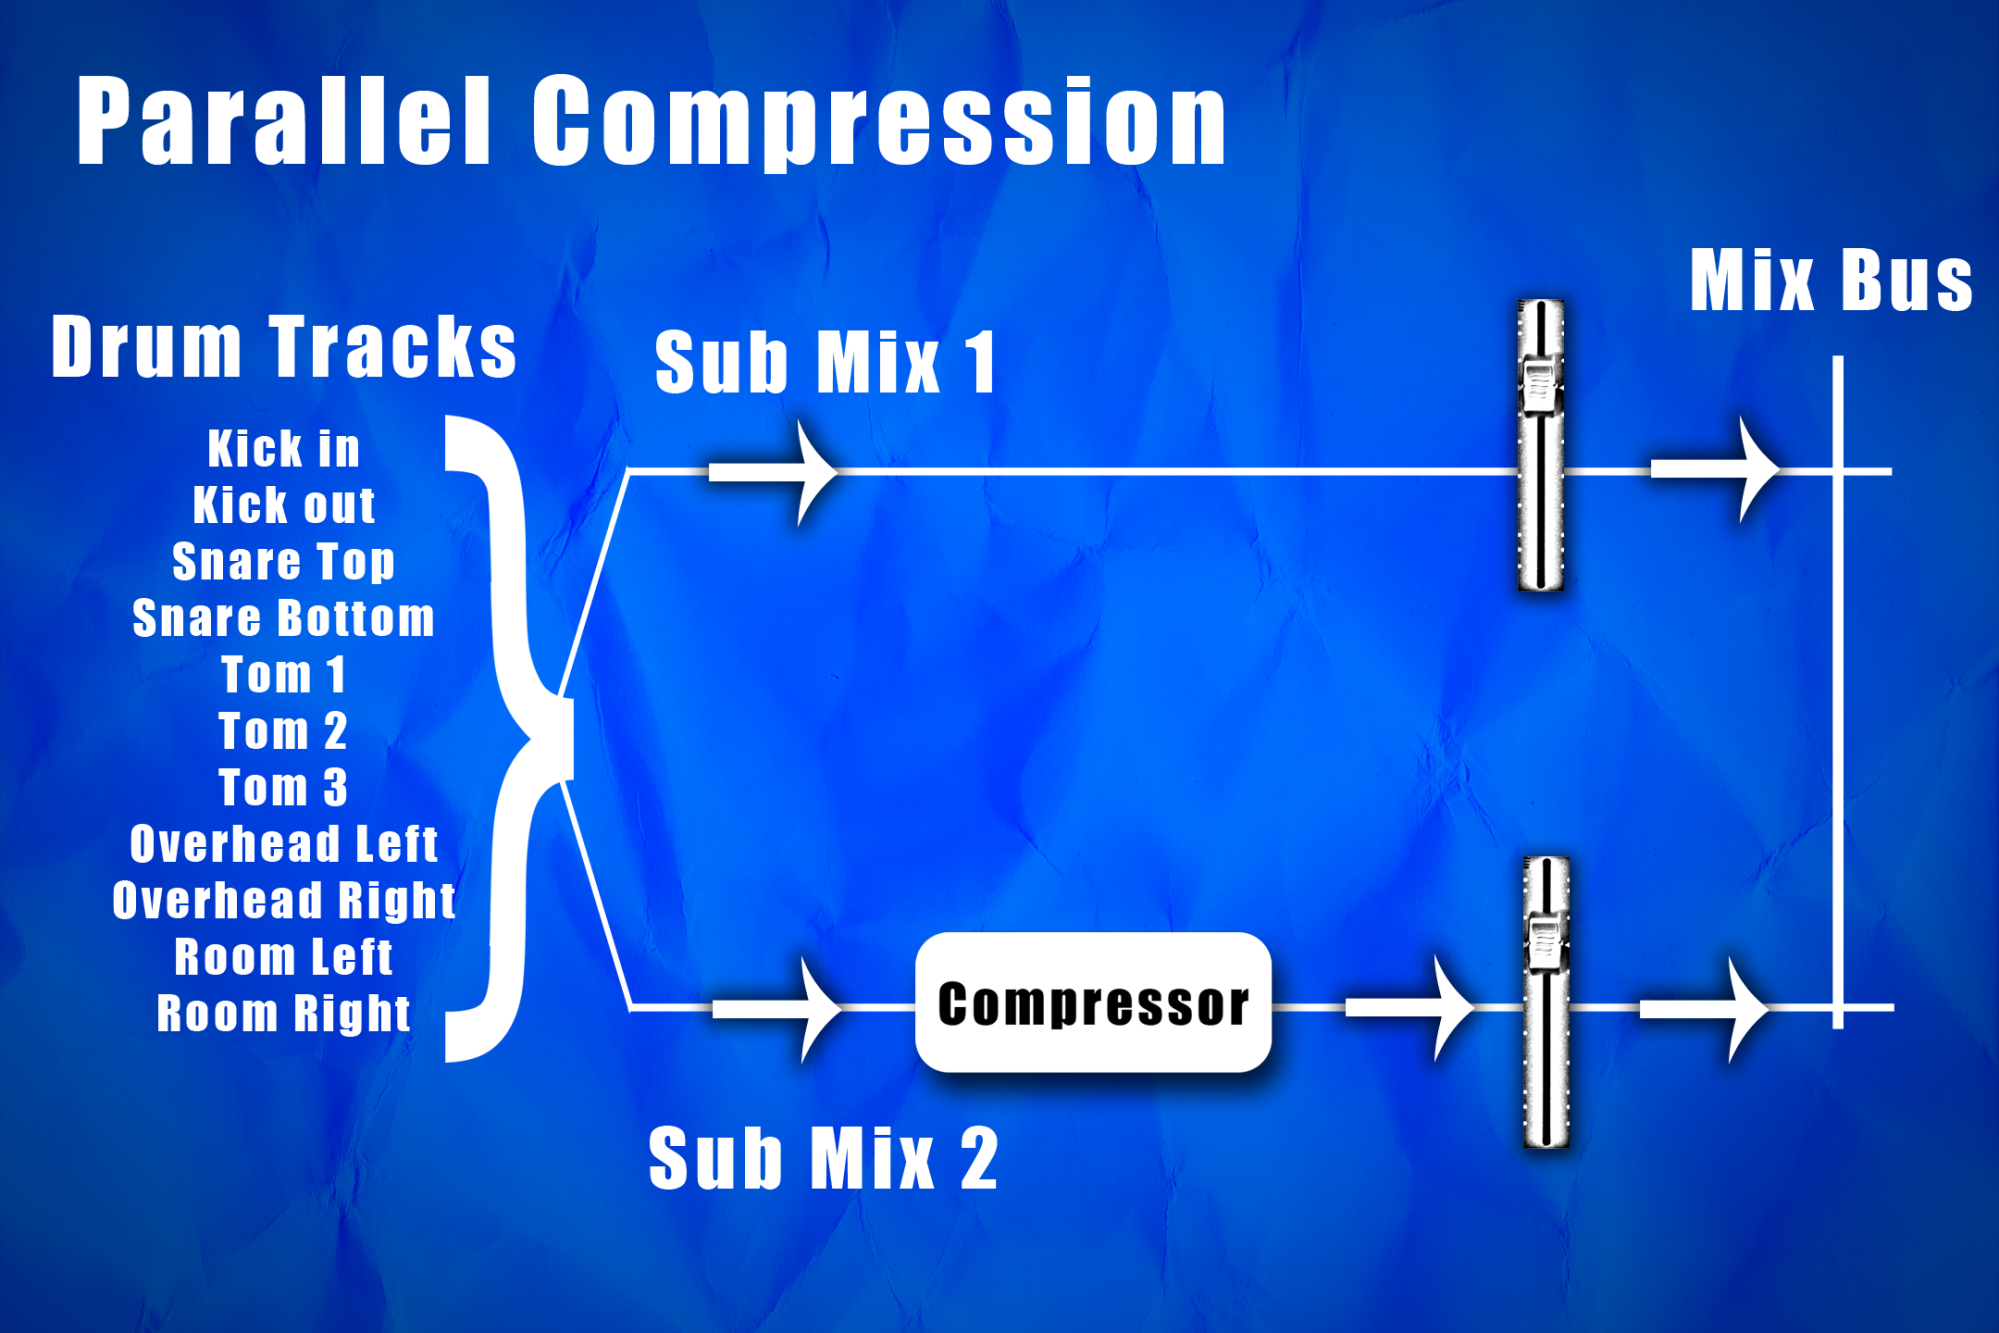
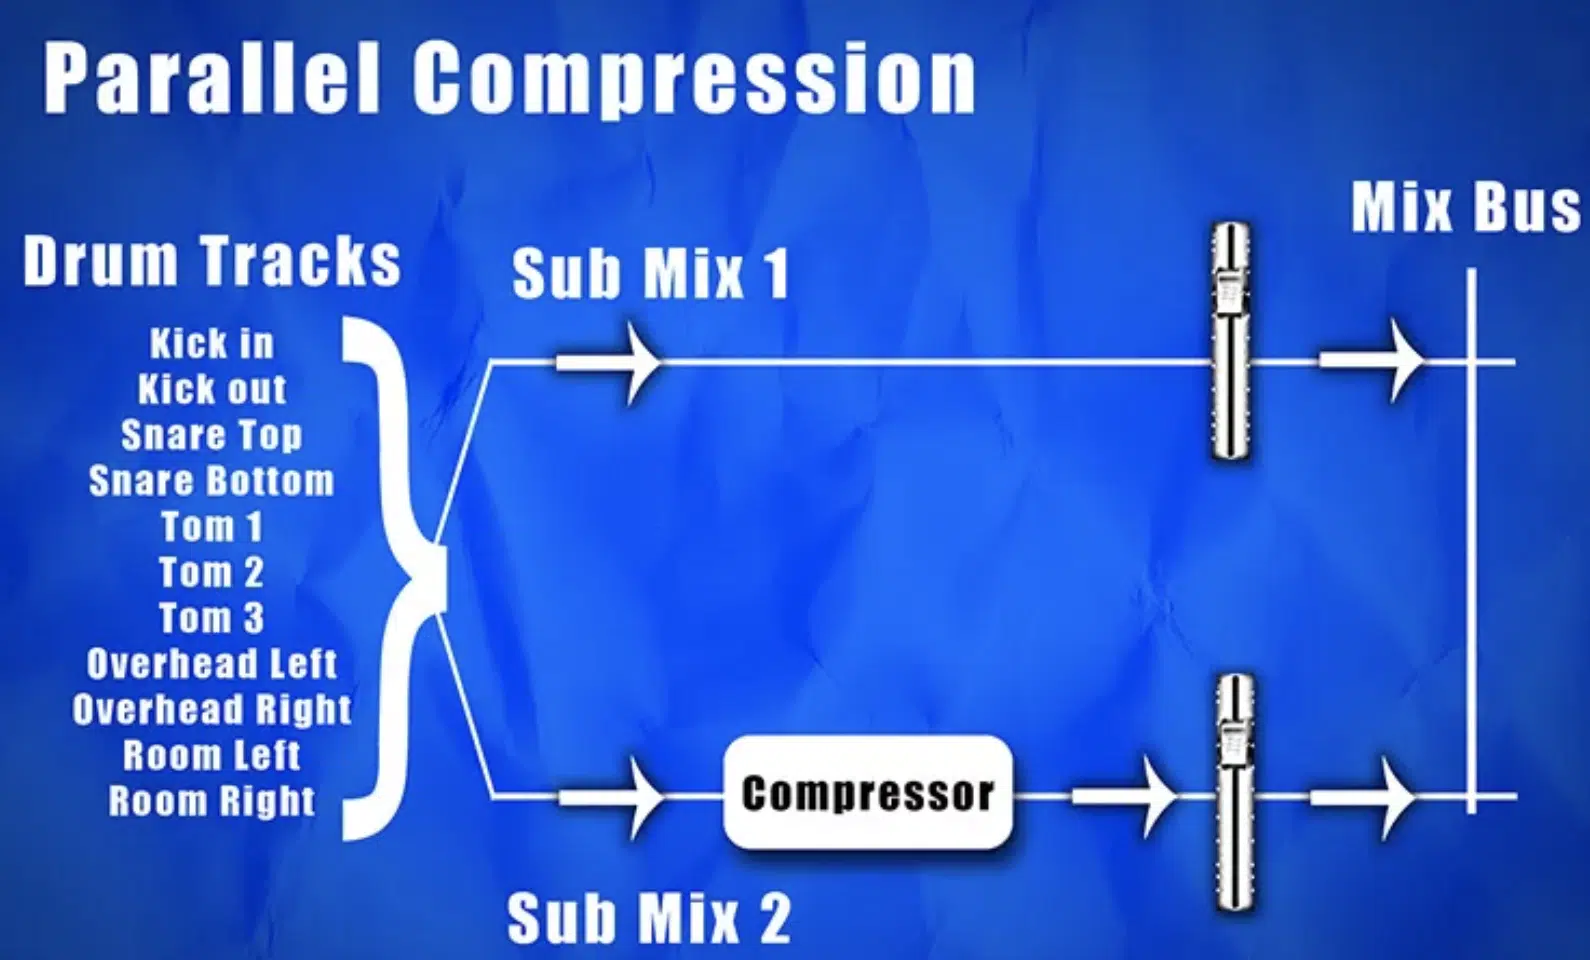
This technique involves sending a copy of the drum track to a compressor, applying heavy compression, and then blending it back in with the original signal. The compressed signal provides added sustain and body, while the dry signal retains the punch and attack. This results in a fuller, more controlled drum sound that still maintains the natural feel and tone of the performance.
Credit: abhigginson.wordpress.com
Setting Up Parallel Compression For Drums
Parallel drum compression can add depth and punch to your drum sound. To set it up, route a copy of your drum track to a new channel and apply heavy compression, then blend it with the original track to achieve the desired effect.
When it comes to mixing drums, parallel compression can give your drums the power and punch that they need to cut through the mix. Setting up parallel drum compression can be a little tricky, but with the right compression settings and the proper setup for sends and returns in your DAW, you can achieve amazing results.
Choosing The Right Compression Settings
The first step in setting up parallel compression for drums is selecting the right compression settings. When it comes to parallel compression, you want to use a high compression ratio, typically around 4:1 or higher. You also want to use a faster attack time, around 10-30ms, and a slower release time, around 100-300ms. Use a lower threshold to capture the softer hits and raise the input gain to balance the output level.
Setting Up The Sends And Returns In Your Daw
To set up parallel compression, you’ll need to use sends and returns in your DAW. First, duplicate your drum track and route one track to the main output and the other to a bus. On the bus track, apply your desired compression settings. Then, use a send fader on the original track to send a portion of the audio to the compressed bus. Start with 0dB and adjust as needed.
Adjusting The Relative Mix Of Your Compressed And Uncompressed Signals
Now that your sends and returns and compression settings are in place, adjust the relative mix of your compressed and uncompressed signals. You want to aim for a blend that gives you the power and punch of the compressed signal without losing the natural sound of the original track. Start with the compressed signal at 100% wet and adjust the fader until you reach the desired level of parallel compression. The balance between the original track and compressed track will depend on your preference, so trust your ears and experiment until you find the sweet spot. In conclusion, setting up parallel compression for drums requires attention to detail and a bit of experimentation. By choosing the right compression settings, setting up the sends and returns in your DAW, and adjusting the relative mix of your compressed and uncompressed signals, you can achieve a powerful and punchy drum sound that will cut through your mix.
Credit: unison.audio
Using Parallel Compression On Different Drum Elements
By using parallel compression on different drum elements, you can add depth and power to your drum tracks without sacrificing clarity. This technique involves duplicating the drum tracks, compressing one copy heavily while leaving the other untouched, and then blending them together for a fuller sound.
Using Parallel Compression on Different Drum Elements Parallel compression is a popular mixing technique used to enhance the impact and clarity of individual drum sounds. Instead of compressing a drum track and losing its natural dynamic range, parallel compression adds a compressed copy of the original signal, resulting in a full and punchy sound. In this section, we’ll focus on using parallel compression on different drum elements, including the kick drum, snare drum, toms, and cymbals/overheads. Kick Drum The kick drum is the foundation of a drum kit, and parallel compression can help give it the necessary punch and weight in a mix. To apply parallel compression to the kick drum: 1. Duplicate the kick drum track and send it to an auxiliary channel. 2. Add a compressor to the auxiliary channel and set the attack and release times to fast. 3. Apply a high ratio and threshold to compress the signal heavily. 4. Blend the compressed signal with the original kick drum track until you find the desired level of punch. Snare Drum Similar to the kick drum, the snare drum also benefits from parallel compression. It brings out the snap and sustain that can get buried in a mix without proper compression. To apply parallel compression to the snare drum: 1. Duplicate the snare drum track and send it to an auxiliary channel. 2. Add a compressor to the auxiliary channel and set the attack and release times to medium. 3. Apply a moderate to high ratio and threshold to level out the snare hits. 4. Blend the compressed signal with the original snare drum track to achieve the desired snap and sustain. Toms Toms are often overlooked when it comes to parallel compression, but they can add a lot of impact and sustain to a mix. To apply parallel compression to the toms: 1. Duplicate the tom tracks and send them to an auxiliary channel. 2. Add a compressor to the auxiliary channel and set the attack and release times to medium. 3. Apply a moderate ratio and threshold to level out the tom hits. 4. Blend the compressed signal with the original tom tracks to give them extra impact and sustain. Cymbals and Overheads Cymbals and overheads capture the overall sound of a drum kit and can benefit from parallel compression to add clarity and presence. To apply parallel compression to cymbals and overheads: 1. Duplicate the cymbal/overhead tracks and send them to an auxiliary channel. 2. Add a compressor to the auxiliary channel and set the attack and release times to slow. 3. Apply a low ratio and threshold to control the peaks. 4. Blend the compressed signal with the original cymbal and overhead tracks to add clarity and presence to the overall drum sound. Conclusion: Using parallel compression on different drum elements can help bring out the natural characteristics of each drum sound. Whether it’s adding punch to the kick drum or sustain to the snare drum, parallel compression is a powerful mixing technique that can take your drum sound to the next level.
Advanced Tips And Techniques For Parallel Drum Compression
Parallel drum compression is a powerful technique that allows you to achieve a tighter, punchier sound for your drum tracks. By sending a copy of your drum mix through a parallel compression chain, you can effectively balance the mix of your drums, adding depth and thickness while maintaining clarity and separation. In this post, we’ll be discussing advanced tips and techniques for parallel drum compression that can take your mixes to the next level.
Triggering Your Compressor With Drum Samples
One advanced technique for parallel drum compression is to use drum samples to trigger your compressor, rather than relying solely on the actual recorded drums. This can be especially useful if you’re working with drum tracks that lack consistent timing or dynamic range. By blending samples with your original drum mix, you can create a tight, powerful foundation for your mix, while still preserving the unique character of the recorded drums.
Sidechaining Your Compressor To Get Tighter Drums
Another advanced tip for parallel drum compression is to use sidechain compression to create a tighter, more focused sound for your drums. With sidechain compression, you can use the kick drum to trigger the compressor on other drum elements, such as the snare or hi-hat, effectively reducing their volume when the kick drum hits. This can help create a cleaner, more cohesive drum mix, without sacrificing impact or energy.
Creating Parallel Compression Chains For Different Drum Elements
Finally, one effective technique for parallel drum compression is to create different compression chains for different drum elements. For example, you might use a more aggressive compression chain for your kick drum, while using a more subtle approach for your snare or overheads. By tailoring your compression settings to each specific drum element, you can achieve greater control over each part of the mix, leading to a more dynamic, impactful overall sound.
Using Automation To Control Parallel Compression
Automating parallel compression for drums can be an efficient way to achieve a balanced sound. With the right tools, parallel compression can be easily controlled to boost the rhythm of your tracks.
When it comes to producing drum tracks, parallel compression is an excellent technique to enhance the impact and presence of the drums. By routing a duplicate copy of the drum tracks to a compressor, you can apply heavy compression to the duplicate tracks while preserving the transients and dynamics of the original tracks. In this way, you can achieve a powerful and punchy drum sound that sits well in the mix. Using automation to control parallel compression can take your drum mixing to the next level by allowing you to fine-tune your compression settings and make dynamic adjustments over the course of the mix.
Automating Your Sends And Returns
To create a parallel compression track, you need to route a duplicate copy of your drum tracks to a separate channel that has a compressor inserted on it. This can be done by using sends and returns in your DAW. However, manually adjusting the send level and return fader for the parallel track can be time-consuming and tedious. By automating the send level and return fader, you can easily control the amount of parallel compression applied to your drum tracks over time.
Automating Your Compressor Parameters
In addition to automating your sends and returns, you can also automate the parameters of your compressor to create dynamic changes in the level of compression applied to your drum tracks. For example, you may want to increase the ratio or attack time of the compressor during the chorus of a song to make the drums hit harder. By automating these parameters, you can make precise adjustments to your compressor settings without having to do it manually with a mouse or fader.
In Conclusion
In conclusion, by using automation to control parallel compression, you can achieve a more dynamic and powerful drum sound that sits well in the mix. By automating your sends and returns and compressor parameters, you can make precise adjustments to your drum mix that add energy, impact, and depth to your productions. Give it a try and see how it can take your drum mixing to the next level. Happy mixing!

Credit: www.youtube.com
Frequently Asked Questions For Parallel Drum Compression
Should You Use Parallel Compression On Drums?
Yes, using parallel compression on drums can enhance their sound and bring out the nuances that may not be apparent with conventional techniques. Parallel compression involves blending an unprocessed signal with a heavily compressed one to achieve a fuller, more dynamic sound.
However, it is not a one-size-fits-all solution, and it’s important to experiment and adjust the settings to get the desired effect.
What’s The Point Of Parallel Compression?
Parallel compression is a technique of blending dry and compressed audio signals to maintain the original sound’s dynamics. It enhances the audio’s loudness and impact while preserving its natural characteristics. Thus, it is useful when the audio lacks punch, or the dynamics needed are challenging to achieve otherwise.
How Much Gain Reduction For Parallel Compression?
The amount of gain reduction for parallel compression depends on the specific mix and desired results. However, typically, the range can be from 2-6 dB of gain reduction.
How Do You Parallel Compress A Drum Bus?
To parallel compress a drum bus, insert a compressor on the drum bus with high compression, low attack, and release settings. Send a copy of the drum bus to another bus without compression. Adjust the fader of the uncompressed bus until the desired amount of parallel compression is achieved.
Experiment with the compression settings on both buses until the desired sound is achieved.
Conclusion
Parallel drum compression is an effective technique for enhancing drum tracks. By blending the compressed signal with the original, you can achieve a fuller, more impactful sound while preserving the natural dynamics and nuances of the performance. However, it’s crucial to exercise restraint and avoid overdoing it.
Experiment with different settings and ratios to find the right balance for each mix. Incorporating parallel compression into your workflow can help you achieve professional-sounding results and stand out in today’s competitive music industry.