Pro Tools First allows users to mix and edit windows in one easy-to-use system. Pro Tools First is a powerful digital audio workstation that allows users to record, edit, and mix audio on their computers.
With its intuitive interface, it’s easy to navigate, even for novice users. One of the key features of Pro Tools First is its ability to mix and edit audio tracks in one window. This makes it simple to adjust levels, add effects, and make other changes without having to switch between multiple windows.
Additionally, Pro Tools First offers a range of advanced editing and mixing tools, including automation, clip gain, and real-time EQ and dynamics processing. Whether you’re a professional audio engineer or a beginner looking to explore the world of digital audio editing, Pro Tools First is a great choice.
Credit: www.mixinglessons.com
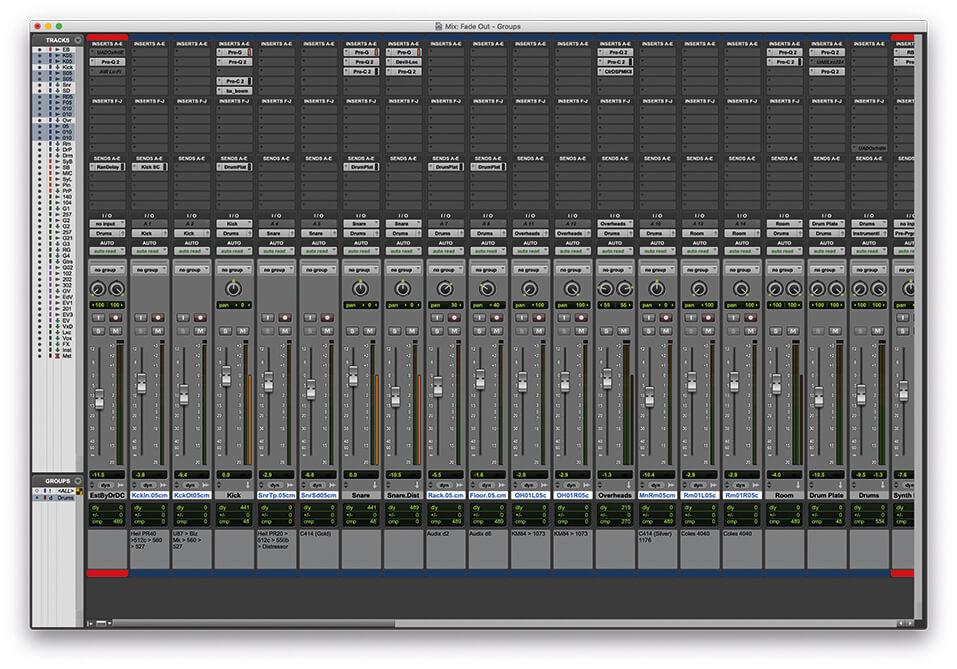
The Mix Window
The Mix Window in Pro Tools First is a useful tool for editing and mixing tracks. It allows you to adjust levels, panning, and other settings quickly and easily. With the Mix Window, you can create a balanced and professional sounding mix for your music or podcast.
Pro Tools First is a professional-grade digital audio workstation designed for novice and intermediate users. Efficiently combining recording, editing, and mixing capabilities, Pro Tools First empowers users with a wide range of features and options. One of the core components of the software is its Mix window. In this article, we will be exploring various features and tools available in the Mix window of Pro Tools First.
Navigating The Interface
The Mix window is a crucial component of Pro Tools First. Once you have begun a new project, you need to know how to access and navigate the Mix window. The first thing you’ll notice is the simple and user-friendly interface that enables easy navigation. The key elements of the interface include the transport window, timeline display, channel strips, track view selectors, grouping options, and the session parameters.
Inserting And Manipulating Tracks
Once you have accessed the Mix window, you can insert and manipulate tracks as per your preference. The software allows you to pick from a wide variety of audio, instrument, and MIDI tracks. Pro Tools First makes it simple to add or delete tracks from the Mix window. You can easily organize the tracks through different methods, including color-coding and grouping.
Adjusting Levels And Panning
Pro Tools First empowers you to manage and level your audio tracks as per your preference. The Mix window allows you to adjust levels and volumes, edit panning settings, and fine-tune the stereo image of each individual track. For instance, you can change the balance of a track between the left and right outputs and adjust the fader, pan, and mute/solo buttons to optimize the quality of your sound.
Working With Plugins
The Pro Tools First Mix window enables you to load plugins and add creative effects to your tracks. Pro Tools First enables you to use the Plugin sidebar, which presents all supported plugins in a grid pattern. The grid showcases various plugin types that you can use, such as dynamics processors, EQs, delay effects, and reverbs. You can add any plugin to a track by dragging and dropping it into the corresponding Mix window track. In conclusion, the Mix window of Pro Tools First is an indispensable tool that enables novice users to create high-quality audio projects efficiently. By providing intuitive navigation, track organization, level adjustments, panning settings, and plugin support, the window is a terrific resource for music production enthusiasts.
Credit: www.sweetwater.com
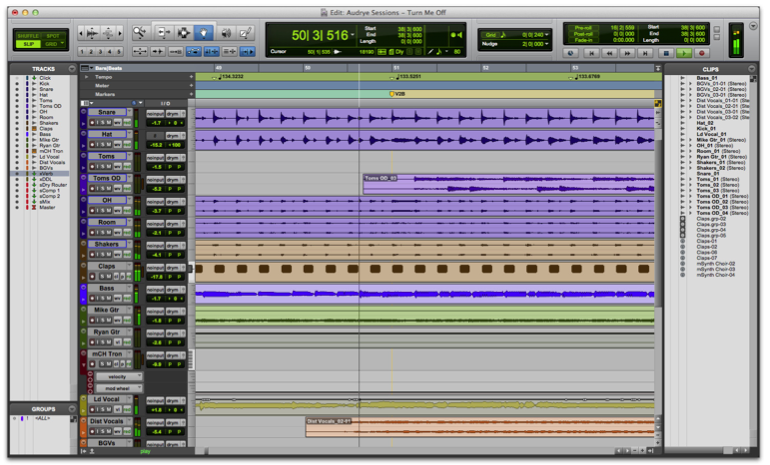
The Edit Window
The edit window in Pro Tools First is essential for precise audio editing. This feature-rich tool offers a user-friendly interface, allowing users to execute quick and intuitive audio editing tasks with ease.
The Edit Window in Pro Tools First is where you can view and manipulate audio clips in your project. This window features several powerful tools that let you edit, arrange, and process your audio in a variety of ways. In this post, we’ll take a look at how you can use the Edit Window to access, edit, and arrange your audio clips. Let’s get started.
Accessing The Edit Window
To access the Edit Window, you first need to select a track in your project. Once you’ve done that, navigate to the bottom of the screen and click the Edit Window icon. This will open up the Edit Window, where you can see your selected track displayed as a waveform.
Editing Audio Clips
Once you’ve opened the Edit Window, you can start editing your audio clips. To edit a clip, simply click on it to select it, and then use the editing tools located at the top of the window. These tools allow you to cut, copy, paste, and trim your audio clips with precision. You can also use the zoom controls to get a closer look at your waveforms and make more precise edits.
Using The Beat Detective Feature
If you’re working with rhythm-based music like pop or hip-hop, the Beat Detective feature in the Edit Window can be a huge time-saver. This tool allows you to analyze your audio to find the beats, and then quantize your clips to the grid. This makes it easy to align your clips with each other and create a more polished and cohesive final product.
Arranging And Comping
The Edit Window also includes powerful tools for arranging and comping your audio clips. You can use the grabber tool to move clips around and rearrange them in your track, or use the slip tool to adjust the timing of individual clips. Additionally, the comping tools let you choose the best parts of multiple takes and stitch them together into a seamless final performance. This can be a huge help if you’re working with vocalists or other musicians who need to record multiple takes to get their performance just right. In conclusion, the Edit Window in Pro Tools First is a powerful tool for accessing, editing, and arranging your audio clips. With features like Beat Detective and comping, you can save time and create more polished and professional-sounding tracks. Dive into your project today and start experimenting with the Edit Window to see what you can create!
Creating A Mix And Edit Session
Create a mix and edit session with ease using the mix and edit windows in Pro Tools First. This powerful editing software provides a user-friendly interface and comprehensive tools to help you achieve your desired sound.
Creating a Mix and Edit Session in Pro Tools First can be an overwhelming task, especially for beginners. However, with a little guidance, you can navigate the software with ease and create a professional-sounding mix. In this section, we will cover the essential steps required to set up a Mix and Edit session in Pro Tools First. We will discuss how to set up your session, create and import audio files, group tracks, and use shortcuts to improve workflow.
Setting Up Your Session
Before you start creating a session, determine the sample rate, bit depth, and file format you will use for recording. You can create a new session by clicking the ‘Create’ button in the Home tab or by selecting ‘New Project’ from the File menu. Next, assign a name and location for your session and set the tempo and meter for your project.
Creating And Importing Audio Files
To import audio files, you can click on ‘Import Audio’ in the ‘File’ menu or drag and drop files into the Pro Tools First timeline. You can also create audio files by recording directly into Pro Tools using a microphone or instrument. Ensure that all recorded or imported audio files have the same sample rate and bit depth as your session.
Grouping Tracks
Grouping tracks is an excellent way to organize your session and allows for easier control of multiple tracks at once. To group tracks, select the tracks you want to group, right-click, and choose ‘Group Selected Tracks.’ You can then assign a name and icon to the group, and all tracks in the group will be controlled simultaneously.
Using Shortcuts To Improve Workflow
Shortcuts are an efficient way to increase productivity, reduce errors, and speed up workflow. Pro Tools First has a vast collection of shortcuts for various functions, including recording, editing, and mixing. You can view and customize shortcuts by selecting ‘Preferences’ from the ‘Setup’ menu and clicking the ‘Editing’ tab. In conclusion, creating a Mix and Edit session in Pro Tools First requires attention to detail and knowledge of the software. However, if you follow the steps outlined in this section, you can easily create a professional-sounding mix. Remember that shortcuts can significantly improve your workflow, and grouping tracks can help keep your session organized. By implementing these tips, you can create high-quality mixes with ease!
Credit: musictech.com
Advanced Features
Pro Tools First is an amazing tool with advanced features that allow users to achieve near-perfect quality in their mixes. The advanced features of the Mix and Edit Windows in Pro Tools First provide users with the tools they need to create professional-sounding mixes quickly and easily. This post will explore three advanced features in Pro Tools First that will significantly enhance your mixes. Each feature uniquely provides ways to work with automation, use EQ and compression, create effects sends and returns, and record and edit MIDI.
Working With Automation
Automation is a vital part of music production, as it helps to achieve greater control over the audio. Pro Tools First offers advanced automation capabilities that allow users to manipulate tracks in ways that were once impossible. With Pro Tools First, users can control almost every aspect of the mix, including volume, panning, and even plug-in settings. The automation feature frees up time that was once spent on manually adjusting knobs and faders, allowing producers to focus more on the creative aspects of their productions.
Using Eq And Compression
EQ and compression are essential tools for audio mixing. Pro Tools First offers well-defined EQ curves and transparent compression that makes it easy to enhance tracks without sacrificing sound quality. Pro Tools First provides the ability to apply EQ and compression to both individual tracks and the entire mix. This feature enables users to use EQ and compression creatively to achieve desired effects.
Creating Effects Sends And Returns
Another advanced feature in Pro Tools First is the ability to create effects sends and returns. This feature allows users to send audio signals to alternate outputs, where they can be processed further with effects. Send tracks are used to control how much of the signal is sent to the alternate output, while return tracks are used to receive and process the signal using audio plug-ins. The feature provides users with more complexity in their mixes, where they can add reverb, delay, and other effects that enhance the overall sound.
Recording And Editing Midi
Pro Tools First also has advanced MIDI features that allow users to record and edit MIDI data with ease. The MIDI Editor gives users the ability to edit note lengths, velocities, and timing. It also provides the ability to quantize and transpose the MIDI data, as well as apply various MIDI plug-ins that process the MIDI information in creative and unique ways. With Pro Tools First, producers can easily manipulate MIDI data to create expressive performances that resonate with audiences.
Troubleshooting Tips
Learn the basic troubleshooting tips for mixing and editing windows in Pro Tools First. The step-by-step guide can help you fix common errors and issues that you may encounter while working on your audio projects.
When working with Pro Tools First, it’s natural to run into unforeseen issues like system crashes or unexpected errors. Luckily, there are a few troubleshooting tips that can help you overcome these headaches and keep your sessions running smoothly. In this post, we’ll cover some common issues and how to solve them, improving system performance, backing up your sessions, and provide resources for further learning.
Common Issues And How To Solve Them
Some common issues you may encounter when working with Pro Tools First include problems with audio or MIDI tracks, unexpected crashes, and errors related to plugins or hardware. If you’re experiencing audio or MIDI issues, make sure your tracks are armed for recording and that the correct inputs and outputs are selected. If Pro Tools First crashes unexpectedly, try restarting your computer or updating your drivers. Plugin or hardware errors can often be resolved by removing the offending plugin or disconnecting and reconnecting the hardware device.
Improving System Performance
To get the most out of Pro Tools First, it’s essential to optimize your system for performance. One way to do this is by adjusting your buffer size to reduce latency and ensure smooth playback. You can also disable unnecessary background processes and applications to free up system resources. Additionally, consider upgrading your hardware components like your RAM or hard drive to improve overall performance.
Backing Up Your Sessions
Nothing is more frustrating than losing hours of work due to a technical glitch or crash. To avoid this situation, it’s important to regularly back up your Pro Tools First sessions. You can do this by manually copying the session file to an external drive or by using the built-in backup feature in Pro Tools First. Make sure to also save your work frequently to minimize the risk of losing data.
Resources For Further Learning
Pro Tools First can be a complex program, especially for beginners. Fortunately, there are plenty of resources available to help you learn and master the software. Avid provides a wealth of video tutorials and online forums where you can ask questions and connect with other users. You can also consider taking a course or workshop to get more hands-on experience with Pro Tools First. Overall, by implementing these troubleshooting tips and best practices, you can ensure that your Pro Tools First sessions run smoothly and efficiently.
Frequently Asked Questions Of Mix And Edit Windows In Pro Tools First
How Do I Toggle Between Mix And Edit Windows In Pro Tools?
To toggle between mix and edit windows in Pro Tools, use the Command+equals key (on Mac) or the Control+equals key (on Windows). Alternatively, you can select the “Window” dropdown menu and choose “Mix” or “Edit” from there.
How Do I Bring Up The Mix Window In Pro Tools?
To bring up the mix window in Pro Tools, go to the “Window” menu and select “Mix. ” You can also use the keyboard shortcut “Command + =. ” From there, you can access all your tracks, plugins, and routing options.
What Comes With Pro Tools First?
Pro Tools First comes with a variety of features including 16 audio and 16 MIDI tracks, 23 included plugins, and access to the Avid Marketplace. Plus, users get access to a selection of loop and sample packs, and they can collaborate with other Pro Tools users online.
What Is The Edit Window In Pro Tools?
The Edit window in Pro Tools is the primary workspace for music and audio production. It provides a visual representation of audio files, MIDI tracks, and plug-ins. It includes editing tools and controls for everything from basic waveform editing to complex automation and arranging.
Conclusion
Mastering the art of mixing and editing in Pro Tools First can transform your music and audio creation game to the next level. By utilizing the numerous features, including the Windows Manager and Shortcuts, you can efficiently manage your workflow and personalize your experience.
With every new project comes an opportunity to apply these practices and become a more professional content creator. So, start implementing them now and let your creativity flow!