Memory locations in Pro Tools allow users to save specific points in a session and recall them later for quick navigation and editing. Pro Tools is a popular digital audio workstation used in the music and post-production industries.
Memory locations are an important feature that helps users to easily return to important points in the session. Whether you need to mark a specific vocal take, a point where a guitar solo begins, or a particular section of a podcast, memory locations are a valuable tool for saving time and ensuring accuracy when editing audio in Pro Tools.
We will explore how to create, label, recall, delete, and import memory locations in Pro Tools.
Credit: www.soundonsound.com
What Are Memory Locations
Pro Tools is a digital audio workstation used by professionals in the music and entertainment industry. Memory locations play an important role in Pro Tools as they allow you to mark specific positions in your session, enabling you to quickly navigate to a specific point. Let’s dive deep and learn more about the Memory Locations in Pro Tools.
Overview
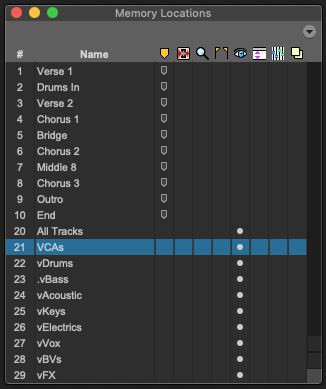
Memory Locations are markers or bookmarks that store specific positions in your session. They are used to bookmark various points in a session, such as a chorus, bridge or specific instrument or vocal tracks. Memory Locations are visual aids that allow users to quickly navigate to specific points in a session, ensuring they can make the necessary changes or adjustments as needed.
How They Are Created
Memory Locations can be created in three different ways, namely: manually, automatically, or by importing them.
| Method | Description |
|---|---|
| Manual | Memory Locations are created by manually selecting the position in the timeline and pressing “Enter” or clicking on the “Add Location” button in the Memory Locations window. |
| Automatic | Memory Locations are created automatically when a new track or clip is added to the session, or when a plugin is inserted into a track. |
| Importing | Memory Locations can be imported from other sessions or from external files such as AAF or OMF. This is useful when working on a collaborative project where multiple users are working on the same session. |
Once you have created a Memory Location, you can assign a color and name to it to easily identify it later. You can also add comments or notes to the Memory Locations, providing additional information for future reference.
Overall, utilizing Memory Locations can save time and help streamline your workflow, making it an essential tool for Pro Tools users.
Types Of Memory Locations
Pro Tools has different types of memory locations for organizing and recalling specific points on a timeline, such as markers, memory locations, and selection memory. These tools are essential for efficient workflow and easy navigation within a project.
Memory locations in Pro Tools enable you to recall specific points within a session quickly. They simplify the editing process and increase your efficiency while working on a project. There are various types of memory locations in Pro Tools, including markers, counters, and selection. In this article, we will delve into each type of memory location to help you understand how they work and how you can use them to enhance your workflow. Markers are useful memory locations that allow you to label specific points within a session to mark different sections, such as the chorus or the bridge. Pro Tools enables you to create markers quickly and intuitively for easy navigation. Additionally, you can create color-coded markers to identify different types of sections such as verses or instrumental breaks. Pro Tools provides different types of markers, including memory locations, clip-based markers, and timeline-based markers. Memory location markers, in particular, allow you to name and store markers that are unique for your session. Counters are memory locations that track the duration or position of a session. You can create timecode-based counters that track the time elapsed, the session duration, or the remaining time. Additionally, you can create bar and beat-based counters that count the bars and beats in the session. Counters can help you stay on track when editing a session and can provide valuable information when working with collaborators or clients. Selections are memory locations that enable you to save and recall specific regions of a session quickly. You can select and save a specific range of audio or MIDI data, making it easy to navigate to that region later. Selections can be helpful when editing long sessions or when you need to jump between specific sections frequently. Pro Tools provides different selection tools, including the grabber tool and the selector tool. Once you have selected a region, you can save it as a memory location, making it easy to recall it later. In conclusion, memory locations are essential tools in Pro Tools that can help you streamline your workflow. They allow you to quickly navigate to specific points in a session and can help you stay organized when working on long projects. By understanding the different types of memory locations available, you can create a more efficient and productive workflow in Pro Tools.
Markers
In Pro Tools, markers serve as memory locations for easily navigating through a session. By placing markers, you can quickly access specific parts of the recording and simplify your editing process.
Creating Markers
Markers are an integral part of working in Pro Tools and can be created to help organize and navigate your session quickly. To create a marker in Pro Tools, you need to follow some quick and easy steps:
- Select the point in the timeline where you want to place the marker.
- Go to the Marker menu within the toolbar and click on ‘New Marker’.
- Alternatively, use the keyboard shortcut “Command + Shift + M” (Mac) or “Ctrl + Shift + M” (Windows).
- The new marker will be added to the timeline at your selected point.
Navigating Markers
In the session, markers can help you navigate quickly to a specific point in the timeline. Once you’ve created a marker in Pro Tools, you can easily navigate back to it by following some straightforward steps:
- Click on the Marker menu in the toolbar or use the keyboard shortcut “Control/Command and M” to open the Marker list.
- All the markers you have added to the timeline will be visible in the Marker list. Click on the marker that you want to navigate towards.
- The timeline will automatically move to the position of the selected marker.
Conclusion
Using markers in Pro Tools is an essential technique to make sessions more organized, more accessible, and more comfortable to navigate. Creating and navigating markers is a quick and straightforward process, and it can help tremendously to develop a more efficient workflow.
Credit: www.production-expert.com
Counter
Counter is an essential tool in Pro Tools that helps to navigate memory locations efficiently. It allows users to quickly access marks and recall different locations in their projects, making editing and mixing tasks more efficient.
Displaying The Counter
In Pro Tools, the Counter displays the timecode or samples elapsed since the beginning of the session. It’s displayed on the main timeline when the Counter is activated. The Counter provides essential information that helps in the editing process, especially when syncing audio with video.
Setting Begin And End Values
Pro Tools allows users to set the beginning and end values of the Counter. This feature can be useful for selecting a specific section of a session for editing or playback. To set the begin and end values, follow these steps:
- Place the cursor at the desired start location.
- Click on the Counter window’s Start Time field and enter the desired value.
- Place the cursor at the desired end location.
- Click on the Counter window’s End Time field and enter the desired value.
After setting the values, the selected section is highlighted in the timeline, and only that section plays during playback. This feature can be helpful when editing a specific part of a song or audio track.
Using The Counter For Editing
The Counter in Pro Tools is essential when editing audio or music. It provides important information about the session and assists in working with audio or video. By displaying the timecode, the Counter shows how long a song or audio clip is, making it easier to trim or cut down to a specific length. The Counter can also be used to add or remove silence between tracks, synchronize tracks, and adjust the natural rhythm of a song. In conclusion, the Counter is a valuable tool available in Pro Tools for every audio producer or music editor. By displaying and allowing the setting of begin and end values, the Counter helps with the editing process and improves the productivity of music editing.
Selection
Selection in Pro Tools is a useful feature that allows users to choose a specific region of a track for editing, playing or deleting. It is a great tool for audio engineers and music producers who want to focus on a specific area of an audio clip. When it comes to editing a track in Pro Tools, the selection feature is very important because it helps users to navigate through a session and edit more efficiently. There are several ways to create and navigate within a selection in Pro Tools.
Creating Selection
Creating a selection in Pro Tools is easy and can be done in several ways. Users can use the selector tool to click and drag on the waveform display to select a specific area of a track. Alternatively, users can use the Keyboard Shortcut (Mac: Command + click and drag, Windows: Control + click and drag) to create a selection. Users can also use the Edit menu and choose the ‘Select’ option to choose a specific time range.
Navigating Selection
Once a selection is created, users can navigate within it by using the selector tool to click and drag the edges of the selection to adjust its size. Users can also use the keyboard shortcut (Mac: Shift + left/right arrow key, Windows: Shift + left/right arrow key) to navigate from one edge of the selection to the other. Moreover, users can use the Edit menu and choose the ‘Extend’ option to extend the selection to the next boundary.
In conclusion, using the selection tool in Pro Tools can save time and increase efficiency when editing audio tracks. With the ability to create and navigate within selections, users can easily edit and manipulate specific areas of a track without affecting other areas. Moreover, users can use the Edit menu to access additional selection options.
Advanced Uses Of Memory Locations
Memory locations in Pro Tools are a powerful feature that allows you to easily mark specific points in your project. You can use them to quickly jump to different parts of a song or to keep track of important sections. But did you know there are some advanced uses for memory locations that go beyond just basic navigation?
Automation
One of the most powerful uses for memory locations in Pro Tools is for automation. Automation allows you to easily control various parameters of your mix, such as volume, EQ, and panning, over time. By using memory locations to mark specific sections of your song, you can quickly make changes to your automation settings depending on where you are in your project.
| Parameter | Memory Location |
|---|---|
| Volume | Chorus |
| EQ | Bridge |
| Panning | Verse 2 |
Key Commands
Another advanced use for memory locations in Pro Tools is with key commands. Key commands allow you to quickly access various functions in Pro Tools with just a few keystrokes. By assigning memory locations to specific key commands, you can quickly jump to different parts of your project without taking your hands off the keyboard.
- Shift + 1 – Verse 1
- Shift + 2 – Chorus
- Shift + 3 – Bridge
- Shift + 4 – Outro
Looping
Finally, memory locations can be used for advanced looping techniques in Pro Tools. By setting memory locations at specific points in your project, you can easily loop a specific section of your song or alternate between different sections. This is especially useful when working on specific parts of the mix, such as the chorus or a guitar solo.
- Set memory location at beginning of chorus
- Set memory location at end of chorus
- Loop between chorus memory locations
Credit: m.youtube.com
Frequently Asked Questions Of Memory Locations In Pro Tools
How Do I See Memory Locations In Pro Tools?
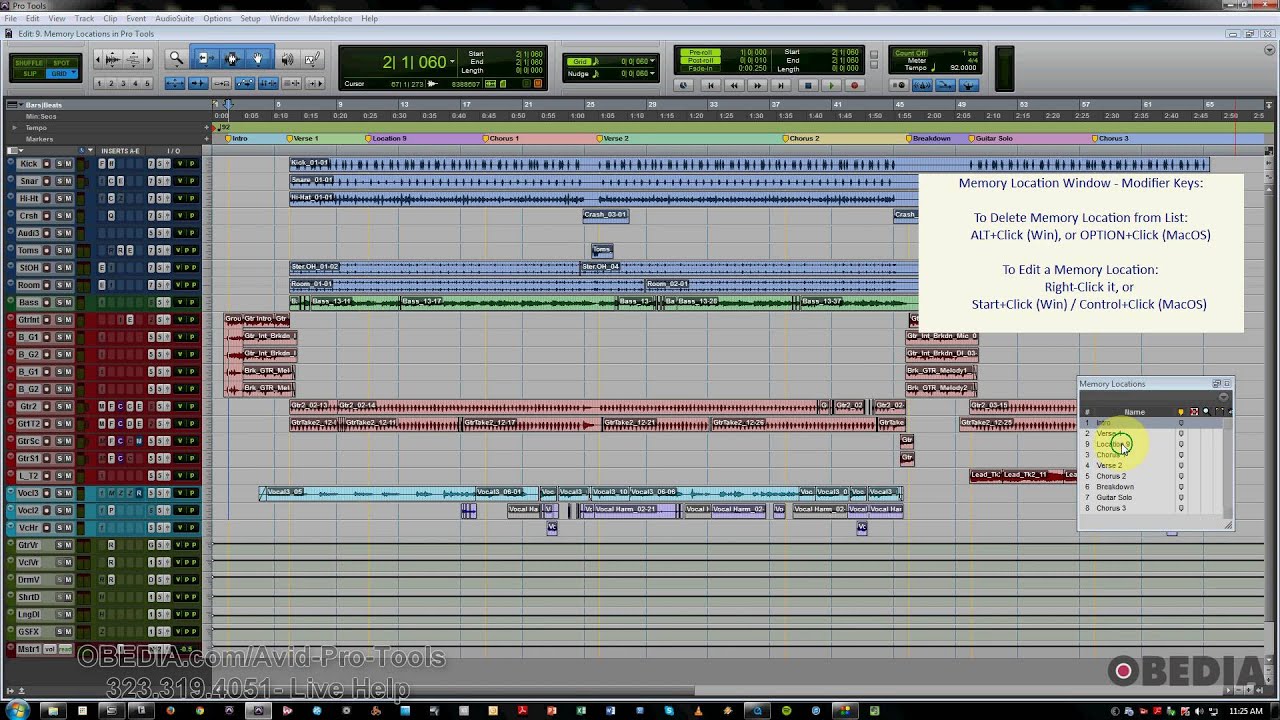
To view memory locations in Pro Tools, go to the Memory Locations window. You can open it by clicking on the Memory Locations button, which looks like a flag, on the toolbar. Once you open the window, you can create and name locations, add notes, and jump to specific locations by double-clicking them.
Where Are Pro Tools Files Stored?
Pro Tools files are usually stored in the session folder, along with any associated audio files. Users can also choose to store Pro Tools files anywhere on their computer or external hard drive.
How Do You Jump Between Memory Locations In Pro Tools?
To jump between memory locations in Pro Tools: 1. Use the `Memory Locations` window to create and name memory locations. 2. Press `Enter` and type in the memory location name to jump to that location. 3. Use `Shift+Left Arrow` and `Shift+Right Arrow` to jump between the previous and next memory locations.
4. You can also use `Command+Numeric Keypad` to directly jump to a memory location, numbered 1-9. 5. Alternatively, use the `Memory Location` marker to add shortcuts for quick access.
What Is The New Memory Location Shortcut In Pro Tools?
The new memory location shortcut in Pro Tools is “Shift”+”Option”+number on Mac or “Shift”+”Alt”+number on Windows. This allows users to quickly recall and navigate to different positions in a session.
Conclusion
Overall, understanding the memory locations in Pro Tools can greatly enhance your workflow and productivity. By utilizing the various memory locations, from markers to memory locations, you can easily navigate through sessions and make edits on the fly. Remember to save your memory locations for future use, and experiment with different ways to incorporate them into your own workflow.
With a little practice, you can become a master of memory locations in Pro Tools.