To use Send Effects in audio production software, select the desired track and send it to a bus or auxiliary channel. This allows you to apply effects to multiple tracks at once.
Send Effects play a crucial role in audio production by making it possible to apply effects to multiple tracks at once. By sending a track to a bus or auxiliary channel, you create a path that allows you to apply effects to that track, as well as other tracks that are also sent to that same bus or channel.
This technique can save time and processing power, as you only need to apply the effect to one channel instead of multiple individual tracks. Additionally, using Send Effects can result in a more cohesive and polished mix, as all the tracks that are sent to the same bus or channel can have a similar sound or effect applied to them.

Credit: www.productionmusiclive.com
Setting Up A Send Effect
If you want to make your tracks sound more polished and professional, setting up a send effect is a great way to do so. Send effects are used to apply an effect uniformly to multiple tracks or individual instruments within a mix. In this guide, we will walk you through how to set up a send effect to add depth and dimension to your tracks.
Selecting A Send Channel
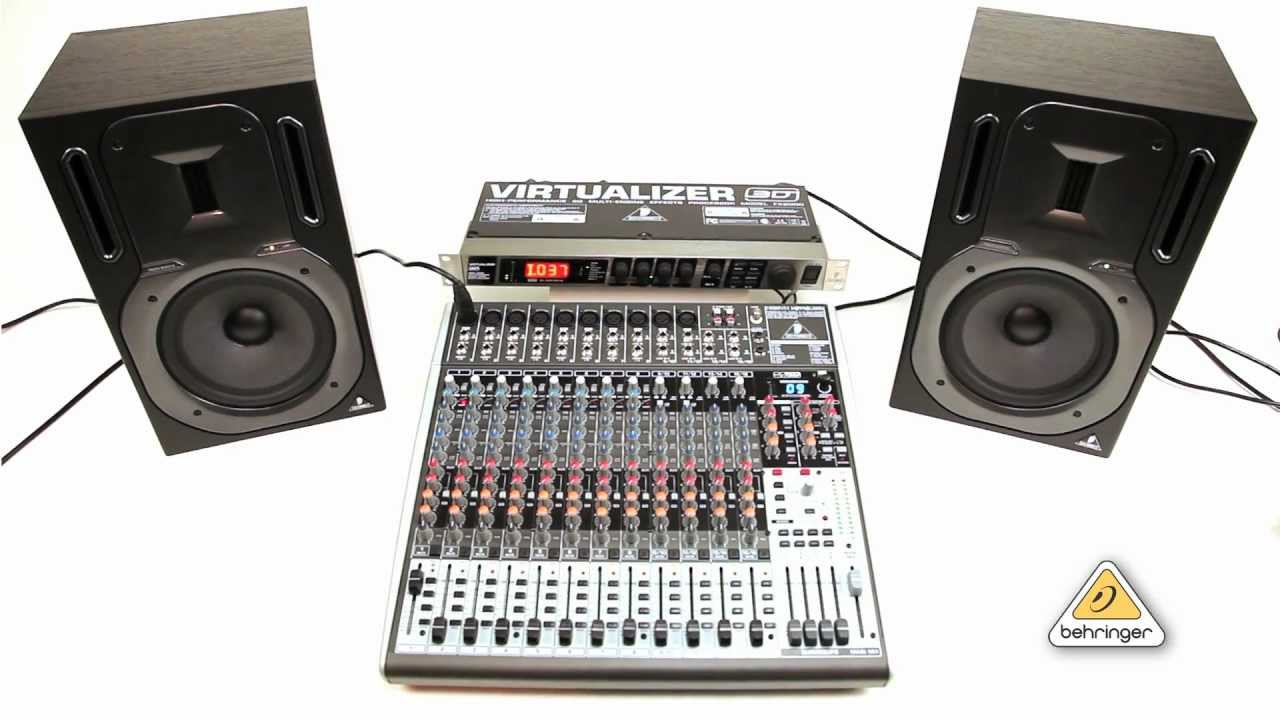
Before creating your send effect, you need to select a send channel to route the effect to. This channel will act as a bus that mixes all the effects from the individual tracks. Here’s how to select a send channel:
- Open your digital audio workstation (DAW) and load your project.
- Locate the mixer or routing section of your DAW where you can find the send channels.
- Choose an available channel where you want to route your send effect.
- Label it accordingly to avoid confusion, such as “Reverb Send” or “Delay Send”.
Creating The Send Effect
Now that you have selected your send channel, it’s time to create the send effect and apply it to individual tracks. Here’s how to do it:
- Select the track you want to add the send effect to.
- Locate the send section in the mixer or routing area.
- From the drop-down menu, choose the send channel you just created.
- Adjust the send level to determine how much of the effect you want to apply to the track.
- Insert your desired effect plugin into the send channel.
- Adjust the effect parameters to achieve the desired sound.
- Repeat steps 1-6 for each track you want to apply the send effect to.
By following these simple steps, you can add depth and cohesion to your tracks using send effects. Experiment with different effects and levels to achieve your desired sound.
Choosing The Right Send Effect
If you’re using Send Effects, one of the most critical steps is choosing the right one. There are many options, and each effect can drastically alter the sound you’re creating. To help you select the perfect effect, we’ve created this guide, where we’ll break down the different types of effects and provide some guidance on how to apply them.
Understanding Different Types Of Effects
Before you dive in and start applying different effects, you need to understand the various types and their uses. There are three main categories of effects: Time-based, Modulation, and Dynamics. Here are some examples of each:
| Effect Type | Examples |
|---|---|
| Time-based | Delay, Reverb, Echo |
| Modulation | Chorus, Flanger, Phaser |
| Dynamics | Compressor, Limiter, Gate |
Time-based effects modify or create a sense of space when applied to the audio, while modulation effects alter the signal’s harmonic content. Finally, dynamics effects control how much a sound’s volume changes over time, which impacts the overall loudness and clarity.
Applying The Effect
Once you understand the different types of effects, it’s time to apply them. It’s helpful to keep in mind that too much of any effect can be a bad thing. To avoid overdoing it, start with the effect’s default settings and adjust gradually until you get the desired result.
If you’re not sure which effect to use, try a delay or reverb as these effects work well with most instruments. When applying the effects, pay attention to how they interact with the rest of the audio elements. If something’s not working, try changing the effect type, parameters, or removing it altogether.
Remember that the right effect can take a bland recording and turn it into a masterpiece, and the wrong one can make even the best audio sound terrible. Take your time when selecting and applying effects, and you’ll be rewarded with a fantastic final product.
Using Send Effects In A Mix
If you want to achieve a professional-sounding mix, you need to learn how to use send effects in a mix. Sending a track to an effect like reverb or delay can add depth, space and texture to your mix. However, it’s important to use send effects carefully as they can also affect the clarity of your mix.
Balancing The Dry/wet Mix
When using send effects, it’s crucial to balance the dry and wet mix. The dry signal is the original sound of your track, whereas the wet signal is the processed sound as it comes back from the effect. The goal is to blend these two signals seamlessly to achieve a cohesive sound.
You can adjust the balance of the dry and wet signal by increasing or decreasing the send level. The send level determines the amount of signal being sent to the effect. It’s important to make sure the volume of your wet signal is not overpowering the dry signal.
Automating Sends
A useful technique is to automate sends in your mix. This means that you can adjust the amount of effect on a track over time. For example, you may want a vocal to be dry during the verse, but gradually increase the reverb as the chorus comes in.
To automate sends, it’s important to enable automation on your send effects. This will allow you to create keyframes that adjust the send level at specific points in your song. By automating sends, you can add movement and dynamics to your mix.
In Conclusion
Using send effects in a mix can take your production to the next level. Remember to carefully balance the dry and wet mix and use automation to add interest to your mix. By mastering send effects, you can achieve a polished and professional sound.
Credit: support.apple.com
Common Mistakes To Avoid
Send effects are a great way to add depth and character to your audio mix. However, there are some common mistakes to avoid when using send effects. Preventing these mistakes, will help you create professional and polished mixes.
Using Too Many Send Effects
One of the most common mistakes when using send effects is using too many. It’s essential to keep in mind that send effects are meant to complement and add depth to your mix, not to fill it with unnecessary effects.
Having too many send effects can cause confusion, drowning the essential elements of your mix. It can also make it challenging to control each effect’s parameter and can lead to phase cancellation and cluttered audio.
Instead of using a send effect on everything, only apply the effect to tracks that need it. Listen to each element of your mix carefully and determine which ones can benefit from a send effect.
Overusing The Send Effect
Another common mistake is overusing the send effect. Applying too much effect can lead to an unnatural-sounding mix. It can also take away from the dynamics and balance of your mix.
The best way to avoid overusing the send effect is to control it precisely. You can try reducing the wet/dry mix to achieve a more subtle effect. Another option is to utilize automation to control the send effect’s intensity throughout the track.
Finally, it’s essential to trust your ears when using send effects. Listen to your mix critically and adjust the send effect accordingly. With practice, you’ll be able to discern when a send effect is appropriately used in a mix.
Tips And Tricks
Learn how to use send effects like a pro with these simple tips and tricks! Whether you’re new to audio mixing or a seasoned pro, you’ll find useful insights and techniques to help you create the perfect sound for your next project.
Tips and Tricks – How To Use Send Effects Using send effects is a great way to enhance the audio quality of your mix. By using parallel processing and creating unique sounds, you can take your tracks to the next level. Here are some tips and tricks on how to use send effects like a pro. Parallel Processing One great technique is parallel processing, also known as New York Compression. You can use this technique to add punch and dynamic to your sound. To do this, you need to route your track to a duplicate track and apply compression. By blending the compressed track with the original track, you can achieve a more dynamic and impactful sound. Creating Unique Sounds Another tip is to use sends to create unique sounds. By sending the original track to a reverb, delay or any other effect, you can create a unique sound that sits well in the mix. An essential point here is to ensure that you don’t over-use sends. Subtle use of effect sends is usually more effective than heavy-handed. Some other effective tips to use send effects are: – Use an EQ on your send effects to shape the sound. – Make sure reverb tails and delays don’t overlap in a busy mix. – Use automation on send effects to create smoother transitions between different sections of the song. Conclusion In conclusion, using sends is a powerful and flexible technique that can help you create a unique and polished sound. By using parallel processing and creating unique sounds, you can enhance the overall audio quality of your mix. By following some of these tips and tricks, you can take your production skills to the next level.
Credit: www.youtube.com
Frequently Asked Questions Of How To Use Send Effects
How Do You Use Reverb Sends?
Reverb sends are used in mixing to apply reverb to multiple tracks simultaneously. To use them, create a new channel with a reverb plugin, route the desired tracks to the new channel using send controls, adjust the amount of reverb with the send level, and fine-tune the reverb settings on the new channel.
This adds depth and space to your mix.
What Is The Difference Between Insert And Send Effects?
Insert effects are added directly to a track or channel, affecting the overall sound. Send effects are added to a separate send channel and blended with the original sound, allowing for greater control over the effect’s level and overall mix.
What Is The Difference Between Send And Return In Mixing?
Send refers to the audio signal being sent out of a certain track or channel to an effects processor or another device. Return, on the other hand, refers to the processed audio signal that is sent back to the mixing console to be blended or combined with the original audio signal.
What Is The Difference Between Insert And Send On Mixer?
Insert sends an audio signal directly to a channel’s audio path, while Send sends a copy of the audio signal to an auxiliary channel, allowing the user to adjust the volume and add effects separately. So, Insert affects the original signal, while Send affects a copy of the signal.
Conclusion
As you’ve learned, send effects offer a great way to enhance your audio tracks and add depth to your music projects. By carefully experimenting with different settings, you can create unique and professional sounding recordings that truly stand out. Remember to start with a plan, adjust your levels carefully, and don’t be afraid to try out new settings until you find the perfect fit.
With consistent practice, you’ll master send effects in no time and take your music to the next level. Happy mixing!