To use Pro Tools Beat Detective, first select a rhythmic section you want to edit, then choose the desired rhythmic feel and let the software do the rest. Pro Tools Beat Detective is a powerful tool that allows you to quantize audio and tightens the timing of your music.
With the tool’s various features, you can quickly analyze rhythmic inconsistencies and correct them with precision. Whether you want to tighten up a drum performance or create a more consistent bassline, Beat Detective can help. We’ll explore the different functions of Pro Tools Beat Detective and how you can use them to improve your audio production.

Credit: www.soundonsound.com
The Basics Of Beat Detective
Learn how to effectively use Pro Tools Beat Detective with these basic tips. From identifying the beat to making edits, this tutorial will guide you through the process.
Installation And Setup
Before delving into the workflow, you need to understand the installation process, which is quite straightforward. To get started, you will require a Pro Tools system with the Beat Detective feature installed. Once you have it, activate it by following these steps:
- Go to the “Event” menu and click on “Beat Detective”.
- Select “Analysis” and then choose “New Analysis”.
- Choose the audio file you want to analyze, set the audio analysis options you require, and click “Analyze”.
After installation, the feature itself is straightforward to find and activate. Now that you have the Beat Detective up and running, it’s time to move on to understanding the workflow.
Understanding Beat Detective Workflow
Beat Detective is a dynamic feature that requires alertness throughout the workflow. Here is a step-by-step guide to help you navigate the process:
- Locate the “Beat Detective” option in the “Event” menu and click on it to open the Beat Detective window.
- Choose the audio regions you want to apply the Beat Detective feature on. You can select multiple non-contiguous regions on different tracks or all-time selection regions.
- Select the task you want to perform; make sure to choose the task that matches the issue you want to solve: Adjust Timing, Create Groove Template, or Find Tempo.
- Set the appropriate criteria in the “Selection” box. The criteria include Threshold, Clip Separation, and Analysis Type.
- Click “Capture” to analyze and select audio elements based on the defined criteria.
- Review the results in the “Results” window to ensure they match your expectations.
- Apply the desired editing task by choosing the relevant “Tasks” option box.
- If you are satisfied with the results, commit the changes, and continue your editing. If you are unhappy with the outcome, click “Undo” to restore the original state.
Beat Detective is a powerful tool that highlights how important audio editing is in the music creation process. If you master the workflow, you will not only save time but also enhance the quality of your audio productions.
Credit: www.production-expert.com
Beat Detection
Learn how to use Pro Tools Beat Detective, a powerful tool for musicians and music producers for quickly detecting beats and transients in audio recordings. With its advanced features and user-friendly interface, you can easily match the groove of your tracks and create perfect transitions.
Source Material Preparation
Before using Pro Tools Beat Detective, it is crucial to prepare your source material correctly. Make sure that the audio file is clean and has no extraneous noises, pops, or clicks. The recording should be a straightforward and stable audio take. If there are dynamic changes in the music that you want to preserve, record them in a separate take. Once you’ve polished your audio material, and it’s free from noise, you’re ready to move on to the beat detection process.
Detecting Beat Boundaries And Groove Templates
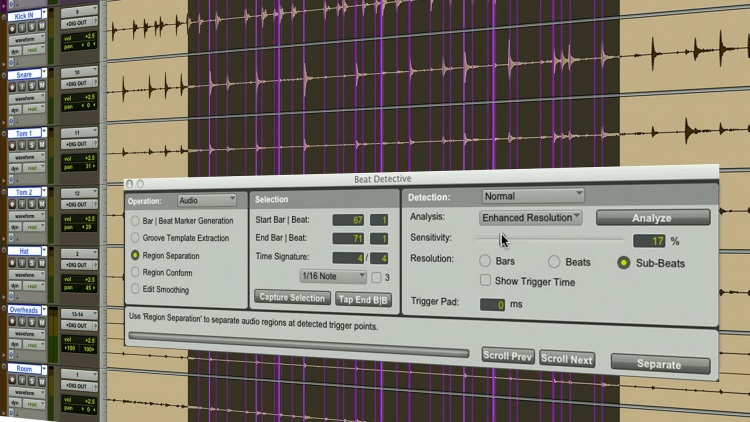
The beat detection process is where Pro Tools Beat Detective shines the most. The software can identify the transient elements in the music, automatically detecting its beat boundary regions. To begin with, one needs to select the audio region, define a region that you want to analyze, and select any portion of that region that represents the groove of the music. After analyzing the groove, the software will produce a “groove template,” the rhythmic map of your music. The groove template is a vital tool to help you alter the rhythm of the music while keeping its timing and tempo intact.
Groove Templates
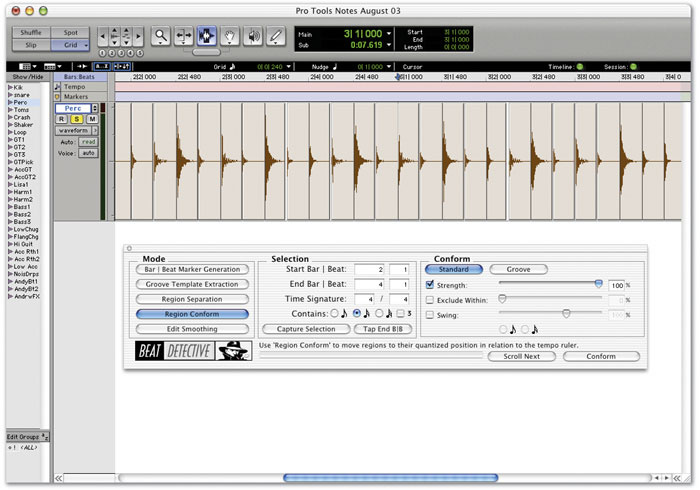
After groove detection, the next step is to edit the audio file to achieve the desired rhythm for the music. Groove Templates allow you to manipulate the timing of the music without changing its overall tempo. Once you’ve created your groove and made necessary edits, the “apply groove” function helps you align your source audio with the desired rhythm. With this function, you can quantize audio for timing correction purposes and obtain the desired timing groove.
Conclusion
When it comes to changing a rhythm in music, Pro Tools Beat Detective is a fantastic tool to use. By accurately detecting beat boundaries and groove templates, Pro Tools Beat Detective ensures that the timing of your music remains intact throughout the editing process. Source material preparation is critical, and by following the guidelines above, you’ll be well on your way to achieving a great rhythm for your music.
Editing With Beat Detective
Learn how to effectively use Pro Tools Beat Detective to edit your music tracks with precision. This powerful tool can help you easily align and adjust beats, saving you time and ensuring a professional-quality sound.
Beat Detective is an incredibly powerful tool in Pro Tools that can help you quickly fix timing issues in your audio recordings. Whether you need to align your audio to the grid or quantize it for a tighter feel, Beat Detective can get the job done quickly and easily. In this section, we’ll take a closer look at how to use Beat Detective for editing.
Aligning Audio To The Grid
One of the most common uses for Beat Detective is to align audio to the grid. This is especially useful when working with recordings that were captured without a click track or with a live band. Here’s how to align your audio to the grid using Beat Detective:
- Select the audio region you want to edit and open Beat Detective.
- Choose the type of edit you want to perform, in this case, “Bar|Beat Detective” for aligning to the grid.
- Adjust the sensitivity settings to capture the transients and beats in your audio region.
- Select the area you want to edit, and click “Capture Selection” to analyze the audio.
- Once the analysis is complete, choose the “Separate” command to split the audio into regions.
- Select the regions you want to edit and choose the “Quantize” command to align them to the grid.
- Preview the results and make any necessary adjustments before committing to the edit.
Quantizing Audio
Another useful feature of Beat Detective is the ability to quantize audio for a tighter feel. This is especially important when working with rhythmic material like drums or percussion. Follow these steps to quantize your audio using Beat Detective:
- Select the audio region you want to edit and open Beat Detective.
- Choose the type of edit you want to perform, in this case, “Bar|Beat Detective” for quantizing audio.
- Adjust the sensitivity settings to capture the transients and beats in your audio region.
- Select the area you want to edit, and click “Capture Selection” to analyze the audio.
- Once the analysis is complete, choose the “Separate” command to split the audio into regions.
- Select the regions you want to quantize and choose the “Quantize” command to snap them to the grid.
- Preview the results and make any necessary adjustments before committing to the edit.
Fixing Timing Issues
Beat Detective can also be used to fix more complex timing issues in your audio recordings. This is especially useful when dealing with performances that were recorded without a click track or with multiple musicians playing together. Follow these steps to fix timing issues using Beat Detective:
- Select the audio region you want to edit and open Beat Detective.
- Choose the type of edit you want to perform, in this case, “Region” and “Events” for fixing timing issues.
- Adjust the sensitivity settings to capture the events and transients in your audio region.
- Select the area you want to edit, and click “Capture Selection” to analyze the audio.
- Use the editing tools to correct any timing issues in your audio recordings.
- Preview the results and make any necessary adjustments before committing to the edit.
In conclusion, Beat Detective is a powerful tool that every Pro Tools user should know how to use. Whether you need to align your audio to the grid or fix timing issues in your recordings, Beat Detective can save you time and effort while producing professional results. With these tips, you’ll be well on your way to mastering Beat Detective and taking your audio editing skills to the next level.
Advanced Techniques
Pro Tools Beat Detective is a powerful tool for editing drums, and it can be used for much more than just basic rhythm correction. With advanced techniques, you can use Beat Detective for drum replacement and remixing. In this article, we’ll explore these techniques in detail, so you can take your drum production to the next level.
Using Beat Detective For Drum Replacement
Drum replacement is a common technique used in music production to replace poorly recorded or poorly played drum tracks with samples. Pro Tools Beat Detective offers an accurate and efficient way to perform drum replacement. Here’s how to do it:
- Import your drum recording into Pro Tools.
- Open the Beat Detective window.
- Select the “Capture” mode and set the parameters for the capture.
- After the capture is complete, use the “Separate Regions” mode to split the drum recording into its individual hits.
- Drag and drop your preferred drum samples onto the separate regions in the session.
- Adjust the volume and timing of the sample hits to match the original recording.
Using Beat Detective For Remixing
Remixing is another common use of Beat Detective. With this tool, you can extract the rhythmic elements of a song and use them in a new remix. Here’s how to do it:
- Import your song into Pro Tools.
- Open the Beat Detective window.
- Select the “Conform” mode and set the parameters for the analysis.
- After the analysis is complete, use the “Separate Regions” mode to split the song into its individual hits.
- Drag and drop the separate regions onto new tracks in the session.
- Mute the original tracks and rearrange the separate regions to create your remix.
Tips And Tricks
Learn how to use Pro Tools Beat Detective like a pro with these helpful tips and tricks. From setting up the software to accurately detecting and correcting timing issues in your recordings, this guide has everything you need to optimize your workflow and produce high-quality music.
If you’re working on music production, you must be aware of the importance of beat detection. Pro Tools Beat Detective is an intelligent tool that helps musicians and producers to identify and fix rhythmic issues in their productions in no time. In this blog post, we’ll be focusing on the tips and tricks that will help you get the most out of Beat Detective.
Working With Complex Rhythmic Material
Working with complex rhythms can be a challenging task for music producers. However, with the help of Pro Tools Beat Detective, this task can be accomplished with ease. To get started, import the audio material you want to work on in Pro Tools. Next, select the desired region, and right-click on the highlighted area. Now choose the “Analysis” option from the menu, followed by “Beat Detective.” In the Beat Detective window, select the desired option that suits your needs. You can choose between options like “Detect Transients,” “Groove Template,” or “Bar/Beat Marks.” Once you’ve selected the desired option, hit the “Capture” button to analyze the audio material. The Beat Detective tool will automatically identify the rhythmic issues and create markers on the timeline. You can now make rhythm corrections by removing or adding beats. You can also shift the audio material to match the desired tempo or groove feel.
Editing Multiple Tracks With Beat Detective
If you want to edit multiple tracks simultaneously with Beat Detective, the process is simple. First, select all the tracks you want to edit and highlight them. Next, select the “Edit” option from the menu, followed by “Beat Detective.” This will open the Beat Detective window. In the Beat Detective window, choose the desired option from “Separate Clip” or “Separate Region.” This will split the audio track into smaller regions, making it easier to edit. Now choose the appropriate rhythmic correction option from the Beat Detective menu. Once you’ve made the changes, you can now merge the clips or regions back into a single track by selecting them and using the “Consolidate” option. This will create a new file with the edited audio material in it. In conclusion, these tips and tricks will help you to use Pro Tools Beat Detective with more flexibility and efficiency. By mastering this tool, you’ll be able to produce music with a more precise and professional touch.
Common Pitfalls
Learn how to avoid common pitfalls when using Pro Tools Beat Detective. With careful execution, you can quickly and accurately edit your audio tracks to create polished, professional-quality music.
Introduction: Pro Tools Beat Detective is an essential tool that helps the users to analyze audio and modify the recorded tracks for perfection. However, even the expert users tend to encounter some common pitfalls while using this tool that might create glitches. Therefore, it’s crucial to be aware of these pitfalls to ensure the smooth working of Beat Detective. In this section, we’ll discuss a few common pitfalls while using Pro Tools Beat Detective and the ways to overcome them. H3: Overreliance on Beat Detective The most common mistake users make is overrelying on Beat Detective to fix things that could have been recorded correctly in the first place. Beat Detective is an excellent tool, but it shouldn’t be used as a substitute for a good recording session. Users should take the time to record the tracks accurately rather than relying on Beat Detective to correct everything in post-production. H3: Avoiding Artifacts and Glitches When using Pro Tools Beat Detective, users might encounter some glitches or artifacts that can negatively impact the quality of the recorded tracks. These glitches occur when the Beats and or the Grids don’t align correctly. To avoid these issues, users should ensure that the Beats and Grids are correctly aligned before applying any correction. Moreover, an incorrect selection of the audio region can also lead to artifacts and glitches. Users should double-check their audio regions and select the correct regions before applying any correction. Conclusion: In conclusion, using Pro Tools Beat Detective can be a game-changer, but only if it’s used correctly. Overreliance on Beat Detective can negatively impact the quality of the recording, and incorrect selection or application can lead to glitches and artifacts. Therefore, keep the above points in mind while using Pro Tools Beat Detective, and enhance your audio recording process.
Credit: www.soundonsound.com
Frequently Asked Questions For How To Use Pro Tools Beat Detective
How Does Beat Detective Work In Pro Tools?
Beat Detective in Pro Tools automatically analyzes audio tracks and identifies any timing inconsistencies. It can split, move, and align audio clips to the grid to fix any timing issues, thus creating a tighter, more polished performance. The software provides a plethora of customizable settings and tools to fine-tune the editing process.
What Is The Shortcut For Beat Detective In Pro Tools?
The shortcut for Beat Detective in Pro Tools is “Command + 8” (Mac) or “Control + 8” (Windows).
What Mode Should Be Used To Make Selection For Beat Detective?
Use the “Separate” mode to make selection for Beat Detective.
How Do I Use Identify Beat In Pro Tools?
To identify a beat in Pro Tools, you need to use the “Spot” function. Simply place the cursor at the beginning of the beat and press the “Spot” button to create a marker. Repeat this process for each beat of the track.
You can then use these markers for tasks like aligning tracks and setting tempo.
Conclusion
To sum it up, Pro Tools Beat Detective is an amazing tool that every music producer and sound engineer should know how to use. It will save you countless hours while editing and aligning your tracks. Remember, timing is everything in music and with the Beat Detective, you can ensure that all your tracks are played at the right time.
With this guide, you’re now well-equipped to confidently use this powerful editing tool. Go ahead and try it out, and let us know your experience in the comments below!