To use automation in Pro Tools, you can simply select the automation mode, choose the parameter you want to automate, and then add automation breakpoints as needed. Automation in Pro Tools allows for precise control over levels, panning, and other parameters throughout a session.
Additionally, automation can be used to create complex effects, sync delay and reverb, and control plugin parameters in real-time. By automating various parameters, you can achieve a dynamic and polished sound in your recording, mixing, and mastering work. With the option to use automation in various modes and various types of tracks, Pro Tools provides a versatile platform for controlling everything from a single vocal track to a full mix.
Moreover, automating in Pro Tools can save time and effort of manual editing and can help bring out the best from your final product.
What Is Pro Tools?
Pro Tools is a digital audio workstation used for recording, editing, and mixing music and sound. Automation in Pro Tools allows users to automate mixing and editing tasks, saving time and creating a more dynamic and polished sound.
Introduction To Pro Tools
Pro Tools is a digital audio workstation used for recording, editing, and producing music and sound for a variety of media. It’s one of the most popular audio software options available for professionals and beginners alike. Pro Tools comes with a vast array of features and tools that help music producers create high-quality music with ease.
Benefits Of Using Pro Tools
Using Pro Tools provides various benefits, making it a top choice for music producers worldwide. Some of the significant advantages of using Pro Tools are:
- Industry-Standard Platform: Pro Tools is widely used in the music industry, making it the industry-standard audio workstation software.
- Professional Quality: With Pro Tools, users can produce high-quality music, ensuring everything from sound design to mixing sound is top-notch.
- User-Friendly Interface: Pro Tools comes with an intuitive interface that helps creators concentrate on creating audio content rather than learning the software.
- Automation Capabilities: Pro Tools allows users to automate various functions, such as volume and panning, enabling users to create dynamic soundscapes that are otherwise challenging to achieve manually.
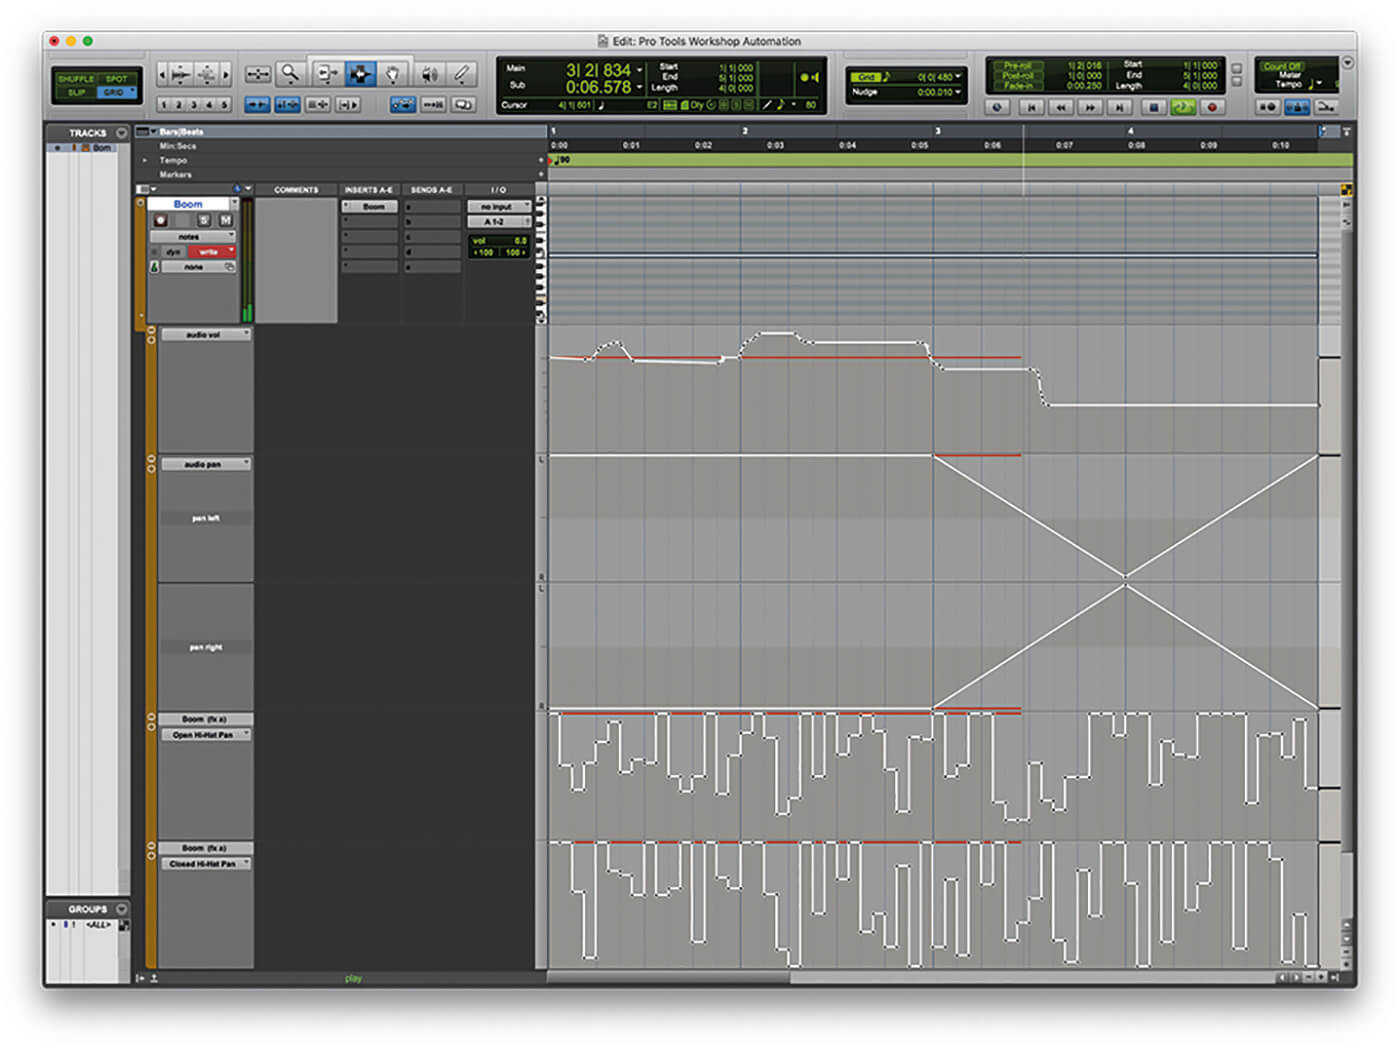
With Pro Tools’ automation capabilities, users can quickly and easily add motion to their mixes using the track’s automation lanes. Automation makes it possible to modify volume, pan, and other parameters throughout a song to create optimal sound quality and a great listening experience.
Using Automation In Pro Tools
Using automation in Pro Tools can seem challenging at first, but with time and practice, it becomes second nature. To use automation, follow these steps:
- Open the automation lane for the track you want to automate by clicking the automation mode button. The automation lane lets you draw in volume, pan, and other parameters.
- Add breakpoints by clicking on the line in the automation lane. These points create an anchor where you can adjust the desired volume or parameter value.
- Move your mouse over the point you wish to adjust and change the value by dragging it up or down.
- Repeat steps two and three until you achieve your desired sound and motion.
In conclusion, Pro Tools is an industry-standard audio software that provides a wide range of tools and features that make it easy to create high-quality music. Using automation in Pro Tools is a great way to create movement and dynamic soundscapes in your audio productions. With practice and time, you can quickly learn how to use automation effectively on different parameters and create audio content that stands out.
Credit: musictech.com
Why You Should Automate In Pro Tools
Automating in Pro Tools can save you time and give you greater control over your mix. By using automation, you can easily adjust the levels of individual tracks, add effects, and create dynamic changes that bring your music to life.
The Importance Of Automation
In today’s world, where technology plays an essential role in every aspect of life, it is no surprise that the music industry has transformed too. The use of technology has made music production easier than ever before. One of the most beneficial tools for music production is automation. Automation is a process of taking care of the repetitive tasks in a music production workflow. Automating your tasks helps saves time and allows you to focus on the creative process. In Pro Tools, automating your tracks and plugins is considered the backbone of the software. Let’s dive deeper into the importance of automation in Pro Tools.
Overview Of Automation In Pro Tools
Pro Tools is an audio software that is widely used in the music industry. It is known for its powerful features, and automation is one of them. Automation in Pro Tools provides you with the tools you need to make your track sound more polished and professional. You can automate a wide range of parameters like volume, panning, effects, and more. By automating these parameters, you can create dynamic effects, smooth transitions, and add a personal touch to your audio recordings.
How To Use Automation In Pro Tools
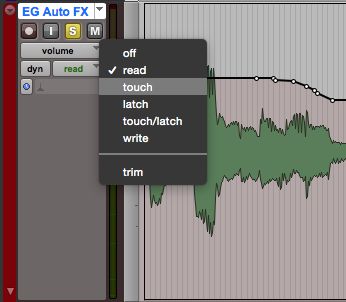
To automate a parameter in Pro Tools, you need to enable automation mode by clicking on the “Auto” button. Once you have enabled automation mode, you can draw in automation data using the “Draw” tool or record automation by moving knobs and faders on your MIDI controller. To change the automation mode, you can simply hit the “Trim” or “Latch” buttons. With Pro Tools, automating your tasks has never been easier.
Conclusion
In conclusion, automation in Pro Tools is a game-changer. It is almost impossible to create a polished track without the use of automation. Pro Tools provides you with the tools you need to automate your tracks and plugins easily. In this blog post, we discussed the importance of automation, an overview of automation in Pro Tools, and how to use automation in Pro Tools. If you haven’t used automation in Pro Tools, we highly recommend that you give it a try. Your music productions will thank you.
What Can You Automate?
Pro Tools is a digital audio workstation (DAW) that provides a range of tools and features to enhance efficiency and productivity. One of the most useful features of Pro Tools is automation, which can streamline workflows and make the mixing and editing process much easier. But, the question is, What Can You Automate? Below are some of the important aspects of automation:
Track Volume And Pan
Track volume and pan are basic operations for mixing in Pro Tools. However, adjusting these parameters manually can be quite time-consuming. With Pro Tools automation, you can easily automate the volume and pan for each track to achieve a more accurate and consistent mix. You can use the volume and pan automation to create gradual fades or changes over time.
Plug-in Parameters
With the help of automation, you can customize the parameters of plug-ins and create dynamic changes in your mix. For instance, you might want to automate the parameters of a compressor to create a smooth transition between vocal parts. Use automation for plug-ins to create nuanced changes and specific effects that can elevate your mix.
Mute And Solo
Whether muting or soloing an instrument or a vocal track, the mute and solo automation is an effective way to adjust these parameters easily. This feature saves the time required to manually mute and unmute tracks. You can apply these changes over a longer period of tracks for a well-controlled effect.
Send Levels
Another important feature of Pro Tools automation is controlling send levels. With this automation, you can vary the levels of signal being sent to effects, auxiliary tracks, and buses. This feature allows you to add a range of effects, and you can choose how much of the signal goes to each of those effects.
Clip Gain
Clip Gain allows you to adjust the gain of individual clips in your session without affecting the overall track level, making it easy to level out audio clips. Automating clip gain can help normalize and balance audio that fluctuates in volume, as well as dynamically adjust the volume of individual clips.
These are some of the essential aspects of Pro Tools automation. With these features, you can customize your workflows and make your mixing process more efficient and accurate.
How To Automate In Pro Tools
Discover how to add automation to your Pro Tools project and streamline your workflow. With a few simple steps, you can automate tasks such as the panning of audio tracks, volume adjustments and plugin settings to achieve a more professional sound.
Automation is a powerful tool that can save you hours of time and energy. In Pro Tools, automation can be used to change the volume, pan, and other parameters of your tracks over time. Whether you are working on a music production or a post-production project, automating your tracks is an essential skill. In this post, we will discuss how to set up automation lanes, draw in automation, and edit automation in Pro Tools.
Setting Up Automation Lanes
To set up automation lanes in Pro Tools, you need to do the following steps:
- Go to the Edit Window of Pro Tools and select the track that you want to automate.
- Click on the “A” button in the track header to open the automation menu.
- Select the parameter that you want to automate from the automation menu.
- Pro Tools will create a new automation lane for the parameter that you selected.
Drawing In Automation
Drawing in automation is one of the easiest ways to automate a track in Pro Tools. To draw in automation, you need to follow these steps:
- Select the automation parameter that you want to edit from the automation lane.
- Use the pencil tool to draw in the automation points on the automation lane.
- Drag the automation points up or down to adjust the parameter value.
You can also use the smart tool or the trim tool to edit the automation points by clicking and dragging them.
Editing Automation
Editing automation in Pro Tools is a straightforward process but can save you a lot of time. To edit automation, you need to do the following steps:
- Select the automation parameter that you want to edit from the automation lane.
- Use the selector tool to choose the automation points that you want to edit.
- Use the cut, copy, and paste functions to move or duplicate the automation points.
- Drag the automation points left or right to adjust the timing of the automation.
Automation in Pro Tools is a powerful feature that can save you a lot of time and effort in your music or post-production projects. By setting up automation lanes, drawing in automation, and editing automation, you can create dynamic and professional-sounding tracks quickly and efficiently. So why not give it a try and unleash the full potential of your creative projects?
Advanced Automation Techniques
Learn advanced automation techniques to speed up your workflow in Pro Tools. From routing audio to setting up macros, automation can help you streamline your editing process and save time.
Pro Tools has always been a favorite DAW for engineers in the music, film, and post-production industries. One of the reasons for its popularity is the advanced automation techniques allowing users to add dynamic movements to a mix.
Grouping Tracks For Automation
Grouping tracks is a helpful technique while working on automation tasks in Pro Tools. Grouping tracks will allow you to automate multiple tracks at once. This can save you a lot of time when working on large projects. Here are the steps to group tracks in Pro Tools:
- Select the tracks that you want to group.
- Right-click on the selected tracks.
- Select “Group” from the contextual menu.
- The group menu will appear and will allow you to name the group, choose group attributes and link the group to a keyboard shortcut.
Using Automation Presets
Using automation presets can save a lot of time and streamline the mixing process. It can be useful when you’re trying to replicate automation movements in different sections of a track. To use automation presets in Pro Tools, follow the steps listed below:
- In the Pro Tools menu bar, click on the “Mix” button.
- Choose “Save Settings As” from the contextual menu.
- Give your preset a name that clearly defines its purpose.
- Choose the automation parameters you want to save, then click “OK”.
- The preset can be accessed later by going to the “Mix” menu, selecting “Plug-In Settings” and choosing the preset from the drop-down menu.
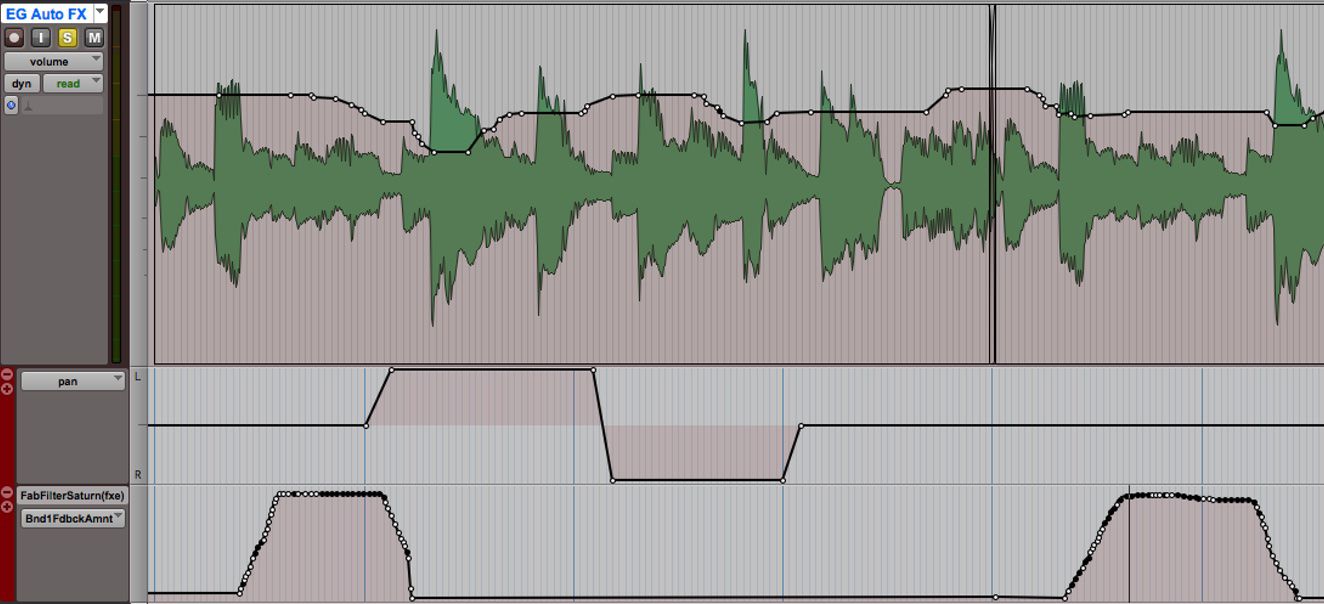
Creating Smooth Transitions
Creating smooth transitions between automated points is crucial to ensuring a mix sounds cohesive. There are a few techniques to achieve seamless transitions, such as:
- Crossfading: Adjust the volumes of two adjacent regions to create a smooth and gradual transition.
- Trimming: Create smooth transitions by trimming automation data in Pro Tools.
- Using Automation Preview mode: Automation Preview mode allows you to preview changes to automation data and see a visual representation of changes before committing to them.
In conclusion, utilizing advanced automation techniques in Pro Tools can enhance your mixing workflow and help you produce high-quality mixes faster. Try grouping tracks for automation, using automation presets, and creating smooth transitions to add movement and depth to your mix.
Credit: ask.audio
Tips For Using Automation Efficiently
Maximizing the use of automation in Pro Tools is key to workflow efficiency. It allows for quick repetitive tasks such as applying effects or edits to be done with ease. Create custom key commands and macros to speed up your workflow and save time.
Automation in Pro Tools is a powerful tool that lets you control various parameters of your music track over time. However, managing automation data can be time-consuming and tedious, especially if you’re working on a complex project. Here are a few tips to help you use automation efficiently.
Using Keyboard Shortcuts
When you’re working with automation in Pro Tools, keyboard shortcuts can be your best friend. They can help you speed up your workflow and make the process more efficient. Here are a few keyboard shortcuts that you can use:
| Shortcut | Action |
|---|---|
| Ctrl + Shift + A | Show/hide automation lane |
| Ctrl + Shift + F | Create a fade in or out |
| Ctrl + click | Create a breakpoint |
Organizing Automation Lanes
Organizing your automation lanes can help you keep things tidy and make it easier to navigate through your project. Here are a few tips to help you organize your automation lanes:
- Create a separate automation lane for each parameter you want to control
- Group related lanes together
- Color-code your lanes for easy identification
Duplicating Automation Data
If you need to repeat the same automation data in different parts of your project, duplicating the data can save you a lot of time. Here’s how you can duplicate automation data:
- Select the automation data you want to duplicate
- Press Ctrl + D to duplicate the data
- Drag the duplicated data to the desired location
Utilizing Templates
Templates can be a lifesaver when you’re working on a project that requires a lot of automation. Here are a few ways you can utilize templates:
- Create a template with all your commonly used automation lanes and parameters
- Save a template with common automation patterns, such as volume or panning, that you can use in different projects
- Modify existing templates to fit the needs of a specific project
In conclusion, using automation efficiently in Pro Tools can help you save time and energy. By using keyboard shortcuts, organizing your automation lanes, duplicating automation data, and utilizing templates, you can streamline your workflow and focus on creating great music.
Common Mistakes To Avoid
When using automation in Pro Tools, it’s important to avoid common mistakes. Don’t overuse automation, make sure you understand the parameters and use a clear naming system. Keeping these things in mind will help you maximize the benefits of automation in Pro Tools.
When it comes to using automation in Pro Tools, there are certain common mistakes to avoid. Over-automating, not checking automation data, forgetting to bypass automation, and not using snapshots are the most common mistakes that can lead to a less-than-optimal workflow. Here’s a closer look at each one.
Over-automating
One of the most common mistakes people make when using automation in Pro Tools is over-automating. While automation can be a great way to add depth and dimension to your projects, it’s important to use it sparingly. Over-automating can make your projects sound cluttered and unprofessional, so it’s important to strike a balance between using automation effectively and knowing when to back off.
Not Checking Automation Data
Another mistake that many people make when using automation in Pro Tools is not checking their automation data. This can result in unintentional changes to your mix, or even worse, complete audio chaos. It’s important to always double-check your automation data before finalizing your project to ensure that everything is where it should be.
Forgetting To Bypass Automation
Forgetting to bypass automation is another common mistake that can cause problems. If you’re tweaking your mix and you’ve got one or more tracks automated, it’s easy to accidentally make changes to a track that you wanted to leave unchanged. To avoid this, always be sure to bypass automation on any tracks that you’re not actively working on.
Not Using Snapshots
Finally, not using snapshots is another mistake to avoid. Snapshots are a powerful tool that lets you save multiple settings for a given mix, which you can then easily switch between. This can save you time and effort when making changes or trying out new ideas. So if you’re not already using snapshots, give them a try! In conclusion, using automation in Pro Tools can significantly enhance your projects, but it’s important to avoid these common mistakes. By being mindful of over-automating, checking your automation data, bypassing automation when necessary, and using snapshots, you can use automation to its fullest potential and create professional-quality mixes that sound great.
Credit: ask.audio
Frequently Asked Questions Of How To Use Automation In Pro Tools
How Do You Do Automation In Pro Tools?
Automation in Pro Tools can be done by using the automation playlists or modes available in the software. First, activate the automation mode for the track you want to automate, then use the pencil tool to write in the automation data on the track timeline.
You can also use the fader or knob controls in real-time to record automation changes.
Why Would You Use Automation In Pro Tools While Mixing?
Using automation in Pro Tools while mixing allows for precise adjustments in volume, panning, and effects at specific points in the track. This technique can save time and ensure consistency throughout the mix, as well as add creative flair to the production.
How Do I Enable Plugin Automation In Pro Tools?
To enable plugin automation in Pro Tools, follow these simple steps: first, select the track containing the plugin you want to automate. Next, click on the track name and select “Auto” from the dropdown menu. Finally, choose the parameter you want to automate and click “Enable”.
How Do You Use Automation?
Automation can be utilized by businesses to simplify tasks, increase efficiency, and save time and money. It involves the use of technology and software to perform repetitive and routine tasks without human intervention. Various systems can be automated such as email marketing, customer service, social media management, data entry, and more.
The main goal is to streamline processes and improve productivity.
Conclusion
Effective automation is an essential tool for music producers and audio engineers. With Pro Tools, there are endless possibilities, from saving time on tedious tasks to enhancing creativity. Implementing automation can be a daunting task, but with patience and practice, you’ll soon realize the power of automation in your music productions.
As you use automation, it’s important to remember to balance human touch with automated precision. Finding that sweet spot will help you create music that not only sounds great but also touches the listener’s soul. Keep exploring, experimenting, and creating with Pro Tools automation!