To setup Ableton OBS, download and install OBS, then launch Ableton and set up audio input and output. In this guide, you’ll learn how to adjust your audio and visual settings in Ableton OBS for the best recording experience.
OBS is a free and open-source streaming and recording software that allows you to capture high-quality video and audio from your computer. Ableton is a popular digital audio workstation used by many musicians and producers for creating music and live performances.
By combining these two powerful tools, you can create engaging and professional-looking videos of your music performances or tutorials. We’ll cover everything you need to know to get started with Ableton OBS.
Choose Hardware
Setting up Ableton OBS requires selecting appropriate hardware for optimum performance. From the computer to the audio interface, microphone, and camera, choosing the right equipment can make a significant impact on the quality of your live streaming sessions.
Choose Hardware If you’re new to Ableton Live or looking to upgrade your setup, selecting the right hardware is a crucial step in creating the perfect work environment. In this subheading, we’ll take a closer look at what to consider when selecting the hardware.
Selecting Your Computer
Your computer is the backbone of your Ableton setup so it’s important to choose one that can handle the software’s processing power. Here are some key features to look for in a computer:
- Processor- Look for a computer with a fast multi-core processor for speedy loading times and smooth operation.
- RAM – More memory allows the computer to handle larger sets and audio files without crashing. Aim for 8GB RAM at a minimum.
- Storage – The amount of storage you need is dependent on your workflow. If you’re working with a lot of large audio files, consider an external storage device like an SSD.
Audio Interface Selection
An audio interface is essential for recording audio into Ableton. Here are some key features to look for when selecting an audio interface:
- Input/Output Count – The number of inputs/outputs you need is dependent on your setup. Consider the instruments you will be recording and any potential need for expanding in the future.
- Connectivity – USB is a common choice, but Thunderbolt and FireWire are also available. Keep compatibility in mind when selecting an audio interface.
- Sample Rate/Bit Depth – Determine the sample rate and bit depth of your projects to ensure your audio interface can handle it.
Midi Controller Setup
A MIDI controller is a physical device that allows you to control Ableton’s software with hands-on interaction. Here’s what to look for when selecting a MIDI controller:
- Number of Keys/Buttons – Determine the number of keys/buttons you need based on your workflow. A larger controller provides more options, but also requires more desk space.
- Connectivity – USB is the most common connection, but consider other options based on your computer setup.
- Compatibility – Ensure that the MIDI controller is compatible with your version of Ableton.
By paying close attention to these hardware options, you’ll be able to select the right equipment to suit your workflow, and create an Ableton setup that works best for you.
Credit: community.justinguitar.com
Setting Up Ableton
Ableton Live is a powerful software designed for music production and live performance. Setting it up properly is crucial to ensure a smooth and efficient workflow. In this article, we will go through the steps to install and set up Ableton, configure audio and MIDI preferences, and connect external instruments.
Installation And Setup
The first step is to download and install Ableton Live from the official website. Once the download is complete, run the installer and follow the on-screen instructions. After installation, launch Ableton Live from your Applications folder (Mac) or Start menu (Windows).
Once you’ve opened Ableton, you’ll be prompted to enter your license information. If you haven’t purchased Ableton yet, you can use the 90-day free trial.
Audio And Midi Preferences
Before you start making music, it’s important to configure the audio and MIDI preferences to suit your needs. To do this, navigate to the “Options” menu and select “Preferences”.
Under the “Audio” tab, you can choose your audio interface, sample rate, and buffer size. It’s recommended to choose the highest buffer size possible without affecting the performance of your computer to avoid audio dropouts.
Under the “MIDI” tab, you can select your MIDI input and output devices. You can also configure MIDI mapping and sync settings.
Setting Up External Instruments
If you have external instruments like synthesizers or drum machines, you can connect them to Ableton and use them in your productions. To do this, you’ll need a MIDI interface or a compatible audio interface with MIDI capabilities.
Connect the MIDI or audio cables from your external instrument to your interface, then connect the interface to your computer. In Ableton’s preferences, under the “MIDI” tab, select your external instrument as the MIDI input device. You can now use your external instrument in your Ableton projects!
Creating A Project
Setting up Ableton OBS is a straightforward process requiring a few basic steps. First, download OBS and Ableton Live software, then configure the audio settings in OBS, followed by adding sources and scenes. With some practice, you’ll be able to create high-quality music videos and live stream performances.
Creating a Project Setting up Ableton Live for the first time can be an exciting yet daunting task. But don’t worry, we’ll guide you through the process step by step. One of the first things you need to do when starting a new project is to create a project file. Here are the steps you need to follow to create a project in Ableton Live. Selecting a Template When you first open Ableton Live, you will be presented with a window asking if you want to create a brand new project or use a provided template. Choosing a template is recommended, especially for new users because it helps you get started more quickly. Ableton Live provides several templates covering different genres of music production, so choose the one that is closest to the type of production you want to achieve. Importing Audio/MIDI Files The next step after choosing a template is importing audio or MIDI files. If you have recorded an audio track or composed one using a digital audio workstation (DAW), you can quickly import it into your Ableton Live project. To do this, select the File menu in Ableton Live and choose Import Audio/MIDI File. Locate the file you want to import and drag it into the Arrangement or Session View of the project. Working with Plugins and Effects One of the great things about using Ableton Live is the vast array of included plugins and effects. Ableton Live comes with built-in plugins and effects for EQ, compression, delay, reverb, and many more. To use these plugins, simply drag and drop them onto the audio or MIDI track you want to apply them to. You can customize the settings and parameters of each plugin to your liking. In conclusion, creating a project in Ableton Live is easy and straightforward. By following the simple steps outlined above, you can create a new project file, choose a template, import audio or MIDI files, and apply plugins and effects to your tracks. Now that you are familiar with the fundamentals of setting up a project in Ableton Live, it’s time to dive into the fun stuff – creating music!
Working With Clips And Tracks
Learn how to set up Ableton OBS by working with clips and tracks. This involves importing audio and video files, creating new tracks, and adding clips to them. With this knowledge, you can create professional-looking live streams and recordings.
Ableton Obs is a popular digital audio workstation used by musicians, producers, and sound designers. One of the essential features in Ableton Obs is the ability to work with Clips and Tracks. Clips are audio or MIDI recordings, while tracks are collections of clips that you can organize and edit. In this article, we will explore the basics of working with Clips and Tracks in Ableton Obs.
Creating Audio/midi Clips
To create an audio clip, click on the “Create” button in the “Session” or “Arrangement” view, then select “Audio” from the options. You can also use the shortcut key “Ctrl + T” to create a new audio track. Next, locate the clip view in the lower section of the interface, and click on the “New” button to create a new clip. You can then record or drag and drop an audio sample into the clip. To create a MIDI clip, follow the same procedure, but this time select “MIDI” from the options. Once you have a blank MIDI clip open, you can start adding notes with your MIDI controller. You can also draw in notes using the MIDI editor or use the step sequencer.
Editing Clips
Ableton Obs provides several editing tools to manipulate audio and MIDI clips. To edit an audio clip, simply double click on the clip to open it in the clip view. From here, you can adjust the volume, pan, and other parameters. You can also add effects such as EQ, reverb, and delay to the clip. Editing MIDI clips is similar to editing audio clips. Double click on the clip to open it in the clip view, and use the editing tools to adjust the notes, velocity, and other parameters. You can also use the MIDI editor to fine-tune the notes.
Organizing Tracks
Organizing tracks in Ableton Obs is easy. To create a new track, click on the “Create” button in the “Session” or “Arrangement” view, then select “Audio” or “MIDI” from the options. You can then drag and drop clips into the track, or record new clips into the track. You can also group tracks together by selecting them and using the “Group” option in the right-click menu. This allows you to control the volume, pan, and other parameters of multiple tracks at once. You can also use the “Send” option to route audio from one track to another. In conclusion, working with Clips and Tracks in Ableton Obs is essential for creating and organizing your music. With the right knowledge and practice, you can create professional-grade tracks that stand out.
Arranging Your Project
Once you have recorded all your clips, it’s time to arrange your project. This is where you decide the flow of the song and create a structure for it. With Ableton OBS, you have full control over how you want to arrange your clips, giving you the freedom to experiment with different ideas until you find the perfect arrangement for your project.
Working With Scenes
Scenes are the building blocks of your project, and setting up scenes correctly is crucial to create an effective arrangement. Scenes can be thought of as a combination of clips that are played together. You can use scenes to create variations in your song or to transition between different parts of your track. To create a new scene, simply right-click the empty area in the Scenes pane and select “Insert Scene.”
Arranging Clips On The Timeline
Once you have created your scenes, the next step is to arrange your clips in the timeline. The timeline is where you can see all your clips laid out from start to finish. To add a clip to the timeline, simply drag and drop it from the browser or session view onto the timeline. You can move clips around the timeline by dragging them to the desired position. You can also trim clips by dragging their edges.
Building The Song Structure
The final step is to build the song structure. This is where you decide the order of your scenes and clips to create a full song. It’s important to keep the listener engaged by varying the arrangement and introducing new elements throughout the track. To do this, you can use different scenes, add effects, and apply automation to make the song more interesting. Once you have built the song structure, you can export it as a finished track.
Credit: blog.b2fab.com
Mixing And Mastering
Set up Ableton OBS for Mixing and Mastering with ease by following these simple steps: create a new project, import your audio, add effects to your tracks, set levels and pan, export and save your final mix. With Ableton OBS, you’ll have all the tools you need to create high-quality, polished audio projects.
Mixing and Mastering your track is an essential part of the music production process. It involves balancing the different elements of your track, enhancing their sound quality, and ensuring that your final mix sounds cohesive. Ableton OBS has many powerful tools that can help you with the Mixing and Mastering process, including faders, EQ, compression, reverb, and delay. —
Working With Faders And Panning
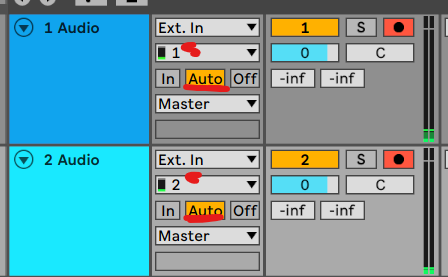
When it comes to balancing your track, you can use Ableton OBS’s faders to adjust the volume of each element. Start by setting the volume of your kick drum, bass, and vocals to ensure they’re audible. Then, use the faders to balance the other elements of your track, such as your pads, synths, and percussion. You can also use panning to create a sense of space and depth in your mix. For instance, you can pan your hi-hats to the right and your shakers to the left. To pan a track in Ableton OBS, click on the circle icon in the mixer view and move it left or right. —
Using Eq And Compression
EQ and compression are essential tools for improving the sound quality of your tracks. EQ allows you to adjust the frequency balance of your sounds, while compression can help you control the dynamic range of your tracks. To use EQ, start by identifying the frequency range that needs tweaking. For instance, if your bass sound is too boomy, use the EQ to attenuate the low-frequency range. You can do this by dragging the EQ curve downwards on the relevant frequency. To use compression, start by setting the threshold to an appropriate level to give your track some dynamic range without being too squashed. You can then adjust the attack and release times to control how quickly the compressor kicks in and out. —
Adding Reverb And Delay
Reverb and delay are two of the most commonly used effects in music production. They can add depth and atmosphere to your tracks, making them sound more polished and professional. To add reverb to a track in Ableton OBS, start by inserting a reverb plugin onto the track. Then, adjust the wet/dry balance to control the amount of reverb you want to apply. You can additionally adjust the decay time to determine how long the reverb lasts. To add delay, insert a delay plugin onto the track, and adjust the feedback and delay time to control the effect. You can experiment with different settings until you find the right balance for your track. —
Mastering Your Track
Mastering your track is the final step in the Mixing and Mastering process. It involves applying a series of effects to your entire track to ensure that it sounds cohesive and professional. To master your track in Ableton OBS, start by applying a limiter to the master bus. This will help you increase the overall loudness of your track without causing distortion. You can then apply equalization to further balance your track and enhance its sound quality. Overall, the Mixing and Mastering process requires patience, experimentation, and good ears. But with Ableton OBS’s powerful tools, you can take your tracks to the next level and achieve professional-level sound quality.
Exporting Your Project
Exporting your project from Ableton Obs is a crucial step towards sharing your music creations with the world. It helps you prepare your project for distribution and ensures that it is compatible with different playback platforms. In this guide, we will walk you through the various steps involved in exporting your project.
Preparing Your Project For Export
Before exporting your project, there are a few things you need to keep in mind to avoid any last-minute surprises. Here’s a checklist of things you need to ensure:
- Check that you have added all the necessary plugins and effects
- Ensure that all the tracks in your project are named and labeled appropriately
- Make sure your audio levels are optimized and not peaking
- If you have any automation or MIDI clips in your project, double-check that they are working correctly and are synchronized
Exporting Audio
Once you have prepared your project, you can start exporting your audio. Here are the steps:
- Go to the File menu and select ‘Export Audio/Video’
- Select the format and quality of your output audio file
- Specify the location where you want to save the exported audio file
- Name your exported file
- Finally, click on the ‘Export’ button to start the process
Uploading To Soundcloud Or Other Platforms
After exporting your audio, you can upload it to a music platform such as SoundCloud. Here’s how:
- Sign up for a SoundCloud account if you haven’t already
- Click on the ‘Upload’ button in the top right corner of your SoundCloud dashboard
- Select the audio file you want to upload
- Add a title, description, and artwork for your track
- Choose the genre that best suits your track
- Finally, click on the ‘Save’ button to publish your track on SoundCloud
By following these simple steps, you can now export your Ableton Obs project and share your musical creations with the world. Happy exporting!
Troubleshooting
Having trouble setting up Ableton OBS? Troubleshooting the software can be frustrating, but it’s essential for ensuring smooth broadcasting. Follow step-by-step guides and watch tutorials to diagnose and fix any issues in a timely manner.
Troubleshooting is an important aspect of using any software, including Ableton OBS. Setting up Ableton OBS can be a bit overwhelming for beginners. You may encounter problems that prevent you from maximizing the software’s potential. However, with a little bit of troubleshooting, you can get back on track. In this section, we will cover the most common issues users face and the solutions to each of them.
Common Issues And Solutions
When setting up Ableton OBS, you may experience issues such as audio crackling, device detection problems, or scenes/sources not appearing. Here are some common troubleshooting tips: – Audio Glitches or Crackles: One of the most frequent issues that users face is audio glitches or crackles. This issue often arises when the buffer size is too low. To fix it, try increasing the buffer size in your audio settings or reducing the number of devices connected. – No Audio Input or Output: Unable to detect the audio input or output device? Check your device compatibility with Ableton OBS. If your device is compatible and still not detecting, try updating or reinstalling the audio drivers. – Scenes/Sources not appearing: Trouble adding a scene or source? Make sure you have added it to the correct canvas. You can click on the “+” button at the bottom of the OBS window to add a new one. – Display Capture Issues: Unable to capture your display? Try updating your graphics card driver, ensuring the relevant source is selected, and running OBS as an administrator.
Code Compilation Issues
Code compilation issues can prevent you from getting started with Ableton OBS. If you’re experiencing these issues, here are some possibilities: – Incorrect Code: Ensure that you have typed the code correctly, including all the commas, brackets, and quotation marks. – Compatibility issues: Check the version of the software you’re using. Some codes won’t work with earlier versions. – Missing Dependencies: Before running any code, ensure you have installed the required dependencies, libraries, and plugins. You can consult the user documentation provided or seek support from the community forums. In conclusion, troubleshooting Ableton OBS may seem daunting. However, knowing how to handle common issues can go a long way in maximizing your experience. Remember to always check for compatibility, update your software and drivers, and follow the guidelines provided. With these tips, you should be on your way to a seamless usage of Ableton OBS.
Credit: m.youtube.com
Frequently Asked Questions For How To Setup Ableton Obs
How Do I Get Audio From Ableton To Obs Mac?
To get audio from Ableton to OBS on a Mac, you first need to set up a virtual audio device using software such as Soundflower or BlackHole. Once set up, select the virtual audio device as the audio input in both Ableton and OBS.
Your audio from Ableton should now be transmitted to OBS.
How Do I Set Output Device In Ableton?
To set the output device in Ableton, click on “Options” in the menu bar and select “Preferences. ” Then, go to the “Audio” tab and choose the desired output device from the drop-down menu under “Audio Output Device. ” Finally, click “OK” to save the changes.
How Do I Set Up Audio On Obs?
To set up audio on OBS, go to “Settings” and select “Audio”. Choose your desired input and output devices. To add audio sources, click the “+” icon in the “Sources” box and choose audio input capture or audio output capture.
Adjust audio levels using the sliders under “Mixer”.
How Do I Set Up Recording In Ableton?
To set up recording in Ableton, first create a new audio track. Then select the audio source, arm the track for recording, and press the record button. You can also use MIDI or external devices to record. Make sure to adjust the input levels and monitor the recording.
That’s it!
Conclusion
Setting up Ableton OBS can be a tricky process, but with this step-by-step guide, you can easily master it in no time. Remember to check all the vital settings, such as audio and video inputs, to ensure a smooth streaming experience.
Make use of the plugins and customizable features to elevate your live performances and recording sessions. With Ableton OBS, the possibilities are endless. So get creative and start streaming like a pro!