To set recording levels in Pro Tools, first adjust your input gain to capture the desired level without clipping. Then use Pro Tools’ metering tools to monitor and adjust levels throughout recording.
If you’re new to recording in Pro Tools, setting levels may seem like a daunting task. However, with the right approach, it can be a smooth and straightforward process that results in high-quality recordings. We’ll explore the steps you should take to set recording levels in Pro Tools, including how to adjust input gain and use metering tools to monitor and optimize levels.
We’ll also discuss some tips for ensuring your recordings sound as good as possible. So, let’s get started and learn how to set recording levels in Pro Tools!
Understanding Recording Levels
Understanding recording levels is vital when it comes to producing high-quality audio recordings. Recording levels refer to the measurement of the audio signal’s amplitude or volume level. It is the process of capturing audio in a way that it doesn’t clip or distort. Pro Tools offers a range of tools and features to help you set recording levels to produce an exceptional audio recording. This post will focus on explaining what recording levels are, why they are important in Pro Tools, and how to set them effectively.
What Are Recording Levels?
Recording levels refer to the strength or volume of the audio signal being sent to an audio interface or recorded in Pro Tools. It measures the amplitude of an audio signal, and it’s crucial to set it correctly during recording. Setting the recording levels too low will result in weak or low audio recordings, while setting it too high can cause distortion or clipping, ruining the entire recording.
Why Are Recording Levels Important?
Recording levels are essential for producing high-quality audio recordings. They determine how much digital information is captured and how well it can be manipulated. When recording, it’s crucial to ensure that the audio signal is strong enough to be captured without clipping or distortion. Setting the recording levels too low can result in audio that’s too quiet or that has noise. On the other hand, setting the recording levels too high can cause distortion, which can’t be fixed later in the mixing process.
One of the most important things to keep in mind when recording is to avoid clipping the audio signal. Clipping occurs when the audio signal exceeds the maximum input level of the system, resulting in distortion. Therefore, it’s crucial to set the recording levels low enough to avoid clipping but high enough to avoid noise.
In Pro Tools, setting the recording levels correctly can be challenging, especially if you’re dealing with multiple channels or microphones. However, with the right techniques, you can set the recording levels with ease and produce high-quality recordings.
Here are some techniques to help you set recording levels in Pro Tools:
- Use preamps and adjust the gain accordingly.
- Use the clip indicator in Pro Tools.
- Use gain plug-ins on individual tracks.
- Record a test take. Check the levels, adjust gain, and try again.
- Use headphones to monitor for any distortion or clipping.
By using these techniques, you’ll be able to set recording levels effectively in Pro Tools and produce high-quality audio recordings that are free from distortion, noise, or clipping. Now that you understand the importance of recording levels and how to set them, you can produce high-quality audio recordings that sound professional and polished.
Preparing To Set Recording Levels
To set recording levels in Pro Tools, start by ensuring that your input source levels are properly calibrated. Next, adjust the level of your recording device to match the intended level of your recording. Use the Pro Tools metering system to monitor audio levels and achieve optimal recording levels.
Setting recording levels in Pro Tools can be a daunting task, especially if you are new to the software. However, with the right preparation and understanding, it can become a seamless process. A crucial part of setting recording levels is preparing adequately, and in this section, we will cover the three essential steps: the importance of headroom, selecting the right microphone, and choosing the right preamp.
Importance Of Headroom
Headroom refers to the space between the highest peak of your recording and the maximum level your hardware or software can handle. It is essential to have enough headroom to prevent clipping and distortion in your recording. As a general rule of thumb, it is best to aim for a peak level of -6 dB to -12 dB, leaving enough room for any unexpected peaks. It’s important to note that digital clipping can happen quickly and may not sound very pleasant. Thus, having sufficient headroom is critical when recording various instruments and signals.
Selecting The Right Microphone
The microphone you use will significantly affect the sound quality of your recording. When selecting the right microphone, consider its frequency response, sensitivity, and polar pattern. Choose a microphone that best suits the tone and character you want to achieve. For example, if you want a bright and crisp sound, a condenser microphone would be a good choice, while a dynamic microphone would be ideal for a warmer sound. The right microphone will make a significant difference in your recording quality.
Choosing The Right Preamp
A preamp amplifies the signal of a microphone, boosting the level to line level. The right preamp choice can add warmth, depth, and clarity to your recording. When selecting a preamp, consider your budget, the type of microphone and sound quality you are trying to achieve. A solid-state preamp can provide a clear and precise sound that is perfect for recording vocals, while a tube preamp may add warmth and depth to your recording. In conclusion, preparing adequately to set recording levels is crucial in achieving the best sound quality. Paying attention to headroom, selecting the right microphone, and preamp will go a long way in improving your recording quality. Remember, each piece of equipment you choose affects the final recording, so invest in quality equipment that is well-matched to your recording goals.
Setting Recording Levels In Pro Tools
Learn how to set recording levels in Pro Tools by first understanding how the gain structure works. Using proper gain staging techniques and metering tools can ensure the optimal recording levels for your audio tracks.
Creating high-quality recordings is essential for any musician or sound engineer. To achieve this, getting the right recording levels is crucial. In this post, we’ll guide you on how to set recording levels in Pro Tools, the most popular digital audio workstation. We’ll cover everything from creating a new session to using plugins to adjust levels. So let’s get started!
Creating A New Session
The first step in setting recording levels in Pro Tools is to create a new session. To do this, click on File > New Session. Choose the sample rate, bit depth, and other settings that match your project’s needs. It’s essential to set the correct session format since this will affect your recording quality. You can also select the number of tracks you want to create and name them according to your preference.
Setting Input Levels
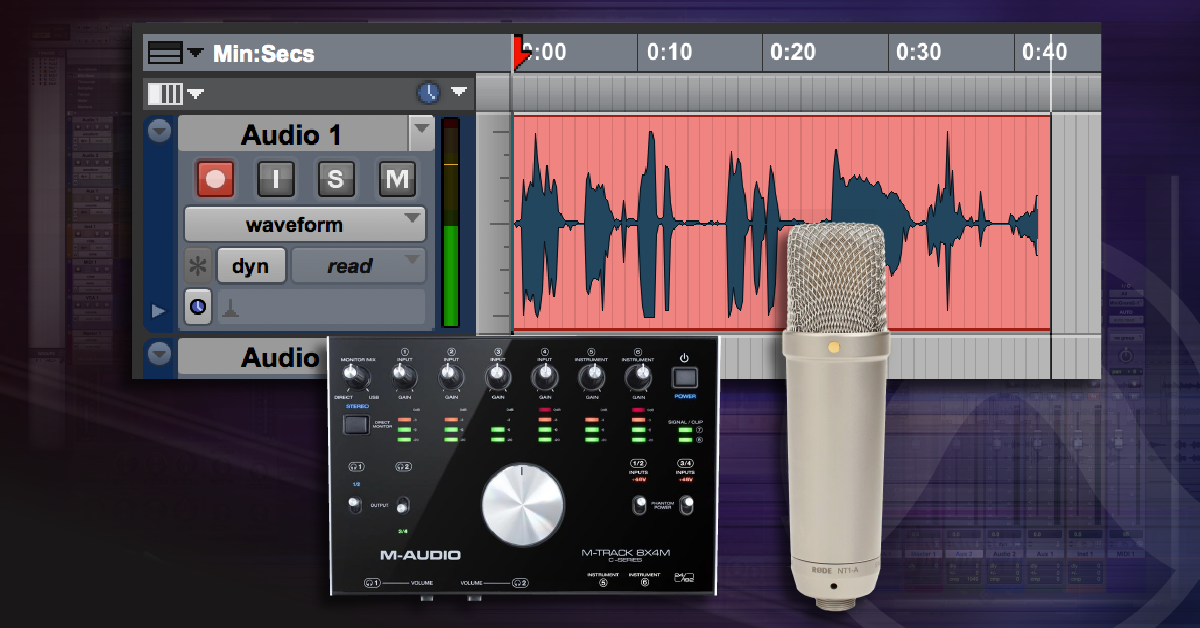
Once you create your session and tracks, it’s time to set your input levels. This step is crucial since it determines the overall quality of your recording. To set input levels, click on the track’s recording input and then choose the input source. Ensure that the input signal is strong but not too high as this can cause distortion. Pro Tools’ meter can help you monitor input levels. The optimal range for input levels is between -18dbfs and -12dbfs.
Setting Trim Levels
After setting your input levels, the next step is to set your trim levels. Trim levels help to adjust the gain of the recorded signal to ensure consistency. To do this, click on the track’s fader, go to the mixer, and choose the trim plugin. Adjust the trim plugin to achieve the desired gain level. Trim levels should be set between -6db to 0db, depending on the recording’s dynamics.
Setting Clip Gain
Clip gain refers to adjusting the volume levels of specific clips in a track to ensure clarity. To set clip gain, click on the track’s clip gain utility and then choose the pencil tool. Use the pencil tool to draw lines on the clip gain waveform to increase or decrease volume levels. This step is crucial since it ensures that the overall mix sounds balanced and clean.
Using Plugins To Adjust Levels
Finally, you can use plugins to adjust your recording levels further. Pro Tools provides a wide range of plugins that can help you achieve the desired sound. Typically, you can use EQ plugins to shape the sound, compressors to control dynamics, and limiters to ensure consistency. Adjust the plugins to get the desired volume and tonal quality. In conclusion, setting recording levels in Pro Tools is crucial for producing high-quality audio recordings. By following the steps outlined above, you can achieve the desired sound with ease. Remember to monitor your input and trim levels using the meter and adjust them accordingly. Also, use plugins to refine your recordings further. Try implementing these tips and witness a significant improvement in your audio recordings.
Using Meters And Monitoring To Set Recording Levels
Setting recording levels in Pro Tools is crucial for producing quality audio. One way to ensure your levels are correct is by using meters and monitoring. Meters display the level of the audio signal and monitoring allows you to hear the audio and make adjustments. In this post, we will discuss different types of meters and how to use them for accurate recording levels in Pro Tools.
Understanding Different Types Of Meters
There are three main types of meters used in Pro Tools: Peak, RMS, and VU meters. Each type serves a different purpose, and understanding their differences is essential to recording quality audio.
Using Peak Meters
Peak meters display the highest point of the audio signal. In Pro Tools, peak meters are located on the channel strip and show the level of the input signal. To set recording levels using peak meters, start by playing the loudest part of the audio you will be recording. Adjust the input level until the peak meter is just below the red zone, ensuring that the audio does not clip.
Using Rms Meters
RMS meters measure the average level of the audio signal. In Pro Tools, RMS meters are located on the master track and indicate the level of the entire mix. To use RMS meters for recording levels, play the loudest part of the audio and adjust the input level, ensuring that the RMS meter does not go above -18 dBFS.
Using Vu Meters
VU meters measure the perceived loudness of the audio signal. In Pro Tools, VU meters are located on the channel strip and show the input level of the audio. To use VU meters for recording levels, play the audio and adjust the input level until the VU meter is at 0VU, indicating the optimum signal level.
Using Headphones For Monitoring
Monitoring the audio is another crucial step in setting recording levels. Headphones are an excellent monitoring tool as they allow you to hear the audio without any interference from the surrounding environment. To use headphones for monitoring, connect them to the output of your audio interface and adjust the volume so that you can hear the audio clearly without it being too loud or too soft.
Best Practices For Setting Recording Levels
Setting proper recording levels is crucial for achieving high-quality recordings in Pro Tools. Whether you’re recording vocals, guitars, drums, or any other instrument, it’s important to avoid clipping and leave enough headroom to avoid unwanted distortion. Following these best practices will ensure that your recordings sound clear, crisp, and professional.
Avoiding Clipping
Clipping occurs when the recording level is too high, causing the audio signal to distort. This can permanently damage your recordings and make them sound harsh and unpleasant. To avoid clipping, make sure that your recording levels are not consistently hitting the red on the meter. Instead, aim for levels that hover around -6 dB to -12 dB on the meter.
Leaving Headroom
Leaving headroom refers to leaving some space between the highest peak of your recording and the maximum level allowed before clipping occurs. This space is important because it prevents distortion and allows room for post-production processing. Aim to leave around 3-6 dB of headroom in your recordings to ensure clarity and avoid distortion.
Recording At A Consistent Level
Recording at a consistent level ensures that your recordings are well-balanced and easy to mix. Inconsistencies in recording levels can result in unbalanced tracks or require significant post-production processing to correct. To achieve consistent levels, use an external preamp or adjust the input gain on your interface to achieve a consistent level throughout the recording session.
Testing Recording Levels
Before starting any recording session, it’s critical to test your recording levels to ensure that they are set correctly. Use a test tone or a sound check to adjust your levels and verify that they meet your desired target. Additionally, periodically check your levels throughout the recording session to ensure that they remain consistent and free of clipping.
Using Compression And Limiting
Compression and limiting are processing tools that can help to control the dynamic range of your recordings and prevent clipping. These tools should be used sparingly and only when necessary, as overuse can result in unnatural-sounding recordings. Use compression and limiting to even out any volume inconsistencies and prevent clipping in your recordings.

Credit: m.youtube.com
Common Mistakes When Setting Recording Levels
Recording levels play a crucial role in the sound quality of a recording. Setting recording levels too high or too low can drastically affect the final outcome of your recording. In this article, we will discuss the common mistakes made when setting recording levels in Pro Tools and how to avoid them.
Recording Too Hot
Recording levels that are too high can cause distortion in your recording. This occurs when the level of the sound source exceeds the maximum level that the recording system can handle. It results in a fuzzy, unpleasant sound that is not fit for use.
To avoid recording too hot, it is important to monitor your levels carefully. Use a level meter to ensure that the levels do not exceed the maximum level. A good approach is to set your recording levels at -12 dB to -6 dB to allow room for headroom.
Not Leaving Enough Headroom
Headroom is the amount of space left between the recording level and the maximum level. When there is not enough headroom, you risk clipping the audio, which can result in unpleasant distortion of the sound.
It is important to leave enough headroom to avoid clipping. A safe level to set your recording levels is -12 dB to -6 dB. It allows for enough headroom while still capturing the audio signals at an optimal level.
Not Monitoring Levels Constantly
Monitoring levels is crucial to ensure that recording levels are set at the optimal level. Failure to monitor levels can cause fluctuations in the sound and volume, resulting in a recording that is not suitable for use.
It is important to monitor levels constantly during recording to ensure that levels are set at a constant level. Use a meter to monitor levels and adjust levels when necessary.
Using Incorrect Meters
Using incorrect meters can lead to inaccurate readings of the recording levels. This can result in levels that are either too hot or too low, leading to distortion or inaudible recordings.
Use meters that are designed for recording levels to ensure that levels are set at the optimal level for your recording. This can help you avoid issues such as clipping and distortion.
Overusing Compression And Limiting
Compression and limiting are useful tools in recording, but overusing them can lead to a recording that lacks dynamic range and sounds flat.
It is important to use compression and limiting sparingly and only when necessary. An over-compressed recording can be difficult to work with and often cannot be fixed in post-production.
Setting recording levels is a crucial part of the recording process. Avoiding the common mistakes that we have discussed can help you achieve a recording that sounds professional and is suitable for use in a variety of settings.
Troubleshooting Recording Level Issues
To troubleshoot recording level issues in Pro Tools, it’s important to set the levels correctly from the start. Use the Pre-Fader meter to set levels before recording and the Post-Fader meter to adjust levels during playback. Ensure that the signal never goes into the red, which can cause distortion.
Recording level problems can be frustrating for anyone working in Pro Tools. These problems can lead to distorted recordings, clipped signals, and overall subpar audio quality. Luckily, there are ways to troubleshoot these issues and ensure you get the best possible recording. In this article, we will cover the most common recording level issues and how to resolve them.
Identifying Distortion Problems
One of the most common recording level issues is distortion. Distortion occurs when the audio signal is too loud, causing it to clip and become distorted. To identify distortion problems, look for red indicator lights on your audio interface or monitors. Distortion can also be heard in the recording as a harsh, crackling sound.
Resolving Clipping Issues
Clipping occurs when the audio signal exceeds the maximum level of your recording system. To resolve clipping issues, you can lower the input gain on your audio interface or turn down the output level of your instrument or amplifier. You can also use a limiter plugin in Pro Tools to prevent clipping. A limiter will automatically reduce the level of audio that exceeds a specific threshold.
Adjusting Input And Output Levels
Adjusting the input and output levels in Pro Tools is crucial to achieving a clean and professional recording. To adjust the input level, use the gain control on your audio interface or microphone preamp. Be sure to set the gain level to a level that does not cause distortion or clipping. To adjust the output level, use the fader control in Pro Tools or the output level control on your audio interface.
Monitoring Critical Listening
Critical listening is essential for troubleshooting recording level issues. It involves using headphones or studio monitors to listen closely to the recorded audio and identify any problems. Be sure to listen for distortion, clipping, and overall audio quality. You can also use plugins in Pro Tools to analyze the frequency and dynamic range of your recorded audio. In conclusion, troubleshooting recording level issues in Pro Tools involves identifying distortion problems, resolving clipping issues, adjusting input and output levels, and monitoring critical listening. By following these tips, you can achieve high-quality recordings and avoid common recording level problems.
Credit: www.sweetwater.com
Credit: m.youtube.com
Frequently Asked Questions Of How To Set Recording Levels In Pro Tools
How Do I Change Audio Level In Pro Tools?
To change audio level in Pro Tools, you need to follow these simple steps: 1) Locate the track’s volume fader or pan; 2) Adjust the volume fader up or down; 3) Use the automation feature to create volume changes over time.
What Should Your Recording Level Be?
Your recording level should be at a consistent and optimal level throughout your recording. A good rule of thumb is to aim for levels to reach somewhere between -12dB and -6dB, with occasional peaks reaching a maximum of -3dB.
Where Do You Adjust The Count In When Recording In Pro Tools?
Adjusting the count in Pro Tools can be done in the Transport Window. You can choose the format and start value of the count, as well as set it to free run or continuous.
How Do I See Audio Levels In Pro Tools?
To see audio levels in Pro Tools, you can use the Mix window or the Edit window. In the Mix window, click on the “View” menu and choose “Mix/Edit Window View” followed by “Mix” or “Edit”. Then, select the track you want to view the audio levels for, and you should see a meter displaying the levels.
In the Edit window, click on the track and select “Show/Hide Track Controls”. From there, you can choose to display the audio levels meter.
Conclusion
Now that you are familiar with the basic recording level concepts, setting the correct recording level in Pro Tools is much easier. By following the recommended guidelines, you can produce high-quality audio recordings. Remember to adjust your gain staging properly, monitor your levels carefully, and keep your signal levels below the red zone.
Lastly, practice makes perfect, so keep experimenting with different levels until you find the perfect balance for your recordings. Happy recording!