For reducing latency in Ableton, adjust buffer size and sample rate. Latency can cause delay in live performances and recording, so optimizing these settings can improve overall performance.
Latency can significantly impact the quality of your Ableton experience, especially during live performances and recording sessions. Fortunately, there are several ways to reduce latency and improve performance. A simple but effective way to do this is by adjusting the buffer size and sample rate in Ableton.
By changing these settings appropriately, you can reduce latency and improve the overall quality of the sound. Another way to minimize latency is by optimizing your computer’s resources, such as closing unnecessary apps and background processes. Taking these steps can ensure a smooth and seamless experience while using Ableton, allowing you to focus on creating music.
Credit: help.ableton.com
Latency 101
Reduce latency in Ableton by adjusting the buffer size and sample rate, optimizing your computer’s performance, and minimizing CPU usage. Additionally, disabling unnecessary plugins and audio effects, using the freeze function, and simplifying your workflow can help improve overall latency performance.
What Is Latency?
Latency in music production means the time delay between your input and the output sound. It can be caused by various factors such as hardware, software, and audio interface settings. Latency is a common challenge that music producers face while recording, mixing or editing their audio projects.
Effects Of Latency On Music Production
Latency in music production can lead to several issues like incorrect timing, poor synchronization, and inaccuracies in the sound output. It can result in delayed response time between the user’s input and the software’s output, leading to frustration and decreased productivity. This can be especially frustrating for live performances, where the timing of each element needs to be precise.
Reducing Latency In Ableton
Reducing latency in Ableton is important to achieve optimal performance while recording, mixing or editing your music projects. Here are some tips to reduce latency in Ableton:
- Use an audio interface with a low-latency driver.
- Adjust buffer size settings to the lowest possible setting without causing crackling or audio dropouts.
- Free up your computer’s processing power by closing other programs.
- Use audio effects that have a lower processing load on your computer.
With these tips, you can effectively reduce latency in your Ableton project and improve your music production experience. Remember to prioritize the quality of your audio projects by ensuring low latency and exceptional sound output.
Identifying The Source Of Latency
Identifying the source of latency in Ableton is crucial for reducing delays and improving audio quality. By analyzing your system and settings, you can pinpoint the root cause of latency issues and make the necessary adjustments to optimize your workflow.
Identifying the Source of Latency Latency is a common frustration among music producers and performers, as it can lead to timing issues and disrupt the creative process. Fortunately, reducing latency in Ableton is possible when you understand the sources of latency. Here are three factors that commonly contribute to latency in Ableton: the computer’s hardware and software, the audio interface and drivers, and plugin processing and buffer size. Let’s explore these factors in more detail. Computer’s hardware and software The performance of your computer’s hardware and software can greatly impact Ableton’s ability to process audio with low latency. Some particular hardware components that may cause latency are the CPU, RAM, and hard drive speed. Similarly, certain software programs running in the background can also contribute to latency issues. If you’re experiencing latency, consider closing unnecessary applications, or upgrading your computer’s hardware if needed. Audio interface and drivers Your audio interface and its drivers play a crucial role in determining the latency of your system. Audio interface drivers are used to communicate between your hardware and Ableton. Outdated or poorly optimized drivers can cause significant delays, especially if you’re using a USB interface. Therefore, it’s essential to utilize up-to-date drivers for your audio interface and configure Ableton’s audio preferences to utilize your driver’s optimal settings. Plugin processing and buffer size The audio processing that occurs within Ableton plugins is another source of latency. The greater the number of plugins and processing you have occurring, the more latency you will likely experience. Additionally, the size of your buffer determines the amount of audio data processed by your computer at once. Higher buffer sizes require more time to process, leading to increased latency. To reduce latency, consider reducing the number of plugins in use and decreasing the buffer size. Conclusion By addressing these three sources of latency, you can reduce the latency in your Ableton setup and improve your overall performance and creativity. Whether you invest in up-to-date computer hardware, optimize your audio interface, or adjust your buffer size and plugin usage, getting to the root of the problem is essential for a seamless music production experience.
Optimizing Your Computer’s Performance For Ableton
Optimizing your Computer’s Performance for Ableton is essential if you want to reduce latency and ensure smooth and efficient music production. Ableton is a powerful digital audio workstation used by many music producers worldwide. While Ableton is a great tool, it requires a lot of processing power from your computer to run smoothly. This processing power can cause latency, which can negatively affect your live performances, recording sessions, and overall workflow. In this blog post, we will take you through some steps that you can follow to reduce latency in Ableton by optimizing your computer’s performance.
Close Unnecessary Applications
The first step to optimizing your computer’s performance for Ableton is by closing all unnecessary applications. Any additional programs running in the background consume your system resources and slow down your computer. It is essential to close all applications that you are not using, especially if they are internet browsers, games, or media players.
You can use the Windows Task Manager to monitor the list of running applications in the background. On a Mac, you can use the Activity Monitor to monitor the list of running applications. Before you start using Ableton, ensure that all unnecessary applications are closed.
Adjusting Settings For Maximum Performance
The second step to optimizing your computer’s performance for Ableton is by adjusting the necessary settings to ensure maximum performance. You can start by disabling all visual effects like drop shadows, animations, and transparency. These visual effects consume a lot of resources, leaving little to no processing power for Ableton.
You can also set your computer’s power plan to ‘High Performance’. This setting allows your computer to allocate more processing power to Ableton, resulting in reduced latency. In Ableton’s preferences, you can adjust the buffer size to lower values to reduce latency. However, lower buffer sizes demand more processing power.
You can optimize your computer’s performance even further by increasing your RAM and using an SSD. Increasing your RAM ensures that your computer has enough memory for Ableton to run smoothly. On the other hand, an SSD improves the speed of your computer, increasing the overall processing power available for Ableton.
By following these steps, you can optimize your computer’s performance for Ableton and reduce latency during recording, live performances, and day-to-day use. A well-optimized computer ensures that music production is efficient and seamless, letting you focus on creating great music rather than worrying about latency issues.
Configuring Your Audio Interface
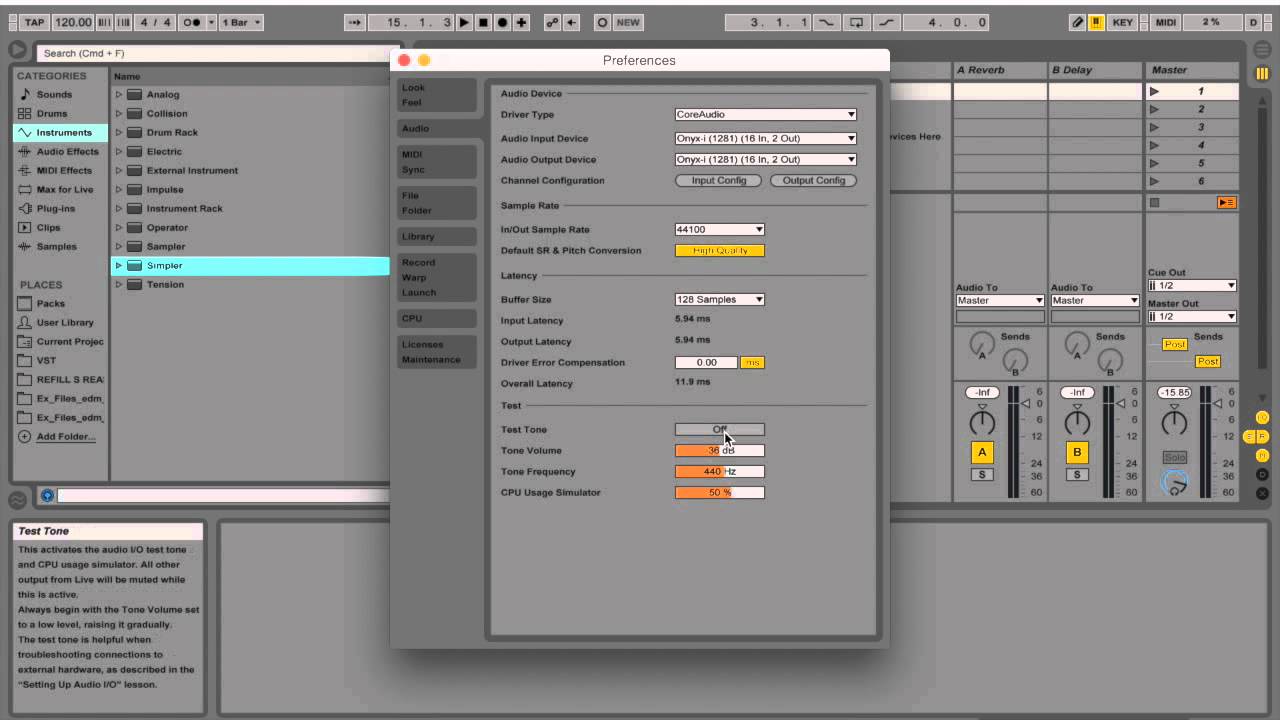
To reduce latency in Ableton, configure your audio interface properly. Make sure to select the lowest possible buffer size, and adjust the sample rate to suit your project. This will help minimize latency and improve the overall recording and playback experience.
Reducing latency in Ableton is essential for producing high-quality audio tracks. One of the primary ways to reduce latency is to configure your audio interface correctly. This post will guide you through the process of selecting the right audio interface, optimizing buffer size, and ensuring that your drivers are up to date.
Selecting The Right Audio Interface And Drivers
Choosing the right audio interface is the first step to reducing latency in Ableton. There are a few factors to consider when selecting an audio interface, like the number of inputs and outputs, the connectivity options, and the overall quality of the device. Make sure to choose an audio interface that provides low-latency performance and has drivers that are compatible with your computer’s operating system. Drivers are critical components of your audio interface, and they play a significant role in reducing latency. Ensure that you have installed the latest drivers for your audio interface. You should also periodically check for driver updates and install them promptly.
Optimizing Buffer Size
Your audio interface’s buffer size can also impact latency. Choosing an optimal buffer size is essential to get the best possible performance from your audio interface. Keeping it at a lower value can help reduce latency, but the lower the buffer size, the more CPU it will use.
How to Optimize Buffer Size:
- Open Ableton and go to preferences.
- Select the ‘Audio’ tab and adjust the buffer size accordingly.
- Lower the buffer size to reduce latency but keep it high enough to avoid audio glitches and hiccups.
- Keep testing and adjusting the buffer size to find the sweet spot.
Remember that optimizing buffer size is a trial-and-error process. There is no one-size-fits-all solution, and the optimal buffer size may vary depending on your computer’s specifications and the complexity of your project. In conclusion, reducing latency in Ableton is not an easy task, but configuring your audio interface correctly can go a long way in achieving low-latency performance. Follow the steps outlined in this post, select the right audio interface and drivers, and optimize the buffer size to achieve the best performance possible.
Troubleshooting Latency Issues
One effective way to reduce latency in Ableton is by adjusting the buffer size. This can be done in the audio preferences menu. Another option is to deactivate all unnecessary channels and plugins to free up CPU resources.
Reducing latency in Ableton can be a challenging task for music producers and recording artists. Delay problems can be caused by hardware, software or plugin issues. Identifying the root cause of latency is the first step towards reducing it. This section will cover several troubleshooting techniques and solutions to common issues that will help you reduce latency in Ableton.
Debugging Techniques
Before jumping on solutions, it’s important to understand how to identify the root cause of latency in Ableton. Here are some debugging techniques to help you debug latency issues:
- Start by checking if there’s a hardware problem. Check your audio interface and cables to make sure they’re working correctly.
- Check your CPU usage in Ableton. High CPU usage can cause latency issues. You can also identify the plugins causing high CPU usage.
- Try disabling any external software, anti-virus, or firewalls. These can cause latency issues.
- Inspect Ableton’s audio settings. Make sure the sample rate and buffer size are correct.
- Check if your computer meets the minimum requirements for Ableton.
Solutions For Common Issues
Here are some solutions for common issues that can cause latency in Ableton:
| Issue | Solution |
|---|---|
| High CPU usage | Freeze or bounce audio tracks, use plugins with lower CPU usage, increase buffer size or reduce sample rate. |
| Plugins with high latency | Use plugins with lower latency or use them only when needed. |
| Buffer underruns/overruns | Increase buffer size or reduce sample rate, close non-essential background applications. |
| Driver issues | Update your audio interface driver. |
Code Optimization
Optimizing your code can also help in reducing latency in Ableton. Here are some tips:
- Use audio clips that match Ableton’s sample rate and bit depth to avoid unnecessary sample rate conversion.
- Use plugins with lower latency. Look for plugins that have “low-latency mode” or use native Ableton plugins.
- Freeze tracks that use plugins with high latency. This will render the plugin to audio and reduce CPU usage.
By applying these techniques and solutions, you can debug and reduce latency in Ableton and improve your overall music production workflow.
Best Practices For Latency-free Recording And Mixing
Learn how to reduce latency in Ableton for seamless recording and mixing with these best practices. By optimizing your settings and implementing helpful tools like direct monitoring, you can achieve latency-free recording and a smooth mixing experience.
Monitoring Tracks
When recording in Ableton, monitoring tracks is essential to ensure latency-free recording. Monitoring tracks are essential for real-time monitoring of the input signal and the recorded signal. It allows musicians to hear what they are playing and record it without any delay. To ensure that you have latency-free monitoring, you can use the direct monitoring feature on your audio interface. This feature allows you to monitor the input signal without going through your computer, minimizing any latency issues.
Recording At Low Buffer Size
Recording at a low buffer size can significantly reduce latency. The buffer size determines the amount of data that is processed by your computer before it is sent to your audio interface. The lower the buffer size, the lower the latency. However, it is important to note that recording at a low buffer size can put a strain on your computer’s resources. You should only use this technique if you have a powerful computer.
Freezing Tracks And Using Parallel Processing
Another way to reduce latency in Ableton is by using the freeze tracks option and parallel processing. Freezing tracks allows you to convert virtual instruments and effects into audio files, reducing the processing power needed to run them. Parallel processing allows you to split your audio into multiple channels and process them separately, reducing latency. You can use this technique to process your audio in real-time while still keeping the latency low. In conclusion, by using these best practices for latency-free recording and mixing in Ableton, you can ensure that you have a smooth and seamless recording experience. By monitoring your tracks, recording at a low buffer size, and using freezing tracks and parallel processing, you can minimize latency and record high-quality audio.
Latency-reducing Techniques For Live Performances
Reducing latency in Ableton can enhance live performances. Some techniques include optimizing buffer size, disabling unnecessary plugins, and using Direct Monitor. These subtle adjustments can make a significant difference in the quality of the sound produced.
Latency is an annoying issue that can often be encountered when recording audio with Ableton. It can be caused by any number of factors and can negatively impact the overall quality of your live performances if left unchecked. Fortunately, there are several techniques that can be employed to reduce latency and improve the overall quality of your performances. In this article, we will explore some of the most effective latency-reducing techniques for live performances.
Minimizing Effects Processing
One of the most effective ways to reduce latency is to minimize the amount of processing that is applied to your audio. This can be achieved by using fewer effects and plugins during performances. By reducing the amount of processing that is applied, the overall processing time is decreased, resulting in a reduced latency.
Using Dedicated Hardware
Another effective technique to reduce latency is to use dedicated hardware. Using dedicated hardware can greatly reduce the latency of your system, as it circumvents any processing that may occur on your computer. By using hardware instead of software, you can minimize the amount of processing that occurs, which results in a significantly reduced overall latency. In summary, reducing latency in Ableton can greatly improve the quality of your live performances. By minimizing effects processing and using dedicated hardware, you can significantly reduce latency and ensure that your performances are always of the highest quality. By implementing these techniques, you can be confident that your live performances will always be smooth, seamless, and responsive to the needs of your audience.
Credit: www.youtube.com
Credit: www.attackmagazine.com
Frequently Asked Questions Of How To Reduce Latency In Ableton
How Do I Stop Latency In Ableton?
Decrease latency in Ableton by adjusting the buffer size to reduce the amount of time it takes for audio to be processed. Additionally, optimize your computer’s performance and turn off any unnecessary plugins or processes. Use an external audio interface or switch to a faster hard drive for better results.
Does Ableton Have Low Latency Mode?
Yes, Ableton does have a low latency mode. It helps minimize the delay between receiving and processing an audio signal. This results in a more responsive and real-time playback experience, especially for live performances.
Why Does Ableton Lag So Much?
Ableton can lag due to various factors such as software bugs, outdated hardware, insufficient RAM, and overloaded CPU. It is important to optimize your computer’s settings and hardware, update Ableton regularly, and adjust your session settings and plugins to reduce CPU usage.
What Buffer Size For Ableton Live Latency?
The recommended buffer size for Ableton Live’s latency settings is 256 samples, according to Ableton’s official documentation. However, the optimal buffer size can vary depending on your specific hardware setup and the complexity of your projects. It’s recommended to experiment with different buffer sizes to find the best balance between latency and processing power.
Conclusion
Reducing latency in Ableton requires a combination of optimizing your computer’s settings and adjusting certain preferences within the software itself. By utilizing the tips outlined in this blog post, such as disabling unnecessary plugins and increasing buffer size, you’ll be able to achieve a smoother and more responsive workflow.
Remember, reducing latency isn’t a one-time fix; it’s an ongoing process that requires regular maintenance to ensure optimal performance. So, keep experimenting and adjusting until you find the right balance for your unique setup. Happy producing!