To prepare a multitrack session before mixing, organize your tracks, label them clearly, adjust levels and panning, and apply any necessary processing. In multitrack recording, each instrument or element of a song is recorded on a separate track, allowing for greater control during the mixing process.
To ensure an efficient and effective mixing session, it is essential to prepare the multitrack session properly. This involves organizing tracks in a logical order, labeling them clearly, adjusting the levels and panning, and applying any necessary processing, such as EQ or compression.
By taking the time to properly prepare the multitrack session, you can streamline the mixing process and achieve a more polished and professional sound.
Credit: www.thebeachhousestudios.com
Organizing Your Multitrack Session
Preparing your multitrack session before mixing is crucial for achieving a high-quality audio production. You should organize your tracks, eliminate unnecessary noises, and label each component properly for a more efficient mixing process. Stay focused and pay attention to detail to ensure the best outcome.
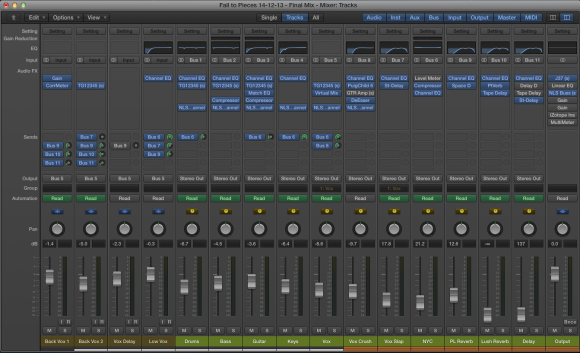
Before you start mixing your multitrack session, it’s essential to organize your tracks properly. A well-organized session can make the mixing process more enjoyable and efficient. Here are a few tips on how to organize your multitrack session effectively.
Grouping Tracks By Instruments
One of the best ways to organize your multitrack session is to group the tracks by instrument. Grouping similar instruments together not only makes it easy to navigate but also helps you identify any issues and make EQ and compression decisions. For instance, you can group all the drum tracks into a single folder or bus, which you can then process collectively. Here’s an example of how you can group tracks by instruments for a typical rock song:
- Drums
- Bass Drum
- Snare Drum
- Tom-Toms
- Cymbals
- Bass
- Guitars
- Lead Guitar
- Rhythm Guitar
- Keyboards
- Vocals
- Lead Vocal
- Backing Vocals
- Other Instruments
By grouping your tracks together, you can save time and keep your session well-organized.
Color-coding Tracks By Type
Another way to organize your multitrack session is to color-code your tracks by type. You can use different colors to differentiate between drums, guitars, and vocals, making it easier to navigate your session. For example, you can use the following colors for different instruments:
- Drums – Blue
- Bass – Green
- Guitars – Yellow
- Keyboards – Red
- Vocals – Purple
- Other Instruments – Orange
Color-coding your tracks can make it easy to pick out specific tracks at a glance and help you quickly identify any issues or discrepancies in the mix.
Naming Tracks For Clarity
Naming your tracks is vital for clarity and helps you keep track of your mix. Use simple yet descriptive names for each track, which will make it easier to navigate through the mix and make the mixing process more efficient. For example, instead of naming your tracks as “Track 1”, “Track 2”, etc., you can use more descriptive names such as “Lead Vocal”, “Bass Guitar”, “Crash Cymbal”, “Kick Drum”, etc. By naming your tracks descriptively, you can quickly navigate through the session, make critical mixing decisions, and make the mixing process more efficient.
Conclusion
In conclusion, organizing your multitrack session might seem time-consuming, but it’s an essential step for a successful mix. Follow the tips above and group your tracks by instruments, color-code them by type, and name your tracks descriptively to make the mixing process more efficient and enjoyable.
Cleaning Up The Tracks
Preparing a multitrack session before mixing is essential for achieving a professional sound. Cleaning up the tracks involves removing excessive noise, organizing the channels, and eliminating any unwanted tracks that could negatively affect the final mix.
Cleaning Up The Tracks Before you dive into the mixing process, it is important to prepare your multitrack session properly for a smooth experience. One of the crucial steps is cleaning up the tracks. In this section, we will discuss the best practices for removing unnecessary tracks, deleting unused audio clips, and correcting track alignment. Removing Unnecessary Tracks The first step towards cleaning up your multitrack session is to remove any unnecessary tracks. These could be empty tracks or tracks that do not contribute to the final mix. Having too many tracks in your session can make it cluttered and confusing, leading to a messy mix. To remove unnecessary tracks, simply select them and delete them. However, before deleting a track, make sure that it does not have any important information in it. If you are unsure about a track, mute it and listen to the mix without it. This will give you a better idea of whether the track is needed or not. Deleting Unused Audio Clips Another step to clean up your session is deleting the unused audio clips. These are clips that were recorded but not used in the final mix. They can take up unnecessary space, making it difficult to navigate through the session. To delete the unused audio clips, select them and delete them. You can also use the “Clean Up” function to remove all the unused clips from your session. This will free up space and make it easier to manage your session. Correcting Track Alignment In a multitrack session, it is crucial to ensure that all the tracks are aligned properly. Misaligned tracks can cause phasing issues and affect the overall sound quality of the mix. To correct track alignment, simply select the tracks and use the “Align Tracks” function. This will align the tracks based on their start points, ensuring that they are synchronized with each other. You can also use the “Nudge” function to adjust the timing of individual tracks. In conclusion, cleaning up the tracks is an essential step to prepare your multitrack session for mixing. Removing unnecessary tracks, deleting unused audio clips, and correcting track alignment can make the mix process smoother and more productive.
Fixing The Timing And Pitch Issues
To ensure a smooth mixing process, it is crucial to fix any timing and pitch issues in a multitrack session beforehand. This involves aligning the different tracks and adjusting the pitch as necessary to achieve a clean, polished sound. Proper preparation can save time and lead to a better end result.
If you want to create a professional-sounding mix, it’s essential to address any timing or pitch issues before you start mixing. Fortunately, most DAWs provide tools that can help fix these issues with ease. In this post, we’ll discuss two common methods for fixing timing issues – correcting timing issues with quantization and adjusting the timing using your ears. we’ll also be looking at how to fix pitch issues with auto-tune plugins.
Correcting Timing Issues With Quantization
Quantization is the process of snapping recorded audio to a grid. It’s the easiest and quickest way to fix timing issues, though it may not always produce the most natural-sounding results. Here’s how to do it:
- Select the track you want to quantize
- Open up your DAW’s quantization options
- Select the quantization settings that best suit the track
- Apply quantization to the track
- Preview the change using the solo button to ensure the timing is more precise but still sounds natural
Adjusting The Timing Using Your Ears
While quantization may be a quick way to correct timing issues, adjusting the timing using your ears is the most effective way to make sure the timing is perfect. Here are some steps to adjust the timing:
- Zoom into the waveform and find the section where the timing issue occurs
- Identify the beats or notes that are off-time
- Move these parts forward or backward in the timeline to correct the timing
- Repeat this process for all the sections with timing issues
- Listen to the track multiple times to ensure the timing is perfect
Fixing Pitch Issues With Auto-tune Plugins
Auto-Tune is an audio plugin that automatically tunes pitch in vocals and instruments. Here’s how you can use Auto-Tune:
| Step | Description |
|---|---|
| 1 | Select the track that you want to use Auto-Tune on. |
| 2 | Open Auto-Tune on the track. |
| 3 | Choose the desired scale and key that the track is in. |
| 4 | Set the retune speed to your preference. |
| 5 | Preview the change using the solo button to ensure it sounds natural. |
In conclusion, fixing timing and pitch issues before mixing is essential for creating a professional-sounding mix. Whether you choose to use quantization, adjust timing using your ears, or use an auto-tune plugin, make sure to take the time to ensure each element is in sync and in tune.
Mix Preparation Techniques
Before mixing a multitrack session, it’s crucial to prepare your mix by organizing your tracks, setting levels, panning, and routing. This will save time during the actual mixing process and improve the overall quality of your mix. Consider using templates for quicker preparation.
Preparing a multitrack session before mixing is crucial for producing a high-quality mix. Mix preparation techniques include balancing track levels, panning, setting up bus sends, and Aux tracks. Following these techniques can make your mixing process more manageable and efficient.
Balancing Track Levels
Balancing track levels is an essential step in the mix preparation process. In this step, you need to adjust the volume levels of the individual tracks to ensure that they sit well in the mix. You can use the gain plugin or the volume fader to adjust the levels. Make sure that the levels are consistent throughout the session, without any unwanted peaking or audio clipping.
Setting The Panning
Panning is the process of placing each track in the stereo field to create a spatial balance. Proper panning can help create separation between different instruments and sounds. In this step, you can use the pan function to adjust the position of each track in the stereo field. Make sure to pan each track according to its role in the mix and create a balanced stereo image.
Setting Up Bus Sends And Aux Tracks
Bus sends and Aux tracks allow you to apply effects to multiple tracks simultaneously. This technique helps keep your mix organized and can simplify your workflow. In this step, create an Aux channel and assign it to the tracks you want to affect. Then add the desired effect to the Aux channel. You can make adjustments to the effect for all the tracks at once using the Aux channel’s fader. In conclusion, follow these mix preparation techniques to make your mixing process more manageable and efficient. Balancing track levels, panning, and setting up bus sends and Aux tracks ensure that your mix is consistent and well balanced. These simple steps can help produce high-quality mixes that your clients will love.
Plugins And Processing Techniques
Plugins are an essential component of mixing music as they allow you to sculpt and enhance your tracks in numerous ways. Processing techniques, on the other hand, refer to the different methods and strategies used to improve the sonic quality of your tracks. When preparing a multitrack session, understanding how to utilize plugins and processing techniques effectively can significantly impact the final mix. Below are some tips for optimizing your plugins and processing techniques:
Eq And Compression Settings
Equalization (EQ) allows you to adjust the frequency balance of a track by cutting or boosting certain frequency ranges. Compression, on the other hand, reduces the dynamic range of a track by automatically reducing the volume of high-level signals. This combination of techniques can add clarity, definition, and depth to your mix. Some tips to keep in mind include:
- Use EQ to remove unwanted frequencies and to create space between instruments.
- Apply compression to individual tracks to control the dynamics of each instrument, but don’t overdo it.
- Use parallel compression if you want to add more punch to specific tracks.
Using Reverb And Delay Effectively
Reverb and delay are two key effects used to add ambiance and depth to individual tracks or to the entire mix. They can help to create a sense of space, depth and distance. Here are some tips for using reverb and delay:
- Use reverb to create a sense of space or to add a naturalistic feel to the track.
- Apply delay to give more space and distance to tracks, especially for vocals.
- Adjust decay time and mix level to find the appropriate amount of reverb or delay that works best for the mix.
Adding Creative Effects
Adding creative effects is a great way to bring out the unique character and personality of your tracks. These effects can range from pitch-shifting and distortion to more subtle effects like modulation and stereo imaging. Here are some tips to help you add creative effects:
- Apply creative effects sparingly to keep the track focused and clean.
- Use modulation effects to add movement and interest to slow-moving tracks.
- Use automation to add variation and dynamics to the track as necessary.
Create A Rough Mix
To prepare a multitrack session before mixing, it’s essential to create a rough mix. This involves setting the levels and panning of each track, adding basic effects, and creating a general balance of the mix. A well-prepared rough mix is crucial to achieve a polished final mix.
Before diving into the mixing process, it’s essential to create a rough mix that brings your tracks to a basic level of balance and harmony. A rough mix is like a sketch that outlines the direction of the final shared vision; it’s crucial to dedicate enough time and attention to this step. The rough mix should provide enough clarity to allow the mixer to make informed decisions as he progresses. Here are three crucial steps in creating an effective rough mix:
Crafting The Basic Structure Of The Song
Crafting the basic structure of the song means considering the arrangement and whether the song makes sense in its current state. Evaluate how the sections of the song transition and compare how one verse is different from another as they proceed through the song. A well-crafted song should have a clear and concise form, meaning it’s essential to pay attention to the arrangement. This step should also include removing unnecessary noises or silences, so the song’s structure aligns perfectly with the listeners’ expectations.
Determining The Focus Of The Mix
Determining the focus of the mix requires a clear understanding of the intended emotion and energy of each track. It means evaluating whether the lead vocal track carries enough weight in relation to the rest of the mix and even how each instrument blends with the others. In this step, it’s essential to set the tone that resonates with the listeners on a deeper emotional level.
Making Critical Mix Decisions
After crafting the basic structure of the song and determining the mix’s focus, it’s time to make critical mix decisions that create a cohesive arrangement of each track. This step includes decisions about panning, EQ, reverb, compression, and levels. It’s where the mixer makes creative choices that immerse the listener into the song’s world. Creating a rough mix is not only a vital stage in the mixing process, but it is also what separates a good mix from a great one. Make sure to give this step the attention it deserves, and you’ll be setting yourself up for success in the subsequent phases of the mixing process.
Preparing For The Final Mix
Before starting the final mix, it’s important to prepare your multitrack session properly. This involves organizing your tracks, labeling them clearly, and ensuring that there are no unwanted sounds or glitches in the recordings. With a well-prepared multitrack session, you’ll be able to mix your tracks more effectively and get the best possible sound for your final mix.
Mixing is a crucial process in the music production industry. It is the art of balancing the levels, panning, and creating an equalization of all tracks in your multitrack session. Before you begin mixing, there are several things you need to do to prepare your multitrack session for the final mix. In this article, we will cover the steps you need to take to ensure a successful and efficient final mix.
Leaving Headroom For The Mastering Process
Before you start mixing your tracks, you should leave enough headroom to make sure your tracks are not too loud. This is important because once you bring all the tracks together, it can create a sound that is too loud or distorted. Leaving enough headroom will give you room to adjust levels later in the mixing process or mastering process, and avoid losing audio quality. Generally, it is recommended to leave a minimum of 6 dB of headroom.
Exporting Individual Tracks For A Professional Mix Engineer
Exporting individual tracks is essential if you are planning to hire a professional mix engineer. It will allow the engineer to work on each track separately and enhance the overall quality of the mix. You should export each track as a separate audio file without any effects or processing. Make sure to label each track with its name, tempo, and key signature, so the engineer can quickly understand the original arrangement.
Storing And Saving The Multitrack Session For Future Use
After you have exported individual tracks, save your multitrack session in a secured location for future use. It will allow you to revisit the session if any changes or revisions need to be made later. It would be best to organize the session by creating a folder with all the exported tracks and the session file. Also, store the session on an external hard drive or cloud service to avoid the risk of losing the data. In conclusion, preparing your multitrack session before mixing is crucial to ensure a quality final mix. By leaving headroom, exporting individual tracks, and saving the session, you can avoid any complications and improve the efficiency of the mixing process.

Credit: majormixing.com
Frequently Asked Questions On How To Prepare A Multitrack Session Before Mixing
How Do You Prepare A Track For Mixing?
Preparing a track for mixing involves essential steps such as organizing your files, editing and cleaning up the audio, setting the level and panning, applying effects and EQ, and exporting the consolidated tracks. Make sure to label everything clearly and have backups of your original files.
How Do I Prepare Files For Mixing?
To prepare your files for mixing, make sure they are properly organized with clear file names and labeled tracks. Adjust the levels of each track and ensure they are properly synced. Use EQ, compression, and other effects to enhance the sound quality.
Finally, export the files in the required format and provide them to the mixing engineer with clear instructions.
How Do You Organize Tracks For Mixing?
To organize tracks for mixing, start by naming them clearly and grouping similar ones together. Use color coding or labeling to make it easy to identify each track. Remove any unnecessary tracks or elements, and adjust volumes to create balance.
Finally, create busses or groups for easier control over similar tracks during mixing.
How Do You Set Up A Mixing Session?
To set up a mixing session, ensure that you have the necessary equipment and software. Start by organizing your files and labeling tracks. Set the tempo and sync your tracks accordingly. Begin crafting your mix by adjusting levels, panning, and EQ.
Use effects like reverb and compression to enhance the sound. Finally, bounce your mix to a mastered file.
Conclusion
To sum up, preparing a multitrack session before mixing is crucial in achieving a well-balanced and cohesive mix. It helps streamline the process, avoids unnecessary headaches, and ultimately saves time and effort. Following the guidelines covered here – organizing the tracks, naming, color-coding, and preparing templates – will lead to a productive and effective mixing session.
By putting in a little bit of effort beforehand and sticking to a structured workflow, you can achieve professional-level mixes that sound amazing on any sound system.