To mix vocals in Garageband, first set up and record your vocals using a microphone. Then, adjust the volume and panning of each track and add effects such as EQ, reverb, and compression to enhance the sound.
Garageband is a versatile digital audio workstation with powerful features that enable users to record, edit and mix their music. When it comes to mixing vocals in Garageband, it is important to have a clear understanding of the basic fundamentals of mixing.
With proper techniques and settings, you can create a polished and professional sound for your project. This guide will show you how to mix vocals in Garageband using tools such as volume, panning, and effects to achieve the desired sound. Whether you are a beginner or an experienced producer, these tips will help you get the most out of your vocal recordings. So, let’s get started!
Preparing The Track For Vocal Mixing
Preparing your vocal track properly is crucial to achieving a polished vocal mix in Garageband. Start by cleaning up any unwanted noise or silence, adjusting panning and volume, and adding EQ and compression to enhance the vocals. With these steps, your vocals will shine in your mix.
Preparing the Track for Vocal Mixing Before you jump straight into mixing your vocals in Garageband, it’s essential to make sure your track is pristine and ready for the vocal. In this section, we’ll cover the steps you should take to prepare your track, including basic EQ adjustments, compression settings, and reverb, and delay settings. EQ Adjustments The first step in preparing your track for vocal mixing is to make basic EQ adjustments. To do this, select the EQ plugin from the channel strip on your track. Start by rolling off any unnecessary low-end frequencies below 100Hz, then sweep the mid and high ranges to discover any harsh frequencies that may need to be removed. You can also boost specific frequencies that will make your vocals sound more prominent. Compression Settings Adding compression will help even out the dynamics of your vocal track, making it sound more polished and professional. Start by adding the compressor plugin to your channel strip. Adjust the threshold to around -20dB and set your ratio to 3:1. The attack and release times will depend on the style and tempo of your track, but generally, you want to choose faster attack times to catch sudden peaks and longer release times to allow the compressor to release smoothly. Reverb and Delay Settings Adding reverb and delay to your vocals will help them sit in the mix better, giving them a sense of space and depth. Start by adding the reverb plugin to your channel strip and choose a preset that suits the vibe of your track. Adjust the wet/dry mix to taste, but be careful not to overdo it. Too much reverb can make your vocals sound washed out and distant. Next, add a delay plugin and set the time and feedback to create an echo effect that complements your vocals. In conclusion, by following these basic steps, you can prepare your track for vocal mixing in Garageband, giving your vocals a polished and professional sound. Remember to start with basic EQ adjustments, add compression to even out the dynamics, and use reverb and delay to create space and depth.
Credit: www.youtube.com
Setting Up Garageband For Vocal Mixing
Learn how to mix vocals like a pro in Garageband with these easy steps. Set up your project with the correct settings, adjust EQ levels, add compression, and perfect your vocal mix using reverb and delay effects.
If you have been struggling with mixing vocals in Garageband, then you are in the right place. Mixing vocals is an integral part of audio production and can be quite challenging even for experienced audio engineers. However, with Garageband, it becomes easier, and we are going to show you how. In this segment, we will take you through the basics of setting up Garageband for vocal mixing. We will cover everything from creating a new project to using the mixer window to ensure that the process is seamless.
Creating A New Project
Before you start mixing vocals, you need to create a new project in Garageband. Follow these simple steps:
- Open Garageband on your computer.
- Click on the “New Project” button, which is located at the bottom left of the screen.
- In the pop-up window, select the “Empty Project” option and click “Choose.”
- Name your project and choose the location where you want to save it.
Adding Vocals To The Project
Once you have created a new project, the next step is to add vocals to it. Here is how you can add vocals in Garageband:
- Click on the “Tracks” button, which is located on the right side of the screen.
- In the pop-up menu, select “Audio,” then “Record using a microphone” and click “Create.”
- Connect your microphone to your computer and set it up correctly.
- Click on the red record button to start recording your vocals.
- When you’re done, press the stop button.
Using The Mixer Window
The mixer window is where you can adjust the levels and effects of your vocal tracks. Here’s how to use the mixer window:
- Click on the “Mixer” button, which is located at the top of the screen.
- In the mixer window, you will see sliders that correspond to individual tracks.
- Adjust the volume of each track by dragging the slider up or down.
- You can also add effects by clicking on the “Smart Controls” button, which is located on the left side of the screen.
- In the Smart Controls pane, you can add effects such as reverb, EQ, or compression.
Now that you have learned the basics of setting up Garageband for vocal mixing, you are ready to start mixing your vocals. Remember, practice makes perfect, so don’t be afraid to experiment with different effects and settings until you achieve the sound you want. With these tips, you can produce high-quality vocal tracks with ease.
Mixing Vocals In Garageband
If you’re new to Garageband, mixing vocals can be a daunting task. In this guide, we will walk you through the process of mixing vocals in Garageband, step by step. We will cover how to adjust the vocal levels, apply EQ, and add compression to your vocals to get that professional sound that you’re after.
Adjusting The Vocal Levels
Before you start mixing your vocals, it’s crucial to ensure that all your recorded tracks have a consistent level. Garageband’s audio mixer provides a simple way of adjusting the vocal levels. Here’s how:
- Select your vocal track by clicking on it.
- In the mixer window, adjust the fader up or down to raise or lower the volume.
- You can also mute or solo tracks by clicking the M or S buttons next to the fader, respectively.
- Check the levels by playing back your tracks and adjusting the faders to ensure that each track is audible and sits well in the mix.
Applying Eq To Vocals
Equalization (EQ) is a critical process in mixing vocals. It allows you to adjust the frequency levels of your vocal, giving it more clarity and presence. Here are the steps to apply an EQ effect to your vocals in Garageband:
- Select your vocal track in the track header area.
- Go to the Smart Controls pane and click on the EQ button. The equalizer window will open up.
- Adjust the sliders to boost or cut different frequency ranges that fit the vocal nicely. For example, add a boost to the high-end frequencies to add more air and sparkle to your vocals.
- Use your ears! Listen to the changes as you adjust the EQ to determine which setting sounds best.
Adding Compression To Vocals
Compression is an essential tool in mixing vocals that helps keep your vocal levels consistent throughout the performance. Here’s how you can apply compression to your vocals in Garageband:
- Select your vocal track and go to the Smart Controls pane.
- Click the Compressor button to open the compressor window.
- Adjust the threshold, ratio, and gain settings to compress the vocal audio signal.
- Be careful not to over-compress as it can lead to an unnatural and lifeless sound.
- Listen to the changes carefully and make adjustments as necessary.
Creating Space With Reverb And Delay
When it comes to mixing vocals in Garageband, it’s important to create space in the mix to allow the vocals to sit comfortably. One way to do this is by using reverb and delay effects. These effects help to create a sense of depth and space, making the vocals sound less dry and upfront. Here are some tips on setting up and adjusting reverb and delay in Garageband:
Setting Up Reverb And Delay
Garageband comes with a range of built-in reverb and delay plugins that you can use. To set up these effects, first go to the track where you want to apply the effect. Click on the Smart Controls button and select the plugin slot for either reverb or delay. Select the plugin you want to use and adjust the settings as desired.
Adjusting Reverb And Delay Levels
Once you’ve set up the reverb and delay plugins, you can start adjusting their levels. You want to strike a balance between having enough effect to create space in the mix and not having too much that it becomes distracting. One way to do this is to use the Send feature in Garageband. This allows you to send a proportion of the vocal signal to an effects channel, where you can adjust the level of the effect. Start by sending a small amount of the vocal signal to the effects channel and gradually increase it until you reach the desired level. Do the same for the delay effect to ensure the vocal sits nicely in the mix.
| Reverb and Delay Tips |
|---|
| Use shorter decay times and less wetness for a more subtle effect |
| Try different presets to find one that works well with your vocal |
| Don’t overdo it! Too much reverb or delay can make the vocal sound distant and muddy |
By using reverb and delay, you can create a sense of space in your vocal mix, making the vocals sound more professional and polished. Keep in mind that these effects are just tools, and it’s up to you to use them wisely to enhance the mix. With these tips, you can take your vocal mixing skills to the next level in Garageband.
Adding Final Touches To The Vocal Mix
After applying compression, EQ, and reverb to your vocal mix, it’s time to add some final touches to make it sound top-notch. Here are two essential techniques that will bring your vocals to life:
Automation For Vocal Mixes
Automation is a technique that allows you to fine-tune the levels of your tracks throughout the mix. By automating the vocal tracks, you can adjust the volume of specific sections where the vocal needs a boost or a reduction in level.
- Open the automation lane in Garageband by clicking on the “A” icon in the left-hand corner of the track.
- Click on the “Volume” automation box to adjust the vocal levels over time.
- Draw in automation by clicking on the line and dragging it up and down as required.
- Adjust the automation parameters until you’re satisfied with the vocal’s balance in the mix.
Grouping Vocals For Better Mixing
Grouping is a technique that helps you to manage and mix multiple tracks as a single unit. By grouping similar tracks together, you can apply the same effects chains to multiple tracks at once, making it easier to balance and maintain consistency across the mix.
| Steps to Group Vocal Tracks |
|---|
| Select the vocal tracks you want to group by clicking on the track headers while holding the “shift” key.Right-click on the selected tracks and choose “Group” in the context menu. Alternatively, use the “cmd+g” keyboard shortcut.Click on the newly created “group” header to reveal group options on the track header.Apply effects on the group header track, and the changes will affect all the tracks in the group. |
Applying automation and grouping techniques to your vocal mix in Garageband can make a significant difference between a good and a great sound. By practicing these techniques, in no time, you’ll be able to produce professional-sounding vocal mixes that will make your music stand out from the crowd.

Credit: thegaragebandguide.com
Credit: producersociety.com
Frequently Asked Questions For How To Mix Vocals In Garageband
How Do You Blend Vocals Together?
To blend vocals together, start by balancing the levels of each vocal track and removing any unwanted noise or frequency clashes. Use EQ and compression to enhance the vocals and create a cohesive sound. A stereo imaging plugin can also be helpful in creating a wide and spacious vocal sound.
Remember to listen carefully and make subtle adjustments until the vocals sound like they belong together.
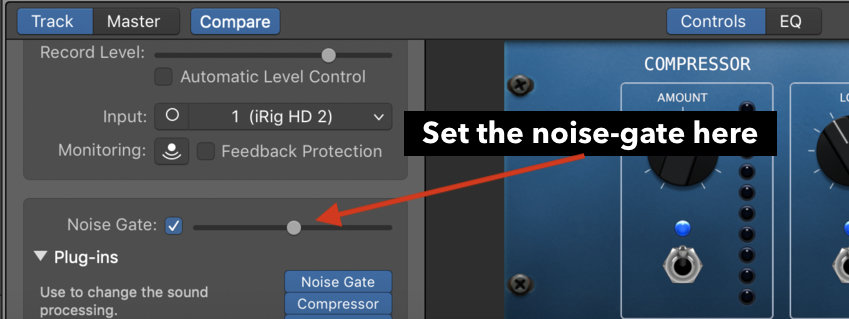
How Do You Clean Up Vocals On Garageband?
To clean up vocals on GarageBand, first, you need to identify the unwanted sounds. Then, you can use effects like EQ, compression, and noise reduction to remove those sounds and enhance the vocals. Additionally, you can use the “strip silence” function to remove the dead air between the vocal phrases.
Is Garageband Good For Mixing Audio?
Yes, GarageBand is a good software for mixing audio. It has features like multitrack editing, virtual instruments, and real-time effects. With its user-friendly interface, it’s a great option for beginners and professionals alike.
Can You Use Garageband To Mix Songs?
Yes, GarageBand can be used to mix songs. It is a popular music production software that allows users to create and edit music tracks, including mixing and mastering functionalities. GarageBand offers a wide range of audio effects and filters, making it a powerful tool for music mixing and production.
Conclusion
After going through the process of mixing vocals in Garageband, you can now proudly create your own tracks that sound just as professional as any other artist. Remember to always keep in mind the important tools and techniques such as equalization, compression, and panning.
By doing so, you will be able to achieve a crisp, clear vocal sound that will stand out from the rest. With continued practice and experimentation, you will be on your way to perfecting your craft and producing music that you can be proud of.