To level match plugins, adjust the volume of each plugin until they sound the same. This ensures a balanced mix with no plugin overpowering the others.
Level matching plugins is a crucial step in achieving a balanced and professional sounding mix. It involves adjusting the volume of each plugin to match the perceived loudness, so no single plugin overpowers the others. Failure to level match plugins can lead to a skewed mix, where one plugin sounds louder than the rest, causing distortion, masking, and frequency imbalance.
Several methods can be used to level match plugins, including using a VU meter, LUFS meter, or loudness curves. Level matching plugins not only improves the overall sound of the mix, but it also simplifies the mixing process by giving each plugin an equal opportunity to contribute to the final sound.
Credit: forums.steinberg.net
Tools Required For Level Matching
To level match plugins, you’ll need certain tools such as a dB meter, pink noise generator, and EQ plugins. These tools ensure that your audio recordings have consistent levels, making it easier to mix and master.
Level matching is an essential technique that every sound engineer, music producer, and audio mixer must master. It helps achieve a consistent volume level within a mix, eliminating the need to constantly adjust the volume manually. However, to achieve the desired result, you need to have the right tools at your disposal. Here are some essential tools you’ll need for level matching.
Decibel Meter
A decibel meter, also known as a sound level meter, is an essential tool that measures the sound levels in a room. With a decibel meter, you can determine the exact amplitude of a sound signal and adjust it accordingly to achieve the desired level. There are several types of decibel meters available, but most are straightforward to use and do not require any technical expertise.
Audio Interface
An audio interface is critical for level matching when using a computer or a digital audio workstation (DAW). It is an external device that connects a computer to a microphone, musical instrument, or mixer. With an audio interface, you can achieve a high-quality sound recording and playback, and adjust the volume level of each track to a consistent level. There are several options available when choosing an audio interface, ranging from simple USB or FireWire devices to more complex setups with multiple inputs and outputs.
Daw
A digital audio workstation (DAW) is an essential tool for any music producer or audio mixer. It is software that allows you to record, edit, mix, and master audio tracks. With a DAW, you can easily level match multiple tracks and adjust their volume levels until they are consistent. There are several popular DAWs available, such as Pro Tools, Logic Pro X, Ableton Live, and FL Studio. In conclusion, level matching is a critical aspect of sound engineering and audio mixing, and having the right tools is essential to achieving the desired results. A decibel meter, audio interface, and DAW are just a few of the essential tools you’ll need to level match effectively. By using these tools, you can achieve a consistent volume level within your mix, resulting in a cleaner, more professional sound.

Credit: joeysturgistones.com
Setting Up For Level Matching
Level matching your plugins is crucial to achieve a well-balanced mix. To accomplish this, start by setting all your plugins to the same volume level and fine tune from there to guarantee accurate sound representation without any discrepancies in volume.
Before you level match plugins, it’s essential to prepare your setup correctly. In this section, we’ll guide you through connecting the audio interface, calibrating the decibel meter, and initializing DAW, ensuring your setup is correct.
Connecting The Audio Interface
To connect the audio interface, follow the steps below:
- Connect the audio interface to your computer or laptop via USB.
- Plug your headphones or speakers into the output jack of the audio interface.
- Connect your microphone or line-in source to the audio interface input jack.
Ensure all connections are secure and correctly connected.
Calibrating Decibel Meter
Before getting started, you need to calibrate your decibel meter; follow the instructions below:
- Turn on your decibel meter and switch it to the dBu setting.
- Place the microphone at the same distance you’ll use it when audio levels are generating.
- Play a 1 kHz sine wave tone through your speakers.
- Adjust the level of the sine wave until the decibel meter reads 0 dBu.
Ensure you perform this calibration before every level matching session.
Initializing Daw
To initialize your DAW, follow the steps outlined below:
- Open your DAW and create a new project.
- Select the correct audio interface as the input and output device in your DAW settings.
- Set the sample rate and bit depth to the same settings as your audio interface.
- Ensure all tracks have no plugins, automation, or level adjustments applied.
By following these steps, you can be confident that your setup is correct, and you’re ready to start level matching plugins.
The Process Of Level Matching Plugins
The process of level matching plugins is an essential step to ensure your music or audio production is of excellent quality. By level matching, you achieve a balanced sound, which is desirable in music production. It ensures that the plugins you are using don’t affect the overall gain staging of the audio signal.
Preparing For Level Matching
Before you begin level matching your plugins, you first need to ensure that you have the right tools for the job. You will need a decibel meter, a noise generator, and a volume matcher. Before you start, ensure that all your plugins are properly set up and inserted into your DAW.
Matching Channel Levels
The first thing you need to do when level matching your plugins is ensure that all the channel levels are matched. This is a crucial step as it helps to ensure consistency in your mix. To match the channel levels of your plugins, insert them into your DAW one at a time and adjust the gain until the levels are matched.
Adjusting Plugin Settings
Once all the channel levels are matched, you can now proceed to adjust the plugin settings. At this point, you need to focus on adjusting the plugin’s settings to achieve the desired effect or sound. Ensure that you make gradual adjustments and keep checking that the overall volume is still consistent.
Finalizing Level Matching
After adjusting the plugin settings, it’s time to finalize the level matching process. At this point, you need to ensure that each plugin’s output level is the same as the input level. Check that the overall volume is consistent and make any necessary adjustments. Once you are satisfied with the results, save your work and move on to the next step in your music or audio production process.
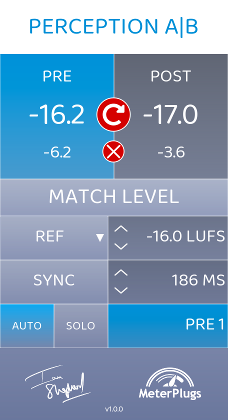
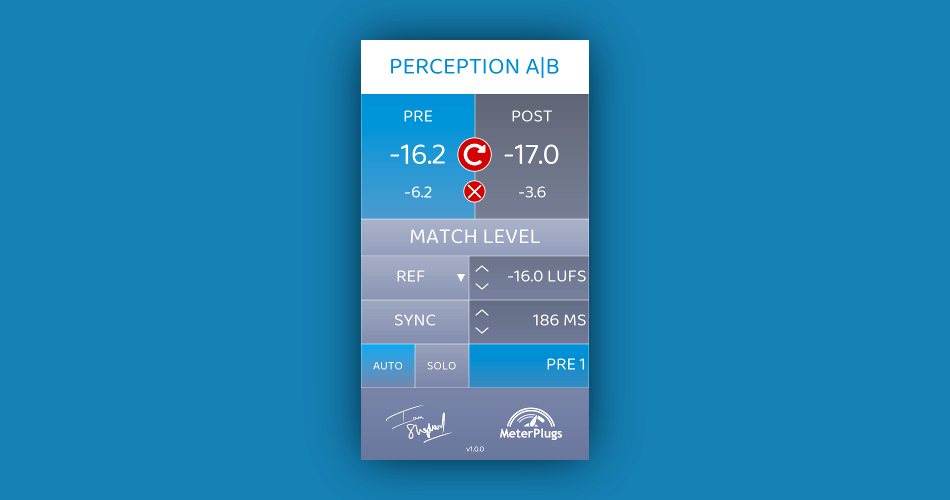
Credit: www.meterplugs.com
Tips On Effective Level Matching
Level matching plugins is crucial when it comes to producing high-quality audio. It ensures that all sound sources are balanced, and every instrument is heard clearly. For audio engineers and producers, level matching is a critical step in creating a well-mastered sound. In this article, we will share tips on effective level matching, which can help you achieve professional audio output.
Working In A Controlled Environment
The environment where you carry out level matching can have a significant impact on the quality of your audio output. For example, if you are working in a noisy or uncontrolled environment, it can be challenging to get accurate results when matching levels. You need to ensure that the environment is quiet and that there is no interference from external sound sources. A controlled environment allows for accurate level matching and guarantees that you get the best possible audio output.
A/b Testing
A/B testing is a technique that allows you to compare two different audio sources. It can be helpful when level matching because you can select two different sounds and compare them to determine which one sounds better. This technique ensures that you are not only matching the levels but also focusing on the quality of the audio. By comparing different sounds, you can achieve a well-mastered sound that is clearer, bright, and balanced.
Paying Attention To Dynamic Range
Dynamic range refers to the difference between the loudest and softest sounds in an audio recording. Paying attention to dynamic range when level matching is essential because it helps you achieve the right balance between the different sounds. You should ensure that all instruments sound natural and that the music is not compressed beyond the audible spectrum. Matching levels also gives the music greater clarity and makes it sound more expansive, giving it more impact.
Using Reference Tracks
Using reference tracks is one of the most effective methods of level matching. By comparing your mix with other similar sounds, you can determine whether your audio output needs tweaking. Reference tracks give you an idea of how loud and balanced your mix should sound. You can use a reference track that has similar instrumentation to your audio output. This ensures that you achieve an accurate balance between the different sounds, resulting in a well-mastered sound.
In conclusion, level matching is a vital step in the process of producing high-quality audio. By following these tips, you can achieve the right balance in your mix and produce a well-mastered sound. Working in a controlled environment, A/B testing, paying attention to dynamic range, and using reference tracks are just some of the ways to enhance your level matching and take your audio production to the next level.
Frequently Asked Questions On How To Level Match Plugins
How Do You Set Levels Before Mixing?
To set levels before mixing, ensure that the individual tracks have a clear, balanced level. This can be achieved by adjusting the fader, gain, or input level of each track. Use of a reference track can also help set the overall level for the mix.
It’s important to keep in mind the headroom and avoid clipping.
How Do I Level Match Plugins?
To level match plugins, start by setting up a gain structure. Then use a plugin like a gain or trim plugin to adjust each track’s gain until they have the same apparent loudness. Finally, make subtle adjustments to each plugin’s parameter to perfect the balance.
Why Is It Important To Level Match Plugins?
Level matching plugins ensures that the audio output level is consistent, which helps in avoiding any sudden jumps or dips in volume. When the plugins are not correctly level matched, they can cause phasing issues, resulting in poor audio quality.
What Are The Benefits Of Level Matching Plugins?
Level matching plugins can result in more accurate and clearer mixing results. It minimizes distortion and makes sure that each instrument and track sits well in the mix. It also helps in retaining the original dynamic range of the audio signal.
Conclusion
Through this blog post, we have learned about the importance of level matching plugins for enhancing the overall sound quality of our audio files. Level matching can help us achieve a balanced and consistent volume level, leading to better sound clarity and eliminating unwanted distortion.
From understanding the basics of level matching to exploring some essential plugins, we now have the necessary knowledge to start leveling our audio files like a pro. So let’s get started and take our audio productions to new heights!