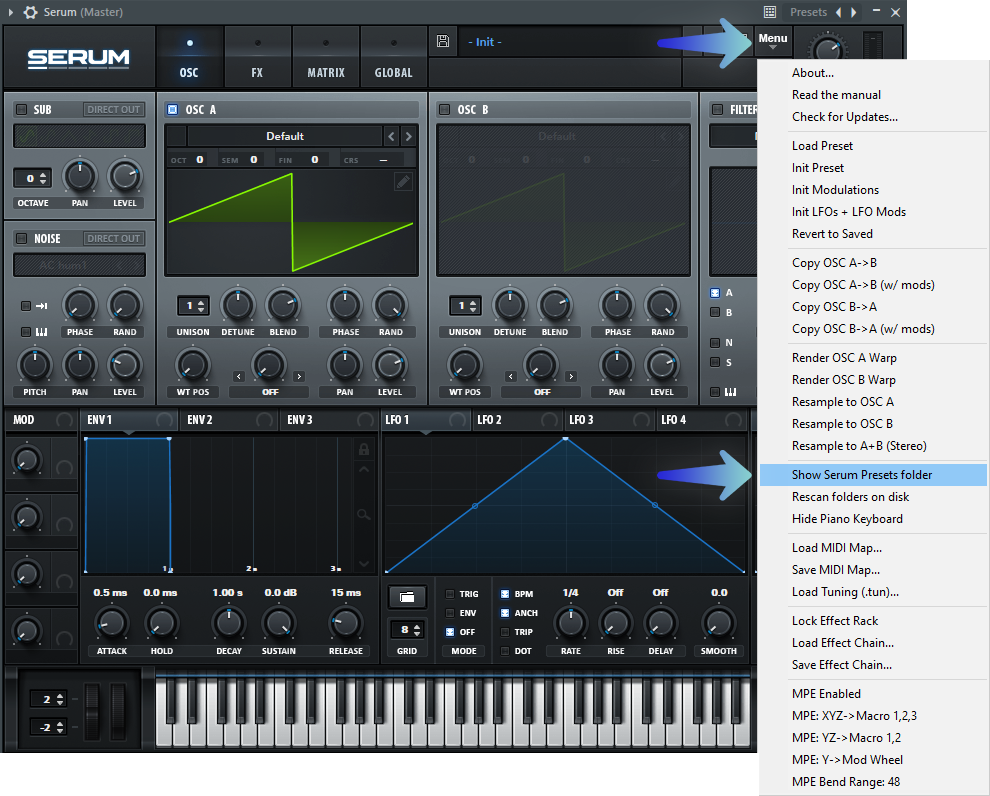
To install presets for Xfer Serum VST synth, simply open Serum, click on the menu icon, choose “Show Serum Presets Folder,” and drag and drop the preset folder into it. The process is easy and straightforward.
Xfer Serum VST Synthesizer is known for its versatility, range of features and high-quality sound. It allows users to create, edit and manipulate sounds in almost any imaginable way. One of the most significant advantages of using Xfer Serum VST synth is the availability of numerous presets, which can be used to jumpstart your music production.
Installing presets for Xfer Serum VST synth is a simple process that can be accomplished even by beginners. In this guide, we will walk you through the step-by-step process of how to install presets for Xfer Serum VST synth easily and quickly. Let’s dive in and get started!
Downloading And Installing Presets For Xfer Serum Vst Synthesizer
Installing presets for Xfer Serum VST synthesizer is a breeze. All it takes are a few steps to start exploring new sounds. With this guide, you can download and install presets for Xfer Serum in no time.
Finding Preset Files Online
When it comes to downloading and installing presets for Xfer Serum VST Synthesizer, the first step is to find the preset files online. There are several websites available that offer a wide range of presets for this plugin. Some of the most popular sites for downloading and installing Serum presets include Splice, 99sounds, and Loopmasters.
Locating The Serum Presets Folder
Once you have downloaded the preset files, you will need to locate the Serum presets folder on your computer. This folder is typically located in the Xfer Records folder in your Documents folder. However, if you installed Serum in a different location, you may need to search for the folder manually.
Installing The Preset Files
To install the preset files, first, open your DAW and load Serum as an instrument. Then, click on the dropdown menu located in the top right corner of the Serum interface and select “Show Serum Presets folder.” Next, drag and drop the downloaded preset files into the Serum presets folder. Finally, reopen Serum and access the presets you just installed by selecting them from the preset menu. In conclusion, installing presets for Xfer Serum VST Synthesizer is a straightforward process that involves finding the preset files online, locating the Serum presets folder, and dragging and dropping the files into the folder. By following these simple steps, you will be able to add a wide range of sounds and textures to your music productions, saving time and enhancing creativity.
Credit: techhousemarket.com
Using The Installed Presets In Xfer Serum Vst Synthesizer
Learn how to easily install and use presets for the Xfer Serum VST Synthesizer with this comprehensive guide. With just a few clicks, you can expand your sound library and enhance your music production.
After installing presets for your Xfer Serum VST Synthesizer, you can start using them in your music productions. This section outlines the steps you need to follow to load, adjust, and save modified presets, enabling you to create unique sounds that fit your music style perfectly.
Loading Presets Into Xfer Serum Vst Synthesizer
Once you have installed your favorite presets, such as those from Cymatics, you can load them into your Xfer Serum VST Synthesizer by following these steps:
- Open your Xfer Serum VST Synthesizer on your Digital Audio Workstation (DAW)
- Select the “Menu” option located at the top left corner of the plugin interface
- Choose “Show Serum Presets Folder.” This action will open your computer’s Finder or Explorer window showing the Serum Presets Folder
- Drag and drop the preset files you downloaded onto the Presets folder.
- Return to your Xfer Serum VST Synthesizer and click on the “Menu” button
- Select “Rescan folders on disk” to enable Serum to recognize the new presets.
- You should now see the newly installed presets in the Presets browser, where you can select them and begin making adjustments.
Adjusting Preset Parameters
Once you have loaded a preset, you can adjust the different parameters to create and customize your unique sound. Here’s how you can do it:
- On the Xfer Serum VST Synthesizer plugin interface, you will see multiple tabs with different parameters
- Click on a tab to reveal the parameters for that tab
- Use the sliders or knobs to adjust the parameters to your liking
- You can adjust parameters such as filter, LFO, and even the wavetable itself
- Take some time to explore each parameter and how it affects the audio output
- Keep experimenting to find the sound that is unique to your work.
Saving Modified Presets
After adjusting the preset parameters and achieving a sound that fits your music style, you can save the new presets by following these steps:
- Click on the “Save” button located at the bottom of the preset browser
- Enter a name for your modified preset and click “Save”
- You can now access the saved preset in the user presets folder
- Alternatively, you can save a copy of the preset under the same name to the default presets folder by clicking the “Save As” button in the Presets Browser.
Using installed presets in Xfer Serum VST Synthesizer is simple and straight forward. Loading presets in Serum is as easy as dragging and dropping the files into the presets folder, adjusting parameters to achieve unique sound effects, and then saving those effects as new presets. With these steps, you can enhance your music production and bring your unique style to the audio world.

Credit: www.productionmusiclive.com
Frequently Asked Questions Of How To Install Presets For Xfer Serum Vst Synthesizer Guide
How Do I Add Serum Presets To Serum?
To add serum presets to Serum, open the Serum plugin and click on the menu icon in the top left corner. From there, select “Show Serum Presets Folder” and copy the preset folders you want into this directory. The presets will be ready to use in Serum.
How Do I Add Presets To Vst?
To add presets to VST, follow these steps: 1. Locate the “presets” folder of the VST plugin. 2. Download the preset files and extract the folders. 3. Copy and paste the preset folders into the “presets” folder. 4. Launch your DAW and load the VST plugin to access the added presets.
5. Enjoy using the new presets in your music production.
Where Are Xfer Serum Presets Stored?
Xfer Serum presets are stored in the Presets folder, which you can find by going to the Serum menu and clicking “Show Serum Presets Folder. ” They are organized by category, such as Arp, Bass, Lead, and so on. You can also create custom folders within the Presets folder to keep your presets organized.
How Do I Add Presets To Splice Serum?
To add presets to Splice Serum, go to the Serum preset folder and copy the. fxp file. Open Serum and click on the Menu button, then select “Show Serum Presets Folder. ” Paste the. fxp file into the folder, and it will appear in the preset list next time Serum is opened.
Conclusion
To sum up, installing presets for Xfer Serum VST Synthesizer is a simple process that can help you enhance the quality of your music production. Remember to download reliable presets from trusted websites, make sure you have the latest version of the VST software installed and correctly locate the preset files on your computer.
With just a few clicks, you can take your music to the next level and create unique sounds that will make your music stand out from the rest.