To export multitrack in Reaper, select all the tracks you want to export and go to the File menu, then select “Render”. In the Render Settings window, choose your output format, filename, and output folder, and make sure the “Multichannel tracks” option is selected.
Reaper is a digital audio workstation (DAW) software that is known for being a versatile and cost-effective option for musicians and audio engineers. One of its key features is the ability to record and mix multiple tracks, allowing users to create complex audio projects with ease.
However, when it comes time to export these multitrack projects, there are some important considerations to keep in mind. We will walk you through the steps for exporting multitrack in Reaper, so you can share your audio productions with the world.
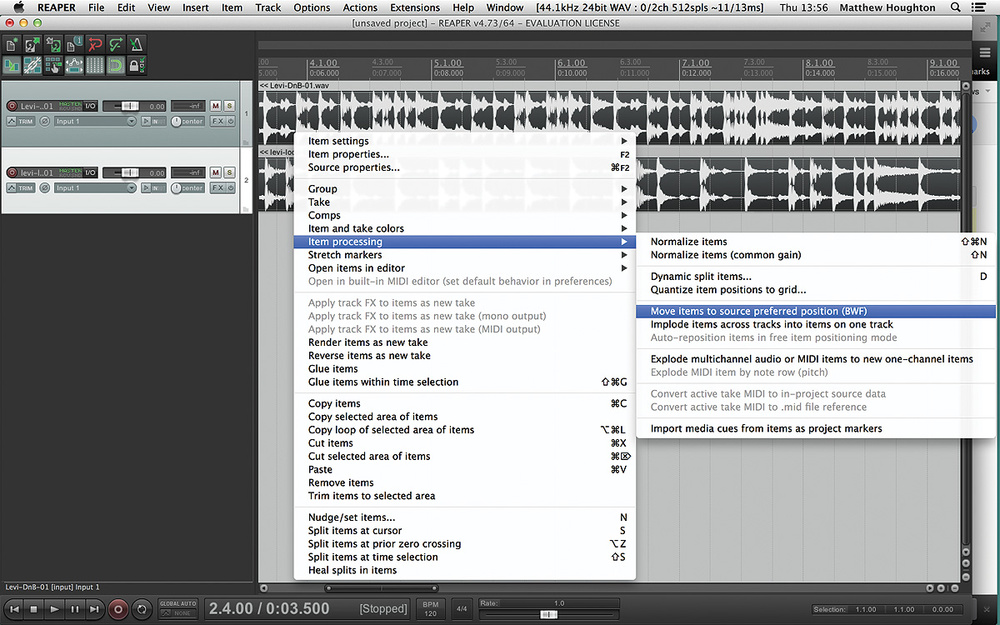
Credit: www.soundonsound.com
Preparing To Export
Learn how to export multitrack recordings in Reaper for your audio projects. Follow these simple steps and ensure high-quality audio output for your export needs.
Before exporting multitrack in Reaper, it is essential to make necessary preparations for the process. Following are the crucial factors to consider before exporting.
Naming Tracks
The first and foremost step is to give appropriate names to the tracks, such as lead vocals, guitar-1, guitar-2, bass, drums, etc. It is essential to name tracks correctly as it makes identification easy later on.
Setting Appropriate Levels
To make sure that the levels are consistent, it is crucial to set the volume levels for each track correctly. The level should not exceed -6dBs to avoid any distortion in the final mix.
Muting And Soloing Tracks
Muting and soloing specific tracks can help distinguish which tracks are playing and which are not. It also helps in identifying any technical issues with tracks like unwanted noise.
Setting Loop Region
To make sure that the selected area is exporting precisely, it is crucial to set the loop region at the desired location. One can place the loop region at the start and end points of the track or the section that needs to be monitored. In conclusion, preparing for exporting multitrack in Reaper is essential to execute the process efficiently. Therefore, it is crucial to name tracks appropriately, set appropriate levels, mute and solo specific tracks, and set the loop region for precise exporting.
Export Settings
To export multitrack in Reaper, navigate to the ‘Export Settings’ dialog box and choose the options that best suit your needs. Determine which tracks you want to export, select the appropriate format, adjust any settings as necessary, and click ‘Render’.
Exporting multitrack in Reaper requires several crucial settings such as file format, sampling rate, and channel selection. Understanding the export settings is essential for a professional audio export. In this article, we will discuss step-by-step on how to export multitrack in Reaper with an in-depth guide on each export setting.
Locating The Render Menu
The first step is to find the render menu in the Reaper interface. You can do so by right-clicking on the track you want to export and selecting “Render” from the drop-down menu. Alternatively, you can go to the “File” menu and select “Render.”
Selecting Export Format
After locating the render menu, the next step is to choose the export format. You can choose between WAV, MP3, FLAC, and other formats. Reaper supports a wide range of file formats, so choose the format that best suits your needs.
Setting Up Channel Selection
The channel selection setting is crucial when exporting multitrack audio. This setting determines which tracks will be included in the export. You can select to export all tracks or individual tracks that you want to export. Click on the “Channel Selection” button and choose the tracks you want to export by clicking on the checkboxes next to the track name.
Setting Up Bit Depth And Sample Rate
Bit depth refers to the number of bits used to represent each audio sample. A higher bit depth provides better quality audio. The sample rate refers to the number of samples per second. A higher sample rate provides higher audio quality but also increases the file size. You can set the bit depth and sample rate from the “Render” menu by clicking on the “Format” button and selecting the desired bit depth and sample rate.
Choosing Render Speed Quality
Once you have selected the desired export settings, you can now choose the render speed quality. The render speed quality determines how fast the export process will be. A higher quality setting increases the export time, while a lower quality setting decreases it. You can choose the render speed quality from the “Render” menu by adjusting the slider under the “Render Speed Quality” option. In conclusion, exporting multitrack in Reaper requires several crucial settings, including file format, channel selection, and sample rate. By following the settings guide, you can export professional quality audio in Reaper.
Rendering The Mix
To export multitrack in Reaper, rendering the mix is the key. Go to “File”, select “Render,” and choose “Multichannel” to export your mix with all of its tracks. You can then save your project in a variety of formats, making it easier to share and work on with collaborators.
After you have recorded, arranged, and mixed multiple tracks in Reaper, it is time for you to render (export) the mix. Rendering is the process of combining all tracks in a project and creating a single audio file. With Reaper, you can export your multitrack project in various formats such as WAV, MP3, FLAC, and more. In this section, we’ll discuss the steps for rendering the mix and exporting it as a high-quality audio file.
Choosing Output Directory
Before exporting your mix, decide where you want to save the rendered audio file. To choose the output directory in Reaper, follow these steps:
- Click on “File” in the menu bar at the top of the screen.
- Select “Render” from the drop-down menu.
- Click on the “…” button under “Output File” and navigate to the folder where you want to save the rendered audio file.
- Click “OK” to confirm the output directory.
Setting File Type
Next, you need to choose the file format for your rendered audio file. Reaper offers several file types that you can choose from, including WAV, MP3, FLAC, and more. To set the file type, follow these steps:
- Click on “File” in the menu bar at the top of the screen.
- Select “Render” from the drop-down menu.
- Click on the “Options” button.
- Choose the desired file type from the “Render format” drop-down menu.
Naming The File
By default, Reaper names the rendered audio file with the name of your project. However, you can change the name before exporting the mix. To name the file, follow these steps:
- Click on “File” in the menu bar at the top of the screen.
- Select “Render” from the drop-down menu.
- In the “Output File” section, type the desired name for your audio file.
Once you have completed these steps, click on the “Render 1 File” button to export your mix as an audio file. With Reaper, you have the flexibility to customize your mix and export it in the file format that best suits your needs.
Credit: m.youtube.com
Verifying The Render
Verifying the render is crucial before exporting multitrack in Reaper. Make sure all the tracks are sounding as expected and check for any inconsistencies in the mix.
After exporting multitrack in Reaper, it is vital to verify the render to ensure that the audio is exported accurately. The process of verifying the render includes ensuring accurate track alignment, checking audio levels, and saving and archiving. Here are the steps to follow:
Ensuring Accurate Track Alignment
After rendering the multitrack, it’s essential to confirm that the exported audio is correctly aligned. This process confirms that all the individual tracks are exported in the same place in time. Some of the steps to align the tracks include:
- Select all the rendered tracks.
- Right-click on the tracks and select “properties.”
- Click on the “Timing basis” tab and ensure that all the tracks have the “project sample rate” selected.
- Play the rendered tracks to confirm that they are correctly aligned.
Checking Audio Levels
After ensuring accurate track alignment, it’s crucial to check the audio levels of each track. This process confirms that the multitrack was exported with consistent volume levels. To check audio levels, follow the steps below:
- Play the rendered tracks.
- Observe the master track to ensure that it doesn’t clip or go past 0db.
- Check individual track volumes and adjust them as necessary.
- Confirm that all the tracks are at consistent volume levels.
Saving And Archiving
After ensuring accurate track alignments and checking audio levels, it’s time to save and archive the rendered multitrack. Saving and archiving is an essential process to ensure that you can access the exported audio in the future. Here are some of the steps needed to save and archive the exported multitrack:
- Select “File” then “save project as” to save the project with a different name.
- Create a new folder where you can store the exported audio and rename the folder appropriately.
- Select all the rendered tracks and copy them into the newly created folder.
- Confirm that the tracks were copied successfully.
In conclusion, verifying the render is fundamental in ensuring that your exported multitrack is accurate. The steps outlined above are critical and should be taken to ensure high-quality multitrack exports.

Credit: forum.cockos.com
Frequently Asked Questions On How To Export Multitrack In Reaper
How Do I Export Track By Track In Reaper?
To export tracks individually in Reaper, select the track you want to export, click File > Render, choose the appropriate settings, and click Render. Repeat the process for each track you want to export individually.
How Do I Render All Tracks In Reaper?
To render all tracks in Reaper, go to the “File” menu and select “Render”. In the render settings window, choose the desired options, such as file format and location. Then, click “Render” to start the process. All tracks will be rendered according to the settings you chose.
How Do You Bounce Multiple Tracks In Reaper?
To bounce multiple tracks in Reaper, go to “File” and select “Render. ” In the Render dialog box, select “Stems(Selected tracks)” under the “Bounds” section. Then, choose your desired format and click “Render. ” Finally, select the location where you want to save the bounced files and click “Save.
“
How Do You Multitrack In Reaper?
To multitrack in Reaper, first create a new project and add a track. Then, select the track, arm it for recording, and begin recording. To add additional tracks, right-click the track and select “Insert new track,” and repeat the previous steps.
You can then adjust the levels and mix the tracks as desired.
Conclusion
As you can see, exporting multitrack in Reaper is not a complex process. By following these simple steps, you can easily export your multitrack project without losing quality. It is essential to select the right file format and configuration to avoid any potential compatibility issues.
Following the guidelines mentioned above will ensure that your multitrack exports are of the highest quality, making your tracks sound professional. So go ahead and export your track, and don’t forget to share and enjoy your creation with the world!