To create a default MIDI track, simply go to the track menu and click “Create Default MIDI Track.” This will create a blank MIDI track with the default settings.
MIDI tracks are a crucial component of digital music production, allowing creators to bring their compositions to life with virtual instruments and software. Creating a default MIDI track can save time and streamline the creative process. By having a go-to template with standardized settings, you can focus on the music without worrying about technical details.
Moreover, customizing your default MIDI track can help you develop a signature sound and style. Whether you’re a beginner or an experienced producer, understanding how to create a default MIDI track is a fundamental skill in modern music production. Follow these simple steps to start making your own digital masterpieces.
Credit: www.productionmusiclive.com
Creating A Default Midi Track
To create a default MIDI track, simply go to your DAW’s preferences or settings, navigate to the track section, and choose the option to create a default MIDI track. This will ensure that every time you open a new project, a MIDI track will automatically be created with your preferred settings and instruments.
Creating a default MIDI track can save you plenty of time while working on your next project. A digital audio workstation (DAW) allows you to customize various sound settings, including drum kits, piano sounds, and synth instruments. This guide will walk you through the steps of creating a default MIDI track, so you always have your preferred instrument readily available.
Step 1: Open Your Digital Audio Workstation
Open your DAW and create a new project or open the one you’re currently working on. Once loaded, ensure that you have a blank slate to work with, i.e., no tracks present.
Step 2: Adding A New Track
On the software interface, you should spot an option to add a new track, usually located at the top of the screen. Click it and select ‘MIDI’ to create a new MIDI track.
Step 3: Selecting The Midi Instrument
Next, you need to choose the instrument of your liking. Your DAW should have numerous choices you can select from, such as a grand piano, guitar, synth, or even a whole orchestra. Choose your instrument and ensure the track’s ‘input’ is set to the software instrument you just selected.
Step 4: Setting Default Midi Track
Once you have named your track and tweaked the instrument and input settings, it’s time to set the MIDI track as your default on the DAW. For example, on Logic Pro X, you can go to the preferences window and indicate the default settings for your MIDI track. Ensure you save the settings so that the next time you start a new project, the MIDI track of your liking is instantly available. Creating a default MIDI track is a simple yet effective timesaver that can impact your productivity and creativity positively. By repeating the steps shared in this guide for your preferred DAW, you can improve your workflow efficiency and devote more time to music-making.

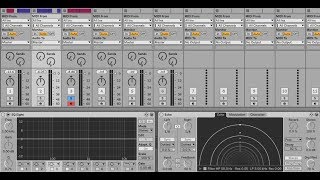
Credit: forums.steinberg.net
Customizing Default Midi Track
Customizing the default MIDI track is easy. Start by opening your DAW and creating a new MIDI track. Then, customize the track by selecting the desired instrument, adjusting the volume levels, and adding any necessary effects.
Music is a form of art that expresses emotions and tells a story. With the creation of MIDI, music production has become easier and more accessible. However, to produce good music, one needs to have a thorough understanding of MIDI and its functionalities. In this blog post, we will teach you how to customize default MIDI track like a pro in three simple steps.
Step 1: Choosing A Default Sound
The first thing to do is to select a default sound that meets your music production requirements. By default, most MIDI tracks use a standard piano sound. However, there are other sound options that you can explore, such as drum kits, guitar, and bass among others. To choose your default sound, you can follow these simple steps:
- Open your MIDI station
- Select the “Preferences” option
- Navigate to the “Audio” section and choose “General” settings
- Select your preferred sound from the “Default MIDI Track” dropdown menu
Step 2: Adjusting The Tempo And Time Signature
The tempo and time signature are critical aspects of music production that determine its feel and rhythm. In some cases, the default settings might not be suitable for a specific track. In such an instance, you might need to customize them to fit your needs. Here is how:
- In the MIDI station, go to the “Preferences” section
- Navigate to the “General” settings section
- Select “Time Display” to adjust the tempo to your preferred value
- Go to the “MIDI” section and adjust time signature accordingly
Step 3: Recording Your First Midi Sequence
After customizing your default MIDI track to adjust to your requirements, the next step is to record your first MIDI sequence. This is where the magic begins. You can record your sequence by following these steps:
- Ensure your MIDI device is connected to the computer
- Create a new track
- Select your customized default sound
- Click on the “Record” button and start playing
In conclusion, customizing your default MIDI track is a simple and effective way to enhance your music production skills. By choosing a preferred default sound, adjusting the tempo and time signature, and recording your first MIDI sequence, you will be able to take your music production skills to the next level.
Bonus Tips
Learn how to create default MIDI tracks with these bonus tips. Improve your music production skills and save time by setting up your own default settings for MIDI tracks.
Bonus Tips Midi tracks are fantastic musical instruments that allow you to record and play music digitally. They are also versatile in terms of creating musical notes and tunes. However, if you really want your Midi track to sound professional, consider using virtual instruments and Midi plugins and effects. Here are some Bonus Tips to help you create default Midi track: Tip 1: Experiment with Different Virtual Instruments Virtual instruments are computer-generated sound making programs that allow you to generate sounds and music that are impossible with traditional instruments. You can find a wide range of virtual instruments, including synthesizers, samplers, drum machines, and more. Experimenting with various virtual instruments can help you find the ones that work best for your Midi track. Tip 2: Use MIDI Plugins and Effects MIDI plugins and effects are software programs that can be used to manipulate and process Midi data. They can be used to shape the sound of your tracks, whether you want to add reverb, delay, or other effects. This will give your music a professional touch and make it stand out. Using Midi plugins and effects is simple; all you need to do is download the plugin that suits your needs and add it to your Midi track. In conclusion, creating a default Midi track is not that difficult if you use virtual instruments and Midi plugins and effects. These tips should help you create a track that stands out from the rest and sounds professional. By experimenting with different virtual instruments and using Midi plugins and effects, you can create unique and memorable tracks that will impress your audience.
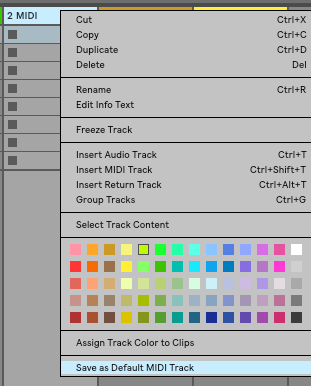
Credit: help.ableton.com
Frequently Asked Questions Of How To Create Default Midi Track
How Do I Save Midi Track As Default?
To save a MIDI track as default, you must first open the Preferences menu and go to the MIDI tab. Then, select the MIDI track you want to save as default and click on the “Set Default” button. Finally, click on “OK” to save the changes.
How Do I Set Midi As Default In Ableton?
To set MIDI as your default in Ableton, go to “Preferences” from the “Options” menu. Select “MIDI Sync” and choose “Track” or “Remote” for your MIDI output. Finally, click “OK” to save your changes.
How Do I Change The Default Audio Track In Ableton?
To change the default audio track in Ableton, go to the Browser tab and locate the default audio folder. Right-click on the audio file you want to set as the default and select “Set as Default Audio Track. ” Now, every new audio track you create will automatically use the selected file as its default.
How Do I Save Midi Presets In Ableton?
In Ableton, you can save MIDI presets by creating a new MIDI track, configuring it to your desired settings, and then saving it as a preset. You can also save a preset for your MIDI controller by configuring the controller to your desired settings and saving it as a user preset.
Conclusion
Creating a default MIDI track is a simple process that can help save time and improve your workflow. By following the steps outlined in this guide, you can easily create a template that includes all of your preferred settings, making it easy to start new projects without having to configure everything from scratch each time.
Remember to experiment with different settings and customize your default track to suit your specific needs. With just a bit of practice, you’ll be able to create high-quality MIDI tracks quickly and efficiently, allowing you to focus on your creative process.