To create a new session in Pro Tools, go to File > New Session. Fill out the necessary fields, choose your session settings, and click Create.
Pro Tools is a popular digital audio workstation used by professionals in the music and film industries. Creating a new session is the first step in starting a new project, which can be overwhelming for beginners. However, with a few simple steps, it’s easy to get started.
We’ll go over how to create a new session in Pro Tools and provide helpful tips to ensure your project runs smoothly. Whether you’re a musician, sound engineer, or film editor, understanding how to create a new session in Pro Tools is a crucial skill to have. So, let’s dive in!
Accessing Pro Tools
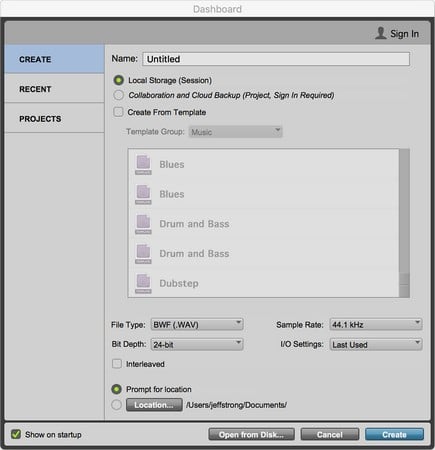
To create a new session in Pro Tools, start by opening the application and selecting “New Session” from the File menu. Then, name your session and choose your desired sample rate and bit depth. Finally, select the location where you want to save the session and click “Create”.
To create a new session in Pro Tools, you must first access the program. Launching Pro Tools is easy if you have it installed on your computer. To start the program, simply click on the icon on your desktop.
Launching Pro Tools
If you don’t have the icon on your desktop, you can search for it in your computer’s file explorer or application folder. Once you have located the program, double-click on it to launch Pro Tools.
Creating A New Session
Once Pro Tools is launched, you can start a new session by selecting “File” from the top menu and then choosing “New Session.” Alternatively, you can use the keyboard shortcut “Command+N” on a Mac or “Ctrl+N” on a PC. A new window will then appear asking you to name your session and select a location to save it. Be sure to choose a descriptive name for your session and select a location where you can easily access it later. After you have filled out the required information, click “Create.” Pro Tools will then open the new session, and you can start recording or editing your audio right away.
Summary
In summary, accessing Pro Tools and creating a new session can be done with just a few clicks. Whether you are a seasoned professional or new to the program, following these simple steps will enable you to get started on your next audio project quickly and efficiently.
Session Setup
To create a new session in Pro Tools, go to the File menu and select “New Session”. Here you can name the session, choose the sample rate and bit depth, and select the track type and input settings. Once you’ve made your selections, click “Create” to start your new session.
When starting a new project in Pro Tools, the first step is to create a new session. The Session Setup window allows you to select the necessary settings and parameters for your project. This section focuses on the Session Setup and covers the important aspects of it in detail.
Choosing Sample Rate And Bit Depth
The Sample Rate and Bit Depth are two important settings that need to be configured before you begin recording. The Sample Rate determines the number of times per second that audio is captured, and the Bit Depth affects the quality of the audio. It is recommended to set the Sample Rate to 44.1kHz or 48kHz for most projects, while the Bit Depth should be set to 24 bits for better sound quality.
Selecting Session File Type
The Session File Type is another crucial setting that needs to be selected during the Session Setup process. Generally, Pro Tools sessions are saved as .ptx files, but you can also choose to save your session as a Template or a Session Interchange file. Templates allow you to set up a session with pre-configured settings, while Session Interchange files enable you to transfer sessions between different versions of Pro Tools.
Conclusion
Session Setup is an essential part of creating a new project in Pro Tools. Choosing the appropriate Sample Rate and Bit Depth settings and selecting the right Session File Type is crucial for ensuring the success of your project. Remember to double-check all settings before starting the recording process to avoid any unwanted surprises.
Session Templates
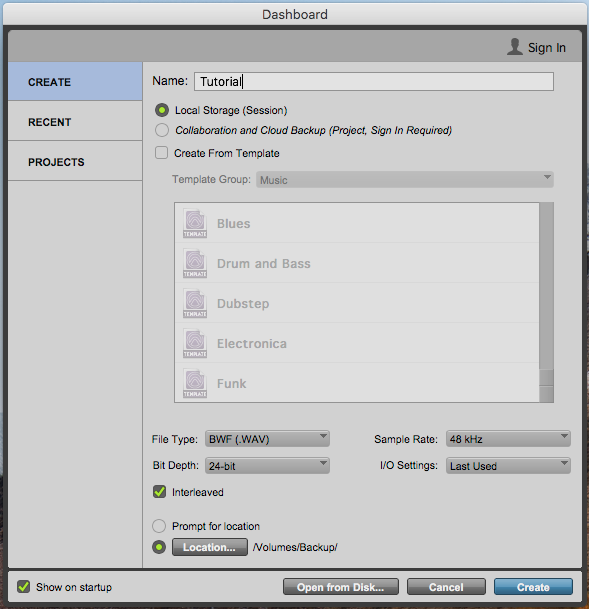
Creating a new session in Pro Tools is easy with Session Templates. Templates enable you to set up your session according to your needs, making it easier to dive right into the creative process. Simply select your preferred template and start working.
What Are Session Templates And Why Use Them?
Session templates refer to pre-configured settings, tracks, plugins, input/output devices, and other individual preferences that are saved and reused for different music and audio projects. They provide an efficient and time-saving way of setting up a new project with specified requirements, settings, and tracks. Instead of starting from scratch, you can utilize templates to create a new session that is pre-configured with all your favorite settings and default plugins. It is an organizing tool that allows for fast and easy initialization of new session projects.
Creating And Saving A Custom Session Template
Creating and saving a custom session template is easy and convenient. Start by opening a new session and configure your preferences and key settings. For instance, set the number of tracks you need, select your input/output devices, set the tempo and meter, and load your favorite plugins. Once you are done, select “Save As Template” under the File menu and give it a name.
Your custom session template will be saved into the “Session Templates” folder located in your Pro Tools document. It is essential to note that the template will save all settings and configurations except recorded audio files. The next time you need to use the same settings to create a new session, click on the “Create from template” button and select your custom template from the Session Templates folder.
Conclusion
Session templates are an excellent feature that allows you to create a new session with preset configurations and settings. It saves you time from configuring these settings each time you start a new project in Pro Tools. You can customize these templates, depending on your preferences and the requirements of your music projects. Creating and saving templates is an effective way to keep your workflow organized and more efficient. So, next time you start a new project on Pro Tools, remember to utilize session templates for better and faster results!
Credit: www.dummies.com
Session Parameters
Creating a new session in Pro Tools is crucial before starting a new recording. It allows you to save your work and customize various parameters that help optimize your recording setup. These parameters are what we call ‘session parameters.’ In this article, we will focus on one of these parameters – Session Parameters, and three subheadings that include ‘Naming your session,’ ‘Setting up tracks and busses,’ and ‘Assigning inputs and outputs.’
Naming Your Session
When creating a new session in Pro Tools, one of the first steps is to name the session. It is essential to name your session so that it reflects the type of recording or mix you will be working on. To name your session:
- Open Pro Tools on your computer and select ‘Create a New Session.’
- Enter a name for your session in the ‘Session Name’ field.
- If you want to save it in a specific location, choose the location by clicking the ‘Browse’ button and select the folder.
- Next, select the ‘Sample Rate’ and ‘Bit Depth’ for your session. The sample rate determines the number of samples per second, while the bit depth determines the dynamic range of your recording.
- Finally, click ‘Create’ to create your new session.
Setting Up Tracks And Busses
Once you have named your session, the next step is to set up your tracks and busses. Setting up your tracks and busses allows you to manage the audio inputs and outputs for your recording. To set up tracks and busses:
- Go to the ‘Track’ menu and choose ‘New Track.’ Alternatively, you can use the key command ‘Command+Shift+N’ (Mac) or ‘Control+Shift+N’ (Windows).
- Select the ‘Track Type’ and ‘Track Format.’ You can choose from different types of tracks, such as Audio, MIDI, Video, or Master Fader tracks. You can also select the format based on the number of channels and the sample rate.
- After creating your tracks, you can set up busses by selecting the ‘Bus’ tab in the ‘I/O’ window. A bus is an audio pathway that allows you to route multiple tracks for input or output.
Assigning Inputs And Outputs
After setting up your tracks and busses, the next step is to assign inputs and outputs. This step involves routing your audio inputs and outputs to your tracks and busses. To assign inputs and outputs:
- Go to the ‘Setup’ menu and select ‘I/O.’ Alternatively, you can use the key command ‘Option+O’ (Mac) or ‘Alt+O’ (Windows).
- Select the input or output that you want to assign to a track or bus.
- Click and drag the input or output to the corresponding track or bus to assign it.
Creating a new session in Pro Tools involves setting up various session parameters. These parameters help optimize your recording setup and ensure that your recording is of high quality. By following these steps, you can easily create a new session, name it, set up tracks and busses, and assign inputs and outputs for your recording.
Session Preferences
To create a new session in Pro Tools, click on “File” and then select “New Session”. Choose your desired location and session name, then select your preferred audio file format and sample rate. Finally, set your session preferences such as tempo, bars/beats, and click track options.
Setting Preferences For Playback And Recording
When creating a new session in Pro Tools, setting preferences for playback and recording is a crucial step in optimizing the workflow. To access these preferences, go to “Setup” and select “Preferences” from the drop-down menu. From there, navigate to the “Operation” tab and adjust the preferences for playback and recording. Adjusting the buffer size, disk allocation, and other preferences can help ensure a smooth recording and playback experience.
Customizing The User Interface
Customizing the user interface is another important step in creating a new session in Pro Tools. To access these preferences, go to “Setup” and select “Preferences” from the drop-down menu. From there, navigate to the “Display” tab and adjust the preferences for the user interface. Customization options include adjusting the color scheme, track and clip heights, and other display options. Customizing the user interface can help improve workflow efficiency and organization.
Summary
In conclusion, when creating a new session in Pro Tools, setting preferences for playback and recording and customizing the user interface can greatly improve workflow efficiency and productivity. By adjusting these preferences, users can create a customized and optimized working environment in Pro Tools.
Credit: pcaudiolabs.com

Credit: music.tutsplus.com
Frequently Asked Questions For How To Create A New Session In Pro Tools
How Do You Create A Session In Pro Tools?
To create a session in Pro Tools, go to the File menu and select “New Session”. Then, name your session and set the desired sample rate, bit depth, and session file type. Hit “Create” and your new session will be ready to go.
How Do I Create A New Pro Tools?
To create a new Pro Tools project, launch the Pro Tools software and select “File” from the top menu. Choose “New Project” from the drop-down menu and enter a name for the project. Select the session parameters and hit create to start working on your new project.
Which Folders Will Pro Tools Create When You Create A New Session?
Pro Tools creates several folders when a new session is created, such as Audio Files, Clips, MIDI Files, Plug-In Settings, Rendered Files, Video Files, and more.
How Do I Send My First Session In Pro Tools?
To send your first session in Pro Tools, you need to go to “File” and select “Save Copy In. ” Choose a destination for your session and select the options you want. Then, click “Save” and your session will be sent to the chosen location.
Conclusion
Creating a new session in Pro Tools can seem daunting, but with these simple steps, you can start creating music in no time. Remember to name your session appropriately and set up your desired preferences. Utilize the workspace and organize your tracks to make editing and mixing easier down the line.
With these tips, you’ll be able to jump straight into creating your latest masterpiece. Get ready to let your creativity shine with the help of Pro Tools.