Building a home studio requires setting up equipment and soundproofing your space. With proper planning and quality gear, you can create a professional recording environment in your own home.
As technology continues to advance, more musicians and content creators are opting to create their own home studios. Setting up a studio may seem daunting but with the right information and guidance, it can be easier than you think. To get started, it is important to have a clear understanding of your goals, the space you have available, and the amount of money you are willing to invest.
We will guide you through building your own home studio by explaining the essential equipment you’ll need, how to treat your room as well as sharing some tips to ensure you create a high-quality recording space.
Choosing A Space
Selecting the perfect area to build a home studio is crucial for creating high-quality content. Consider factors such as natural light, proximity to main living areas, and sound insulation when choosing a space.
Building a home studio is an affordable and convenient way to have access to a private recording space. Choosing the best space is crucial, as it can affect the quality of your recordings. It is important to consider several factors when selecting the ideal location for your home studio.
Determining Your Needs
The first step in choosing a space for your home studio is determining your specific needs. This includes factors such as the volume of recording equipment, the type of music you will be composing, and the size of your band. If you are a solo artist, a small corner of a room might suffice, but if you’re in a band with drums, amplifiers, and other instruments, a larger area might be necessary.
Assessing The Acoustics
Assessing the acoustics of the space is also crucial when choosing the location of your home studio. You want a room that is not too small or too large, as both can affect the quality of the recordings. A square room with sound diffusing elements such as curtains, bookshelves, and carpets can help lessen the echo in the room.
Conclusion
Choosing the right space for your home studio is an important step in creating a productive environment where you can make amazing recordings. By determining your specific needs and assessing the acoustics of the space, you’ll be able to select a location that meets your requirements and helps bring your creative vision to life.
Credit: www.soundonsound.com
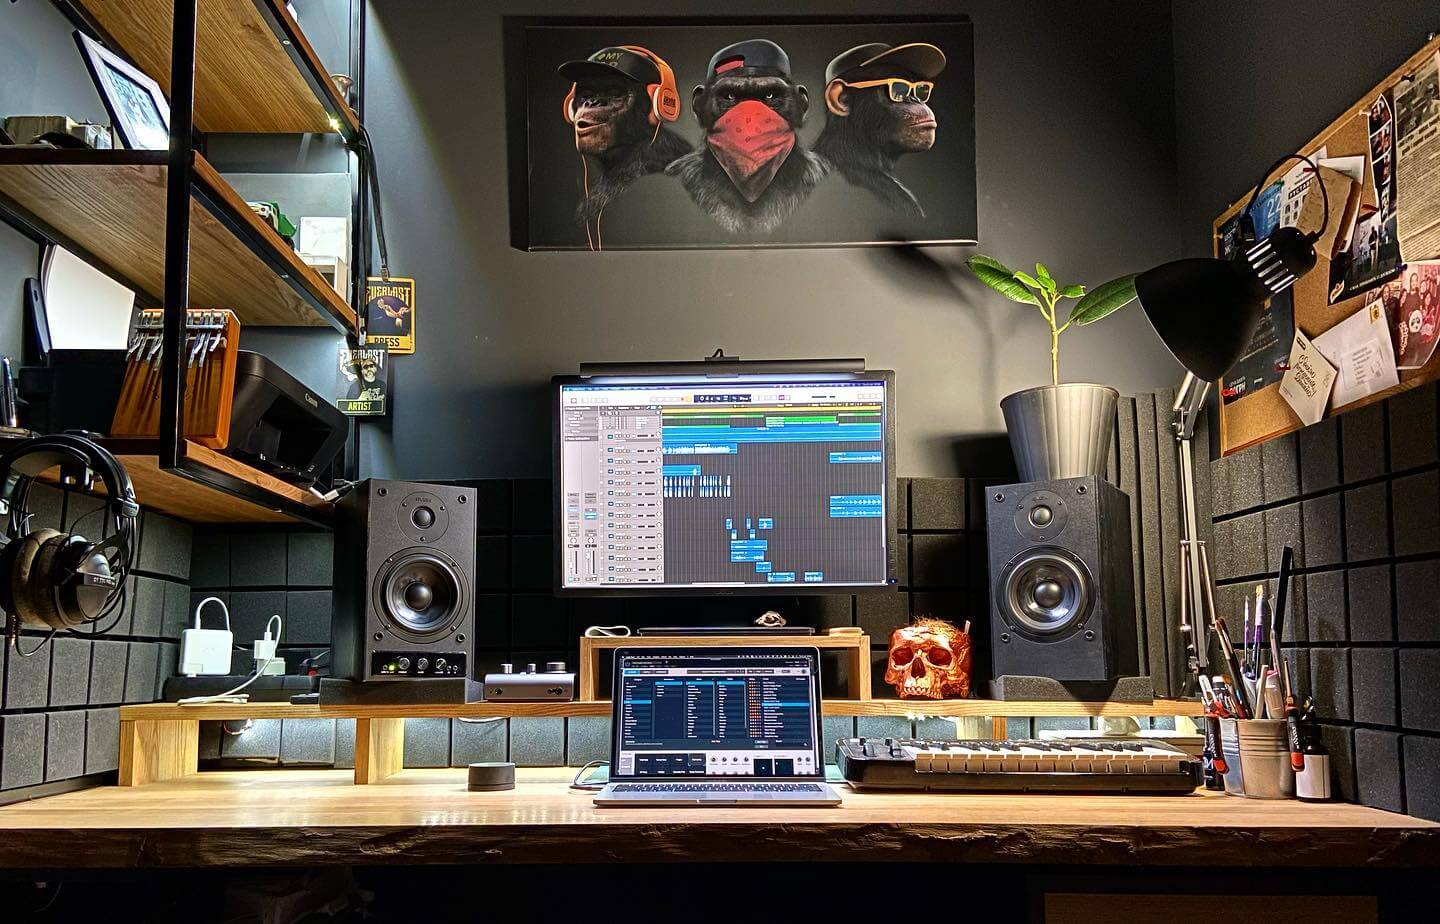
Essential Equipment
Building a home studio requires some essential equipment such as a computer, audio interface, microphone, headphones, and studio monitors. By investing in quality equipment, you can create a professional sounding recording environment in the comfort of your own home.
To build an efficient home studio, you need to have the essential equipment in place. These include a computer with suitable software, audio interface, studio monitors, microphone, and cables. Investing in quality equipment can enhance the quality of your recordings and make your work easier.
Computer And Software
The first essential piece of equipment you need is a computer with the appropriate software to enable you to record, mix, and edit music. Your computer must have a powerful processor, enough storage capacity, and high RAM to support the software. You may opt for a desktop or a laptop, depending on your preferences and available space. Besides, you need software like Pro Tools, Logic Pro, or Ableton Live, among others to record and mix music.
Audio Interface
To convert analog-to-digital signals for recording, you require an audio interface. This piece of equipment is crucial in getting a clear and quality recording. It connects the musical instruments and microphones to the computer. Different audio interfaces come with varying features, such as input/output channels, headphone outputs, and different voltage preamps. Investing in a quality audio interface can enhance the quality of your recordings.
Studio Monitors
Studio monitors are specialized loudspeakers designed to deliver an impartial and clear sound representation. They are ideal for mixing, mastering, and production. Choosing high-quality studio monitors with excellent frequency response, sensitivity, and amplification is crucial. Additionally, make sure they match your room’s size and acoustic treatment.
Microphone And Cables
A suitable microphone is essential in capturing clear and accurate sound. You can choose between condenser and dynamic microphones, depending on your recording needs. Besides, investing in high-quality cables is critical in transmitting audio signals between the musical equipment and the audio interface or mixer. Ensure that you purchase the right length and type to avoid noise interference. In conclusion, having the right equipment is crucial to building an efficient and functional home studio. Investing in high-quality equipment can enhance the quality of your recordings, ease your work, and save you time and money in the long run.
Designing Your Space
Designing your space is one of the most important steps when it comes to building a home studio. A well-designed space will not only improve the quality of your recordings but it will also create a comfortable and efficient workspace. In this section, we will cover two crucial elements of designing your space: soundproofing and acoustic treatment and furniture and layout.
Soundproofing And Acoustic Treatment
Soundproofing and acoustic treatment are essential if you want to achieve professional-quality recordings. Soundproofing is the process of preventing sound from entering or leaving your studio, while acoustic treatment is used to improve the acoustic properties of your space.
When it comes to soundproofing, there are several methods you can use:
- Seal all gaps and cracks: Gaps and cracks allow sound to leak in and out of your space. Use acoustic sealant to seal all the gaps around windows, doors, and electrical outlets.
- Add mass: Adding mass to walls and ceilings will help prevent sound transmission. Use high-density materials such as drywall or mass-loaded vinyl to cover existing walls and ceilings.
- Build a room within a room: Building a room within a room is one of the most effective ways to achieve complete sound isolation. This involves constructing a new frame within your existing walls and ceiling, then adding insulation and drywall.
Acoustic treatment involves manipulating the way sound behaves in your space. This can be achieved by using acoustic panels, diffusers, and bass traps. Here are some tips for acoustic treatment:
- Add acoustic panels to your walls: Acoustic panels are designed to absorb sound waves, preventing them from bouncing around in your space.
- Use bass traps in corners: Bass traps help absorb low-frequency sounds that tend to accumulate in corners.
- Add diffusers to your ceiling: Diffusers help break up sound waves, creating a more natural-sounding space.
Furniture And Layout
The furniture and layout of your home studio can make a huge difference in the quality of your recordings. Here are some tips for designing your furniture and layout:
- Invest in a comfortable chair: You will be spending a lot of time in your chair, so it’s important to invest in a comfortable, ergonomic one that won’t leave you with back pain.
- Place your desk against a wall: This will help prevent sound from reflecting off the wall and back into your microphone.
- Avoid placing your microphone near reflective surfaces: Reflective surfaces such as windows, mirrors, and metal objects can cause unwanted reflections and distortions in your recordings.
- Create a designated area for your equipment: Keep your equipment organized and within reach so that you can easily adjust your settings as needed.

Credit: www.shure.com
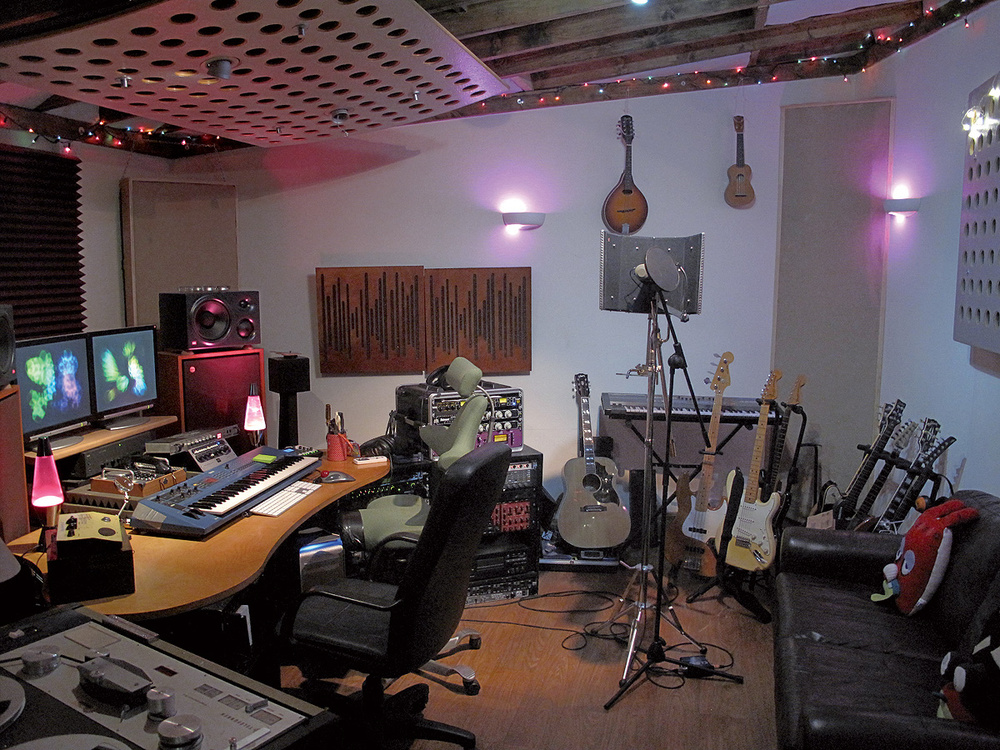
Setting Up Your Equipment
Setting up your home studio equipment is an essential step to achieving professional-quality audio recordings. To get started, it’s important to make sure that each piece of equipment is connected correctly. Additionally, you’ll need to calibrate your monitors and set up your microphone correctly to ensure that you’re capturing the best audio possible. In this guide, we’ll walk you through each step of the process to help you set up your home studio like a pro.
Connecting Your Audio Interface
Before you begin recording, you’ll need to connect your audio interface to your computer. To do this, follow these steps:
- Connect one end of your audio interface’s USB or Thunderbolt cable to your computer.
- Connect the other end of the cable to your audio interface.
- If your audio interface requires external power, plug it into a power outlet.
- Turn on your audio interface.
Calibrating Your Monitors
Once your audio interface is connected, it’s time to calibrate your monitors. Calibration is essential to ensure that you’re hearing your recordings accurately. Follow the steps below to calibrate your monitors:
- Use a sound pressure level meter to measure the sound pressure level at your listening position.
- Open your digital audio workstation and play a test tone through your monitors.
- Use your sound pressure level meter to measure the sound pressure level of the test tone.
- Adjust the volume of your monitors until the measured sound pressure level matches the target level for your listening environment.
Setting Up Your Microphone
Once your monitors are calibrated, it’s time to set up your microphone. Follow the steps below to get started:
- Place your microphone on a stand or shock mount to minimize noise and vibrations.
- Connect your microphone to your audio interface using an XLR cable.
- Adjust the height and position of your microphone to get the best sound possible.
- Test your microphone by recording and adjusting its placement as needed to get the best sound quality.
Creating Your First Recording
Learn how to build a home studio and create your first recording with these easy steps. Start by selecting the right equipment, setting up the space, and experimenting with sound until you get the perfect mix.
Creating Your First Recording: Establishing Levels: The first step in creating your first recording is to establish the levels of your recording equipment. Make sure that you have a decent microphone placed appropriately in front of your sound source. Adjust the input level of your audio interface to avoid clipping. Try to keep your recording signal level as high as possible without going into the red zone in your DAW. This will ensure that your recording doesn’t sound too quiet or too loud. Recording Technique: After setting up the levels, it’s time to focus on recording technique. If you are recording vocals, make sure that you have a pop filter in front of the microphone to avoid pops and breaths. If you’re recording an instrument, try out different mic positions to find the sweet spot. If you are recording a band, make sure everyone is positioned correctly around the microphone. If you’re recording a spoken word, make sure you pace yourself, take breaks as needed, and enunciate well. Editing Your Audio: Once you’re done recording, it’s time to edit your audio. This will involve trimming unused audio regions, splitting into individual tracks, and applying basic effects such as EQ, Compression, and Reverb. Use an EQ to remove unwanted frequency ranges and improve the perceived clarity of your sound. Apply compression to tame the dynamic range of your recording and enhance the overall loudness. Finally, add Reverb to create a sense of space and depth to your recording. Keep these techniques in mind while editing your audio. In conclusion, building a home studio and creating your first recording may seem daunting, but if you focus on these key steps and techniques, you can create a great sounding track. Establish your levels, practice proper recording techniques, and use basic editing techniques to create a more polished sound. Start with these basics, then continue learning and experimenting with your home studio setup.
Credit: audient.com
Optimizing Your Workflow
When building a home studio, optimizing your workflow is crucial. It allows you to work more efficiently, save time, and produce higher-quality work. Here are three ways to optimize your workflow:
File Management
Good file management is one of the most important aspects of optimizing your workflow. It allows you to quickly find the files you need and reduces the risk of losing important data. Here are some tips for organizing your files:
- Use clear and consistent naming conventions for your files.
- Create a folder structure that makes sense for your workflow.
- Keep all your files in one place, such as an external hard drive.
- Back up your files regularly to prevent data loss.
Keyboard Shortcuts
Keyboard shortcuts are another great way to optimize your workflow. They allow you to perform tasks quickly without having to stop and use the mouse. Here are some keyboard shortcuts every content writer should know:
| Action | Windows Shortcut | Mac Shortcut |
|---|---|---|
| Cut | Ctrl + X | Cmd + X |
| Copy | Ctrl + C | Cmd + C |
| Paste | Ctrl + V | Cmd + V |
| Undo | Ctrl + Z | Cmd + Z |
| Redo | Ctrl + Y | Cmd + Shift + Z |
Custom Templates
Creating custom templates is a great way to optimize your workflow. If you find yourself writing the same type of content repeatedly, you can create a template that includes all the necessary formatting, headings, and placeholders. Here are some tips for creating custom templates:
- Identify the types of content you write most frequently.
- Create a template for each type of content.
- Include all the necessary formatting, headings, and placeholders in the template.
- Save the template in a folder where you can easily access it.
Additional Tools And Techniques
If you want to take your home studio to the next level, there are a few additional tools and techniques you can use to make your recordings sound even better. In this section, we’ll cover three important areas: virtual instruments, effects and plugins, and automation.
Virtual Instruments
Virtual instruments are software-based musical instruments that can be played using a MIDI controller or your computer keyboard. They can be used to mimic the sound of real instruments, or to create unique sounds that are impossible to achieve with traditional instruments. There are many virtual instruments available, ranging from simple synthesizers to complex orchestral libraries.
If you’re just starting out, you may want to invest in a few basic virtual instruments, such as a piano or drum kit. As you become more comfortable with them, you can experiment with more advanced instruments and learn how to program them to create the sounds you want.
Effects And Plugins
Effects and plugins are software tools that can be used to process your audio recordings and add special effects to them. Some effects are used to correct problems with the audio, such as noise reduction or EQ, while others are used to add creative effects, such as reverb or distortion.
There are many different effects and plugins available, both free and paid. When choosing which ones to use, it’s important to consider the needs of your recording and the style of music you’re creating.
Automation
Automation is the process of recording changes to your mix over time. For example, you might use automation to slowly increase the volume of a track over the course of a song, or to fade out the reverb on a vocal track at a certain point.
Most DAWs (Digital Audio Workstations) have built-in automation tools that allow you to record changes to your mix in real-time. By using automation, you can add movement and dynamics to your mix, making it more interesting and engaging.
These are just a few of the additional tools and techniques you can use to build a home studio. By experimenting with different tools and techniques, you can find the ones that work best for you and create professional-quality recordings from the comfort of your own home.
Going Pro
So, you’ve decided to take your home studio to the next level and turn it into a professional one. Congratulations! Going pro means that you’ve now taken your passion and turned it into a career. However, there are a few things you’ll need to do to ensure your success. In this section, we’ll cover some key things to keep in mind as you expand your setup, market your studio, and collaborate with other artists.
Expanding Your Setup
If you’re serious about taking your home studio to the next level, it’s essential to expand your setup. This means investing in high-quality equipment and software that will allow you to create professional-grade music, videos, or other content. Here are some things to consider:
- Invest in a high-quality audio interface that can handle multiple inputs and outputs
- Upgrade your recording software to a professional-grade DAW
- Invest in high-quality microphones and headphones for recording and mixing
- Consider adding hardware effects processors like compressors, EQs, and reverbs
- Invest in studio monitors and acoustic treatment to ensure accurate monitoring
Marketing Your Studio
Marketing your studio is essential to its success. After all, you can’t have a successful business if no one knows you exist. Here are some ways to market your studio:
- Create a website that showcases your services, rates, and portfolio
- Use social media to promote your studio and engage with potential clients
- Offer free consultations or trial recording sessions to attract new clients
- Create business cards and flyers to distribute locally
- Attend local music events and conferences to network with potential clients
Collaborating With Other Artists
Collaborating with other artists can be a great way to expand your network and build your reputation. Here are some tips for successful collaborations:
- Be clear about your expectations and goals for the collaboration
- Communicate regularly and openly with your collaborators
- Be respectful of each other’s creative ideas and input
- Credit each other appropriately in the final product
- Promote each other’s work and collaborations on social media
Frequently Asked Questions For How To Build A Home Studio
How Much Will It Cost To Build A Home Studio?
The cost of building a home studio varies based on the equipment and features you require. A basic setup with a computer, audio interface, microphone, and headphones could cost around $500-$1000. However, for a more professional setup with additional equipment and soundproofing, the cost could go up to $5000 or more.
How To Build A Home Studio For Beginners?
To build a home studio for beginners, start by selecting a suitable space, investing in quality studio monitors, recording software and a microphone. You can also add acoustic treatment panels to enhance sound quality and reduce noise reflections. Finally, ensure your studio is properly set up and calibrated for optimal sound production.
Can You Build A Studio In Your House?
Yes, you can build a studio in your house. It’s a great way to have a dedicated space for your creative pursuits. However, it’s important to check local zoning laws and building codes before starting any construction. You may also need a building permit and must follow safety regulations.
What Is The Ideal Size For A Home Studio?
The ideal size for a home studio can vary depending on the type of equipment and space needed. However, it’s recommended to have a minimum space of 8 feet by 10 feet to accommodate basic equipment and allow for proper sound insulation.
The height of the room should also be at least 8 feet to reduce sound distortion.
Conclusion
Creating a home studio allows you to take control of your music production and achieve professional-sounding recordings without spending a lot of money. From selecting the right equipment to optimizing your space, building a home studio may seem like a daunting task at first.
However, with proper planning and execution, you can set up a studio that meets your unique needs and allows you to unleash your creativity. Remember to prioritize sound quality, invest in essential gear, and most importantly, have fun with the process.
Happy recording!