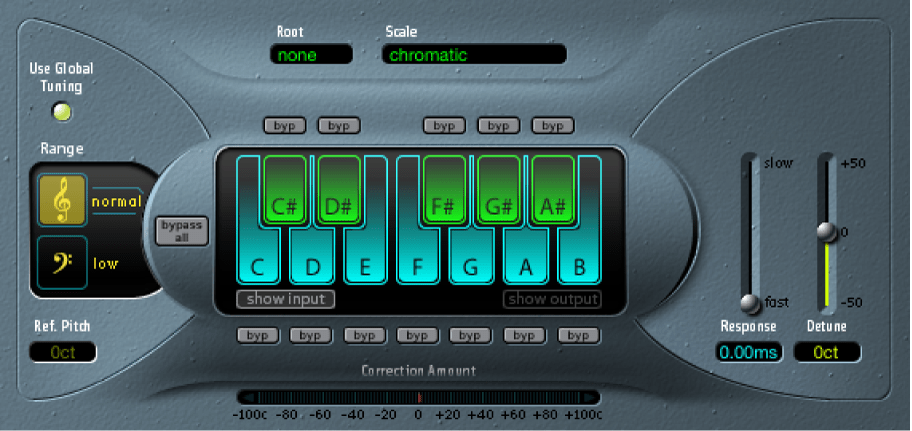
To auto-tune using Logic Pro X, select the audio track and then the Pitch Correction plugin. In the plugin, set the key and scale, adjust the retune speed, and adjust the amount of tuning.
Auto-tuning is a popular method used to correct pitch in vocals and instruments. It can also be used creatively as an effect. Logic Pro X has a built-in Pitch Correction plugin that makes it easy to auto-tune audio tracks. We’ll go through the steps to auto-tune using Logic Pro X and provide tips for getting the best results.
Whether you’re a professional producer or just starting, this guide will help you achieve the desired pitch and tone for your audio recordings.
Setting Up Your Project
Learn how to set up your project properly in Logic Pro X for autotune. Follow these step-by-step instructions to ensure a smooth and efficient process.
Creating A New Project:
In Logic Pro X, before you start auto-tuning, you need to create a new project. Once you launch Logic Pro X, go to the File menu, click New, and then select New Project. Alternatively, use the keyboard shortcut Command + N. A dialogue box will appear, where you can choose to create a project from scratch or select from one of the pre-made project templates. Select your desired option, name the project and click Create.
Choosing The Right Key And Tempo:
Before you start editing your vocals, it’s crucial to choose the right key and tempo for your project. This will ensure that your vocals blend seamlessly with the other sounds in your mix. To choose your desired key and tempo in Logic Pro X:
- In your new project, navigate to the toolbar and select the Key Signature and Project Tempo options.
- Choose the key and tempo that you want for your project.
- Hit the Return key to confirm your selections.
It is important to note that if you don’t know the key or tempo of your song, Logic Pro X can detect it for you by following the steps below:
- Go to File and select Import Audio File.
- Select the audio file that you want to import and click Open.
- Enable the Tempo Detection and Flex and Follow options and click OK.
- Logic Pro X will then detect and display the existing key and tempo information.
Following these steps will ensure that each element in your project fits harmoniously, resulting in a well-balanced and professional-sounding track.
Credit: majormixing.com
Using Auto-tune In Real-time
Learn the art of auto-tuning in real-time using the popular digital audio workstation Logic Pro X. With a simple set-up, you can enhance your vocal tracks and achieve that perfect pitch for your music project.
If you’re looking to correct pitch in real-time during a vocal recording session, auto-tuning is a popular method. Logic Pro X offers built-in auto-tuning functionality with its Flex Pitch and Pitch Correction plugins. In this article, we will focus on how to use the auto-tuning feature in real-time.
Enabling Flex Pitch
First, we need to enable Flex Pitch to make use of the real-time auto-tuning feature. To do this, follow these steps:
- Select the track you want to auto-tune
- Click on the “Track Inspector” button located on the left side of the screen
- Under the “Audio FX” section, click on the “Flex Pitch” plugin to enable it
Once you have enabled the Flex Pitch plugin, you can start using the auto-tuning feature.
Selecting The Auto-tune Effect
To select the auto-tune effect, you need to add the Pitch Correction plugin to the track. Follow these steps to do so:
- Click on the “Inserts” button located on the left side of the screen
- In the search bar, type “Pitch Correction” and select the plugin from the list of options
- The Pitch Correction plugin will be added to your track’s plugin chain
Now that you have added the Pitch Correction plugin, you can select the type of auto-tuning effect you want to apply. The plugin comes with a variety of presets that you can choose from, or you can customize the settings to your liking. By following these simple steps, you can use Logic Pro X’s auto-tuning feature in real-time during vocal recording sessions. This can save time and effort in post-production, allowing you to achieve a polished and professional sound.
Fine-tuning Your Vocals
Learn how to fine-tune your vocals using the auto-tune function in Logic Pro X. With step-by-step instructions, you can achieve pitch-perfect vocals in your recordings with ease.
After you have auto-tuned your vocals in Logic Pro X, it’s time to fine-tune them to perfection. This stage of the process involves making small adjustments to the retune speed and pitch correction for the most natural sound. Here are the steps to follow:
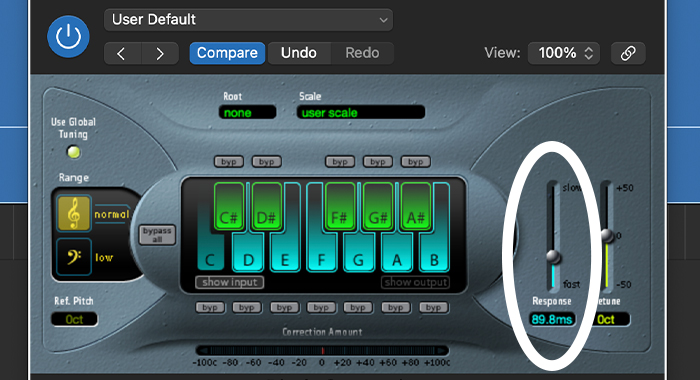
Adjusting The Retune Speed
The retune speed controls how quickly the pitch correction is applied to the vocal track. A faster speed will sound more robotic, while a slower speed will sound more natural. Here’s how to adjust the retune speed:
- Click on the “Track” header for the vocal track you want to adjust.
- Select “Flex Pitch” from the drop-down menu.
- Click on the bottom right corner of the note blob to access the note’s settings.
- Use the “Retune” slider to adjust the speed until it sounds natural.
Correcting Pitch Manually
While auto-tune can fix most pitch issues, there may be some notes that require manual correction. Here’s how to manually correct pitch in Logic Pro X:
- Select the vocal track you want to adjust.
- Click on the “Flex Pitch” button in the track header.
- Find the note you want to adjust and click on it to access its settings.
- Use the “Semitones” dial to adjust the pitch until it’s in tune.
- Use the “Formant” dial to adjust the vocal timbre if necessary.
Final Words
With these simple steps, you can fine-tune your vocals in Logic Pro X and achieve a polished and professional sound. Remember to keep the adjustments subtle and natural-sounding for the best results. With some practice, you can become a pro at auto-tuning your vocals. Happy mixing!
Credit: crumplepop.com
Advanced Techniques
Learn how to use the auto tune feature in Logic Pro X for advanced music editing. These techniques allow you to create a polished and professional sound in your recordings.
Advanced Techniques: Auto-Tune is an incredible tool that can help you achieve the perfect pitch while recording vocals. But, did you know that there are advanced techniques that you can use to take your auto-tuning to the next level? In this section, we will focus on two specific techniques: Creating harmonies with Auto-Tune and Using MIDI to control pitch. Creating harmonies with Auto-Tune: Creating harmonies with Auto-Tune is an excellent technique to add depth and texture to your vocals. To get started, you’ll need to open up the Auto-Tune plugin and create a second instance of it. Next, you’ll want to apply the Auto-Tune effect to the second track, ensuring that it’s in a different key than the first. Now, when you record your vocals on the second track, the Auto-Tune effect will create a harmony alongside your original vocals. This technique can take your recordings to another level, adding an extra dimension of sound that can really impress your listeners. Using MIDI to control pitch: Another advanced technique for auto-tuning is using MIDI to control pitch. This technique involves connecting a MIDI keyboard to your computer and setting up Logic Pro X to recognize it. Once you’ve done this, you can use the keyboard to control the pitch of your vocals in real-time. To set up this technique, open up the Auto-Tune plugin and navigate to the MIDI tab. From here, you can select which MIDI channel you want to use and adjust the settings to suit your needs. Once you’ve done this, you’ll be able to use your MIDI keyboard to control the Auto-Tune effect, allowing you to adjust the pitch of your vocals as you sing. In Conclusion: By implementing these advanced techniques into your auto-tuning process, you can take your recordings to the next level. Whether you’re looking to add depth and texture with harmonies or use MIDI to control pitch, these techniques are sure to impress your listeners and take your music to new heights. So why not give them a try today?
Mixing And Mastering With Auto-tune
Learn how to easily auto-tune your vocals using Logic Pro X. With its built-in Auto-Tune tool, you can adjust the pitch of your recordings and achieve the desired sound quality for your mixes and masters.
Mixing and Mastering with Auto-Tune is a crucial aspect of music production. It can enhance the quality of vocals and turn an average track into a hit. In order to achieve the desired sound, you need to apply the Auto-Tune plugin and master it in the right way. This article will guide you through the process of auto-tuning using Logic Pro X, and then give you a step-by-step guide for balancing the vocal mix.
Applying Auto-tune As A Plugin
The first step in using Auto-Tune is to apply it as a plugin in Logic Pro X. Here are the steps to follow:
- Open Logic Pro X and create a new project.
- Select the track you want to apply Auto-Tune to.
- Go to the “Audio FX” section on the channel strip and click on “AU plugins” to select Auto-Tune.
- Choose the type of correction you want to apply, whether it is subtle or extreme.
- Play the track and adjust the settings accordingly until you achieve the desired sound.
Balancing The Vocal Mix
After applying the Auto-Tune plugin, the next step is to balance the vocal mix. It involves managing the levels, panning, and other aspects of the vocals to ensure they integrate well with the rest of the track. Below are the steps to follow:
- Start by establishing the vocal track’s position within your mix’s frequency range.
- Next, adjust the volume levels of the vocal track so that they are consistent throughout the entire song.
- Use equalization to brighten or darken the vocal depending on the track’s overall sound.
- Consider panning the vocal track to ensure that it sits well in the stereo mix.
- Use reverb and delay to create space around the vocal track.
- Finally, use automation to control the vocal track’s levels and effects to make the audio mix stand out.
In conclusion, Auto-Tune is an essential tool for mixing and mastering your tracks. Its ability to correct pitch inaccuracies while maintaining the vocal’s natural sound makes it an invaluable asset in music production. By following the steps in this article, you can achieve perfectly refined vocals in your tracks using Logic Pro X.
Common Auto-tune Mistakes To Avoid
To achieve smooth, natural-sounding vocals with Logic Pro X’s Auto-Tune, it’s important to avoid common mistakes. Some tips are to use a lighter touch, adjust the pitch manually if necessary, pay attention to timing, and use the correct key signature.
By following these tips, you can create professional-sounding vocal tracks.
Auto-tune is a powerful tool, but it’s important to use it properly to achieve the desired effect. Since its invention, the use of auto-tune has become more prominent than ever before. While there is nothing inherently wrong with using auto-tune, it can be misused, leading to disastrous results. Here are some common mistakes to avoid when auto-tuning using Logic Pro X.
Overuse Of Auto-tune
Overuse of auto-tune is a common mistake to avoid. While auto-tune is a versatile tool that can quickly rectify minor pitch issues, it’s an issue when used to rectify poor vocal performances. Over-reliance on auto-tune can completely distort the natural sound of the voice, making it robotic and unauthentic. To avoid overusing auto-tune, go for subtlety and individuality.
Neglecting Other Vocal Processing
Another common mistake to avoid when auto-tuning using Logic Pro X is neglecting other vocal processing. It’s recommended to use other processing tools such as compression, reverb, delay, and equalization in conjunction with auto-tune on vocals to give a more defined and natural sound. When you combine the tools, it gives you a more subtle sound effect enhancing the quality of your vocal track. To avoid common mistakes when using auto-tune, it’s important to have proper planning and understanding of how to use it. Remember, auto-tune can either enhance or ruin a vocal performance, depending on how you use it. Over-reliance on the tool and neglecting other processing tools can lead to poor results. By exercising restraint and balance, you can achieve the perfect pitch-corrected sound without compromising on the natural timbre of the voice.

Credit: www.charlescleyn.com
Frequently Asked Questions For How To Auto Tune Using Logic Pro X
How Do I Auto-tune In Logic Pro X?
To Auto-Tune in Logic Pro X, first select the audio track you want to use. Then go to the “Audio Effects” and select “Pitch” and then “Pitch Correction”. Adjust the settings to your preference, including the key and scale. Finally, apply the effect to your track and you’re done.
How Do I Tune In Logic Pro X?
To tune in Logic Pro X, you can use the built-in tuner plugin or an external tuner device connected to your computer. Simply play the note you want to tune and adjust until it matches the desired pitch. Make sure to also check your tuning settings in the preferences menu and use a reference pitch if necessary.
How Do I Hear Auto-tune While Recording Logic?
To hear Auto-Tune while recording in Logic, insert the Auto-Tune plugin on the desired track and make sure the plugin is in “auto” mode. Play your instrument or sing into the microphone to hear the Auto-Tune effect in real-time during recording.
Does Logic Pro Have Pitch Correction?
Yes, Logic Pro has a built-in pitch correction tool called Flex Pitch. It allows users to easily manipulate and adjust the pitch of audio recordings.
Conclusion
Auto-tuning can transform an average vocal recording into a studio-quality track in a few clicks by using Logic Pro X. With proper understanding and application, you can enhance your vocals to the next level. Besides, the key to successful auto-tuning is to maintain just the right amount.
Logic Pro X’s Flex Pitch can significantly contribute to perfecting vocal tracks by rectifying minor inaccuracies. Overall, Logic Pro X pinpoints many different changes needed to improve an audio track, making it a game-changing tool for any producer, singer or audio enthusiast.