To mix vocals, set levels, EQ, compress, and use effects such as reverb and delay. Mixing vocals is a critical part of producing a polished and professional song.
It involves adjusting the levels of individual tracks, using EQ to remove unwanted frequencies, compressing to control dynamics, and using effects such as reverb and delay to add depth and dimension. Proper vocal mixing can make or break a recording, and it takes a certain level of skill and practice to get it right.
With some basic knowledge and experimentation, however, anyone can learn how to mix vocals effectively. We will explore the best techniques and tools for mixing vocals, whether you are working with a full band recording or a solo artist.
Credit: mastering.com
Preparing Your Mix
Achieving a well-mixed vocal recording takes patience, technique, and practice. Start by equalizing each vocal track and adjusting the levels to ensure there are no clashing frequencies. Then, apply compression to even out the dynamics and add some reverb or delay to create a cohesive sound.
Eliminate Unwanted Sounds
Before starting to mix vocals, it’s important to get rid of any unwanted sounds that might interfere with the clarity and quality of the vocals. These sounds can include anything from background noise to mouth clicks and pops. To eliminate these sounds, you can use a noise gate or a de-esser plugin. A noise gate helps to silence any sounds below a certain threshold, while a de-esser plugin specifically targets and reduces harsh sibilance sounds.
Adjust Eq
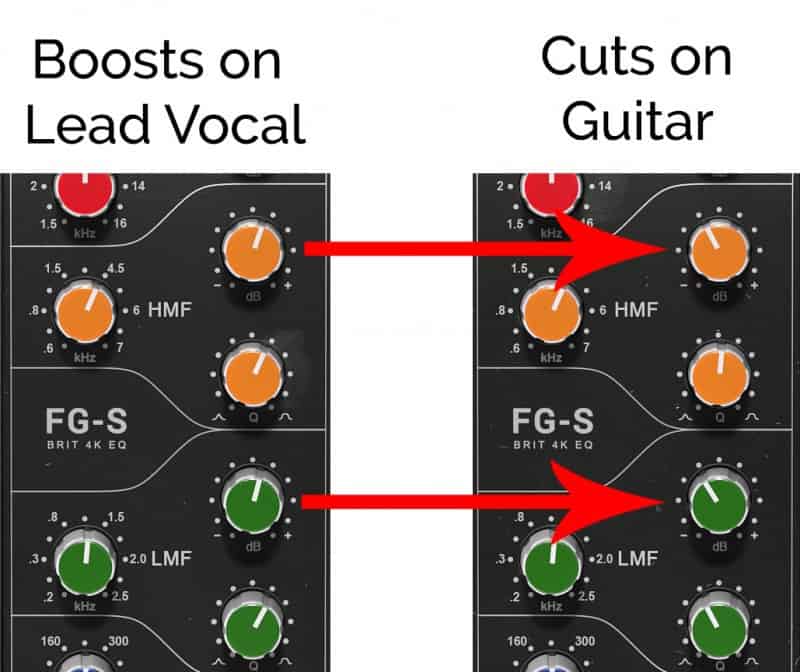
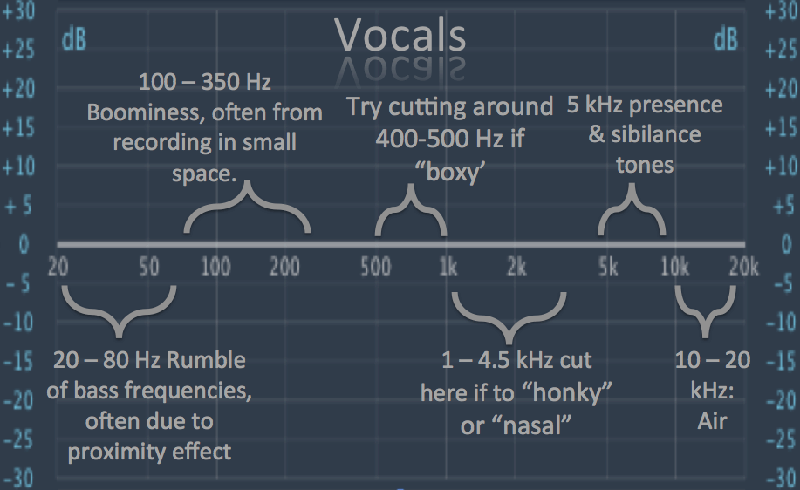
Equalization is important when mixing vocals as it helps to balance out the different frequencies of the voice. Start by using a high-pass filter to remove any low-end rumble or unwanted bass frequencies. Then, use a parametric EQ to boost or cut specific frequencies that may be either too prominent or dull in the mix. Be sure not to overdo it with EQ as it can lead to unnatural and unpleasant sounding results.
Reduce Sibilance
Sibilance refers to the harsh “s” and “sh” sounds that can occur in vocals. To reduce sibilance, use a de-esser plugin mentioned earlier. Another way to minimize sibilance is to use proper mic technique during recording. Having the singer sing slightly off-axis from the mic can help reduce sibilance and produce a smoother sound. It’s important to note, however, that completely removing sibilance can lead to a dull and lifeless vocal sound. By following these tips for preparing your mix, you can achieve a clearer and more polished vocal sound. Eliminating unwanted sounds, adjusting EQ, and reducing sibilance are essential steps in achieving a professional-sounding vocal mix.
Setting Up Your Track
Mixing vocals is an art that requires a good ear for music and technical expertise in using different tools and software. Before you get started with mixing, you need to set up your track in the right way. This includes importing vocals properly, creating different bus tracks and adjusting different levels and effects. Here is a detailed guide on how to set up your track for mixing vocals:
Import Vocals
The first step for mixing vocals is to import vocals into your DAW (Digital Audio Workstation). You can do this by dragging and dropping audio files, or by importing them directly from the menu. Make sure to select the right format, sample rate, and bit depth to ensure the best quality sound. You should also label each track properly to avoid confusion and make it easy to locate your files later on.
Create A Bus
One of the most important steps when it comes to mixing vocals is to create bus tracks. Bus tracks are used to group different elements of your mix, such as vocals and instruments, so that you can apply effects and adjustments to them all at once. The most popular way to group vocal tracks is to create a stereo bus, which will allow you to add reverb, delay, and other effects. You can do this by selecting “create bus” option from the menu and selecting the number of channels you need.
When you have created a bus, you can route all your vocal tracks to it by selecting the right input. This will allow you to control the overall level and effect of your vocals by adjusting the bus settings. You can also add compression, equalization, and other effects to the bus to enhance the overall sound quality.
By following these simple steps, you can set up your track properly and start mixing vocals like a pro. Whether you’re a beginner or an experienced sound engineer, these tips and tricks will help you to achieve the perfect mix every time.
Setting Levels
Achieving the perfect vocal mix involves setting levels. This process helps balance the volume of each vocal track in relation to the others and the instrumental track. Start by adjusting the volume of each vocal track until they blend well together.
When it comes to mixing vocals, setting the levels is crucial for achieving a balanced and professional sound. Without proper level settings, the vocals may get buried under other instruments or overpowering, causing the listener to lose interest. This section will cover how to set initial levels and adjust volume to ensure each element of the mix fits together seamlessly.
Setting Initial Levels
Before mixing vocals, it’s important to have a clear plan on how the vocals will fit in with the rest of the instrumental elements. To achieve this, it’s essential to set the initial levels of each track before making any adjustments. Here are the steps to set initial levels:
- Start by muting all tracks except for the lead vocal track to ensure you are not distracted by other elements.
- Set the fader of the lead vocal track to unity gain, which is the same level as the original recording.
- Play the vocal track and adjust the levels until they reach a comfortable and consistent volume.
Once the lead vocal track is at an appropriate level, unmute other tracks to see how they fit in with the vocals and make necessary adjustments.
Adjust Volume
After initial levels are set, adjusting the volume is the next step in mixing vocals. It’s essential to ensure that each element of the mix fits together seamlessly without masking or overpowering each other. Here are the steps to adjust the volume:
- Start by listening to the instrumental tracks, including drums, bass, keyboards, and guitar, to determine any elements that mask or overpower the vocals.
- Adjust the volume of each instrumental track to create a balance with the lead vocal track.
- Make sure the lead vocal track is still at the appropriate level and adjust its volume if necessary.
- Listen to the mix as a whole and adjust the volume of individual tracks if needed.
When adjusting the volume, it’s crucial to use your ears and not rely too much on visual cues such as meters. A mix that sounds good to your ears is more essential than one that looks good on a meter. In conclusion, setting levels is a crucial step when mixing vocals. Following the steps outlined above will help achieve a balanced and professional sound. Remember, the most important factor is to use your ears and not rely solely on visual cues. Happy mixing!
Credit: ekmixmaster.com
Panning And Stereo
To get the best mix for vocals, using panning and stereo techniques is essential. Panning helps in placing vocals in the mix while stereo creates width and depth, allowing the vocals to stand out. With the right balance, your vocals can sound clear and impactful, making your music stand out from the rest.
Pan Vocals
Panning is when you move the position of a recording in a mix from left to right. It allows you to isolate the vocals and place them in the center of your mix, while the other instruments are panned to the left or right. To pan the vocals, use the mixer panel in your recording software. Most mixers have a panning knob next to each track. You can use this to manually adjust the position of each track. It is important to keep in mind that too much panning can make your mix sound unbalanced. Avoid hard-panning the vocals too far to one side or the other.
Adding Stereo Width
In addition to panning, stereo width refers to the amount of space that a recording takes up in the stereo field. Adding stereo width to your vocals can greatly enhance the overall sound of your mix. There are several ways to add stereo width to your vocals, including using stereo widening plugins or doubling the vocal track and panning each track to opposite sides. Another option is to use a stereo reverb effect on the vocals. When using stereo effects, be sure to use them very sparingly and in moderation. Too much stereo width can make the mix sound too busy and cluttered. In conclusion, panning and adding stereo width to your vocals can take your mix to the next level. By using these techniques, you can create a more dynamic and interesting mix that highlights the vocals and brings out the full potential of your recording.
Applying Effects
To mix vocals, applying effects is crucial. EQing can help remove unwanted frequencies, while compression and reverb can add depth and character to the vocals. Experiment with different effects and settings to achieve the desired sound.
Adding effects to vocals is a crucial step in crafting an authentic and high-quality mix. While effects can enhance the sound of a vocal track, applying them correctly is crucial. Three primary effects used when mixing vocals are compression, delay, and reverb. Let’s dig into each of these effects and how to use them effectively.
Compression
Compression is essential in vocal mixing to keep the vocal from being too dynamic and out of control. Compression levels out the volume of the vocals, making them more consistent and easier to hear. Here are basic steps to apply compression to your vocal track:
- Set the ratio at 2:1 to 4:1
- Set the attack time at around 10-30ms
- Set the release time to auto or at 100-200 ms
- Adjust the threshold to where you see gain reduction of around 3-6dB
Delay
Delay is another popular effect used in vocal mixing, which adds depth and dimension to the vocal. With delay, you can create a sense of space, and it can also function as a subtle effect to fatten up the vocal. Here’s how to apply a simple vocal delay:
- Set the delay time to a musical interval or to match the song’s tempo
- Use a feedback level of between 10-30%
- Adjust the wet-to-dry ratio to taste, to make the delay more apparent or subtle
Reverb
Reverb is a popular effect used in vocal mixing to add space and dimension to the vocal. It’s essential to apply it correctly to avoid making the vocal sound too washed out or distant. Here is how to use it effectively for vocals:
- Choose a reverb plugin with a predelay control
- Set the predelay to 10-20ms to create space or to match the song’s tempo
- Select an appropriate reverb type such as plate, hall, or chamber
- Adjust the reverb decay time, size, and diffusion to taste
In conclusion, applying the right effects to your vocal track will go a long way in creating a professional mix. Compression, delay, and reverb are popular effects; however, you can experiment with others such as chorus, distortion, and phasers. Remember that it’s essential to use effects in moderation and to use your ears when applying them.

Credit: www.waves.com
Automating Your Mix
Automating your mix can be a useful technique when it comes to mixing vocals. Plugins such as EQ filters, dynamic processors, and time-based effects can do the job for you. When setting up your automation, take note of the overall volume, frequency balance, and soundstage of the vocals.
When mixing vocals, it can be a challenge to balance them with the other elements in your track. One way to achieve a more consistent sound and save time is to automate your mix. This technique involves setting specific parameters for individual tracks, like volume and effects, and then programming those changes to occur automatically throughout the song. Here are some ways to automate your mix successfully:
Automate Volume
Controlling the volume of your vocals is an essential part of mixing. You can use volume automation to create smooth transitions between different parts of the song, like verses and choruses. Start by drawing in automation points on the volume fader for each vocal track. Then, adjust each point to create the desired volume level. By automating the volume of your vocals, you can ensure they are heard clearly and consistently throughout the track.
Automate Effects
Effects like delay, reverb, and compression can enhance the sound of your vocals and make them stand out in the mix. Automating these effects allows you to add variation and interest to your vocals without having to adjust them manually. For example, you could automate the reverb on a vocal track to increase in the chorus, creating a more spacious sound. To automate effects, you will need to use a plugin that has automation capabilities or use the built-in automation features of your DAW.
Conclusion
Automating your mix can save you time and help you achieve a more consistent and professional sound. By automating the volume and effects of your vocals, you can create smooth transitions and add variation to your mix without having to adjust them manually throughout the song. Experiment with different automation techniques to find the perfect balance for your vocals and make your mix stand out.
Frequently Asked Questions For How Can I Mix Vocals
What Is The Best Way To Mix Vocals?
The best way to mix vocals is to ensure each vocal track is clear and balanced in terms of volume, tone, and effects. Use compression, EQ, and reverb to enhance the vocals and avoid clashing frequencies. Make sure the vocals sit well within the mix without overpowering other elements.
Finally, monitor the mix on different speakers to ensure it sounds good on a range of systems.
In What Order Do You Mix Vocals?
Mixing vocals typically follows these steps: First, focus on the lead vocal and balance it with the instrumental mix. Second, address the harmonies and background vocals. Third, use equalization to adjust the frequencies. Fourth, add time-based effects like reverb and delay.
Finally, adjust the volume and overall level.
How Do You Edit And Mix Vocals?
To edit and mix vocals, you should start by cleaning up recordings for background noise and breathe sounds. Then, use EQ to balance frequencies and adjust levels to create a smooth sound. Compression, reverb, and delay can also enhance the vocals.
Finally, adjust the stereo image and volume levels to match the song.
How Do You Send Vocals To Be Mixed?
To send vocals to be mixed, you can either send the raw audio file or export the vocals as individual stems. Make sure to label and organize the files properly, and communicate any specific mixing requests to the audio engineer.
You can use cloud storage or file-sharing platforms to send the files securely.
Conclusion
To sum up, mixing vocals is all about balance and experimentation. It requires a deep understanding of how to enhance the singer’s performance and make their voice stand out in the mix. Remember to use EQ, compression, reverb, and other effects in moderation to avoid over-processing the vocal track.
Keep a clear objective in mind, trust your ears, and don’t be afraid to try new techniques. With practice and patience, you can achieve professional-sounding vocal mixes that elevate your music production to the next level.