Gain staging in Presonus Studio One is essential to balancing the levels in your DAW. Ensure all your tracks are set to peak at around -18dBFS to prevent overloading and clipping.
Presonus Studio One is a powerful digital audio workstation with a comprehensive set of tools for music production. Gain staging is critical in Studio One, as it allows you to balance the levels of your tracks for optimal sound quality.
The process involves adjusting the input and output levels of your tracks to ensure that the sound remains clear and free of distortion, clipping, and overloading. Gain staging in Studio One is a straightforward process, and by following a few simple steps, you can achieve a well-balanced mix that sounds professional and polished. We’ll explore how to gain stage in Presonus Studio One and offer some tips and tricks to get the most out of your DAW.
Setting Up Your Gain Staging In Presonus Studio One
Gain staging is an essential task that ensures optimum sound quality in Presonus Studio One. With the right gain structure, you can prevent distortion, minimize noise, and achieve pristine recordings. Follow these easy steps to set up your gain staging in Presonus Studio One.
Setting up your gain staging in Presonus Studio One is an important aspect of recording, mixing, and mastering audio. Gain staging refers to the process of properly setting the gain levels at each stage of the audio signal flow. In this blog post, we will guide you on how to configure your audio interface, choose the right input channels, and set input levels in Presonus Studio One.
Configuring Your Audio Interface
Before you start working on your audio recordings, it’s important to ensure that your audio interface is properly configured. To configure your audio interface in Presonus Studio One, follow these simple steps:
- Go to Studio One -> Options -> Audio Setup to access your Audio Device settings.
- Ensure that your audio interface is selected as your Audio Device.
- Choose the appropriate sample rate and buffer size for your project.
- Once you have configured your audio interface, you can move on to setting up your input channels.
Choosing The Right Input Channels
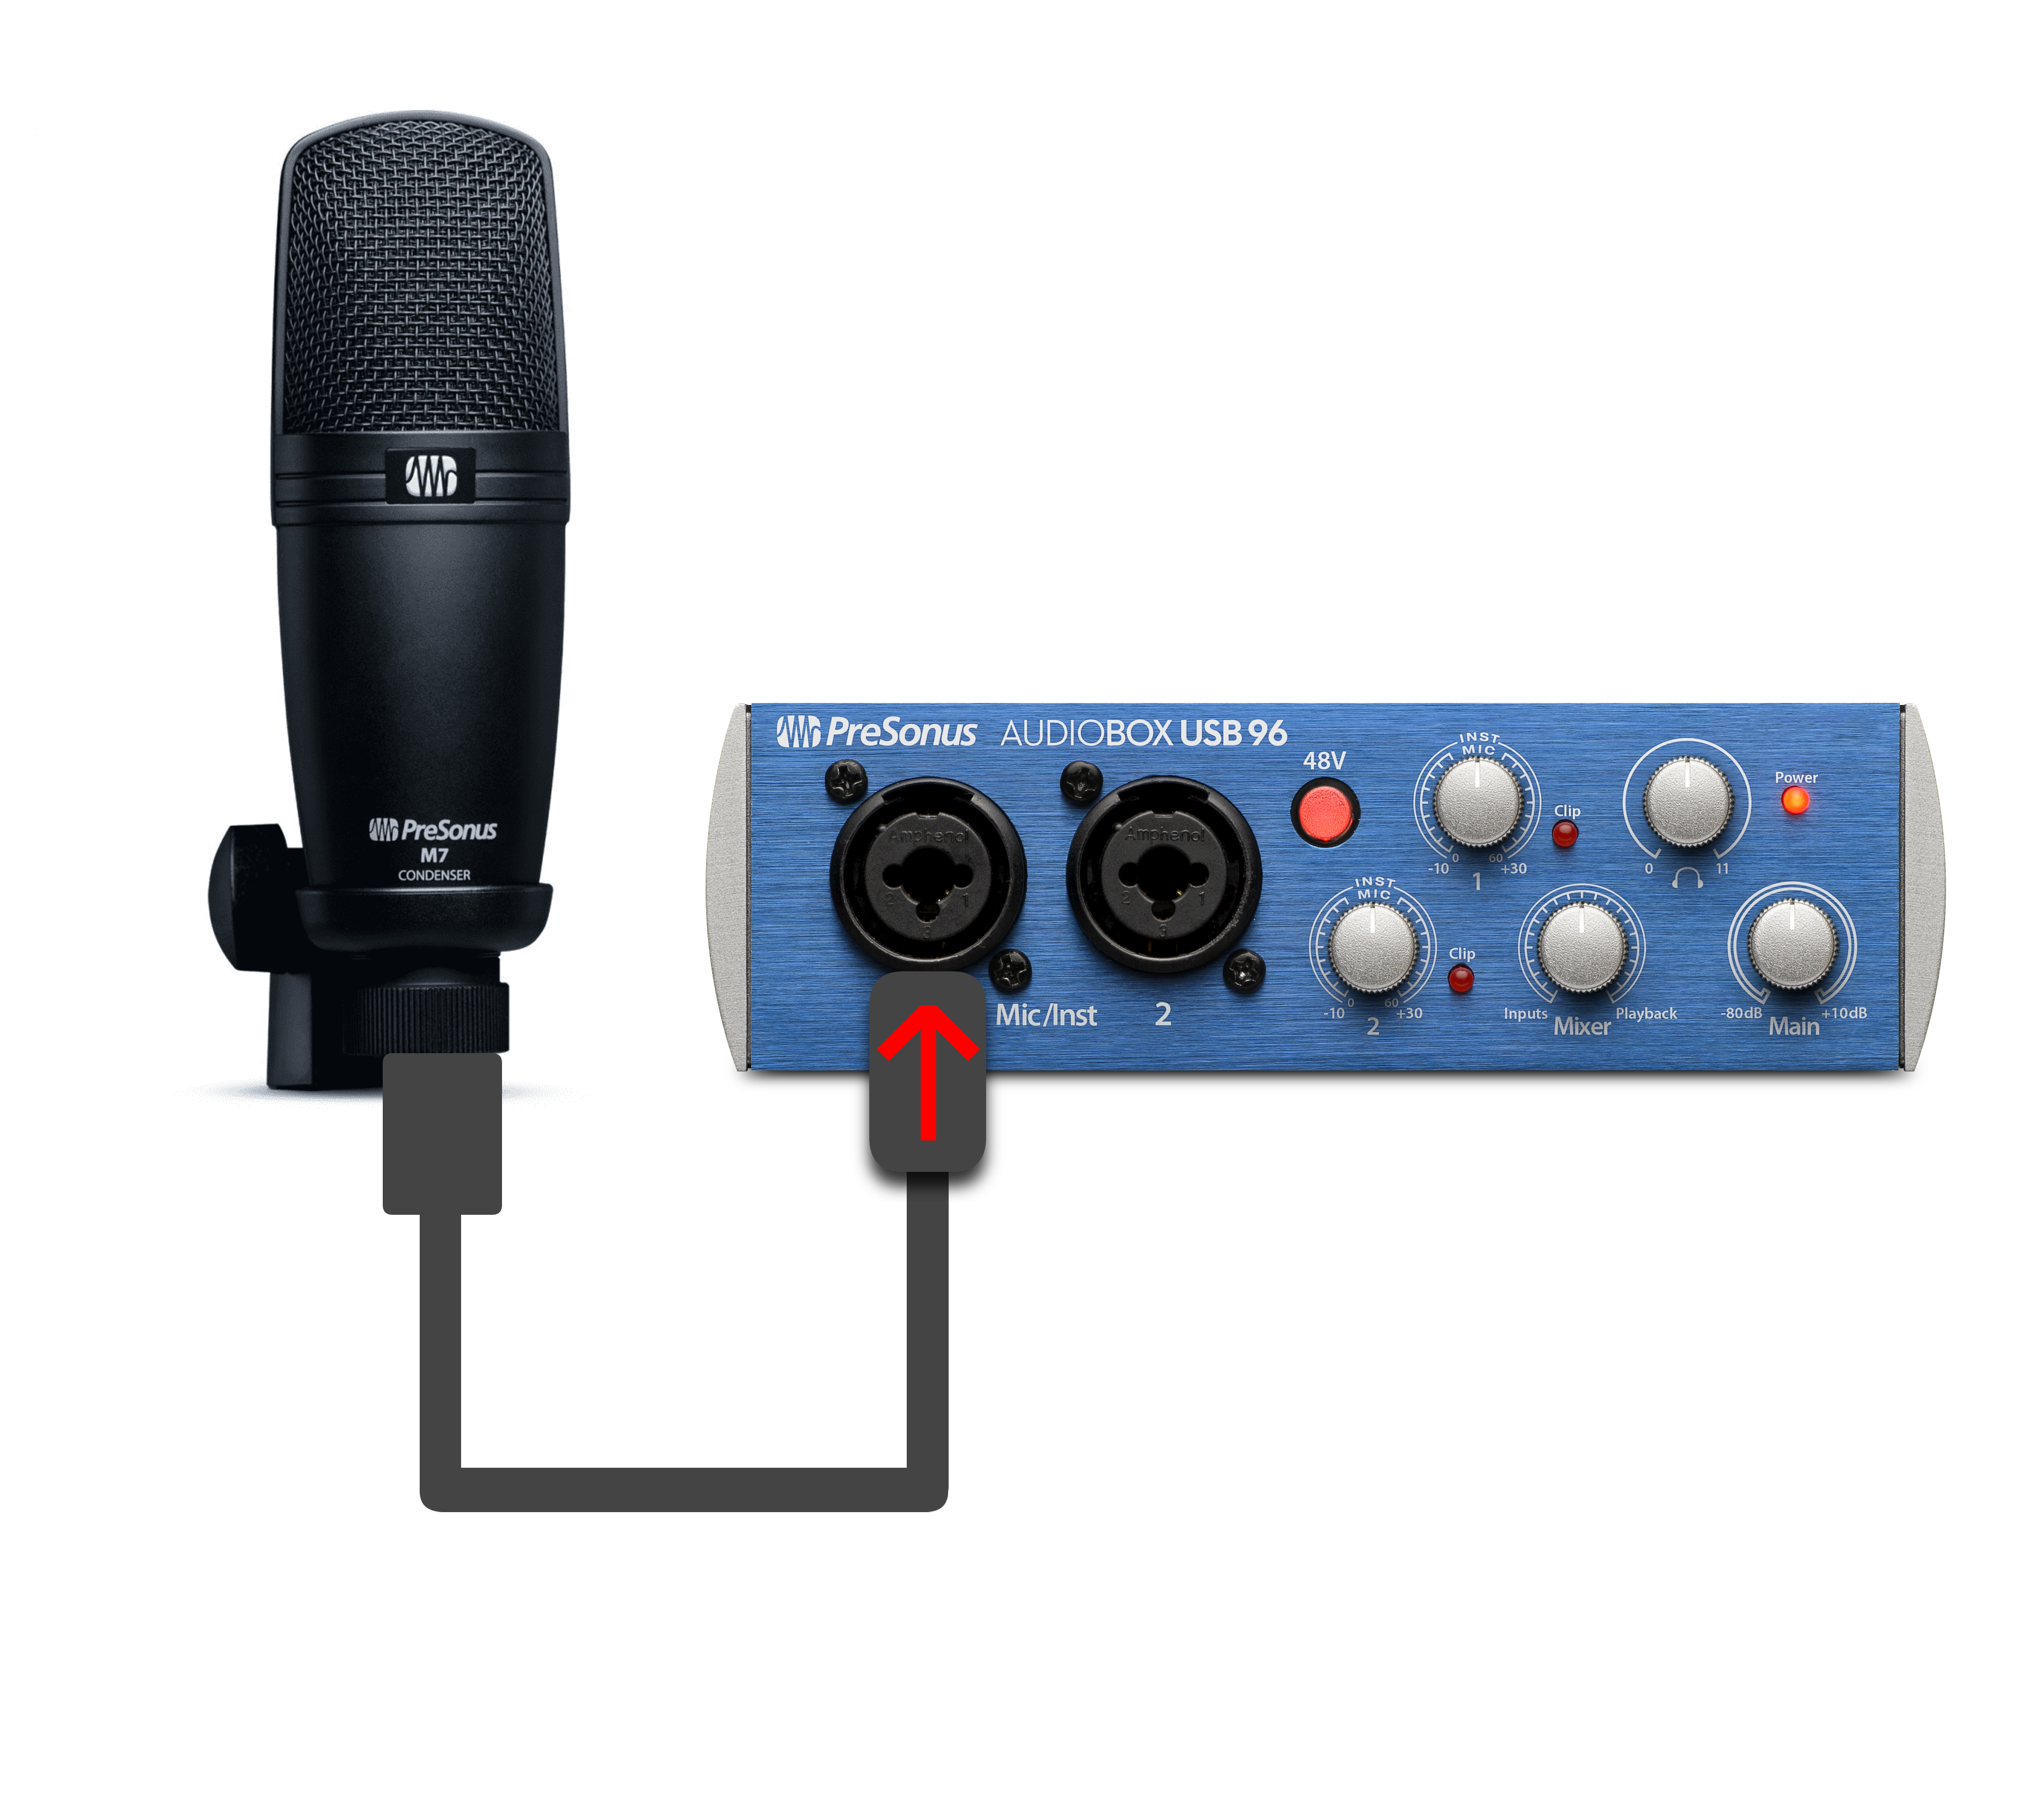
Choosing the right input channels is crucial to the success of your recording project. In Presonus Studio One, you can choose to record from a wide variety of input sources, including microphones, instruments, and line-level sources. To choose the right input channels in Presonus Studio One, follow these steps:
- Open your Studio One session and create a new track.
- Go to the top of the screen and click on the drop-down box labeled Input.
- Select the appropriate input channel for your recording source.
- Make sure that your input channels are properly connected to your audio interface.
Setting Input Levels
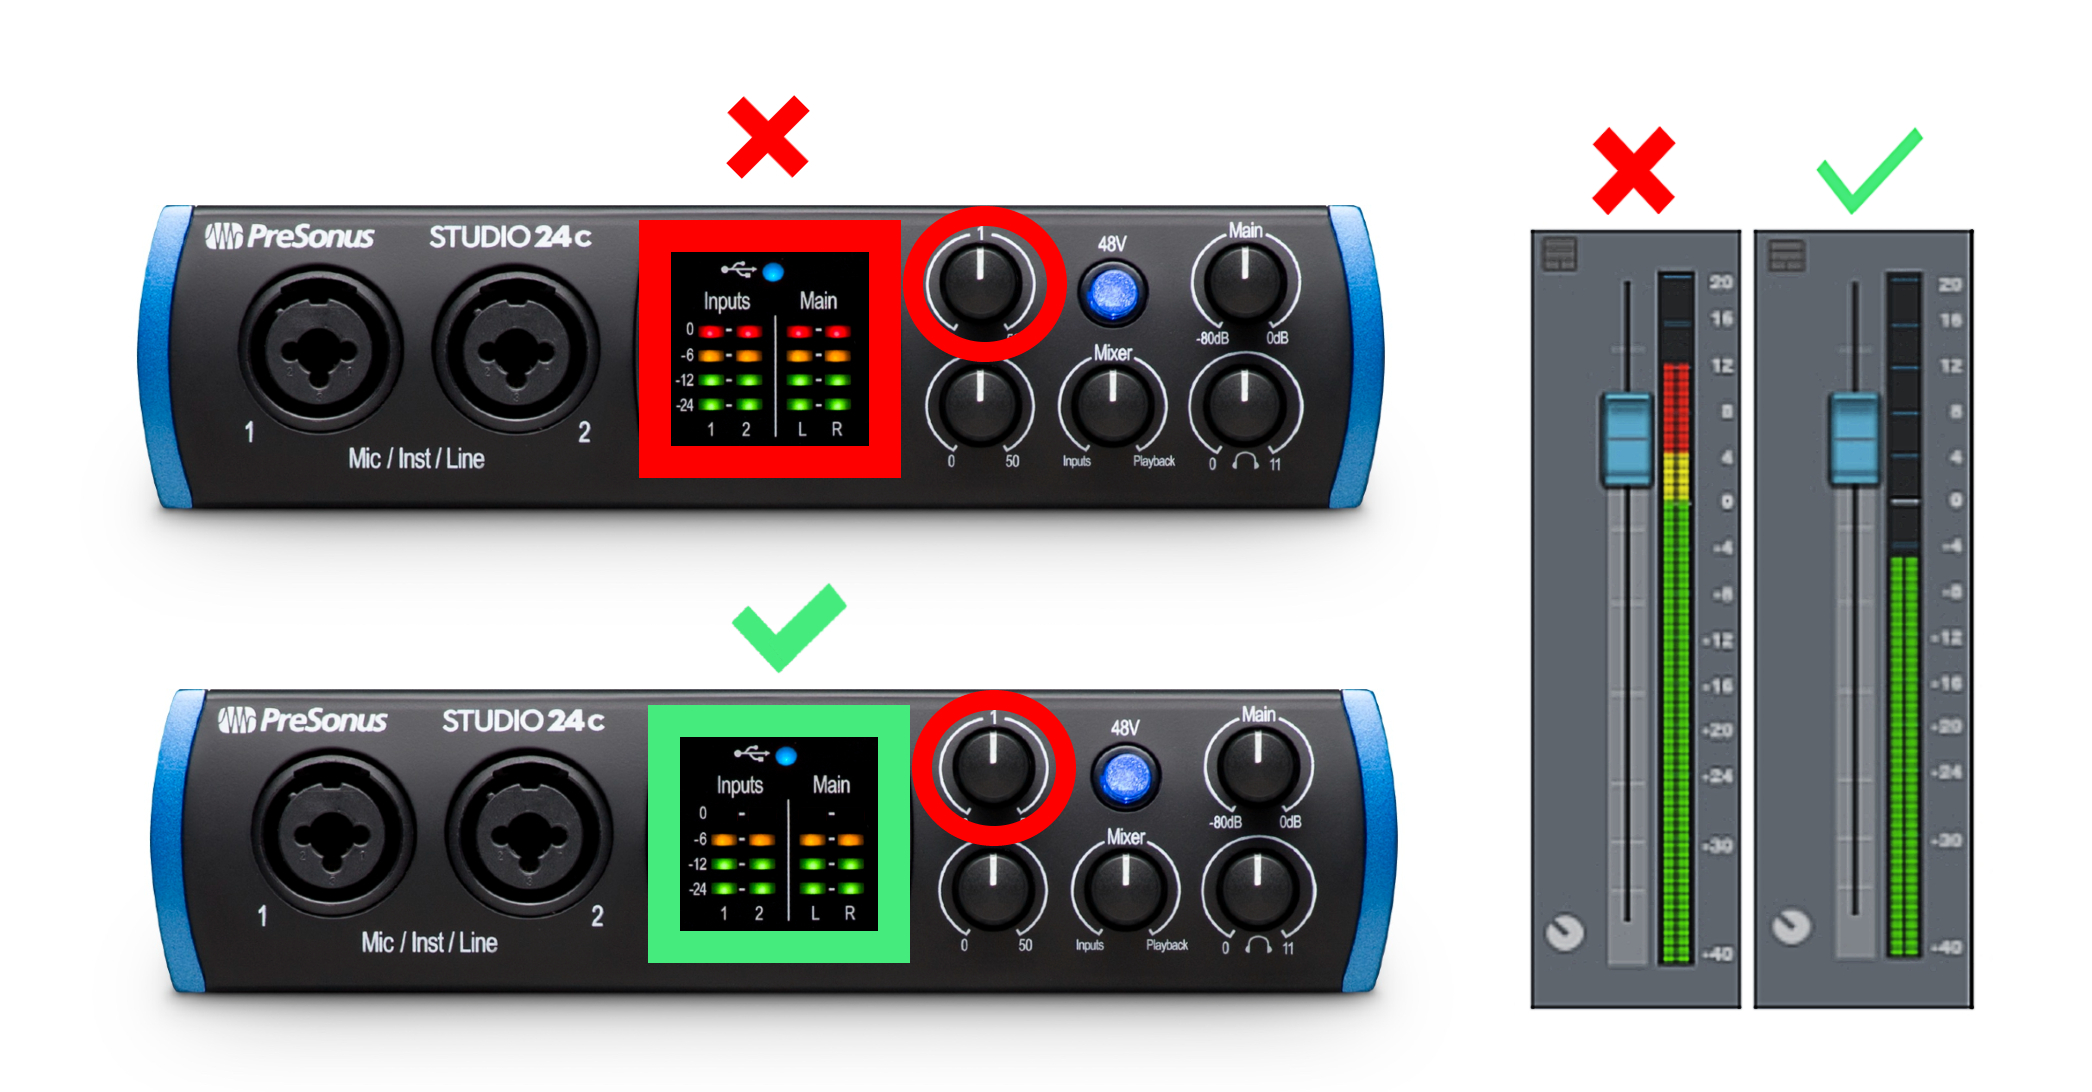
The next step in the gain staging process is to set your input levels. Input levels refer to the amount of gain that is applied to the audio signal from the input source. In Presonus Studio One, you can easily set your input levels by following these steps:
- Select your track by clicking on it.
- Locate your Input Gain knob in the mixer section of your screen.
- Adjust the input gain knob until your input levels are within the recommended range, typically between -12 dB and -6 dB.
- Use the Clip Gain feature to make minor level adjustments before the signal reaches any plugins or effects.
In conclusion, setting up your gain staging in Presonus Studio One is a crucial step in the recording, mixing, and mastering process. By properly configuring your audio interface, choosing the right input channels, and setting your input levels, you can achieve optimal gain staging and ensure the best possible sound quality for your project.
Credit: www.youtube.com
Adjusting Levels With Plugins
Setting the Gain Staging in Presonus Studio One is crucial when adjusting levels with plugins. By using the plugin chain and correctly gain staging each plugin, you’ll optimize the sound quality of your mix.
Adjusting Levels with Plugins is one of the most critical aspects of producing high-quality audio content. In Presonus Studio One, one of the most efficient ways of adjusting levels accurately is through the use of plugins. While there are different types of plugins available in the software, three of the most commonly used are compressors, limiters, and equalizers.
Compressors
Compressors are plugins that aid in controlling dynamic ranges. Dynamic range refers to the difference between the loudest and softest parts of an audio track. A compressor accomplishes this by decreasing the volume of the loudest parts while increasing the softest parts. By doing this, the audio track’s dynamic range is compressed, resulting in a more consistent sound. This consistency is desirable for most types of audio content and can improve the overall mix.
Limiter
A limiter is similar to a compressor. However, its primary function is to control peak levels rather than dynamic range. When an audio track’s peaks go above a certain threshold, a limiter is used to prevent the volume from going too high. This ensures that the audio remains clear and consistent, and that distortion or clipping does not occur.
Equalizers
Equalizers are plugins that come in handy when trying to improve the tonal quality of an audio track. They aid in adjusting the levels of different frequency bands, enabling you to boost or cut certain frequencies to balance or enhance the audio. For instance, cutting out the low frequencies can eliminate rumble and muddiness, or increasing the mid frequencies of a vocal track can add clarity and warmth. Equalizers come in varying types, such as graphic, parametric, and shelving. Understanding these different types can help you select the most appropriate equalizer for your audio track. In summary, understanding plugins, such as compressors, limiters, and equalizers, enables you to make precise and accurate adjustments to audio tracks. By gaining an in-depth knowledge of these plugins, you can maximize their potential in Presonus Studio One and create audio that is rich, clear, and of excellent quality.
Using Volume Automation In Presonus Studio One
Gain staging in Presonus Studio One can be achieved with volume automation, a powerful tool that allows you to control the volume of individual tracks or entire mixes. By setting the right levels, you can avoid distortion and achieve a well-balanced sound.
When it comes to mixing music, gain staging is a critical aspect that every audio engineer should understand. Having proper gain staging ensures that each track in your mix sounds clear and crisp, without any unwanted distortion or noise. In Presonus Studio One, you can use volume automation to adjust the levels of your tracks, allowing you to achieve smoother transitions between parts of your song. Below, we’ll look at the three volume automation modes in Presonus Studio One: Draw Mode, Latch Mode, and Touch Mode.
Draw Mode
In Draw Mode, you can manually draw volume curves on your track’s automation lane. This mode is handy for making precise volume adjustments over time. You can access Draw Mode by clicking the Draw Mode button at the top of your Studio One window. Once you’re in Draw Mode, you can choose from a range of drawing tools to create the exact curves you need. Using Draw Mode, you can create completely custom volume adjustments that may not be possible with the other two modes.
Latch Mode
Latch Mode is an automation mode that lets you record volume adjustments directly into your track’s automation lane. In this mode, when you press the volume fader on your mixer, the automation lane will start recording the changes you make. Once you release the fader, the changes will stop recording, and the automation lane will keep the recorded adjustments. Using Latch Mode allows you to create dynamic volume changes in real-time, and it’s particularly useful for creating dynamic swells and fades.
Touch Mode
Touch Mode is a mode that starts recording volume adjustments when you touch a fader or knob on your controller and stops recording when you release it. Unlike Latch Mode, which keeps the recorded adjustments, Touch Mode only applies the recorded changes when you’re actually touching the controller. In other words, if you release the controller before the end of a segment, the automation lane will revert to its previous level. Touch Mode is particularly useful when you need to make subtle adjustments to your track’s volume, such as during a vocal performance. In conclusion, using volume automation in Presonus Studio One is an excellent way to achieve smoother transitions and more dynamic mixes. By understanding the three automation modes – Draw Mode, Latch Mode, and Touch Mode – and using them appropriately, you can create professional-sounding mixes that truly stand out.
Credit: support.presonus.com
Tips And Tricks For Gain Staging In Presonus Studio One
Learn how to properly set gain levels in Presonus Studio One with these easy-to-follow tips and tricks. From understanding the importance of headroom to using the clip gain tool, this guide will help you achieve optimal sound quality in your recordings.
If you are looking for a high-quality sound output, then gain staging is a step you cannot afford to skip. Presonus Studio One is a fantastic digital audio workstation (DAW) that can help you gain stage your project to perfection. In this blog post, we will discuss tips and tricks for gain staging in Presonus Studio One, including using reference tracks, using low cut filters, and avoiding digital clipping.
Using Reference Tracks
Reference tracks are an excellent tool to help guide your gain staging process. To use reference tracks in Presonus Studio One, follow these steps:
- Choose a reference track that has a similar sound to the project you are working on.
- Import the reference track into your Presonus Studio One project.
- Adjust the reference track’s volume so that it matches the volume of your project’s mix.
- Listen to how the reference track’s levels sound and compare them to your mix.
- Make adjustments to your mix to match the reference track’s levels.
- Continue to adjust and compare until you are satisfied that your mix matches the reference track.
Using reference tracks will give you an additional tool to help you achieve the desired results in your gain staging.
Using Low Cut Filters
Low cut filters are an essential tool for gaining stage your mixes with Presonus Studio One. They work by removing frequencies below a specified threshold, allowing you to clean up your mix and remove any unwanted sounds. To use low cut filters in Presonus Studio One, follow these steps:
- Select the track you want to apply the low cut filter to.
- Open the inserts section of the track.
- Select the EQ plugin from the list of available plugins.
- Select the low cut filter option.
- Choose the frequency you want to cut from the list of available frequencies.
- Adjust the filter to taste, carefully monitoring the sound to avoid removing too much of the desired frequencies.
Using low cut filters is an excellent way of removing unwanted sounds and ensuring your mix is clean and well balanced.
Avoiding Digital Clipping
Digital clipping can occur when your mix is too loud, and your system cannot handle the volume. To avoid digital clipping in Presonus Studio One, follow these tips:
- Use gain staging to ensure that your mix’s overall volume is not too high.
- Use volume envelopes to avoid sudden changes in volume.
- Use limiters to avoid any sudden spikes in volume.
- Export your mix at a lower volume to give your listeners the best experience and avoid digital clipping.
Avoiding digital clipping will help ensure that your mix sounds fantastic and is free from any unwelcome noise. In conclusion, gain staging is an important step in the music production process, and Presonus Studio One is a powerful tool to help achieve it. Remember, using reference tracks, low cut filters, and careful volume management can make a significant difference in the quality and clarity of your mix.
Credit: support.presonus.com
Frequently Asked Questions For Gain Staging Presonus Studio One
What Is The Best Level For Gain Staging?
The best level for gain staging is between -18dB and -12dB. This allows enough headroom for additional processing and prevents clipping. It also ensures a clear and consistent signal throughout the mixing process.
Is Gain Staging Necessary?
Gain staging is necessary in music production to achieve optimal sound quality and prevent distortion. By properly setting the levels of each instrument and track, you can maintain a balanced mix and improve the overall clarity and detail of your music.
Is Gain Staging The Same As Mixing?
No, gain staging is not the same as mixing. Gain staging refers to setting the appropriate levels of audio signals to minimize distortion and noise. Mixing, on the other hand, involves adjusting the volume, panning, and EQ of individual tracks to create a balanced and cohesive final mix.
What Is Gain Staging For Audio Recording?
Gain staging for audio recording is the process of adjusting the levels of each individual audio signal in a recording chain to ensure that they remain at a consistent and appropriate level throughout the recording process. This helps to prevent clipping and distortion while improving the final sound quality of the recording.
Conclusion
Proper gain staging is essential in achieving high-quality sound recordings. Presonus Studio One makes it easy to adjust the input, output, and track levels to ensure minimal distortion and optimal signal-to-noise ratio. As you work through your recording and mixing process, keep in mind the importance of gain staging and how it can impact the final product.
With the tools and techniques provided by Studio One, you have everything you need to create professional-grade recordings and take your music to the next level.