EQ frequency guide provides information on the frequency range of different instruments and vocal ranges for equalization. In this guide, you can find the frequency range for different instruments, such as drums, guitar, bass, piano, and vocals, along with a brief explanation on how to adjust the EQ for each instrument or range.
Below are some additional details on what you can expect to learn from an EQ frequency guide. An EQ frequency guide is an essential tool for musicians, sound engineers, and producers. Understanding how to identify and adjust the various frequencies in a mix can make a significant difference in the overall sound quality.
With an EQ frequency guide, you can learn how to remove unwanted frequencies, enhance the desired ones, and add clarity to a mix. We will explore the significance of an EQ frequency guide, how to use it effectively, and why it is essential to have one in your arsenal as a music professional.
Credit: mastering.com
What Is Eq Frequency?
EQ frequency refers to equalization, a process used to adjust sound by increasing or decreasing specific frequencies. An EQ frequency guide can help you understand what frequencies to adjust for different instruments or vocals, resulting in a better mix and overall sound quality.
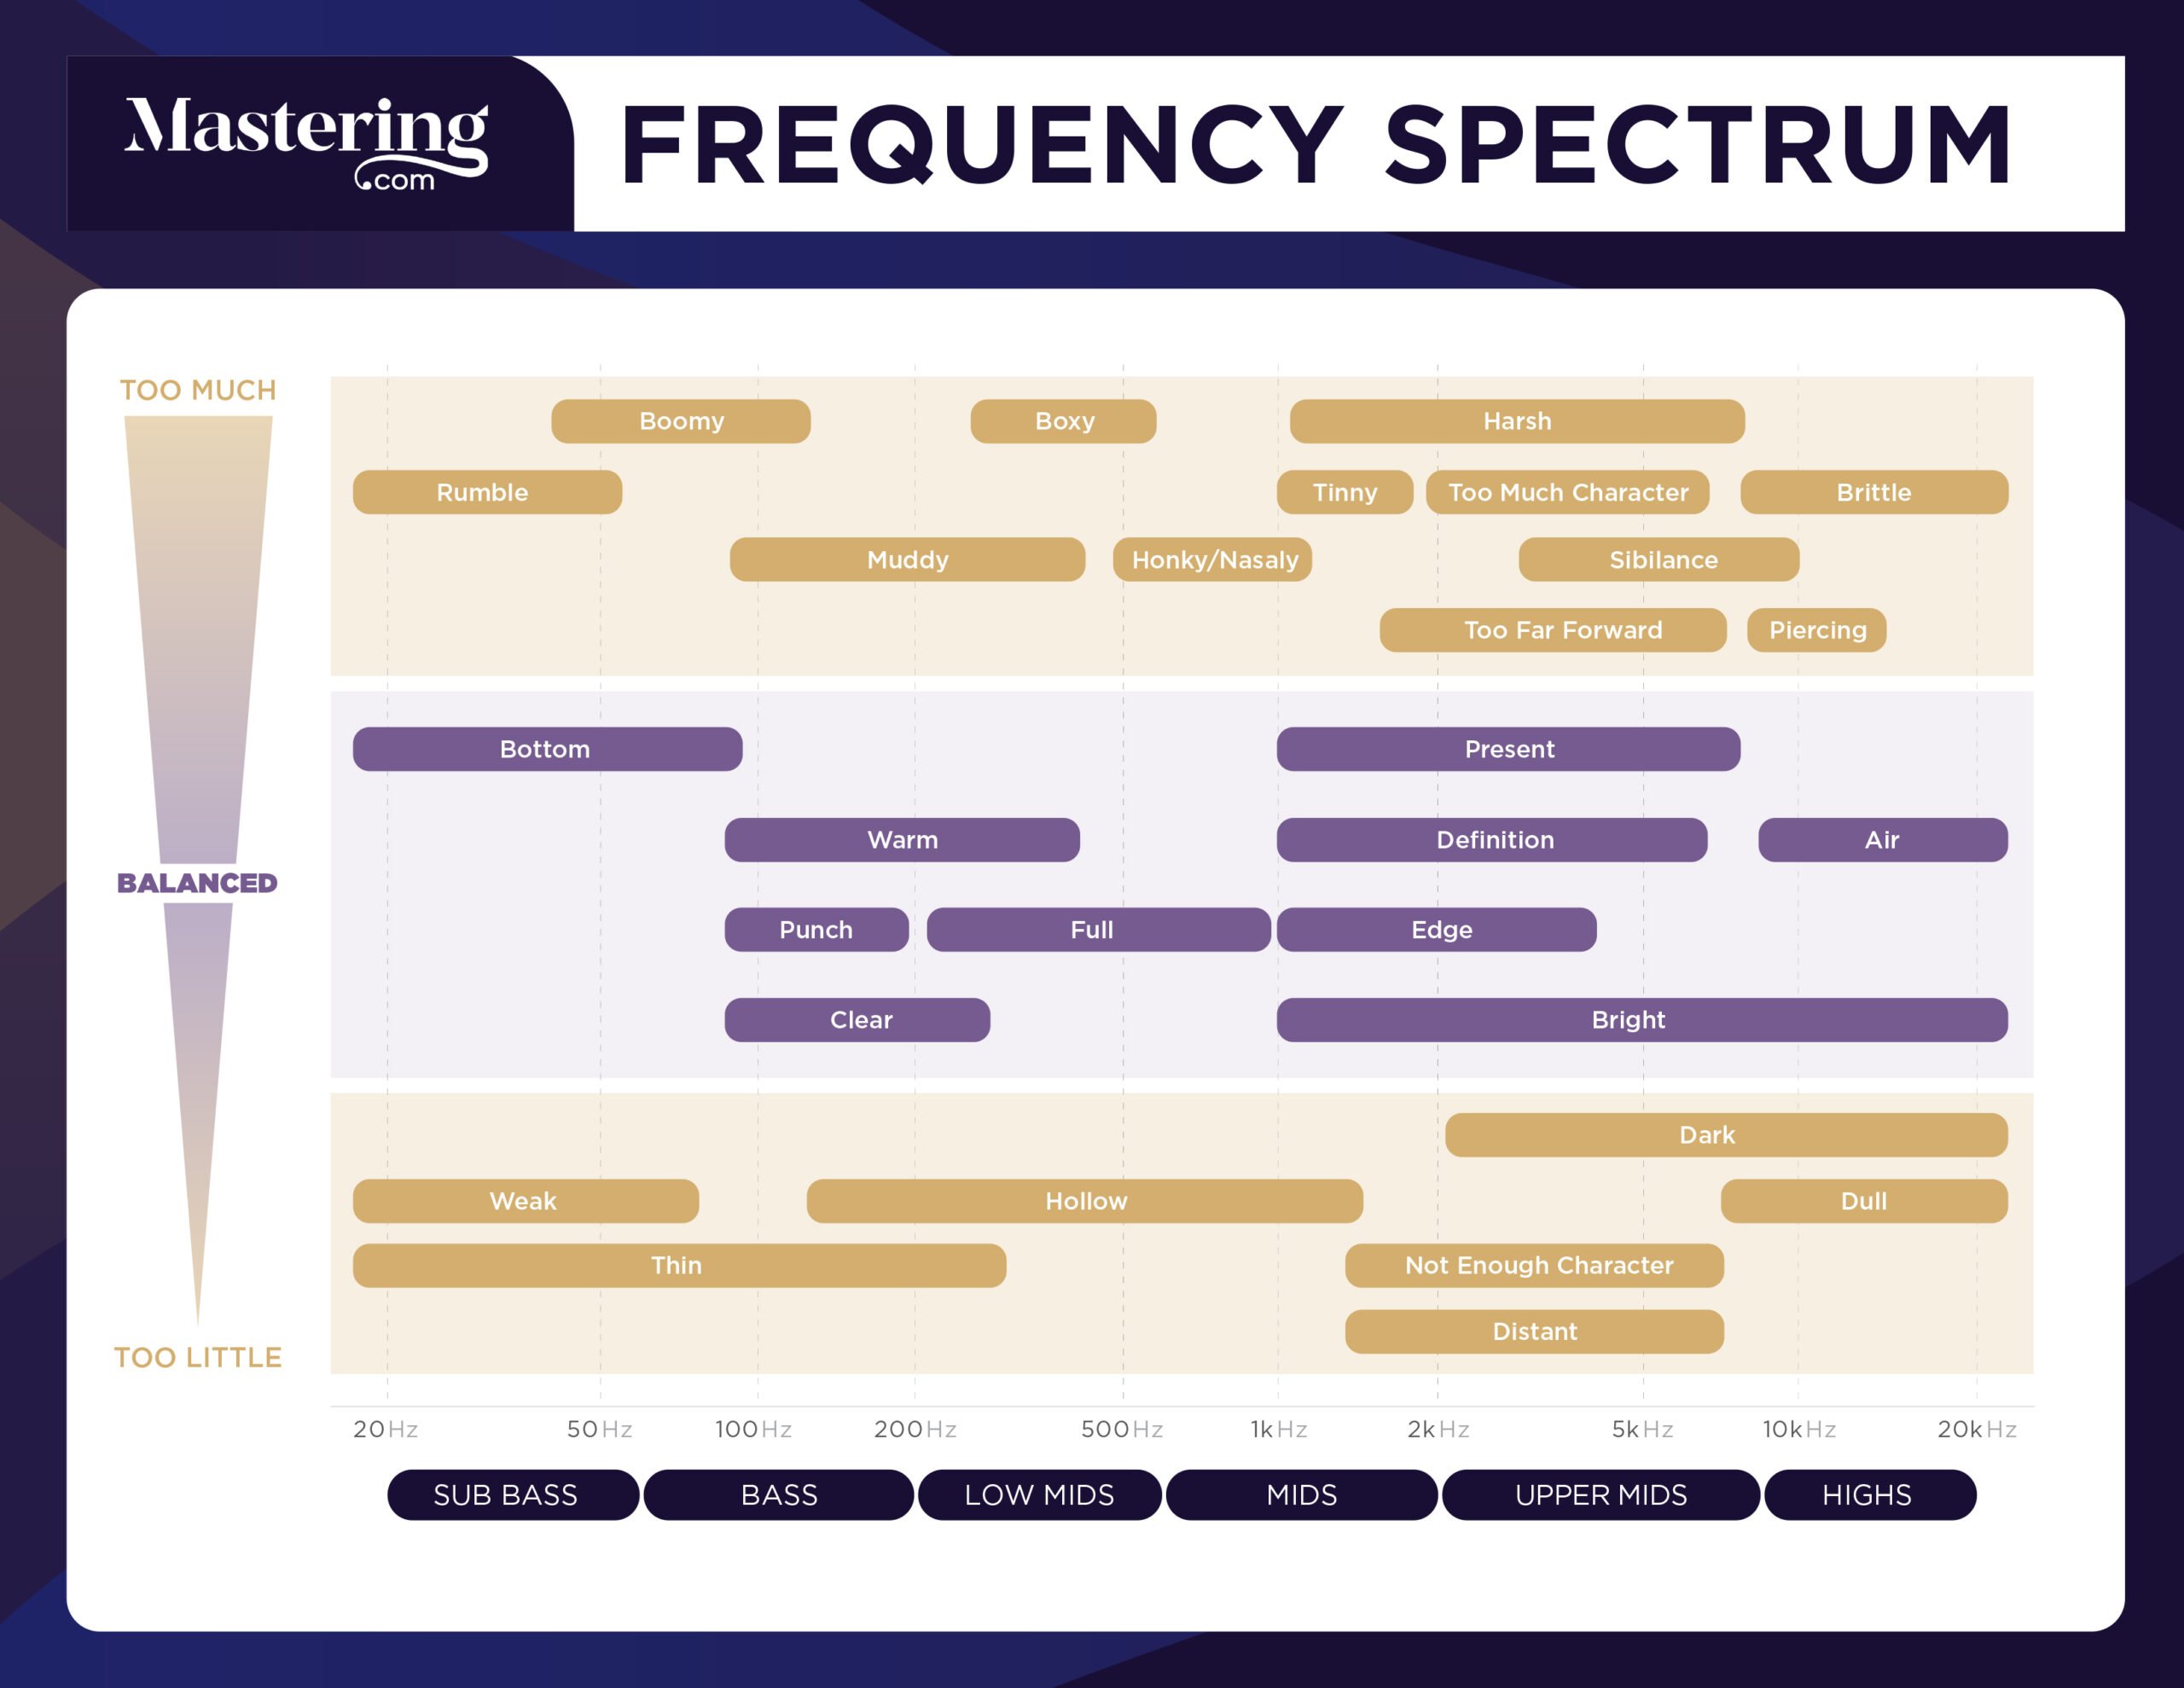
Frequency Spectrum Basics
The frequency spectrum refers to the range of frequencies that an instrument can produce. It is typically measured in hertz (Hz), which is a unit of frequency that indicates the number of cycles per second. The human ear can detect sounds that range from 20 Hz to 20 kHz, while certain animals can detect sounds beyond this range. Understanding the frequency spectrum is important when it comes to audio production, as different instruments and sounds will produce different frequencies.
Defining Eq Frequency
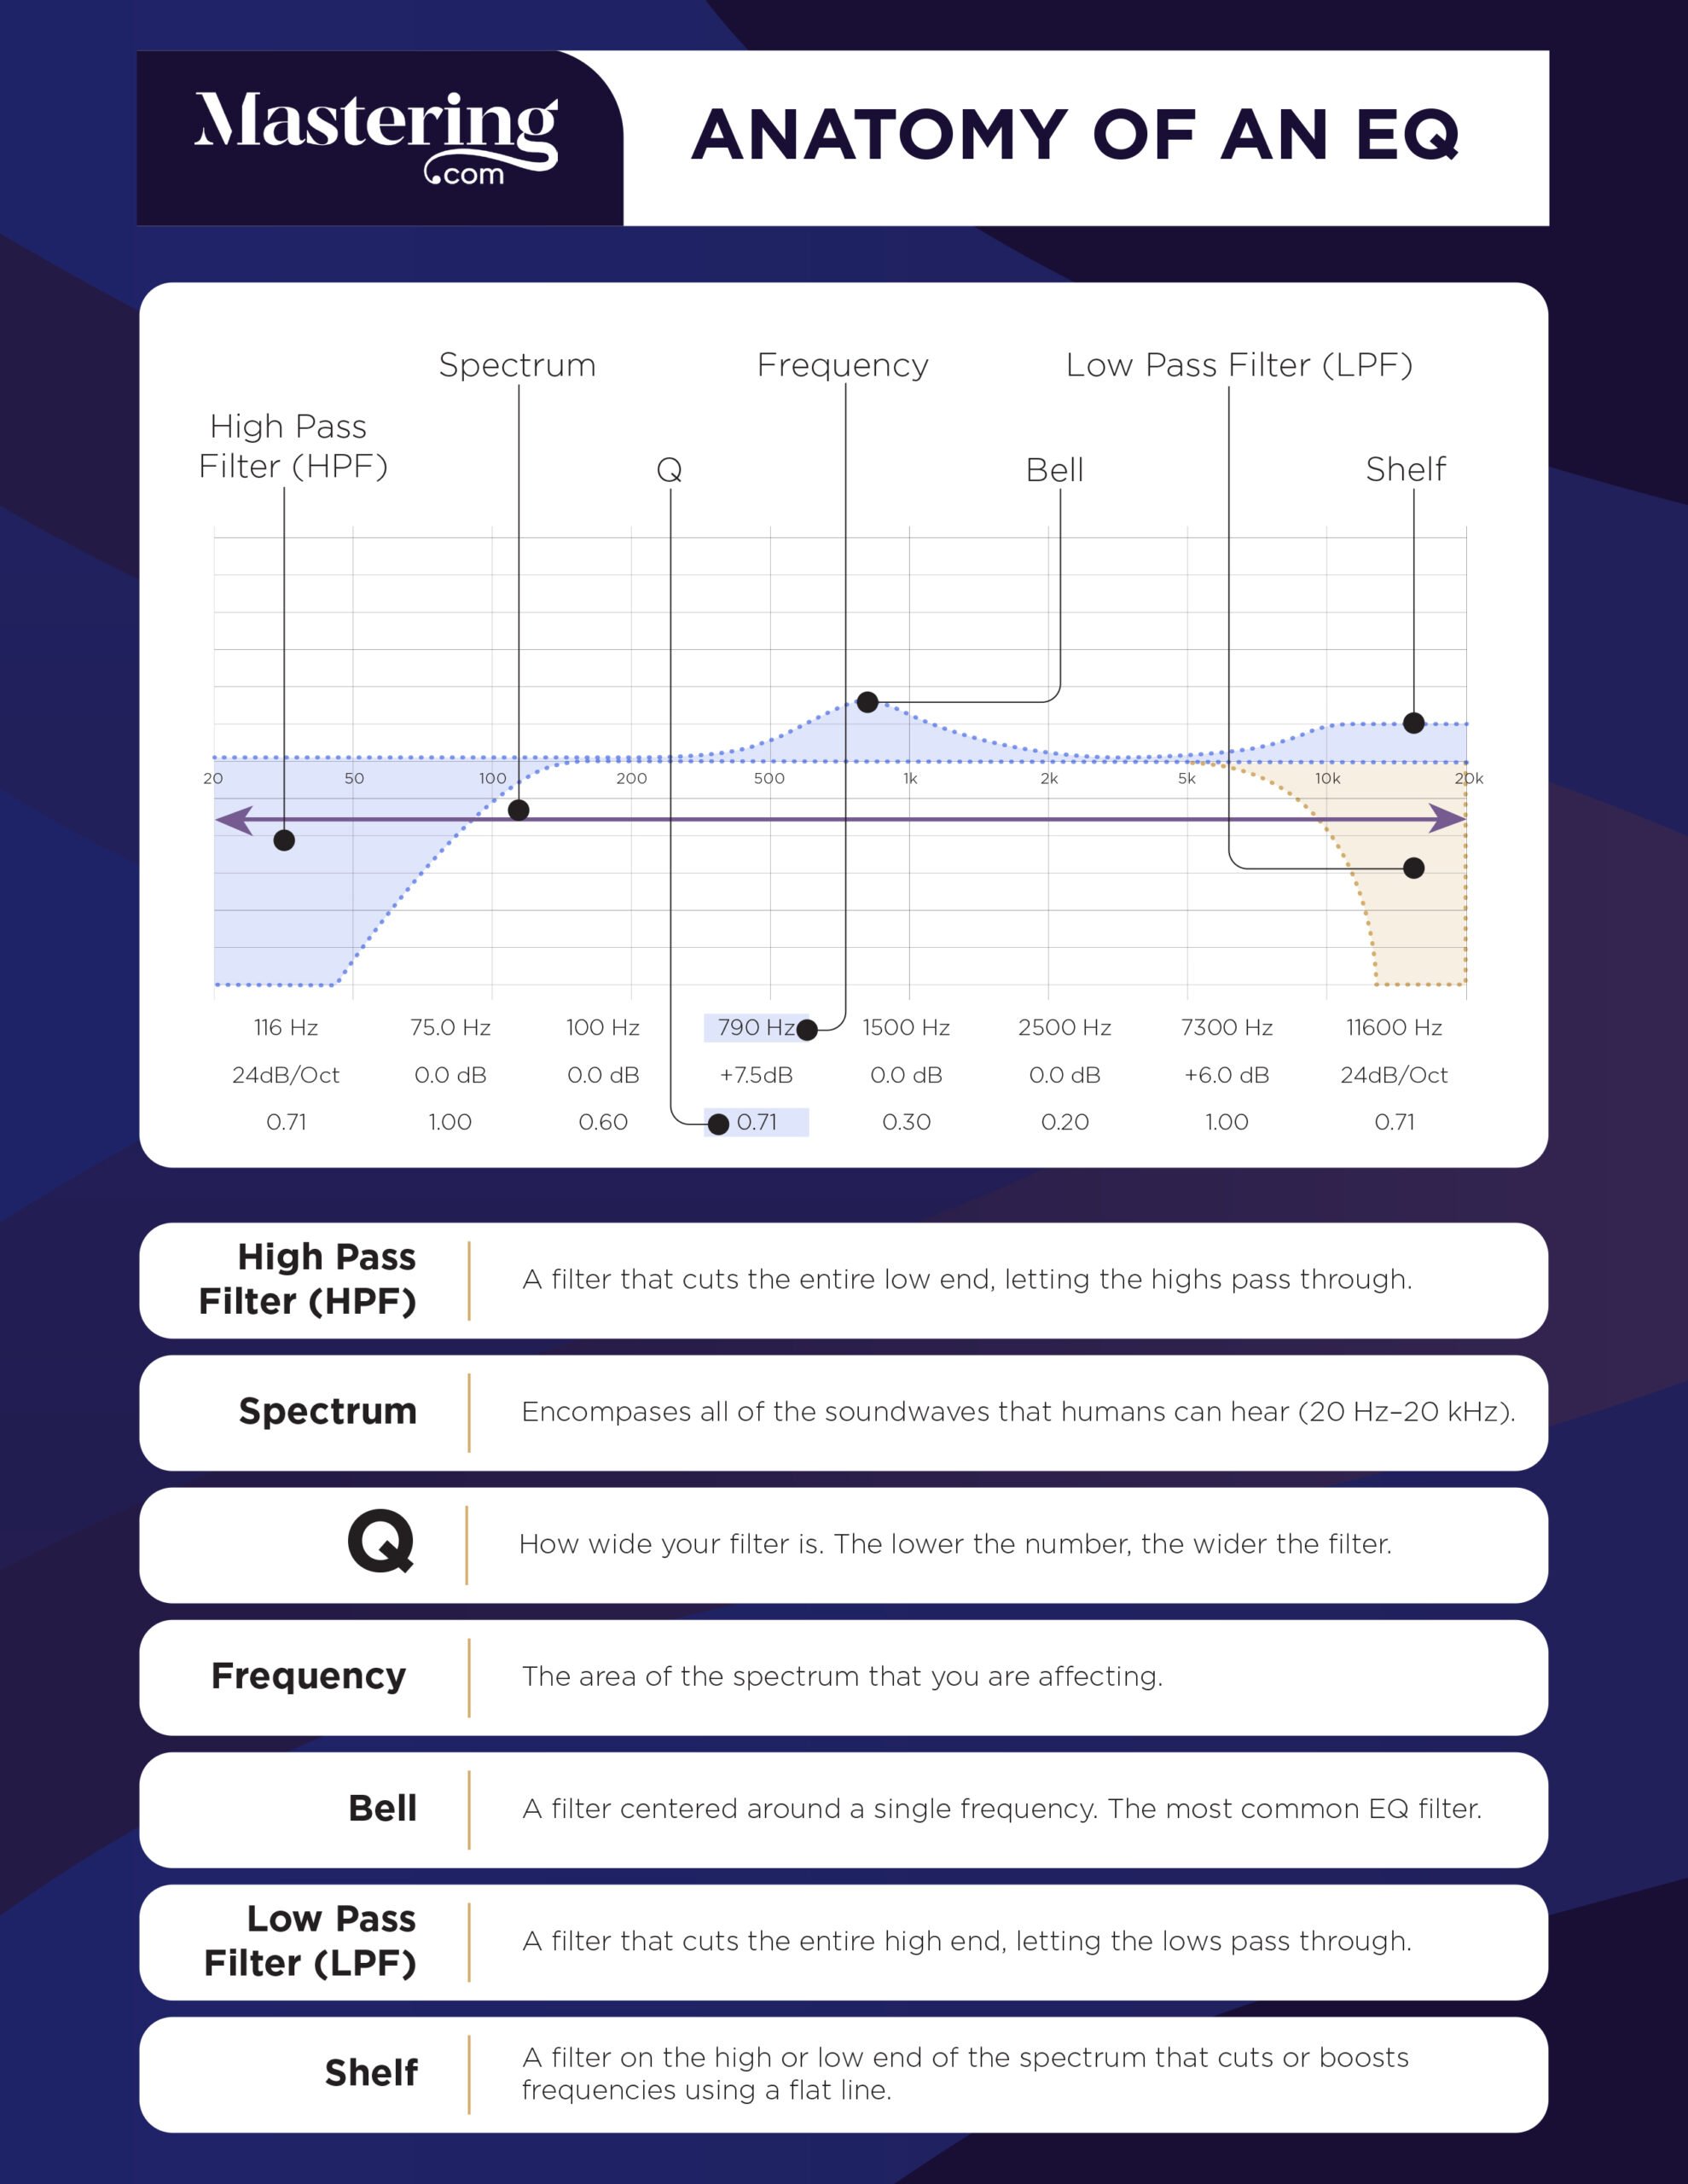
EQ or equalization relates to the process of adjusting the balance between different frequency components within an audio signal. This enables sound engineers to fine-tune the overall sound of a recording or a live performance. EQ can be applied in many ways, such as boosting the bass frequencies of a kick drum or reducing the high frequencies of a guitar amplifier. When adjusting the EQ of an audio signal, you are essentially manipulating the frequency spectrum to achieve a desired effect. EQ frequency refers to the individual frequencies that are being adjusted. For example, a boost at 1kHz would increase the volume of that frequency. In conclusion, understanding EQ frequency is crucial when it comes to audio production, as it allows engineers to tailor the sound to their specific needs. By understanding the basics of the frequency spectrum and how EQ works, you can begin to craft your own unique sound.

Credit: www.audio-issues.com
Eq Frequency Ranges
EQ frequency ranges refer to the different frequencies that can be adjusted on an equalizer. Understanding these ranges is crucial for achieving the desired balance in audio production and mastering.
An essential aspect of music production is equalization (EQ). EQ is a tool that helps in manipulating the frequencies of audio tracks. The ability to understand and recognize the various frequency ranges is essential for effective use of EQ. In this blog post, we will discuss the EQ Frequency Guide, focusing on the subheading: EQ Frequency Ranges. We will explore the different frequency ranges such as low frequencies, low-mid frequencies, mid frequencies, high-mid frequencies and high frequencies, including their characteristics and usage.
Low Frequencies
Low frequencies are the bass elements that occupy the lowest part of the frequency spectrum. These frequencies can range from 20Hz to 200Hz, and they are responsible for producing the fundamental tones of kick drums, bass guitars, and other types of bass instruments. Low frequencies give the music a sense of power and weight. However, excessive low frequencies can make the mix muddy and cluttered, resulting in a loss of clarity. Reducing low frequencies can be helpful in eliminating unwanted noises, but care should be taken to ensure that the mix doesn’t sound thin and weak.
Low-mid Frequencies
The low-mid frequencies range from 200Hz to 500Hz. These frequencies are responsible for creating the warmth and depth of instruments like drums, guitars, and pianos. They are also responsible for the body of vocals. Too much low-mid frequency can make the mix sound boomy and boxy, while not enough can make it thin and weak. Therefore, a careful balance of low-mid frequency is essential for a clear and balanced mix.
Mid Frequencies
Mid frequencies range from 500Hz to 2000Hz. These frequencies bring out the presence and clarity of instruments like vocals, guitars, and horns. Too much mid frequency can cause ear fatigue, while not enough can make the mix sound hollow and lifeless. Finding the right balance of mid frequencies is critical in creating a clear and present mix.
High-mid Frequencies
High-mid frequencies range from 2000Hz to 4000Hz. These frequencies are responsible for creating the definition and clarity of instruments like cymbals, snare drums, and hi-hats. They also bring out the attack and sharpness of guitars and other instruments. Too much high-mid frequency can cause ear fatigue and make the mix sound harsh and shrill. On the other hand, not enough high-mid frequency can make the mix sound dull and lifeless.
High Frequencies
High frequencies range from 4000Hz to 20,000Hz. These frequencies give the mix the air and sparkle, resulting in a bright and lively sound. They bring out the shimmer of cymbals, the brilliance of strings, and the sizzle of percussion instruments. However, excessive high frequency can cause ear fatigue and make the mix sound harsh and piercing. Therefore, it is essential to strike a balance between high frequency and other frequencies to produce a well-balanced mix. Understanding the EQ frequency ranges is essential in creating a balanced and transparent mix. Effectively using EQ to manage the frequencies is a critical skill for any music producer or audio engineer. By carefully considering the characteristics and usage of each frequency range, one can produce a mix that is both clear and captivating.
Identifying Eq Issues
EQ frequency guide helps in identifying issues related to emotional intelligence in individuals. By understanding different frequencies of EQ, individuals can assess their own emotional intelligence and work on areas that need improvement.
Identifying EQ Issues: EQ frequency is essential to achieving a perfect mix, but it can be challenging if you don’t know what to look or listen to. To identify EQ issues, you must understand frequencies and their effects on our ears. Here, we will examine some of the most common EQ issues that you may encounter in your mixing process. Muddiness: Muddiness is a common problem in the low-mid frequencies between 200-500 Hz. The muddiness issue implies a lack of definition and clarity in the mix, which can make it dull. To address muddiness, you need to pinpoint the problematic frequency range and subtract it using an EQ’s band. Boxiness: Boxiness occurs around 400 Hz to 600 Hz, and it’s a resonance problem that creates a boxy sound in the mix. It’s common in recordings made in small rooms with square walls. To fix boxiness, try cutting around the resonance frequency using a narrow band. Honkiness: Honkiness is a nasal, annoying sound mainly from the mid-range frequencies between 600-1000 Hz. You can fix honkiness by using a narrow band to cut the problematic frequency range and then adjusting the bandwidth until it sounds natural. Harshness: Harshness is a problem that occurs around 2-4 kHz, and it creates a sharp, unpleasant sound. It’s common in vocal recordings, and you can fix it by cutting the frequency range using a narrow band and then adjusting the attenuation to achieve a natural sound. Tininess: Tininess is a problem that occurs in the high-frequency range, around 8-12 kHz. It produces a thin, brittle sound and can make the mix sound harsh and amateurish. To fix tininess, increase the frequency range using a wide band and adjust the gain until it blends naturally into the mix. In summary, understanding how frequencies affect our ears is crucial in identifying and fixing EQ issues. By addressing muddiness, boxiness, honkiness, harshness, and tininess, you can achieve a crisp, clear, and professional sound in your mix.
Fixing Eq Issues
Fixing EQ issues can be a challenging task, especially for beginners. The EQ frequency guide can help you identify and correct any issues with the sound quality of your audio to ensure it sounds balanced and clear to your audience.
If you are an audio engineer or music producer, you know the importance of EQ in achieving a good mix. However, sometimes things don’t sound as good as you want them to, and this is where the EQ frequency guide comes in.
Using Low-cut Filters
One common issue that may arise when EQing is the presence of unwanted low frequencies. Using low-cut filters is an easy and effective way to remove those frequencies. Simply set the filter at the frequency below where you want to keep the audio, and the filter will remove the rest.
Using Hi-cut Filters
On the other hand, if you are dealing with unwanted high frequencies, you can use hi-cut filters. Set the filter at the frequency above where you want to keep the audio, and it will remove the rest.
Using Bell Filters
Bell filters allow you to boost or cut a specific frequency range. They are particularly useful for balancing the frequencies of individual instruments in a mix. For example, if a guitar sound is too thin, you can use a bell filter to boost the midrange frequencies of the guitar to make it sound fuller.
Using Wide-q Filters
Wide-Q filters are similar to bell filters, but with a broader range. They are useful for making more significant adjustments to the overall sound of your mix. For example, if you feel like the overall mix is too boxy, you can use a wide-Q filter to cut the low-mid frequencies. In conclusion, using EQ can be tricky, but with the EQ frequency guide, fixing issues is manageable. Try out these techniques, and you will notice significant improvements in your mixes.
Tips For Using Eq Effectively
To use EQ effectively, it’s important to understand the frequency ranges of different instruments and vocals. A basic EQ frequency guide can help you achieve a better mix by allowing you to boost or cut certain frequencies to bring out the best in your music.
Using an EQ Frequency Guide can be incredibly helpful when it comes to mixing music, especially when trying to balance different sounds in a mix. But it’s important to keep in mind that EQ is a powerful tool that can easily be overused, resulting in a mix that sounds overly processed or unnatural. To avoid these pitfalls, here are some tips for using EQ effectively:
Less Is More
It’s tempting to want to EQ every track in a mix, but this can quickly lead to an overly processed sound. Instead, try to be selective about which tracks you EQ and how much you EQ them. In many cases, subtle adjustments are all that’s needed to make a track sit better in a mix. Remember, less is often more when it comes to EQ.
Don’t Solo Eq
Another common mistake when it comes to EQing is to solo individual tracks while making EQ adjustments. While this might make it easier to hear what you’re doing, it can also lead to a mix that sounds unnatural. After all, your mix won’t be heard in isolation – it will be heard as part of a larger piece of music. To ensure your mix sounds natural, make EQ adjustments while listening to the entire mix.
Always Use Your Ears
While an EQ Frequency Guide can be helpful, it’s important to remember that every mix is unique. What sounds good in one mix might not sound good in another. As such, it’s important to always use your ears when EQing. Trust your intuition and make adjustments based on what sounds good to you.
Take Breaks
Finally, it’s important to take breaks when EQing. Your ears can quickly become fatigued when you’re listening to music for extended periods of time, which can make it difficult to make accurate EQ adjustments. Take frequent breaks and give your ears a rest. This will help ensure that you’re making the best possible EQ adjustments. By following these tips, you’ll be well on your way to using an EQ Frequency Guide effectively to create great-sounding mixes. Remember to be selective in your EQ adjustments, avoid solo EQing, trust your ears, and take breaks when needed. Happy mixing!
Credit: mastering.com
Frequently Asked Questions On Eq Frequency Guide
What Frequencies Should I Eq Out?
It depends on the specific audio. EQ out frequencies that sound harsh or muddy. Cut low end below 30Hz to reduce rumble. Roll off high end above 16kHz to prevent hiss. Narrow cuts around trouble frequencies are more effective than broad ones.
Always trust your ears, not charts.
What Is Eq Frequency Chart?
An EQ frequency chart is a visual representation of the frequency range that an audio equalizer can adjust. It displays the frequency bands, their corresponding frequencies in Hertz, and the amount of boost or cut that can be applied to each band.
This helps sound engineers adjust and balance the different frequencies in an audio mix.
What Should I Set My Eq To?
Setting EQ depends on the type of music you are listening to and personal preferences. Start by setting all frequencies to zero and adjust each band to enhance or reduce specific frequencies based on the music. Trust your ears and experiment until you find the perfect balance.
What Is 400 Hz In Equalizer?
In equalizers, 400 Hz is a frequency range that can be adjusted to boost or cut certain frequencies in audio. It can affect the warmth and clarity of sounds. A precise setting of 400 Hz can make a big difference in the overall sound quality of the audio.
Conclusion
Eq Frequency Guide provides an in-depth understanding of how equalization works and how it can be used in music production. By understanding the different frequency ranges and their impact on sound, you can achieve a more balanced and polished final product.
Whether you’re a professional musician or just starting, this guide will help you take your mixes to the next level. Remember to experiment with different EQ settings and trust your ears to achieve the best results.