In Ableton, drums can be played using the Drum Rack or the simpler Drum Kit. Both options offer a range of sounds and customization capabilities for creating unique drum tracks.
Ableton Live is a popular digital audio workstation that is widely used for music production and performance. One of its notable features is its built-in drum tools, which allow producers to create and manipulate drum tracks with ease. In this guide, we will explore the two main ways of playing drums in Ableton: the Drum Rack and the Drum Kit.
We will also discuss how to customize drum sounds, add grooves, and incorporate MIDI controllers for a dynamic and expressive drum performance. Whether you are a seasoned producer or a beginner, this guide will help you make the most out of Ableton’s drum capabilities.
Getting Started
Installation And Setup
Before you start exploring the drums in Ableton, it is important to install and set up the software correctly. Firstly, ensure that your computer meets the requirements listed on the Ableton website. Then, download and install the software onto your computer. Once installed, connect your MIDI controller to your computer and launch Ableton.
If you encounter any issues during the installation or setup process, the Ableton website has detailed installation and setup guides and a comprehensive FAQ section to answer any questions you may have.
Creating A New Project In Ableton
Once you have installed and set up Ableton, you can create a new project to start making music. To create a new project, open Ableton and click on “New Live Set.”
Next, select the tempo and time signature for your project. You can change these settings later on if needed. Finally, select “Create” to start your new project.
Now, you are ready to explore the drums in Ableton. You can use the built-in drum samples and drum racks to create beats and rhythms or upload your own samples.
Remember, the more you practice, the more comfortable you will become with using Ableton to create your own unique drum tracks!
Drum Rack Essentials
Drum Rack Essentials is a comprehensive guide to using drums in Ableton. It covers everything from setting up drum racks to using effects to create unique sounds. This guide is a must-have for anyone looking to take their drum production skills to the next level.
The Drum Rack Essentials is one of the most vital parts of Ableton Live’s music production workflow. Understanding how Drum Racks work and how to load samples into them is essential for creating compelling drum sequences in Ableton Live. In this guide, we have provided a comprehensive overview of Drum Rack Essentials, which will include the following H3 headings: Understanding the drum rack, Loading drum samples into the drum rack, and Editing and customizing drum samples.
Understanding The Drum Rack
The Drum Rack is a powerful MIDI instrument in Ableton Live that allows you to create drum kits using drum samples. The drum rack consists of various components, including pads and cells, and each cell can hold a different sound. The Drum Rack can hold up to 128 cells, making it easy to create a complex drum kit.
Loading Drum Samples Into The Drum Rack
To load a drum sample into the Drum Rack, simply drag and drop a sample into one of the cells. Ableton Live will automatically detect the sample’s note, which you can then use to trigger the sample. The Drum Rack interface allows you to adjust various settings for each sample, including volume and panning.
Editing And Customizing Drum Samples
Once you have loaded your drum samples into the Drum Rack, you can begin editing and customizing them. Ableton Live provides various tools to help you customize your samples, including filters, envelopes, and effects. You can also adjust the pitch and timing of your samples to create unique and compelling drum sequences. In conclusion, mastering Drum Rack Essentials is vital for any producer who wants to create professional-sounding drum tracks in Ableton Live. By understanding how the Drum Rack works, loading samples into it, and customizing your samples, you can create unique and compelling drum sequences that will bring life to your music.
Programming Drums
Learn how to program drums like a pro in Ableton with this guide. Discover tips and tricks for crafting the perfect beat and take your productions to the next level.
Programming Drums is a crucial aspect of producing music in Ableton. By creating beats with different patterns and rhythms, you can give life to your compositions and make them stand out. In this guide, we will focus on exploring the MIDI clip editor, adjusting note velocities and durations, and adding groove and swing to your beats. With these techniques, you will be able to program drums that are both expressive and unique.
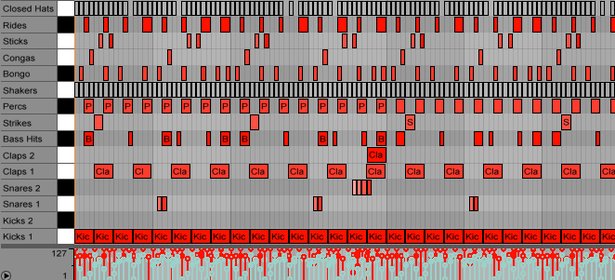
Exploring The Midi Clip Editor
The MIDI clip editor in Ableton is where you can visually create and edit your drum patterns. To access it, double-click on a MIDI clip in the arrangement view or session view. Once you’re in the editor, you can start adding notes to your drum rack. Each note corresponds to a specific drum sound, such as a kick, snare, or hi-hat. You can adjust the length of the notes by dragging their edges, and you can move them around by clicking and dragging them.
Adjusting Note Velocities And Durations
Note velocities determine the loudness of each drum hit. By adjusting them, you can add dynamics and accents to your beats. To change a note’s velocity in Ableton, click on it and then drag the velocity bar up or down. You can also adjust the duration of a note by dragging its length. This allows you to create rhythmic variations and syncopations.
Adding Groove And Swing To Your Beats
Groove and swing are essential elements of drum programming. Applied correctly, they can make your beats sound more human and lively. In Ableton, you can add groove by using the Groove Pool. The Groove Pool contains a range of pre-programmed groove templates that you can apply to your clips. You can also adjust the amount of groove applied to a clip by using the Timing and Velocity controls. Swing, on the other hand, can be added by adjusting the timing of your notes. To do this, use the Swing control in the MIDI clip editor. In conclusion, Programming Drums is an important skill for any music producer. By exploring the MIDI clip editor, adjusting note velocities and durations, and adding groove and swing, you can create unique and expressive drum patterns in Ableton. With these techniques, you’ll be able to take your music to the next level.

Credit: www.djgym.co.uk
Advanced Techniques
Learn advanced techniques for drums in Ableton with this comprehensive guide. Discover new ways to incorporate unique sounds and effects into your productions, and take your music to the next level.
When it comes to creating dynamic drum patterns, fills, and variations, Ableton offers a wide range of advanced techniques that can take your music production skills to the next level. In this guide, we’ll explore some of the powerful tools you can use to enhance your drum programming skills in Ableton.
Using Automation To Create Dynamic Drum Patterns
If you want to give your drum patterns a dynamic and evolving feel, the automation feature in Ableton is a great tool to use. With automation, you can adjust parameters such as volume, pan, and effects over time, creating dynamic and intricate drum patterns that evolve throughout your track. To get started with automation, simply select the parameter you want to automate and then create an automation line in the arrangement view. You can then adjust the shape and curve of the automation line to create different effects. For example, you can use a curved automation line to gradually increase the volume of a snare drum hit over time, creating a rising drum fill that builds energy in your track.
Creating Fills And Variations
Drum fills and variations are essential elements in any music track, as they add excitement and interest to the music. In Ableton, there are many ways to create unique and interesting fills and variations for your drum patterns. One simple technique is to use the duplicate feature to create a variation of your existing drum pattern. You can then modify the duplicated pattern by adding or removing drum hits, changing the velocity of the hits, or applying effects. This technique is a quick and easy way to create simple variations on the fly. For more complex fills, you can use the MIDI editor to program in intricate drum fills manually. With the MIDI editor, you can adjust the timing of each drum hit, the velocity, and even the pitch. This gives you complete control over the drum fill, allowing you to create unique and rhythmically complex patterns.
Building Hybrid Drum Kits
One of the most exciting features of Ableton is the ability to build hybrid drum kits using samples and synthesized sounds. This technique allows you to create custom drum sounds that are unique to your music. To build a hybrid drum kit, start by selecting a base drum kit in Ableton’s drum rack. You can then add samples or synthesized sounds to each drum pad in the rack. This gives you the ability to combine traditional acoustic drum sounds with electronic and synthetic sounds, creating a unique hybrid kit that can be used in a wide range of music genres. In addition to traditional drum sounds, you can also use Ableton’s built-in synthesizers and effects to create unique sound effects and percussive sounds that can be used in your drum patterns. In conclusion, there are many advanced techniques for drum programming in Ableton that can help you take your music production skills to the next level. With tools like automation, MIDI editing, and hybrid drum kits, you have all the tools you need to create unique and dynamic drum patterns that will make your music stand out.
Effects And Processing
Learn how to enhance the sound of your drums in Ableton with various effects and processing techniques. From EQ and compression to reverb and delay, this guide provides tips and tricks for achieving the perfect drum sound in your productions.
Drums are an essential part of any music track, be it electronic or acoustic. The right effects and processing on your drum tracks can make all the difference in creating a polished and professional sound. In this guide, we’ll take you through some of the key effects and processing techniques you can use to enhance your drum tracks in Ableton Live.
Applying Eq And Compression To Drums
One of the most important steps in processing your drum tracks is applying EQ and compression. EQ allows you to carve out space in the frequency spectrum for each individual drum sound so that they all sit harmoniously together in the mix. Compression can help even out the levels of your drum sounds and make them more punchy and dynamic. Consider using a multiband compressor to target specific frequency ranges for each drum sound.
Using Distortion And Saturation For Texture
If you’re looking to add some grit and character to your drum tracks, distortion and saturation are great tools to turn to. Distortion can add bite and harmonics to your drum sounds, while saturation can add warmth and depth. With Ableton Live’s built-in distortion and saturation plugins, you can experiment with different settings and find the perfect amount of texture for your drums.
Creating Unique Drum Sounds With Reverb And Delay
Reverb and delay are two effects that can take your drum tracks from basic to unique and interesting. Adding reverb can create a sense of space and depth, while delay can add rhythmic interest and create complex textures. Experiment with different types of reverb and delay, as well as different settings like decay time and feedback, to really sculpt your drum sounds and make them stand out in the mix. In conclusion, the effects and processing techniques listed above are just a few of the many ways you can elevate your drum tracks in Ableton Live. Whether you’re looking to add some character, texture, or depth to your drum sounds, these tools can help you achieve your desired results. With practice and experimentation, you’ll be on your way to creating incredible-sounding drum tracks in no time.
Credit: www.ableton.com
Performing Live
If you are a drummer looking to perform live with Ableton, the software’s built-in drum rack can be an invaluable tool. Using a drum pad controller, you can trigger drum samples and loops in real-time, allowing you to create dynamic, engaging performances that take advantage of Ableton’s unique features. In this guide, we will explore some tips for setting up your drum pad controller in Ableton, as well as mapping drum rack parameters for live performance.
Setting Up A Drum Pad Controller In Ableton
The first step in performing live with Ableton is to ensure that your drum pad controller is properly set up and functioning within the software. To do this, you will need to connect your controller to your computer via USB and ensure that it is recognized by Ableton. Once your controller is connected, you can create a new MIDI track in Ableton and select your controller as the input device. From there, you can start mapping your drum pad controller to trigger specific drum samples and loops within the drum rack.
Mapping Drum Rack Parameters For Live Performance
To effectively use Ableton’s drum rack in a live performance setting, it is important to map drum rack parameters to your drum pad controller. This allows you to quickly and easily adjust parameters such as volume, pitch, and decay for each individual drum sample or loop. To do this, you can use Ableton’s built-in MIDI mapping feature to assign specific drum rack parameters to different pads on your controller. This will allow you to make on-the-fly adjustments to your drum sounds during a live performance, creating a unique and engaging experience for your audience.
Collaborating With Other Musicians
Collaborating with other musicians is an essential aspect of music creation. With Ableton’s Drum Rack, collaboration becomes seamless and productive. The software allows musicians to share drum projects and stems with each other easily. However, before discussing how we can collaborate with other Ableton users, let’s first look at how we can export drum MIDI files for use in other DAWs.
Exporting Drum Midi Files For Use In Other Daws
Ableton’s Drum Rack is not the only software musicians use for music creation. Suppose you would want to use drum tracks created in Ableton in other Digital Audio Workstations (DAWs). In that case, exporting drum MIDI files is the way to go. Here’s a quick guide on how to do that:
- Select the clip with your drum MIDI file.
- Right-click on the clip, and on the dropdown menu, select “Crop Clips to New Midi Track.”
- In the new track, right-click on the drum rack and choose “Extract Chain.”
- You can now copy and paste the MIDI notes to your preferred DAW.
Collaborating With Other Ableton Users Using The Drum Rack
Collaboration with other Ableton users is seamless and comfortable with the Drum Rack. The software allows you to save drum Racks which you can share via various platforms. Here’s a quick guide on how to do that:
- Click on the “Save” icon on the top right corner of the Drum Rack.
- Select a location where you would like to save your file.
- You can share this file via various platforms such as email, Dropbox, Google Drive, or OneDrive.
- The recipient should then drag and drop the file into their Drum Rack, and all the drum elements will be loaded and ready to use.
The Drum Rack is an excellent tool for enhancing collaboration with other musicians, or you can export your drum MIDI files for use on different DAWs. With Ableton’s Drum Rack, collaboration has never been more comfortable.
Tips And Tricks
If you are a musician or a music producer, using Ableton for creating drum tracks is an essential part of your workflow. Drums bring life to a music composition, but programming drums in Ableton can be challenging, especially if you are new to the software.
Working With Live Drum Recordings In Ableton
Live drum recordings are an excellent addition to your music production. However, they can be hard to work with, especially when trying to quantize the beats or grooves. When you try to quantize live drum recordings, it might sound robotic and lose its human feel. Instead of quantizing the recordings, try warping them. Warping preserves the drum’s human feel while aligning it with the project’s tempo.
Creating Complex Drum Patterns With The Arpeggiator
Ableton’s Arpeggiator is not only for creating arpeggios; it is also a great tool for creating complex drum patterns. The Arpeggiator allows you to create patterns by using different rate and gate settings, which can make your drums have a more diverse sound. Experiment with different settings on the Arpeggiator to create unique and complex drum patterns.
Using Third-party Drum Packs And Plugins
Ableton has a vast library of drum sounds, but sometimes, they don’t fit the sound you’re looking for. This is where third-party drum packs and plugins come in handy. There are tons of third-party drum packs and plugins available online, and they are often designed to fit specific genres or styles. Utilizing third-party packs can help you create unique drum patterns and add variety to your productions.
| Benefits of using Third-Party Drum Packs: |
|---|
| – Variety of drum sounds and grooves |
| – Tailored to specific genres or styles |
| – Allows for unique drum pattern creations |
With these tips and tricks, you can create more dynamic and creative drum tracks in Ableton. Remember, don’t be afraid to experiment! Drum programming is an art form, and the more you practice, the better you will get.
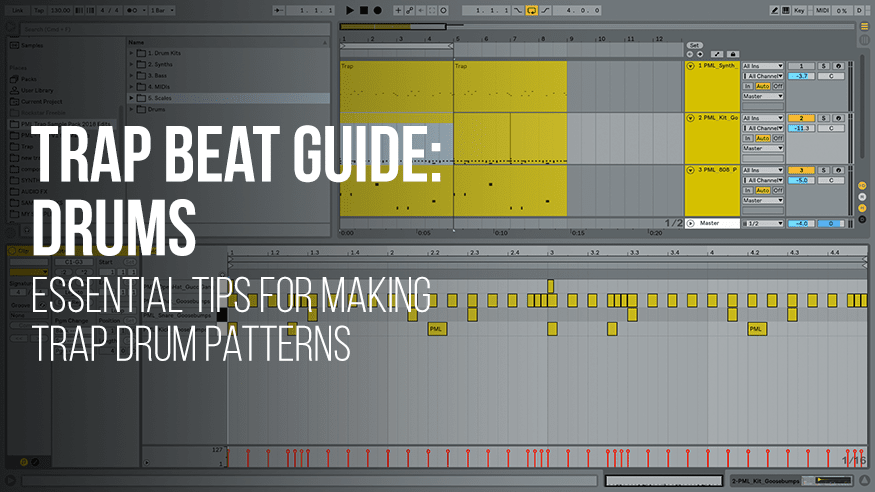
Credit: www.productionmusiclive.com
Frequently Asked Questions On Drums In Ableton Guide
How Do You Use Drums In Ableton?
To use drums in Ableton, start by creating a new MIDI track and selecting a drum kit instrument. Create a drum loop by using the MIDI keyboard, drum pad controller, or by drawing notes in the piano roll. Adjust the individual drum sounds’ volume, pitch, and effects to create a unique beat.
Repeat this process to build your track.
How Do I Make My Drums Sound Real In Ableton?
To make your drums sound real in Ableton, use realistic drum samples, layer different sounds, adjust the timing, velocity, and dynamics of each hit, add humanizing effects like swing or slight variations in pitch, and use parallel compression to make them sound bigger and wider.
How Do You Sequence Drums In Ableton?
To sequence drums in Ableton, simply drag and drop drum samples onto the MIDI track. Open the drum rack, assign each drum sound to a specific MIDI note and arrange patterns using the step sequencer or piano roll. You can also use the swing feature or quantization to adjust timing and add groove.
How Do I Make My Drums Hit Harder In Ableton?
To make your drums hit harder in Ableton, try these tips: 1. Use a compressor to even out the volume of your drums. 2. Add saturation or distortion to give them more character and depth. 3. EQ your drums to bring out their natural frequencies and cut any unwanted frequencies.
4. Layer your drums with complementary sounds to fill out your mix. 5. Adjust the levels and panning of your drums to create separation and clarity.
Conclusion
The drums in Ableton guide is an essential tool for producers, composers, and musicians who are looking to create unique and dynamic sounds. With the powerful features of Ableton, you have the flexibility to customize your drum tracks and take your music to the next level.
By understanding the basics of drum programming and working with the right tools and plugins, you can create complex and sophisticated rhythm sections that will add depth and character to your music. Don’t hesitate to experiment and explore all the possibilities that Ableton has to offer.
Happy producing!