To prepare your songs for mastering, ensure they are mixed well and have proper headroom. Then, export them in high-quality audio formats such as WAV or AIFF.
Preparing your songs for mastering is a crucial step in ensuring that they sound their best when released. The mastering process involves applying the finishing touches to your songs, making them sound polished and professional. However, before handing them over to a mastering engineer, you need to ensure that they are mixed well and have the proper headroom.
This involves eliminating any clipping or distortion and ensuring that there is enough headroom for the mastering engineer to work with. Additionally, when exporting your songs, be sure to use high-quality audio formats such as WAV or AIFF to ensure that no audio information is lost in the conversion process.
Credit: prosoundformula.com
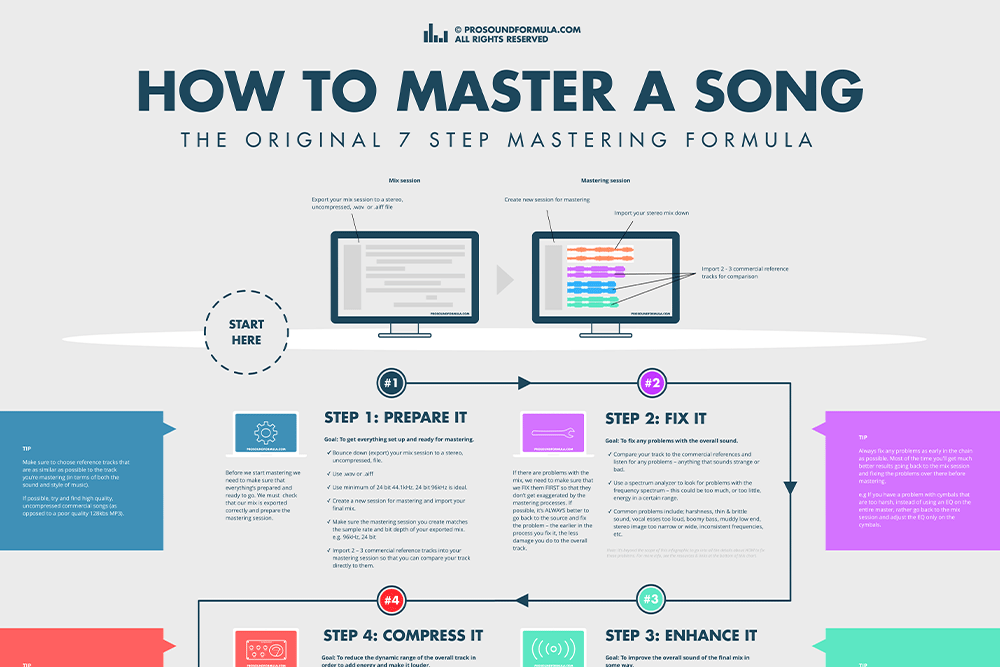
Preparing Your Mix For Mastering
To ensure optimal sound quality, it’s crucial to prepare your mix for mastering. Begin by organizing your tracks, checking levels, and getting rid of any unwanted background noise. This will help your music sound its best during the mastering process.
Preparing Your Mix for Mastering is a critical step in ensuring that your songs sound as good as possible. There are several steps that you can take to make sure that your mix is ready to be mastered. Organize Your Tracks, Ensure All Tracks are Named Appropriately, Confirm the Bit Depth and Sample Rate, Consider Using Reference Tracks for Comparison, Clean Up Any Unwanted Audio Clips and Sounds, Get Your Mix as Close to the Final Product as Possible, and Export the Mix with Enough Headroom.
Organize Your Tracks
Before you start preparing your mix for mastering, it’s essential to organize your tracks. This process will help you quickly find the individual tracks that you need to adjust. Creating groups or folders that contain similar tracks can also be helpful. Start by listening to each track and determine which group it belongs to. Drag and drop each track to the appropriate group or folder. This step will make your life much easier when you start adjusting individual tracks.
Ensure All Tracks Are Named Appropriately
Naming your tracks appropriately is essential when preparing your mix for mastering. Use descriptive names that accurately reflect the sounds in the track. Doing so will make it easier to find and adjust specific tracks when the time comes. It will also help the mastering engineer understand your mix and make the appropriate adjustments.
Confirm The Bit Depth And Sample Rate
Before exporting your mix, confirm the bit depth and sample rate. These settings can significantly impact the quality of the final product. Generally, 24-bit depth and 44.1 kHz or higher sample rates are suitable for most commercial releases. Different platforms may require different settings. Ensure you understand their requirements before adjusting these settings.
Consider Using Reference Tracks For Comparison
Using reference tracks can be a great way to monitor your mix. Reference tracks are professionally mixed and mastered songs that are similar in style and genre to your music. To use them effectively, play both your mix and the reference track simultaneously. Make adjustments to your mix to try and match the reference track. This step will help you achieve a similar sound and volume level to the industry standard.
Clean Up Any Unwanted Audio Clips And Sounds
Clean up any unwanted audio clips and sounds from your mix. These unwanted sounds can significantly impact the quality of the final product. Be sure to remove any unwanted background noise, clicks, pops, or hiss. You may need to use noise reduction plugins or manually remove these sounds.
Get Your Mix As Close To The Final Product As Possible
Before exporting your mix, make sure it is as close to the final product as possible. Ensure all levels are balanced, and the EQ is as close as possible to the final sound you want. Remember that the mastering engineer will make final adjustments, but your mix should be as close as possible to your vision.
Export The Mix With Enough Headroom
Finally, when exporting your mix, make sure there is enough headroom. Headroom is the space between the loudest peaks in your mix and 0 dBfs, the maximum digital level. Leaving headroom helps prevent distortion during mastering. Aim for at least -3 dB to -6 dB of headroom. Export in a lossless format such as WAV to ensure the highest quality. In conclusion, preparing your mix for mastering is essential to ensure high-quality sound in your final product. By following these steps, you can ensure that your mastering engineer has the best possible mix to work with.
Preparing Your Individual Audio Tracks For Mastering
To prepare your songs for mastering, it’s crucial to properly export your individual audio tracks in high-quality WAV or AIFF format and ensure all tracks start at the same time. Use proper gain staging to avoid clipping and leave enough headroom for the mastering engineer to work with.
Lastly, label your tracks and provide detailed notes to help the engineer understand your vision.
Before sending your songs off for mastering, it’s essential to make sure that each individual audio track is ready for the process. Preparing your audio tracks before mastering ensures that you get the most out of the mastering process and achieve the best possible final product. Below are some essential steps to take when preparing your individual audio tracks for mastering:
Check For Distortion Or Clipping
Before starting any other processing, it’s crucial to check for distortion or clipping in each individual audio track. If your tracks have any distortion or clipping, it’s best to fix them by adjusting the levels to avoid any problems during mastering. It’s essential to keep all your levels under control to get the most out of the mastering process.
Check The Eq On Each Track
Next, check the EQ on each audio track and ensure that each track’s EQ sounds balanced and complements the rest of the song. If you find any areas that need work, it’s best to adjust the EQ before mastering to achieve the best final mix.
Apply Compression To Individual Tracks If Needed
Applying compression to individual tracks can help even out any volume inconsistencies and add more punch to each audio track. However, it’s essential to use compression sparingly, as too much compression can make your tracks sound flat and lifeless.
Edit And Clean Up The Audio Using A Gate Or Similar Tool
Editing and cleaning up your individual audio tracks using a gate or similar tool can help to reduce background noise and eliminate any undesirable sounds or artifacts. These edits can help to ensure that each track sounds as polished as possible before mastering.
Apply Reverb Or Delay As Needed
Reverb or delay can add a sense of space and depth to each individual audio track, especially in genres such as pop or rock. However, it’s best to use reverb or delay sparingly, as too much can make each track sound muddy or indistinct.
Confirm All Individual Tracks Are Summing To The Mix Correctly
Finally, it’s essential to confirm that all individual audio tracks sum to the mix correctly before sending off for mastering. This step ensures that each audio track complements the others and forms a coherent, well-mixed song. By following these essential steps, you can prepare your individual audio tracks for mastering and ensure that you achieve the best possible final mix for your songs.
Preparing Your Final Mix For Mastering
To prepare your songs for mastering, it’s important to ensure your final mix meets a few key requirements. This includes checking your levels, making sure your EQ and compression is balanced, leaving enough headroom, and making sure your files are properly labeled and formatted.
By following these steps, you can ensure your tracks are ready for the mastering process.
Preparing your final mix for mastering is a crucial step to ensure your music sounds the best it can. You want to make sure that your songs are ready for the final stage of the recording process and that they accurately reflect your creative vision. In this section, we’ll dive into some important steps you need to take to prepare your final mix for mastering.
Ensure You Have The Correct File Format
Before you send your final mix for mastering, make sure you have the correct file format. The most common formats for mastering are WAV and AIFF. Both formats are lossless and offer high-quality audio, which is crucial for a professional sound. Ensure that your file is exported at the same sample rate and bit depth that you used for mixing to maintain the quality of your music.
Name Your Final Mix Appropriately
It’s essential to name your final mix properly before sending it for mastering. Use a clear and concise naming convention that indicates the song name and version number, like “SongName_finalmix_v1.wav”. It will help the mastering engineer to keep track of your project and avoid confusion. If you have multiple songs, make sure to name them appropriately and clearly label their version number.
Confirm Headroom For The Final Mix
Headroom is the amount of space between the loudest parts of your audio and the maximum level your mix can reach before clipping or distortion occurs. Before sending your final mix for mastering, make sure the headroom is sufficient for the mastering process. Aim for at least -6dB of headroom to ensure that the mastering engineer has enough room to work with. Most mastering engineers prefer having enough headroom to apply compression and EQ without damaging your mix’s quality.
Perform A Final Listen-through
Take the time to listen to your final mix critically before sending it for mastering. Listen to it on different speakers and headphones to ensure that it sounds great across all mediums. Make sure that all the elements in your mix are balanced, and there are no inconsistencies like volume fluctuations. Check for any unwanted noises or issues with phase or stereo imaging. Fix any issues that you find before sending it to be mastered.
Take A Break Before Sending Your Mix For Mastering
Taking a break before sending your final mix for mastering is essential. Listen to it again after a few days or a week as it will help you freshen your perspective and hear any issues you may have missed earlier. Get feedback from trusted sources like friends, colleagues, or even online communities to gather some insights on how people perceive your music. In conclusion, preparing your final mix for mastering is an essential step in the recording process. Ensure your file format and naming conventions are correct, confirm the headroom, perform a final listen-through, and take a break before sending it for mastering. These steps will help you achieve the best possible results and accurately reflect your creative vision.

Credit: www.youtube.com
Choosing The Right Mastering Engineer
Finding the right mastering engineer is crucial to ensure that your songs reach their full potential. To prepare your songs for mastering, make sure to properly mix them, use high-quality audio files, communicate your goals and preferences with the engineer, and trust their expertise.
Research Potential Mastering Engineers
Researching potential mastering engineers is the first step in finding the right one. Look for audio engineers who specialize in mastering and have experience working with your genre of music. You can begin your search on the internet, social media, or by asking other musicians for recommendations.
Request Samples Or A Portfolio Of Work
Once you have identified potential mastering engineers, the next step is to request samples or a portfolio of their work. This will give you an idea of their skills and what to expect from their work. You can listen to the before-and-after samples of their previous work to ensure you like their style and techniques.
Check Pricing And Turnaround Times
Before finalizing any mastering engineer, ensure you are clear on their pricing and turnaround times. Ask for a quote and make sure it fits your budget. Compare the cost with other professionals in the industry to ensure you are getting a fair price. Ensure their turnaround time suits your schedule and is reasonable enough.
Communicate Your Goals And Preferences
Smooth communication between you and your mastering engineer should start from the beginning. Let them know your goals, style, and preferences upfront. Clear communication ensures they understand your vision and can tailor their approach to achieve your desired result and goals.
Provide Clear Instructions For The Mastering Engineer
To ensure your songs are mastered to your liking, provide the engineer with clear instructions. Explain critical areas that need attention, such as vocal levels and instrument mixes. Label the tracks correctly so that the engineer understands the order and structure of the songs. By providing clear guidelines, you can avoid misinterpretation by the mastering engineer and receive precisely what you want. Finding the right mastering engineer can make a world of difference in the final sound of your music. By researching, requesting samples, checking pricing and turnaround times, and providing clear instructions, you can ensure your songs are mastered to your liking, and you’re fully satisfied.
Preparing Your Files For Transmission To The Mastering Engineer
To ensure seamless transmission of your songs to the mastering engineer, it is crucial to properly prepare the files. Start by checking the file format, resolution, and file names. It’s also important to communicate any specific instructions or preferences to the engineer beforehand.
With these steps, you can ensure a successful mastering process for your music.
Preparing Your Files for Transmission to the Mastering Engineer To get the best results from mastering, you need to ensure your audio is properly prepared. The process of preparing audio files for mastering can be overwhelming, but with the right approach, it can be easy. Here are some tips on how to prepare your songs for mastering. Ensure Your Files are Organized and Named Correctly An essential step in preparing your audio for mastering is to organize your audio files in a logical and straightforward way. Make sure you have a separate folder for each song, and label each file appropriately, including the song name, version, and format. This organization will help the mastering engineer work effectively, and you’ll avoid any confusion or mix-ups caused by improperly labeled files. Confirm the File Format with the Mastering Engineer Check with the mastering engineer about their preferred file format before sending your audio files. Most mastering engineers accept high-quality audio formats, including WAV, AIFF, and even DSD. Sending high-quality audio files will ensure that the mastering engineer has all the details and nuances they need to deliver the best results. Make Sure the Bit Depth and Sample Rate are Correct Bit Depth and Sample Rate are two critical components of an audio file that greatly affect the overall quality. Ensure that your audio files have the right Bit Depth and Sample Rate. For Bit Depth, the standard is 24bits. And for Sample Rate, the standard is 44.1kHz. Make sure you check with the mastering engineer to see if they have any specific recommendations based on their setup. Include a Reference Mix or Track for Comparison A reference mix is a pre-mastered version of your song that you provide for the mastering engineer to refer to. Using a reference mix can help the mastering engineer understand your vision for the final master. A reference track can be an original song that you emulate or one that has a similar vibe, tone, or feel to what you’re trying to achieve. Check that the Files are Secure and Virus-Free Before sending your audio files to the mastering engineer, it’s essential to check that they are virus-free and secure. Keep your audio files in a password-protected folder, and make sure they don’t contain any viruses that could harm the engineer’s computer system. This security ensures that your files will not be corrupted and that there will be no data loss during the transmission process. Following these tips for preparing your songs for mastering will ensure that your music gets the attention it deserves from the mastering engineer and delivers the results you desire.

Credit: m.youtube.com
Frequently Asked Questions Of How To Prepare Your Songs For Mastering
How Do I Prepare A File For Mastering?
To prepare a file for mastering, follow these 5 guidelines: 1. Ensure the file meets technical requirements. 2. Clean up any pops, clicks, or distortion in the audio. 3. Leave headroom for the mastering engineer to work with. 4. Remove any limiters or EQ on the master buss.
5. Export the file as a high-quality, uncompressed audio file such as WAV or AIFF.
What To Do Before Mastering A Track?
Before mastering a track, there are a few things you should keep in mind. Make sure to review the mix for any issues, adjust levels and panning, clean up any unwanted noises, and ensure that it is properly exported. Additionally, it is important to take breaks during the mastering process and to use reference tracks to ensure that the final product is balanced and sounding great.
What Should My Mix Be Before Mastering?
Your mix should be balanced, with each element in its proper place and at the appropriate level. This means that each instrument and vocal should be equal in terms of perceived loudness and not mask or overpower any other element.
It should also be free of any distortion or significant frequency clashes. Before mastering, ensure that you have addressed any mix issues that could affect the final product.
How Do I Get My Mix Ready To Master?
To get your mix ready for mastering, make sure to: 1. Organize tracks and ensure they are consolidated and labeled correctly. 2. Clean up any unwanted noise and ensure levels are balanced. 3. Use proper EQ and compression. 4. Add reverb or delay (if necessary) and ensure all effects are tasteful.
5. Export the mix in the appropriate format and bit depth.
Conclusion
To summarize, preparing your songs for mastering is an essential step in ensuring a professional and high-quality end product. Follow these guidelines to ensure that your songs are ready for the mastering process. Remember to take your time, pay attention to detail, and utilize the skills of a professional mastering engineer.
With these tips in mind, you’ll be well on your way to music that truly shines.