To use external hardware with Presonus Studio One, simply connect it to your computer and select it as your audio device within Studio One’s audio settings. This allows you to use hardware such as audio interfaces, MIDI controllers, and external effects processors with your Studio One projects.
Presonus Studio One is a powerful digital audio workstation that offers a variety of tools and features for recording, editing, and mixing music. However, many musicians and producers prefer to use external hardware to add additional sonic character and control to their recordings.
Whether you’re using an audio interface for high-quality recording or a MIDI controller for hands-on performance, Studio One makes it easy to integrate external hardware into your workflow. We’ll walk you through the steps for setting up and using external hardware with Presonus Studio One.
Connecting External Audio Devices
Easily connect external audio devices with Presonus Studio One by using the Audio Device Setup menu. Simply choose the appropriate device and adjust settings for optimal performance.
Connecting External Audio Devices is an essential part of music production. In the case of using PreSonus Studio One, incorporating external hardware is an incredibly useful way to boost your music production quality. Here are some guidelines on how to connect different external audio devices like Audio Interface, MIDI Controller, and External Microphone with PreSonus Studio One effectively.
Audio Interface
Plugging an Audio Interface into your computer can help you achieve better sound quality while producing music. Here’s how to connect your Audio Interface with PreSonus Studio One: 1. Firstly, power off your audio interface and computer before starting the connection process. 2. Next, use the USB cable and plug one end into the Audio Interface and the other into your computer. 3. Then, turn on your audio interface and computer. 4. Launch PreSonus Studio One, navigate to “Studio One” -> “Options” -> “Audio Setup.” 5. Choose your Audio Interface from the list of devices available, and that’s it!
Midi Controller
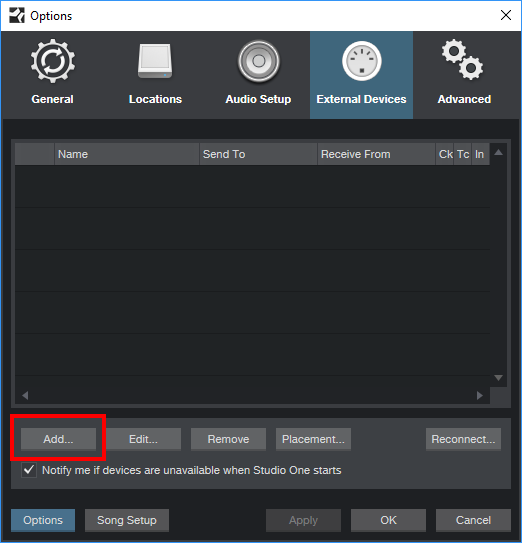
MIDI Controllers can significantly improve workflow and enable you to control different aspects of your music production from a single device. Here is how to connect your MIDI Controller with PreSonus Studio One. 1. Start by powering off your MIDI Controller and computer. 2. Connect the USB cable to the MIDI Controller and your computer. 3. Turn on the power of your MIDI Controller and computer. 4. Launch PreSonus Studio One, navigate to “Studio One” ->”Options” ->”External Devices.” 5. Here, click on “Add” and select your MIDI Controller Manufacturer and Model. 6. To make sure your MIDI Controller works correctly with PreSonus Studio One, select the “Receive From” and “Send To” options appropriate to your needs.
External Microphone
For recording different instruments and vocalists, it’s always best to use an external microphone. Here’s how to connect your external microphone with PreSonus Studio One: 1. Power off your external microphone and computer before starting the connection process. 2. Next, connect the XLR cable to your external microphone and the other end to the Audio Interface. 3. Power on your external microphone and computer. 4. Launch PreSonus Studio One and create a new Audio Track. 5. Make sure your Audio Interface is selected as the primary input source for recording. In conclusion, connecting external audio devices with PreSonus Studio One is a seamless and straightforward process. Just follow the necessary steps for each device, and you’ll be able to produce high-quality music in no time!

Credit: m.youtube.com
Configuring Audio And Midi Settings
To use external hardware with Presonus Studio One, configuring audio and MIDI settings is crucial. By selecting the correct audio device and configuring MIDI settings to use the external device, you can start recording, editing, and mixing your audio tracks with greater ease and control.
When it comes to recording music, using external hardware with PreSonus Studio One can help take your productions to the next level. However, to make the most out of your equipment, you need to configure your audio and MIDI settings.
Audio Device Settings
To begin, you want to ensure that your audio device is selected and correctly configured in PreSonus Studio One. Here are the steps to follow:
- Go to “Studio One” and select “Options”
- Select “Audio Setup” and choose your audio interface device from the drop-down menu.
- Ensure that the audio device has the correct input and output configuration selected and click “OK”.
Buffer Size And Sample Rate
The buffer size and sample rate are crucial settings that affect the quality and performance of your recordings. Here is what you need to do:
- Go to “Studio One” and select “Options”
- Select “Audio Setup” and choose the correct buffer size for your system.
- Choose an appropriate sample rate, such as 44.1kHz or 48kHz.
- Click “OK” to save the changes.
Midi Device Settings
A MIDI device can connect your hardware synthesizer or MIDI controller to your computer to help you generate sounds. To configure it correctly, follow these steps:
- Go to “Studio One” and select “Options”
- Select “External Devices” and click “Add”.
- Select the category of your device (such as MIDI keyboards).
- Select the manufacturer and the model you are using and click “OK”.
- Your MIDI device should now be added to the list of external devices. Make sure it is enabled by clicking the checkbox next to its name.
By following these steps, you should be able to easily configure your audio and MIDI settings in PreSonus Studio One to optimize your recordings. Remember, better sound quality and performance is just a few clicks away!
Using External Hardware Instruments
Using external hardware with Presonus Studio One is simple and straightforward. After connecting your hardware, you can easily integrate it into your workflow by mapping the controls to your preferred functions. This allows you to make the most of your hardware and create a seamless production experience.
Adding Hardware Instruments To A Song
When setting up Presonus Studio One to work with external hardware instruments, the first step is to add the instrument to the song. To do this, go to the “External Devices” menu and click “Add.” From there, you can select the type of instrument you want to add, such as a synthesizer or drum machine. Once you’ve added the instrument, you can assign it to a specific track in your song.
Recording With External Hardware Instruments
To record with an external hardware instrument in Presonus Studio One, you’ll need to make sure that the instrument is properly connected and assigned to a track in the software. Then, simply hit record and start playing your instrument. You can use the transport controls to start and stop recording, and you can use the mixer to adjust levels and add effects to your instrument’s output.
Saving And Recalling External Hardware Instrument Settings
Once you’ve set up your external hardware instruments in Presonus Studio One, you may want to save your settings so that you can recall them later. To do this, go to the “External Devices” menu and click “Save Setup.” You can then give your setup a name and save it for future use. To recall your settings, simply go back to the “External Devices” menu and select the setup you want to use. By saving and recalling your settings, you can quickly switch between different setups and get the sound you’re looking for without having to spend time reconfiguring your instruments each time.
Using External Hardware Effects Processors
One of the most interesting aspects of digital audio production is the ability to blend the worlds of analog and digital audio processing. With modern DAWs such as Presonus Studio One, it’s easier than ever to incorporate external hardware effects processors into your workflow. In this section, we’ll explore the various ways you can use external hardware effects processors with Presonus Studio One, focusing on inserting them into tracks, recording with them, and automating and controlling them.
Inserting External Hardware Effects Processors Into Tracks
The process of inserting an external hardware effects processor into a track in Presonus Studio One is relatively straightforward. First, you’ll need to connect your external processing unit to your audio interface using the appropriate cables. Then, create a new track in Studio One by right-clicking in the track list and selecting “Add Track”.
Next, open the mixer view and navigate to the track you’ve just created. Click on the “FX” button at the top of the channel strip to open the plug-in browser, and select “External Plugins” at the bottom of the list. From here, you should see your external processing unit listed as an available insert.
Recording With External Hardware Effects Processors
Recording with external hardware effects processors is a bit different than with software plug-ins. First, ensure that your audio interface is set up to route the input signal through your external processor. Then, record-enable the track in Studio One and start recording as normal.
When you’re done recording, it’s important to note that the processed audio will now be “printed” onto the track. This means that any changes you make to the external processing unit after the fact will not affect the recorded audio. For this reason, it’s a good idea to spend some time dialing in the perfect sound before hitting the record button.
Automation And Control Of External Hardware Effects Processors
One of the main advantages of using external hardware effects processors is the ability to manipulate them in real-time via physical controls. With Presonus Studio One, it’s possible to automate these parameters just like with any software-based effect.
First, ensure that your external processing unit is set up to receive MIDI messages. Then, click on the “Show Automation” button at the top of the track list in Studio One. This will open the automation lane for the currently selected parameter (e.g. the wet/dry mix of a reverb effect).
If you move a physical control on your external processing unit, you should see the automation lane in Studio One update in real-time. From here, you can edit the automation just like with any other parameter in the DAW.
Tips And Troubleshooting
Learn how to seamlessly connect external hardware to your Presonus Studio One with these simple tips and troubleshooting methods. From setting up audio interfaces to configuring MIDI devices, this guide will help you take your music production to the next level.
Presonus Studio One is one of the most popular digital audio workstations that musicians, producers and engineers use to record, mix and master their tracks. While Studio One comes with a range of built-in plugins, sometimes you need to use external hardware devices to achieve your desired sound. In this post, we’ll share some tips and troubleshooting techniques to help you get the most out of using external hardware devices with Presonus Studio One.
Common Issues When Using External Hardware
When using external hardware devices with Presonus Studio One, you may run into some common problems. Here are some of the issues you might experience and how to troubleshoot them:
- No Sound: If you’re not getting any sound from your external hardware device, make sure it’s properly connected to your computer and that the correct input and output channels are selected in Studio One. Check the device manufacturer’s instructions for any specific settings you need to adjust in your audio settings.
- Latency: Latency issues can cause an unwanted delay between your playing and the audio output. To reduce latency, try increasing the buffer size in your audio settings or investing in an external audio interface with lower latency.
- Driver Issues: Make sure your external hardware device has the latest driver updates installed. Search the manufacturer’s website for the latest driver software downloads and follow their instructions for installation.
Recommended Hardware Devices For Studio One
Studio One is compatible with a range of external hardware devices. Here are some of our top picks for recommended hardware devices that work well with Studio One:
| Device Name | Type | Price |
|---|---|---|
| Focurite Scarlett 2i2 | Audio Interface | $159 |
| Universal Audio Apollo Twin MkII | Audio Interface | $899 |
| Mackie Big Knob Studio+ | Monitor Controller | $299 |
| dbx 286s | Channel Strip Processor | $199 |
Optimizing Your System For External Hardware
To get the most out of using external hardware devices with Studio One, it’s important to optimize your system settings. Here are some tips for optimizing your system:
- Update Your Software: Make sure you are using the latest version of Presonus Studio One and your external hardware device drivers. This ensures that all compatibility issues are resolved and any reported bugs are fixed.
- Manage Your Plugins: Only use the plugins you need for your projects. Using too many plugins can slow down your system, so consider disabling any plugins you’re not using.
- Upgrade Your Hardware: If you’re experiencing latency issues or slow performance, consider upgrading your computer’s hardware components, such as your processor or RAM.
- Use Direct Monitoring: Direct Monitoring allows you to monitor through your external hardware while you’re recording. This reduces latency and ensures you’re hearing your sound in real-time.
By following these tips and troubleshooting techniques, you can use external hardware devices with Presonus Studio One effectively and maximize your music production workflow.

Credit: mixandmastermysong.com
Credit: support.presonus.com
Frequently Asked Questions For How To Use External Hardware With Presonus Studio One
How Do I Use External Instruments In Studio One?
To use external instruments in Studio One: 1. Connect your instrument to your computer 2. Open Studio One and create a new instrument track 3. Click on the “Input” button on the track and select your external instrument 4. Press “Record” or play your MIDI keyboard to start making music 5.
Adjust your settings and options as needed for optimal performance.
How Do I Add External Plugins To Studio One?
To add external plugins to Studio One, follow these steps: First, locate the plugin file and copy it into the correct plugin folder. Next, open Studio One’s Preferences and go to the Locations tab. Click on the VST Plugins tab and add the folder containing the newly added plugin.
Finally, restart Studio One and the plugin should now be available to use.
How Do I Add An Instrument To My Presonus Studio One?
To add an instrument to your PreSonus Studio One, go to the Instruments tab, and choose your preferred instrument from the list. You can also install third-party plug-ins from the Studio One Extension Manager. Simply select the plug-in you want, and it will be added to your instruments list.
How Do I Set Output Device In Studio One?
To set output device in Studio One, go to Options, then Audio Setup. Under Audio Devices, choose your desired output device from the drop-down menu. If it doesn’t appear, click on Configure Audio Devices and select it from there. Lastly, click Apply and OK to save the changes.
Conclusion
To sum up, external hardware is a fantastic addition to Presonus Studio One that will elevate your audio production experience. With the right equipment and setup, you can maximize the creative potential of your DAW and bring your music to life.
Whether it’s a MIDI controller, an audio interface or any other external hardware, Studio One has everything you need to make the most of it. So don’t hesitate to explore the possibilities and take your music to the next level.