To record vocals in FL Studio, ensure you have a good microphone, adjust input levels, use effects sparingly and record in a sound treated space. Recording vocals in FL Studio is an essential part of producing music.
However, it can be tricky to get the perfect sound. Whether you’re an experienced producer or a beginner, there are a few essential tips that can help you achieve high-quality recordings. We’ll provide you with the basic guidelines for recording vocals in FL Studio.
We’ll also discuss how to use plugins and effects, how to adjust input levels, and the importance of recording in a sound treated space. These tips will help you take your recordings to the next level and create professional-sounding tracks.
Credit: productionden.com
Setting Up Your Microphone
When it comes to recording vocals in FL Studio, a good microphone setup is essential to achieving high-quality sound. Setting up your microphone involves two crucial factors: choosing the right microphone and positioning it in the right place. Here are some tips to help you improve your microphone setup and achieve the best possible recordings.
Choosing The Right Microphone
Choosing the right microphone for your recording is crucial as it can have a significant impact on the quality of your recordings. There are several types of microphones available, but the most commonly used microphones for recording vocals are:
| Type of Microphone | Advantages | Disadvantages |
|---|---|---|
| Condenser Microphone | Produces warm, natural sound, perfect for vocals | Expensive and delicate, requires phantom power |
| Dynamic Microphone | Durable, affordable, and versatile, good for live performances | Produces less detailed sound, not ideal for soft vocals |
For recording vocals in FL Studio, a condenser microphone is generally recommended, but a dynamic mic can also work well if you are on a tight budget. Just make sure to choose a microphone that is compatible with your audio interface and suits your singing style.
Positioning Your Microphone
Once you’ve chosen the right microphone, it’s time to position it properly. Here are some tips to help you get the best sound:
- Choose a quiet recording environment free from external noises and echoes.
- Position the microphone at least 6 inches away from your mouth to avoid popping and sibilance sounds.
- Position the microphone at a 45-degree angle below your mouth for a more natural sound.
- Use a pop filter to minimize plosives and improve vocal clarity.
- Avoid placing the microphone too close to a reflective surface or a wall that can cause echoes.
By following these tips, you’ll be able to set up your microphone properly and achieve professional-sounding recordings in FL Studio. Remember, a good microphone setup is just one of the many components of a good vocal recording. With practice and patience, you’ll be able to master the art of recording vocals and take your music to the next level.
Preparing The Recording Environment
To ensure optimal recording quality in FL Studio, it’s important to prepare the recording environment. This includes selecting the right microphone and room, minimizing background noise and reflections, and proper microphone placement. By following these essential tips, you can achieve professional-sounding vocal recordings in FL Studio.
Preparing the recording environment is crucial to getting a high-quality recording. Whether you’re a seasoned pro or new to FL Studio, selecting the right studio space and minimizing background noise are essential. In this section, we’ll go over some essential tips to ensure that your recording environment is optimized for vocals.
Selecting The Right Studio Space
Choosing the right studio space is key to a good recording. You want to look for a space that is quiet and has good acoustics. If possible, try to find a room that has been specifically designed for recording. Spaces with hardwood floors and flat walls are ideal for sound quality. You will also want to ensure that the studio space has enough room for you, your microphone, and any other equipment you’ll be using.
Minimizing Background Noise
Background noise can ruin a recording. To minimize noise, start by turning off any unnecessary electronic equipment in the room. Fans, air conditioning, and refrigerators can all produce unwanted noise. If you’re recording in a room with windows, close them to reduce outside noise. You can also use sound-absorbing materials like acoustic foam to help eliminate echoes and other noise reflections. One of the easiest ways to reduce background noise is to use a pop filter. Pop filters are designed to eliminate the popping sounds that often occur when recording vocals. They work by placing a barrier between the singer and the microphone, reducing the amount of air that hits the microphone. Finally, make sure that everyone in the recording environment knows to be as quiet as possible while the recording is in progress. This includes turning off cell phones and other devices that might produce noise. By following these tips for preparing the recording environment, you’ll be well on your way to getting a high-quality vocal recording in FL Studio.
Optimizing Fl Studio Settings For Recording
Optimizing FL Studio settings is crucial when recording vocals. Follow these essential tips: use a high-quality microphone, adjust the input gain, set the ASIO driver, use headphones, and reduce background noise. With these steps, you can achieve high-quality vocal recordings in FL Studio.
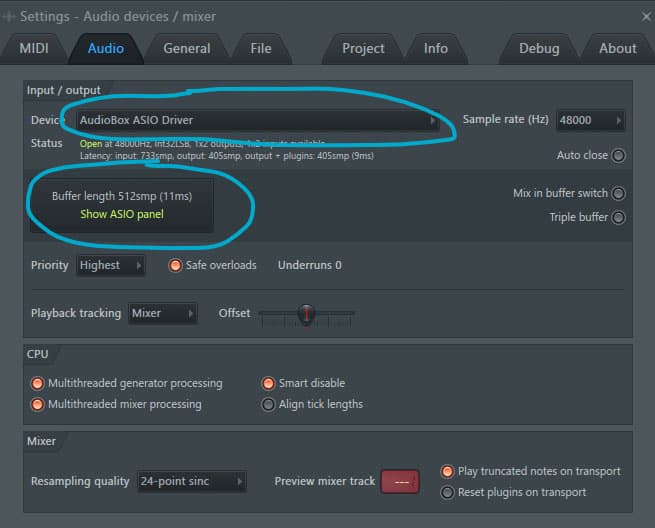
Optimizing FL Studio Settings for Recording When it comes to recording vocals, having the right tools and settings in place is essential to achieving professional-sounding results. In this article, we’ll delve into the necessary steps to optimize FL Studio settings for recording. Here are the key areas we’ll cover. Audio Device Setup Before you start your recording session, ensure that your audio interface is properly connected to your computer. Here is how you can set up an audio device in FL Studio. 1. Navigate to Options > Audio Settings 2. Select your audio device from the dropdown menu 3. In the Input/Output section, select your desired input and output ports 4. Click on the ‘Show ASIO panel’ button to further configure your audio device 5. Adjust the buffer length to achieve the lowest latency possible Setting up the Mixer The mixer in FL Studio plays a significant role in the recording process. You’ll need to set up the mixer correctly to achieve optimal sound quality. Here are the steps to follow. 1. Open the mixer by clicking on the mixer icon in the toolbar or by hitting F9 2. Ensure that the input track is enabled, and the record arm button is turned on 3. Mute unnecessary mixer tracks to prevent bleed and noise 4. Set the levels of each channel by adjusting the faders 5. Add effects such as EQ, compression, and reverb to enhance the vocals Configuring FL Studio’s Recording Settings Lastly, adjusting the recording settings is crucial to ensure that your recorded vocals are clear and distortion-free. Here are the essential recording settings in FL Studio that you need to configure. 1. Navigate to Options > Audio Settings 2. In the Input/Output section, select your desired sample rate and bit-depth 3. Ensure that ‘Auto Close’ is enabled so that FL Studio can close other programs when you start recording 4. Turn on the Metronome to keep the recording in time with your project 5. Select your desired recording mode from the dropdown menu (Playlist or Pattern) 6. Adjust the recording volume before starting your recording By optimizing FL Studio settings for recording, you can achieve outstanding vocal recordings and produce professional-sounding tracks. Be sure to follow the above guide, and you’ll be well on your way to making great music.

Credit: www.productionmusiclive.com
Tips For Vocal Recording
Recording vocals in FL Studio can be a tricky process, but with these essential tips, you’ll get the perfect sound every time. Start by choosing the right mic and interface, setting adequate gain levels, and managing your recording environment to reduce unwanted noise.
Remember to experiment with different effects and vocal processing techniques to find your unique style.
Recording vocals in FL Studio can be challenging, especially if you’re new to music production. However, with the right techniques and tools, you can capture high-quality vocal recordings that sound professional. Here are some tips for vocal recording in FL Studio.
Recording At The Right Volume Levels
One of the most important aspects of vocal recording is setting the right volume levels. If the vocals are too low, there won’t be enough volume to work with during the mixing process. On the other hand, if the vocals are too loud, they may clip and distort, making them unusable. To ensure that you’re recording at the right volume levels, use the mixer to monitor your recording levels. You can use the channel rack to adjust the volume of the mixer tracks and set the levels for each individual track. Try to keep your vocals within the yellow/orange range on the mixer meter, as this is the sweet spot for recording vocals.
Getting The Best Vocal Performance
Getting a great vocal performance is crucial in getting the best possible recording. To achieve this, it’s important to create a comfortable and relaxed environment for the vocalist. Make sure the room is quiet, and the temperature is comfortable. Additionally, you should encourage the artist to warm up their vocals before recording and take breaks if they need them. Also, ensure they hydrate their body by drinking a glass of water before the recording to prevent dry mouth, which could affect their performance.
Using Headphones For Monitoring
When recording vocals, using headphones can help you monitor the recording while preventing any sound leakage into the microphone. Be sure to adjust the headphone volume levels so that the artist can hear their voice clearly without being too loud and causing feedback. Moreover, you can use FL Studio’s plugin ‘Fruity Convolver’ to add reverb and compression to the headphones, so the artist can hear themselves better and stay on pitch. It would help if you also used a pop filter to prevent plosive sounds from reaching the microphone. In conclusion, these tips will help you record high-quality vocal tracks in FL studio. Remember to experiment with different techniques and settings until you find the perfect combination for capturing vocals that sound professional and polished.
Processing And Mixing Vocals
Learn the essential tips for recording clear and crisp vocals in FL Studio by focusing on techniques like microphone placement, proper gain staging, and processing. A combination of EQ, compression, and reverb effects can help in mixing the vocals to perfection.
Once you have recorded your vocals, the next step is to process and mix them to achieve a polished and professional sound. There are various techniques you can use to achieve this, which we will be discussing below.
Comping And Editing Vocals
Comping is the process of combining the best parts of multiple takes to create a single, perfect take. This helps in eliminating mistakes, vocal inconsistencies, and other issues. In FL Studio, you can use the playlist and take lanes to create a comped vocal track. After creating a comped track, it’s time to edit vocals. It’s recommended to use a headphone while editing, which helps in identifying the imperfections clearly. Cut out the unwanted parts, such as breaths and pops, and adjust the timing to ensure the vocals sit well with the beat.
Removing Noise And Pops
Background noise and pops can be distracting and take away from the vocal clarity. FL Studio comes with various plugins that can effectively remove pops, clicks, and noise from the vocals. Use the Edison plugin to remove noise and pops, and ensure the vocal remains clear and clean.
Applying Eq And Compression
Equalization and compression are the most crucial steps in vocal processing. EQ helps in balancing the vocal frequencies, while compression evens out the dynamic range of the vocal. In FL Studio, the Fruity Parametric EQ and Fruity Compressor plugins can be used to apply EQ and compression on vocals. Ensure to apply EQ and compression in moderation and never over-process the vocals. Over-processing can result in a harsh and unnatural sound, which can be detrimental to the overall song quality. By following the tips mentioned above, you can achieve a professional and polished vocal sound in FL Studio. Remember to experiment with different techniques and plugins, and trust your ears to achieve the best possible result.
Adding Effects And Enhancements
To take your recorded vocals to the next level, adding effects and enhancements in FL Studio is essential. Utilize tools like reverb, compression, EQ, and distortion to polish your vocals and make them stand out in your mix. Experiment with different settings and plugins to find the perfect sound for your track.
Using Reverb And Time-based Effects
Adding effects is an important aspect of enhancing the quality and richness of vocal recordings. Reverb and time-based effects are two popular ways of doing so. Reverb can add space and depth to vocals while time-based effects include delay and echo and can create a sense of presence and depth. Using these effects in moderation can enhance the recording quality and make it more appealing to the listener.
Adding Harmonies And Doubling
Another widely used technique for enhancing vocal recordings in FL Studio is adding harmonies and doubling. By duplicating the original recording and creating multiple vocal tracks, you can create harmonies by adjusting the pitch and timing of the added tracks. Doubling can create a richer and fuller sound by adding a second voice and panning it opposite to the original track. However, make sure not to overdo it as it can lead to a cluttered and distracting sound.
Pitch Correction
Pitch correction is an effective technique in fixing small pitch errors in vocals. It’s important to keep the pitch correction natural to avoid making the vocals sound robotic. FL Studio comes with a built-in pitch correction plugin, but it is better to do it manually using the pitch shifter tool and adjusting the pitch as needed. While applying pitch correction, make sure to keep the original recording intact and always use it as a reference. By following these simple techniques of adding effects, harmonies, and pitch correction, you can ensure a polished and professional vocal recording in FL Studio. Remember to use these techniques in moderation and always keep the original recording as a reference to maintain the authenticity of the performance.
Advanced Techniques And Tips
Learn how to improve your vocal recordings in FL Studio with these essential tips. From microphone placement to vocal editing techniques, this guide covers all you need to know to achieve professional-sounding results.
Advanced Techniques and Tips Recording vocals in FL Studio can be a challenging task. However, with advanced techniques and tips, you can achieve a professional sound that will elevate your music to the next level. Here are some great tips to help you layer vocals for depth and impact and use automation for effect and EQ changes. Layering Vocals for Depth and Impact Layering vocals is a powerful technique to create depth and impact in your recordings. It involves recording different versions of the same vocal part and blending them to create a larger sounding track. Here are some tips to get started with layering vocals in FL Studio:
- Record multiple versions of the same vocal part, experiment with different vocal styles, harmonies, and melodies.
- Be mindful of pitch and timing when recording each part.
- Use a combination of EQ, compression, and reverb to blend the different vocal parts together.
- Separate each vocal part into its mixer track to have more control over the individual levels and effects applied.
- Create duplicates of each vocal part and pan each duplicate hard left and right to create a wider stereo image.
Using Automation for Effect and EQ changes Automation is an essential tool in FL Studio that can create more nuanced vocal recordings. It involves gradually increasing or decreasing an effect or EQ parameter over time. Here are some tips for using automation in FL Studio:
- Choose the parameter you want to automate, such as reverb, delay, or EQ.
- Right-click on the parameter to open up the automation menu.
- Draw in the automation using a mouse or MIDI controller to adjust the parameter over time.
- Be subtle with your automation to create a natural-sounding and dynamic recording.
- Use automation to create build-ups and breakdowns in the vocals, adding to the overall musicality of the track.
In conclusion, FL Studio offers tremendous capabilities to take your vocal recordings to the next level. With advanced techniques and tips, such as layering vocals and automation, you can create a professional and dynamic vocal recording.

Credit: www.editorskeys.com
Frequently Asked Questions For Essential Tips For Recording Vocals In Fl Studio
How Do You Record Good Vocals In Fl?
To record good vocals in FL Studio, you need to follow these steps: 1. Choose the right microphone and interface. 2. Set up your recording session correctly. 3. Optimize your recording environment. 4. Use proper microphone techniques. 5. Apply EQ, compression, and other effects to enhance the vocals.
Is Fl Studio Good For Voice Recording?
FL Studio is primarily a music production software, but it can also be used for voice recording. It has a range of features that are useful for recording and editing vocals, including multi-track recording, built-in effects, and a mixer. However, it may not be the best option for professional-grade voice recording.
How Do You Master Vocals In Fl Studio?
To master vocals in FL Studio, use EQ, compression and reverb plugins to adjust levels, reduce interference and add depth. Edit pitch with Autotune or Melodyne, and add harmonies with FL’s Vocodex feature. Practice with different effects and workflows until you perfect your sound.
How Do You Not Hear Yourself When Recording Vocals In Fl Studio?
To not hear yourself when recording vocals in FL Studio, use headphones to monitor the audio. Connect the headphones to your audio interface’s headphone output and select that input as your monitoring source. Adjust the mix so that there’s no latency or delay, and then start recording.
Conclusion
As we come to the end of our journey into recording vocals in FL Studio, we hope you’ve found our essential tips to be helpful in achieving top-notch results. With the right tools and techniques, you can create recordings that are rich in clarity, depth, and emotion.
Remember to always pay attention to acoustics, microphone placement, gain staging, and post-processing. Above all, practice makes perfect, so don’t be afraid to experiment and find your own unique style. Happy recording!