To export multiple tracks in Logic Pro 9 and Logic X, go to the File menu, select Export, and then choose All Tracks as Audio Files. This will create individual audio files for each track in your project.
Logic Pro is a popular digital audio workstation used by musicians, producers, and sound engineers around the world. One of the common tasks in music production is to export multiple tracks in one go. In Logic Pro 9 and Logic X, exporting multiple tracks is an easy process that can be completed in just a few clicks.
Once you have your project ready, simply follow the steps to export all tracks as individual audio files. In this tutorial, we will go through the step-by-step guide to exporting multiple tracks in Logic Pro, so you can save time and focus on creating great music.
Credit: support.apple.com
Exporting Multiple Tracks In Logic Pro X
Exporting multiple tracks in Logic Pro X is essential for music producers who need to save individual tracks to send to a mix engineer or collaborate with other artists. This tutorial will guide you through the process of exporting multiple tracks in Logic Pro 9 and Logic X, making it easier for you to share your music with others.
Exporting multiple tracks in Logic Pro X is a crucial step in the music production process. It allows you to export your individual tracks, so you can mix them properly or send them to someone else for mixing. In this tutorial, we will walk you through the process of exporting multiple tracks in Logic Pro X in three easy steps: selecting tracks for export, choosing the export format, and naming and choosing a destination for exported files. ### Selecting tracks for export Before you start exporting your multiple tracks, you need to select the ones that you want to export. In Logic Pro X, you can easily select tracks for export by following these steps: Table 1: Steps to select for export. | Steps | Actions | | — | — | | Step 1 | Open Logic Pro X on your computer. | | Step 2 | Find the tracks you want to export in your project. | | Step 3 | Hold down the Command key and click on the track headers to select the tracks. | | Step 4 | Once you have selected the tracks, go to File > Export > All Selected Tracks. | ### Choosing the export format After selecting the tracks, the next step is to choose the export format for the tracks. You can choose various formats depending on your need, such as AIFF, WAV, MP3, among others. Follow these simple steps to choose the export format: Table 2: Steps to choose the export format. | Steps | Actions | | — | — | | Step 1 | Click on the “Format” dropdown menu. | | Step 2 | Choose the format that you want to export the tracks in. | | Step 3 | Choose the bit depth and sample rate for your export. | | Step 4 | Click on the “Save” button. | ### Naming and choosing a destination for exported files The final step is to name and choose a destination for the exported files. When you export multiple tracks from Logic Pro X, it will create a separate audio file for each track. Follow these steps below to name and choose a destination for the exported files: Table 3: Steps to name and choose a destination for exported files. | Steps | Actions | | — | — | | Step 1 | Click on the “Name” column and name each track. | | Step 2 | Browse and choose the destination folder for the exported files. | | Step 3 | Click on the “Export” button. | Conclusion: Exporting multiple tracks in Logic Pro X is a straightforward process. By following the above-mentioned steps, you can export multiple tracks in just a few clicks, and use them for mixing or send them to someone else for mixing.
Exporting Multiple Tracks In Logic Pro 9
Exporting multiple tracks in Logic Pro 9 can seem like a daunting task, but with a little preparation, it can be a simple and quick process. Whether you’re exporting audio stems for a professional studio, or simply sharing your music with friends, Logic makes it easy to consolidate and export your tracks with ease.
Preparing Tracks For Export
Before you begin exporting your tracks, it’s essential to ensure that each track is ready for export. This includes checking the mixing levels, muting any unwanted parts, and ensuring that each track is properly panned. You should also decide which tracks should be exported, and which ones should be omitted. This may be done by either selecting individual tracks or grouping them together with other tracks that you want to keep as one file.
It’s also important to ensure that any effects or plugins added to each track are rendered and set to the correct level for export. When you are happy with your tracks, it’s time to export them.
Setting Up The Export Process
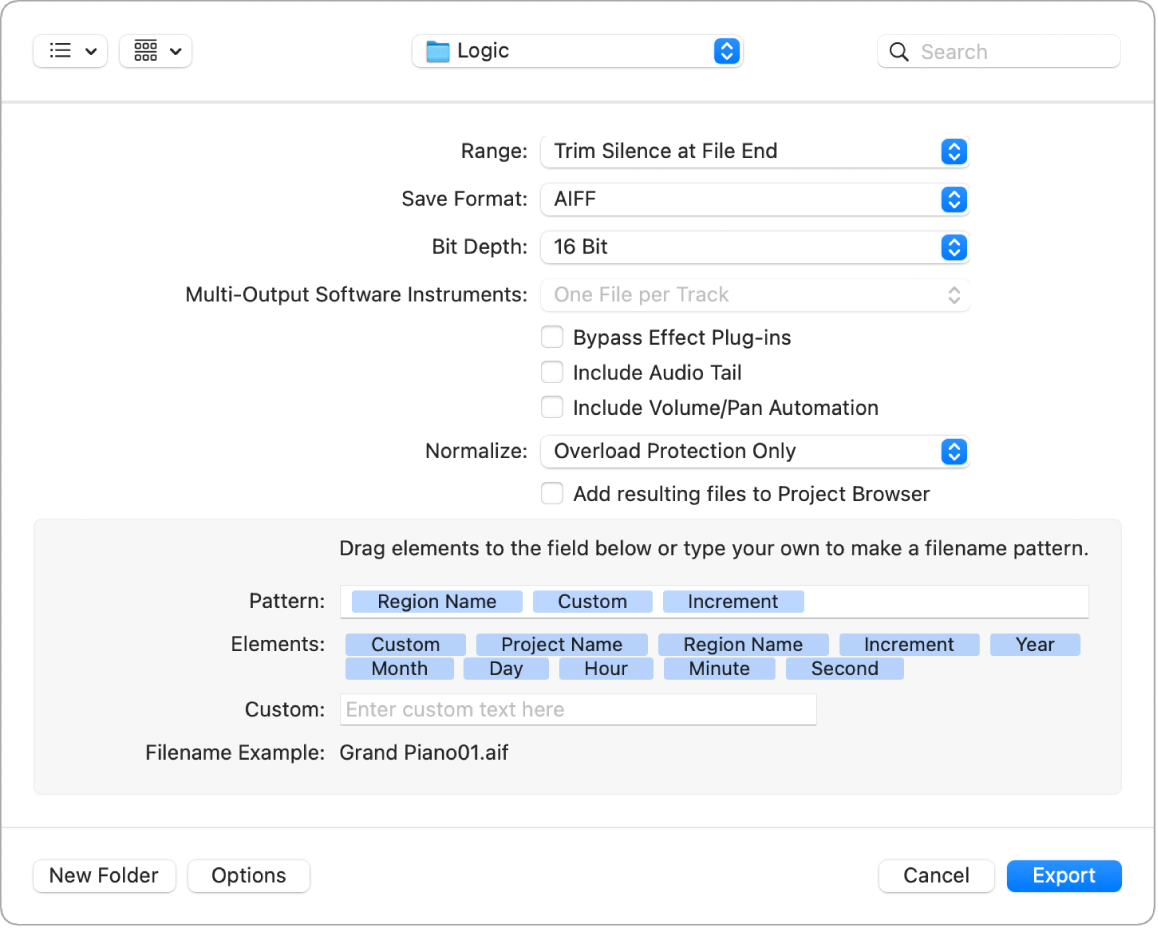
The first thing to do is select all the tracks you wish to export and go to the File menu, where you can choose “Export All Tracks as Audio Files.” This will bring up the Export Audio dialog box, where you can specify the format, sample rate, and bit depth for your exported tracks.
You can choose from a variety of audio formats, including WAV, AIFF, MP3, and many others. Once you have made your selection, click on the “Export” button to begin the export process.
Naming And Choosing A Destination For Exported Files
The last step is to name and choose a destination for the exported files. Logic default export location is the same project folder, so you may change it to the desired output folder. You can also name your files using a range of different naming options such as numbering, date, and time signatures. When you are finished, select “Export” to complete the process.
In conclusion, exporting multiple tracks in Logic Pro 9 is a relatively simple process. By taking the time to properly prepare your tracks, correctly setting up the exporting process, and choosing a proper naming convention and destination for your files, you can quickly and easily share your music with others.
Tips For Exporting Multiple Tracks
Learn how to export multiple tracks in Logic Pro 9 and Logic X with this easy-to-follow tutorial. Follow the steps carefully to ensure a seamless exporting process and create high-quality audio tracks for your music productions.
Exporting multiple tracks can be a daunting task, especially for those new to Logic Pro 9 and Logic X. Getting the right mix of tracks done right can really make your music sound professional. Here are some tips to help you with exporting multiple tracks.
Organizing Tracks Before Exporting
Before exporting multiple tracks, it is essential to organize them properly. If your project has multiple tracks, you should group them in a way that makes sense to you. This will help you keep track of what you are exporting and in what order. Naming convention will also make things easier for you when exporting.
Prioritizing Tracks For Export
It is essential to prioritize your tracks based on your musical arrangement. The main priority should be given to core elements such as drums, bass, and vocals. This approach will ensure that the core elements are properly balanced in the mix. You should also lower the track volume levels to avoid clipping and distortion.
Checking Exported Files For Quality
It is recommended that you check your exported files for quality after exporting. You should listen to the tracks carefully to ensure that they sound the way you want them to. If the tracks have any mistakes, you should correct them before the final export. Checking the exported files can also help you identify any mix issues such as volume imbalances. In summary, exporting multiple tracks can be challenging, but with these tips, it should be much easier to accomplish. Organizing your tracks before exporting, prioritizing the core elements, and checking the exported files for quality will go a long way to making your music sound professional and polished.
Common Exporting Errors And How To Fix Them
Learn how to export multiple tracks in Logic Pro 9 and Logic X with ease by avoiding common exporting errors. Follow our tutorial to fix issues and ensure your tracks are exported flawlessly.
Common Exporting Errors and How to Fix Them: Exporting multiple tracks in Logic Pro can be challenging, especially if you encounter some errors during the process. Certain errors, if not fixed, can compromise the quality and playback of your exported tracks. In this section, we will explore common exporting errors and how to fix them, ensuring that you export high-quality tracks that meet your desired specifications. Incorrect file format selection One of the most typical errors to encounter when exporting tracks in Logic Pro is selecting the wrong file format. It would be best to ensure that you choose the right file format to avoid playback issues. Here are the possible formats that you can choose from when exporting your tracks, depending on your project requirements: – AIFF: High-quality uncompressed file format suitable for burning to CD – WAV: Similar to AIFF, a high-quality uncompressed file format used in Windows – Apple Lossless: A compressed file format that retains the original audio quality – MP3: A lossy compressed file format suitable for sharing your tracks online To avoid choosing the wrong file format, select the intended format from the format drop-down menu in the Export Audio Dialog box. Mismatched bit-depth and sample rate Another common error that can affect the quality and playback of your exported tracks is a mismatched bit-depth and sample rate. Bit-depth refers to the number of bits used to represent a single audio sample, while sample rate defines the number of samples per second. When exporting your tracks, ensure that the bit-depth and sample rate you select matches your project settings. Otherwise, the exported tracks may sound distorted or corrupted. Here are the standard bit-depth and sample rate specifications you can use: – Bit-depth: 16-bit or 24-bit – Sample rate: 44.1 kHz, 48 kHz, 88.2 kHz, or 96 kHz Ensure that you check your project settings before exporting your tracks to avoid this error. Incorrectly named files Naming your exported tracks correctly is essential, as it helps you identify tracks and prevents confusion. Ensure that you follow a naming convention that is easy to understand and identify what each track contains. To avoid incorrectly named files, you can use placeholders in the naming field, such as track number or name, project name, date, and time. For example, track1_myproject_date_time.wav. Conclusion In summary, exporting multiple tracks in Logic Pro requires attention to detail and following the correct steps and settings. By avoiding common exporting errors such as selecting the wrong file format, mismatching bit-depth and sample rate, and incorrectly named files, you can export high-quality tracks that meet your project requirements.
Credit: support.apple.com
Frequently Asked Questions For How To Export Multiple Tracks In Logic Pro 9 And Logic X Tutorial
How Do I Export Multiple Tracks From Logic Pro?
To export multiple tracks from Logic Pro, select the tracks you want to export by holding down the command key and clicking on each track. Then, go to File > Export > All Selected Tracks as Audio Files. Choose your desired settings and location, and click Export.
How Do You Select Multiple Tracks In Logic 9?
To select multiple tracks in Logic 9, hold down the “Shift” key and click on the tracks you want to select, or hold down the “Command” key and drag your mouse over the desired tracks.
How Do You Bounce Multiple Tracks In Logic Pro?
To bounce multiple tracks in Logic Pro, navigate to the File menu and select “Bounce. ” Choose “Bounce Tracks” from the options, then select the tracks you want to bounce. Adjust any desired settings, then hit “Bounce” to complete the process.
How Do I Export All Stems From Logic?
To export all stems from Logic, go to the File menu, select Export, and then choose either “Stems” or “All Stems”. Follow the prompts to select the format and destination, and then click Export.
Conclusion
In a nutshell, exporting multiple tracks in Logic Pro is not only practical but essential when you are in the music industry. Knowing this technique assures that your project with multiple tracks will still maintain its quality, which allows your song to stand out from others.
By following our tutorial, you can easily and quickly export multiple tracks in Logic Pro 9 and Logic X. With your skills and these tips, showcasing your work has never been easier!