To fix latency in Cubase 5, adjust buffer size settings and optimize your system’s performance. Dealing with latency issues in Cubase 5 can be frustrating for music producers and engineers.
When the delay between your input and the output is noticeable, it can disrupt your creative workflow. However, by making simple adjustments to the buffer size settings and ensuring your system is running smoothly, you can effectively reduce and eliminate latency in Cubase 5.
In this guide, we will explore some practical steps to optimize your system for low latency performance in Cubase 5, allowing you to focus on creating music without any interruptions or delays.
Understanding Latency In Cubase 5
Latency refers to the delay between when an audio signal is input into Cubase 5 and when you hear the output. In music production, low latency is crucial to ensure real-time monitoring and recording accuracy.
- Inadequate buffer settings can lead to increased latency in Cubase 5.
- High CPU usage may cause delays in processing audio signals, resulting in latency.
- Using multiple plugins simultaneously can overload the system and introduce latency.
- Outdated audio drivers may not optimize system performance, contributing to latency issues.

Credit: www.amazon.com
Optimizing Audio Settings
When dealing with latency issues in Cubase 5, optimizing the audio settings can significantly improve performance. Two essential aspects to focus on are Adjusting Buffer Size and Optimizing Audio Driver Settings.
Adjusting Buffer Size
Setting the buffer size correctly can help reduce latency in Cubase 5. Larger buffer sizes increase stability but may introduce more latency, while smaller buffer sizes reduce latency but can lead to dropouts on slower systems.
Optimizing Audio Driver Settings
Choosing the right audio driver and configuring its settings properly is crucial for optimal performance in Cubase 5. Ensure you are using an ASIO-compatible driver for the lowest possible latency.
Utilizing Freeze And Render Functions
In Cubase 5, latency issues can often disrupt your workflow and affect the quality of your projects. However, utilizing the Freeze and Render functions can help you efficiently manage latency and ensure smooth playback of your audio tracks. Let’s delve into how you can leverage these functions to address latency concerns in Cubase 5.
Using Freeze Function
The Freeze function in Cubase 5 allows you to conserve system resources by rendering audio and instrument tracks to temporary files. This eliminates the need for real-time processing, which can contribute to latency issues during playback. To use the Freeze function, follow these steps:
- Select the audio or instrument track you wish to freeze.
- Right-click on the track and choose “Freeze Track” from the context menu.
- Once the track is frozen, Cubase will disable real-time processing for that track, reducing the strain on your system and minimizing latency.
Applying Render Function
The Render function allows you to permanently apply your track’s effects and processing, further reducing the need for real-time processing and minimizing latency. To apply the Render function, follow these steps:
- Highlight the track you want to render.
- Navigate to the “Render” option in the menu and select “Render in Place.”
- Choose the rendering settings that best match your project’s requirements, such as including or excluding certain effects.
- Once the rendering process is complete, your track will no longer require real-time processing, helping to alleviate latency issues.
Managing Plugins Effectively
One common issue that users of Cubase 5 may encounter is latency, which can disrupt the smooth workflow and hinder the creative process. Latency refers to the delay between pressing a key on your MIDI controller or playing a virtual instrument and hearing the sound produced. This delay can be frustrating and affect the overall performance of your project. Fortunately, there are several steps you can take to fix latency in Cubase 5, and one crucial aspect to consider is managing your plugins effectively. In this article, we will explore how you can identify resource-intensive plugins and make use of plugin bypass and offline processing to minimize latency.
Identifying Resource-intensive Plugins
When it comes to latency issues, it is essential to identify the plugins that are consuming excessive system resources. Certain plugins, such as amp simulators, reverb effects, and multi-layered samplers, tend to be more resource-intensive than others. By identifying these plugins, you can prioritize them for optimization and find alternative solutions if necessary.
Here are some steps you can follow to identify resource-intensive plugins:
- Open your Cubase 5 project and navigate to the mixer window.
- Pay attention to the plugins used in each channel and make a list of the ones that are frequently causing latency issues.
- Take note of any plugins that consume a significant amount of CPU power, as indicated by the CPU meter in Cubase 5.
- Additionally, you can use the “Plugin Information” window in Cubase 5 to view the CPU usage of each plugin.
Utilizing Plugin Bypass And Offline Processing
Once you have identified the resource-intensive plugins, one effective way to minimize latency is by utilizing plugin bypass and offline processing features in Cubase 5. These tools allow you to temporarily disable plugins or process them offline, reducing the strain on your system resources and decreasing latency.
Here’s how you can make use of plugin bypass and offline processing:
- To bypass a plugin, simply right-click on it in the mixer window and select the “Bypass” option. This will temporarily disable the plugin without removing it from your project.
- If you are working on a part that does not require real-time processing, you can also utilize the offline processing feature. This allows you to apply plugin effects to your audio or MIDI data without real-time playback, reducing latency. To access offline processing, right-click on the audio or MIDI event that you want to process, go to the “Audio” or “MIDI” menu, and select the desired plugin for offline processing.
- Remember to reactivate the bypassed plugins or revert the offline processing once you are done with the parts that required latency reduction. This ensures that your project retains the intended sound and processing.
By effectively managing your plugins in Cubase 5, specifically by identifying resource-intensive plugins and utilizing plugin bypass and offline processing, you can significantly minimize latency issues and enhance the overall performance and responsiveness of your projects.
Hardware And System Considerations
To fix latency in Cubase 5, consider upgrading your hardware and system for optimal performance. Enhance your computer’s processing power and memory capacity. Additionally, ensure that your audio interface drivers are up to date and compatible with your system. Improving hardware and system setup can significantly reduce latency issues in Cubase 5.
When it comes to fixing latency issues in Cubase 5, there are certain hardware and system considerations that need to be taken into account. These factors play a crucial role in ensuring a smooth and lag-free experience while working with audio projects. Upgrading hardware components and performing system maintenance and optimization are two key areas to focus on.
Upgrading Hardware Components
One effective way to address latency issues is by upgrading hardware components. By investing in the right hardware, you can significantly improve the performance of your Cubase 5 software. Here are a few hardware upgrades to consider:
- Processor: A powerful processor with multiple cores can handle complex audio processing tasks more efficiently.
- RAM: Increasing the amount of RAM in your system allows for better multitasking and faster data transfer, reducing the likelihood of latency issues.
- Hard Drive: Consider upgrading to a solid-state drive (SSD) for faster read and write speeds, which can enhance the overall performance of your software.
- Audio Interface: Choosing a high-quality audio interface can minimize latency and deliver better audio playback.
System Maintenance And Optimization
Keeping your system well-maintained and optimized is another crucial step in minimizing latency in Cubase 5. By following these system maintenance and optimization tips, you can ensure optimal performance:
- Regular Updates: Stay up-to-date with the latest Cubase 5 updates and drivers, as they often contain bug fixes and improvements that can address latency issues.
- Close Unnecessary Programs: Close any unnecessary programs or applications running in the background to free up system resources.
- Disable Antivirus Scans: Temporarily disable antivirus scans while working on demanding audio projects to prevent any performance slowdowns.
- Adjust Buffer Size: Experiment with different buffer sizes in Cubase 5 settings to find the optimal balance between latency and audio quality.
- Disable Power Saving Settings: Ensure that power-saving settings are turned off, as they may interfere with the performance of your hardware and cause latency issues.
By exploring hardware upgrades and implementing system maintenance and optimization techniques, you can effectively fix latency issues in Cubase 5. Remember to consider the specific needs of your audio projects and choose the hardware components that best suit your requirements.
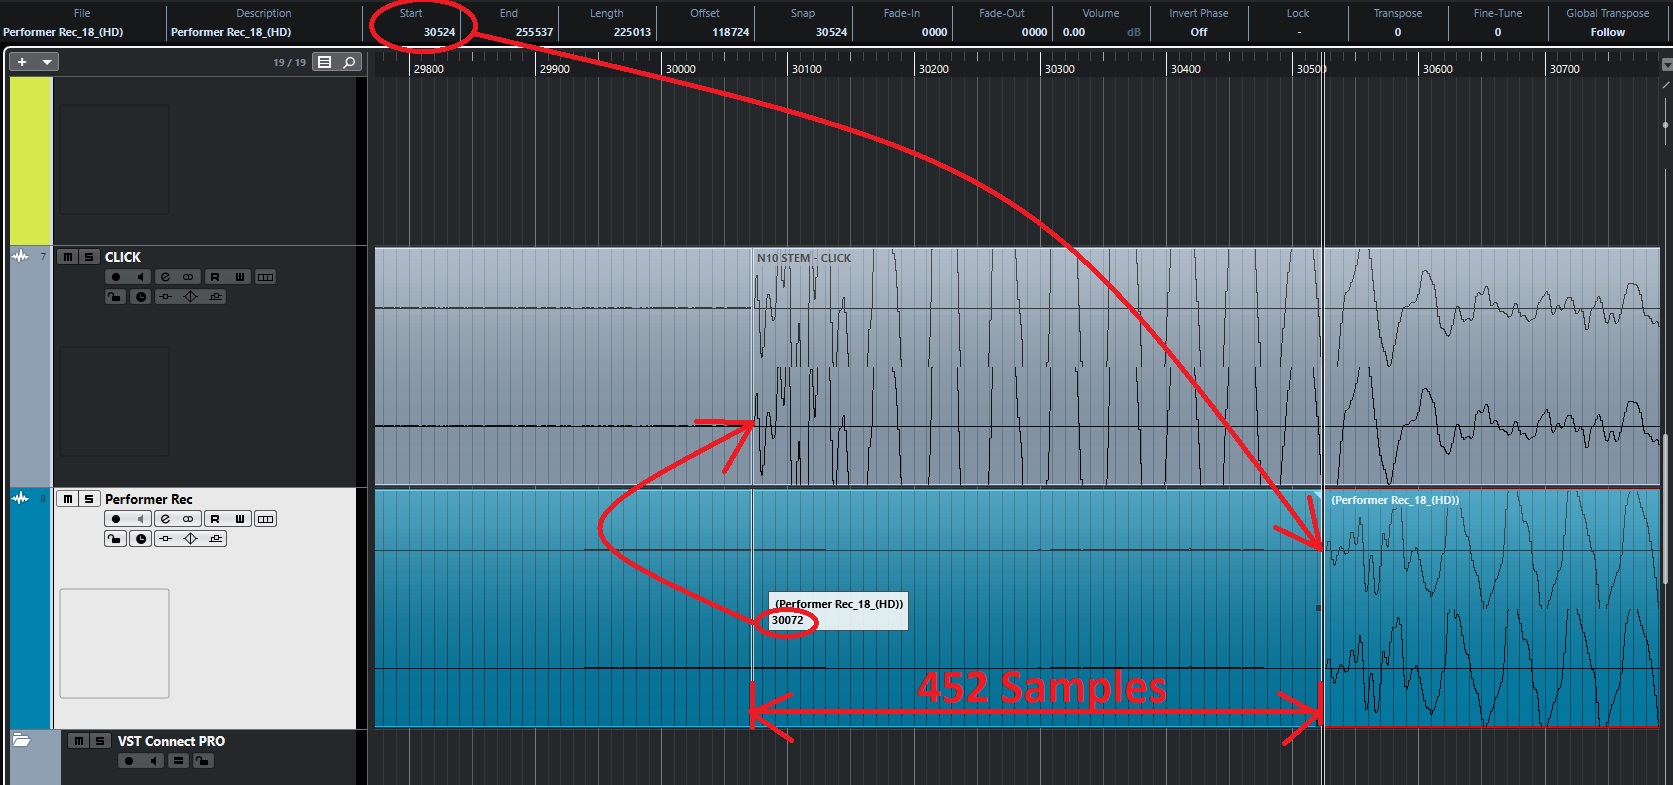
Credit: forums.steinberg.net
Credit: www.sweetwater.com
Frequently Asked Questions Of How To Fix Latency In Cubase 5
How Do I Reduce Latency In Cubase?
To reduce latency in Cubase, adjust buffer size, close unnecessary applications, update drivers, optimize settings, and use direct monitoring.
How Do I Get Rid Of Audio Latency?
To get rid of audio latency, use a low buffer size, update your audio drivers, and close unnecessary programs running in the background.
How To Check Latency In Cubase?
To check latency in Cubase, go to ‘Devices’ and select ‘Device Setup. ‘ Then, click on ‘VST Audio System’ and check the ‘Audio Engine Latency’ setting to monitor latency. Adjust the buffer size to reduce latency for smoother audio playback and recording.
How Do I Reduce Latency In Daw?
To reduce latency in your DAW, try adjusting your buffer size to a lower setting. Close any unnecessary plugins or applications running in the background. Make sure your computer meets the recommended system requirements. Use an ASIO driver and update it regularly.
Lastly, disable any power-saving features that may be affecting performance.
Conclusion
Addressing latency issues in Cubase 5 is essential for a seamless and efficient music production process. By following the tips and techniques outlined in this blog post, you can effectively reduce latency and enhance the overall performance of your software.
Implementing these strategies will undoubtedly optimize your audio recording and playback experience, allowing you to focus on your creative endeavors without technical interruptions.